13. Integrations
Screenshots show the Turkish interface of Prozence with fictional "Örnek Teknoloji A.Ş." data; the English interface has the same layout.
This chapter is for the Admin and the IT team who connect Prozence to the external systems the company uses: Google Workspace, Microsoft 365, Yandex 360, Zoho Mail, single sign-on (SAML), CRMs, chat channels, Messages with Google Chat, payroll and accounting systems, Microsoft Teams, REST API, SCIM, mobile app notifications, Zoom and Apple / Google Wallet. All connections are optional; Prozence also works without any of them (sign-in with an email code, copying and pasting the signature).
Since 0.99.13, most connections are set up and followed in the app, in the Admin → Integrations tab. The Microsoft app registration, the Wallet certificates and some older screens stay in WordPress; both places use the same setting. Secret values (API key, client secret, service account key, certificate) are never shown on the screen again after they are saved; only "Saved …" and the last four characters appear. All sample values in this chapter are fictional (ornek.invalid), and the keys in the images are masked.
This chapter is for Prozence Workplace 0.99.45.
Who: Admin · IT · WordPress administrator · Auditor (only the Status tab)
For the WordPress screens of the CRM connectors, see 12. Customer directory administration. For who sees which tab, see 10. Administration and setup.
In this chapter
- Integrations: Status tab
- Seeing the status of connections (WordPress)
- Selecting the email platform
- Google / Microsoft wizard (in the app)
- Connection wizard: giving and testing permissions (WordPress)
- Google Workspace: connecting the service account
- Writing the Gmail signature centrally
- Sign-in with Google
- Setting up a CRM connection in the app
- CRM field mapping
- Owner assignment rules
- Interaction trail (CRM notes)
- Reading back from the CRM
- CRM error queue
- Directory and sign-in: comparing with the directory in the app
- Automatic apply in directory sync
- Directory sync (Google or Microsoft)
- Calendar: holidays, external calendars and Google Calendar
- Microsoft 365 connection and sign-in with Microsoft
- Single sign-on (SAML)
- Outlook signature: Exchange server rule
- Yandex 360 connection and signature writing
- Zoho Mail connection and signature writing
- Chat channels (Slack, Teams, Google Chat)
- Setting up Messages (Google Chat)
- Employee events webhook
- Export to payroll software
- Microsoft Teams app
- Creating a REST API key
- Managing API keys and the request log
- Automatic user provisioning with SCIM
- App review account
- Setting up mobile notifications (Firebase and APNs)
- Zoom connection
- Apple and Google Wallet
Integrations: Status tab
Who: Admin, Auditor (read-only) · Where: Admin → Company → Integrations → Status
What it does: Shows the status of all connections in the app, without going to WordPress: CRMs, directory sync, Google permissions and the other connections. If there is a problem, you go to the related tab with one click.
Before you start: Only an Admin and an Auditor see the tab. For employees and module admins, Integrations is not in the menu.
- In the left menu, click Admin.
- In the Company group, click Integrations. The sub-tabs appear at the top; Status opens first.
- Read the CRM connections box. The badge of each CRM that is on is Active, Pending or Problem; below it you see "Last successful send: …", "N records stopped", "N records will be retried" and, if necessary, "Last error (…): …". CRMs that are off are listed on one line as "Off: …". For the settings, click CRM settings.
- In the Directory sync box, see the time of the last comparison, the number of users in the directory and the number of people in Prozence. If there are pending suggestions, the badge shows "N suggestions waiting"; click Open sync. If sync is not set up, the badge is Off and the box says "Not set up: the Google Workspace service account JSON key is pasted into the connection wizard on the Google / Microsoft tab or into WordPress; the Microsoft 365 app registration is set up in WordPress."; Open the wizard takes you to the Google / Microsoft tab.
- If a Google service account is uploaded, the Google permissions for enabled features row in the Google Workspace connection box shows Working, N steps missing, Not tested or Not set up. If something is missing, click Open the wizard.
- In the Other connections box, look at the badge of each connection (Working, Attention, Problem, Off). Go to the related screen with Open settings, Open channels or (if you have WordPress permission) Open in WordPress. If you do not have WordPress permission, the note "The Microsoft app registration and Wallet certificates are set up in WordPress; ask your WordPress administrator. The Google service account JSON key can be pasted into the connection wizard on the Google / Microsoft tab." shows below the box.
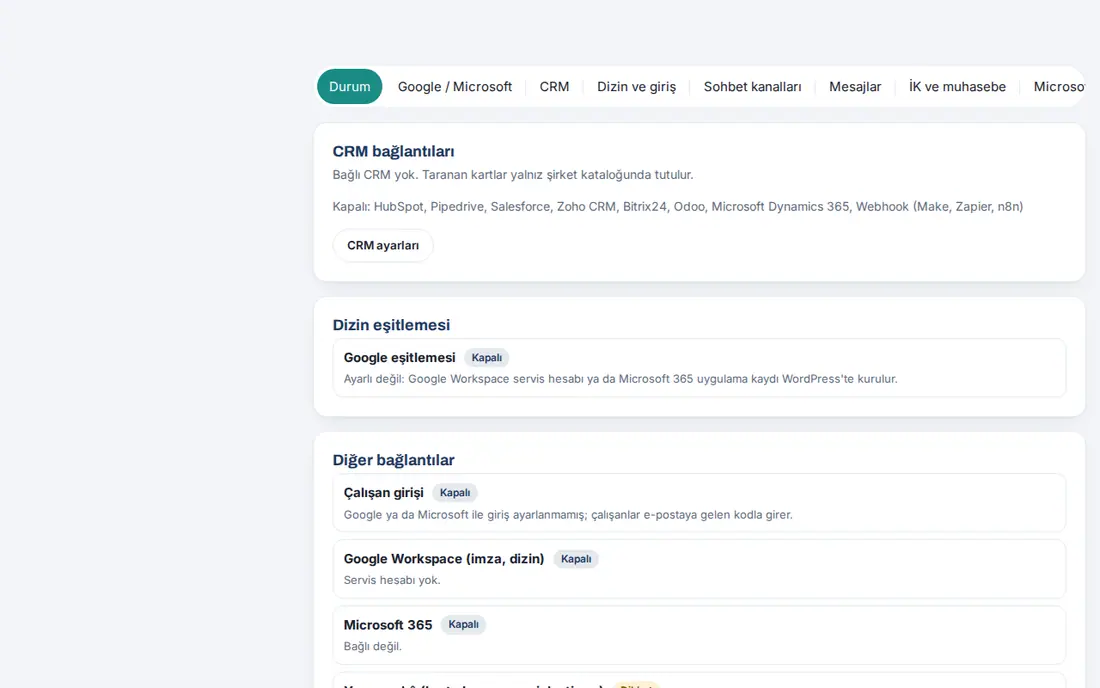
Rows in the Other connections box:
| Row | Message when not connected | Where it is set up |
|---|---|---|
| Employee sign-in | "Sign-in with Google or Microsoft is not set up; employees sign in with a code sent by email." | Sign-in with Google, Microsoft 365 |
| Single sign-on (SAML) | "Not set up." (if saved but the button is off: "Identity provider set up; sign-in button off.") | Single sign-on (SAML) |
| Google Workspace (signatures, directory) | "No service account." | Google / Microsoft wizard |
| Microsoft 365 | "Not connected." | WordPress → Microsoft 365 |
| Yandex 360 (signature, directory) | "Not connected." (if connected: "Connected; last test succeeded." or "Connected; not tested yet.") | Yandex 360 connection |
| Zoho Mail (signature) | "Not connected." (if connected: "Connected; last test succeeded." or "Connected; not tested yet.") | Zoho Mail connection |
| AI (card reading, enrichment) | "No key: card photos cannot be read." ("Card reading stopped: AI credit has run out." / "Card reading stopped: the API key is invalid.") | Admin → Customer directory (see 12) |
| Apple and Google Wallet | "Apple: off · Google: off" | Apple and Google Wallet |
| Zoom (meeting background) | "Not connected." | Zoom connection |
| Chat channels (Slack, Teams, Google Chat) | "No channels." | Chat channels |
| Messages (Google Chat) | "Setup pending (client ID and secret)." | Setting up Messages |
| HR events (webhook) | "Off." | Employee events webhook |
| Phone notifications (web push) | "The server could not generate keys." ("Keys ready." when ready) | Set up automatically; needs HTTPS |
Tip: When an Admin taps the "CRM sync stopped: …" row in the Waiting for you list in the app, Integrations → CRM opens directly.
Important: An Auditor sees only the Status tab. The server does not send setting fields, people's names, queue details or keys to an Auditor; every save by an Auditor is rejected with "This action requires Admin permission.".
Seeing the status of connections (WordPress)
Who: User with Prozence permission in WordPress, IT · Where: WordPress → Prozence Workplace → Kurulum ("setup") → İsteğe bağlı bağlantılar ("optional connections")
What it does: Shows the status of all external connections in one list in WordPress and tests the connections with Dene ("test").
- In WordPress, open the Prozence Workplace → Kurulum screen.
- In the İsteğe bağlı bağlantılar list, read the status of each row: Google Workspace (imza, dizin eşitlemesi) ("signature, directory sync"), Google izinleri ("Google permissions"), HubSpot CRM and the other CRMs, Yapay zekâ (kartvizit okuma, zenginleştirme) ("AI (business card reading, enrichment)"), Telefon bildirimi (web push) ("phone notifications (web push)"), Apple ve Google Wallet ("Apple and Google Wallet"), Microsoft 365 (giriş, dizin eşitlemesi) ("sign-in, directory sync"), Sayfa önbelleği ("page cache") and the others.
- To set up or fix a connection, click Ayarla ("set up") in the row; to test it, click Dene.
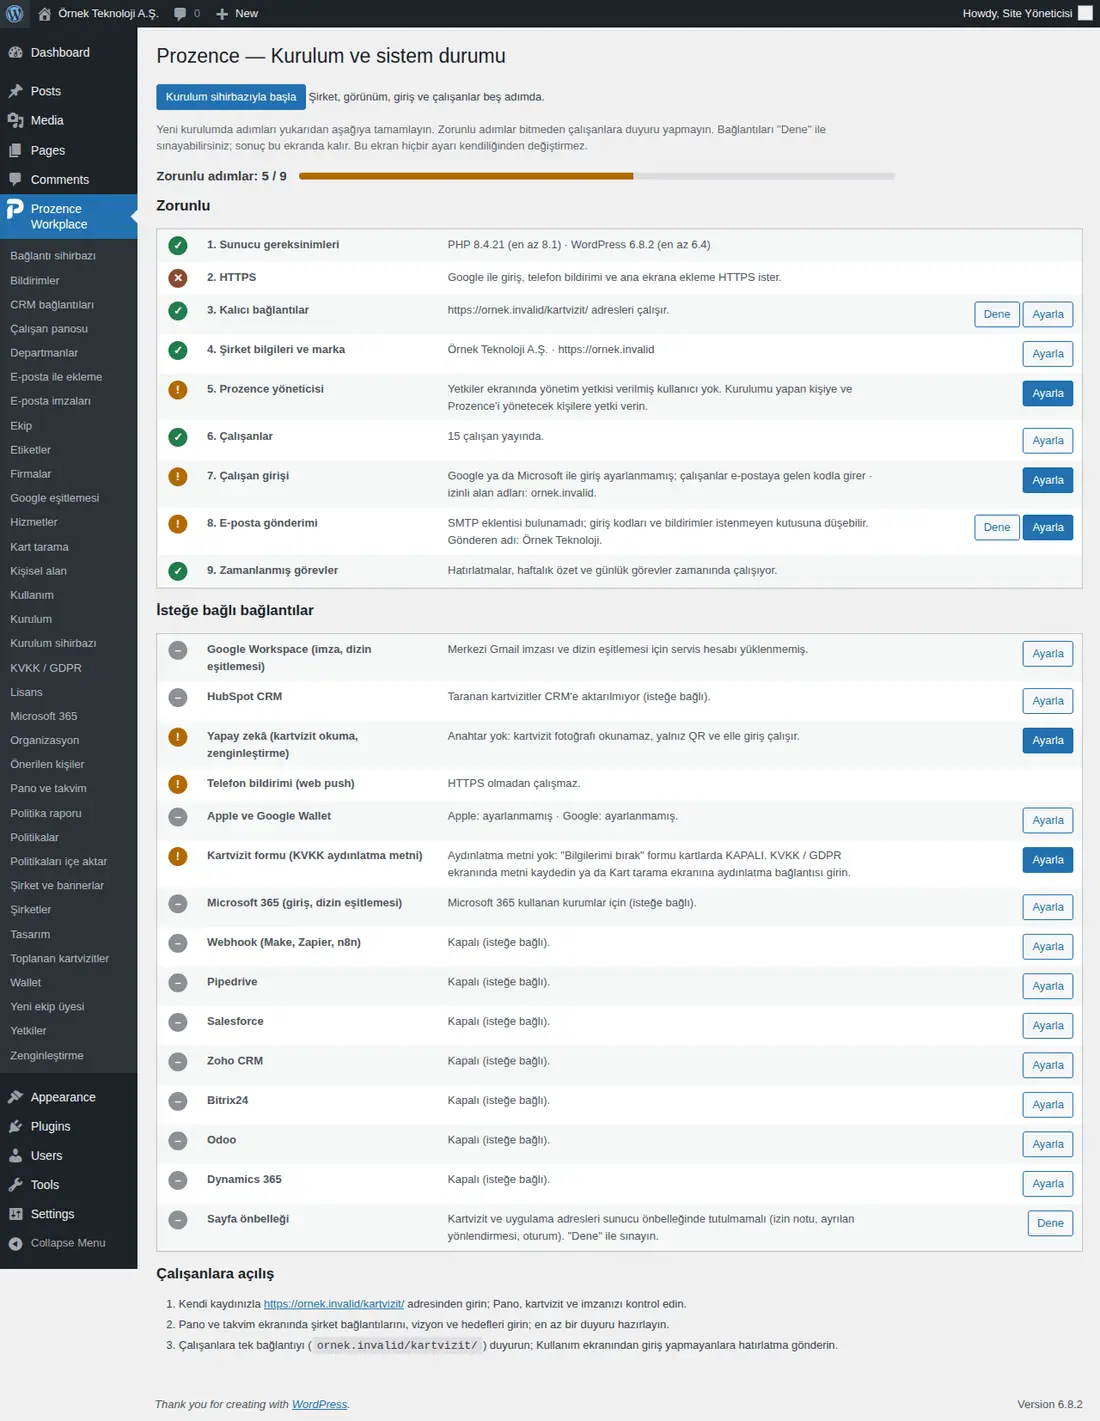
Tip: For the full list of rows and messages, see 10. Administration and setup. An Admin who has no WordPress account follows the same information on the Status tab.
Selecting the email platform
Who: App administrator · Where: Admin → Contact → Email signature → Delivery → Email platform
What it does: You select the platform the company uses for email. Only the settings of the selected platform appear.
- Open Admin → Email signature and click the Delivery tab.
- In the Email platform box, select one option:
- Google Workspace: central writing to Gmail, Google directory sync, sign-in with Google;
- Microsoft 365: Outlook (Exchange) server rule, sign-in with Microsoft, Entra ID directory sync;
- Yandex 360: central writing to Yandex 360, Yandex 360 directory sync (see Yandex 360 connection);
- Zoho Mail: central signature writing to Zoho Mail (see Zoho Mail connection);
- Other (manual): no central writing; employees copy the signature from My card.
- Click Save.
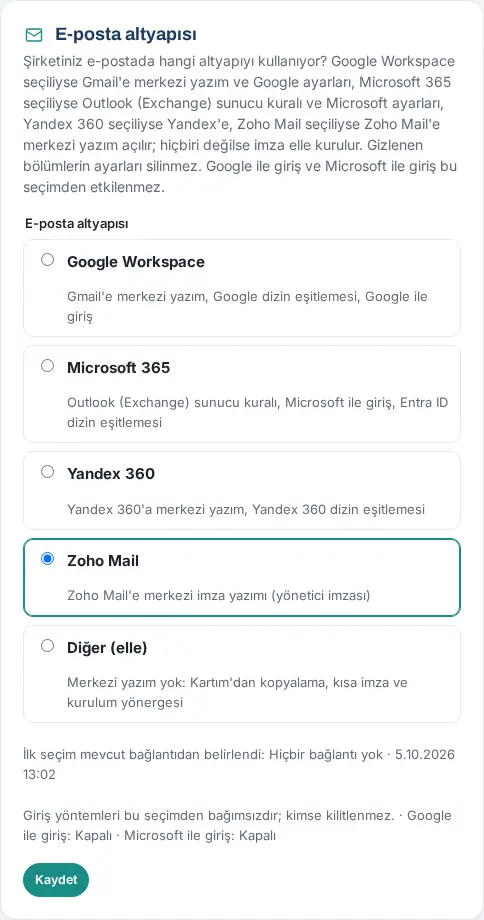
Tip: At the first setup, the selection is made automatically from the existing connection; the bottom of the box shows when and on what basis it was made. The same selection is also at the top of the E-posta imzaları ("email signatures") and Microsoft 365 screens in WordPress.
Important: The settings of the hidden sections are not deleted; the automatic jobs of the platform that is not selected (e.g. writing to Gmail, the daily directory comparison) stop. Sign-in with Google and sign-in with Microsoft are not affected by this selection; no one is locked out.
Google / Microsoft wizard (in the app)
Who: Admin; Google Workspace or Microsoft 365 administrator (for the steps on the Google and Microsoft screens) · Where: Admin → Integrations → Google / Microsoft
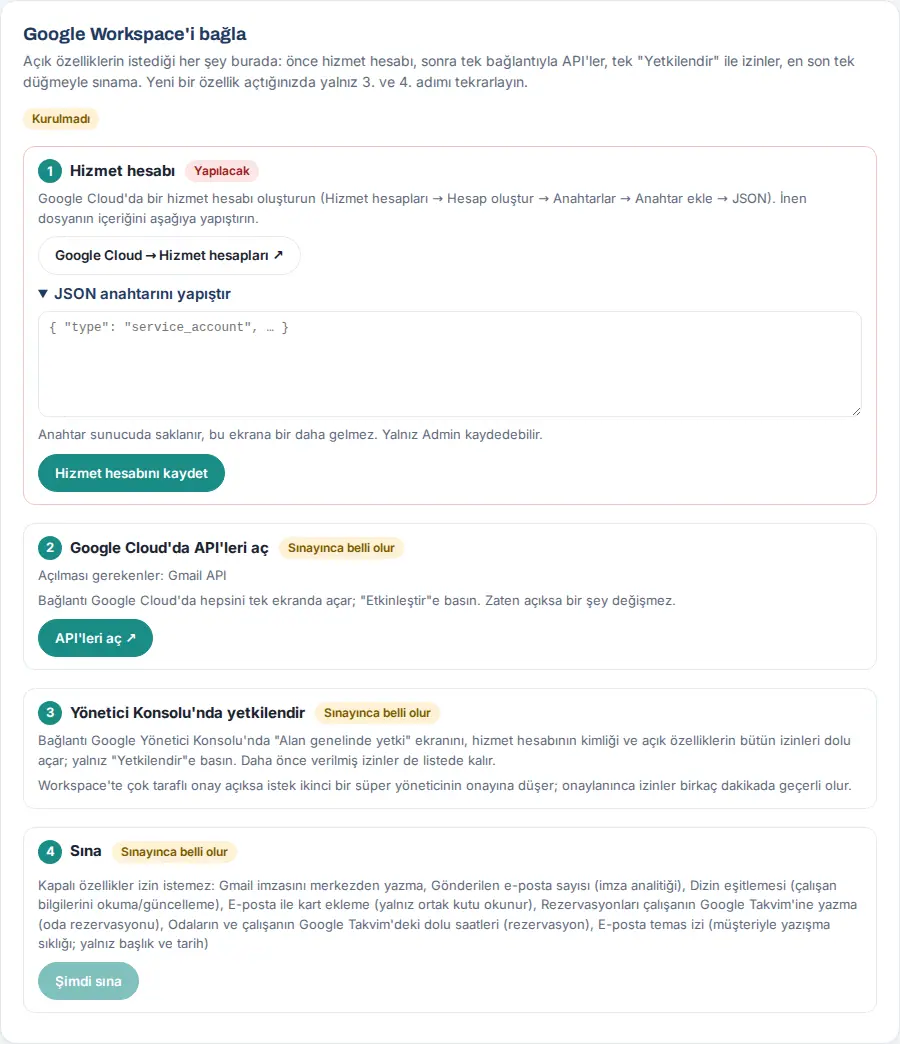
What it does: Sets up and tests, on one screen and in four steps, the Google permissions that the enabled Prozence features need (Gmail signature, directory sync, adding cards by email, room booking and Google Calendar, email contact trail…). The status of each step is shown next to it: OK, To do or Shown after testing.
Before you start:
- You need an administrator who can create a project in Google Cloud and give "Domain-wide delegation" in the Google Admin console.
- Only an Admin sees the tab.
Connect Google Workspace:
- In step 1 Service account, click Google Cloud → Service accounts ↗. Create a service account in Google Cloud (Service accounts → Create service account → Keys → Add key → JSON).
- Paste the content of the downloaded JSON file into the Paste the JSON key box and click Save service account. The step shows "Installed: …" and the project name; the box is cleared.
- In step 2 Enable the APIs in Google Cloud, read the Needs to be enabled: row (e.g. "Gmail API") and click Enable APIs ↗. On the page that opens in Google Cloud, click "Enable".
- In step 3 Authorize in the Admin console, click Authorize ↗ (N permissions). The "Domain-wide delegation" screen opens in the Google Admin console with the service account ID and the permissions filled in; just click "Authorize". If the shared mailbox is a separate account, a second button appears.
- In step 4 Test, click Test now. The table shows Working, Permission missing, API off, Error, Missing or Could not test for each enabled feature.
- On the red rows, follow the Open ↗ (API page) or Authorize ↗ link and click Test now again. When everything works, the badge at the top becomes All working.
Connect Microsoft 365 (appears if the Microsoft 365 connection is saved):
- 1 Entra app registration (tenant, client, secret): the registration is made on the Microsoft 365 screen in WordPress (see Microsoft 365 connection).
- 2 Paste the permission block into the app manifest: click Copy; in Entra → App registration → Manifest, replace the "requiredResourceAccess" block with it and save.
- 3 Admin consent: click Grant admin consent ↗; consent is given on Microsoft's page, and the return needs a WordPress administrator session.
- 4 Test: click Test now.
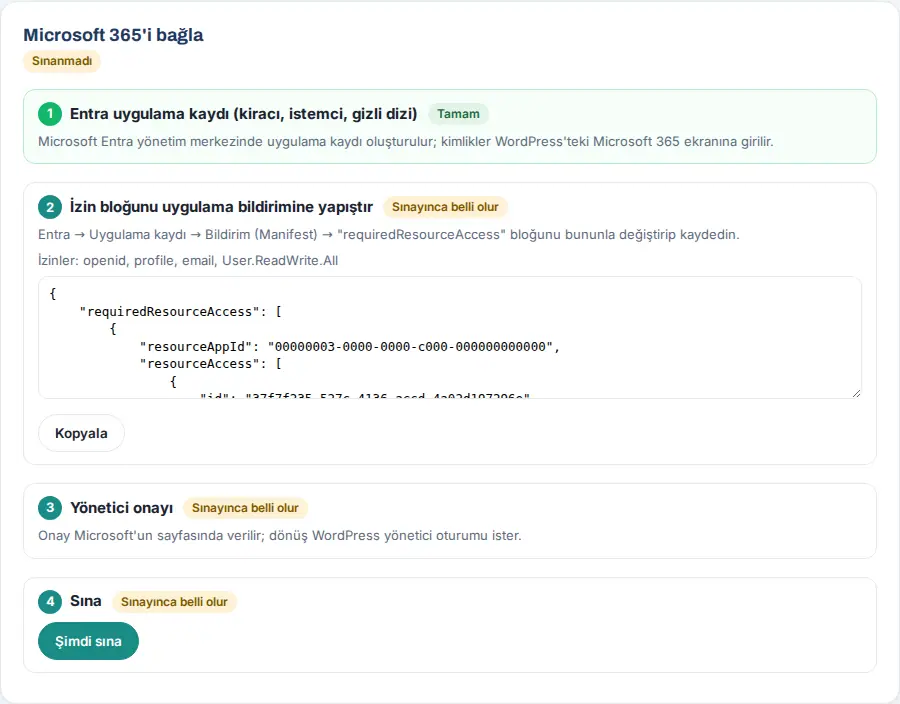
Result: The test result is stored on the server and is shared with the Bağlantı sihirbazı ("connection wizard") in WordPress. The Booking (Google Calendar) and Email contact trail boxes now show a one-line status ("The Google Calendar connection is working.", "1 steps missing for Google Calendar.", "No Google service account.") and an Open the wizard button instead of the long setup text.
Common errors and warnings:
| Message | Cause | What to do |
|---|---|---|
| "Paste the JSON key." | Saved while the box was empty | Paste the whole file |
| "Add the service account first (step 1)." | Tested when there was no account | Complete step 1 |
| "Test finished; check the red rows." | At least one feature does not work | Fix it with Open ↗ or Authorize ↗ in the row |
| "This is a test / stage environment: the Google connection doesn’t work here; set it up on the live site." | Opened on a test site | Set it up on the live site |
| "Tested too often. Try again in a minute." | Too many tests in a short time | Wait a minute |
Tip: When you turn on a new feature later, repeat only steps 3 and 4; the earlier permissions stay in the list.
Important:
- If multi-party approval is on in Workspace, the "Authorize" request goes to a second super administrator for approval; after approval, the permissions take effect in a few minutes.
- The JSON key is stored on the server and is never shown on this screen again. After you upload it, delete the file from your computer; do not share it in a screenshot or an email.
- The test only reads; no email, calendar or user record is changed.
Connection wizard: giving and testing permissions (WordPress)
Who: IT, Google Workspace or Microsoft 365 administrator · Where: WordPress → Prozence Workplace → Bağlantı sihirbazı
What it does: Sets up and tests the Google Workspace and Microsoft 365 permissions from WordPress. Since 0.99.25 you can do the same in the app (see Google / Microsoft wizard (in the app)); both screens use the same result. Prozence asks only for the permissions of the features you turn on; it does not read employees' mailboxes and does not send email in their name.
Google Workspace:
- First connect the service account. The wizard fills in after this step.
- In the 1. Yönetici konsolunda yetkilendirin ("authorize in the Admin console") section, click Google yönetici konsolunda aç (alanlar dolu gelir) ("open in the Google Admin console (fields filled in)"). On the Google screen that opens, click Authorize.
- In the 2. İzinleri sınayın ("test the permissions") section, click İzinleri sına ("test permissions"). The table shows the status of each feature: Çalışıyor ("working"), İzin eksik ("permission missing"), API kapalı ("API off"), Eksik ("missing"), Hata ("error"), Sınanamadı ("could not test") or Kapalı ("off"). On an API kapalı row, the Etkinleştir → ("enable →") link opens the related page in Google Cloud.
Microsoft 365:
- 1. İzinleri tek yapıştırmayla ekleyin ("add the permissions with one paste"): open entra.microsoft.com → App registrations → your Prozence app → Manifest. Take the block in the wizard with Kopyala ("copy"), paste it in place of the
requiredResourceAccesssection and save. - 2. Yönetici onayı ("admin consent"): after you save the tenant and app ID on the Microsoft 365 screen, click Yönetici onayı ver ("grant admin consent"). On Microsoft's page, click Accept with a global administrator account.
- 3. İzinleri sınayın: click İzinleri sına.
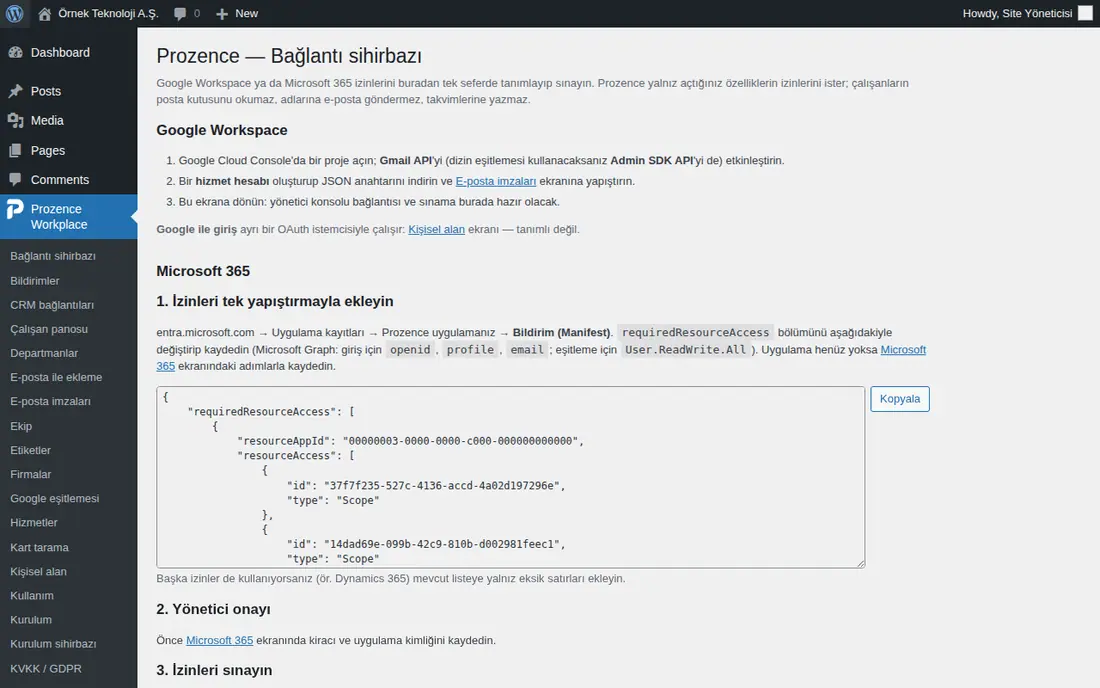
Important: The test only reads (e.g. one employee's sender names, the count of the "Sent" label, the first user in the directory). If you also use other permissions in Microsoft (e.g. Dynamics 365), add only the missing rows to the existing list.
Google Workspace: connecting the service account
Who: IT, Google Workspace administrator · Where: WordPress → Prozence Workplace → E-posta imzaları → Bağlantı ("connection"); in the app, Admin → Integrations → Google / Microsoft → step 1
What it does: Central signature writing to Gmail, directory sync, Google Wallet, Google Calendar and the shared mailbox use the same Google service account.
- In Google Cloud Console, select or create a project. APIs & Services → Library → Gmail API → Enable. If you will use directory sync, also enable Admin SDK API.
- IAM & Admin → Service accounts → Create service account (e.g.
kartvizit-imza; no role is needed). On the account's Keys tab, download the key file with Add key → JSON. - Paste the content of the file into the Paste the JSON key box on the Google / Microsoft tab in the app, or into the Servis hesabı ("service account") box on the E-posta imzaları screen in WordPress, and save.
- Delete the downloaded JSON file from your computer.
- Give domain-wide delegation with the wizard. If you want to do it by hand, follow the Kurulum (bir kez) ("setup (once)") steps on the screen: admin.google.com → Security → Access and data control → API controls → Domain-wide delegation → Add new; the client ID is the numeric ID of the service account.
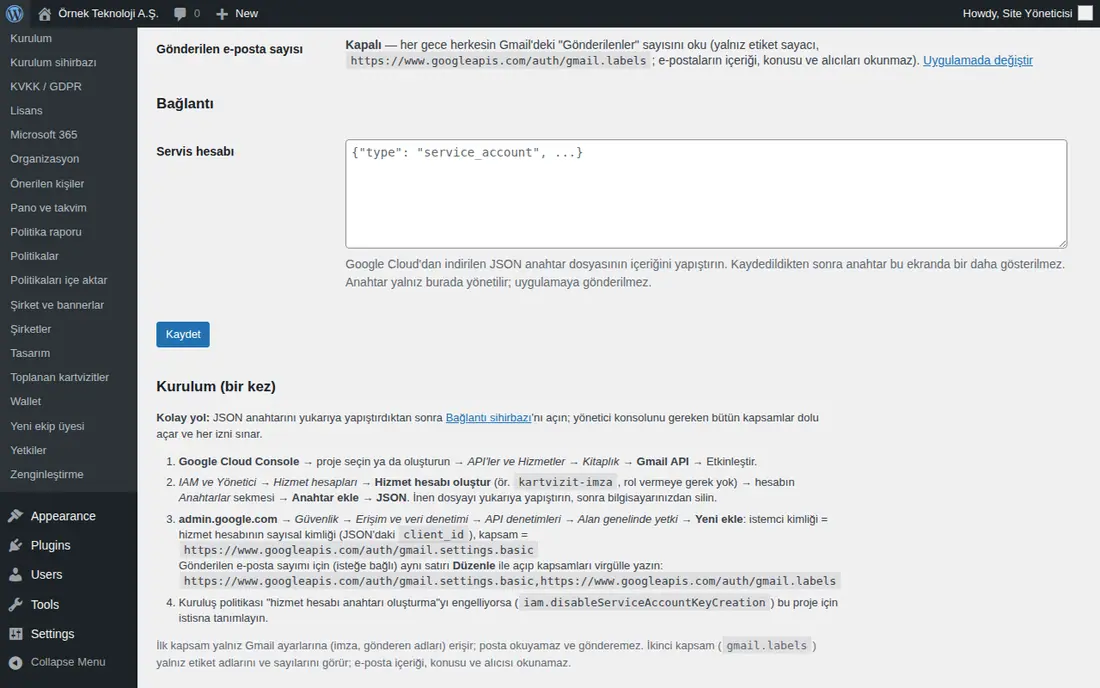
Tip: The first scope (gmail.settings.basic) accesses only the Gmail settings (signature, sender names); it cannot read or send mail. The second scope (gmail.labels) sees only the label names and counts.
Important: The key is never shown again after it is saved. If your organization policy blocks creating service account keys (iam.disableServiceAccountKeyCreation), set an exception for this project.
Writing the Gmail signature centrally
Who: App administrator · Where: Admin → Contact → Email signature → Delivery → Gmail: central setup
What it does: Each employee's signature is written centrally to their own Gmail account; the employee does not need to do anything.
Before you start: Email platform = Google Workspace must be selected and the service account must be connected. If there is no connection, the box shows the warning "Gmail is not connected".
- On the Delivery tab, open the Gmail: central setup box.
- If you want, select these options and click Save:
- Refresh the Gmail signature automatically when it changes: when a person is saved or a company setting (address, footer text, logo) changes, only the Gmail of the people whose signature changed is refreshed;
- Read everyone’s Gmail “Sent” count every night: for the "how many clicks in how many emails" rate in the analytics; only the label counter is read.
- In the Bulk actions section, click Write everyone’s signature and confirm. The Gmail signature of every published person is written.
- Follow the result in the Signature status per person list (Written, Too long: untracked, Error, Not written). For one person, use the Write to Gmail, Check and Restore previous buttons in their row.
- To tell employees that their signatures changed, click Send the information email to everyone; to introduce the app, click Send the welcome email to everyone.
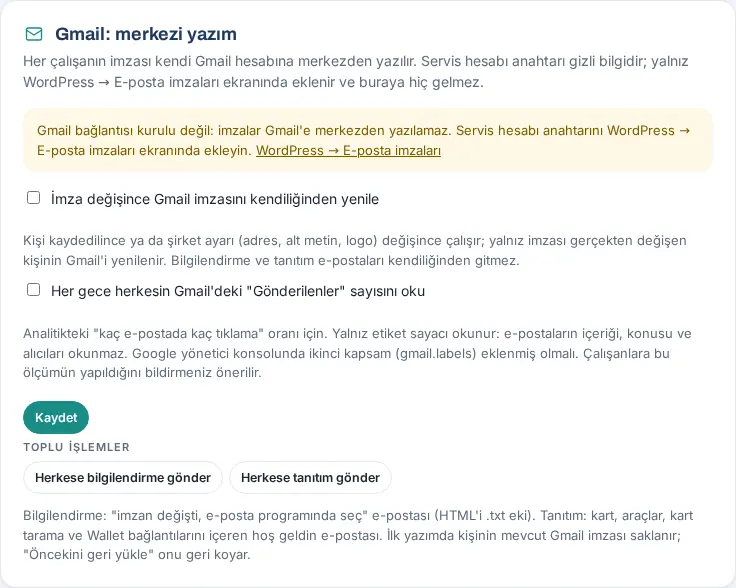
Tip: Check Gmail (everyone) compares the signature in Gmail with the current signature. At the first writing, the person's previous Gmail signature is stored; Restore previous puts it back.
Important:
- The information and welcome emails do not go automatically; you send them with the button.
- Gmail allows only one central signature. Employees choose the short signature for replies themselves (see 02. Email signature).
- For the sent count, the second scope (
gmail.labels) must be added in the Admin console. We recommend that you tell employees that this measurement is made. - For signature design, templates and banners, see 11. Brand, identity and signature management.
Sign-in with Google
Who: IT, Google Workspace administrator · Where: WordPress → Prozence Workplace → Kişisel alan ("personal space") → Giriş ("sign-in")
What it does: A Sign in with Google button is added to the sign-in screen. The employee signs in with the company Google account without waiting for a code.
- Open Google Cloud Console → APIs & Services → Credentials → Create OAuth client ID.
- Select Web application as the application type. In Authorized JavaScript origins, type your site address (e.g.
https://ornek.invalid). - If you select Internal on the OAuth consent screen, only company accounts can use it.
- Copy the client ID that is created (it ends with
…apps.googleusercontent.com). - In WordPress, open the Kişisel alan screen. Paste it into the Google istemci kimliği ("Google client ID") box.
- In the İzinli alan adları ("allowed domains") box, type the company's Google Workspace domains separated by commas (e.g.
ornek.invalid). - We recommend that you leave E-posta koduyla giriş ("sign-in with an email code") at Açık (Google'a erişemeyenler için yedek) ("on (backup for people who cannot reach Google)").
- Click Ayarları kaydet ("save settings").
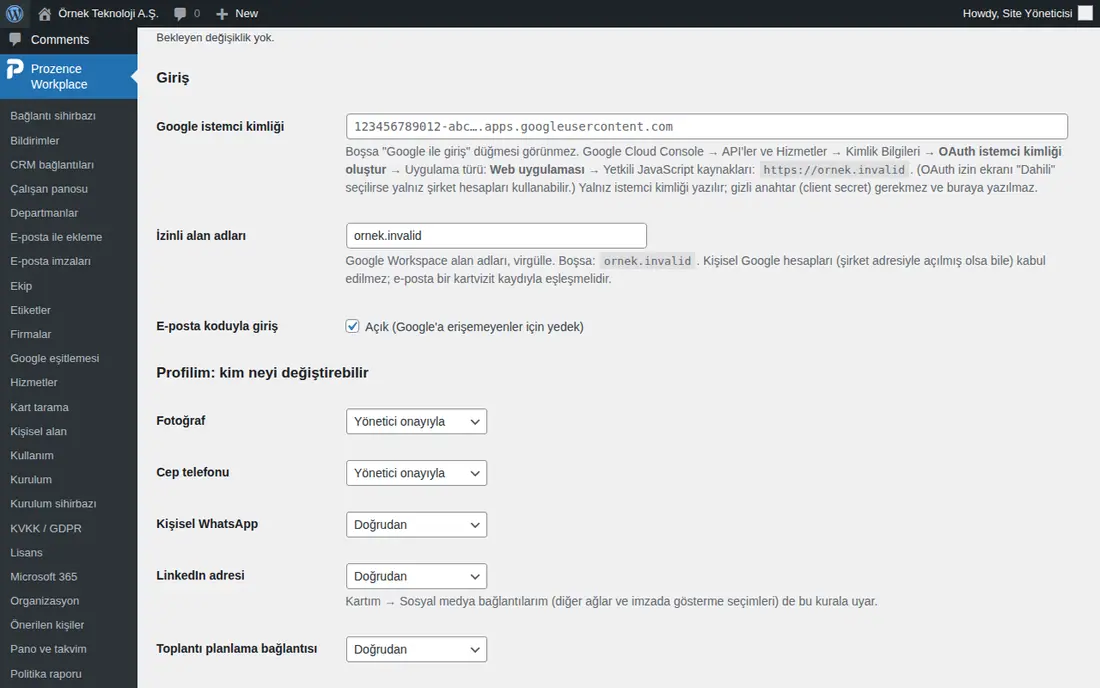
Tip: Only the client ID is entered; the client secret is not needed and is not entered here. You can select the same client ID in the Messages setup with Use it. If Google istemci kimliği is empty, the button does not appear.
Important: Personal Google accounts are not accepted (even if they were opened with a company address). At sign-in, the email address must match a published employee record.
Setting up a CRM connection in the app
Who: Admin · Where: Admin → Integrations → CRM
What it does: Contacts from Add card, from details left on a business card and from email are sent to every active CRM. The settings of eight connectors are on one page in the app: HubSpot, Pipedrive, Salesforce, Zoho CRM, Bitrix24, Odoo, Microsoft Dynamics 365, Webhook (Make, Zapier, n8n). The CRM bağlantıları ("CRM connections") and Kart tarama ("card scan") screens in WordPress also keep working; both places use the same setting.
Before you start:
- Prepare an API key with permission to read and write contacts in the CRM (or the client details the connector needs). The recommended way in HubSpot: HubSpot → Development → Keys → Service keys → Create service key; scopes
crm.objects.contacts.readandcrm.objects.contacts.write(for company enrichment, alsocrm.objects.companies.readandcrm.objects.companies.write). A service key is renewed every 6 months. - For Microsoft Dynamics 365, first set up the Microsoft 365 connection.
- Open the Integrations → CRM tab. At the top is the CRM connections description; below it are Interaction trail, Owner assignment rules, the connector cards and the Error queue.
- Click the connector's card (e.g. HubSpot); the card opens. The card of a connector with a problem opens by itself.
- Select the connector's turn-on checkbox (e.g. Send contacts to Pipedrive). HubSpot has no separate checkbox; it works when an access key or a form ID is entered.
- Fill in the key and connection fields (HubSpot: Access key (Service key), Portal ID, Data region, Form ID (GUID); for the other connectors, the fields on the screen).
- Select the defaults: Default owner (if the employee who collected the card is not found in the CRM), Default source, Form name, Consent record text.
- Fill in the Field mapping table (see CRM field mapping).
- Click Save, then Test. The result "Last test (…): …" stays under the card. In Pipedrive, Test also reads the active users and labels; Default owner and Label mapping turn into drop-down lists.
- To also send the contacts added earlier, click Send existing records and accept the confirmation question ("…: queue all records in the catalogue and send them 25 at a time?").
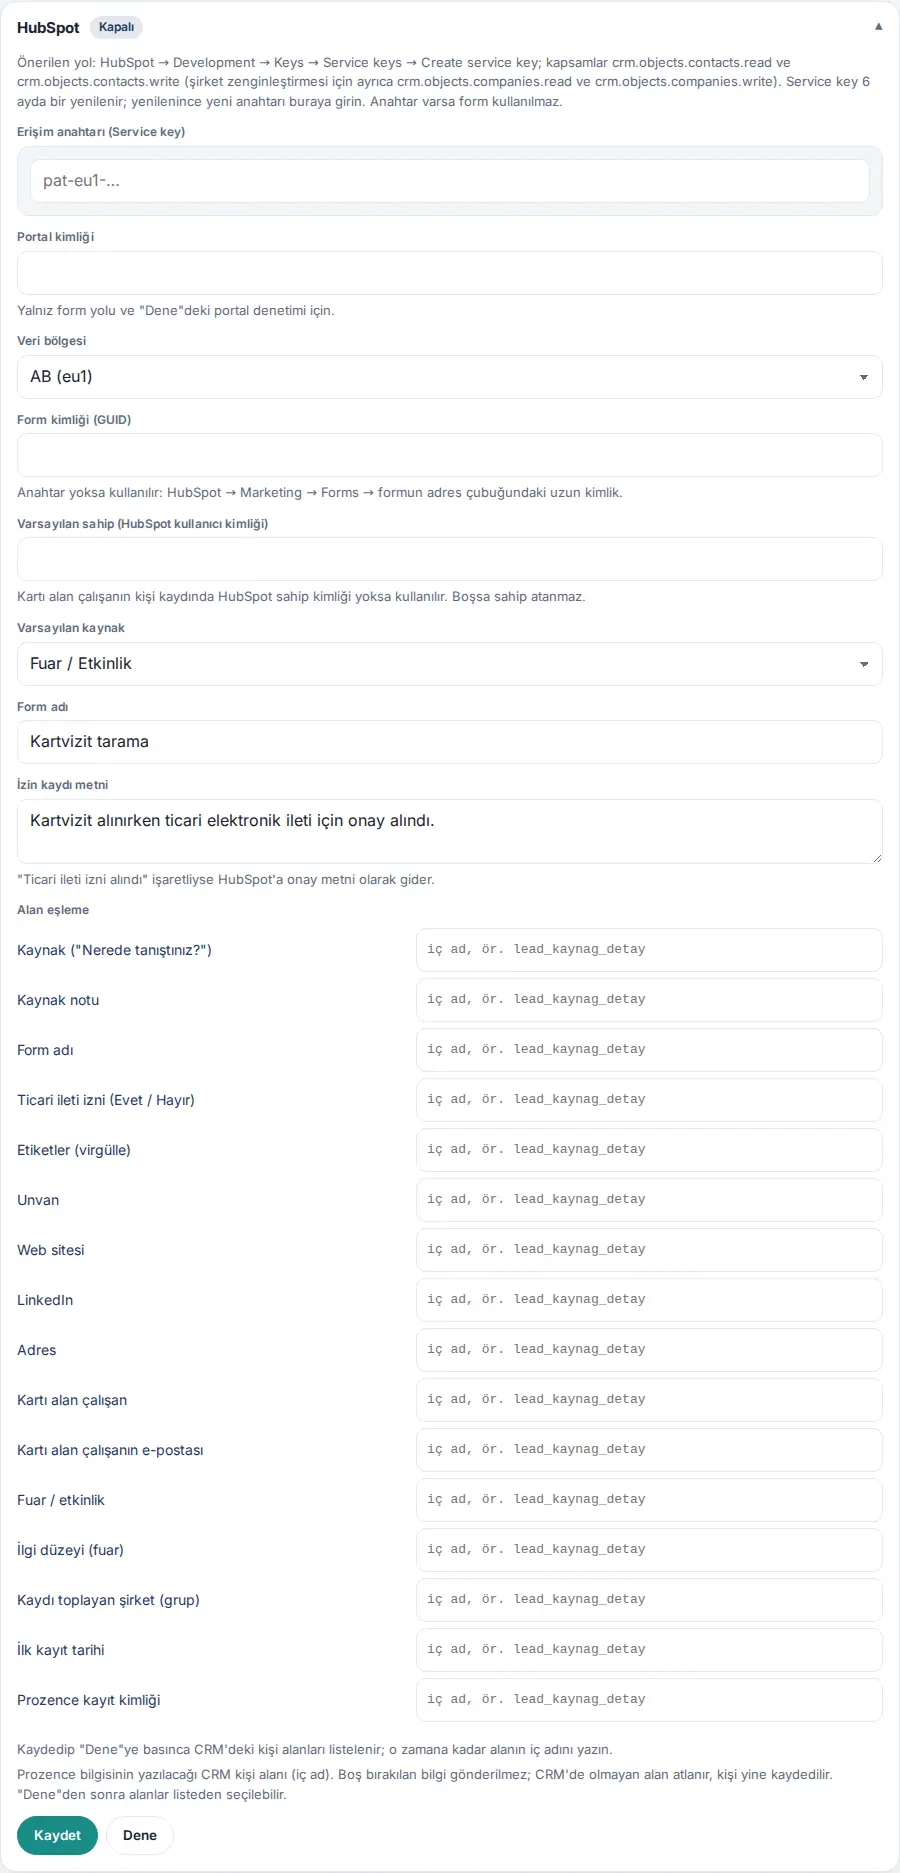
HubSpot settings:
| Setting | What it does | Default |
|---|---|---|
| Access key (Service key) | Writes contacts with the HubSpot CRM API; needed for interaction notes | Empty |
| Portal ID | Only for the form method and the portal check in Test | Empty |
| Data region | EU (eu1) or US (na1) | EU (eu1) |
| Form ID (GUID) | Sending through the form if there is no key (cannot write notes) | Empty |
| Default owner (HubSpot user ID) | Used if the employee who collected the card has no HubSpot owner ID; if empty, no owner is assigned | Empty |
| Default source | The source of records with no source selected; selected from the company's source list | Etkinlik ("event") |
| Form name | The form name the record came from in HubSpot | Kartvizit tarama ("business card scanning") |
| Consent record text | If "Marketing consent obtained" is ticked, it goes to HubSpot as the consent text | Kartvizit alınırken ticari elektronik ileti için onay alındı. ("Consent for commercial electronic messages was obtained when the business card was received.") |
Secret fields: Values such as the key, the client secret and the Bitrix24 webhook address never come to the browser. If a value is saved, Saved and the last four characters appear above the field; the box says "Type a new value to change it". If you leave it empty, the old value is kept; to delete it, select Remove and save. The signing key of the Webhook connector, however, is shown to the Admin so that the receiving system can verify it; Refresh changes it.
Common errors and warnings:
| Message | Cause | What to do |
|---|---|---|
| "The HubSpot key is invalid or has expired (401). Get a new key from HubSpot → Development → Keys → Service keys and enter it under Admin → Integrations → CRM → HubSpot." | The key is wrong or was not renewed | Get a new Service key and enter it |
| "The HubSpot key lacks permissions (403): the crm.objects.contacts.read and crm.objects.contacts.write scopes are required." | The key is missing a scope | Add the scopes in HubSpot |
| "The Microsoft 365 connection is not set up; it is required first for Dynamics 365 (WordPress → Prozence → Microsoft 365)." | The Dynamics card was turned on without Microsoft 365 | Connect Microsoft 365 first |
| "Too many tests; try again in a minute." | Test more than 6 times a minute | Wait a minute |
| "Turn the connection on and save first." | Send existing records on a connection that is off | Turn the connection on and save it |
Tip: After a scan, the employee does not see a raw error: the screen shows "Sent to the CRM (HubSpot)." or "The record was added to the company catalogue; it could not be sent to the CRM (HubSpot) right now. It will be retried automatically." / "… An admin has been notified.".
Important:
- Service providers (bank, accountant, supplier…) never go to any CRM.
- In Salesforce, Zoho, Bitrix24, Odoo and Dynamics, owner IDs are typed by hand; the drop-down list is only in Pipedrive.
- The connectors other than HubSpot could not be shown with a real account on the demo site; the screens are in the "Off" state.
CRM field mapping
Who: Admin · Where: Admin → Integrations → CRM → connector card → Field mapping
What it does: You select in one table which Prozence detail is written to which contact field in the CRM. HubSpot, Pipedrive, Salesforce, Zoho, Bitrix24, Odoo and Dynamics 365 use the same table. The mappings in the old separate field boxes came to the table as they were.
- Open the connector's card and test the connection with Save → Test. Test reads the editable contact fields in the CRM.
- In the Field mapping table, click the box next to a Prozence detail.
- Start to type the field name (e.g. "fair"). In the suggestion list, the field name is shown on top and its internal name in the CRM below.
- Select the correct field; the internal name is entered in the box. If Test has not read the fields yet, type the internal name by hand (e.g. HubSpot
internal name, SalesforceAPI name, Bitrix24UF_CRM_…). - Leave empty the details you do not want to send.
- Click Save.
The 16 details that can be mapped: Source ("Where did you meet?"), Source note, Form name, Marketing consent (Yes / No), Tags (comma-separated), Job title, Website, LinkedIn, Address, Employee who collected the card, Email of the employee who collected the card, Trade fair / event, Interest level (fair), Collecting company (group), First recorded date, Prozence record ID.
Field name format (example in the box): HubSpot "internal name, e.g. lead_source_detail" · Pipedrive "40-character field key" · Salesforce "API name, e.g. Source__c" · Zoho "API name, e.g. Source" · Bitrix24 "UF_CRM_…" · Odoo "field name, e.g. x_source" · Dynamics "logical name, e.g. new_source".
Common errors and warnings:
| Message | Cause | What to do |
|---|---|---|
| "<bilgi>: "<ad>" geçerli bir <CRM> alan adı değil." ("<detail>: "<name>" is not a valid <CRM> field name.") | The internal name does not match the CRM's format; the save stops | Select from the suggestion list or type it in the correct format |
| "The same CRM field (<name>) is mapped to two values: … and …." | One CRM field is on two rows | Empty one of them |
Tip: A field that does not exist in the CRM does not break the send: that field is skipped and the contact is still saved. A value for a CRM field of the pick list or date type must go in a format the CRM accepts; otherwise only that field is skipped.
Important: The Microsoft Dynamics field list shows only text attributes.
Owner assignment rules
Who: Admin · Where: Admin → Integrations → CRM → Owner assignment rules
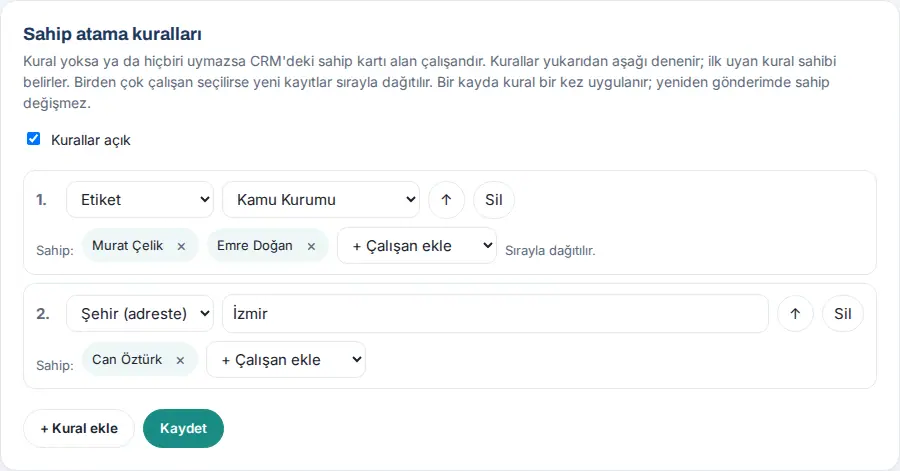
What it does: You set the owner of a new record in the CRM with rules (e.g. records tagged "Kamu Kurumu" ("public institution") go in turn to Murat Çelik and Emre Doğan, records with an İzmir address go to Can Öztürk). If there is no rule, or no rule matches, the owner is the employee who collected the card.
- In the Owner assignment rules box, click + Add rule. A new numbered row opens.
- Select the condition in the first list: Tag, Trade fair / event, Source, City (in address) or Every record.
- Select or type the value (tags and events from the list; source and city as text, e.g. "İzmir").
- In the + Add employee list, select the employee who will be the owner. If you select more than one employee, the row shows "Distributed in turn."; new records are distributed in turn. To remove an employee, click the × next to their name.
- If necessary, add other rules. The rules are tried from top to bottom; change the order with ↑ and remove a rule you do not need with Delete.
- Select the Rules on checkbox and click Save.
| Setting | What it does | Default |
|---|---|---|
| Rules on | Turns all the rules on or off at once | Off (no rules) |
| Condition | Tag, Trade fair / event, Source, City (in address), Every record | — |
| Owner: | One or more employees; in turn if more than one | — |
Common errors and warnings: "Rule N: choose a condition.", "Rule N (…): enter or choose a value.", "Rule N: tag not found.", "Rule N: event not found.", "Rule N (…): choose at least one employee."
Tip: A rule is applied to a record once and the selected person is remembered; the owner does not change on a resend or a queue retry. If the selected employee leaves, the rule is applied again. In the source note, "collected by" is still the employee who really collected the card.
Important: The rules apply only to newly sent records; the owner of a contact that already exists in the CRM does not change. Employees who have left do not appear in the list.
Interaction trail (CRM notes)
Who: Admin · Where: Admin → Integrations → CRM → Interaction trail
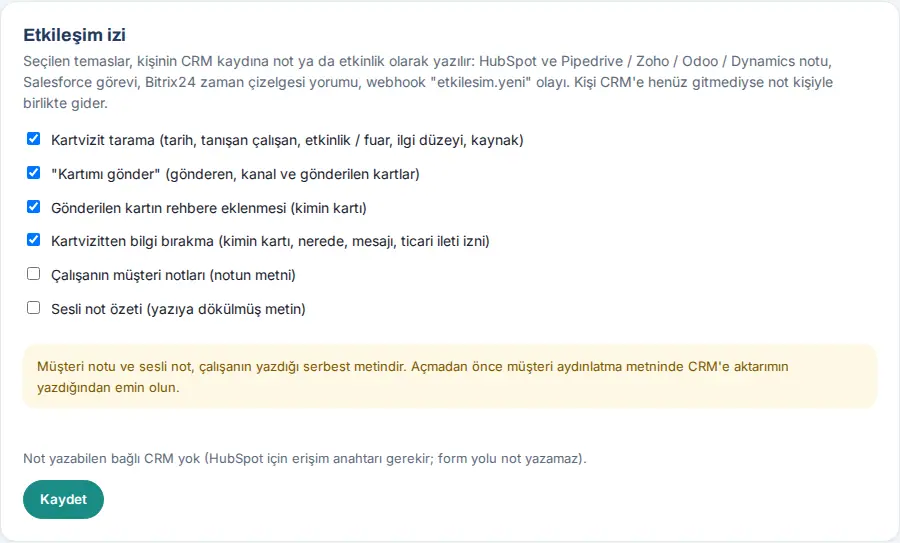
What it does: Each contact with the person (business card scan, "Send my card", leaving details…) is written as a note or activity on the person's record in each connected CRM. The sales team sees in the CRM "when, where and who met this person".
- In the Interaction trail box, select the contact types to write to the CRM.
- If you also want to send customer notes and voice note summaries, first read the warning; your customer privacy notice must state the transfer to the CRM.
- Click Save. At the bottom of the box, the "Written to: …" line lists the connected CRMs that can write notes.
| Setting | What it does | Default |
|---|---|---|
| Business card scan (date, employee who met them, event / fair, interest level, source) | Writes a note at a scan | On |
| "Send my card" (sender, channel and cards sent) | Writes a note when a card is sent | On |
| Card sent was added to contacts (whose card) | Writes a note when the recipient adds the card to their contacts | On |
| Details left on a business card (whose card, where, message, marketing consent) | Writes a note when details are left | On |
| Employee notes on the contact (note text) | Sends the text of the note | Off |
| Voice note summary (transcribed text) | Sends the voice note summary | Off |
Record written in each CRM: HubSpot note (associated with the contact; only with an access key), Salesforce task (Completed), Pipedrive / Zoho / Odoo / Dynamics note, Bitrix24 timeline comment, Webhook etkilesim.yeni event.
Tip: If the contact has not gone to the CRM yet, the note waits and goes with the contact. Each event is written once per connector.
Important:
- If the box says "No connected CRM can take notes (HubSpot needs an access key; the form route cannot write notes).", no notes are written.
- If a note cannot be written, it goes to the shared error queue as an "interaction note". If the HubSpot key has no permission to write notes, the message is "HubSpot anahtarının not yazma izni yok (403); kişi kapsamları (crm.objects.contacts.write) gerekir." ("The HubSpot key has no permission to write notes (403); contact scopes (crm.objects.contacts.write) are required.").
- Pending notes of a type you turn off later are not sent.
Reading back from the CRM
Who: Admin · Where: Admin → Integrations → CRM → Read back from CRM
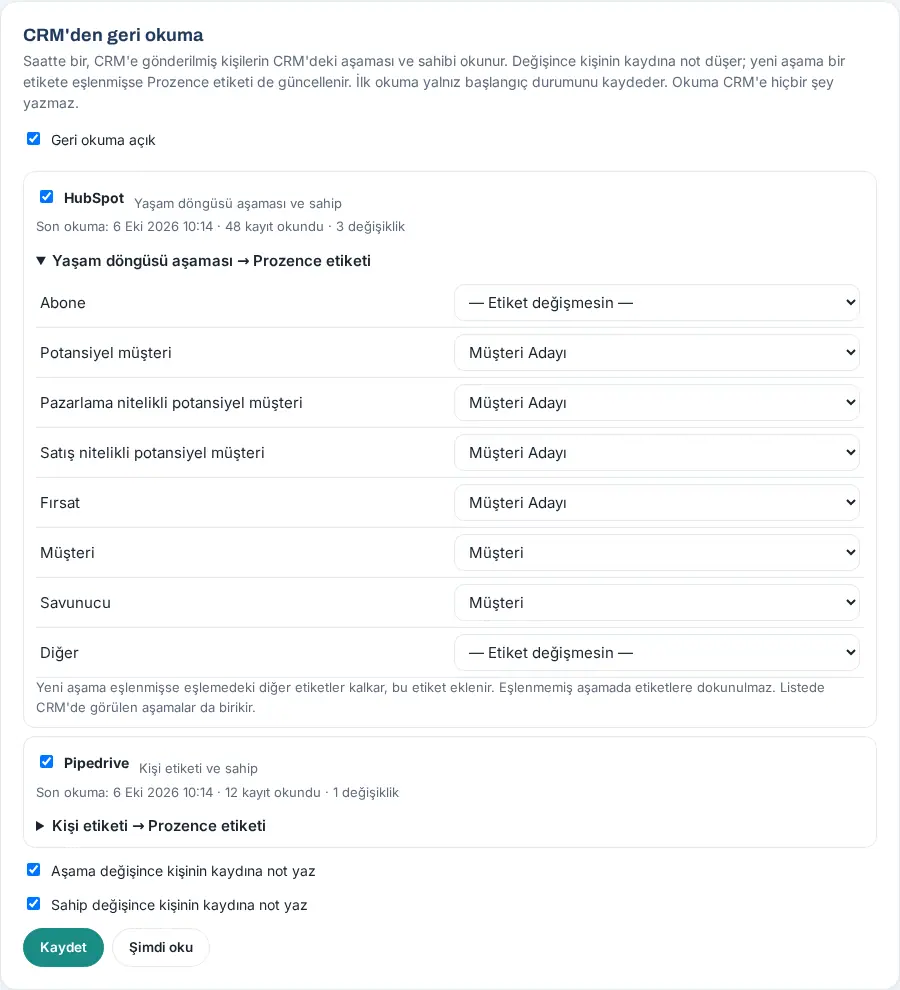
What it does: Once an hour, reads the stage and owner in the CRM of the contacts Prozence sent to the CRM. When the sales team turns a contact into a customer or hands it to another salesperson in the CRM, this reaches the record in Prozence as a note and a tag; employees who use Prozence see the status without opening the CRM. Reading writes nothing to the CRM.
Before you start: At least one CRM must be connected (see Setting up a CRM connection in the app). In HubSpot, read-back needs an access token (private app); if HubSpot is connected only via a form, the row shows Can't read and "HubSpot is connected via a form; read-back needs an access token (private app).".
- In the Read back from CRM box, tick Read-back on.
- Tick the CRMs to read. Each row shows what is read (e.g. Lifecycle stage and owner, Owner only).
- To give a Prozence tag by stage, click the … → Prozence tag heading in the row and choose a tag for each stage. Leave — Don't change tags — for stages where the tag should not change. HubSpot has a ready mapping: Müşteri ("Customer") and Savunucu ("Evangelist") → Customer; Potansiyel müşteri ("Lead"), Pazarlama nitelikli potansiyel müşteri ("Marketing qualified lead"), Satış nitelikli potansiyel müşteri ("Sales qualified lead") and Fırsat ("Opportunity") → Prospect.
- Keep Add a note to the contact's record when the stage changes and Add a note to the contact's record when the owner changes as you prefer.
- Click Save. The first read happens within an hour; if you do not want to wait, click Read now.
| CRM | Stage read | Owner |
|---|---|---|
| HubSpot | Lifecycle stage (custom stages with their HubSpot name) | Yes |
| Salesforce | Lead status; "Dönüştürüldü" ("Converted") for a converted lead. No stage for a contact | Yes |
| Zoho CRM | Lead status. No stage for a contact | Yes |
| Dynamics 365 | Lead status reason (New, Contacted, Qualified…). No stage for a contact | Yes |
| Pipedrive | Person label | Yes |
| Odoo, Bitrix24 | — | Yes |
Result:
- The first read only records the starting state; no note or tag is written.
- On later reads, if the stage or owner changed, a note written by the CRM is added to the contact's record (e.g. "HubSpot — Yaşam döngüsü aşaması: Fırsat → Müşteri · Sahip: Zeynep Korkmaz → Murat Çelik · Prozence etiketi: Müşteri"). The note is visible to everyone who can see the record (see 04. Customer directory).
- If the new stage is mapped to a tag, the other mapped tags are removed and this tag is added; unmapped tags (e.g. Technopark) are left alone.
- Each CRM row shows "Last read: …, N records read, N changes"; if reading failed, the error is shown in red below it.
Common errors and warnings: "Choose at least one CRM.", "With read-back on, choose at least one thing: notes or a stage → tag mapping.", "Read-back is off, or no connected CRM can be read back.", "Read too often. Try again in a minute."
Tip: Stages seen in the CRM are also added to the mapping list; Salesforce, Zoho and Pipedrive stages appear after the first read.
Important:
- Reading runs once an hour, in turn, with at most 100 records per CRM (50 for Dynamics 365, Pipedrive and Bitrix24); in a company with many records, it can take a few hours until a record is read again.
- A tag changed by reading is not sent back to the CRM (to avoid a loop). Contacts deleted in the CRM are skipped.
- The note keeps the stage name in the language it was written in; it is not translated even if the app language is English.
CRM error queue
Who: Admin · Where: Admin → Integrations → CRM → Error queue (N)
What it does: Lists the contacts and interaction notes that could not be sent to the CRM. Temporary errors (connection, 408, 429, 5xx) are retried automatically; permanent errors (other 4xx errors, such as a wrong key or an unauthorized field) become Stopped at the first try and are retried by hand.
- Scroll down to the Error queue (N) box. If there is nothing pending, it says "No pending or failed sends.".
- Each row shows the contact, the CRM, "interaction note" (if it is one), a badge (Stopped or Next try: …), the number of tries and the error message.
- Fix the cause of the problem (e.g. the key) in the connector card.
- For one record, click Try again; for all of them, click Retry all now (up to 50 records at a time).
- Remove a record you do not need from the queue with Remove.
Result: When a record stops in automatic retry, Admins get at most one phone notification a day: CRM sync stopped — "…: contacts cannot be sent to the CRM; the records remain in the company catalogue. Details: Admin → Integrations → CRM." While the problem continues, the "CRM sync stopped: HubSpot (N people waiting)" row stays in the Admins' Waiting for you list; it disappears at the first successful send.
Important: A record removed from the queue is not sent again automatically; if necessary, use Send existing records.
Directory and sign-in: comparing with the directory in the app
Who: Admin · Where: Admin → Integrations → Directory and sign-in
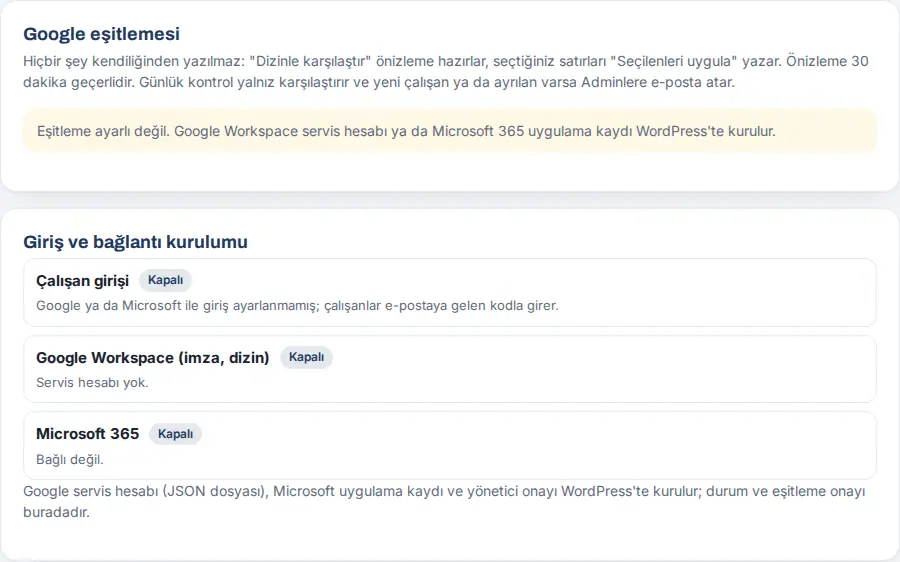
What it does: You compare the Google Workspace, Microsoft 365 or Yandex 360 directory with the employee records in Prozence, in the app: new employees, people who may have left, and data differences. Nothing is written automatically; the rows you select are applied. It is the same function as the Google eşitlemesi ("Google sync") screen in WordPress.
Before you start: Sync must be set up in WordPress (see Directory sync). If it is not set up, the tab says "Sync is not set up. The Google Workspace service account JSON key is pasted into the connection wizard on the Google / Microsoft tab or into WordPress; the sync settings and the Microsoft 365 app registration are done in WordPress.". The Sign-in and connection setup section at the bottom of the tab also shows these ways; Open the wizard takes you to the Google / Microsoft tab.
- Open the Directory and sign-in tab.
- Click Compare with directory. The screen shows "Preview ready."; the Suggested changes (N) box opens.
- The suggestions are listed in three groups:
- New employees (in the directory, not in Prozence): added as draft people; you check them and publish them;
- Possibly left: marked as "Left"; the card is unpublished, and the QR code turns to the redirect page;
- Data differences: written in the direction of the arrow; the value is read again just before it is written to the directory, and skipped if it changed.
- Select the rows to apply (or Select everyone in this group).
- Click Apply selected.
- For addresses that will have no card, such as a shared mailbox or a service account, click Ignore in the row and confirm.
- To check the permissions, click Test permissions; each permission shows Working, Not tested or Problem.
Common errors and warnings:
| Message | Cause | What to do |
|---|---|---|
| "The preview is out of date (older than 30 minutes). Compare again to apply." | The preview is older than 30 minutes | Click Compare with directory again |
| "Select rows to apply." | No rows were selected | Select rows |
| "Writing to the directory is off in this environment (test / staging); only the Prozence side is updated." | Test environment | Apply it on the live site |
| "Too many comparisons; try again in a minute." | More than 6 comparisons a minute | Wait a minute |
Tip: If the daily check is on (in WordPress), it compares and emails the Admins if there are new employees or leavers; to have it apply them itself, see Automatic apply in directory sync. The source badges in the Employees list are also updated from the comparison (see 10. Administration and setup).
Automatic apply in directory sync
Who: Admin · Where: Admin → Integrations → Directory and sign-in → Automatic apply
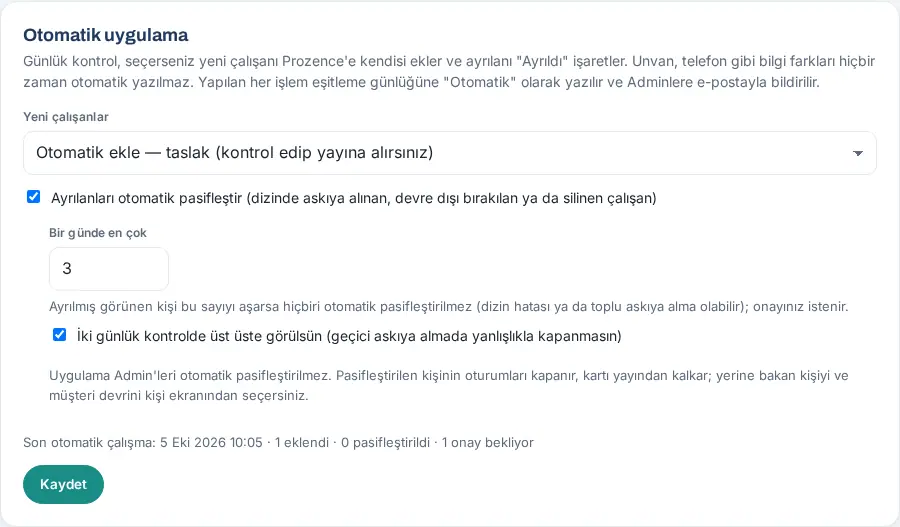
What it does: If you choose, the daily check adds new employees in the directory to Prozence itself and marks employees closed in the directory as "Left". You no longer need to update Prozence by hand when people join or leave. Differences in details such as job title or phone are never written automatically; they are still written with Apply selected.
Before you start: Directory sync must be set up (see Directory sync). The box does not appear while sync is not set up.
- On the Directory and sign-in tab, scroll to the Automatic apply box.
- In New employees, choose one:
- Notify only (no automatic adding) (default);
- Add automatically — draft (you review and publish);
- Add automatically — published (card and app open right away).
- To close leavers too, tick Deactivate leavers automatically (suspended, disabled or deleted in the directory). Two settings appear when you tick it:
- At most per day (1–50, default 3): if more people than this appear to have left, none are deactivated automatically; the Admins get an email asking for approval.
- Must appear in two daily checks in a row (so a temporary suspension doesn't deactivate by mistake) (on by default).
- Click Save. Below the box, the last run is shown: "Last automatic run: …, N added, N deactivated, N awaiting confirmation".
Result:
- An automatically added employee is created with the name, job title and mobile number from the directory; if you chose draft, you review and publish them. If you chose published, the "New joiners" announcement is also prepared according to your setting.
- A deactivated employee's card is unpublished and their sessions are closed. You choose the stand-in and the customer handover from the person's record (see 10. Administration and setup). If it was a mistake, publish the person again.
- Each action is written to the sync log as "Otomatik (günlük kontrol)" ("Automatic (daily check)"). The daily email to the Admins lists the employees added automatically, those marked "Left", and those awaiting your approval (with the reason).
Important:
- App Admins are never deactivated automatically; they stay on the approval list.
- If the directory comes back empty, or more than 50 new employees appear in one day, nothing is done automatically.
- Even with the daily notification email off, the daily check runs while automatic apply is on; an email is sent only when an automatic action is taken.
- If you use Entra ID or Okta, SCIM opens and closes accounts right away; automatic apply runs once a day.
Directory sync (Google or Microsoft)
Who: IT, app administrator · Where: WordPress → Prozence Workplace → Google eşitlemesi
What it does: Matches the employee records with the users in the company directory by email address: it suggests new employees, people who may have left and data differences. No change is made automatically; you select and apply them. The comparison and approval can also be done in the app (see Directory and sign-in).
Before you start: For Google, you need the service account and the Admin SDK API; for Microsoft, the Microsoft 365 connection; for Yandex 360, the Yandex 360 connection.
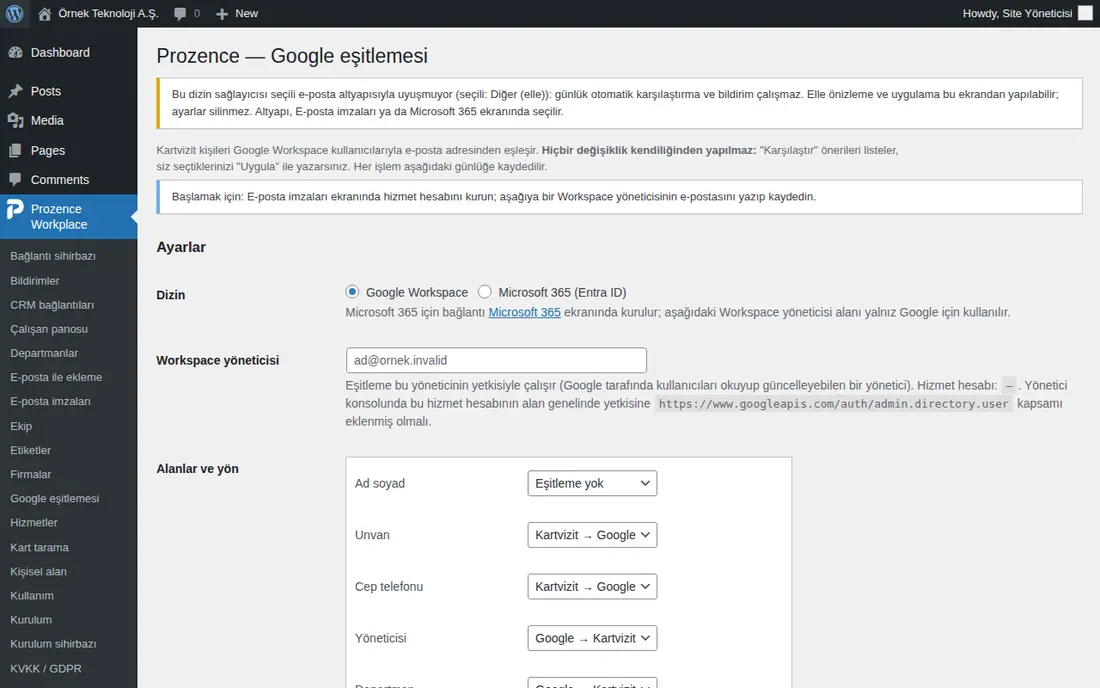
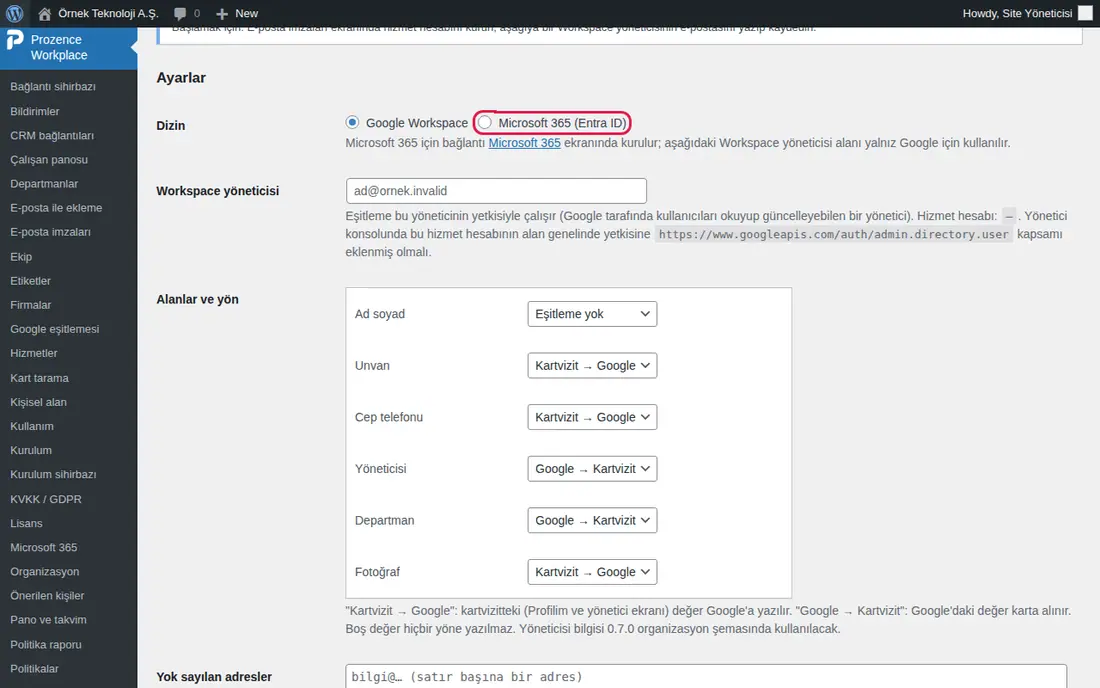
- Open the Google eşitlemesi screen. In the Ayarlar ("settings") section, select Google Workspace, Microsoft 365 (Entra ID) or Yandex 360 as the Dizin ("directory"). You can also select Yandex 360 in the app with Sync staff from the Yandex 360 directory.
- For Google, type the email of a Workspace administrator who can read and update users in the Workspace yöneticisi ("Workspace administrator") box (e.g.
bt.yonetici@ornek.invalid). - In the Alanlar ve yön ("fields and direction") table, select the direction for each field (Ad soyad ("full name"), Unvan ("job title"), Cep telefonu ("mobile phone"), Yöneticisi ("manager"), Departman ("department"), Fotoğraf ("photo")) (Ad soyad can be synced only in the Google → Kartvizit direction, and Fotoğraf only in the Kartvizit → Google direction):
- Kartvizit → Google ("business card → Google"): the value on the business card is written to the directory;
- Google → Kartvizit ("Google → business card"): the value in the directory is taken to the card;
- Eşitleme yok ("no sync").
- In the Yok sayılan adresler ("ignored addresses") box, type the addresses that will have no business card, one per line (shared mailboxes, service accounts).
- If you want, select Her gün karşılaştır; yeni çalışan ya da ayrılan varsa yöneticilere e-posta gönder ("compare every day; email the administrators if there are new employees or leavers"). Click Ayarları kaydet ("save settings").
- Click Şimdi karşılaştır ("compare now"). The suggestions are listed in three groups: Yeni çalışanlar ("new employees"), Ayrılmış olabilecekler ("possibly left"), Bilgi farkları ("data differences").
- Select the rows to apply and click Seçilenleri uygula ("apply selected"). For an address you want to keep out permanently, use Yok say ("ignore").
Tip: You can select the person who covers for an employee who left later, in the Ayrılış ("offboarding") box in the person's record (see 10. Administration and setup). For automatic creation and deactivation from Entra ID or Okta, see SCIM.
Important:
- If the preview is older than 30 minutes, compare again before you apply. The value is read again just before it is written; if it changed, it is skipped.
- Unless automatic apply is on, the daily check does not change anything; it only informs. Each action is written to the log on the screen.
- If the directory provider does not match the email platform, the daily comparison does not run; a warning appears at the top of the screen.
- Only Unvan ("job title") and Departman ("department") can be written to Yandex 360 (this needs the
directory:write_userspermission); Yandex 360 has no manager relationship or photo. Without the permission to read departments, departments are not compared.
Calendar: holidays, external calendars and Google Calendar
Who: App administrator · Where: Admin → Company → Calendar and Board → Calendar
What it does: Adds public holidays and public external calendars to the company calendar. Employees can add the company calendar to their own Google Calendar or Outlook calendar.
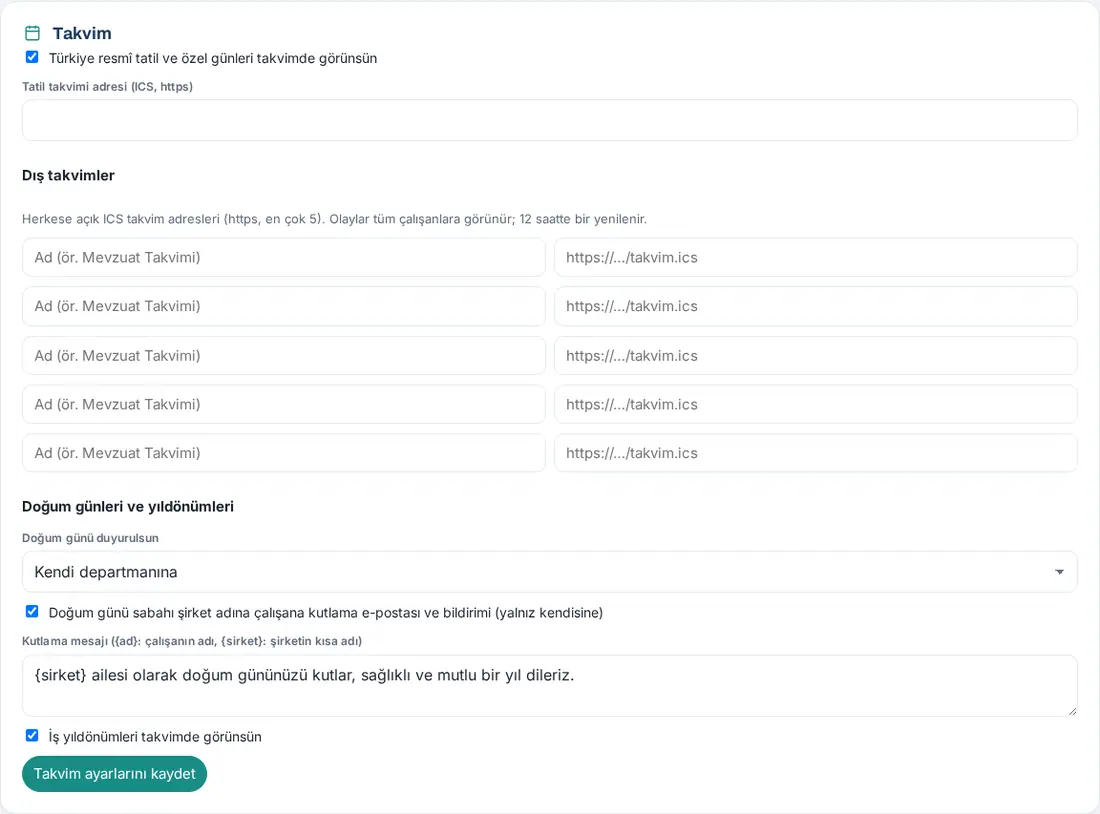
- Open the Calendar and Board section and scroll down to the Calendar box.
- Select the Show Turkey’s public holidays and special days on the calendar checkbox. By default, the Holiday calendar address (ICS, https) box contains Google's public Turkey holiday calendar; you can also type another ICS address. If the box is empty, holidays are not read.
- In the External calendars section, add up to 5 public ICS calendars: type a name (e.g. "Mevzuat Takvimi" ("regulatory calendar")) in the left box and the
https://…/takvim.icsaddress in the right box. - Click Save calendar settings.
Adding it to the employee's own calendar:
- The employee opens the Calendar tab on the Board and taps Add to my calendar.
- They copy their personal address with Copy.
- Google Calendar → Other calendars → From URL → they paste the address.
Tip: Employees seeing their own Google / Outlook calendars on the Prozence Calendar tab (My calendar, 0.99.33) and room bookings being written to Google Calendar work with the permissions given with the Google / Microsoft wizard.
Important: The events of external calendars are visible to all employees and are refreshed every 12 hours. Only https addresses are accepted. The personal subscription address belongs to the person and must not be shared. If the address leaked, the employee renews it with Renew link (the old one stops working).
Microsoft 365 connection and sign-in with Microsoft
Who: IT, Microsoft 365 administrator · Where: WordPress → Prozence Workplace → Microsoft 365
What it does: Employees use Sign in with Microsoft; employee details can be synced with Entra ID; the signature information email goes with the Outlook steps. The Microsoft Teams app and the Dynamics 365 connector also use this app registration.
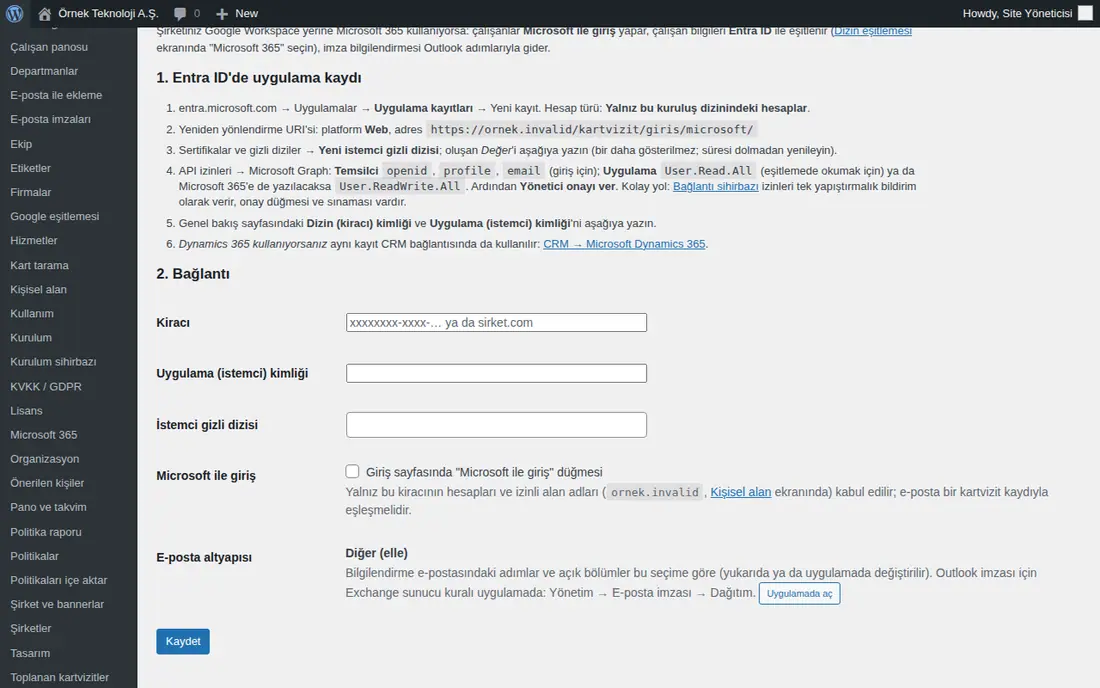
1. App registration in Entra ID:
- entra.microsoft.com → Applications → App registrations → New registration. Account type: Accounts in this organizational directory only.
- Redirect URI: platform Web, address
https://ornek.invalid/kartvizit/giris/microsoft/(with your own site address). The correct address is shown on the Microsoft 365 screen. - Certificates & secrets → New client secret. Copy the Value that is created; it is not shown again.
- API permissions → Microsoft Graph: Delegated
openid,profile,email(for sign-in); ApplicationUser.Read.All(to read during sync), orUser.ReadWrite.Allif data will also be written to Microsoft 365. Then Grant admin consent. The easy way: Google / Microsoft wizard. - On the Overview page, copy the Directory (tenant) ID and the Application (client) ID.
2. Connection:
- In WordPress, open the Microsoft 365 screen.
- Fill in the Kiracı ("tenant") (tenant ID or domain), Uygulama (istemci) kimliği ("application (client) ID") and İstemci gizli dizisi ("client secret") boxes.
- For Sign in with Microsoft, select Giriş sayfasında "Microsoft ile giriş" düğmesi ("the "Sign in with Microsoft" button on the sign-in page").
- Click Kaydet ("save").
Tip: If you use Dynamics 365, the same app registration is also used in the CRM connection. For directory sync, select Microsoft 365 (Entra ID) on the Google eşitlemesi screen (see Directory sync).
Important:
- Only accounts of this tenant and the allowed domains (on the Kişisel alan screen) are accepted; personal accounts and accounts of other organizations are rejected.
- Renew the client secret in Entra before it expires and enter it here again; if it expires, sign-in with Microsoft, Teams and Dynamics do not work.
- In Microsoft 365, the Outlook signature cannot be written from outside; the signature is set up with a server rule (see Outlook signature: Exchange server rule).
Single sign-on (SAML)
Who: Admin; Okta, Microsoft Entra ID, Google Workspace, OneLogin, JumpCloud, AD FS or Keycloak administrator · Where: Admin → Integrations → Single sign-on (SAML)
What it does: Employees sign in with one click through the company's identity provider (IdP). They tap the "Sign in with …" button on the sign-in screen, sign in on the identity provider's own screen (with its own password and two-step verification) and return to Prozence. The password never reaches Prozence. Employees can also sign in from the "My Apps" tile in Okta or Entra.
Before you start:
- You need permission to create apps in the identity provider.
- The email address sent by the identity provider must be on one of the allowed email domains (see 10. Administration and setup) and must match a published employee record in Prozence that has not left. Someone who is in the identity provider but has no Prozence record cannot sign in; to create employees automatically, see Automatic user provisioning with SCIM.
1. App in the identity provider:
- In the menu on the left, click Admin, then Integrations in the Company group, then the Single sign-on (SAML) tab.
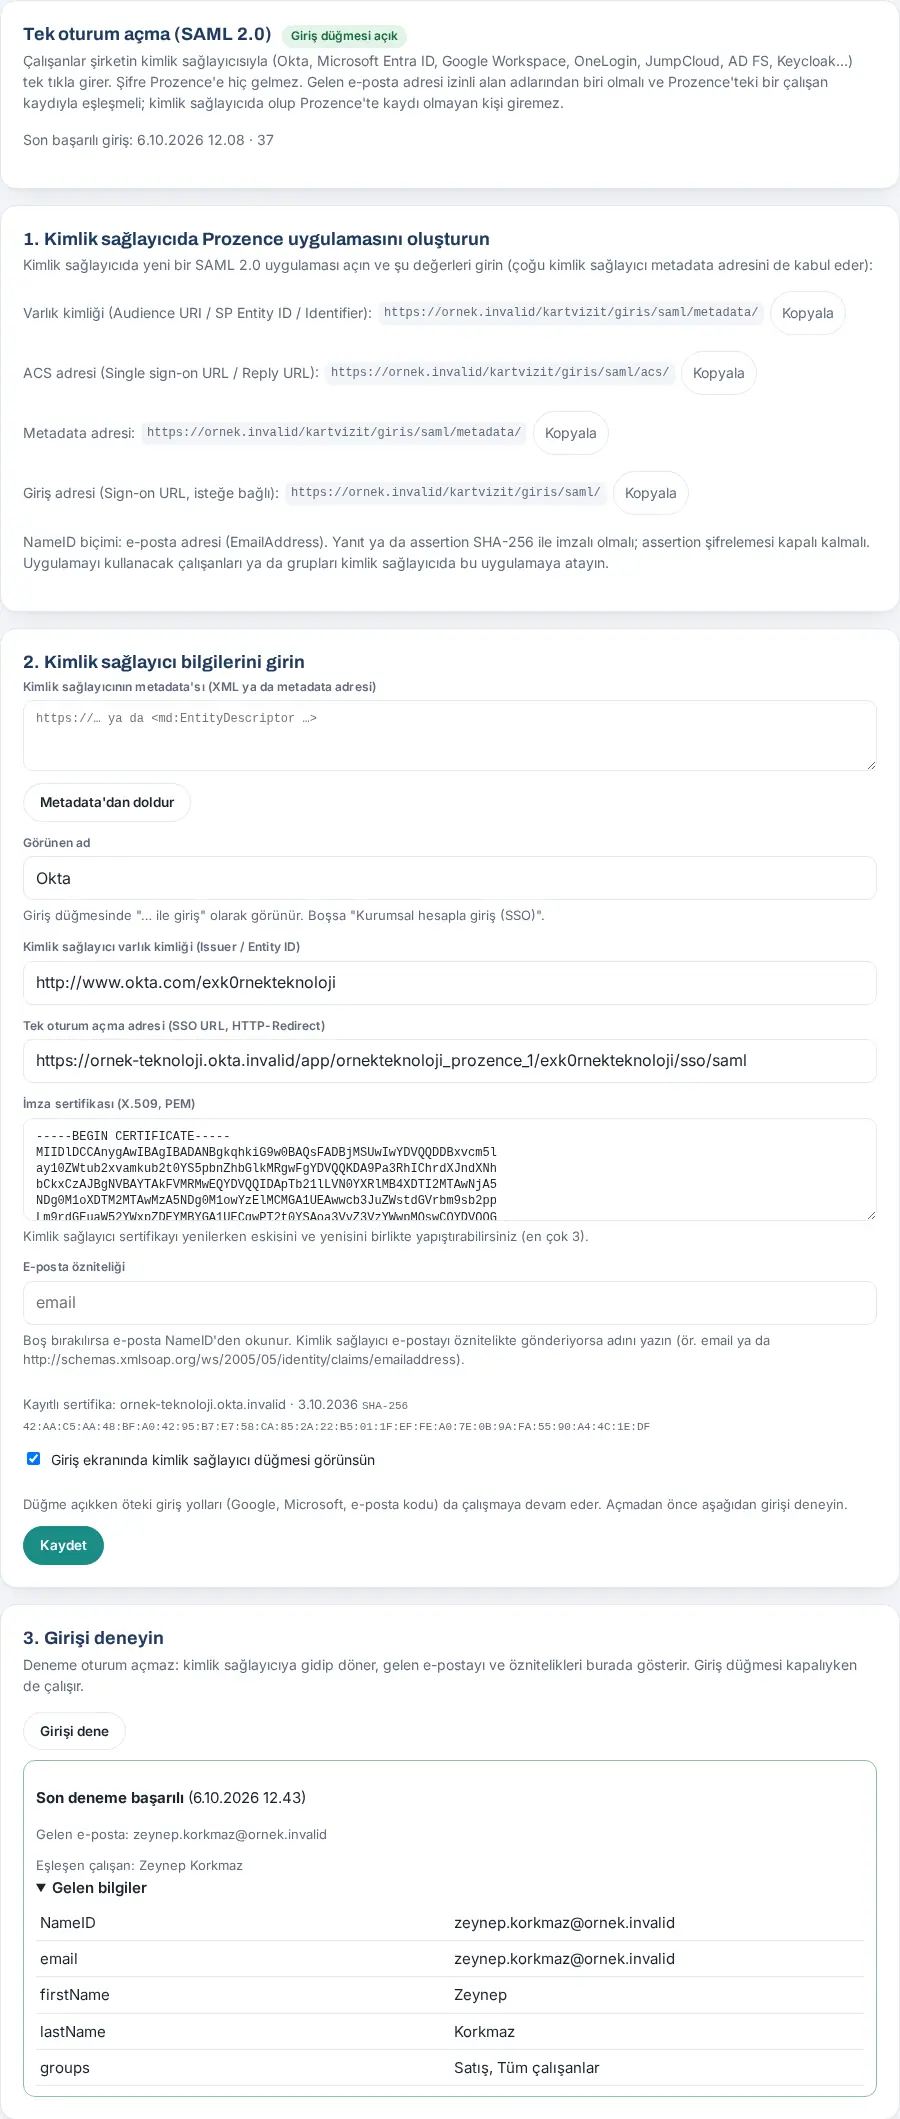
- Enter the values in the 1. Create the Prozence app in your identity provider box into a new SAML 2.0 app in your identity provider. Copy next to each row copies the value.
- Entity ID (Audience URI / SP Entity ID / Identifier):
https://ornek.invalid/kartvizit/giris/saml/metadata/ - ACS URL (Single sign-on URL / Reply URL):
https://ornek.invalid/kartvizit/giris/saml/acs/ - Metadata URL: If your identity provider accepts a metadata URL, you can give this instead of the first two values.
- Sign-on URL (optional):
https://ornek.invalid/kartvizit/giris/saml/
- Entity ID (Audience URI / SP Entity ID / Identifier):
- Set the NameID format to email address (EmailAddress). The response or the assertion must be signed with SHA-256; leave assertion encryption off.
- In the identity provider, assign the employees or groups who will use the app to this app.
| Identity provider | Where and which field |
|---|---|
| Okta | Applications → Create App Integration → SAML 2.0. "Single sign-on URL" = ACS URL, "Audience URI (SP Entity ID)" = entity ID, "Name ID format" = EmailAddress, "Application username" = Email. After saving, copy the metadata URL on the Sign On tab. |
| Microsoft Entra ID | Enterprise applications → New application → Create your own application → Single sign-on → SAML. "Identifier (Entity ID)" = entity ID, "Reply URL" = ACS URL. By default the NameID is the user principal name (UPN); if the UPN is not the same as the email, enter http://schemas.xmlsoap.org/ws/2005/05/identity/claims/emailaddress in Email attribute in Prozence. Copy the "App Federation Metadata Url". |
| Google Workspace | Admin console → Apps → Web and mobile apps → Add app → Add custom SAML app. "ACS URL" = ACS URL, "Entity ID" = entity ID, "Name ID format" = EMAIL, "Name ID" = Primary email. Use the content of the file from Download metadata in the second step. |
2. Identity provider details:
- Paste the identity provider's metadata XML or metadata URL in the Identity provider metadata (XML or metadata URL) box and click Fill in from metadata. Identity provider entity ID (Issuer / Entity ID), Single sign-on URL (SSO URL, HTTP-Redirect) and Signing certificate (X.509, PEM) are filled in. This step does not save.
- If you have no metadata, fill in the three fields by hand. Paste the certificate as it is, starting with
-----BEGIN CERTIFICATE-----.
- If you have no metadata, fill in the three fields by hand. Paste the certificate as it is, starting with
- Type the identity provider's name in the Display name box (e.g.
Okta). The sign-in button shows "Sign in with Okta"; if you leave it empty, "Sign in with company account (SSO)". - If the identity provider sends the email in an attribute instead of the NameID, type the attribute name in Email attribute (e.g.
email). If it is empty, the email is read from the NameID. - Click Save. Below, the subject, expiry date and SHA-256 fingerprint of the saved certificate appear. If it expires within 30 days, an orange Expires within 30 days badge shows; if it has expired, a red Expired badge.
3. Test and sign-in button:
- In the 3. Test the sign-in box, click Test sign-in. Sign in on the identity provider's screen; you then return to this tab. The test does not sign anyone in and works even while the sign-in button is off.
- If it says Last test succeeded, check the Email received and Matching employee lines. Open Received details to list the NameID and the attributes the identity provider sent. If it says Last test failed, the reason is shown below (e.g. certificate, Audience, unregistered email).
- Select Show the identity provider button on the sign-in screen and click Save. The badge at the top of the tab changes to Sign-in button on; the button appears on the sign-in screen.
Tip:
- For a sign-in that starts from the "My Apps" tile in Okta or Entra, Prozence restarts the flow itself; since the employee is already signed in to the identity provider, they do not type the password again.
- While the identity provider renews its signing certificate, paste the old and the new one together in the Signing certificate box (up to 3); when the change is complete, delete the old one and save again.
- At the top of the tab you see the Last successful sign-in time, the number of sign-ins and the last error, if any. The Other connections box on the Status tab also has a Single sign-on (SAML) row.
- In the Prozence mobile app this button also opens in the phone's browser; you return to the app when the sign-in is complete (see 20. Prozence mobile app).
Important:
- While the button is on, the other sign-in methods (Google, Microsoft, email and SMS code, invitation) keep working. Forcing sign-in only through SAML is not available in this version.
- Encrypted assertions and SHA-1 signatures are not supported. There is no single logout: signing out of Prozence does not end the session in the identity provider.
- The sign-in must be completed in the browser where it started. A sign-in moved to another device or browser gives the error "Sign-in wasn't started in this browser. Try again."
- It could not be shown with a real Okta / Entra tenant on the demo site; the values in the image are fictional.
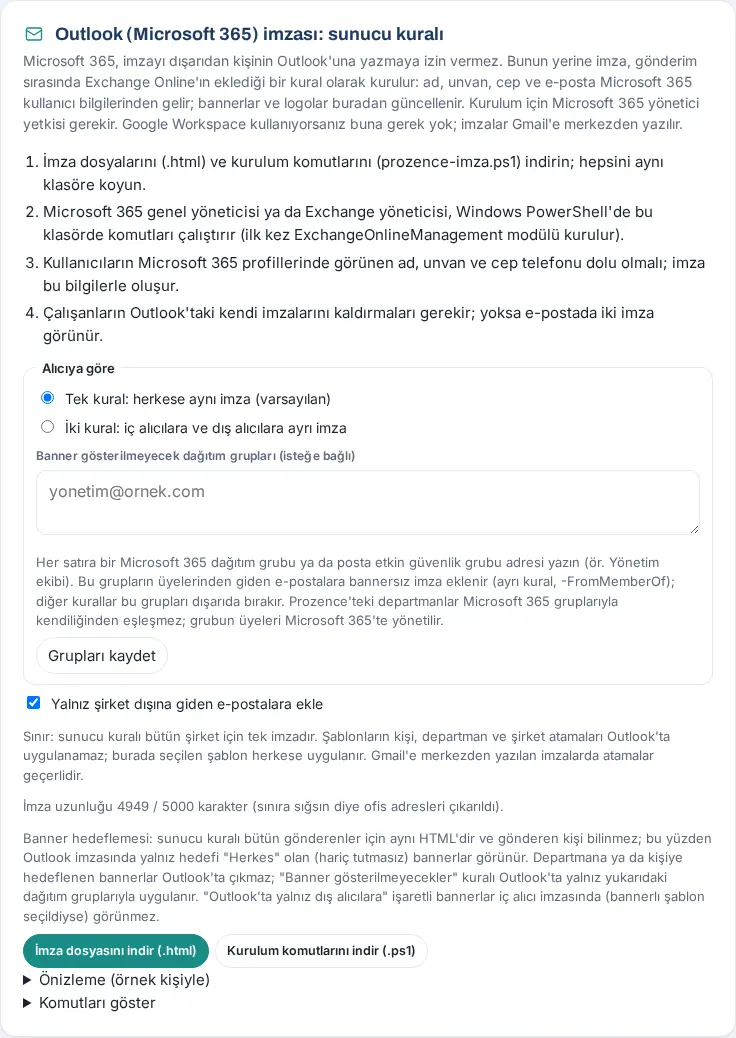
Outlook signature: Exchange server rule
Who: App administrator together with the Microsoft 365 global administrator or Exchange administrator · Where: Admin → Contact → Email signature → Delivery → Outlook (Microsoft 365) signature: server rule
What it does: Microsoft 365 does not allow writing the signature into a person's Outlook from outside. Instead, the signature is set up as a rule that Exchange Online adds at the time of sending. It is added to all emails sent from desktop, web and phone Outlook.
Before you start: Email platform = Microsoft 365 must be selected. The display name, job title and mobile phone in the users' Microsoft 365 profiles must be filled in; the signature is built from these details.
- In the By recipient section, select one option:
- Single rule: same signature for everyone (default);
- Two rules: separate signatures for internal and external recipients.
- If you want, type one Microsoft 365 distribution group or mail-enabled security group address per line (e.g.
yonetim@ornek.invalid) in the Distribution groups without banners (optional) box and click Save groups. Emails sent by members of these groups get the signature without a banner. - Select the Add only to emails sent outside the company checkbox if you want.
- Open Preview (with a sample person) and check the signature. The box shows the signature length (e.g. "4949 / 5000 characters").
- Click Download signature file (.html) and Download setup commands (.ps1). Put all the files in the same folder.
- The Microsoft 365 global administrator or Exchange administrator runs the commands in Windows PowerShell in this folder. The first time, the ExchangeOnlineManagement module is installed. To see the commands without running them, open Show commands.
- Ask employees to remove their own signatures in Outlook; otherwise two signatures appear in the email.
Tip: The "Save to contacts" and "Digital business card" buttons go to the person's card by email address. In reply chains, the signature is not added a second time.
Important:
- The server rule is one signature for the whole company. The person, department and company assignments of templates cannot be applied in Outlook; the selected template is applied to everyone.
- The Outlook signature shows only banners whose target is "Everyone". Banners targeted at a department or a person do not appear.
- If the signature is longer than 5,000 characters, it is shortened (e.g. the office addresses are removed). This method has no photo, no personal links, no signature analytics and no out-of-office note.
- If you use Google Workspace, you do not need this; signatures are written to Gmail centrally.
Yandex 360 connection and signature writing
Who: Admin; Yandex 360 organization administrator · Where: Admin → Integrations → Yandex 360; Admin → Contact → Email signature → Delivery
What it does: If your company uses Yandex 360 for email, each employee's signature is written centrally to their own address in Yandex 360; the employee does not need to do anything. With the same connection, the staff list is synced from the Yandex 360 directory (with preview and approval; see Directory sync). To add business cards by email, the shared mailbox is connected separately over IMAP (see 12. Customer directory administration).
Before you start:
- You need an administrator account in the Yandex 360 organization.
- To write signatures, Yandex 360 must be selected as the email platform.
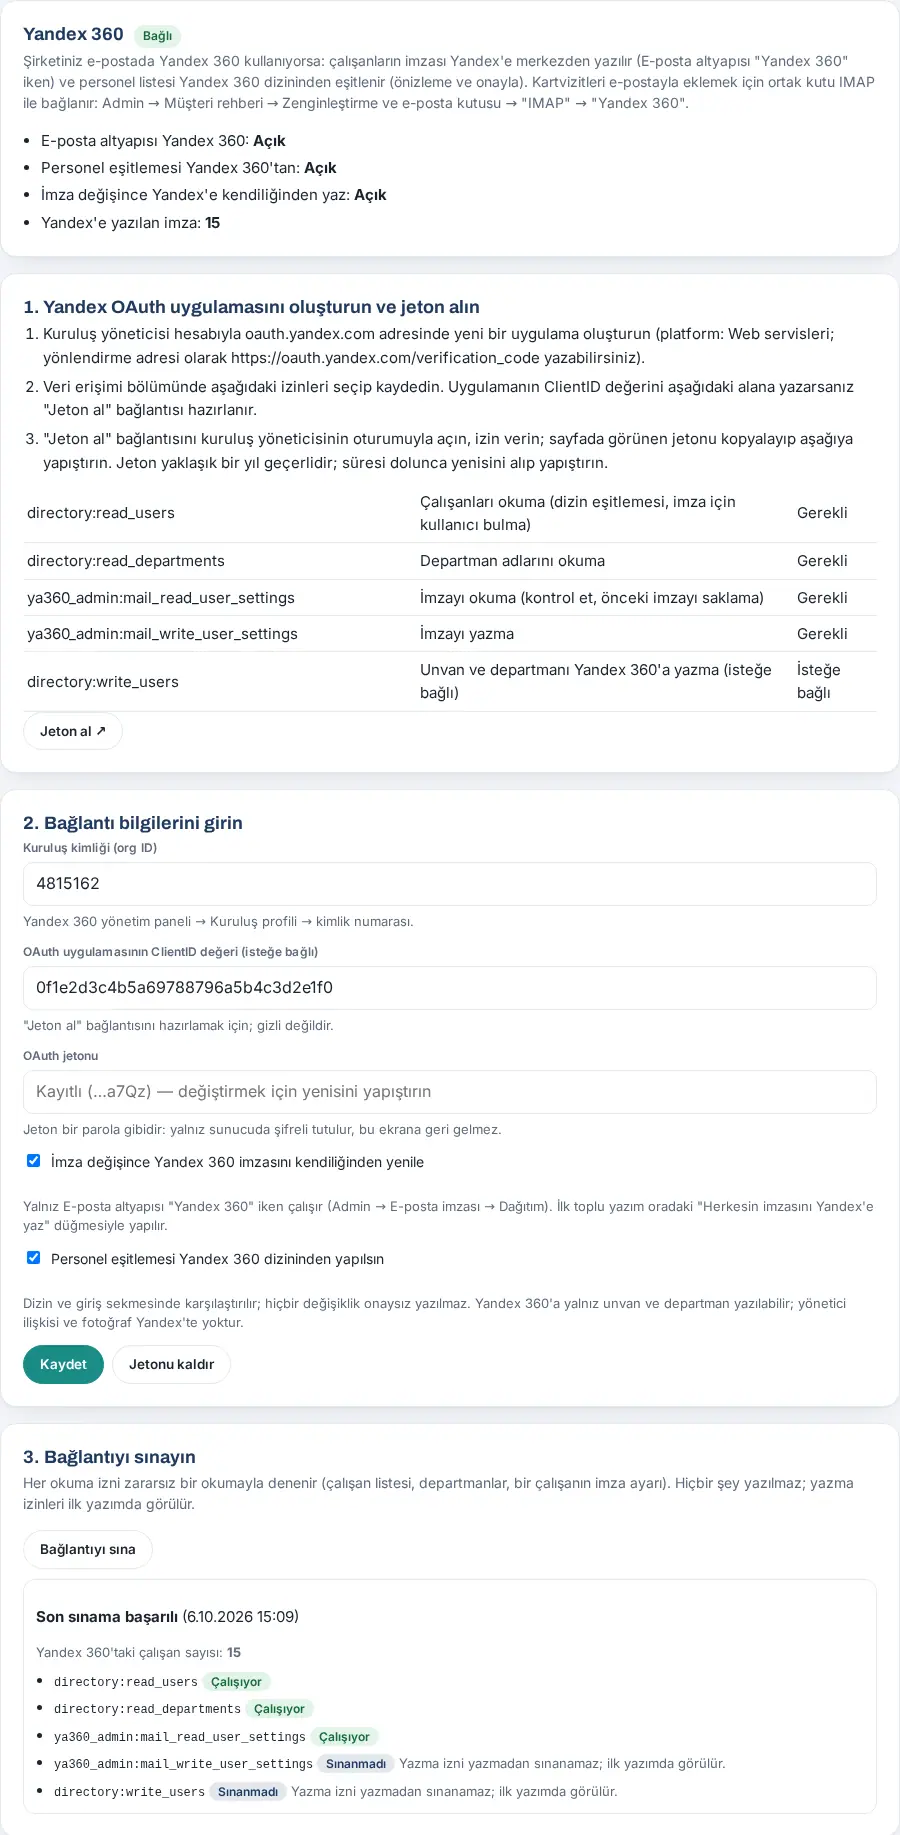
1. OAuth app and token:
- In the menu on the left, click Admin, then Integrations in the Company group, then the Yandex 360 tab.
- With the organization administrator account, create a new app at
oauth.yandex.com. Select "Web services" as the platform; you can enterhttps://oauth.yandex.com/verification_codeas the redirect URL. - In the app's data access section, select and save the permissions listed in the 1. Create the Yandex OAuth app and get a token box:
directory:read_users: reading employees (required);directory:read_departments: reading department names (required);ya360_admin:mail_read_user_settings: reading the signature (required);ya360_admin:mail_write_user_settings: writing the signature (required);directory:write_users: writing the job title and department to Yandex 360 (optional).
- Type the app's ClientID in the OAuth app ClientID (optional) box and click Save. The Get token ↗ link appears.
- Open Get token ↗ while you are signed in as the organization administrator, and allow access. Copy the token shown on the page.
2. Connection details:
- Type your organization's number in the Organization ID (org ID) box (Yandex 360 admin panel → Organization profile; e.g.
4815162). - Paste the token in the OAuth token box.
- If you want, select:
- Refresh the Yandex 360 signature automatically when the signature changes: when a person is saved or a company setting (address, footer text, logo) changes, only the Yandex signature of the people whose signature changed is refreshed;
- Sync staff from the Yandex 360 directory: the directory comparison uses Yandex 360 instead of Google or Microsoft.
- Click Save. The badge at the top of the tab changes to Connected.
3. Test:
- In the 3. Test the connection box, click Test connection. Each read permission is tried with a harmless read; nothing is written.
- If it says Last test succeeded, check the number of employees in Yandex 360 and the Working, Permission missing or Not tested badge for each permission. Write permissions cannot be tested without writing; they are seen at the first write, so they stay Not tested.
4. Writing the signatures:
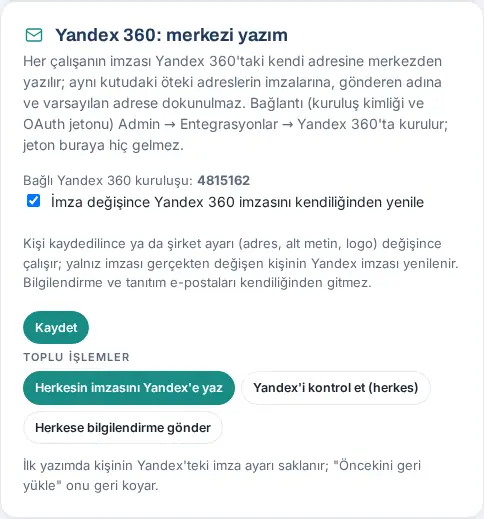
- In Admin → Email signature → Delivery, select Yandex 360 as the Email platform and click Save. The Yandex 360: central writing box opens; Connected Yandex 360 organization: appears at its top.
- In the Bulk actions section, click Write everyone's signature to Yandex and confirm. The signatures of everyone who is published are written to Yandex 360.
- Follow the result in the Signature status per person list. For one person, use the Write to Yandex, Check and Restore previous buttons in their row. Check Yandex (everyone) compares the signature in Yandex with the current signature.
- To let employees know, click Send the information email to everyone. The information email explains where the signature appears in Yandex Mail.
Tip:
- The signature is written for the person's own address and made the default signature. The signatures of other addresses in the same mailbox, the sender name and the default sender address are not touched.
- At the first write, the person's signature setting in Yandex is saved; Restore previous puts it back.
- The Other connections box on the Status tab has a Yandex 360 (signature, directory) row.
Important:
- The token is like a password: it is kept only on the server, encrypted, and does not come back to the screen; only its last four characters are shown. The token is valid for about a year; when it expires, get a new one and paste it. Remove token stops signature writing and the Yandex directory sync.
- No signature is written to a Yandex account that is disabled or dismissed.
- Signatures are not written to Yandex from demo and staging sites; only the live site writes them.
- The information and welcome emails are not sent automatically; you send them with the button.
- It could not be shown with a real Yandex 360 organization on the demo site; the values in the images are fictional.
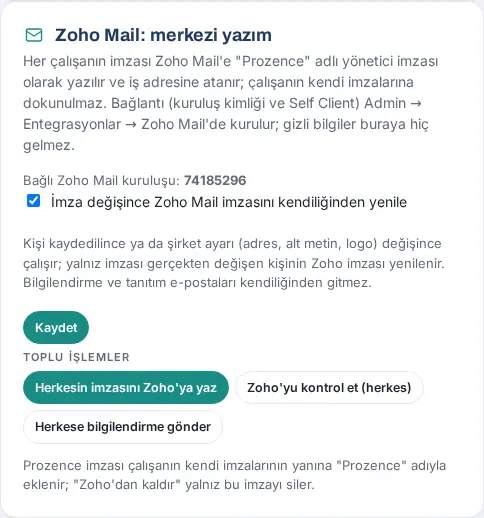
Zoho Mail connection and signature writing
Who: Admin; Zoho Mail organization administrator · Where: Admin → Integrations → Zoho Mail; Admin → Contact → Email signature → Delivery
What it does: If your company uses Zoho Mail, each employee's signature is written centrally to Zoho Mail as an admin signature named "Prozence" and assigned to the person's work address. Signatures the employee created in Zoho themselves are not touched. To add business cards by email, the shared mailbox is connected over IMAP (see 12. Customer directory administration).
Before you start:
- You need an administrator account in the Zoho Mail organization.
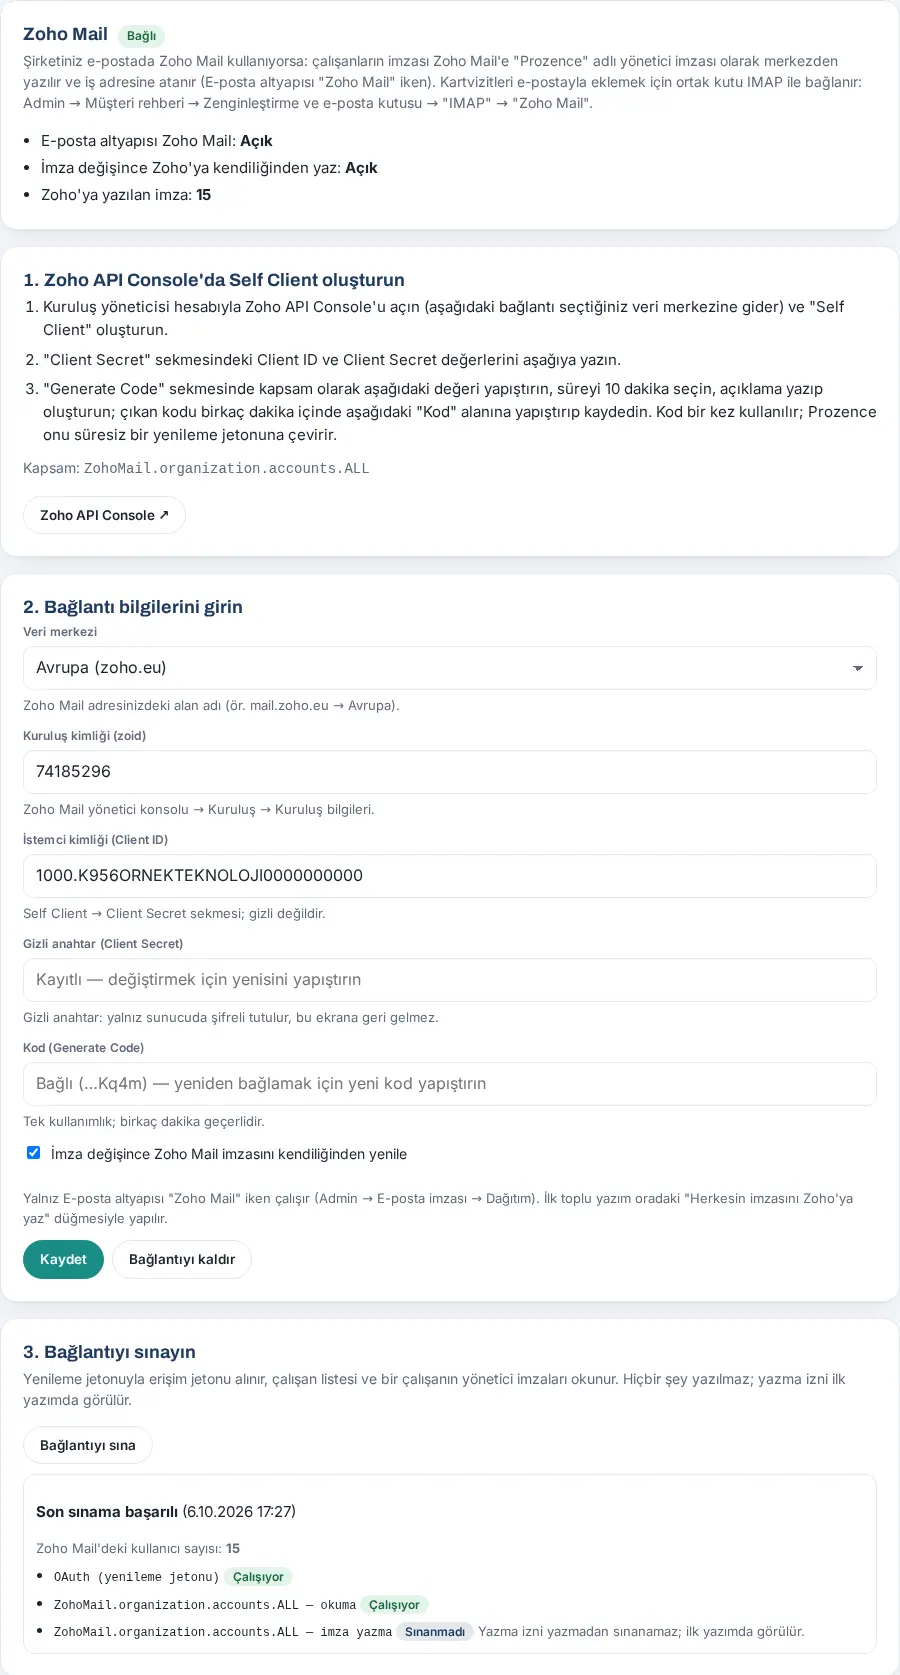
- Find the organization ID (zoid) in the Zoho Mail admin console under Organization → Organization info.
- Work out your data centre from the domain in your Zoho Mail address (e.g.
mail.zoho.eu→ Europe (zoho.eu)). - To write signatures, Zoho Mail must be selected as the email platform.
1. Self Client:
- In the menu on the left, click Admin, then Integrations in the Company group, then the Zoho Mail tab.
- In the 2. Enter the connection details box, select the Data centre. The Zoho API Console ↗ link goes to that data centre's console.
- With the organization administrator account, open the Zoho API Console and create a "Self Client".
- Enter the values from the "Client Secret" tab in the Client ID and Client Secret boxes.
- On the "Generate Code" tab, enter
ZohoMail.organization.accounts.ALLas the scope, choose 10 minutes as the duration, enter a description and create the code.
2. Connection:
- Type the organization ID in the Organization ID (zoid) box (e.g.
74185296). - Paste the code you created in the Code (Generate Code) box within a few minutes.
- If you want, select Refresh the Zoho Mail signature automatically when the signature changes. When a person is saved or a company setting (address, footer text, logo) changes, only the Zoho signature of the people whose signature changed is refreshed.
- Click Save. Prozence exchanges the code for a refresh token that does not expire; the badge at the top of the tab changes to Connected.
3. Test:
- In the 3. Test the connection box, click Test connection. An access token is obtained, and the employee list and one employee's admin signatures are read; nothing is written.
- If it says Last test succeeded, check the number of users in Zoho Mail and the Working or Not tested badges in the rows. The write permission cannot be tested without writing; it is seen at the first write, so it stays Not tested.
4. Writing the signatures:
- In Admin → Email signature → Delivery, select Zoho Mail as the Email platform and click Save. The Zoho Mail: central writing box opens; Connected Zoho Mail organization: appears at its top.
- In the Bulk actions section, click Write everyone's signature to Zoho and confirm.
- Follow the result in the Signature status per person list. For one person, use the Write to Zoho and Check buttons in their row. Check Zoho (everyone) compares the Prozence signature in Zoho with the current signature.
- To let employees know, click Send the information email to everyone. The information email explains where the signature appears in Zoho Mail.
Tip:
- The Prozence signature is written to be placed above the quoted text. Because it is assigned to the person's work address, it is used for emails written from that address; if it does not appear automatically in a new email, the employee selects the Prozence signature for their work address in Zoho Mail → Settings → Signature.
- Remove from Zoho in the person's row deletes only the Prozence signature; the employee's own signatures stay.
- The Other connections box on the Status tab has a Zoho Mail (signature) row.
Important:
- The client secret and the refresh token are kept only on the server, encrypted, and do not come back to the screen; only the last four characters are shown. The code is single-use; the same code is not accepted twice. Remove connection stops signature writing to Zoho; signatures already written stay in Zoho.
- If the data centre or the client ID changes, the old refresh token no longer works; reconnect with a new code.
- No signature is written to a Zoho Mail mailbox that is disabled or blocked.
- Signatures are not written to Zoho from demo and staging sites; only the live site writes them.
- Directory sync with Zoho Mail is not available in this version.
- It could not be shown with a real Zoho Mail organization on the demo site; the values in the images are fictional.
Chat channels (Slack, Teams, Google Chat)
Who: Admin · Where: Admin → Integrations → Chat channels
What it does: The events you select (company-wide announcement, I’m Safe check-in, urgent OHS (occupational health and safety, İSG) report…) also go to the company's chat channel. This is a one-way notification; for messaging between employees, see Setting up Messages (Google Chat).
Before you start: In the chat app, create an "incoming webhook" for the channel and copy its address:
- Slack: Apps → Incoming Webhooks → select a channel. The address has the format
https://hooks.slack.com/services/…. - Microsoft Teams: in the channel, ••• → Workflows → "Post to a channel when a webhook request is received". The address ends with …logic.azure.com or …powerplatform.com.
- Google Chat: open the space → the space name at the top → Apps & integrations → Webhooks → Add webhook → copy the link. The address has the format
https://chat.googleapis.com/v1/spaces/….
- Open the Integrations → Chat channels tab.
- Select the Send to chat channels checkbox.
- Click + Add channel.
- In the Type list, select Slack, Microsoft Teams, Google Chat or Generic webhook.
- Type the Channel name (e.g. "#genel", "Tüm şirket") and the Incoming webhook address.
- Select the Events to send:
- Company-wide announcements and policies;
- I’m Safe check-in started (whole company);
- I’m Safe check-in ended (counts only);
- Urgent safety report (type and location);
- New public wiki article;
- Pulse survey started;
- New employee (name and start date).
- Keep This channel is on selected. Click Save chat channels. The screen shows "Saved. Test the channel with "Send test message".".
- Test the connection with Send test message under the channel.
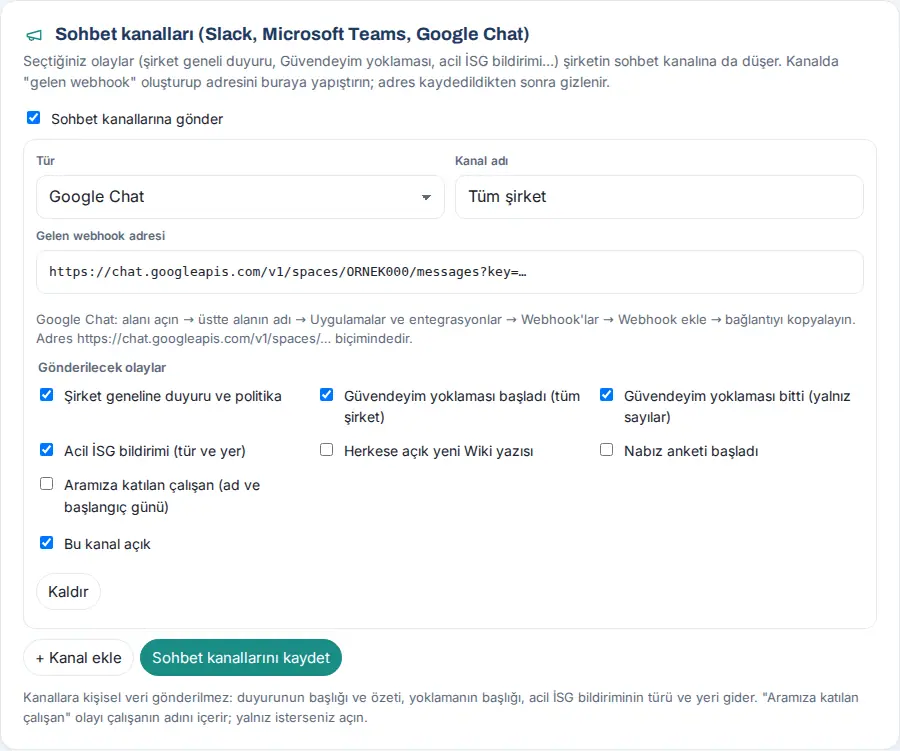
Result: The card of a saved channel shows the line "Address saved: chat.googleapis.com/…" and the last four characters of the address. If no test was made yet, it says "(no test message sent yet)". After that, "Last successful send: …" or "Last error: …" appears.
Common errors and warnings:
| Message | Cause | What to do |
|---|---|---|
| "Saved, but no messages will be sent because "Send to chat channels" is off." | The main switch is off | Select Send to chat channels and save |
| "Could not send: …" | The address is wrong or the channel was deleted | Paste a new webhook address and save |
Tip: You can set up to 10 channels. To stop a channel without deleting it, clear the This channel is on checkbox; to delete it, click Remove. For the Generic webhook type, the Signing key (for verification on the receiving system) appears; Renew the key when saving changes it.
Important:
- No personal data is sent to the channels: the title and summary of the announcement, the title of the check-in, and the type and location of the urgent OHS report are sent. The "New employee" event contains the employee's name; turn it on only if you want to.
- Department-only announcements and check-ins do not go to the channel.
- The webhook address is hidden on the screen after it is saved. Only
httpsand the official domains of the type are accepted. - Generic webhook sends JSON to your own system; the
X-Prozence-Imzaheader is an HMAC-SHA256 signature.
Setting up Messages (Google Chat)
Who: Admin; Google Cloud project administrator · Where: Admin → Integrations → Messages
What it does: Employees write to each other and to the whole company without leaving the app; the platform is the company's Google Chat. Each employee connects their Google account once; messages go in their own name and are also visible in Google Chat. Prozence does not store messages. For how employees use Messages, see 06. Board and intranet.
Before you start:
- The company must use Google Workspace; personal Gmail accounts cannot be connected.
- You must be able to make changes in the Google Cloud project that contains the Sign in with Google client.
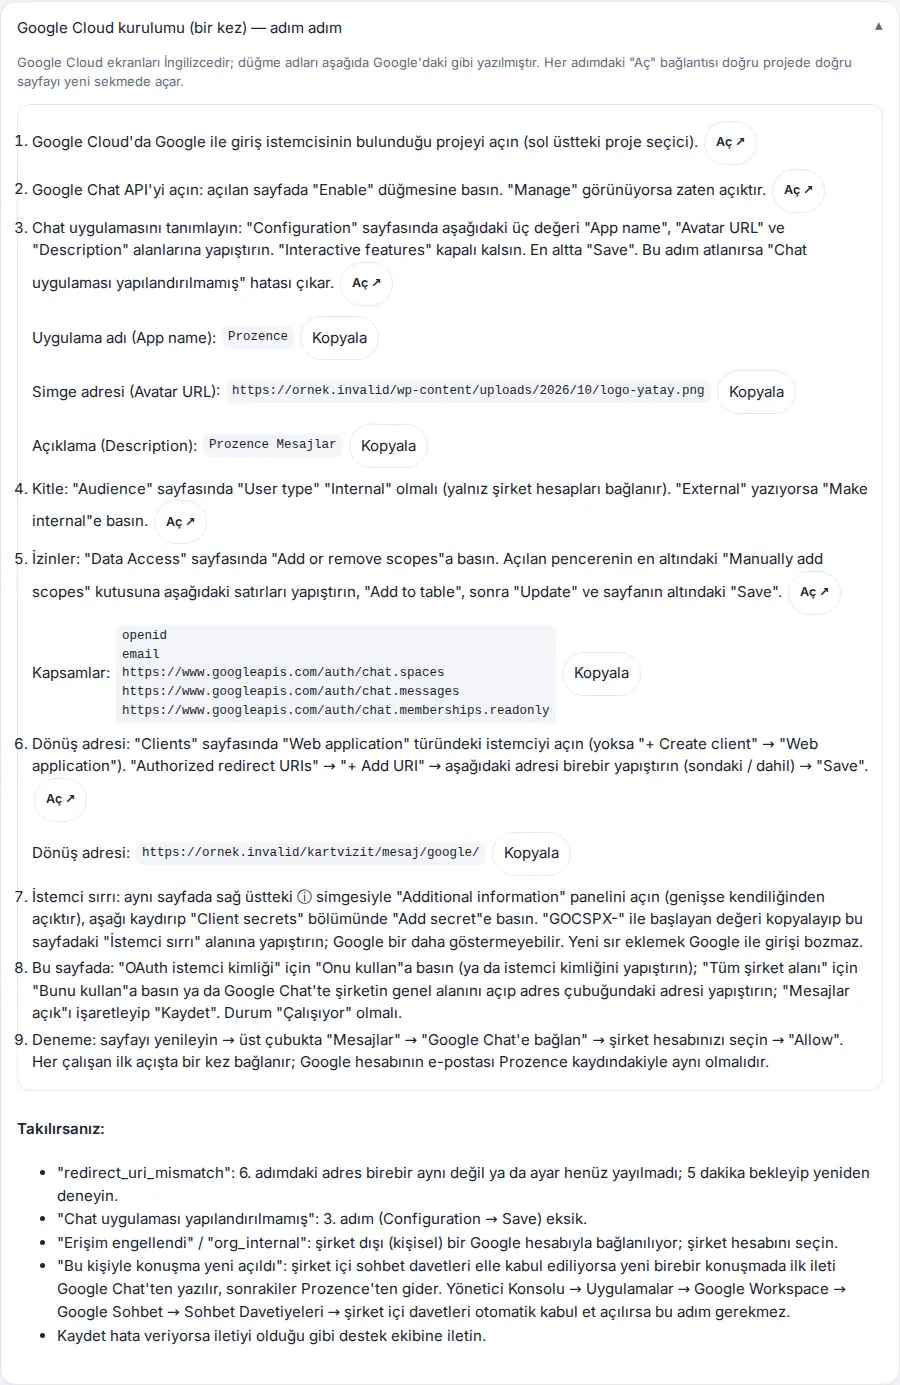
Google Cloud setup (once): Open the Google Cloud setup (once) — step by step section at the bottom of the tab. The Google Cloud screens are in English; the button names are written in quotes as they appear in Google. The Open ↗ link in each step opens the correct page in the correct project in a new tab.
- In Google Cloud, open the project that contains the Sign in with Google client (the project picker at the top left).
- Turn on the Google Chat API: on the page that opens, click "Enable". If you see "Manage", it is already on.
- Define the Chat app: on the "Configuration" page, take the Uygulama adı (App name), Simge adresi (Avatar URL) and Açıklama (Description) values with Copy and paste them. Keep "Interactive features" off. At the bottom, click "Save".
- Audience: on the "Audience" page, "User type" must be "Internal". If it says "External", click "Make internal".
- Permissions: on the "Data Access" page, "Add or remove scopes" → paste the Scopes: lines into the "Manually add scopes" box (
openid,email,…/auth/chat.spaces,…/auth/chat.messages,…/auth/chat.memberships.readonly) → "Add to table" → "Update" → "Save". - Redirect address: on the "Clients" page, open the client of the "Web application" type; "Authorized redirect URIs" → "+ Add URI" → paste the address on the Redirect address: line (in the format
https://ornek.invalid/kartvizit/mesaj/google/), including the / at the end → "Save". - Client secret: on the same page, ⓘ → "Additional information" → "Client secrets" → "Add secret". Copy the value that starts with "GOCSPX-".
- Come back to this page (the form below).
- Test: reload the page → Messages in the top bar → Connect to Google Chat → select your company account → "Allow".
Saving in Prozence:
- Keep the Messages on ("Messages" button in the top bar) checkbox selected.
- Paste the client ID into the OAuth client ID box. If a Sign in with Google client is set up, just click Use it.
- Paste the value that starts with "GOCSPX-" into the Client secret box.
- In Google Chat, open the company's general space and paste the address from the address bar into the Whole-company space box. If there is a Google Chat webhook in the chat channels, you can click Use this (the webhook key is not taken, only the space ID).
- Type the name of the space in the Name shown in the list box (e.g. "Tüm şirket").
- Click Save. The screen shows "Messages saved. Employees will see the "Messages" button after reloading the page."; the status becomes Working.
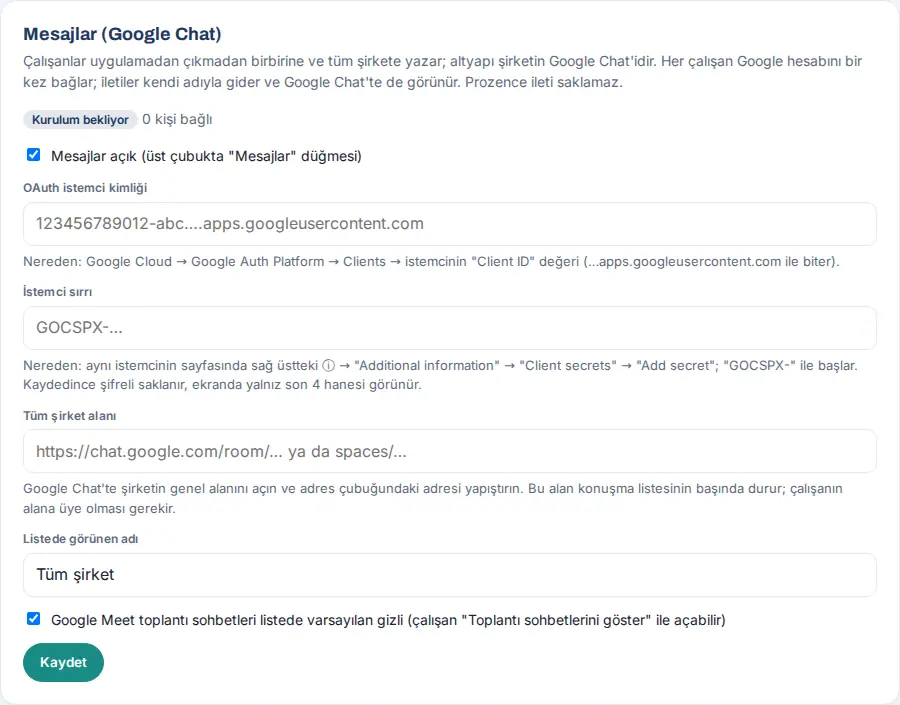
| Setting | What it does | Default |
|---|---|---|
| Messages on ("Messages" button in the top bar) | Shows the button to everyone; when you turn it off, the settings are kept | On (works when the client details are entered) |
| OAuth client ID | Google OAuth client (ends with "…apps.googleusercontent.com") | Empty |
| Client secret | Stored encrypted; only the last 4 characters appear on the screen | Empty |
| Whole-company space | The company space at the top of the conversation list; the employee must be a member | Empty |
| Name shown in the list | The name of the whole-company space in the list | Tüm şirket ("whole company") |
| Google Meet meeting chats hidden in the list by default (…) | Hides meeting chats in the list; the employee can show them | On |
Result: If the setup is saved, a summary appears instead of the form: Status, OAuth client ID, Client secret "Saved (…last 4)", Whole-company space, Meeting chats, Connected employees. Actions: Edit (opens the form; Cancel takes you back), Turn off Messages / Turn on Messages, Remove all connections, Delete setup.
Common errors and warnings:
| Message | Cause | What to do |
|---|---|---|
| "The client ID must be a Google OAuth client ID ending in "…apps.googleusercontent.com"." | A wrong value was pasted | Paste the "Client ID" value |
| "The client secret looks invalid." | The secret is incomplete or wrong | Add a new secret and paste it |
| "Company space not recognized. Paste the space's address from Google Chat (…/room/… or spaces/…)." | The space address format is wrong | Copy the space address in Google Chat |
| "The Chat app is not configured in the Google Cloud project. Admin: Google Cloud → Google Chat API → Configuration." | Step 3 is missing | Save the "Configuration" page |
| "Google Chat API is not enabled in the project. …" | Step 2 is missing | Enable the API |
| "redirect_uri_mismatch" (on the Google screen) | The address in step 6 is not exactly the same | Paste the address again, including the / at the end; wait 5 minutes |
| "Access blocked" / "org_internal" (on the Google screen) | The person connects with a personal Google account | Select the company account |
Tip: When you troubleshoot, look at the Last Google error: line on the screen: it shows the time, HTTP code, operation and Google's message (people's names and message content are not shown).
Important:
- Remove all connections removes each employee's Google Chat connection; everyone must connect again. Messages in Google Chat are not deleted.
- Delete setup deletes the client ID, the client secret and the company space; all connections are also removed.
- If internal chat invitations are accepted by hand, the first message in a new one-to-one conversation is written from Google Chat. If you turn on automatic acceptance of internal invitations in Admin console → Apps → Google Workspace → Google Chat → Chat invitations, you do not need this step.
Employee events webhook
Who: Admin · Where: Admin → Integrations → HR & accounting → HR events (webhook)
What it does: For the human resources events you select (leave approval, expense payment, new employee, leaver, asset assignment…), signed JSON goes to the address you enter. Make, n8n or your own server sends these events to Logo, Mikro, Luca, Netsis or your payroll company.
Before you start: Prepare the https:// address that will receive the events (e.g. the webhook address of a Make scenario). The receiving system must verify Prozence's signature.
- Open the HR & accounting tab.
- Select the Send HR events to the address checkbox.
- Type the receiving address in the Address (https) box.
- Under Events to send, clear the events you do not want.
- If it is really necessary to send the names of leave types that contain health information to the receiver, select the Write leave types containing health data in plain text (…) checkbox.
- Click Save. At the first save, a Signing key is generated and shown in the box; enter this key in the receiving system.
- Click Send test. The
baglanti.denemeevent goes to the receiver; the Last successful delivery: line is updated.
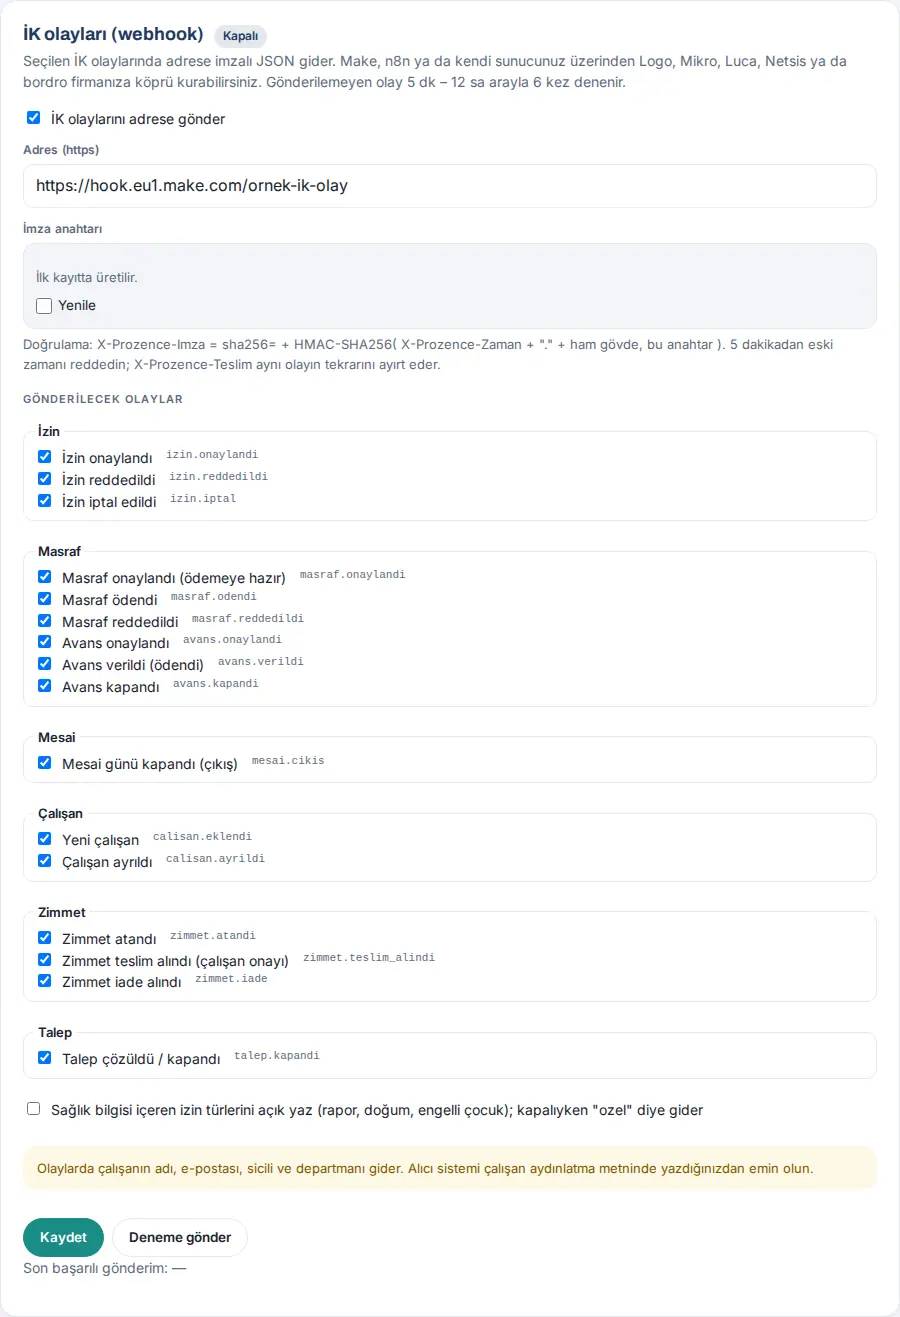
| Setting | What it does | Default |
|---|---|---|
| Send HR events to the address | Turns sending on | Off |
| Address (https) | Receiving address | Empty |
| Signing key / Refresh | Key for the HMAC signature; changes when Refresh is selected and saved | Generated at the first save |
| Events to send | Leave: izin.onaylandi, izin.reddedildi, izin.iptal · Expense: masraf.onaylandi, masraf.odendi, masraf.reddedildi, avans.onaylandi, avans.verildi, avans.kapandi · Work time: mesai.cikis · Employee: calisan.eklendi, calisan.ayrildi · Asset: zimmet.atandi, zimmet.teslim_alindi, zimmet.iade · Request: talep.kapandi |
All selected |
| Write leave types containing health data in plain text (sick leave, maternity, disabled child); when off they are sent as "ozel" | Sends the name of the leave type | Off |
Verifying the signature (receiving system): X-Prozence-Imza = sha256= + HMAC-SHA256( X-Prozence-Zaman + "." + raw body, signing key ). Reject times older than 5 minutes; X-Prozence-Teslim tells repeats of the same event apart.
Result: An event that cannot be sent is tried up to 6 times, at intervals of 5 min, 15 min, 1 h, 4 h and 12 h; on a 4xx response it becomes Stopped. Pending and stopped events appear in the Queue table (Event, Time, Attempts, Status); there are Retry all now and Remove stopped buttons. When sending stops, Admins get the İK webhook gönderimi durdu ("HR webhook sending stopped") notification at most once a day.
Common errors and warnings: "Adres https:// ile başlamalı." ("the address must start with https://"), "Göndermek için adresi yazın." ("type the address to send"), "Önce adresi kaydedin." ("save the address first") (Send test without saving).
Important:
- The events contain the employee's name, email, employee number and department. Make sure you list the receiving system in the employee privacy notice.
- When you confirm Remove stopped, these events are never sent again.
- No requests are sent to internal network addresses.
Export to payroll software
Who: Admin; also, from the timesheet screen, managers who see time and attendance (PDKS) and HR (leave) operators · Where: Admin → Integrations → HR & accounting → Export to payroll software
What it does: Downloads the month's timesheet and approved leave with columns that suit the Excel import of your payroll software. One row per employee: days worked, normal / overtime / public holiday hours, leave days by type, the SGK (Turkish social security) missing-day count and reason, the SGK premium days.
- In the Export to payroll software box, select the month (default: last month).
- Select the software: Genel (bütün sütunlar) ("general (all columns)"), Logo (Bordro Plus / j-HR), Mikro (Bordro / İK), Luca Bordro or Netsis (Logo Netsis HR). A note for that software appears below.
- Click Download Excel (two sheets: Puantaj (timesheet), İzinler (leave)) or Download CSV (timesheet). The screen shows "N employees exported.".
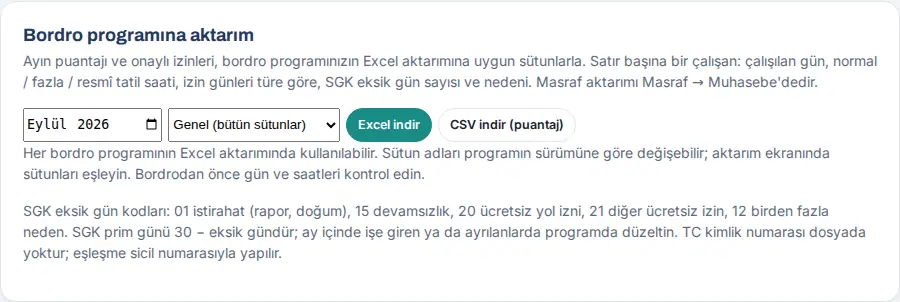
Tip: You can also get the same file with the Export to payroll software button on the Work time timesheet screen (see 29. Time and attendance management). Expense export is in Expense → Accounting (see 18. Expense management and accounting).
Important:
- SGK missing-day codes: 01 sick leave (sick note, maternity), 15 absence, 20 unpaid travel leave, 21 other unpaid leave, 12 more than one reason. For people who start or leave during the month, correct the premium days in the software.
- The Turkish ID number (TC kimlik numarası) is not in the file; matching is done by employee number.
- Column names can change with the software version; map the columns on the import screen. Check the days and hours before you run payroll.
Microsoft Teams app
Who: Admin; Microsoft 365 / Teams administrator · Where: Admin → Integrations → Microsoft Teams
What it does: Prozence opens in Teams as a personal app: the employee gets in with their Teams account without signing in again; notifications also come to the Teams activity feed; the Onaylarım ("my approvals") tab opens the pending approvals.
Before you start: The Microsoft 365 connection must be set up. If it is not, the tab shows the "Microsoft 365 not connected" badge, the warning "First set up the Microsoft 365 connection (tenant, client ID and secret)." and the Go to the Google / Microsoft tab button.
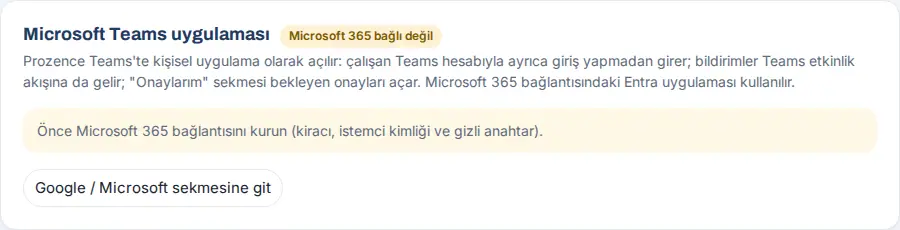
- In the Setup (once) section, do step 1 in the Entra admin center: App registrations → Prozence app → Expose an API. Take the Application ID URI (
api://<alan adınız>/<istemci kimliği>, i.e.api://<your domain>/<client ID>) and Scope name (access_as_user) values with Copy. Under Authorized client applications, add the Teams desktop and mobile and Teams web IDs and select theaccess_as_userscope. - In step 2, add API permissions → Microsoft Graph → Application permissions → TeamsActivity.Send; then "Grant admin consent".
- In step 3, click Download Teams package (
prozence-teams-<sürüm>.zip). Upload the package in Teams admin center → Teams apps → Manage apps → "Upload". - In step 4, add Prozence to Setup policies → Global (Org-wide default) → Installed apps and Pinned apps.
- At the top, select the Teams app on checkbox and click Save.
- Click Test now. The rows come with ✓ or ✗: Microsoft 365 connection, Teams app, Teams frame (does the site's security header block Teams), Test notification (to you) ("Sent: check Activity in Teams.").
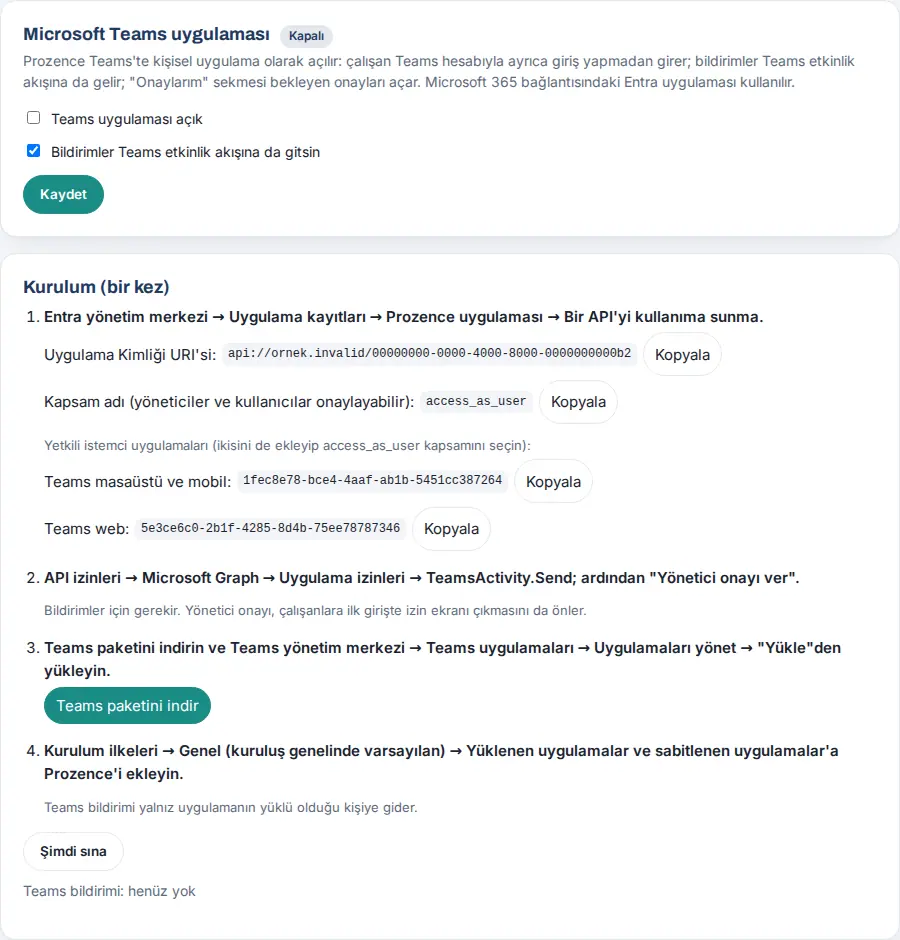
| Setting | What it does | Default |
|---|---|---|
| Teams app on | Turns on single sign-on in the Teams tab and permission for the Teams frame | Off |
| Also send notifications to the Teams activity feed | Also sends each app notification to the Teams activity feed | On |
Result: Under the box, the "Teams notification: …" line shows the last successful send, the counter and what is waiting in the queue; if there is a problem, it shows "Last error (…): …". When the employee opens Prozence in Teams, they are signed in automatically; when they tap a notification, Prozence opens on the related record.
Common errors and warnings:
| Message | Cause | What to do |
|---|---|---|
| "Microsoft Graph refused: the Entra app needs the TeamsActivity.Send application permission with admin consent." | Step 2 is missing | Add the permission and grant admin consent |
| "The Prozence Teams app is not installed for …, or the person is not in Microsoft 365. Install the app for everyone in the Teams admin center (setup policy)." | Step 4 is missing | Add it to the setup policy |
| "The site’s own security header (…) stops Teams from opening the page. …" | X-Frame-Options or frame-ancestors | Change the header so that it allows the Teams domains under /kartvizit/ |
| "Prozence Teams uygulaması kapalı. Yöneticinize başvurun." ("The Prozence Teams app is off. Contact your administrator.") (the employee sees it) | Teams app on is not selected | Select the checkbox and save |
| "Sunucuda ZIP desteği (ZipArchive) yok." ("The server has no ZIP support (ZipArchive).") | The package could not be created | Ask your hosting company for the PHP Zip extension |
Important:
- A Teams notification goes only to people who have the app installed. The Approve / Reject buttons are on the Prozence screen; there is no separate card in Teams.
- If the site's CSP restricts script sources, Microsoft's Teams script domain (
res.cdn.office.net) must be added. - There is no real Microsoft 365 tenant on the demo site; the setup screen is shown with fictional IDs.
Creating a REST API key
Who: Admin · Where: Admin → Integrations → API keys → New key
What it does: Make, n8n, Zapier or your own software reads Prozence data with these keys; they can also send announcements and notifications. Each key has its own permissions.
Before you start: The API works only over HTTPS. If the site is not on HTTPS, the warning "The site is not on HTTPS: the API only works over HTTPS." appears.
- Open the API keys tab. At the top, the Address: (
https://ornek.invalid/wp-json/prozence/v1/), a samplecurlcommand and the list of endpoints appear. - In the New key section, type in the Name box where the key will be used (e.g. "Make – bordro").
- Under Permissions, select only the checkboxes you need.
- If you want, select an End date (optional).
- Click Create key. The screen shows "Key created. Copy it now; it won’t be shown again.".
- Click Copy on the Key: line and paste the key in a safe place (e.g. the Make connection).
- Click Done, I saved it. The key disappears from the screen; only its prefix stays in the list.
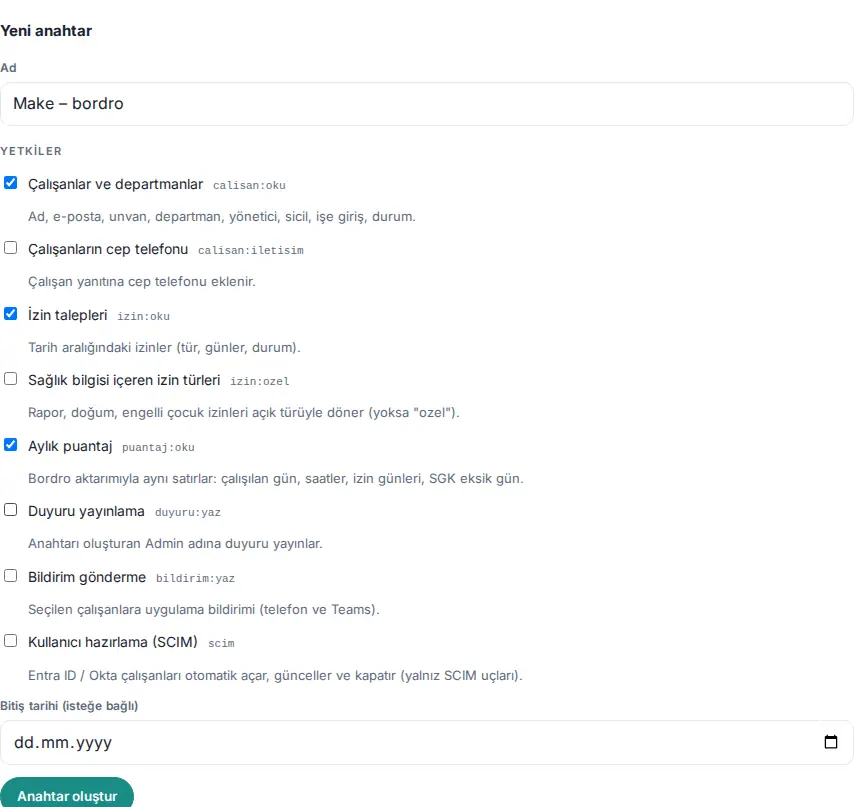
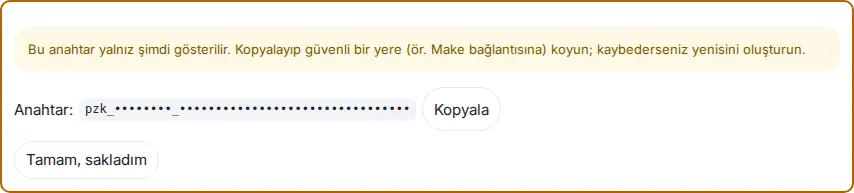
| Permission | What it opens |
|---|---|
Employees and departments calisan:oku |
Name, email, job title, department, manager, employee number, start date, status |
Employees’ mobile phone calisan:iletisim |
The mobile phone is added to the employee response |
Leave requests izin:oku |
Leave in a date range (type, days, status) |
Leave types with health information izin:ozel |
Sick leave, maternity and disabled child leave come back with their real type (otherwise "ozel") |
Monthly timesheet puantaj:oku |
The same rows as the payroll export |
Publishing announcements duyuru:yaz |
Publishes announcements in the name of the Admin who created the key |
Sending notifications bildirim:yaz |
App notification to selected employees (phone and Teams) |
User provisioning (SCIM) scim |
Creates, updates and deactivates Entra ID / Okta employees automatically (SCIM endpoints only) |
Endpoints: GET calisanlar (sayfa, adet up to 200, departman, ayrilanlar, degisen_sonra), GET calisanlar/{id}, GET departmanlar, GET izinler (bas, bit up to 366 days, durum, calisan), GET puantaj (ay=YYYY-AA), POST duyurular, POST bildirimler (up to 500 recipients; 2000 recipients a day per key). The key is sent with the Authorization: Bearer … or X-Prozence-Anahtar header.
Common errors and warnings:
| Message | Cause | What to do |
|---|---|---|
| "Give the key a name (e.g. "Make – payroll")." | Name is empty | Type a name |
| "Choose at least one permission." | No permission selected | Select at least one checkbox |
| "The end date must be after today." | A past date or today's date | Select a future date |
| "At most 20 keys are allowed. Delete unused ones." | The limit is reached | Delete a key you do not use |
Important:
- The key is shown only at the moment it is created; the server stores only its hash. If you lose it, create a new one.
- Do not send the key in the address (query string); the request is rejected ("Anahtarı adreste göndermeyin; Authorization: Bearer başlığını kullanın." ("Do not send the key in the address; use the Authorization: Bearer header.")).
- Do not share the key in a screenshot, an email or a chat.
Managing API keys and the request log
Who: Admin · Where: Admin → Integrations → API keys → Keys and Recent requests
What it does: You follow the status and use of the keys, and turn off or delete keys you do not need.
- In the Keys list, read each key's name, badge (Open, Off, Invalid), prefix, permissions, creator, end date and last use ("Last used: … · N" or "Not used yet").
- To stop a key temporarily, click Close; to turn it on again, click Open.
- To delete it, click Delete; the button becomes Delete? Yes, delete; click it again.
- In the Recent requests table, follow the last 30 requests (Time, Key, Request, Result). Failed requests are red.
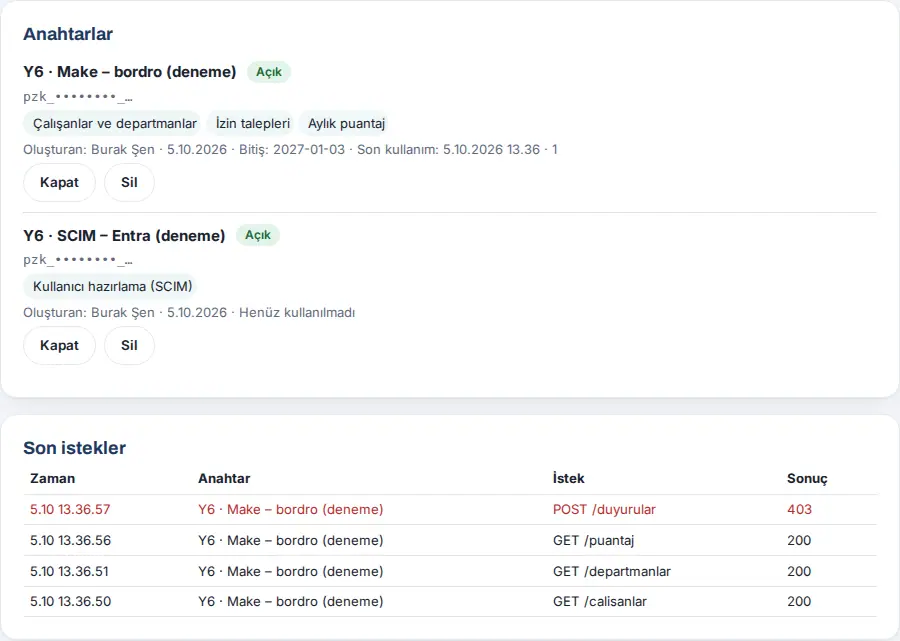
Responses the connected system can get:
| Response | Message | What to do |
|---|---|---|
| 401 | "API anahtarı gerekli (Authorization: Bearer …)." ("API key required"), "Geçersiz API anahtarı." ("invalid API key"), "API anahtarı kapalı." ("API key is off"), "API anahtarının süresi dolmuş." ("API key has expired"), "Anahtarı oluşturan kişi artık Admin değil; yeni bir anahtar oluşturun." ("the person who created the key is no longer an Admin; create a new key") | Turn the key on or create a new one |
| 403 | "Bu anahtarın "…" yetkisi yok." ("this key does not have the "…" permission") / "API yalnız HTTPS ile kullanılır." ("the API is used only over HTTPS") | Create a new key with the required permission |
| 429 | "Saatlik istek sınırı (1000) aşıldı." ("hourly request limit (1000) exceeded") / "Çok fazla hatalı deneme. Bir saat sonra yeniden deneyin." ("too many failed attempts; try again in an hour") / "Günlük bildirim sınırı (2000 alıcı) aşılıyor." ("daily notification limit (2000 recipients) exceeded") | Wait; send requests less often |
| 400 | "Tarih aralığı en çok 366 gün olabilir." ("the date range can be at most 366 days"), "ay (YYYY-AA) gerekli ve gelecekte olamaz." ("ay (YYYY-MM) is required and cannot be in the future") etc. | Correct the parameter |
Important: If the person who created the key leaves or loses the Admin role, the key becomes Invalid: "Expired, or its creator is no longer an Admin: requests are rejected. Create a new key." For this reason, create integration keys with a permanent Admin account. The log keeps the IP address only as a hash.
Automatic user provisioning with SCIM
Who: Admin; Microsoft Entra ID or Okta administrator · Where: Admin → Integrations → API keys → User provisioning (SCIM 2.0)
What it does: Microsoft Entra ID or Okta creates, updates and deactivates employees in Prozence automatically: name, email, job title, department, employee number, mobile, manager. An employee whose account is deactivated becomes "left" (their sessions end and their card is unpublished; the record is not deleted). Prozence does not write anything to Entra / Okta.
- In the User provisioning (SCIM 2.0) box, click Copy on the Tenant URL: line (in the format
https://ornek.invalid/wp-json/prozence/scim/v2). - Above, create a key with the User provisioning (SCIM) permission (see Creating a REST API key). You enter this key in Entra / Okta as the "Secret Token" / "API Token".
- Entra: Enterprise applications → New application → Create your own application (non-gallery) → Provisioning → Automatic. Enter the tenant URL and the key and click "Test Connection". In the mappings, turn off Groups; the department comes from the user's "department" field.
- Okta: Applications → Create App Integration → SWA / SCIM 2.0 → Provisioning → Integration. SCIM connector base URL = tenant URL, Unique identifier = userName, authentication: HTTP Header (Bearer).
- Select an option in the New employee arriving list and click Save.
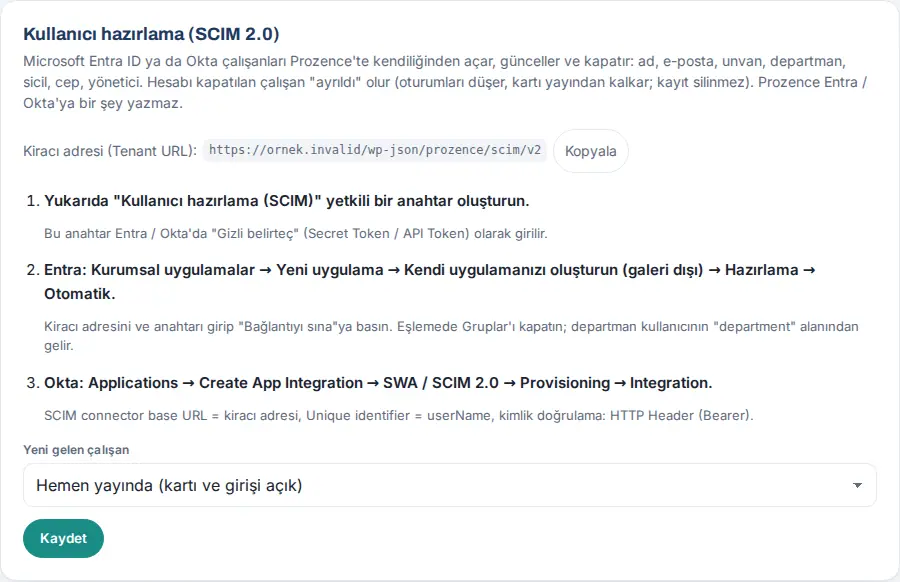
| Setting | What it does | Default |
|---|---|---|
| New employee arriving | Live at once (card and sign-in active) or Draft (an Admin reviews and publishes) | Live at once |
Mapping: userName / work email → email · displayName or first name + last name → name · title → job title · mobile phone → mobile · department → department · employeeNumber → employee number · manager → manager (by email). When the account is deactivated (active=false) or deleted, the employee becomes "left"; when it is activated again, the offboarding is undone.
Tip: At the first setup, try it on one user with Entra's "Test Connection" and "Provision on demand" features. SCIM requests are also written to the Recent requests log. The hourly limit for SCIM is 5000 requests.
Important:
- Groups and bulk operations are not supported; the photo does not come through SCIM (directory sync continues).
- A second record with the same email is not created (409 "uniqueness").
- To stop SCIM, Close or Delete the key; Entra provisioning gets 401 and stops.
- This could not be shown with a real Entra / Okta tenant on the demo site.
App review account
Who: Admin · Where: Admin → Integrations → App review account
What it does: Apple App Store / TestFlight and Google Play reviewers sign in to the Prozence mobile app with this fictional employee. The address does not need a mailbox: the code is not sent by email; a fixed 8-digit code generated on the screen is used. The account does not appear in the directory, in Team or in lists.
Before you start: Sign-in with an email code must be on. If it is off, the warning "Sign-in with email code is off, so the review account cannot sign in either. …" appears.
- Open the App review account tab. The badge is Off.
- In the Open the account form, check the E-posta adresi ("email address") (default
apple-inceleme@<site alanınız>, i.e. your site domain). It cannot be the address of a real employee. - Type the period in the Valid for how many days (1–90) box (default 30).
- Click Open the account and generate a code. The badge becomes Open; the Code: line appears in a frame.
- Take the code with Copy and enter it in the "sign-in information for review" field in TestFlight / Play Console: the email address as the user name and the code as the password.
- Click OK, I saved it; the code disappears from the screen.
- In the What should it see in the app? section, select the view. The choice is saved immediately.
- When the review is finished, click Close the account.
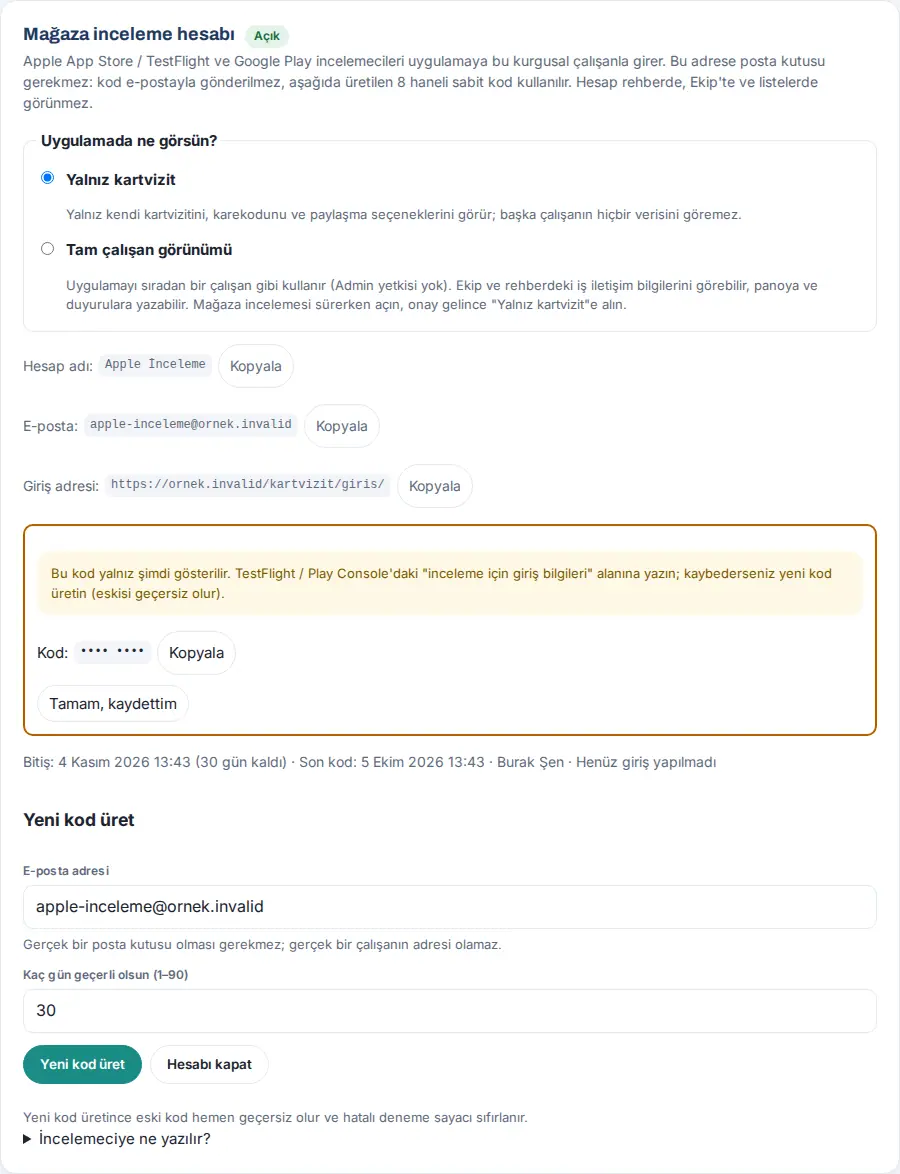
| Setting | What it does | Default |
|---|---|---|
| What should it see in the app? | Business card only: only its own business card, QR code and sharing options. Full employee view: uses the app like an ordinary employee (no Admin permission); can see the work contact details in Team and the directory, and can post on the Board and announcements | Business card only |
| E-posta adresi | The reviewer's sign-in address | apple-inceleme@<site alanı> |
| Valid for how many days (1–90) | Validity period of the code and the account | 30 |
Result: On the sign-in page, the reviewer types the email address, taps Send a code to my email and types this code instead of a received code. In the Business card only view, they see on an English screen their own digital business card, the QR code, the Open my card, Add to contacts and Share buttons and a description of Prozence; the Türkçe ("Turkish") button changes the language. Under the box you see "Ends: …", "Last code: … · …", "Last sign-in: … · total N" and "Failed attempts: N / 10".
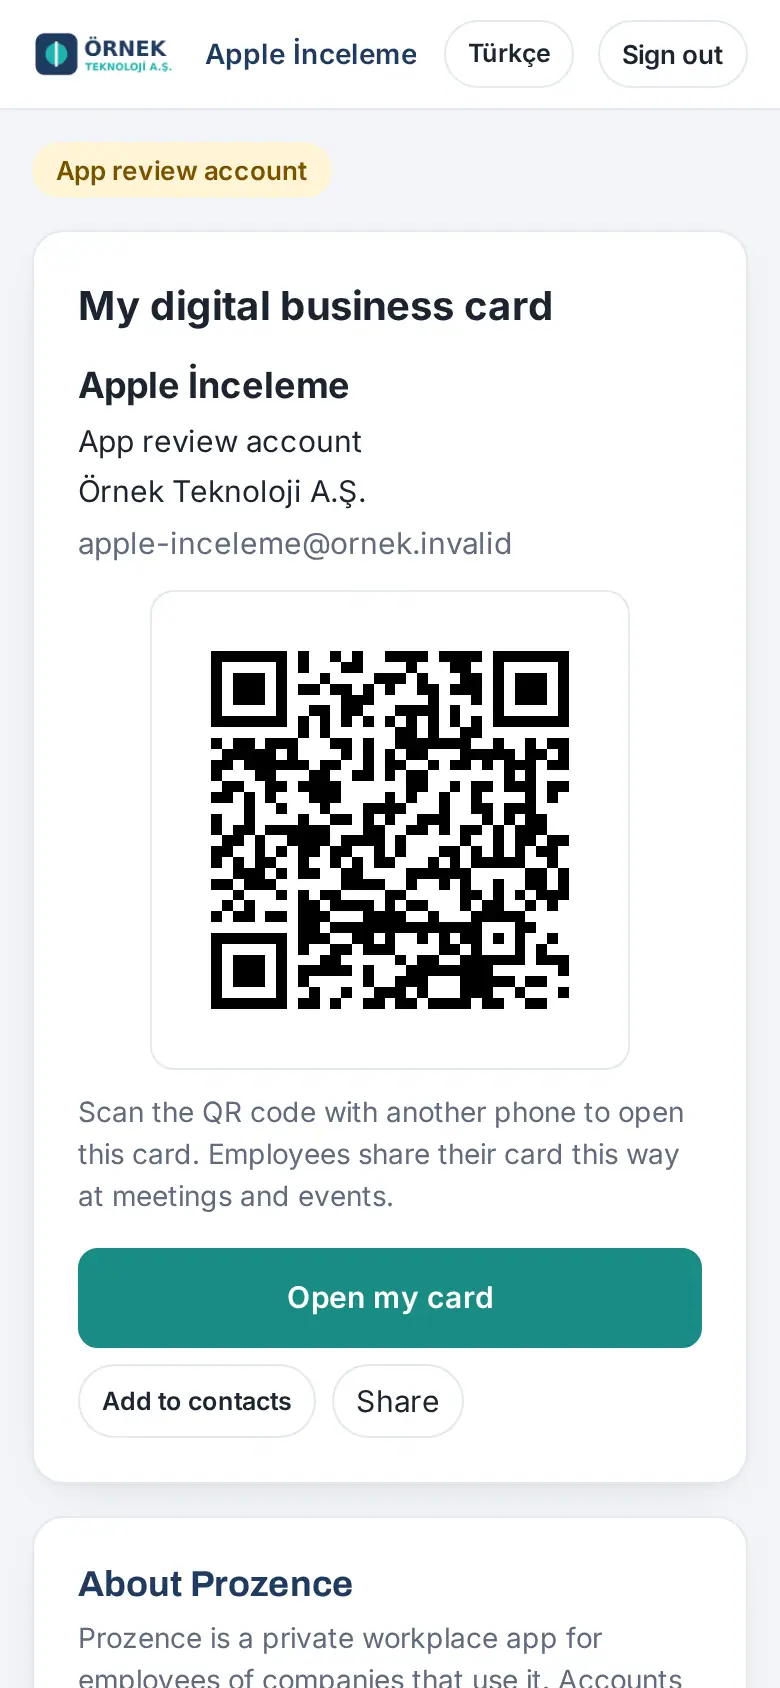
Common errors and warnings:
| Message | Cause | What to do |
|---|---|---|
| "This email address belongs to a real employee; choose another address for the review account." | The address of a real employee was entered | Enter a fictional address |
| "The period must be 1–90 days." | The period is out of range | Enter a value from 1 to 90 |
| "Wrong code. Attempts left: N." (the reviewer sees it) | Wrong code | Check the code again |
| "10 failed attempts were made; the account is locked. It unlocks when you generate a new code." | 10 failed attempts; the badge is Locked | Generate a new code |
| "The code has expired. Request a new code." | The period ended; the badge is Expired | Generate a new code |
| "This section is closed for the app review account." | Another section was requested in the Business card only view | If necessary, switch to Full employee view |
Tip: Open the What do I give the reviewer? section; it shows what to enter in the fields in App Store Connect and Play Console.
Important:
- The code is fixed (not single-use). When you generate a new code, the old code becomes invalid at once and the failed attempt counter is reset. Close the account when the review is finished.
- While Full employee view is on, a warning appears on the screen: the reviewer can see employees' work contact details. When approval comes, switch to Business card only. Closing the account switches the view back to Business card only automatically.
- Do not share the code anywhere other than the store form.
Setting up mobile notifications (Firebase and APNs)
Who: Admin; owner of the developer account that publishes the mobile app · Where: Admin → Integrations → Mobile notifications
What it does: Turns on phone notifications in the Prozence mobile app (Android and iPhone). When the employee taps Turn on notifications in the app, their device is registered; approvals, announcements, work time and all other notifications also go to the phone. The notifications of the home screen app in the browser (web push) are separate and do not need this setup.
Before you start:
- For Android, you need the service account key file (JSON) of the Firebase project: Firebase → ⚙ Project settings → Service accounts → "Generate new private key".
- For iPhone, you need an Apple Push Notifications service (APNs) key (.p8 file), the Key ID and the Team ID in the Apple Developer account: Certificates, Identifiers & Profiles → Keys → "+".
- The key files are secret: upload the file to the server only from this screen; do not send it by email or chat.
Android — Firebase:
- Open the Mobile notifications tab. In the Android — Firebase row, the badge is Not set up.
- With the file selection button, select the service account JSON file you downloaded from Firebase.
- Click Upload. The badge becomes Ready; the project, the service account and the upload time are shown below it.
iPhone — Apple APNs:
- In the Key ID box, type the 10-character key ID from the Apple Developer → Keys page.
- In the Team ID box, type the 10-character team ID from Apple Developer → Membership.
- Change the value in the Bundle ID box only if your company publishes its own build of the app.
- With .p8 key file, select the key file you downloaded from Apple.
- Click Save. The badge becomes Ready.
Testing:
- Click Test connection. The Android and iPhone rows show the result (can a Google access token be obtained, does the APNs key sign).
- On the phone, in the Prozence app, tap My profile → Notifications → Turn on notifications, then Send test notification.
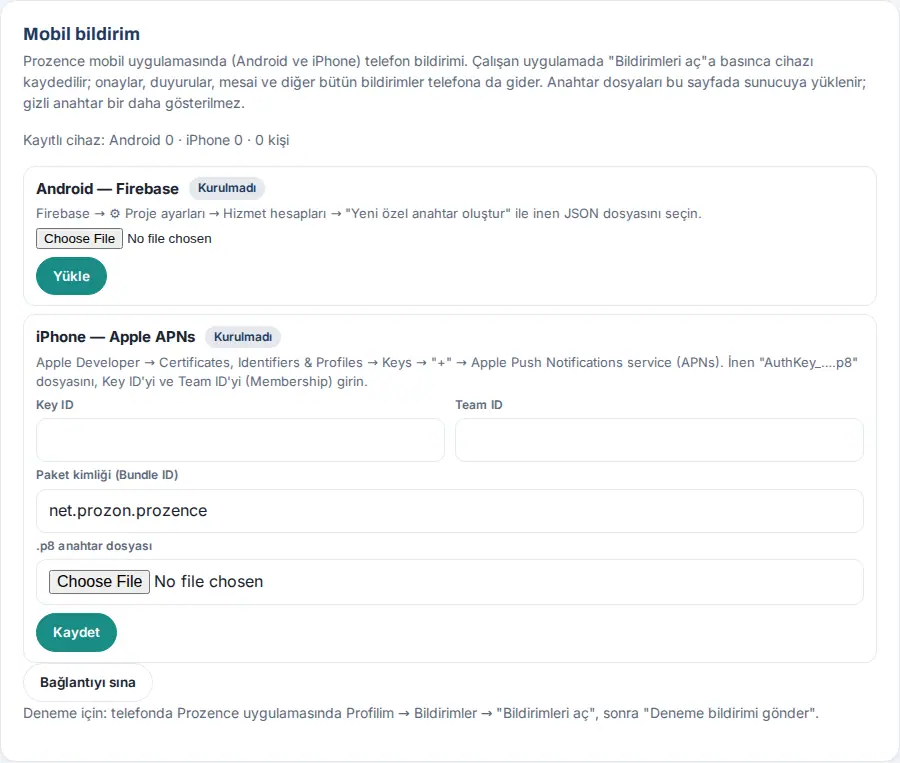
| Setting | What it does | Default |
|---|---|---|
| Firebase service account (JSON) | Sending to Android with Firebase Cloud Messaging | Not uploaded |
| Key ID, Team ID | IDs of the APNs key (10 characters each) | Empty |
| Bundle ID | Bundle ID of the iPhone app | Bundle ID of the Prozence app |
| .p8 key file | APNs signing key; if left empty, the old one is kept | Not uploaded |
Result: At the top, "Registered devices: Android N · iPhone N · N kişi" ("people") appears. One person can register up to 5 phones. Invalid device tokens are deleted automatically.
Common errors and warnings:
| Message | Cause | What to do |
|---|---|---|
| "Choose the JSON file first." | Upload without selecting a file | Select the file |
| "This is not a Firebase service account JSON file. …" | The wrong file was selected (e.g. the app configuration file) | Select the file downloaded from Project settings → Service accounts |
| "The service account file could not be read (project ID, email or private key is invalid)." | The file is damaged | Create a new key and upload it |
| "The file is too large; make sure you chose the right file." | The file is larger than 20 KB | Select the correct file |
| "The Key ID must be 10 characters (shown on Apple Developer → Keys)." / "The Team ID must be 10 characters (Apple Developer → Membership)." | The ID is missing or wrong | Copy it from Apple Developer |
| "Choose the .p8 key file." / "The .p8 file could not be read. …" | No file, or the wrong file | Select the .p8 file downloaded from Keys |
| "The server's cURL does not seem to support HTTP/2; Apple APNs requires HTTP/2. Ask your hosting provider." | The server does not support HTTP/2 | Ask your hosting company for cURL HTTP/2 support |
Important:
- Secret keys never come back to the screen in any response. To change them, upload the new file.
- Remove has two steps ("Are you sure? Android notifications will stop" / "Are you sure? iPhone notifications will stop"); when you remove it, notifications stop on that platform.
- The notification content contains no personal link key; when the person taps the notification, the related page of the app opens.
- There is no mobile app and no real key on the demo site; the screen is shown in the "Not set up" state. For the employee side, see 20. Prozence mobile app.
Zoom connection
Who: App administrator, Zoom account administrator · Where: Admin → Company → Brand & Identity → Identity Kit templates → Meeting → Zoom connection
What it does: Prozence uploads the meeting backgrounds to the employees' Zoom profiles itself. Each employee sends their own background (name, job title, QR) from My Identity Kit with one tap; the company's shared background set is uploaded to all employees from here.
- Sign in to marketplace.zoom.us as the administrator of your Zoom account.
- Select Develop → Build App → Server-to-Server OAuth App and give the app a name (e.g. "Prozence").
- On the Information page, fill in the company name and the contact email.
- Add three scopes with Scopes → Add Scopes:
user:read:user:admin(to find the user by email);user:write:virtual_background_files:admin(to upload virtual backgrounds);user:delete:virtual_background_files:admin(to delete the old background that Prozence uploaded).
- Activate the app with Activation → Activate your app.
- Paste the values on the App Credentials page into the Zoom connection box in Prozence: Account ID, Client ID, Client secret.
- Set the options:
- Let employees upload their personal backgrounds to Zoom;
- Update personal backgrounds automatically: if it is on, when the employee's name, job title or template changes, their background in Zoom is refreshed at most once a day.
- Click Save, then Test connection. Instead of Not connected, the status shows that the connection works.
- To upload the shared set, click Upload to all Zoom users in the Upload the shared set to Zoom section.
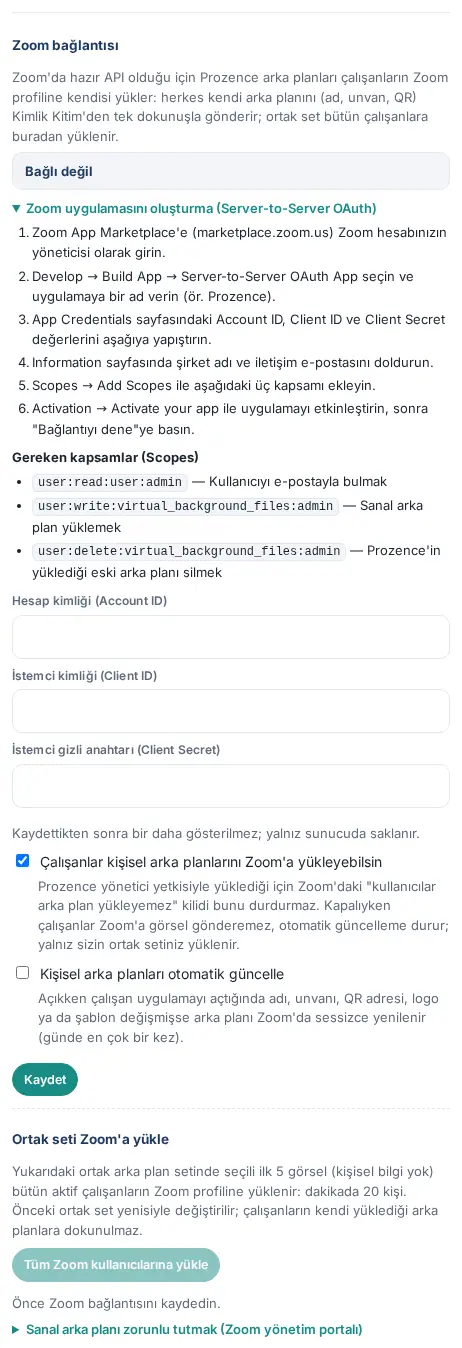
Tip: Up to 5 images from the shared set are uploaded (Zoom accepts up to 10 virtual backgrounds per person). The upload goes at a speed of 20 people a minute; the progress appears on the screen. Employees who cannot be found by email in Zoom are listed.
Important:
- The client secret is never shown again after it is saved; it is stored only on the server. To remove the connection, use Remove connection; backgrounds already uploaded to Zoom are not deleted.
- Requiring the virtual background is done in the Zoom admin portal (the Requiring the virtual background (Zoom admin portal) instructions).
- For Identity Kit templates, see 11. Brand, identity and signature management.
Apple and Google Wallet
Who: IT · Where: WordPress → Prozence Workplace → Wallet
What it does: Employees add their business cards to the phone's wallet. The card opens from the lock screen and has the business card QR code on it. When the job title, phone or photo changes, the card is updated automatically; when the employee leaves, the card becomes invalid.
Apple Wallet:
- developer.apple.com → Certificates, IDs & Profiles → Identifiers → + → Pass Type IDs. Description "Prozence kartvizit"; identifier in the format that the WordPress Wallet screen suggests: the site's domain name in reverse order (e.g.
pass.invalid.ornek.kartvizitfor ornek.invalid). If the site is opened with an IP address or through localhost, no suggestion is made; the screen shows a general example:pass.com.ornek.kartvizitfor ornek.com. - Open the Pass Type ID that was created and click Create Certificate. On a Mac, create a CSR with Keychain Access → Certificate Assistant → "Request a Certificate From a Certificate Authority" and upload it. Double-click the downloaded certificate to add it to Keychain.
- In Keychain Access, select the certificate (together with its key), save it with Export → .p12 and give it a password.
- In WordPress, open the Wallet screen. Enter the Pass Type ID, the Takım kimliği (Team ID) (shown in developer.apple.com → Membership), the Sertifika (.p12) ("certificate (.p12)") file and the .p12 şifresi ("p12 password").
- Click Kaydet ("save").
Google Wallet:
- pay.google.com/business/console → Google Wallet API → open an issuer account.
- In "Users", add the Google service account as "Developer". Enable "Google Wallet API" in the Google Cloud project of the service account.
- Type the issuer ID (Issuer ID, a number) in the Google Wallet yayıncı kimliği ("Google Wallet issuer ID") box and click Kaydet.
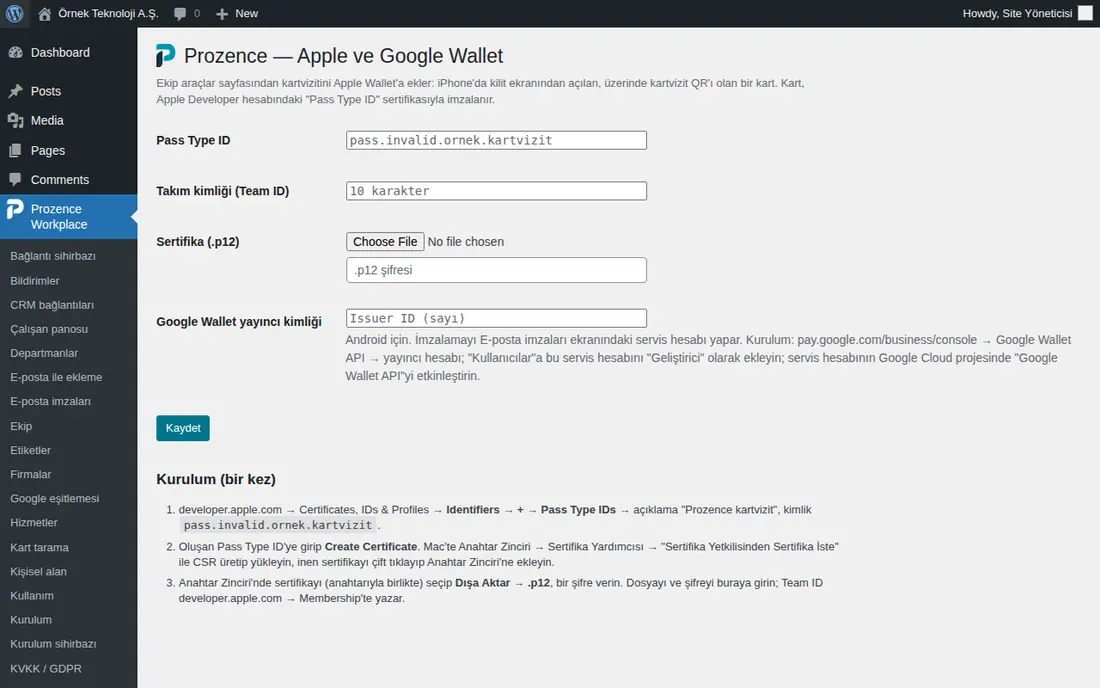
When the setup is complete, employees see the Add to Apple Wallet button in My card (see 01. Digital business card and Identity Kit). On the Wallet screen, you can download a sample card in the Deneme ("test") section, and in the Kendini güncelleyen kart ("self-updating card") section you can see the number of registered people and devices and the result of the last update notification.
Tip: The self-updating card needs HTTPS. Cards added in older versions do not carry the update address; updates start when the employee adds the card again once.
Important:
- If the certificate does not open with the password, does not match the key or has expired, the Apple Wallet button is not shown to employees. The status is shown on the Wallet and Kurulum screens; a warning comes 30 days before the certificate expires (see 16. Troubleshooting).
- The certificate and password are never shown in any response, log or email.