30. Employee leave management
Screenshots show the Turkish interface of Prozence with fictional "Örnek Teknoloji A.Ş." data; the English interface has the same layout.
This chapter is for the people who set up and manage the leave module: the leave module admin, the human resources (HR) approvers and the app administrator. You set the working days, the seniority tables, public holidays, the rules of the leave types, the leave advance and the tracking of signed leave forms; you enter the balances, give the final approval and receive the signed forms with the QR code.
For the employee's leave request screens and the manager's first approval, see 21. Employee leave.
Who: Leave module admin · HR (leave operator) · App administrator
In this chapter
- Opening the settings (leave module)
- Working days, seniority tables and public holidays
- Rules of paid and unpaid leave types
- Carry-over, leave advance and backdated requests
- Tracking the signed form
- Assigning approvers and viewers
- The approval flow and human resources approval
- Entering and adjusting annual leave balances
- All requests, cancelling and recording leave for an employee
- Receiving the form with the QR code (human resources)
- Exporting approved leave to payroll software
Opening the settings (leave module)
Who: Leave module admin, app administrator · Where: Admin → Modules → Leave
What it does: Turns on the leave module and puts all its rules on one screen.
Before you start: The module is off by default in the company. The app administrator can turn on the module in Admin → General → the module list (see 10. Administration and setup).
- On a computer, click Admin in the menu on the left.
- In the Modules group, click Leave. Leave settings opens. If you are a module admin but not an app administrator, you see only your own modules in Admin.
- The shortcuts at the top: Annual leave balances and All leave requests open the related windows; Assign HR approvers (for the app administrator only) takes you to People and permissions.
- Select the Leave requests on (employees request leave in the app) checkbox.
- Fill in the sections below and click Save settings at the very bottom. The message "Leave settings saved." appears.
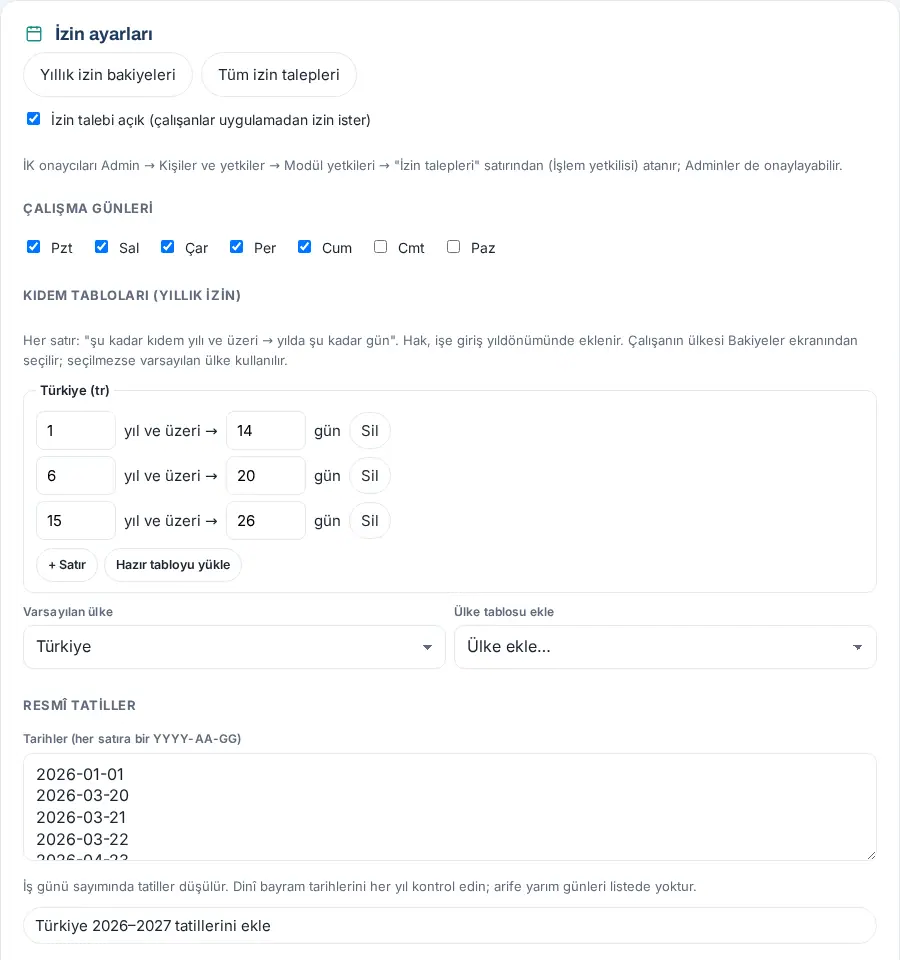
Important: Only the module admin and the app administrator can change the settings: "Only the module admin can change settings." Since 0.99.2, there is no Settings button in the My leave box; the old #izin-ayar link takes you to this tab.
Working days, seniority tables and public holidays
Who: Leave module admin · Where: Admin → Modules → Leave
What it does: Sets how leave days are counted and how much annual leave entitlement an employee gets by length of service.
- Under Working days, select the working days (e.g. Mon–Fri).
- Under Seniority tables (annual leave), enter "… years and above → … days" on each row. For Türkiye, click Load preset table (1 year → 14, 6 years → 20, 15 years → 26 days). To add a row, click + Row; to delete one, click Delete.
- If you have employees in another country, select the country in the Add country table list. Set the Default country.
- Under Public holidays, fill in the Dates (one YYYY-MM-DD per line) box or click Add Türkiye 2026–2027 holidays.
- Click Save settings.
| Setting | What it does | Default |
|---|---|---|
| Leave requests on (employees request leave in the app) | Turns on the module; the My leave box shows to employees | Off |
| Working days | Which days are counted for leave counted in working days; the days on which the signed form reminder is sent | Mon–Fri |
| Seniority tables (annual leave) | The annual leave days added on the work anniversary (service 0–60 years, days 0–60) | Türkiye: 1 year → 14, 6 years → 20, 15 years → 26 days |
| Default country | The table applied to employees with no country selected in their balance | Türkiye |
| Add country table | Adds a table for another country (ready suggestions: Germany, the Netherlands, France, the United Kingdom, Azerbaijan, the United Arab Emirates, the USA; or a two-letter code) | — |
| Public holidays | The dates excluded when working days are counted | Türkiye 2026–2027 holidays |
Important:
- Check the dates of religious holidays every year; half-day holiday eves are not in the list.
- In a country with no rows, no entitlement is added on the anniversary; HR manages the balance manually.
- An invalid date is not saved: "Tatil tarihi YYYY-AA-GG biçiminde olmalı: …" ("A holiday date must be in YYYY-MM-DD format: …"). At least one working day must be selected: "Choose at least one working day."
Rules of paid and unpaid leave types
Who: Leave module admin · Where: Admin → Modules → Leave → Leave types and rules
What it does: Turns each leave type on or off; sets the maximum number of days at a time, the maximum number of times a year and the balance of the type.
- Under Leave types and rules, click the card of the type. The card title shows a summary of the rules (e.g. "3 days a year, carries over · max 2 times a year · working days").
- Enter the rules (0 = no limit). See the table below.
- Repeat the same steps for other types and click Save settings.
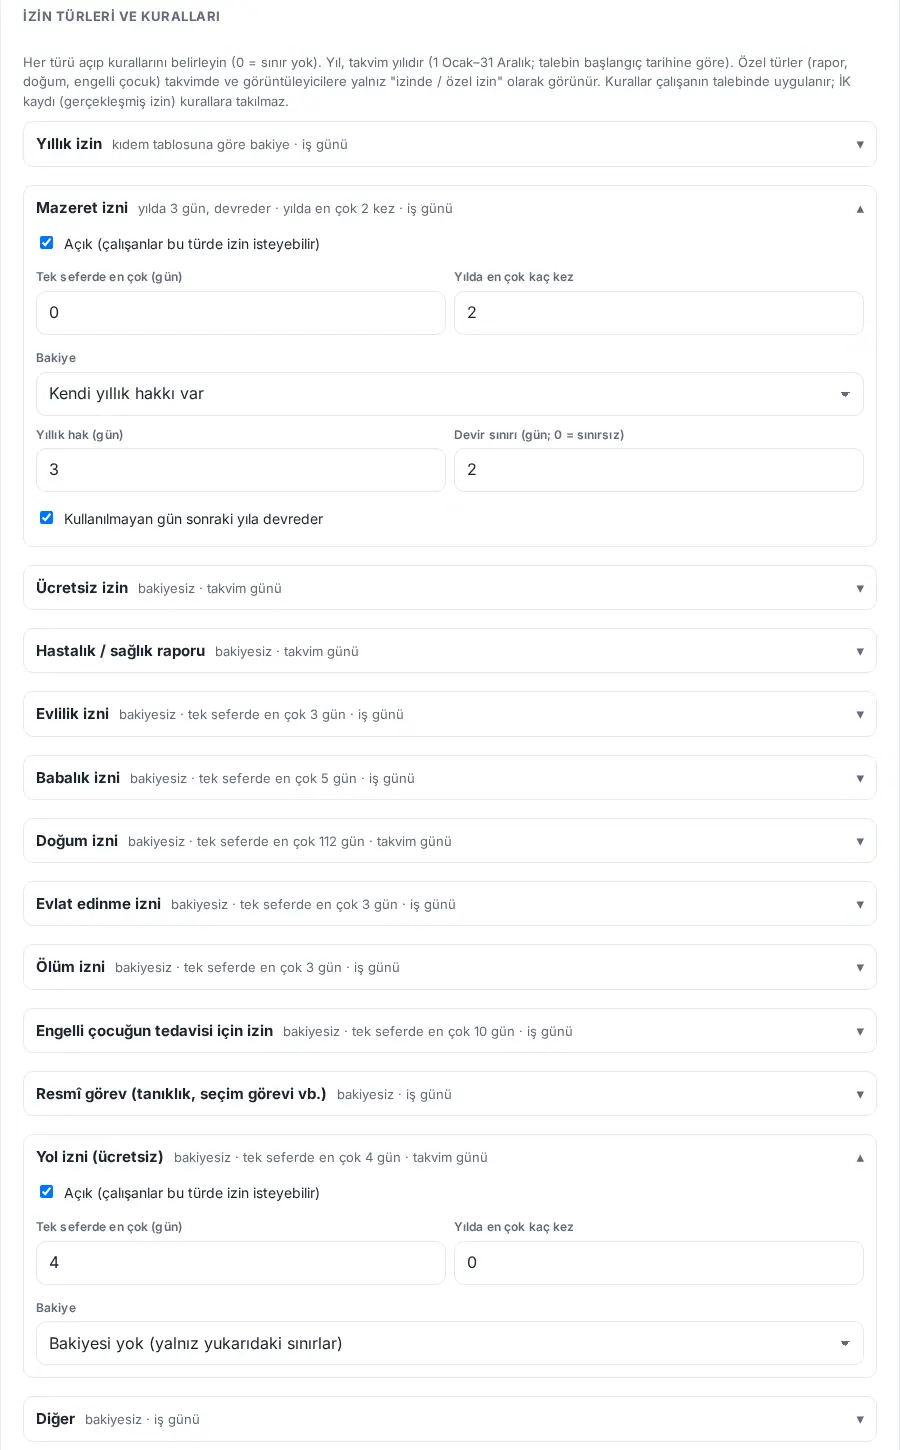
| Setting | What it does | Default |
|---|---|---|
| On (employees can request this type) | Shows or hides the type in the Request leave list. Annual leave cannot be turned off | On (all types) |
| Max at a time (days) | The maximum number of days in one request | Marriage 3, paternity 5, maternity 112, adoption 3, bereavement 3, disabled child 10, travel leave 4; others 0 |
| Max times per year | How many requests can be made in a calendar year (approved and pending requests are counted; cancelled and rejected ones are not) | 0 (no limit) |
| Balance → No balance (only the limits above) | The type is used only with the limits above | Selected |
| Balance → Deducted from annual leave balance | The request uses the employee's annual leave balance; if the balance is not enough, the request is not sent | — |
| Balance → Has its own yearly allowance | The type has its own yearly allowance; enter the Yearly allowance (days) | — |
| Yearly allowance (days) | For a type with its own allowance, the days that can be used in a year (e.g. 3 for personal leave) | 0 |
| Unused days carry over to the next year | The unused allowance moves to the next calendar year | Off |
| Carry-over limit (days; 0 = unlimited) | The upper limit of carried-over days | 0 |
Result: When the employee selects the type in the Request leave form, they see its rules on one line; types with their own allowance are listed in the My leave box as "remaining / total allowance this year" (remaining: pending requests are subtracted; total: the yearly allowance and the carried-over days).
Important:
- A type cannot both be deducted from annual leave and have its own allowance: "…: bir tür ya yıllık izinden düşer ya da kendi yıllık hakkı olur; ikisi birden seçilemez." ("…: a type is either deducted from annual leave or has its own yearly allowance; you cannot select both.")
- For a type with its own yearly allowance, if Max at a time (days) is larger than the yearly allowance (or, if carry-over is on, larger than the yearly allowance plus the carry-over limit), it is reduced to the yearly allowance (rounded up to a full day) when you save.
- The "Deducted from annual leave" choice is written to the record when the request is made; changing the setting later does not affect older requests.
- The rules apply to the employee's request. Record leave on their behalf (HR entry) records leave that has already taken place and is not stopped by the rules.
- Sick leave / medical certificate, maternity leave and leave for a disabled child are private types: on the calendar and for viewers, only "on leave / private leave" shows.
Carry-over, leave advance and backdated requests
Who: Leave module admin · Where: Admin → Modules → Leave → Rules and Advance leave
What it does: Sets the carry-over of annual leave, whether an employee with no or insufficient entitlement can take a leave advance, and how many days back an employee can enter a request.
- Under Rules, enter the Carry-over limit (days; 0 = unlimited) value.
- Under Advance leave, select the Employees with no or insufficient entitlement may take advance leave checkbox. The Maximum advance (days) field appears; if it is empty, 5 is suggested.
- Enter the Backdated requests (days) value.
- Click Save settings.
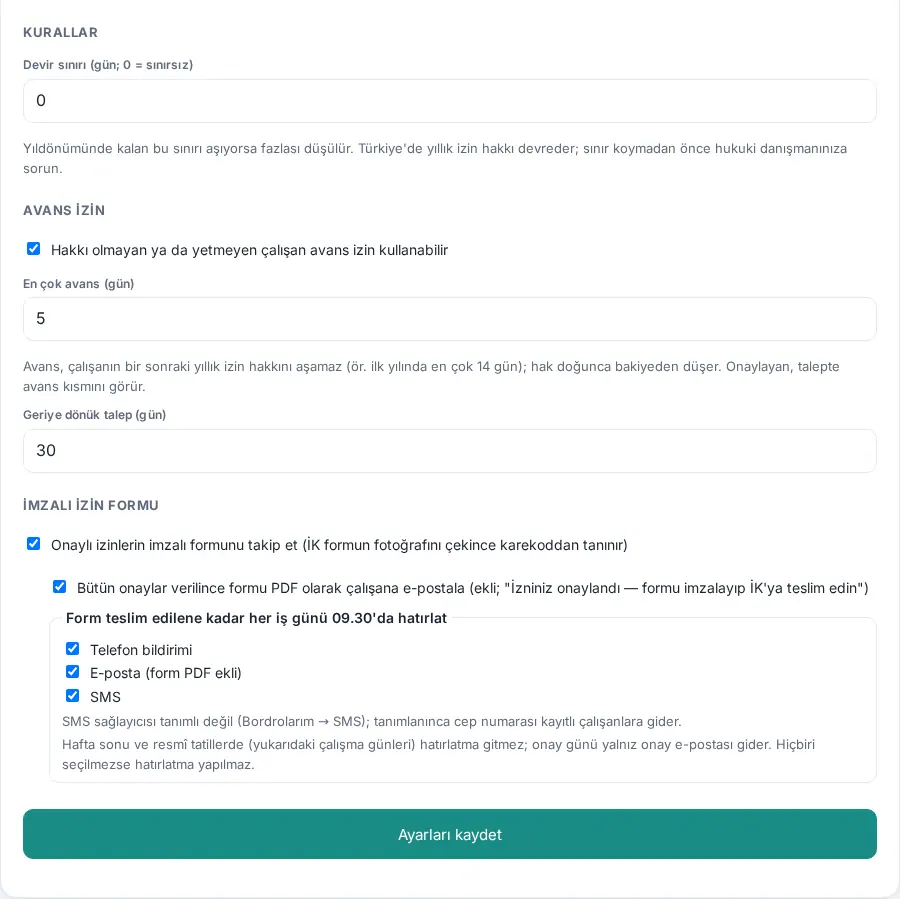
| Setting | What it does | Default |
|---|---|---|
| Carry-over limit (days; 0 = unlimited) | If the remaining annual leave is above this limit on the anniversary, the excess is removed (0–200) | 0 (unlimited) |
| Employees with no or insufficient entitlement may take advance leave | An employee whose balance is not enough can take leave from their next entitlement | Off |
| Maximum advance (days) | The maximum advance that can be used (0–30, in half-day steps); it cannot exceed the employee's next annual entitlement | 5 when the checkbox is selected |
| Backdated requests (days) | How many days back an employee can request leave (0–365) | 30 |
Result: While the leave advance is on, the employee sees the row "Advance leave: up to …" in My leave. For a request with an advance, the approver sees the warning "… days of this request are advance (leave not yet earned)." The advance is not a separate transaction: the remaining balance goes below zero, and the entitlement added on the anniversary covers the negative amount.
Important:
- In Türkiye, annual leave entitlement carries over. Ask your legal adviser before you set a carry-over limit.
- The advance applies only to types that are deducted from annual leave. The company decides the legal suitability of the advance (employment contract, internal regulation).
- When the advance is turned off, pending requests with an advance stay; new requests with an advance cannot be sent.
- When an employee leaves the company, HR closes the advance they used with a balance adjustment.
Tracking the signed form
Who: Leave module admin · Where: Admin → Modules → Leave → Signed leave form
What it does: Tracks whether the signed form of approved leave was handed in to HR. While tracking is on, approved leave stays Signed form pending until the form is received; on receipt, it becomes Finalized.
- Select the Track signed forms of approved leave (HR photographs the form and it is recognised by its QR code) checkbox.
- Select or clear the When all approvals are given, email the form to the employee as a PDF (attached; "Your leave is approved — sign the form and hand it to HR") checkbox.
- Under Remind every working day at 09:30 until the form is delivered, select the channels: Phone notification, Email (form attached as PDF), SMS.
- Click Save settings.
| Setting | What it does | Default |
|---|---|---|
| Track signed forms of approved leave | Tracks leave whose form is expected; makes the "Receive signed form" button available to HR | On |
| When all approvals are given, email the form to the employee as a PDF | At the final approval, an email with the PDF of the form attached goes to the employee | On |
| Phone notification | A notification every working day at 09:30 until the form is handed in | On |
| Email (form attached as PDF) | An email every working day at 09:30 until the form is handed in | On |
| SMS | An SMS every working day at 09:30 until the form is handed in (an SMS provider and a mobile number are needed) | On |
Tip: If no SMS provider is set, the box says "No SMS provider set (My payslips → SMS); once set, SMS goes to employees with a mobile number on file."
Important: No reminder is sent on weekends, on public holidays or on the day of approval. If no channel is selected, there is no reminder. Tracking applies only to leave approved after the feature was installed. If you turn it off, all emails and reminders stop.
Assigning approvers and viewers
Who: App administrator, leave module admin · Where: Admin → Modules → Leave → Permissions
What it does: Sets who gives the final approval (HR), who can only view, and who manages the module.
- Go down to the Permissions section at the bottom of the Leave tab.
- In the role's box, type a name in the Add person… field and select it in the list. To remove a person, click × next to them.
- To give a role to everyone in a department, click + Add department under Role by department.
- Click Save.
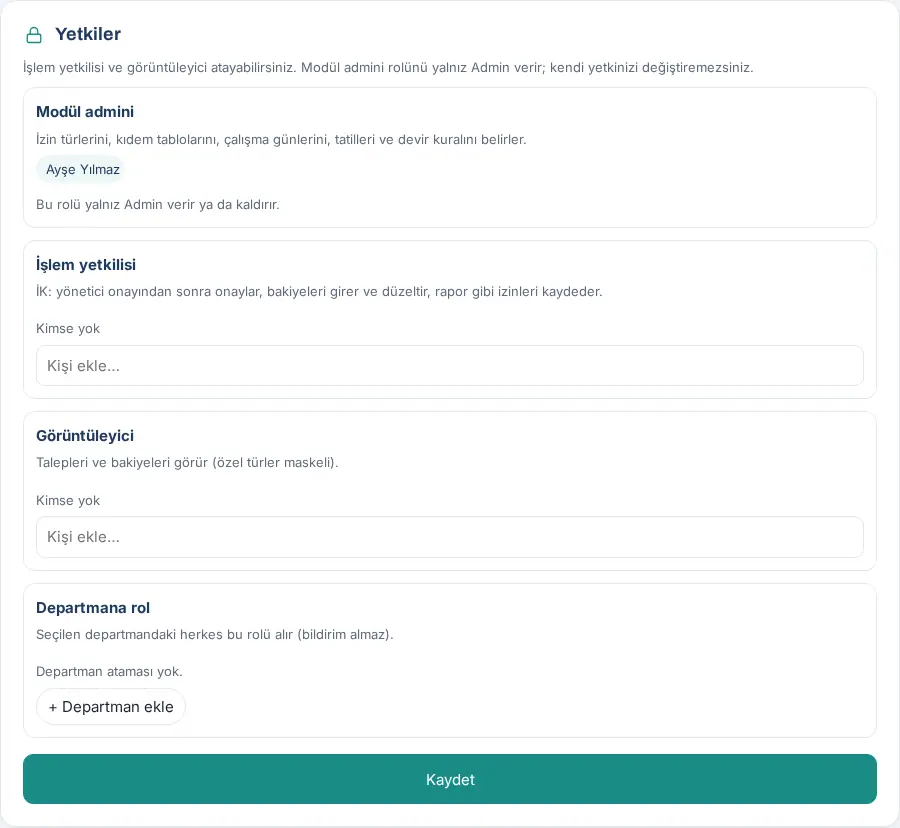
| Role | What it does |
|---|---|
| Module admin | Sets the leave types, seniority tables, working days, holidays and the carry-over rule. Only an Admin gives or removes this role |
| Operator | HR: approves after the manager's approval, enters and adjusts balances, records leave such as sick notes, receives the signed form |
| Viewer | Sees requests and balances (private types are masked) |
| Role by department | Everyone in the selected department gets this role (does not get notifications) |
Tip: For the detailed permission setup, see 10. Administration and setup.
The approval flow and human resources approval
Who: HR (leave operator) · Where: My Space → My leave → Awaiting approval (N)
What it does: You give the final approval to requests that the manager approved. Approved leave is added to the calendar, the Board and the directory as "On leave", and is deducted from the balance.
Approval flow:
- The employee sends a request → Awaiting manager. The manager gets the notification and email "Leave request awaiting your approval".
- The manager approves → Awaiting HR. HR gets the notification and email "Leave request awaiting your HR approval".
- HR approves → Signed form pending (if tracking is on) or Approved. The employee gets a notification and an email with the PDF attached.
- HR receives the signed form → Finalized.
The request of an employee who has no manager set, or whose manager left the company, goes directly to HR; HR approves it. For requests that wait for more than 2 days, the approver gets the reminder "Pending leave request".
Approving as HR:
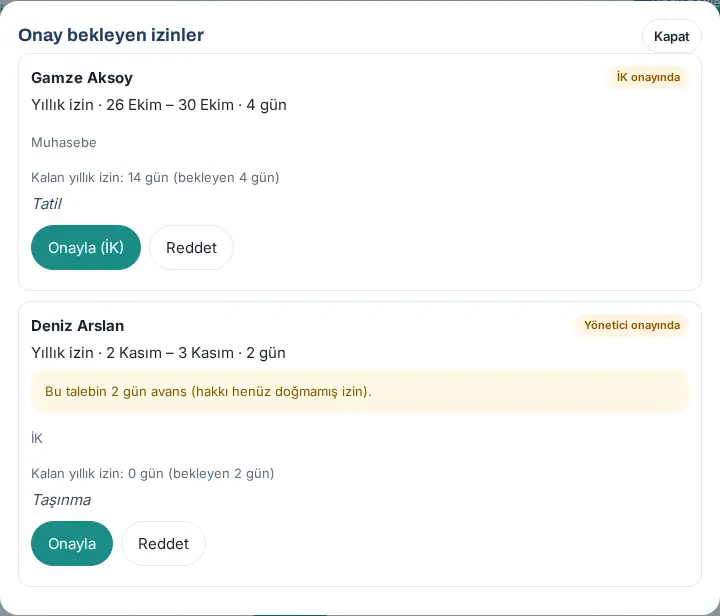
- In the My leave box, click Awaiting approval (N). The requests that are Awaiting HR (and your team's requests that wait for manager approval) are listed.
- Each card shows the person, leave type, dates, number of days, department, "Annual leave remaining: … (pending …)", description and the person who covers. For a request with an advance, the advance warning appears.
- Click Approve (HR). The message "Approved and added to the calendar. A signed form is expected from the employee." appears.
- To reject, click Reject, write the reason and click Reject again.
Important: You cannot approve your own request. Viewers see sick notes, maternity leave and leave for a disabled child only as "Private leave".
Entering and adjusting annual leave balances
Who: HR · Where: My Space → My leave → Balances (or Admin → Modules → Leave → Annual leave balances)
What it does: You enter each employee's opening balance (including carried-over days) once; after that, the entitlement is added automatically on each work anniversary according to the seniority table.
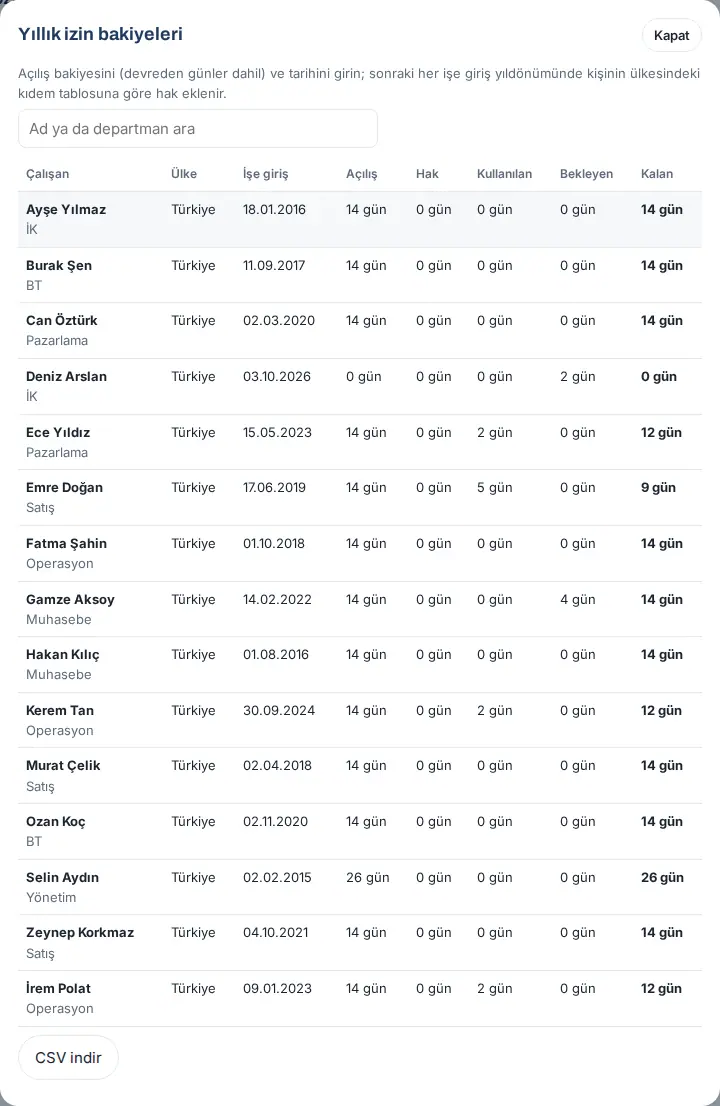
- Click Balances. The Annual leave balances table shows each employee's Country, Hire date, Opened, Entitlement, Used, Pending and Remaining days. You can type a name or department in the search box.
- Click an employee's row.
- Under Opening balance and seniority, fill in the Opening balance (days, incl. carried over), Balance date, Start date and Country (seniority table) fields.
- If you want, enter the Birth year (visible to HR only). In Türkiye, the annual leave of employees aged 18 or younger and 50 or older cannot be less than 20 days; this is applied automatically when the birth year is entered.
- Click Save.
- To change the balance later, under Adjustment, type the Days (+/−) and the Reason, and click Add adjustment.
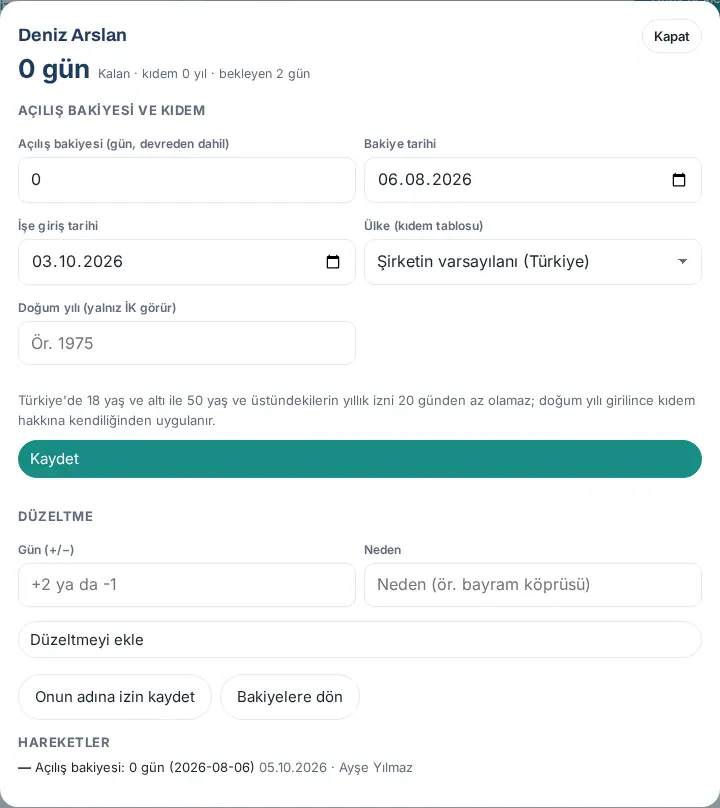
Tip: Under Transactions, all changes to the balance are listed with who made them. You can export the table with Download CSV (izin-bakiyeleri.csv). When the entitlement is added on the anniversary, the employee gets the notification "Your annual leave entitlement was added".
Common errors and warnings: "Opening balance must be between −30 and 400 days." · "Adjustment cannot be 0 and may be at most ±100 days." · "Write the reason for the adjustment."
All requests, cancelling and recording leave for an employee
Who: HR, viewer (view only) · Where: My Space → My leave → All requests
What it does: You filter the leave requests of the whole company, cancel approved leave and record leave that has already taken place (e.g. a backdated sick note) for an employee.
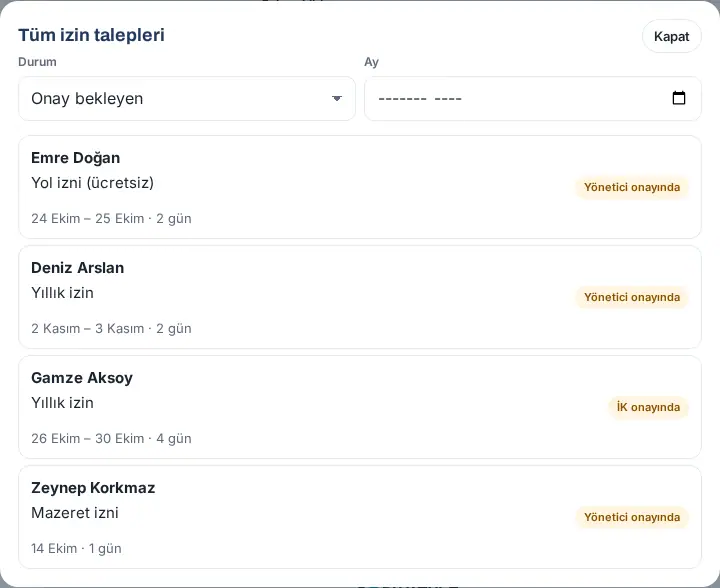
- Click All requests. The All leave requests window opens.
- In the Status list, select Awaiting approval, Approved, Signed form pending, Rejected, Cancelled or All. Filter with Month.
- Click a request to see its details and History. For a pending request, Approve (HR) and Reject are here.
- To cancel approved leave, click Cancel and confirm. The leave is removed from the calendar, and the days go back to the balance; the people concerned get the notification "Approved leave cancelled".
Recording leave for an employee:
- In Balances, click the employee's row.
- Click Record leave on their behalf. The HR entry: … window opens.
- Fill in the Leave type, Start and End (last day of leave) fields; you can enter a past date.
- Click Save. The message "Leave saved and added to the calendar." appears; the record is saved as approved.
Important: You cannot process your own leave as HR: "You cannot process your own leave record as HR; another HR operator or an Admin must do it."
Receiving the form with the QR code (human resources)
Who: Leave operator (HR), leave module admin · Where: My Space → My leave → Receive signed form
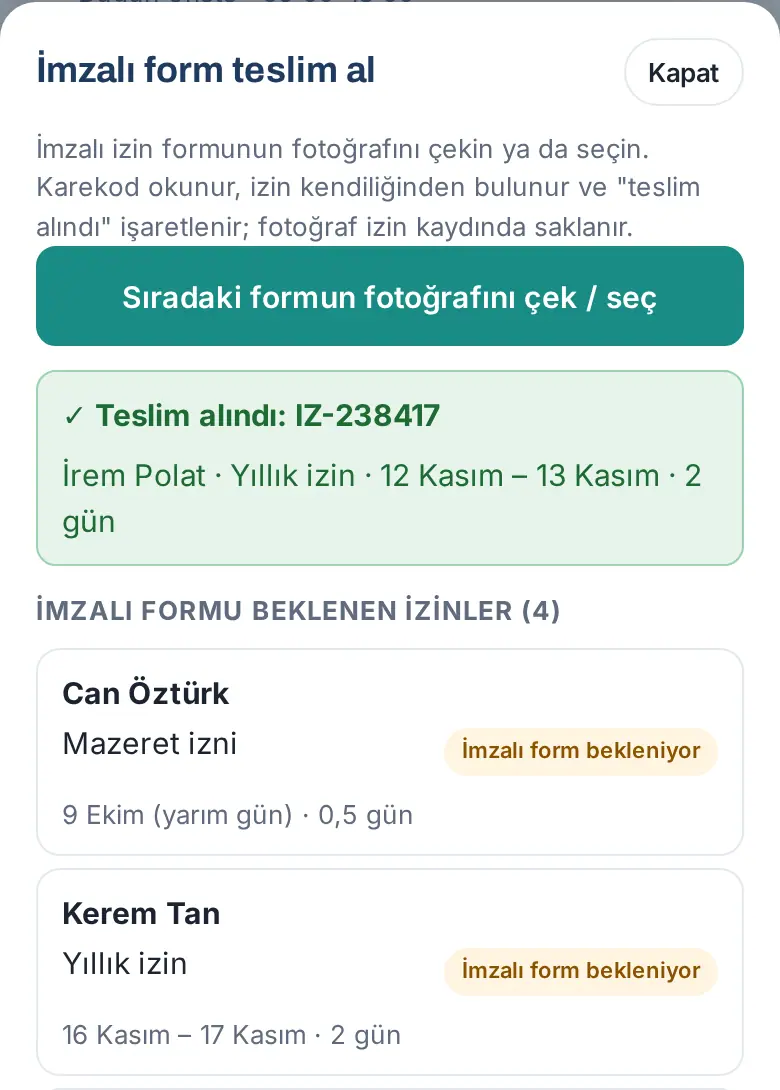
What it does: When the employee gives you the signed form, you take a photo of the form. The QR code on the form is read on the phone, the leave is found automatically and marked as "received"; the leave becomes Finalized. The photo is kept with the leave record.
Before you start: Tracking the signed form must be on.
- In the My leave box, tap Receive signed form. The number of pending forms shows in brackets. At the bottom of the window, Leave awaiting a signed form is listed.
- Tap Take / choose a photo of the form. On a phone, the camera opens; put the form on a flat surface and take the photo so that the QR code is sharp.
- If the QR code is read, a green box shows "✓ Received: IZ-…" with the employee's name, leave type, dates and duration. The employee gets the notification "İzin formunuz teslim alındı" ("your leave form has been received").
- For the next form, tap Take / choose a photo of the next form.
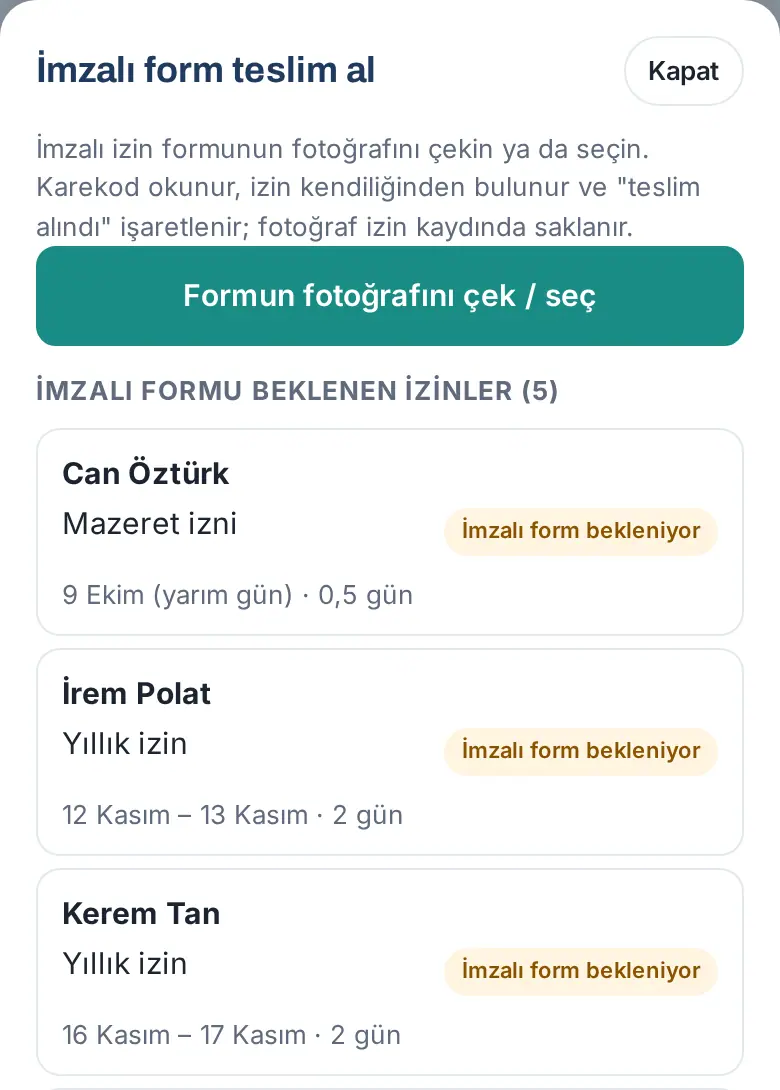
If the QR code cannot be read: The warning "The QR code could not be read. Put the form on a flat surface and photograph it again in good light with the QR code in focus." appears. In the list below it, select the Form no ("form number", e.g. IZ-128) of the form and tap Match with this leave and save. The record says "matched manually".
Common errors and warnings:
- "Form güncel değil: izin kaydı form yazdırıldıktan sonra değişmiş. Güncel formu yazdırıp yeniden imzalatın." ("The form is not current: the leave record changed after the form was printed. Print the current form and have it signed again.")
- "Bu form … tarihinde … tarafından teslim alınmış." ("This form was received on … by ….") — you can change the photo with Replace photo; the old photo is deleted.
- "Kendi izin formunuzu teslim alamazsınız; başka bir İK yetkilisi teslim almalı." ("You cannot receive your own leave form; another HR operator must receive it.")
- "This QR code does not belong to a leave form." / "Bu karekoda ait onaylı bir izin bulunamadı (izin iptal edilmiş)." ("No approved leave was found for this QR code (the leave was cancelled).")
Important: The photo is visible to the employee, HR and the module admin (View signed form). Viewers cannot see the photo of private types. The photos are kept in a protected folder and open only through the app. This screen needs a real phone camera; in the screenshot in this guide, the photo was selected from a file.
Exporting approved leave to payroll software
Who: HR, attendance officer · Where: My Space → Work time → Timesheet → Export to payroll software
What it does: The approved leave of the month is downloaded together with the timesheet (puantaj), with columns that fit the Excel import of the payroll software (Logo, Mikro, Luca, Netsis or a general template).
- In the Work time box, click Timesheet and select the month.
- Under Export to payroll software, select the software and click Download Excel.
You can also get the same file from the Admin → Integrations → HR & accounting tab (see 13. Integrations). The Excel file has two sheets: Puantaj ("timesheet": per employee, days, hours, leave days by type and SGK (Social Security Institution) missing days) and İzinler ("leave"). For details and a screenshot, see 29. Time and attendance management.
Important: Only approved leave is counted; leave that crosses the end of a month is split. The file has no Turkish ID (TC) number; matching is done by the personnel number.