12. Customer directory administration
Screenshots show the Turkish interface of Prozence with fictional "Örnek Teknoloji A.Ş." data; the English interface has the same layout.
This chapter is for the people who set up the customer directory for the company: Admins and the "Customer directory" module admin. It explains card reading (AI), the source list, tags, sharing of new records, the cooling customer period, enrichment, the adding-by-email mailbox, microphone and location permissions, and CRM connections.
For how employees use the customer directory, see 04. Customer directory; for adding cards, see 03. Adding cards (business card scanning).
In this chapter
- Opening the customer directory settings
- Giving roles
- Card reading (AI) settings
- Checking voice note and location permissions
- Source list (Where did you meet?)
- Tags and tag groups
- Default sharing of new records
- Cooling period and monthly summary (relationship tracking)
- Enrichment
- Adding-by-email mailbox and Test connection
- Importing on behalf of someone else and downloading the whole catalog
- Commercial message consent and KVKK records
- Customer records of an employee who has left
- CRM connections (HubSpot and others)
Opening the customer directory settings
Who: App administrator · Customer directory module admin · Where: Admin → Modules → Customer directory
What it does: All customer directory settings are on one screen in the app.
- On a computer, click Admin in the left menu. On a phone, tap Profile in the bottom menu and open the Admin strip.
- In the Management menu, select Customer directory in the Modules group.
- Open one of the four tabs at the top:
- Card reading: card reading (AI), voice note and location permissions.
- Sources and tags: "Where did you meet?" sources and tags.
- Sharing and privacy: visibility of new records and relationship tracking.
- Enrichment and mailbox: AI enrichment and adding by email.
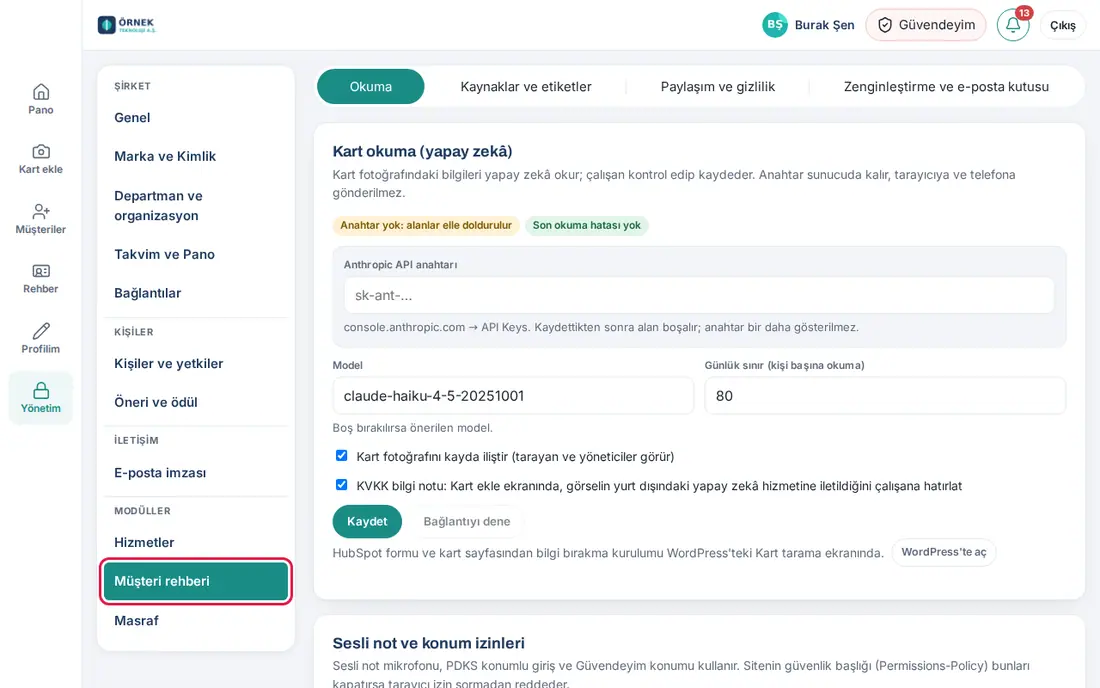
Tip: The bottom of each tab tells you which settings stay in WordPress; Open in WordPress takes you to that screen. For the Management panel, see 10. Administration and setup.
Important: When you save a setting, it applies to the whole company immediately.
Giving roles
Who: App administrator · Where: Admin → People and permissions → Module permissions → Customer directory
What it does: Sets who does what in the customer directory.
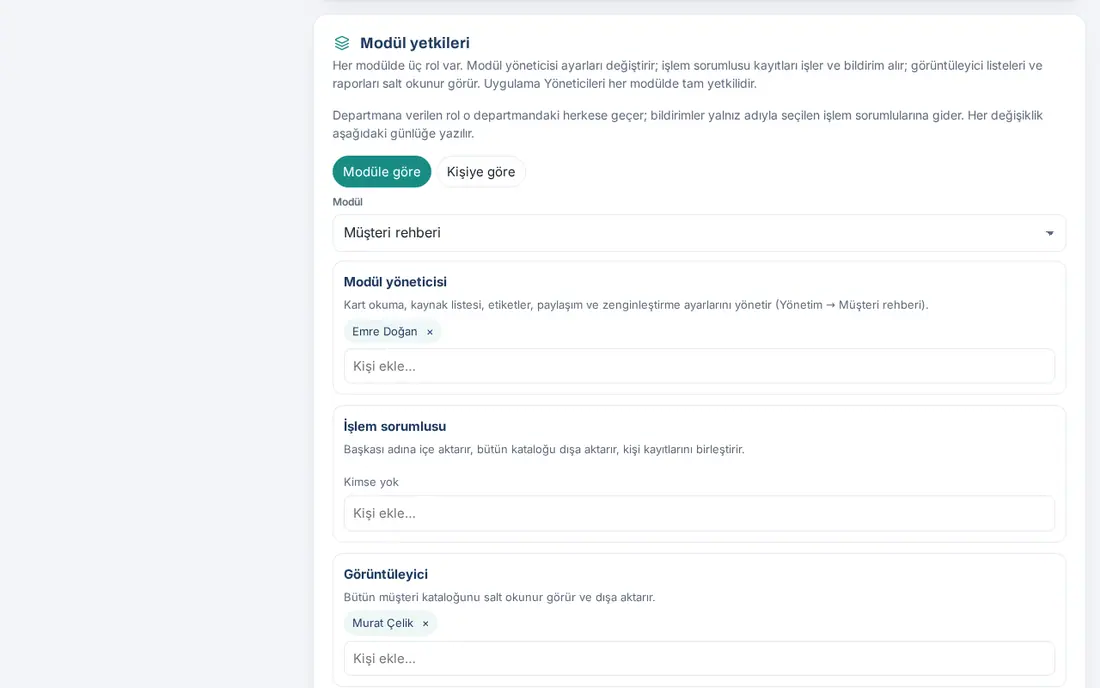
- Open the People and permissions section and go to the Module permissions box.
- Make sure By module is selected. Select Customer directory from the Module list.
- For each role, type a name in the Add person… box and select an employee. To remove a person, click the × on the name.
| Role | What it does |
|---|---|
| Module admin | Manages the card reading, source list, tags, sharing and enrichment settings. Sees and tests the mailbox setting but cannot change it. |
| Operator | Imports on behalf of others, exports the whole catalog. |
| Viewer | Exports the whole catalog (read-only). |
Important:
- App administrators have full permission in every module.
- No role can bypass the rule for merging contact records: only the owner of both records or their team manager can merge them.
- The Viewer and Operator roles can download the email and phone of all customers. Give these roles only to people who need them.
For the general use of the role table, see 10. Administration and setup.
Card reading (AI) settings
Who: App administrator · Module admin · Where: Customer directory → Card reading → Card reading (AI)
What it does: Sets up the connection for reading business card and badge photos with AI. If there is no key, employees take a photo but fill in the fields by hand.
- Open the Card reading tab. The badges at the top show the connection status (e.g. No key: fields are filled in manually, No recent reading errors).
- Paste the key into the Anthropic API key box (console.anthropic.com → API Keys).
- If you leave the Model field empty, the recommended model is used.
- Enter the Daily limit (readings per person) value. The same limit also applies to voice note summaries, with a separate counter.
- Select or clear the checkboxes:
- Attach the card photo to the record (visible to the scanner and administrators);
- Privacy notice: on the Add card screen, remind employees that the image is sent to an AI service abroad.
- Click Save.
- Use Test connection to test that the key works.
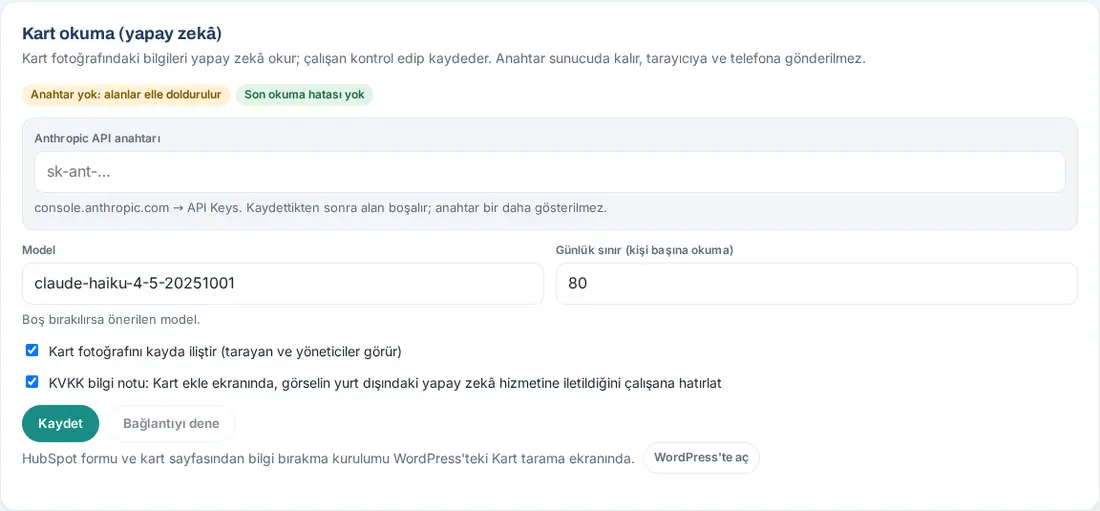
Tip: If the last reading had an error, a red box shows the time and the reason (e.g. invalid key, no credit left). When credit runs out or the key is invalid, Admins get at most one notification per day.
Important:
- The key stays on the server. After you save, the field is emptied and the key is not shown again; only its last four characters are visible.
- The card image is sent to an AI service abroad to be read. Before you turn off the KVKK (Turkey's personal data protection law) privacy notice, ask your legal advisor.
- The setup for the HubSpot form and for leaving details from the card page is on the Kart tarama ("Card scanning") screen in WordPress (see CRM connections).
Checking voice note and location permissions
Who: App administrator · Module admin · Where: Customer directory → Card reading → Voice note and location permissions
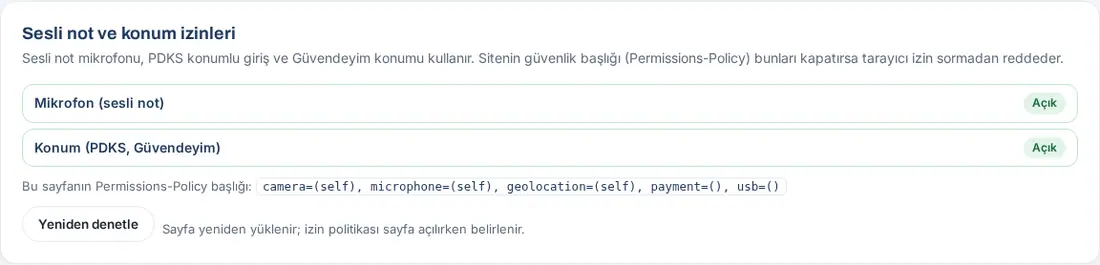
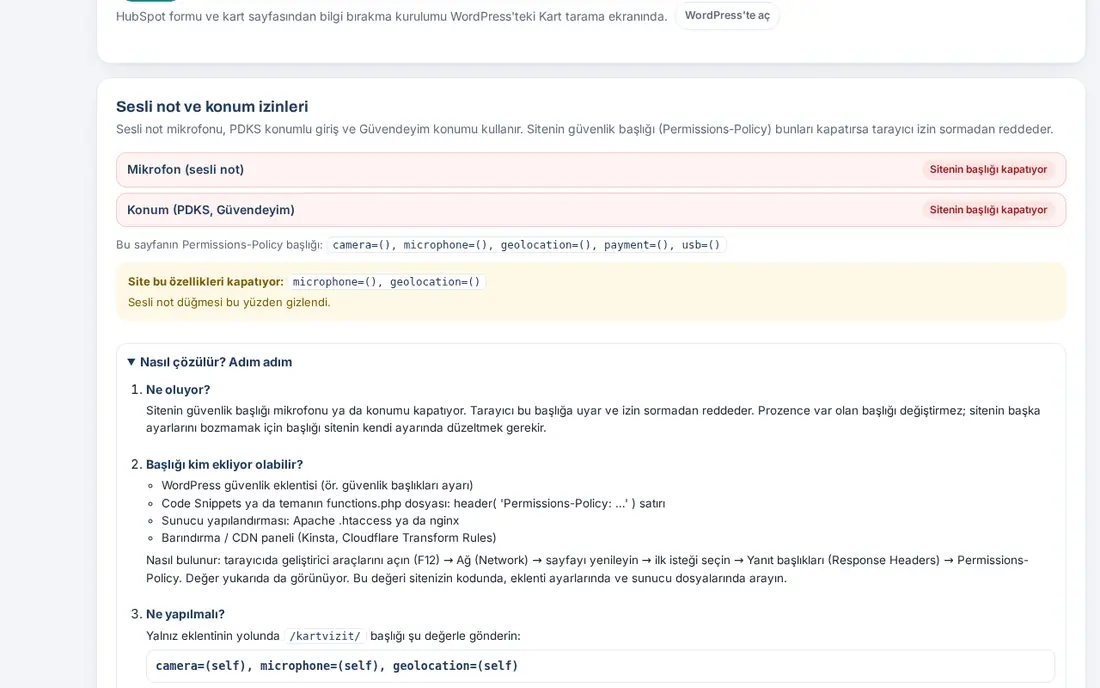
What it does: Dictate uses the microphone; time and attendance (PDKS) check-in with location and I’m Safe use location. If your site's security header (Permissions-Policy) blocks them, the browser refuses without asking, and the Dictate button does not appear. This box shows the status and explains the solution step by step.
- On the Card reading tab, go to the Voice note and location permissions box.
- Read the status of the two rows: Microphone (voice note) and Location (attendance, I’m Safe).
- Open: no problem.
- Blocked by the site's header: a setting on your site blocks the microphone or location.
- Under them, the page's actual Permissions-Policy header is shown.
- If the status is red, open the How to fix it, step by step section. There are five steps: What is happening?, Who might be adding the header?, What should be done?, Check again, Affected features.
- Depending on what adds the header, take the ready example with Copy: PHP snippet (Code Snippets or functions.php), Apache (.htaccess), nginx, Cloudflare Transform Rules. Your site administrator or hosting provider makes the change.
- After the change (and after clearing the cache, if there is one), click Check again. The page reloads.
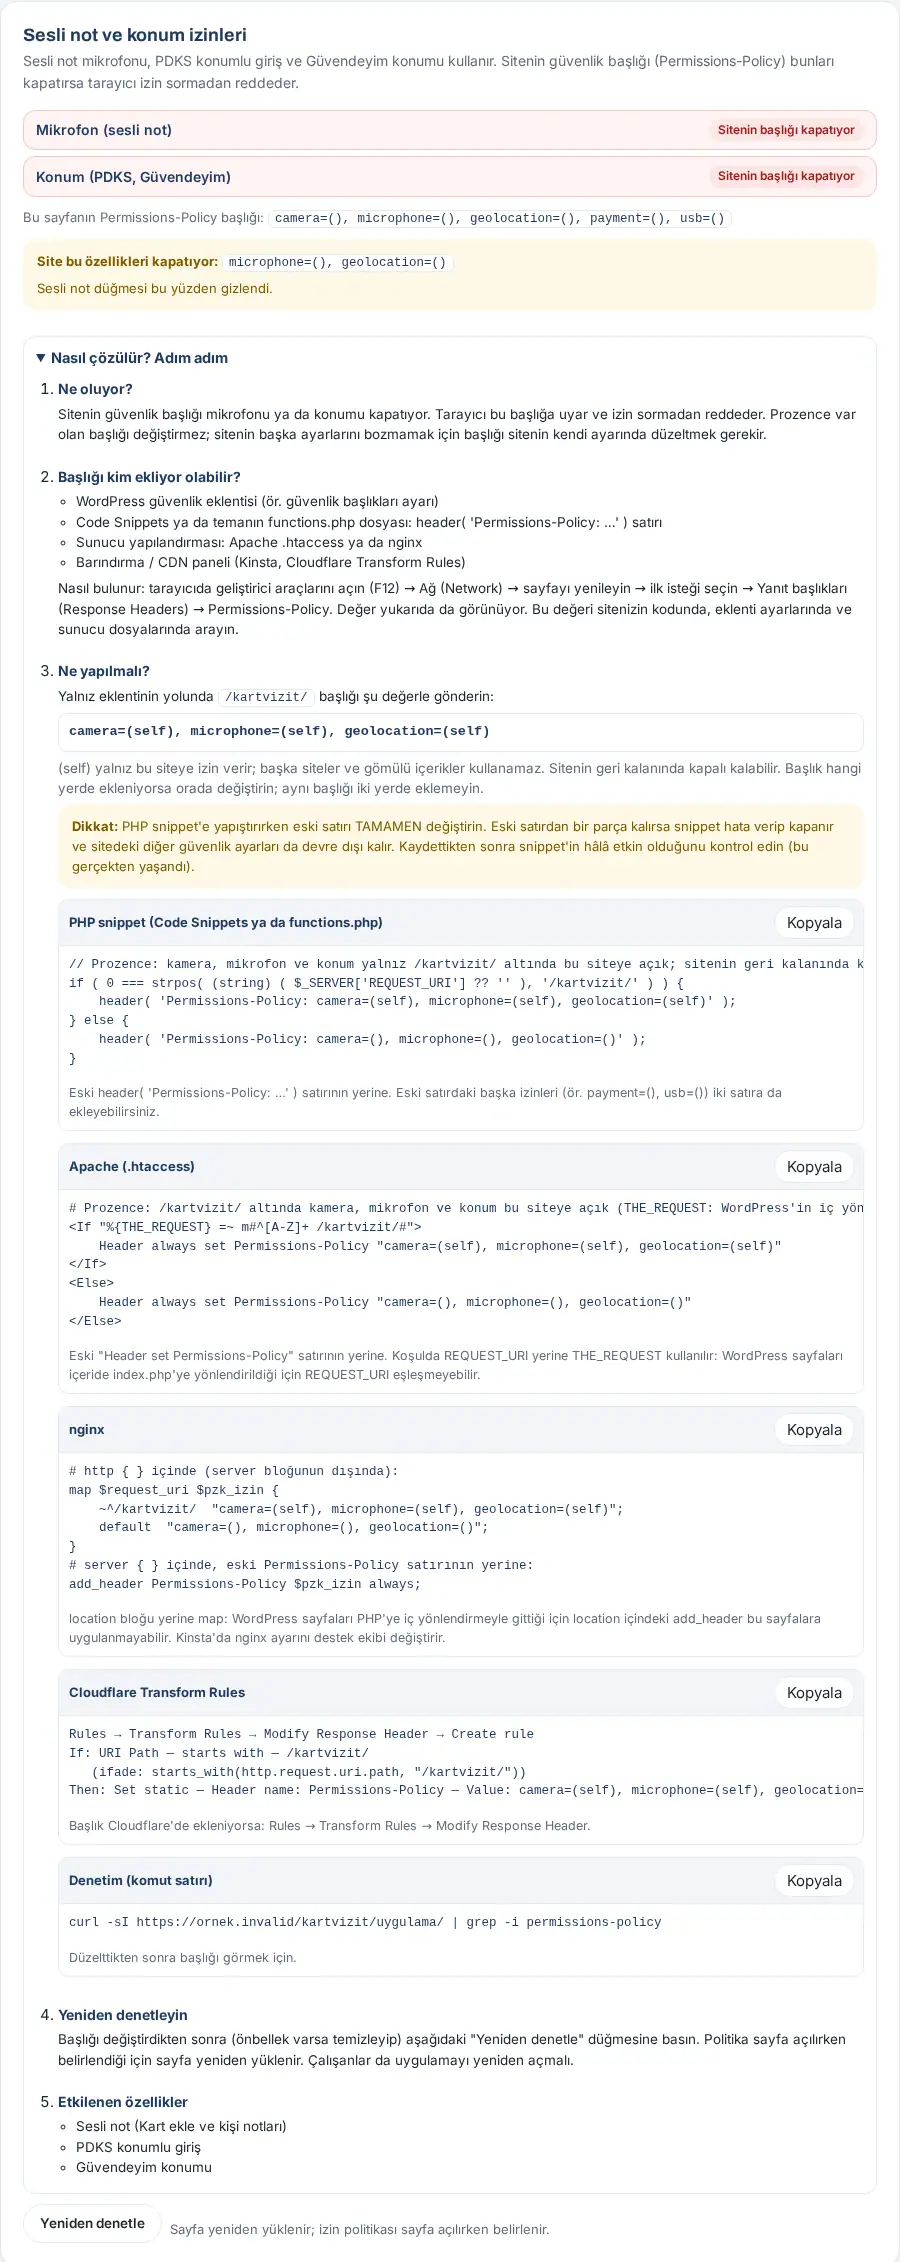
Important: When you change the PHP snippet, replace the old line COMPLETELY. If a part of the old line stays, the snippet gives an error and is turned off, and the other security settings on the site are disabled too. After you save, check that the snippet is still active.
Tip: Safari does not report the permissions policy. On an iPhone, a microphone block becomes clear only when the employee tries Dictate. For other problems, see 16. Troubleshooting.
Source list (Where did you meet?)
Who: App administrator · Module admin · Where: Customer directory → Sources and tags → Sources
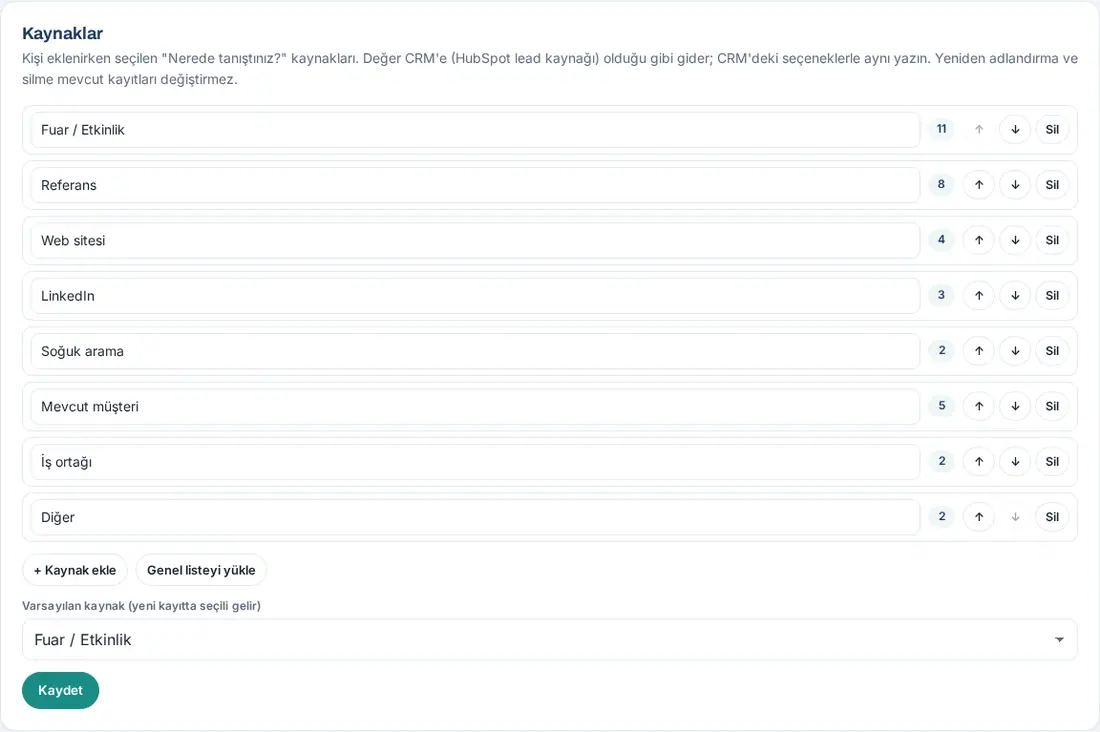
What it does: When an employee adds a card, they select a Source in the Where did you meet? section (e.g. Trade show / Event, Referral, Website). You set the list here.
- Open the Sources and tags tab.
- Edit the source names in the Sources list. Each row shows how many contacts are saved with that source.
- Change the order with ↑ and ↓; to remove a source, click Delete.
- For a new source, click + Add source. To return to the ready list, use Load the general list.
- Select the default from the Default source (preselected for new records) list.
- Click Save.
Important:
- The source value goes to the CRM (HubSpot lead source) as it is. Write it the same as the options in the CRM.
- Renaming and deleting do not change existing records.
- There can be up to 30 sources; each one can be up to 60 characters. Empty or duplicate sources are not accepted.
Tags and tag groups
Who: App administrator · Module admin · Where: Customer directory → Sources and tags → Tags
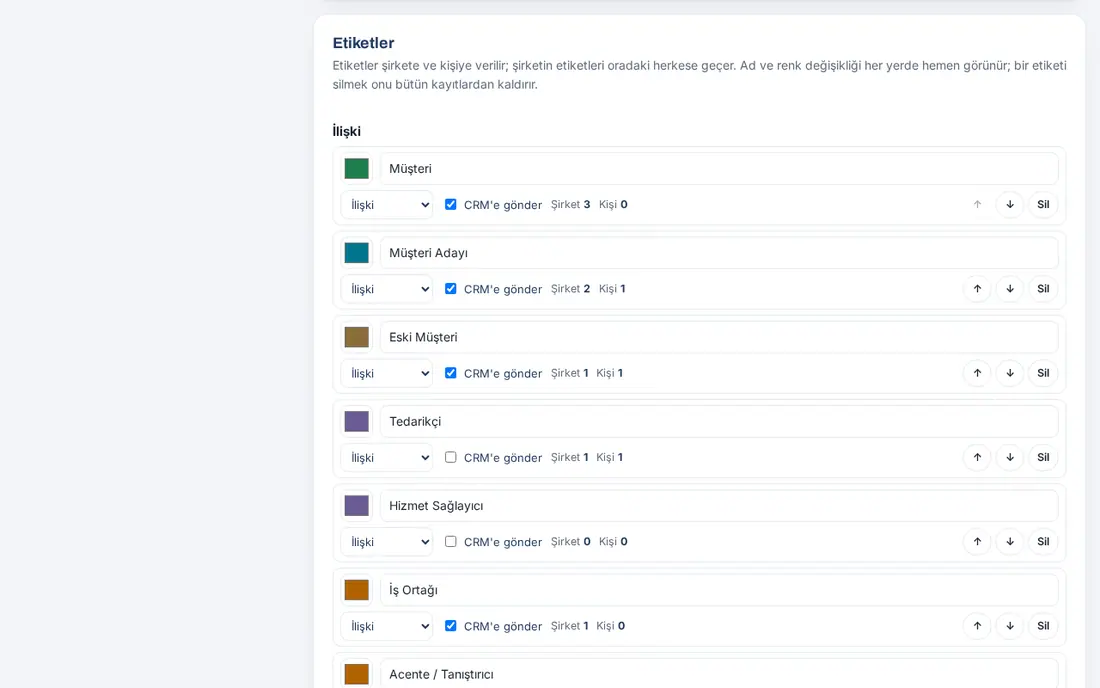
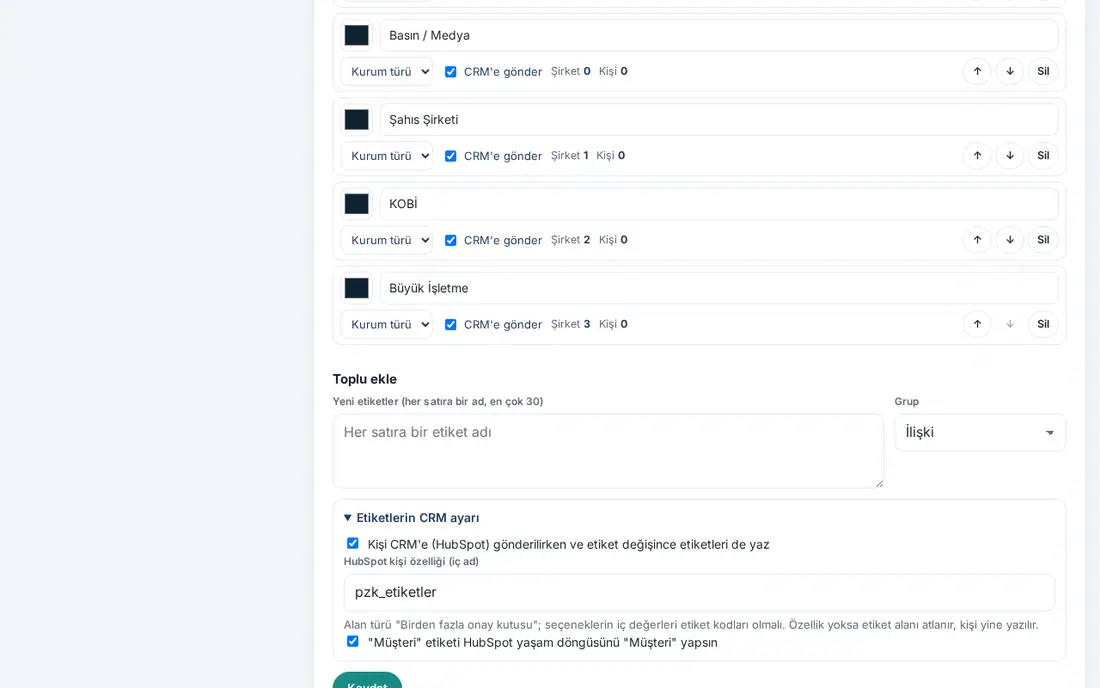
What it does: Sets the tags employees give to contacts and companies. There are two groups: Relationship (Customer, Prospect, Supplier…) and Organization type (Public Institution, SME, Large Enterprise…).
- On the Sources and tags tab, go to the Tags section.
- For each tag, edit:
- the color box and the tag name;
- the group (Relationship or Organization type);
- Send to CRM: whether contacts with this tag are sent to the CRM;
- the order (↑, ↓) or Delete. Each row shows how many companies and contacts use the tag (Company, Person).
- To add new tags, type one name per line in the New tags (one name per line, up to 30) box in the Add in bulk section, and select the Group.
- If you use HubSpot, open the CRM settings for tags section:
- Also write tags when a contact is sent to the CRM (HubSpot) and when tags change;
- HubSpot contact property (internal name) (e.g.
pzk_etiketler); - The "Customer" tag sets the HubSpot lifecycle stage to "Customer".
- Click Save.
Tip:
- A tag given to a company passes to everyone in that company.
- For contacts you "buy services from", such as Supplier, Service Provider, Bank, Accountant / CPA, clear Send to CRM. If the contact also has the Customer, Prospect, Former Customer, Business Partner or Agent / Introducer tag, the contact still goes to the CRM.
- Adding and removing tags on records in bulk is done in the Toplanan kartvizitler ("Collected business cards") and Firmalar ("Firms") lists in WordPress (Open in WordPress).
Important: Deleting a tag removes it from all company and contact records. You are asked to confirm when you save. Name and color changes appear everywhere immediately.
Default sharing of new records
Who: App administrator · Module admin · Where: Customer directory → Sharing and privacy → Visibility of new records
What it does: Sets who can see a newly added contact by default, for Add card, adding by email and import.
- Open the Sharing and privacy tab.
- Select the Default visibility:
- Only the person who added it: the record is visible to the person who added it and to their managers in the org chart.
- The adder's department: everyone in the same department as the person who added it sees it.
- Whole company: all employees in the app see it.
- Click Save.
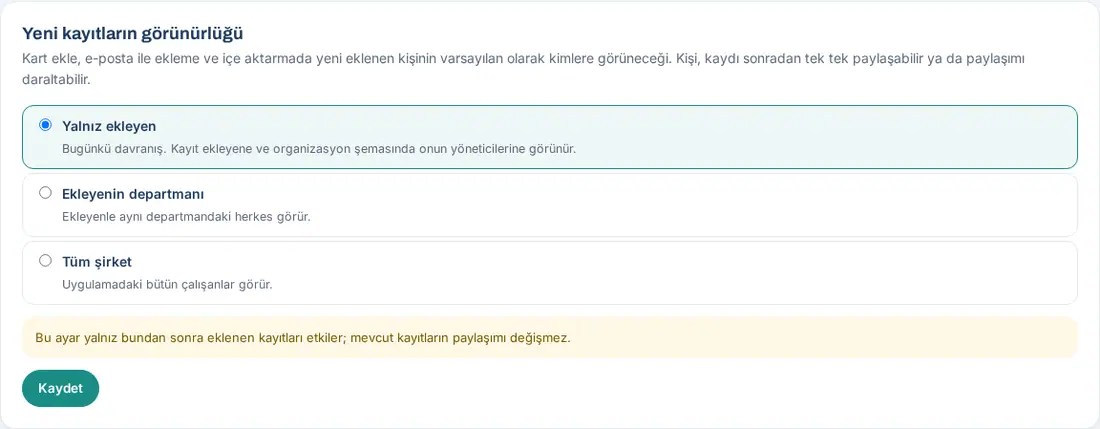
Important: This setting affects only records added from now on; the sharing of existing records does not change. An employee can later share a record one by one or narrow its sharing (see 04. Customer directory).
Cooling period and monthly summary (relationship tracking)
Who: App administrator · Module admin · Where: Customer directory → Sharing and privacy → Relationship tracking
What it does: The last contact with a customer (card scan, note, send my card, left details) appears in the list and in the contact details. A customer with no contact for longer than the period you set here counts as "cooling".
- On the Sharing and privacy tab, go to the Relationship tracking box.
- Select the Counts as cooling after period: 30 days, 60 days, 90 days, 120 days or 180 days (default 90 days).
- If you want, select the Monthly cooling customers summary: on the morning of the first working day of each month, send every employee the 10 most important cooling customers of their own and their team checkbox.
- Click Save.
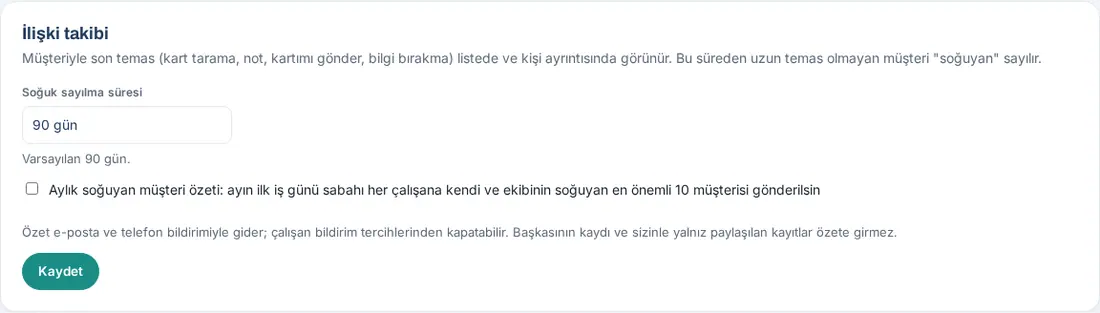
Tip: Half of the period you select is the "warm" threshold. Employees see cooling customers with Filter → No contact (cooling) and in My sales summary (see 04. Customer directory).
Important: The monthly summary goes by email and phone notification; the employee can turn it off in their notification preferences. Other people's records and records that are only shared with the employee are not included in the summary. The summary does not know public holidays; the first working day of the month is the first weekday.
Enrichment
Who: App administrator · Module admin · Where: Customer directory → Enrichment and mailbox → Enrichment
What it does: When new companies and contacts are added, their details are completed with AI in the background: the company website is read, and if web search is on, additional sources are checked. Employees see the company info card and the About the person summary.
Before you start: Enrichment needs the card reading key. If there is no key, the On, but no AI key badge appears.
- Open the Enrichment and mailbox tab.
- Read the counters: Today (with the daily limit), Web searches (today), This month, Waiting in queue, Enriched companies, Assessed contacts.
- Select the checkboxes:
- Enrichment on: new companies are enriched automatically;
- Search the web in addition to the company website (LinkedIn, news, incentive lists);
- Derive a decision role and short professional summary for contacts (contact insights);
- Also search the web for contacts.
- Enter the Daily limit (companies + contacts) value.
- In the Our solutions box, briefly write the products and services your company sells (up to 600 characters). The contact's decision role is assessed against these solutions.
- Click Save.
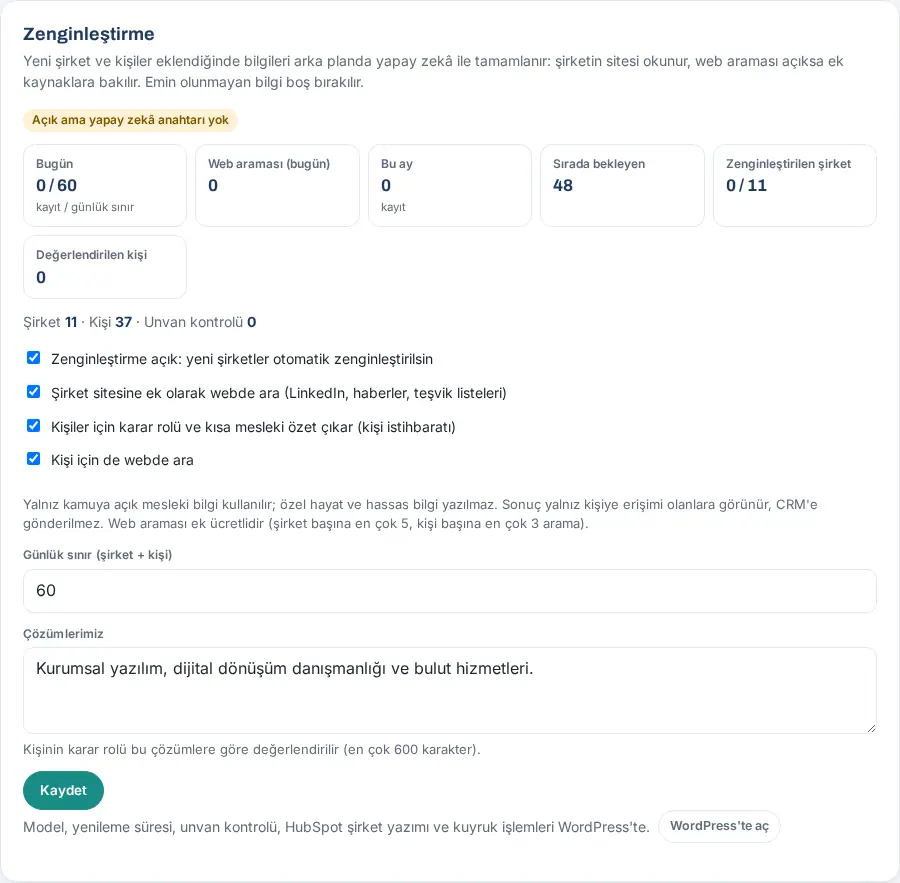
Tip: The model, refresh period, job title check, writing companies to HubSpot and queue actions (e.g. Eksikleri sıraya al ("Queue missing ones")) are on the Zenginleştirme ("Enrichment") screen in WordPress (Open in WordPress).
Important:
- Only publicly available professional information is used; private life and sensitive information are not written. The result is visible only to people who have access to the contact, and it is not sent to the CRM.
- Web search costs extra (at most 5 searches per company and 3 per contact). Information that is not certain is left empty; information entered by hand is kept.
Adding-by-email mailbox and Test connection
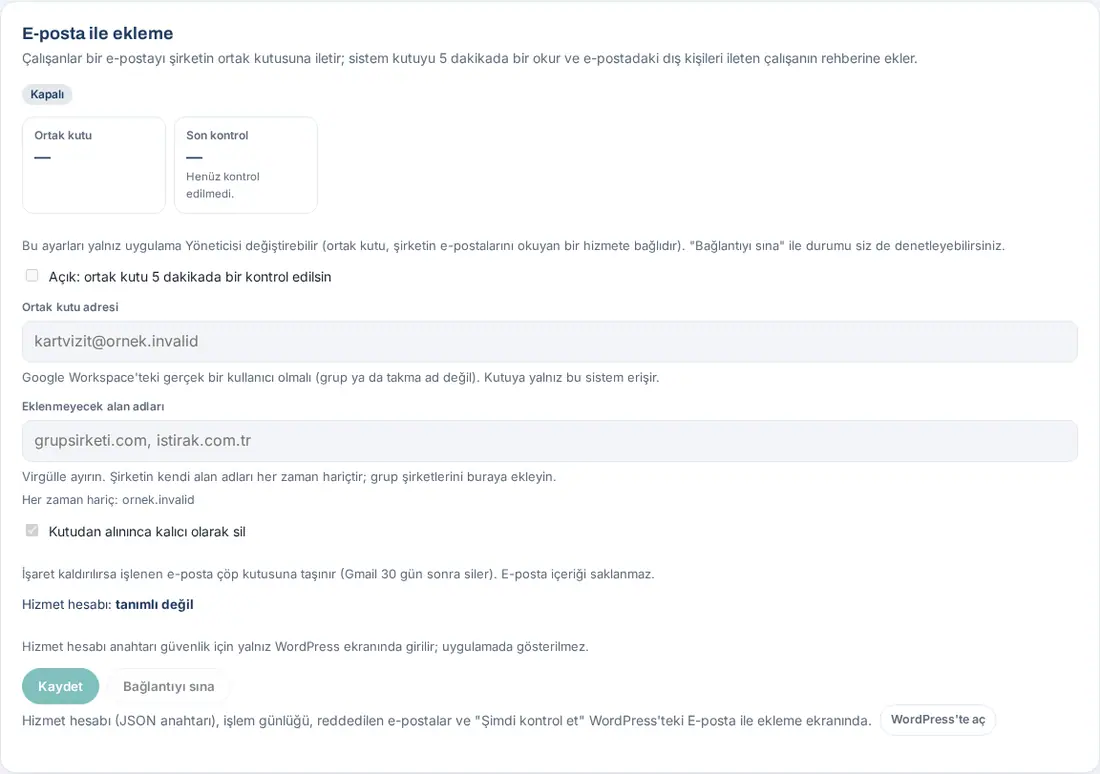
Who: App administrator (changes it) · Module admin (sees and tests it) · Where: Customer directory → Enrichment and mailbox → Adding by email
What it does: Employees forward a customer's email to the company's shared mailbox; the system reads the mailbox every 5 minutes and adds the external people in the email to the directory of the employee who forwarded it (see 03. Adding cards (business card scanning)).
Since 0.99.47, if the email has a contact file (vCard, .vcf) attached, AI is not used; the contacts in the attachment are read directly. Employees who use an iPhone add a contact from their phone's contacts this way (Contacts → Share Contact → Mail; see 03. Adding cards (business card scanning)). If the mailbox is on, its address is also shown in the tip on the employees' Add card screen. At most 25 people are added from one email (at most 5 attachments, each at most 1 MB); their source is "Phone contacts". The sender verification rules are the same: the attachment of an email that cannot be verified is not downloaded.
Before you start:
- The shared mailbox must be a real user mailbox (it cannot be a group or an alias). An employee's own address cannot be the shared mailbox.
- For a Gmail (Google Workspace) mailbox, the Google service account (JSON key) must be defined on the E-posta ile ekleme ("Adding by email") screen in WordPress. For security, the key is not shown in the app (see 13. Integrations).
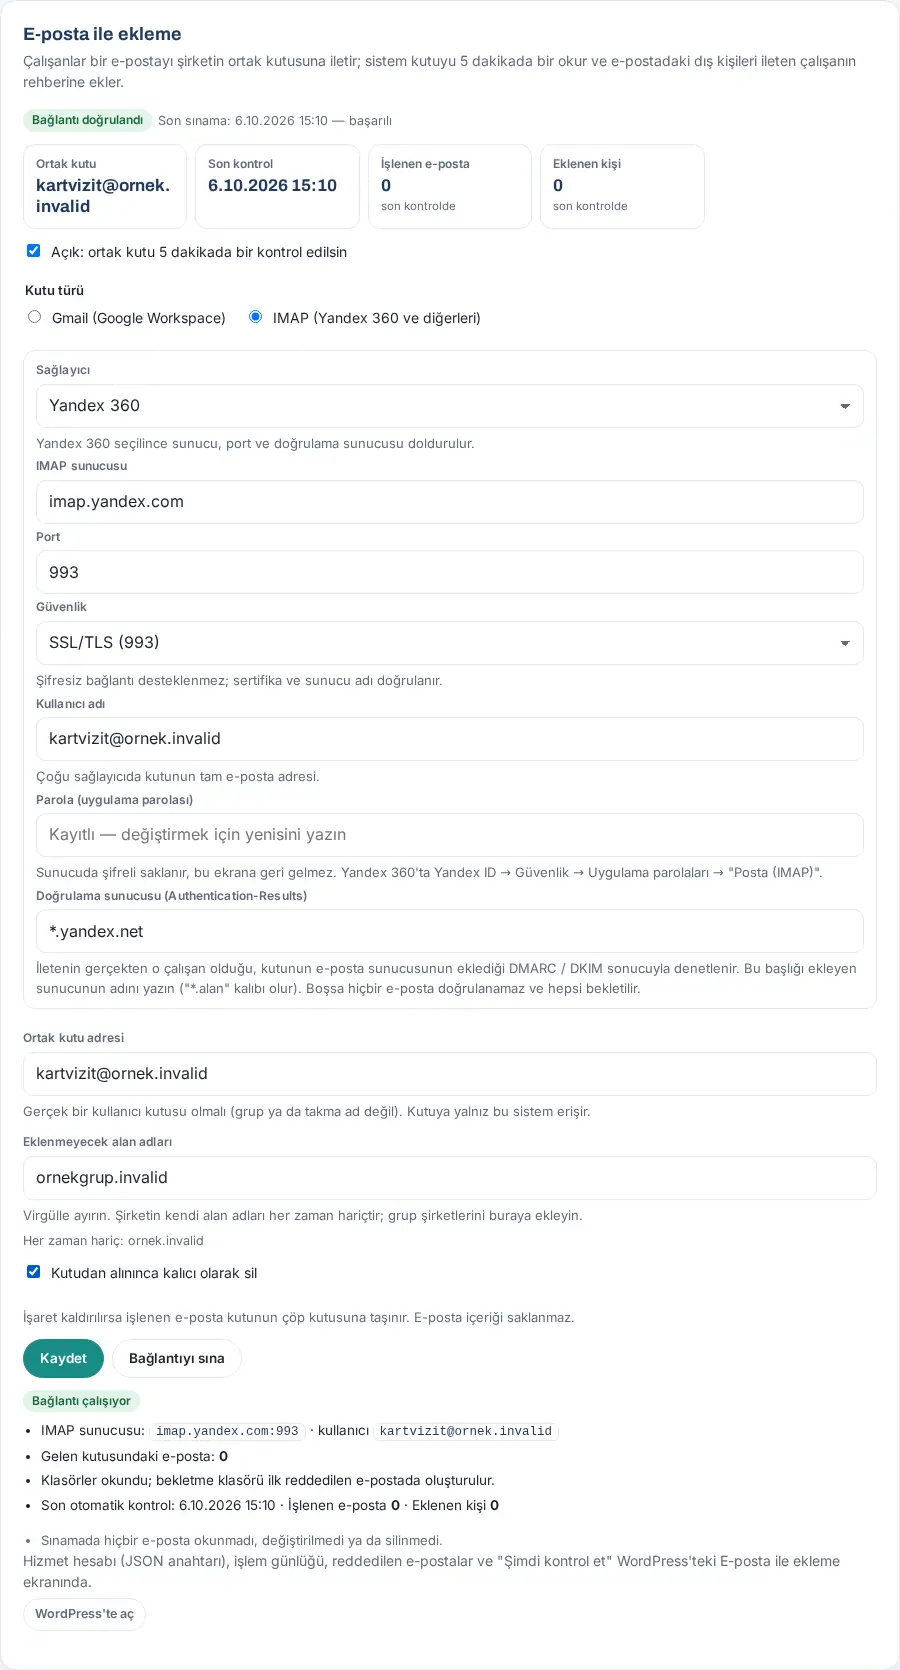
- An IMAP mailbox (Yandex 360 and other mail servers that support IMAP) needs no service account; you need the mailbox's IMAP server, user name and an app password. In Yandex 360, you create the app password in Yandex ID → Security → App passwords → "Mail (IMAP)"; IMAP access must be on in Yandex Mail → Settings → Email clients. In Zoho Mail, IMAP access must be on in Settings → Mail Accounts; if two-factor authentication is on, an application-specific password is created in account security.
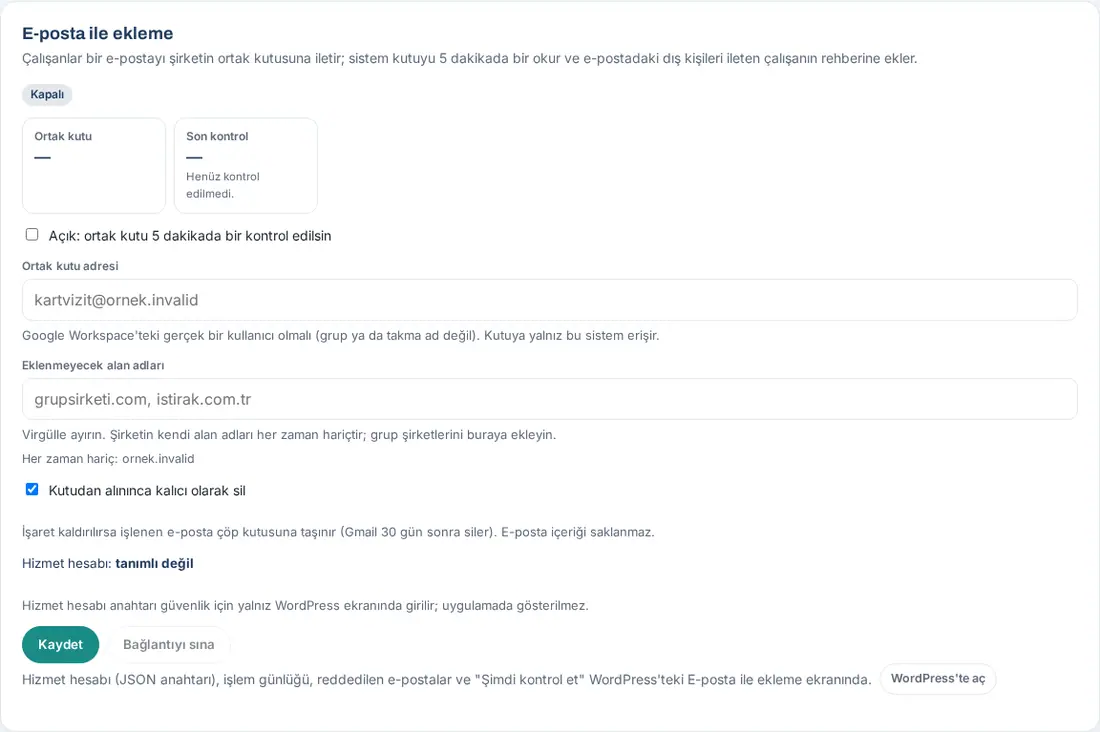
- On the Enrichment and mailbox tab, go to the Adding by email box. The status badge at the top shows Off, Configured (not tested), Connection verified or Last test failed. The Shared mailbox and Last check details appear next to it.
- Select the On: check the shared mailbox every 5 minutes checkbox.
- Under Mailbox type, select Gmail (Google Workspace) or IMAP (Yandex 360 and others). When you select IMAP, these fields open:
- Provider: selecting Yandex 360 fills in the IMAP server (
imap.yandex.com), Port (993), Security and Verification server (*.yandex.net). Selecting Zoho Mail fills in the organization account serverimappro.zoho.comand Zoho's verification servers; in the European data centre, change the server toimappro.zoho.eu. For another server, select Other (IMAP) and fill in the fields by hand; - Security: SSL/TLS (993) or STARTTLS (143). Unencrypted connections are not supported; the certificate and the server name are verified;
- User name: with most providers, the full email address of the mailbox (e.g.
kartvizit@ornek.invalid); - Password (app password): after saving, it does not come back to the screen; to change it, type a new one; if you leave it empty, the saved password is kept;
- Verification server (Authentication-Results): the name of the server that adds the DMARC / DKIM result on the mailbox's mail server (a "*.domain" pattern works). If it is empty, no email can be verified and all of them are held.
- Provider: selecting Yandex 360 fills in the IMAP server (
- Type the Shared mailbox address (e.g.
kartvizit@ornek.invalid). - In the Domains to exclude box, type the domains of group companies that must not be added, separated by commas. The company's own domains are always excluded.
- Keep Delete permanently once taken from the mailbox selected. If you clear it, processed emails are moved to the trash (Gmail deletes them after 30 days; with IMAP, the mailbox's trash is used).
- Click Save.
- Click Test connection. The result appears under the box. If the connection could not be made, the reason and the steps to take are shown; if needed, you can copy the scope with Copy. With IMAP, the result shows the server, the user, the number of emails in the inbox and the holding folder.
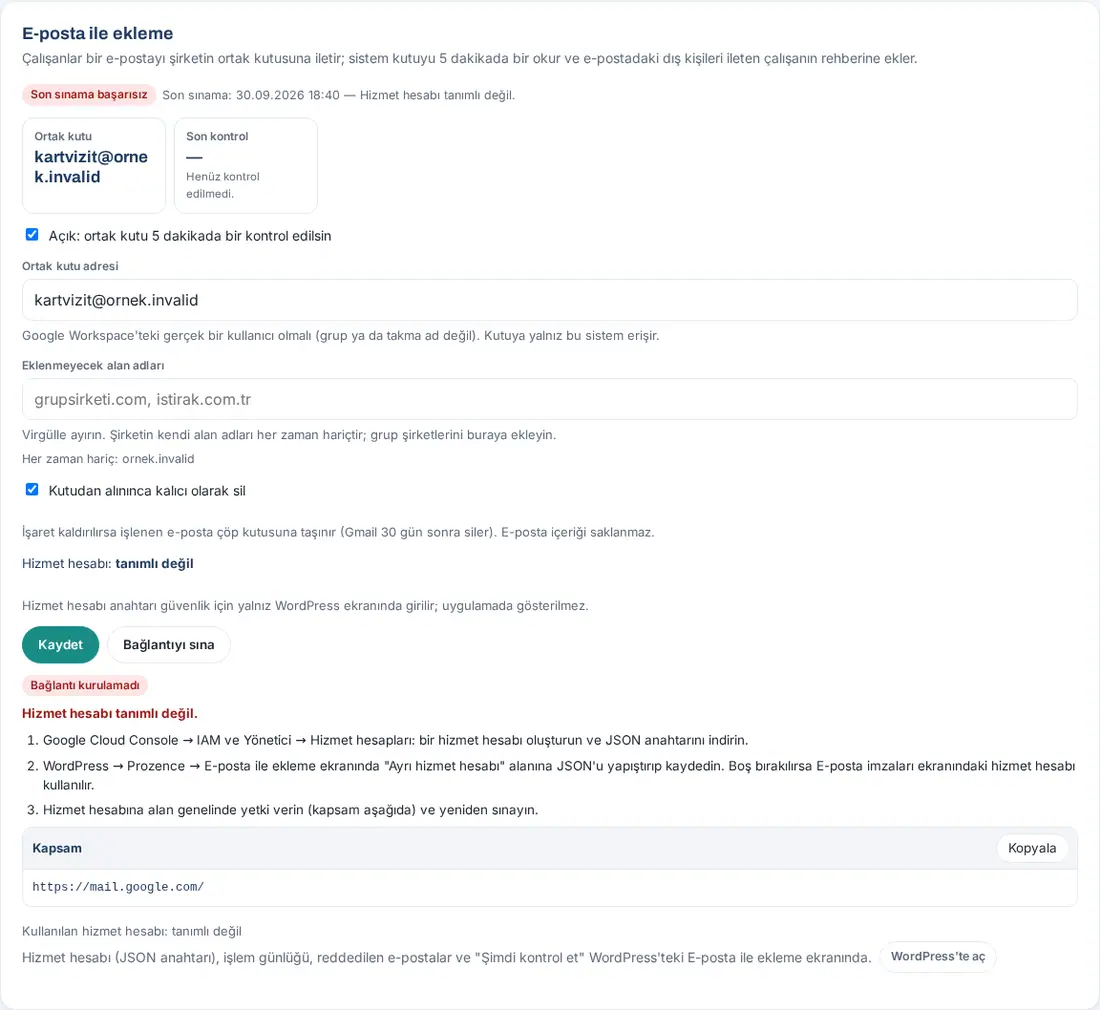
Tip: Test connection does not read any email; it only checks that the mailbox can be reached. Common reasons: no service account, broken key, no scope in domain-wide delegation, Gmail API turned off, mailbox not in Workspace or suspended. With IMAP: wrong server name or port, the account's own password typed instead of an app password, IMAP access turned off for the mailbox. The IMAP test opens the inbox in read-only mode. You can test up to 5 times in 10 minutes.
Important:
- Only the Admin can change the mailbox setting, because the service account can access mailboxes in the organization. The module admin sees and tests the setting.
- When the mailbox, the mailbox type, the IMAP server or its on / off status changes, all Admins get a notification and an email; the change is written to the log.
- The processing log, rejected emails and Şimdi kontrol et ("Check now") are on the E-posta ile ekleme screen in WordPress.
- With IMAP, an email whose sender cannot be verified is not deleted; it is moved to the Prozence/Doğrulanamadı ("could not be verified") folder in the mailbox (the folder is created the first time).
- Gmail (Google Workspace) and IMAP mailboxes are supported. A Microsoft 365 (Exchange Online) mailbox is not supported; Exchange Online does not allow password sign-in over IMAP.
Importing on behalf of someone else and downloading the whole catalog
Who: Operator · Viewer · Module admin · App administrator · Where: Add card → Import; Customers → Download
What it does: Authorized roles can import an employee's old business card list on their behalf, and can download the customer catalog of the whole company. For the basic import and export steps, see 04. Customer directory.
Importing on behalf of someone else:
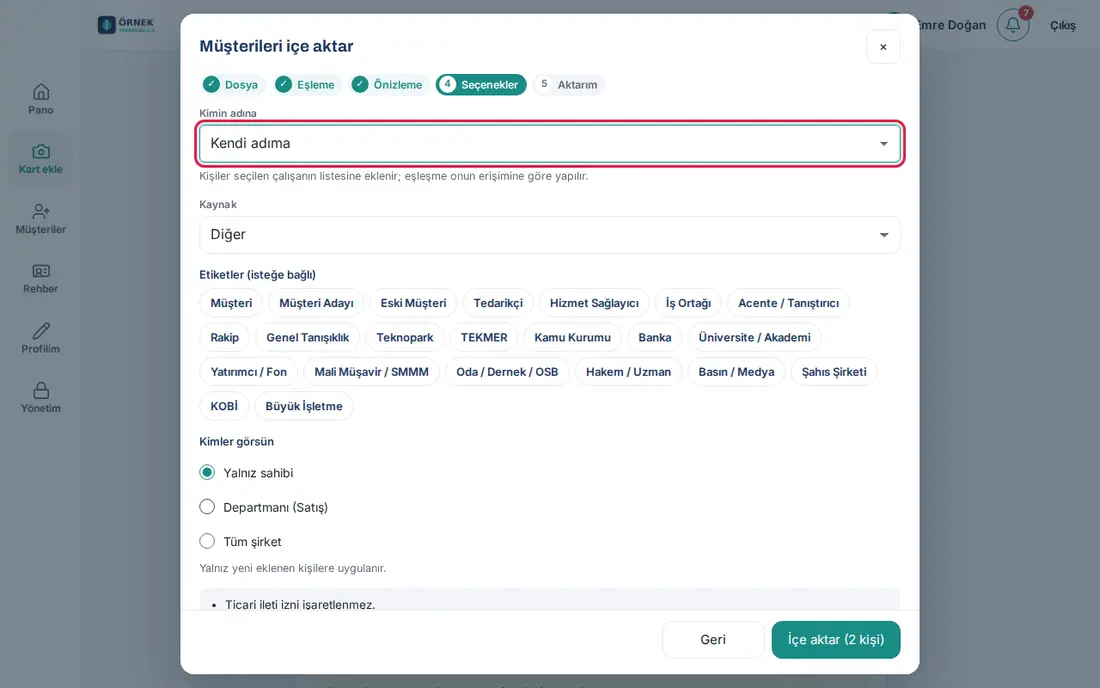
- On the Add card screen, click Import, select the file and do the mapping.
- In the Options step, select the employee from the On behalf of list (default On my own behalf). The contacts are added to the selected employee's list; matching is done according to that employee's access.
- Select the Source, Tags (optional) and Who can see, then click Import (N contacts).
Downloading the whole catalog:
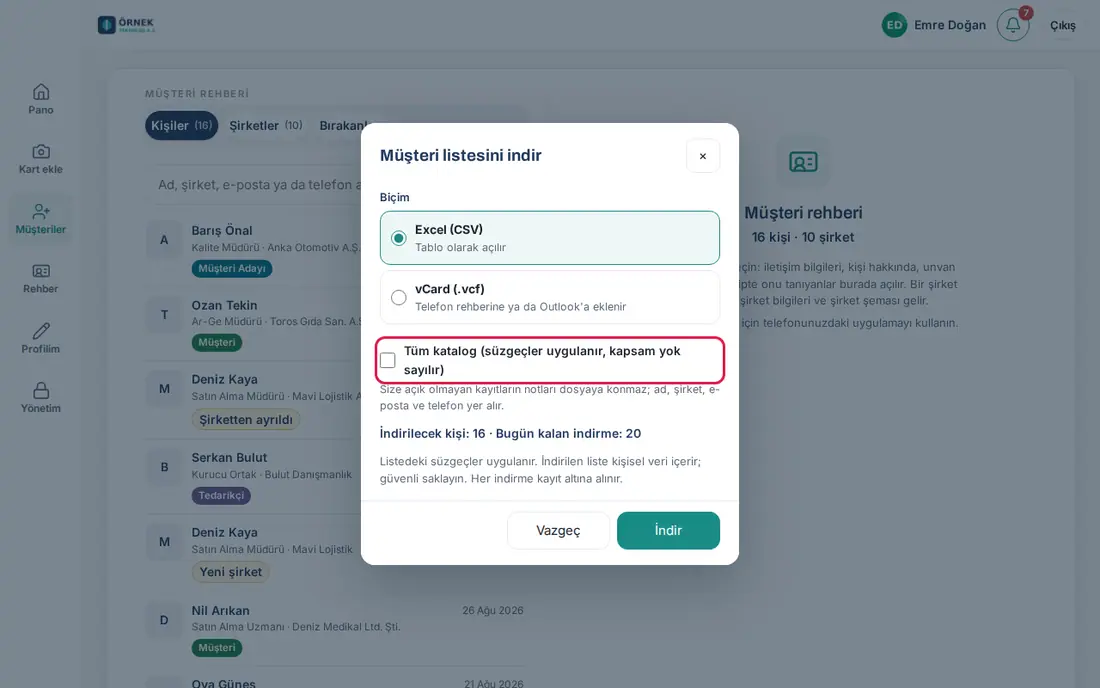
- In Customers, click Download.
- Select the Whole catalog (filters apply, scope is ignored) checkbox. If the Added from phone contacts filter is selected in the list, only the contacts added from phone contacts are downloaded from the whole catalog too (0.99.47).
- Select the Format and click Download.
Important:
- In the whole catalog, the notes of records that are not open to you are not put in the file; the name, company, email and phone are included.
- Each person can download at most 20 times per day; every download and every import (who, when, how many records) is written to the log.
- For imported contacts, commercial message consent is not marked, and the contacts are not sent to the CRM.
Commercial message consent and KVKK records
Who: App administrator (with Prozence permission in WordPress) · Where: WordPress → Prozence Workplace → KVKK / GDPR
What it does: You manage the commercial email consent of customer contacts and KVKK (Turkey's personal data protection law) requests. Consent comes from the Commercial message (email) consent obtained checkbox that the employee selects when adding a card; how and when it was obtained is written to the record.
If the contact wants to withdraw consent, there are two ways:
- Employee: Withdraw consent in the contact details (see 04. Customer directory).
- Administrator (WordPress):
- On the KVKK / GDPR screen, go to the Kayıt ara ("Search records") section.
- Type the person in the E-posta, telefon ya da ad ("Email, phone or name") box and click Ara ("Search").
- In the row, see the consent status in the Ticari ileti izni ("Commercial message consent") column.
- Type how the person told you in the Nasıl bildirdi? ("How did they tell you?") box and click İzni geri al ("Withdraw consent").
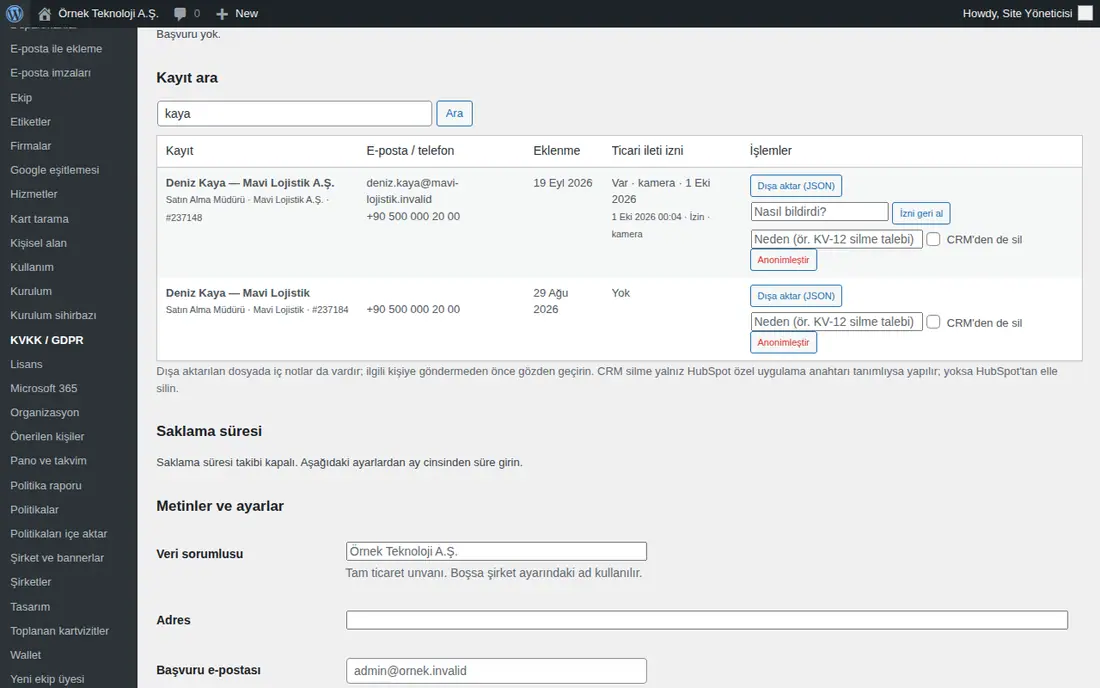
When consent is withdrawn, the consent is removed from the record, the evidence is written, and "no consent" goes to the connected CRMs.
Important: The Dışa aktar (JSON) ("Export (JSON)") and Anonimleştir ("Anonymize") actions on the same screen are for personal data requests; Anonimleştir cannot be undone. For the whole screen, see 15. Multiple companies, language, KVKK and license.
Customer records of an employee who has left
Who: App administrator (with Prozence permission in WordPress) · Where: WordPress → Prozence Workplace → Ekip ("Team") → employee → Ayrılış ("Leaving") box
What it does: Transfers the customer records scanned by an employee who left the company to the covering person; customers are not left without an owner.
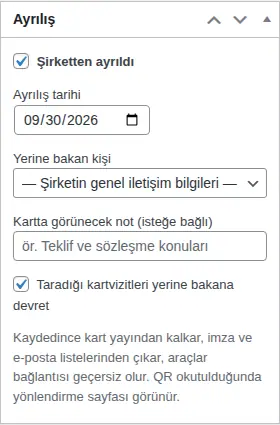
- When you mark the employee as left in the Ayrılış box, select the Yerine bakan kişi ("Covering person").
- Keep the Taradığı kartvizitleri yerine bakana devret ("Transfer scanned business cards to the covering person") checkbox selected.
- Save. The covering person is also added to the records scanned by the employee who left.
For all the steps, see 10. Administration and setup.
Important: The transfer checkbox appears only in the first leaving record. To share individual records later, an employee who can see the record, or the team manager, can use Share.
CRM connections (HubSpot and others)
Who: App administrator (with Prozence permission in WordPress) · Where: WordPress → Prozence Workplace → CRM bağlantıları ("CRM connections") (HubSpot: Kart tarama)
What it does: Contacts added with Add card, with the business card form (leave your details) and by email are sent to every active CRM. Contacts and companies are not duplicated (they are matched by email, phone and company name). The owner of the record is the CRM user of the employee who received the card.
Supported connections: HubSpot, Pipedrive, Salesforce, Zoho CRM, Bitrix24, Odoo, Microsoft Dynamics 365 and the general Webhook — Make, Zapier, n8n (for CRMs without a public API).
Connecting HubSpot:
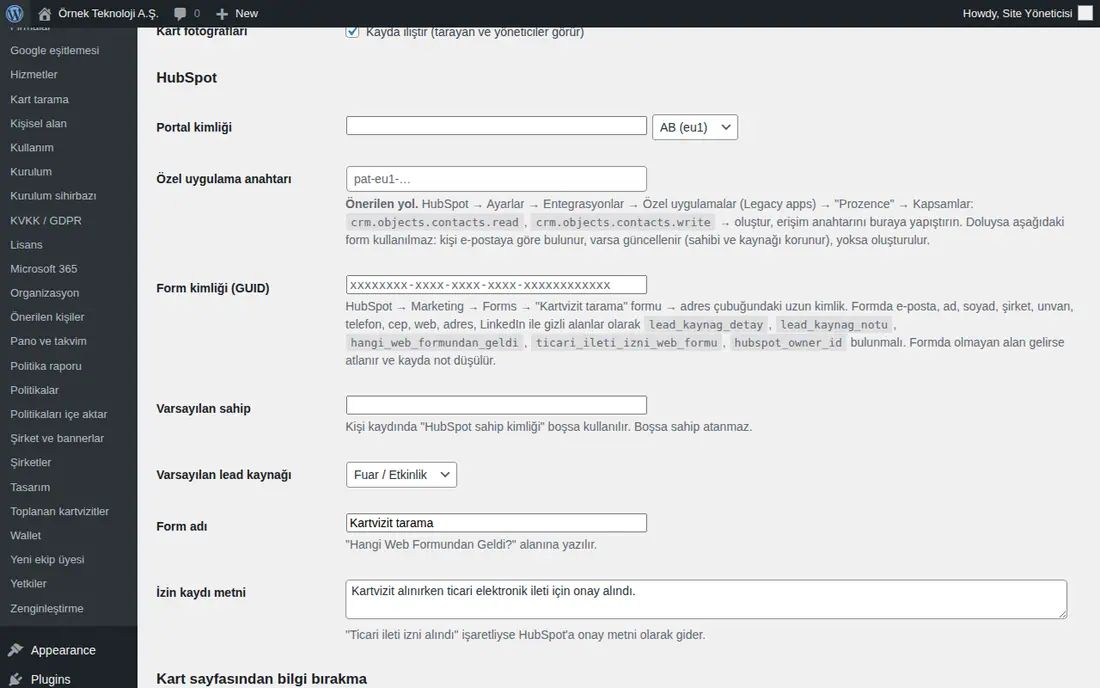
- In WordPress, open Prozence Workplace → Kart tarama and go to the HubSpot section.
- Type the Portal kimliği ("Portal ID") and select the region (AB (eu1) ("EU (eu1)") or ABD (na1) ("US (na1)")).
- Paste the Özel uygulama anahtarı ("Private app key") (the recommended way; you create it in HubSpot with contact read and write scopes). If there is no key, the form method with the Form kimliği (GUID) ("Form ID (GUID)") is used.
- Fill in the Varsayılan sahip ("Default owner"), Varsayılan lead kaynağı ("Default lead source"), Form adı ("Form name") and İzin kaydı metni ("Consent record text") fields.
- Click Kaydet ("Save").
Connecting other CRMs:
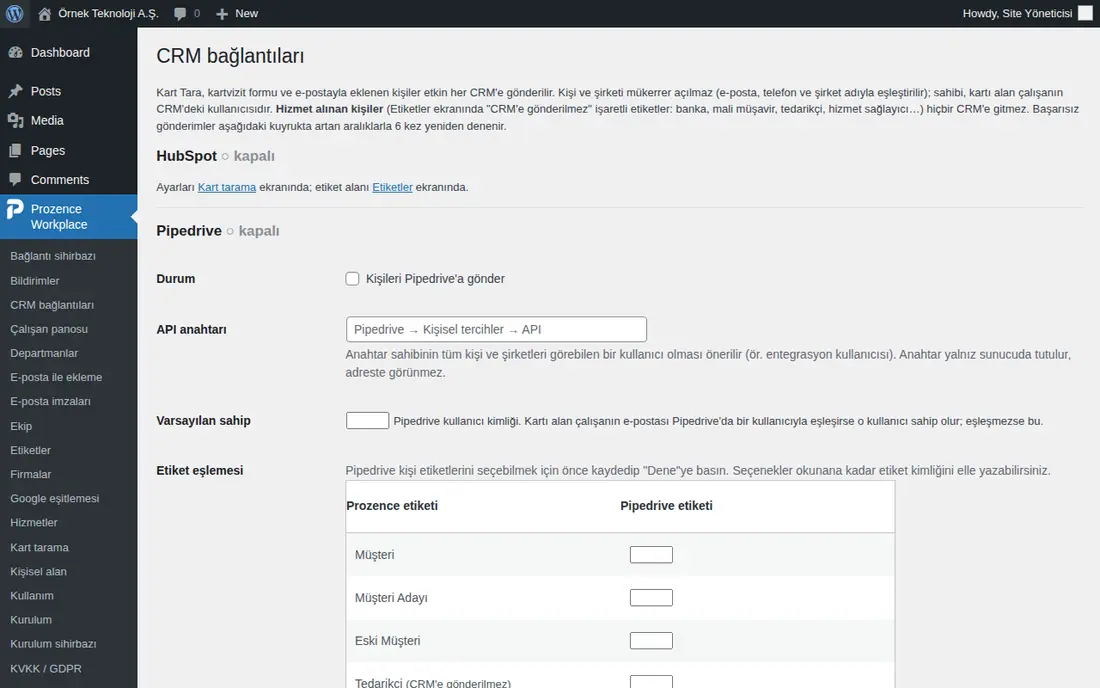
- Open the CRM bağlantıları screen. The heading of each connection shows its status (● etkin ("● active") or ○ kapalı ("○ off")).
- In the connection's section, select the Durum ("Status") checkbox (e.g. Kişileri Pipedrive'a gönder ("Send contacts to Pipedrive")) and fill in fields such as the key, default owner and tag mapping.
- Click Kaydet, then click Dene ("Test") to test the connection.
- To also send contacts that were added earlier, click Var olan kayıtları aktar ("Transfer existing records") (records are sent 25 at a time).
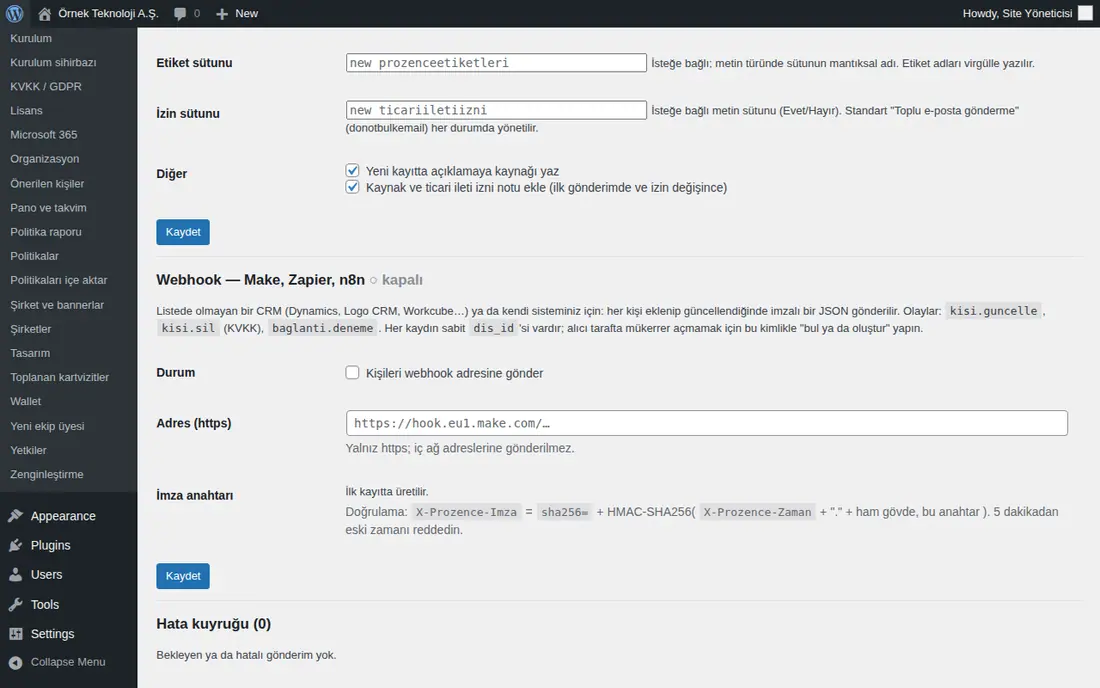
Records that could not be sent: The Hata kuyruğu ("Error queue") section at the bottom of the screen lists pending and failed sends. Temporary errors are retried 6 times automatically, at increasing intervals. After you correct the setting, click Tümünü şimdi dene ("Retry all now") or Yeniden dene ("Retry") in the row; remove an unnecessary row with Çıkar ("Remove").
Tip:
- You decide which tags go to the CRM with the Send to CRM checkbox in the Tags section.
- Microsoft Dynamics 365 uses the app registration set up for Microsoft 365 (see 13. Integrations).
Important:
- Contacts you buy services from, such as Supplier, Service Provider, Bank and Accountant / CPA, do not go to any CRM (if the contact has no sales tag too).
- Commercial message consent is carried to the CRM; "No" is written only when consent is withdrawn.
- Contacts imported from a file are not sent to the CRM.
- Contacts added one by one from phone contacts (sharing, Choose from phone contacts, Upload vCard file) are sent when the undo period ends, after 10 minutes; if the employee undoes the card, the contact never goes to the CRM. Contacts added from a vCard attachment in an email are sent immediately; contacts added from the import preview for several contacts are never sent (0.99.47).
- Keys are kept only on the server and appear masked on the screen.