04. Customer directory
Screenshots show the Turkish interface of Prozence with fictional "Örnek Teknoloji A.Ş." data; the English interface has the same layout.
The customer directory collects all customer contacts and companies that you and your team add in one list. You can search for a person, call them or send them an email, and add notes and reminders. You can share a record with your colleagues. Customers you have not contacted for a long time are marked as "cooling".
For the ways to add a card (photo, badge, manual entry, email signature, phone contacts), see 03. Adding cards (business card scanning). For the settings that administrators make (sources, tags, default sharing, cooling period), see 12. Customer directory administration.
In this chapter
- Opening the customer list
- Searching for people, companies and phone numbers
- Filtering the list (Filters panel)
- Quick filters, sorting and saved views
- Selecting several people (bulk actions)
- Contact details and quick actions
- Send my card
- Commercial message consent and withdrawing consent
- Adding a note
- Setting a follow-up reminder
- Tagging a contact
- Sharing a record
- Approving or rejecting an access request
- Known by the team and related people
- People whose job title or company changed
- Customer birthdays
- Company view
- Org chart
- People who left their details through your card
- Finding cooling customers
- My sales summary
- Downloading the list (export)
- Bulk import from a file
- Merging two records of the same person
- Customer directory on a computer
Who sees what? By default, a record you add is visible only to you and to your managers in the organization chart (your company may have chosen a different default). Managers see the cards that their teams add. You see another person's record only if it is shared with you. Everyone who can see a record can edit it.
Opening the customer list
Who: Employee · Where: Bottom menu Card → Customers
What it does: Shows all customer records that you can see.
- On your phone, tap Card in the bottom menu, then select Customers in the tabs at the top. On a computer, click Customers in the left menu.
- Select one of the tabs at the top:
- People: customer contacts. The number in brackets is the total number of people.
- Companies: customer companies (see Company view).
- Left details: people who left their details through your digital card (see People who left their details through your card).
- Each row shows the company logo or a coloured initial, the person's name, job title and company, at most two tags (more are shown as "+2") or a status badge, and the last contact date ("Last contact: 30 Sep"). If a colleague added the record, their initials appear on the right (hover to see the name).
- The list loads 50 records at a time. To see more, tap Show more at the bottom of the list.
- To open a person's details, tap the row.
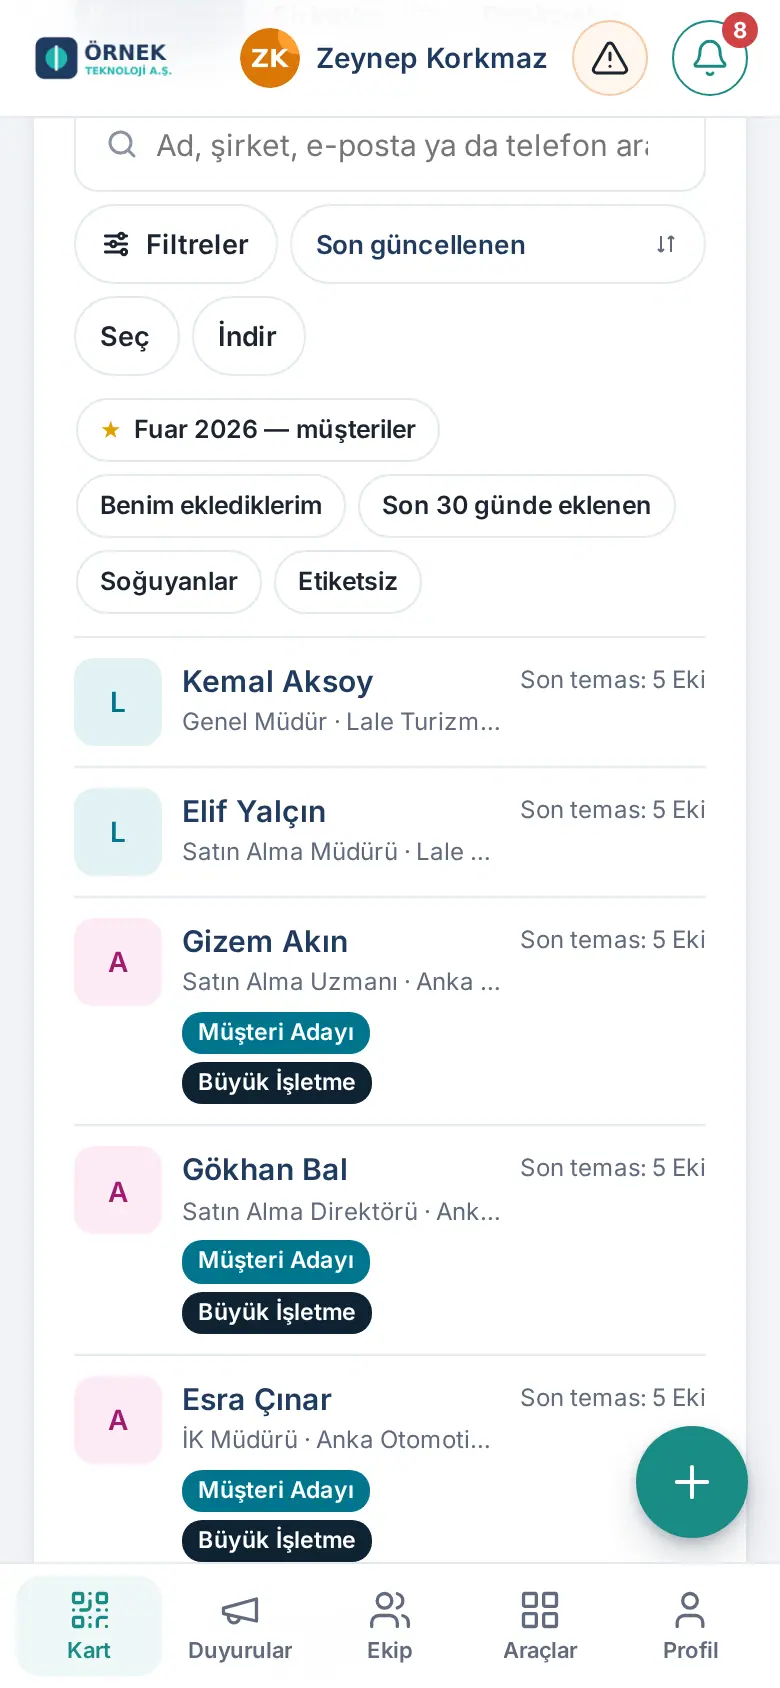
Tip: If you see the Access requests box above the list, a colleague wants access to one of your records (see Approving or rejecting an access request).
Searching for people, companies and phone numbers
Who: Employee · Where: Customers → search box
- Type what you are looking for in the Search name, company, email or phone box.
- The list gets shorter as you type. The search covers all records that you can see, not only the 50 records on the screen.
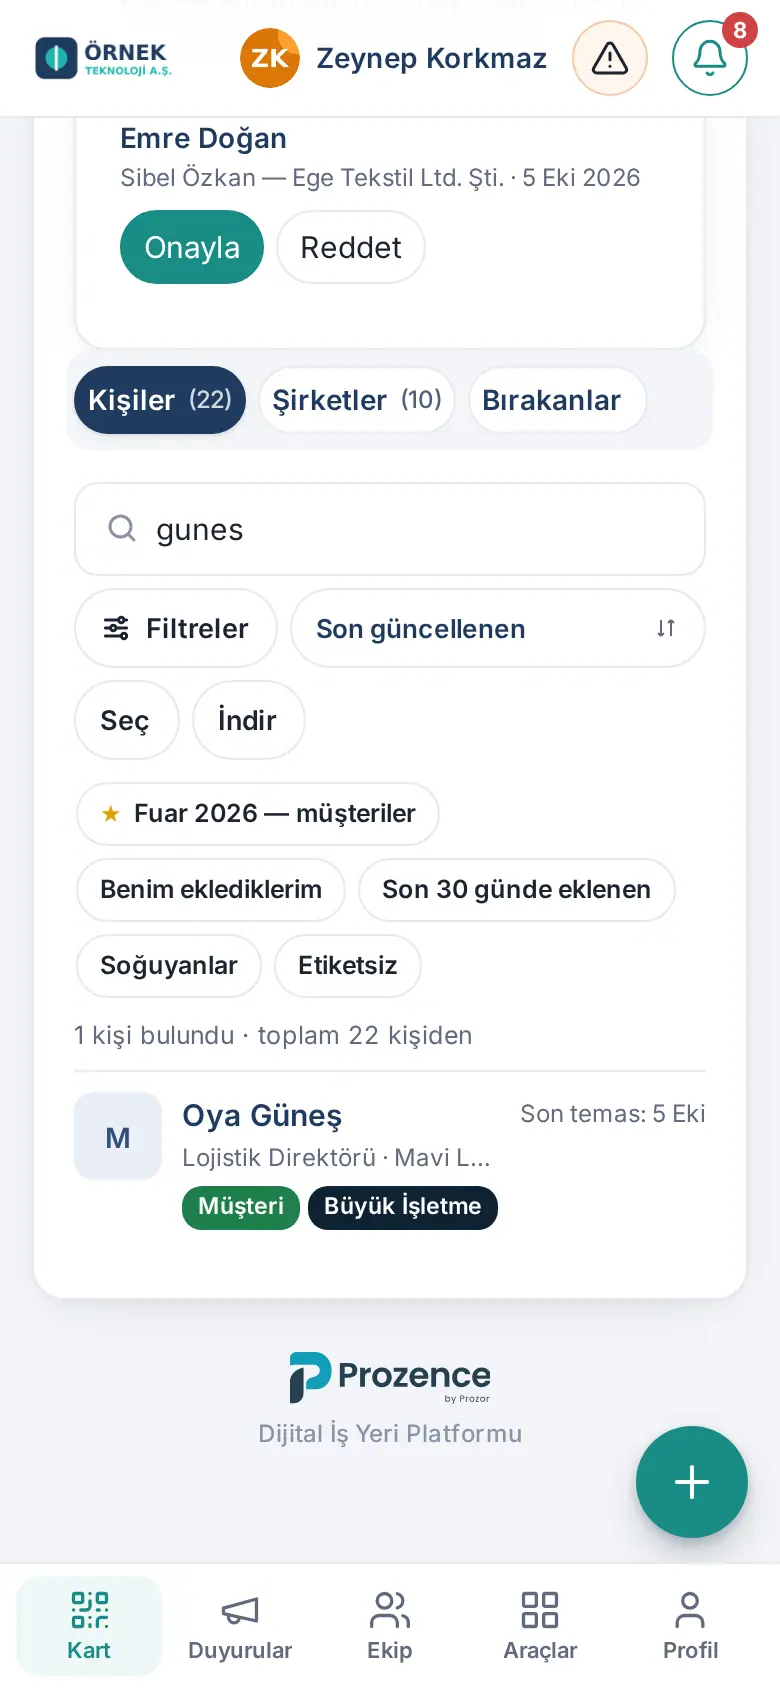
Tip: You do not have to type Turkish letters: "gunes" finds Güneş, "ILKER" finds İlker, "ayse" finds Ayşe.
Filtering the list (Filters panel)
Who: Employee · Where: Customers → Filters
What it does: Narrows the list by tag, date added, last contact, the employee who added the record, source, how the record was added and status. Filters only work on the records you can already see.
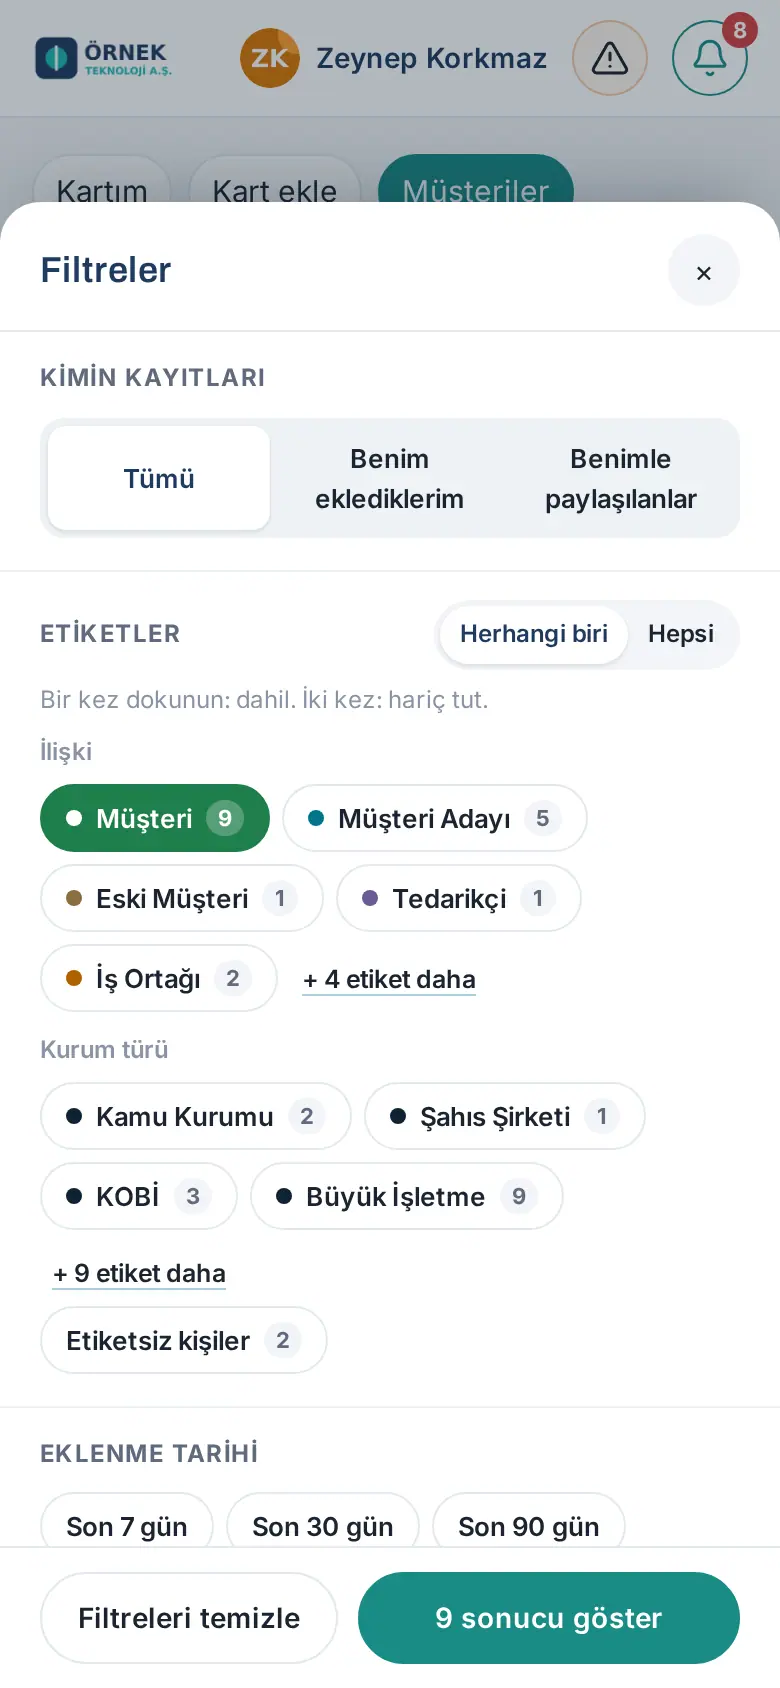
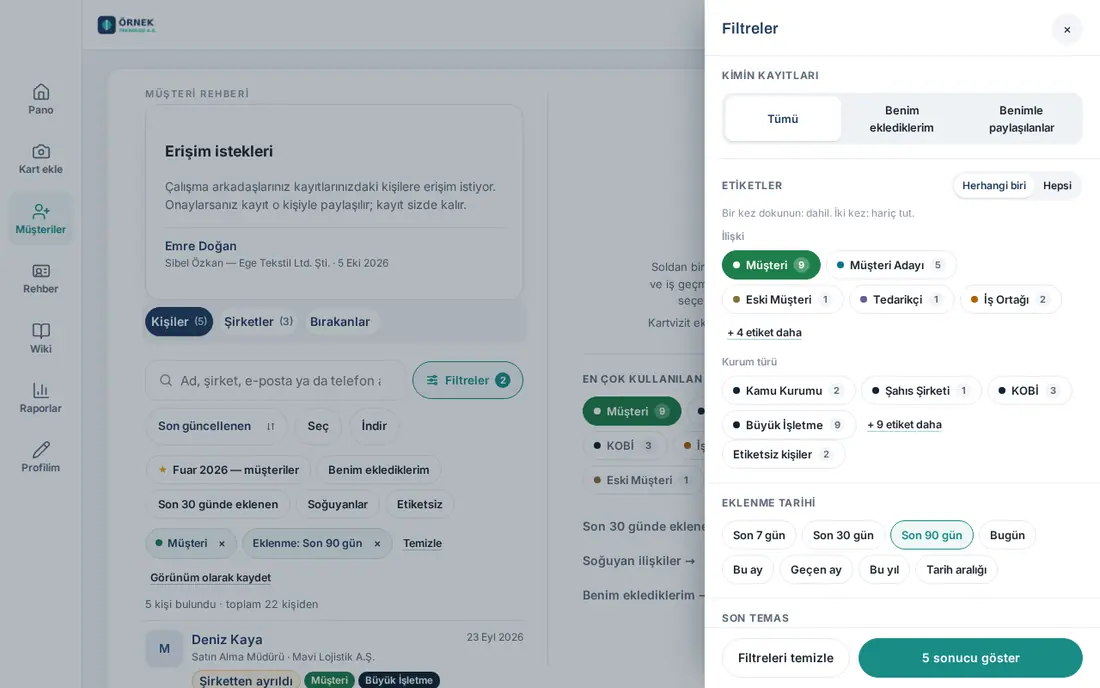
- Tap Filters next to the search box. On a phone the panel opens from the bottom; on a computer it opens from the right.
- Select the filters that you want. The list updates right away with each choice; the number next to an option is the number of people with that option.
- Whose records: All, Added by me, My team's (if you have a team) or Shared with me.
- Tags: tap a tag once to list the people who have it. Tap it twice to exclude that tag (the chip shows "Excluding: …"). A third tap removes the choice. If you select several tags, use Any / All at the top to show people with "any of the tags" or "all of them". Unused tags are under + … more tags. Untagged people shows the people with no tag at all. A tag given to a company also counts for the people at that company.
- Date added: Today, Last 7 days, Last 30 days, Last 90 days, This month, Last month, This year or Date range (the start and end days are included).
- Last contact: Contact in the last 7 / 30 / 90 days or No contact (cooling customers; see Finding cooling customers).
- Added by: the employee who first added the record; Me comes first. If the list is long, use Search employees.
- Source: the source selected when the card was added (e.g. Trade show / Event, Referral); Not specified shows records with no source.
- How added: Card scan, QR code, Event badge, Email signature, Entered manually, Left via my card, Mailbox, Phone contacts, Import or Visitor sign-in (only the ones in your list appear).
- Status: Has email / No email, Has phone / No phone, Marketing consent given / No marketing consent, Sent to CRM / Not sent to CRM (if a CRM is connected), Has card photo, Title or job changed.
- Event: a trade fair or event (see 05. Events and trade fairs); shown if there are events.
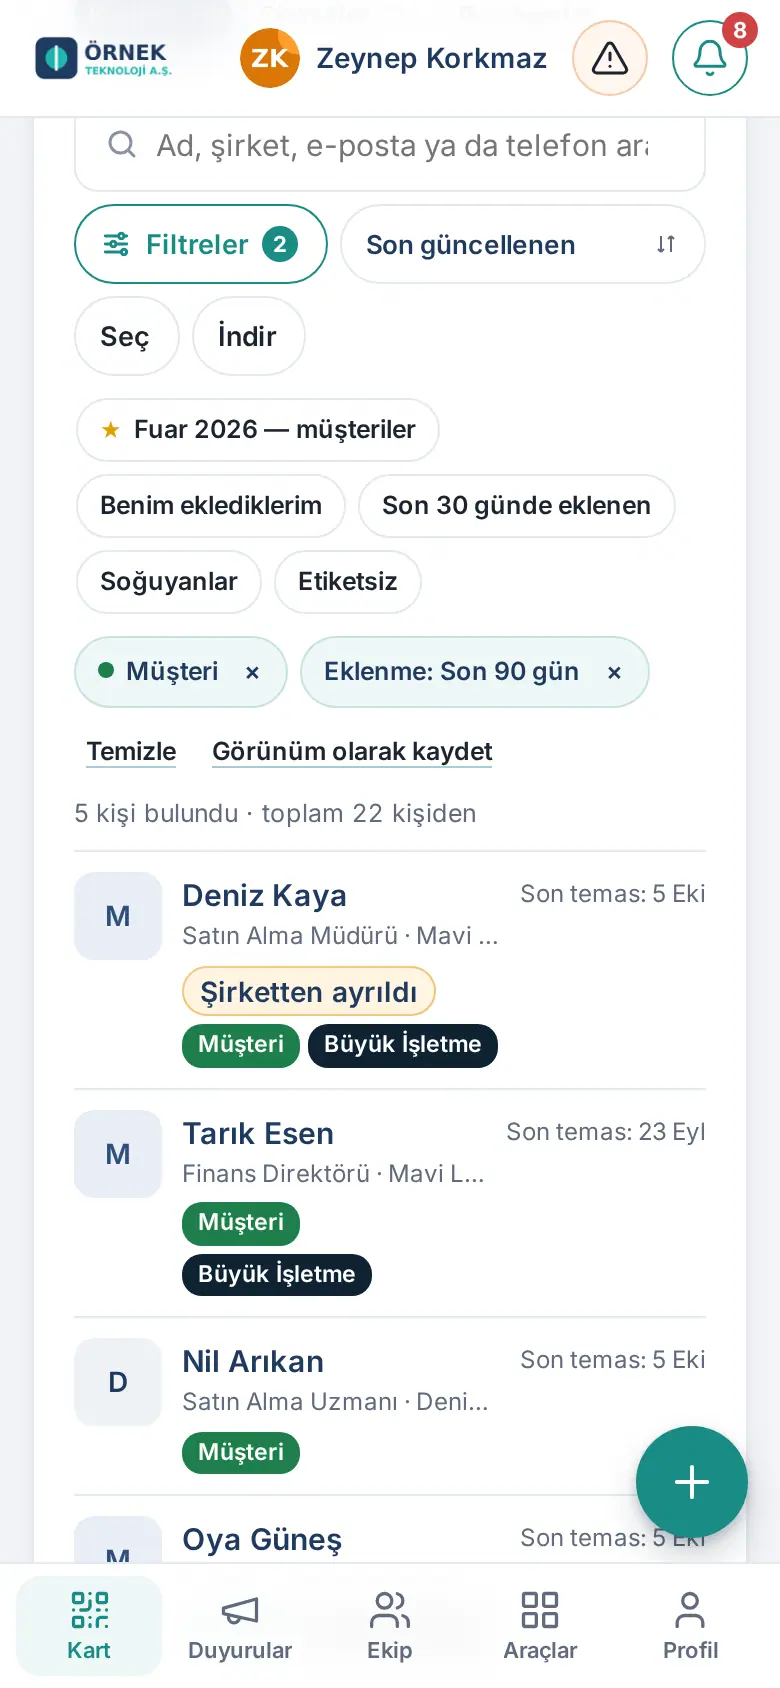
- Tap Show … results at the bottom. The selected filters appear above the list as chips; the Filters button shows the number of selected filters, and a "… people found · out of … people" line appears above the list.
- To remove a filter, tap × on its chip. To remove all of them, tap Clear next to the chips or Clear filters in the panel.
Tip:
- Several choices under the same heading are combined with "or"; different headings are combined with "and". For example, the Customer tag + Last 30 days = customers added in the last 30 days.
- Filters are also written to the address bar: if you send the link to a colleague, it opens with the same filters (they only see the records they can see themselves).
- Download also uses the current filters, search and sort order (see Downloading the list).
Quick filters, sorting and saved views
Who: Employee · Where: Customers → below the search box
What it does: Turns on the filters you use often with one tap, sorts the list in the order you want and saves your filter combinations with a name.
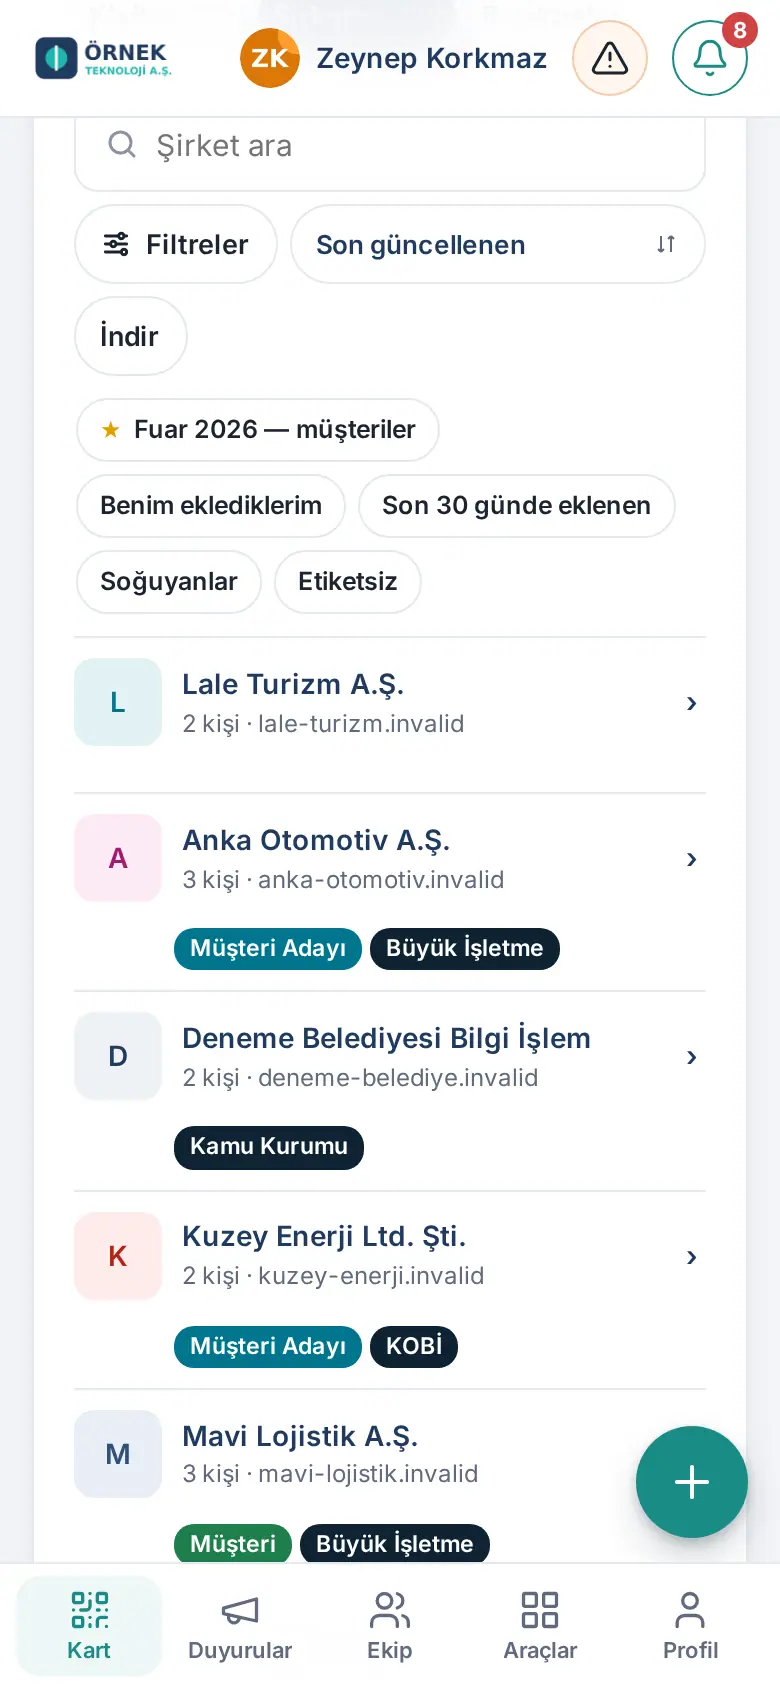
- Tap one of the quick filters below the search box: Added by me, My team's, Added in the last 30 days, Cooling or Untagged. A selected quick filter appears dark with a check mark; tap it again to remove it.
- To change the order, choose from the sort box: Recently updated (default), Newest first, Oldest first, By name (A–Z), By company (A–Z), Last contact (recent) or Longest without contact. When you sort by date added, the date on the row is the date added.
- To save a filter combination, select the filters, tap Save as view next to the chips, type a name (e.g. "Fair 2026 — leads") and tap Save.
- A saved view appears with ★ at the start of the quick filters. Tapping it applies its filters; tapping it again while it is selected clears the filters.
- To delete a view, tap Delete under Saved views at the bottom of the Filters panel.
Tip: Saved views belong only to you; you can save at most 20 views. If you save again with the same name, the old view is updated.
Selecting several people (bulk actions)
Who: Employee · Where: Customers → Select
What it does: Adds or removes tags for several people at once and downloads the people you select.
- If needed, search or filter the list first.
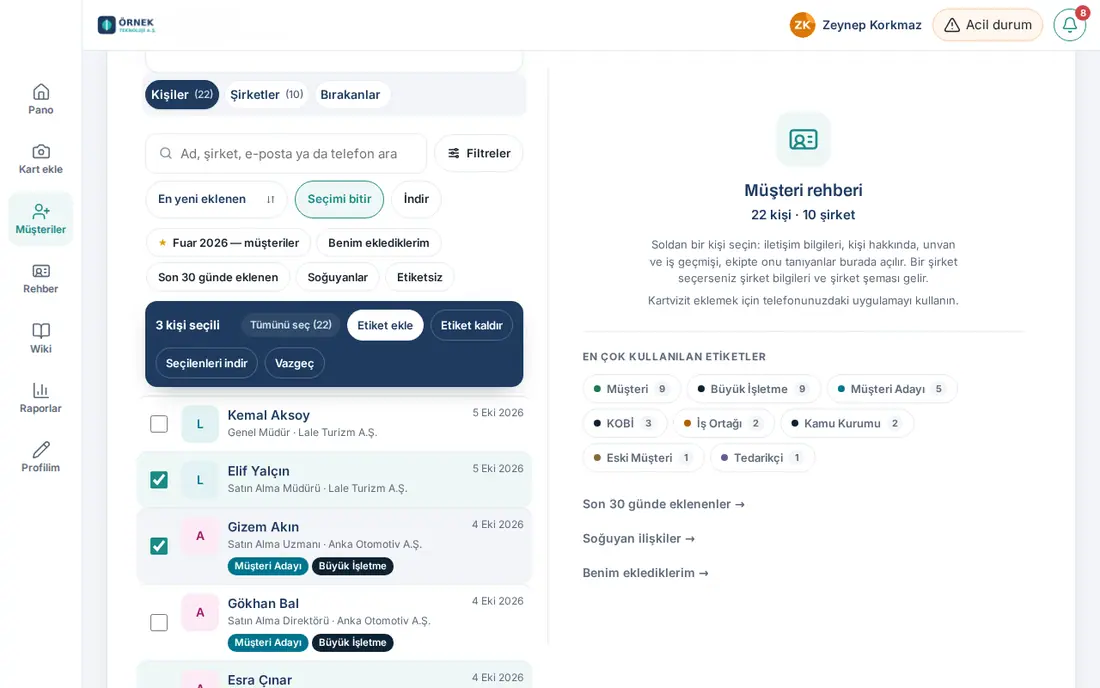
- Tap Select. A check box appears at the start of each row, and a dark action bar opens above the list.
- Tick people one by one, or use Select all (…) to select everyone who matches the filter (not only the ones on screen; at most 5,000).
- Choose an action:
- Add tag: select the tags in the tag window and tap Save. The people's existing tags are kept.
- Remove tag: select the tags to remove and tap Save.
- Download selected: downloads only the people you selected (see Downloading the list).
- When the action is done, "Tag added: … people" appears. To leave selection, tap Cancel or Done selecting.
Important:
- Bulk tagging only changes the person's own tags. A tag given to the company (shown faded on the person) stays; change company tags from the Companies tab.
- A record you cannot see is never included; if there is one, the result shows "… records skipped".
- If tags are sent to the CRM, the changed people are sent to the CRM again in the background.
Contact details and quick actions
Who: Employee · Where: Customers → tap a person
What it does: Shows all the information about a person and the actions you can take with them on one screen.
- Tap the person in the list. On a phone, the details open in full screen.
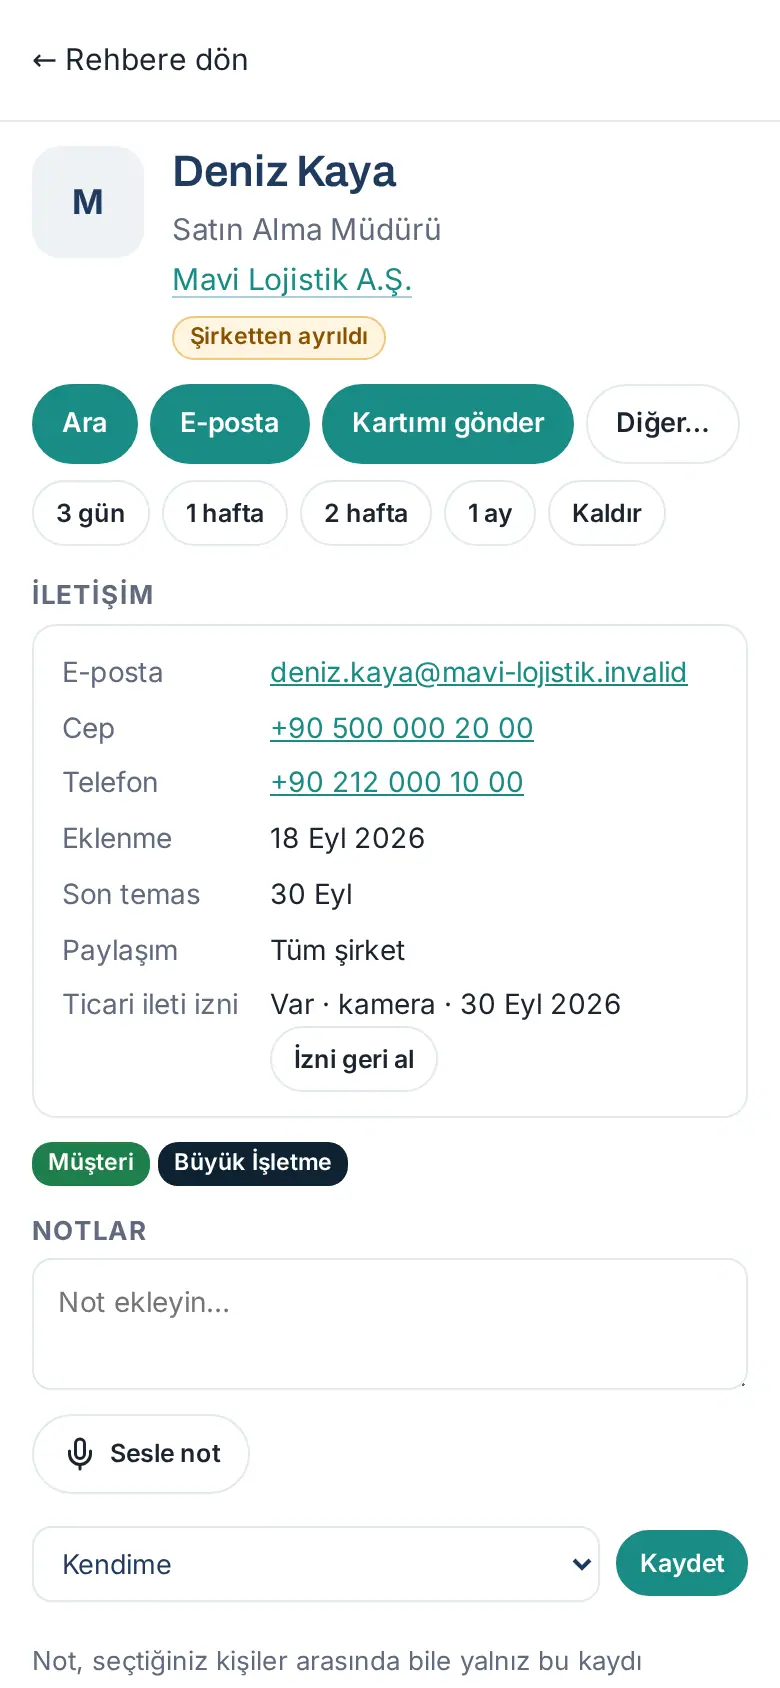
- The person's name, job title and company are at the top, with status badges below (e.g. Cooling, Left the company, Shared by: …, From my team: …, Read from badge).
- Use the three main buttons:
- Call: calls the person's mobile phone.
- Email: opens a new message in your email app.
- Send my card: sends your own digital business card to the person (see Send my card).
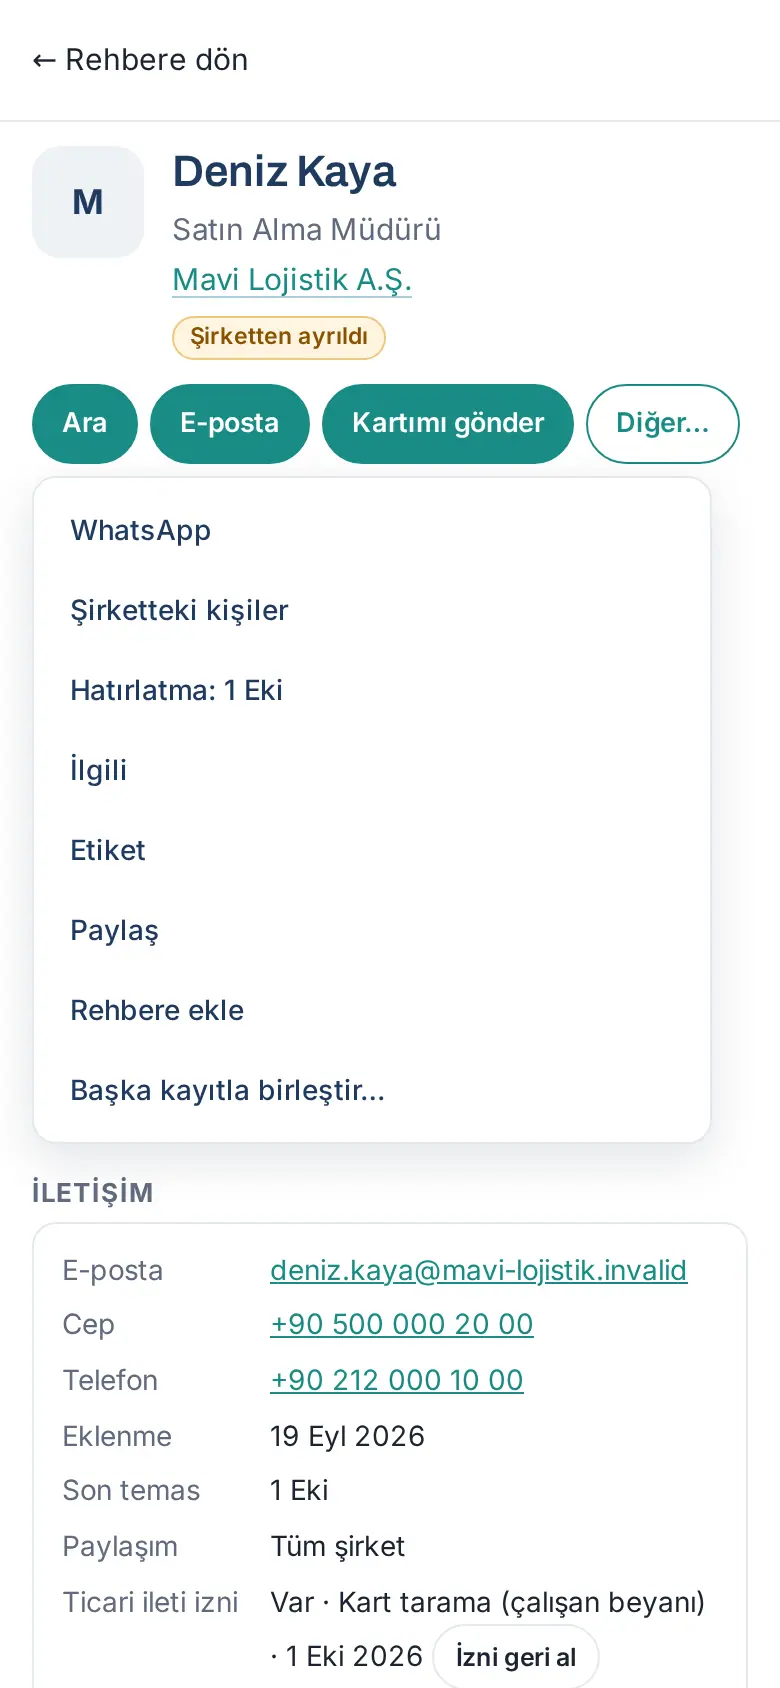
- For other actions, tap More…. The menu contains:
- WhatsApp: writes to the person on WhatsApp.
- People at the company: opens the person's company.
- Remind: sets a follow-up reminder (see Setting a follow-up reminder).
- Related: shows who on the team knows the person and people from the same company.
- Tag: tags the person.
- Share: shares the record with your colleagues.
- Add to contacts: saves the person to your phone's contacts (contact card, .vcf).
- See card: opens the business card photo (if the photo is stored).
- Merge with another record…: merges two records of the same person.
- Scroll down. The sections come in this order: Contact, tags, Notes, Known by the team, Company, From the same company and About the person.
- To go back to the list, tap ← Back to directory.
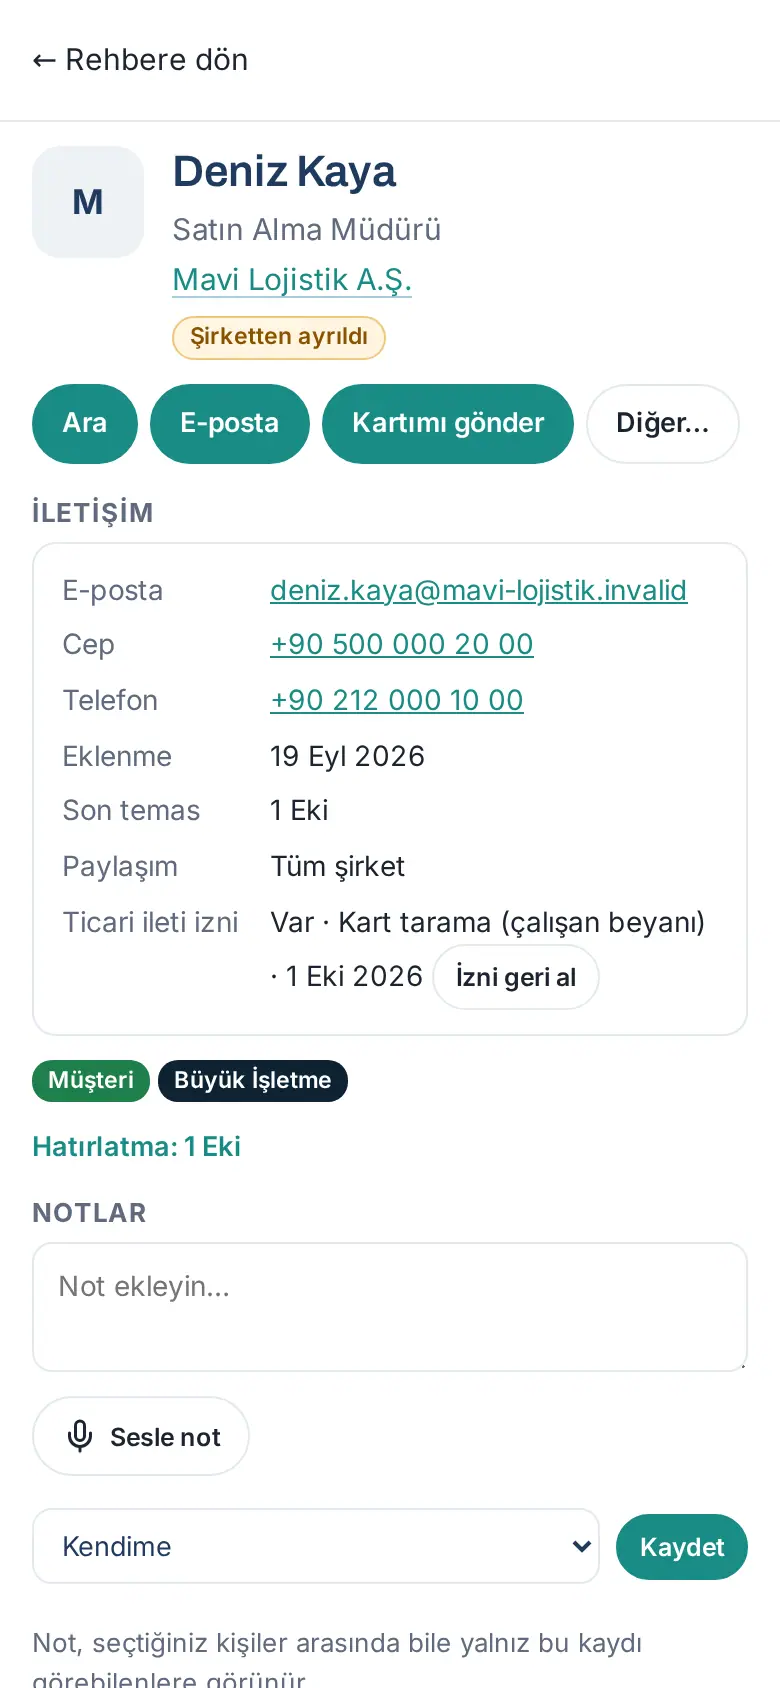
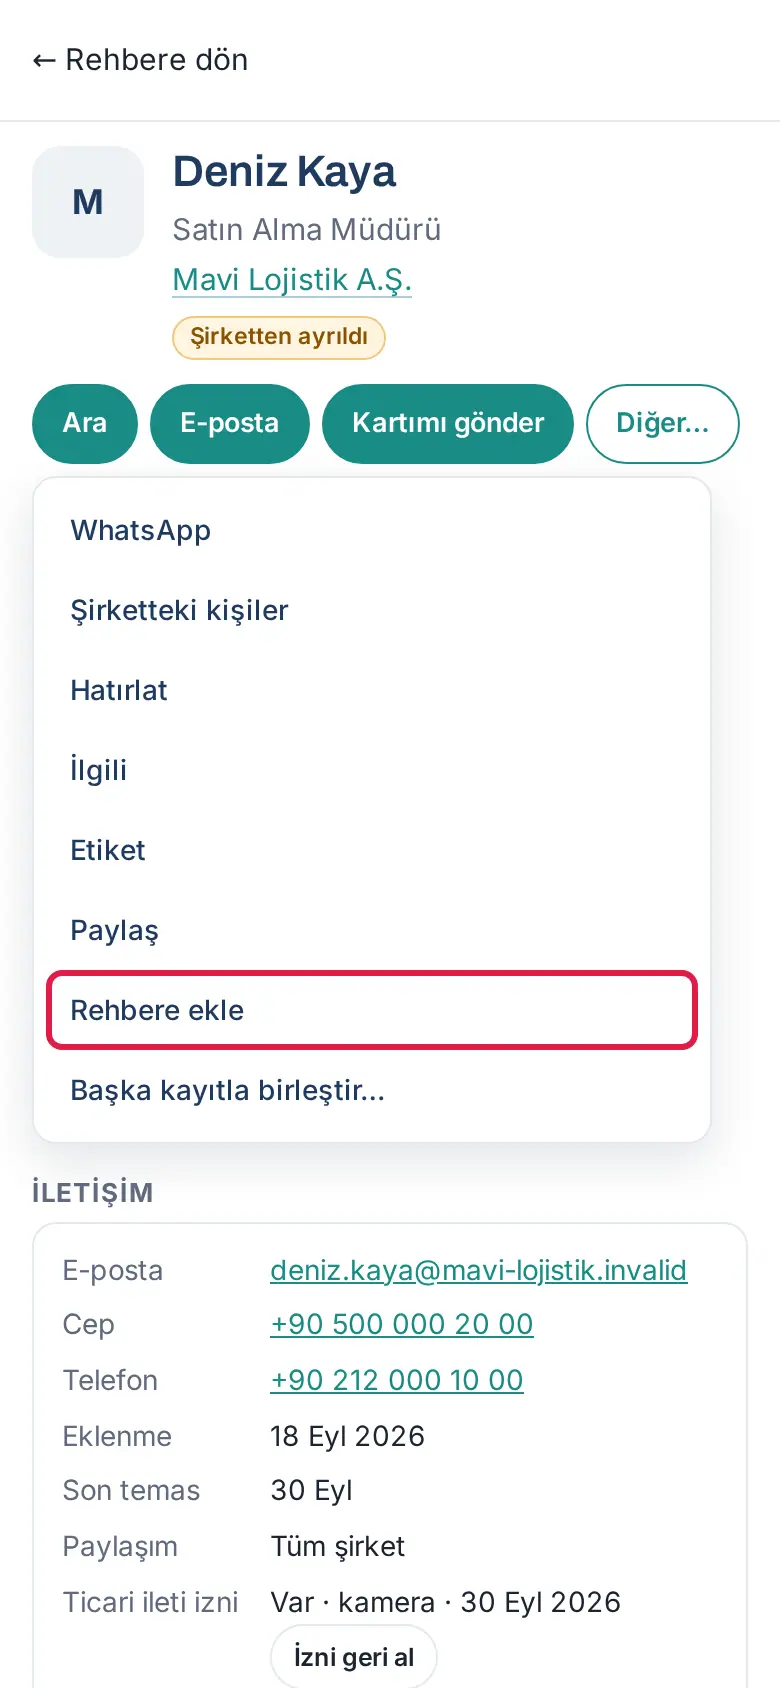
The Contact section contains these rows (only the rows with information appear): Email, Mobile, Phone, LinkedIn, Added, Last contact, Post, Commercial message consent, Note. Tap an email address or phone number to write an email or call directly.
Tip: If the person has no information for a button, the button does not appear (e.g. if there is no mobile number, Call and WhatsApp do not appear).
Send my card
Who: Employee · Where: Contact details → Send my card
What it does: You send your own digital business card to a person you met by email, WhatsApp or SMS.
- In the contact details, tap Send my card.
- Select the channel: Email, WhatsApp or SMS. If your phone supports the share menu, Share… also appears.
- If you selected Email, the Subject and Message are filled in for you. Change them if you want.
- Tap Send the email.
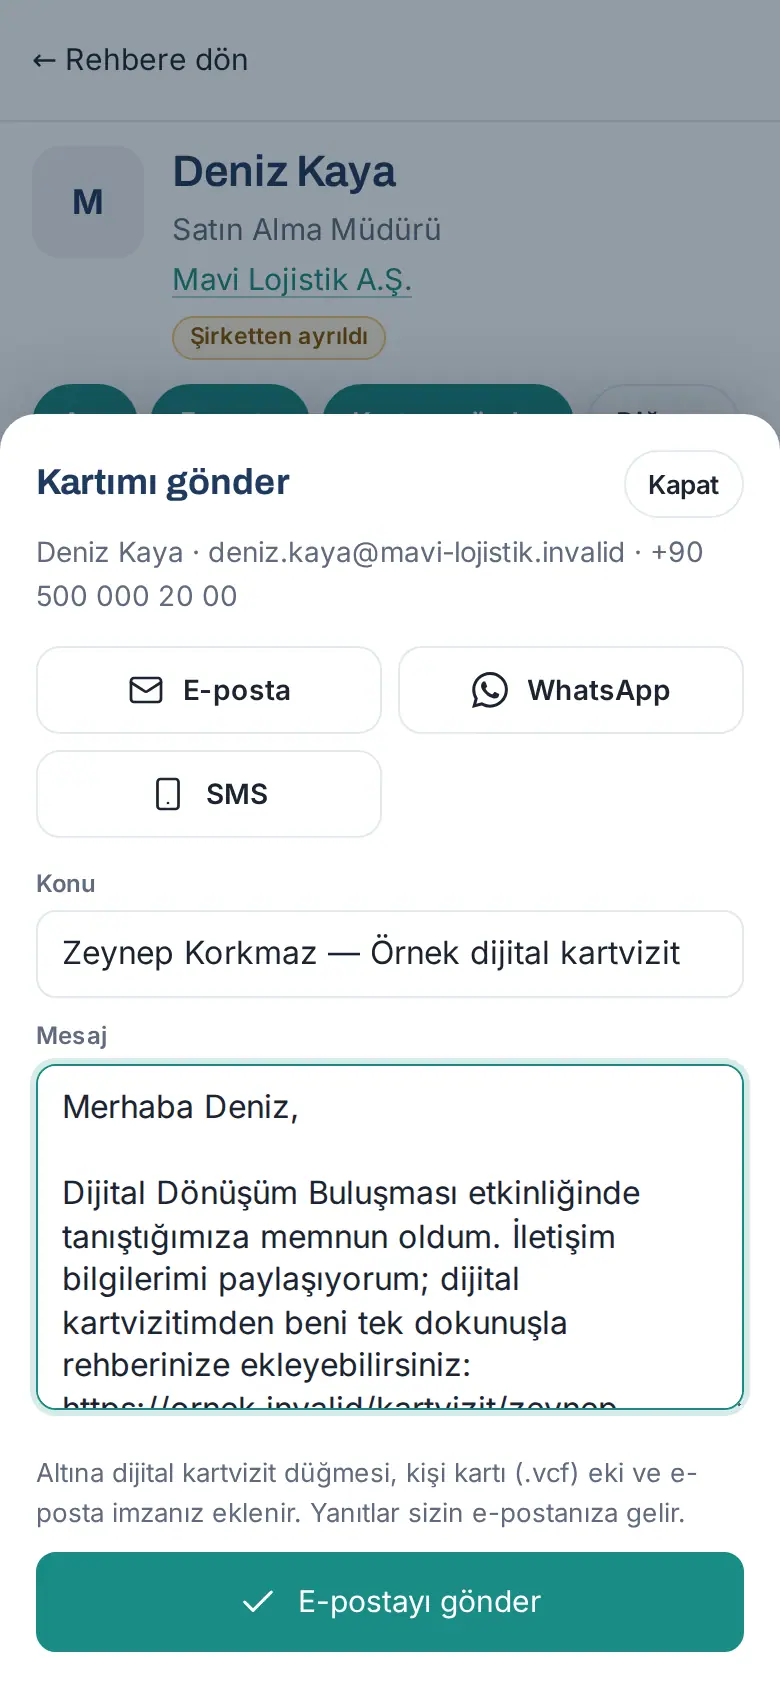
A digital business card button, a contact card (.vcf) attachment and your email signature are added to the bottom of the email. If the person replies, the reply comes to your email address. After you send it, the button shows "Card sent: …" and the date.
Important: You can send an email to the same person once every 12 hours, and at most 40 emails per day.
Commercial message consent and withdrawing consent
Who: Employee · Where: Contact details → Contact → Commercial message consent
What it does: Shows whether the person gave you consent to send them commercial emails. If the person wants to withdraw consent, you update the record here. KVKK (Turkey's personal data protection law) requires that consent and its withdrawal are recorded.
Consent is given by ticking the Commercial message (email) consent obtained box when you add a card (see 03. Adding cards (business card scanning)). The Commercial message consent row shows the status of the consent, how it was obtained and the date (e.g. "Yes", then how it was obtained, such as card scanning, and the date "30 Sep 2026").
If the person tells you by phone or email "I do not want any more messages":
- Open the contact details.
- In the Commercial message consent row, tap Withdraw consent.
- In the box that opens, write how the person told you (e.g. "by phone"). This is optional.
- Confirm. The message "Consent withdrawn; also forwarded to the CRM." appears.
Important: The withdrawal is recorded and goes to the connected CRM as "no consent". Do not send commercial emails to the person any more.
Adding a note
Who: Employee · Where: Contact details → Notes
What it does: Keeps your meeting notes in the person's record. You can make a note visible only to yourself or to your team.
-
In the contact details, go to the Notes section.
-
Type your note in the Add a note… box. To write by speaking, tap Dictate (see 03. Adding cards (business card scanning)).
-
In the Who can see row, tap who will see the note:
- To myself (default): only you.
- To my department: people in your department who can see the record.
- Everyone who can see the record: all employees who can see the record.
If your department is not set, To my department is dimmed and cannot be selected.
-
Tap Save. After saving, the selection goes back to To myself.
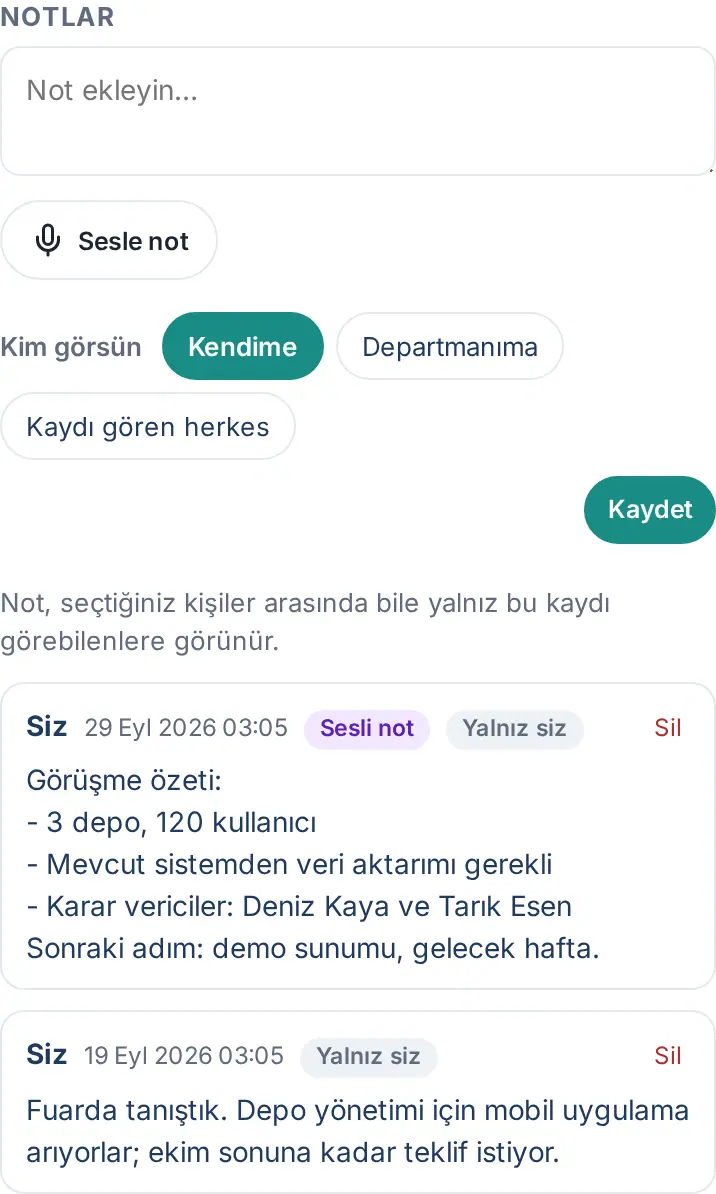
- Each note shows the author, the date and who can see it (e.g. Only you). Dictated notes have the Voice note mark.
- You can reply to a note that is visible to others with Reply. Replies appear below the note.
- You can delete your own note with Delete. The replies to the note are also deleted.
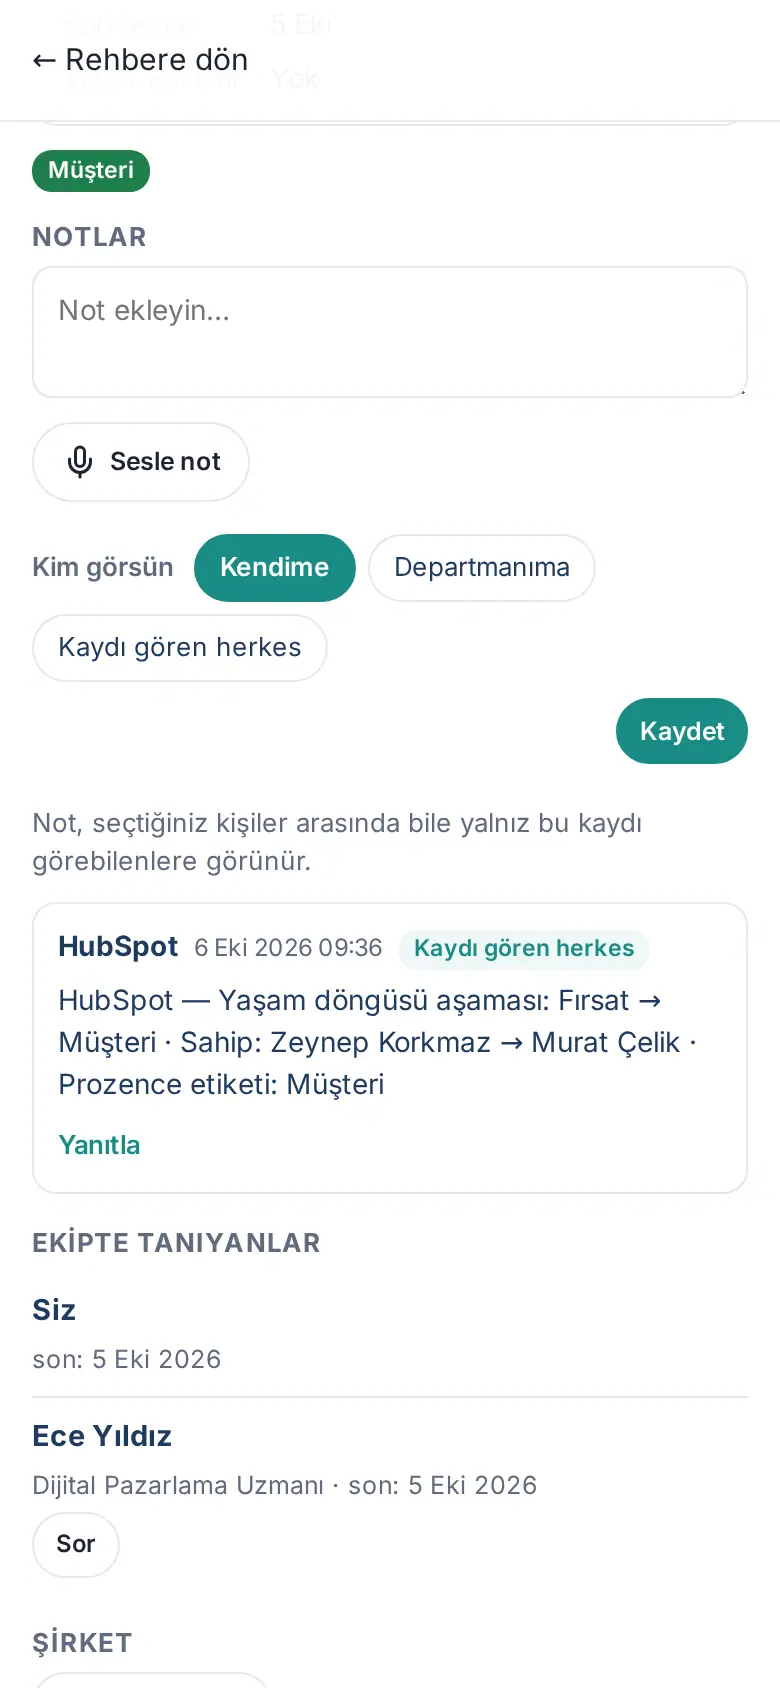
- If your company has turned on read-back from the CRM, a note written by the CRM (e.g. HubSpot) is added automatically when the contact's stage or owner changes in the CRM. These notes are visible to everyone who can see the record; you can reply to them (0.99.52; see 13. Integrations).
Tip: If your company has turned on AI, a Summarize suggestion appears in the contact details after you speak with Dictate; if you tap it, AI suggests a short summary and a next step. For the person's name and company to be sent too, you must tick the Also send the contact's name and company box; by default they are not sent.
Important: Even among the people you select, the note is visible only to those who can see this record.
Setting a follow-up reminder
Who: Employee · Where: Contact details → More… → Remind
What it does: Sends you an email (and a phone notification, if turned on) so that you do not forget to call a customer again or to send a quote.
- In the contact details, tap More…, then Remind.
- Select the period: 3 days, 1 hafta ("1 week"), 2 hafta ("2 weeks") or 1 ay ("1 month").
- The message "You'll get a reminder by email on the morning of …" appears. The reminder shows as "Reminder: …" above the Notes section of the contact details and in the More… menu.
- To delete the reminder, select Remove in the same menu.
To see all your reminders:
- Tap Profile in the bottom menu and select the Reminders tab.
- Each reminder shows the person, the company and the time. Use:
- Snooze 3 days or 1 hafta ertele ("snooze 1 week");
- Completed: when you finish the task.
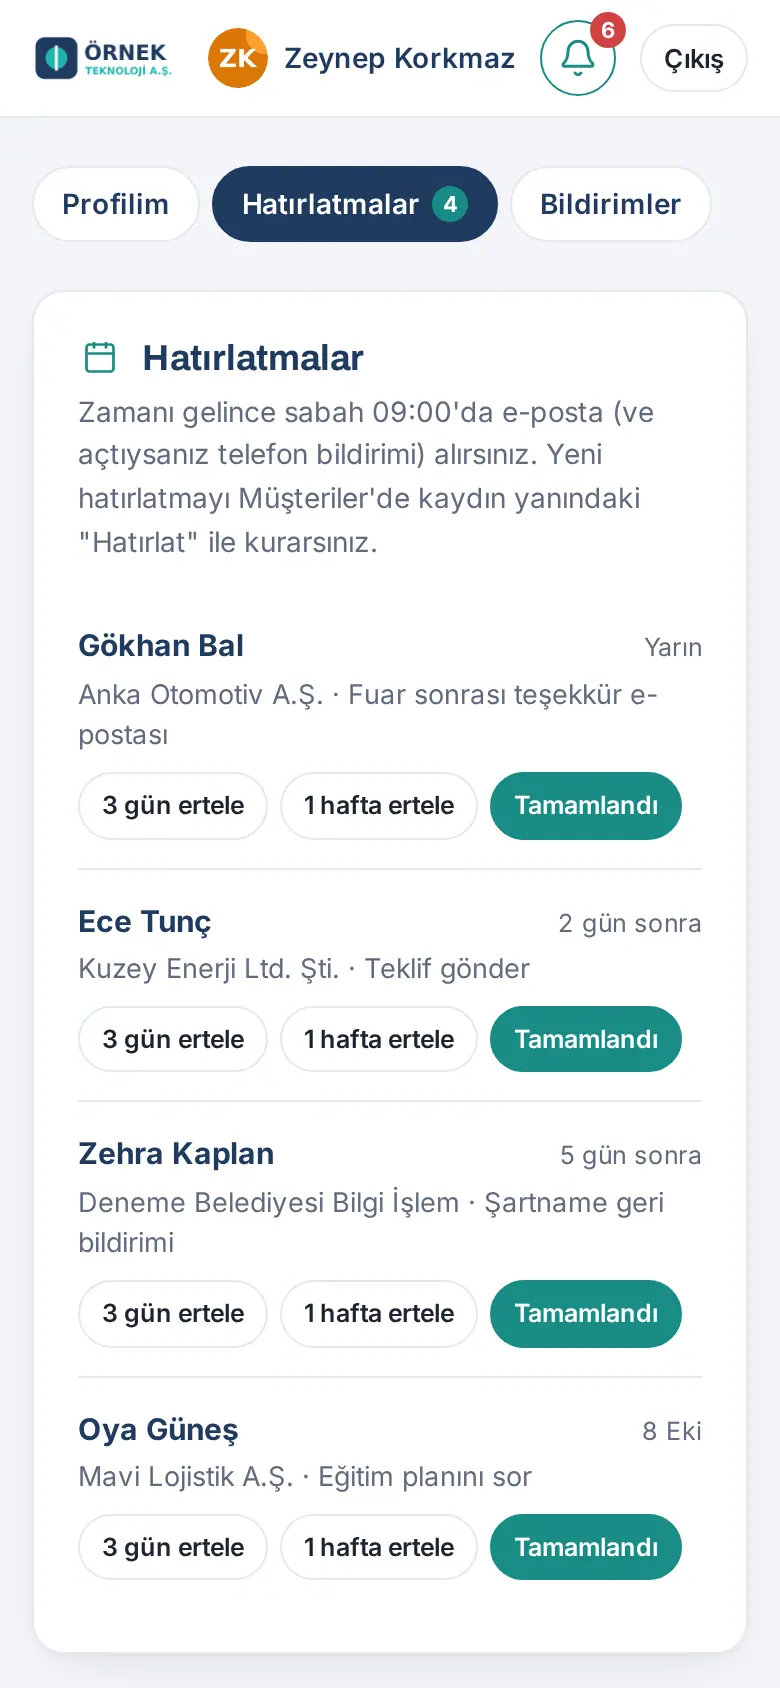
Tip: When the reminder is due, you get an email at 09.00 in the morning. You can also select Follow-up reminder when you add a card (see 03. Adding cards (business card scanning)). For notification settings, see 09. Notifications.
Tagging a contact
Who: Employee · Where: Contact details → More… → Tag
What it does: Groups the person by relationship type (Customer, Prospect, Supplier…) and organization type (Public Institution, SME…). You can filter the list by tag.
- In the contact details, tap More…, then Tag.
- The Tags window shows two groups: Relationship and Organization type. Tap the tags that you want to give; selected tags appear in color.
- Tap Save.
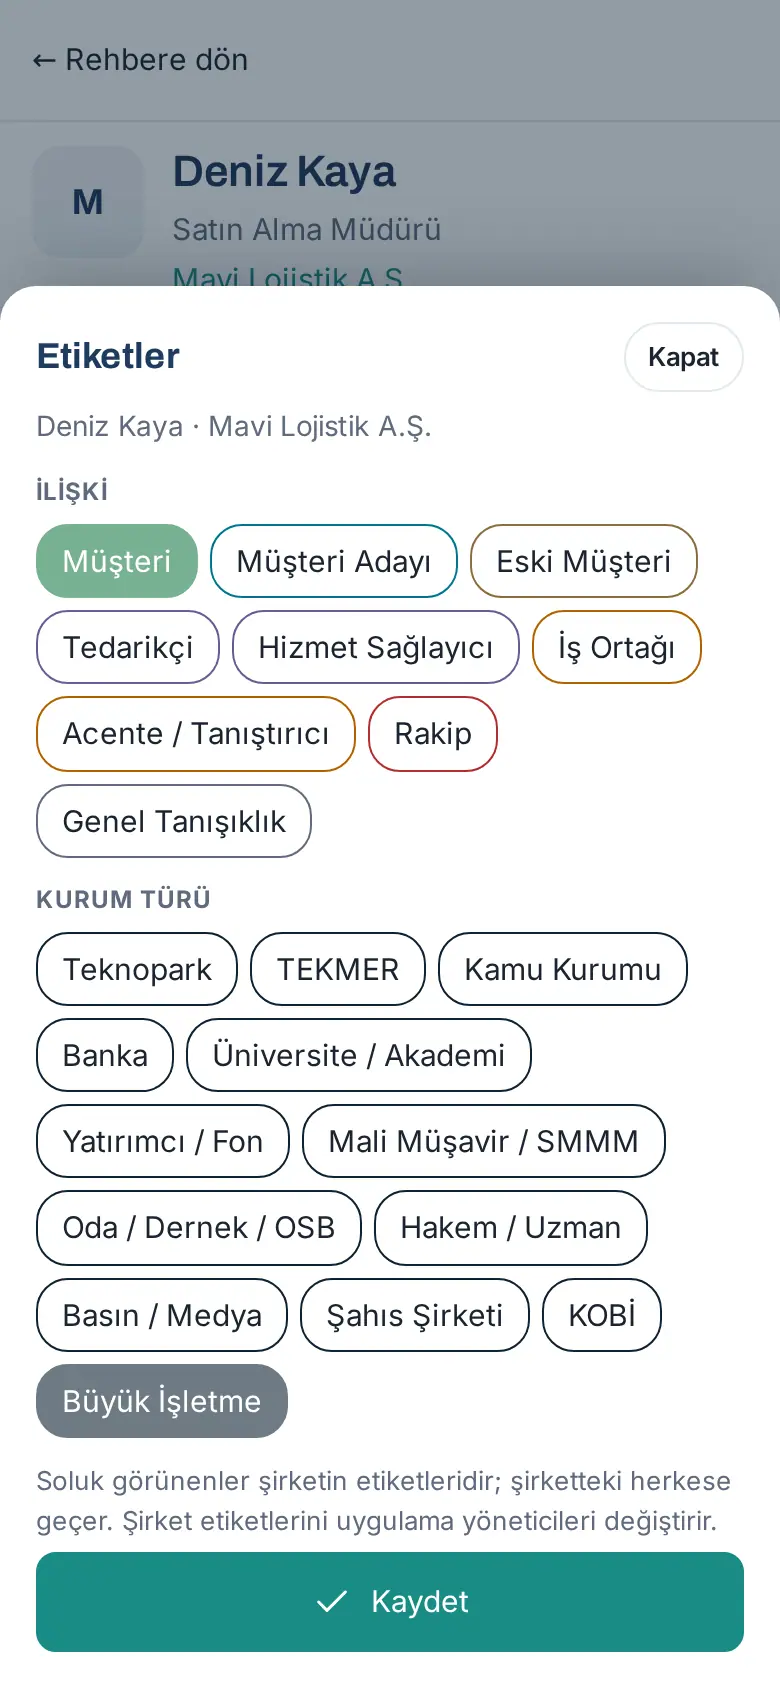
Tip: Tags that appear faded are tags given to the person's company. They apply to everyone at the company; administrators change company tags.
Important: Your company decides whether tags such as Supplier, Service Provider and Bank are sent to the CRM (see 12. Customer directory administration).
Sharing a record
Who: Employee · Where: Contact details → More… → Share
What it does: Shares a person you added with the whole company, with one or more departments, or with the employees you select.
- In the contact details, tap More…, then Share.
- If you want, write a short message in the Your message (optional) box (e.g. "Asked for a quote, call back in November.").
- Select who to share with:
- Share with the whole company: everyone on the team sees it.
- Departments: one or more departments.
- People: type a name in the Search employees box and select an employee.
- Tap Save.
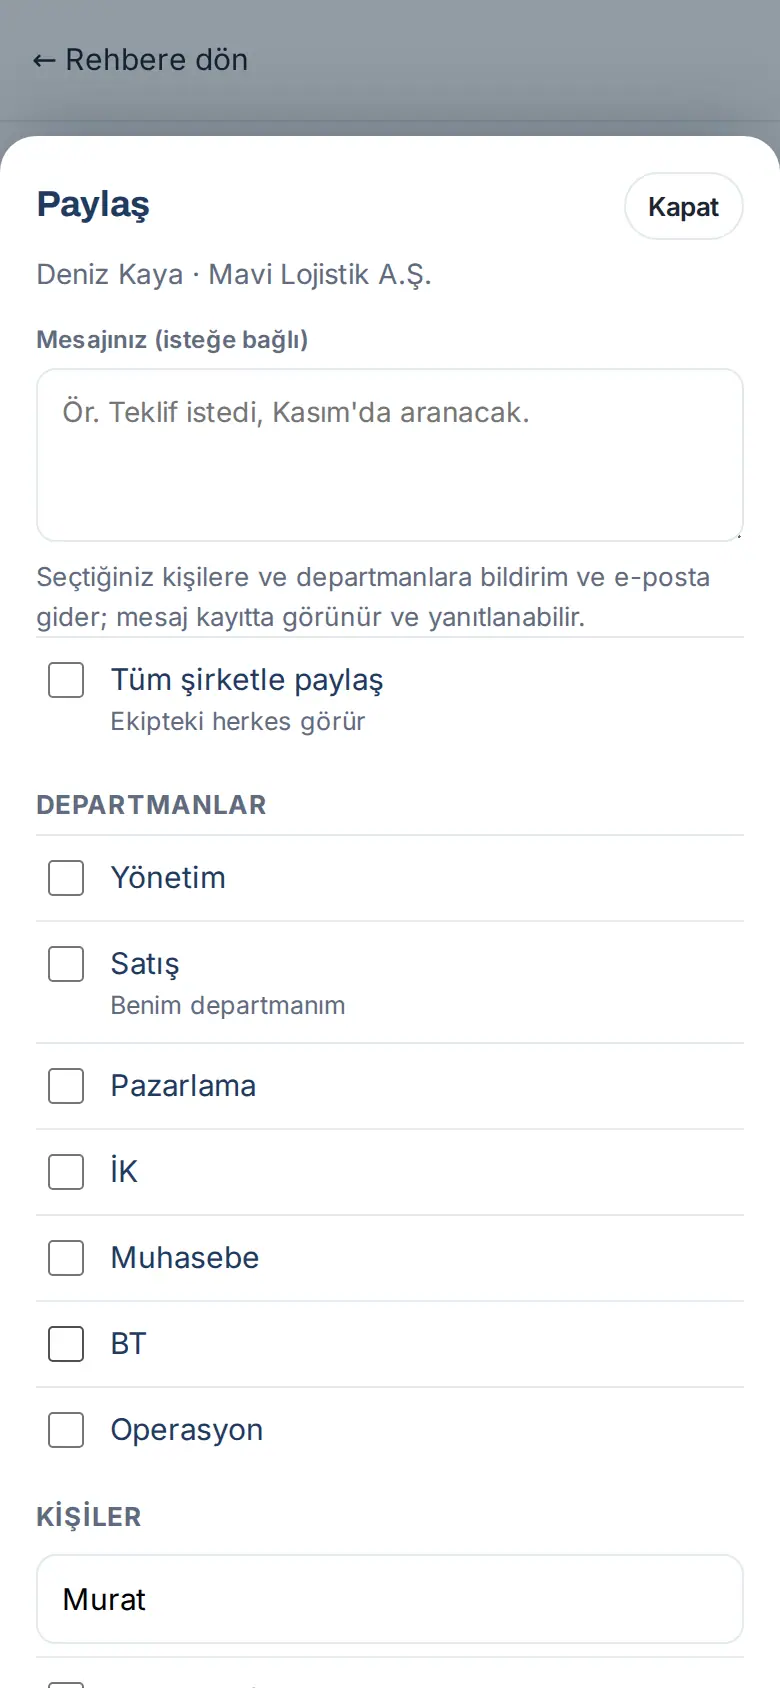
If you write a message, the people you select and the employees in the selected departments get a notification and an email; your message appears in the record and people can reply to it. If you share without a message, only the people you newly add get a phone notification; departments are not notified and no email is sent.
Important: The people you share with can see and edit the record; the record stays yours. Your manager always sees their team's records. To stop sharing, clear the selections in the same window and tap Save.
Approving or rejecting an access request
Who: Employee (record owner) · Where: Customers → Access requests
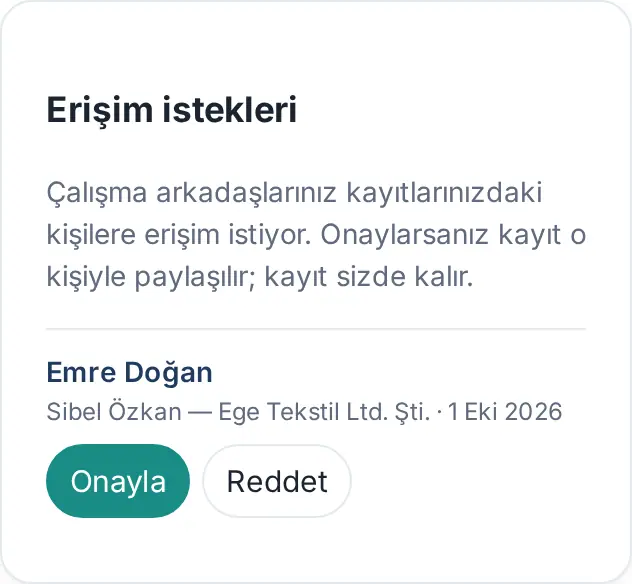
What it does: When a colleague scans the business card of a person in your record, they cannot see the record and send you an access request (see 03. Adding cards (business card scanning)). If you approve, the record is shared with that colleague.
- Open Customers. The Access requests box appears above the list.
- Each request shows the requesting employee (e.g. Emre Doğan), the requested person and company, and the date.
- To share the record, tap Approve. To not share it, tap Reject.
Tip: The number of pending requests also appears in My sales summary (see My sales summary).
Important: When you approve, the record stays yours; it is only shared with that colleague. After you approve, you can stop sharing with the steps in Sharing a record.
Known by the team and related people
Who: Employee · Where: Contact details → Known by the team or More… → Related
What it does: Shows who else on the team knows a customer and which other people from the same company are recorded. You can talk to your colleague before you call the customer.
- In the contact details, scroll down:
- Known by the team: employees who scanned or added the person, or whose card the person left details through, and the latest date.
- Company: the person's company; tap it to open the company.
- From the same company: other people from the same company and who knows them. For people you can see, the Call and Email buttons appear.
- To see the same information in a window, select More… → Related. The Related people window also includes tags, About the person and Job title and work history.
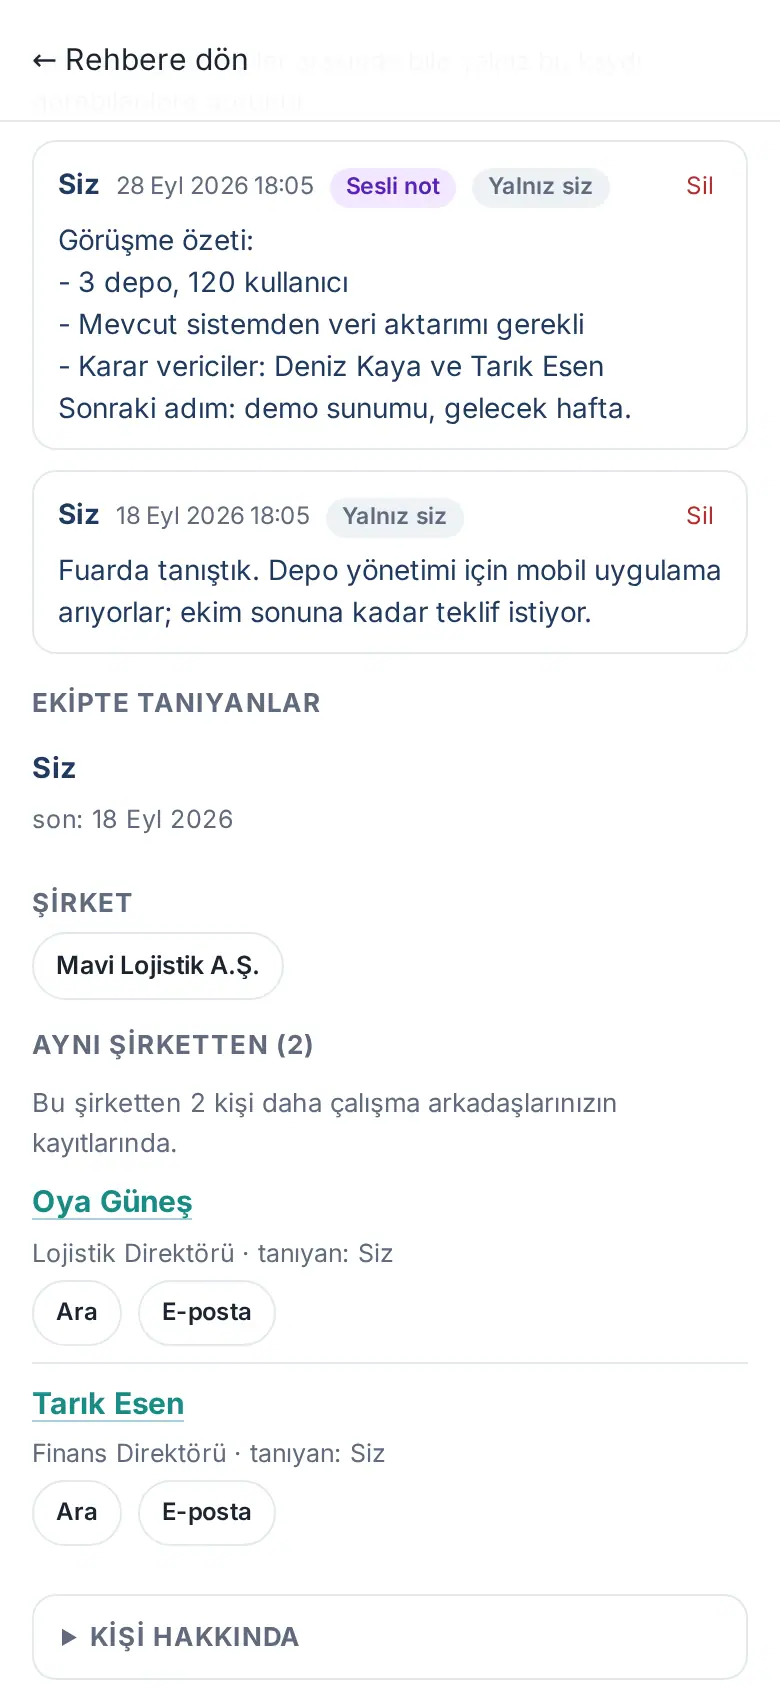
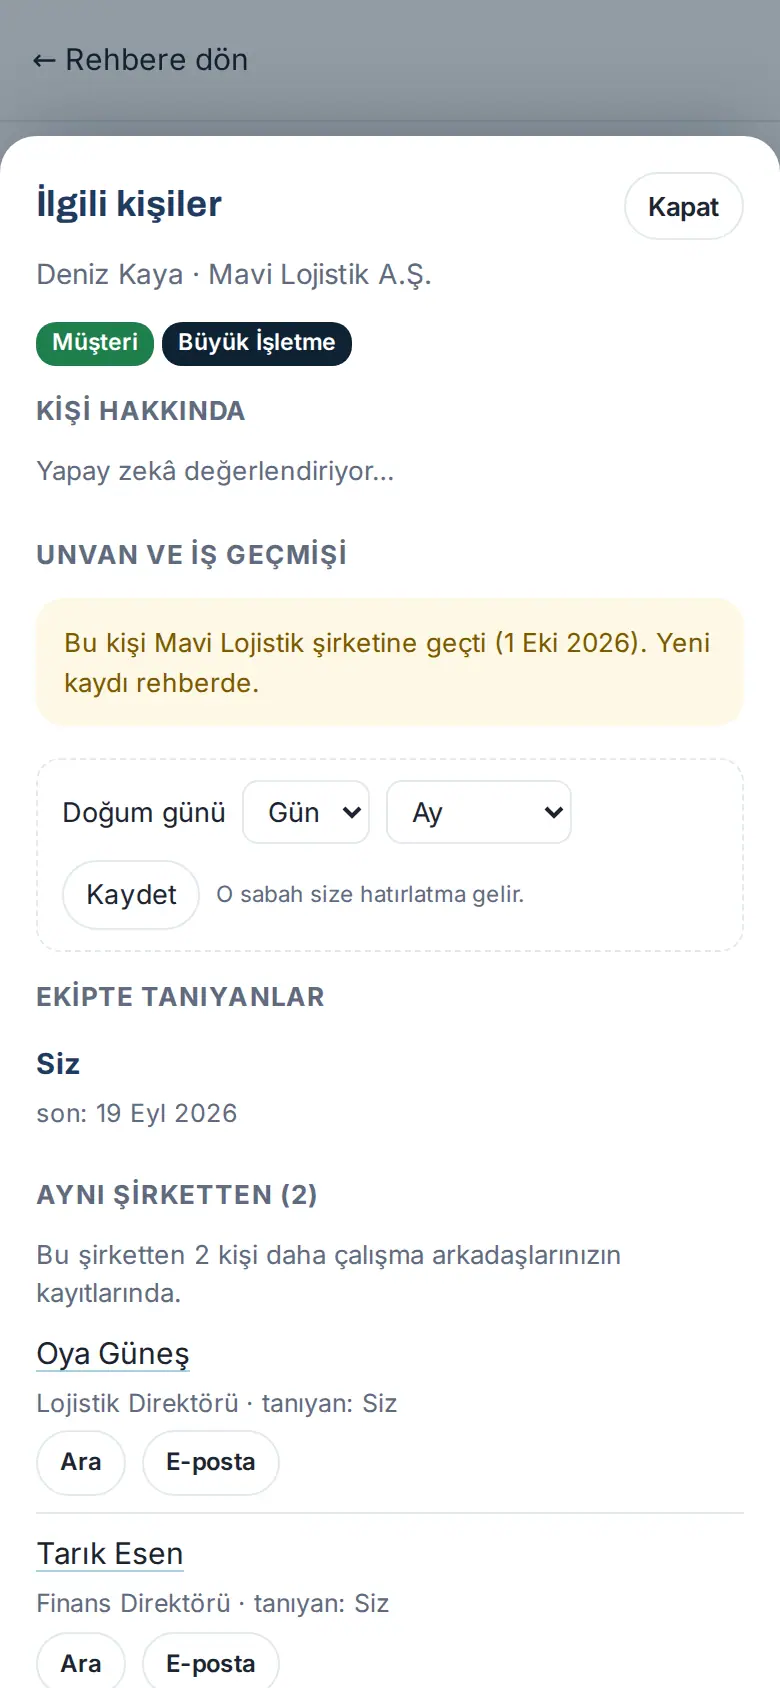
Tip: If your company turned it on, the About the person section shows a short summary that AI derived from public professional information (decision role, suggested approach). This information is not sent to the CRM.
Important: Contact information of people in other employees' records that are not shared with you is not shown; only their number or names appear.
People whose job title or company changed
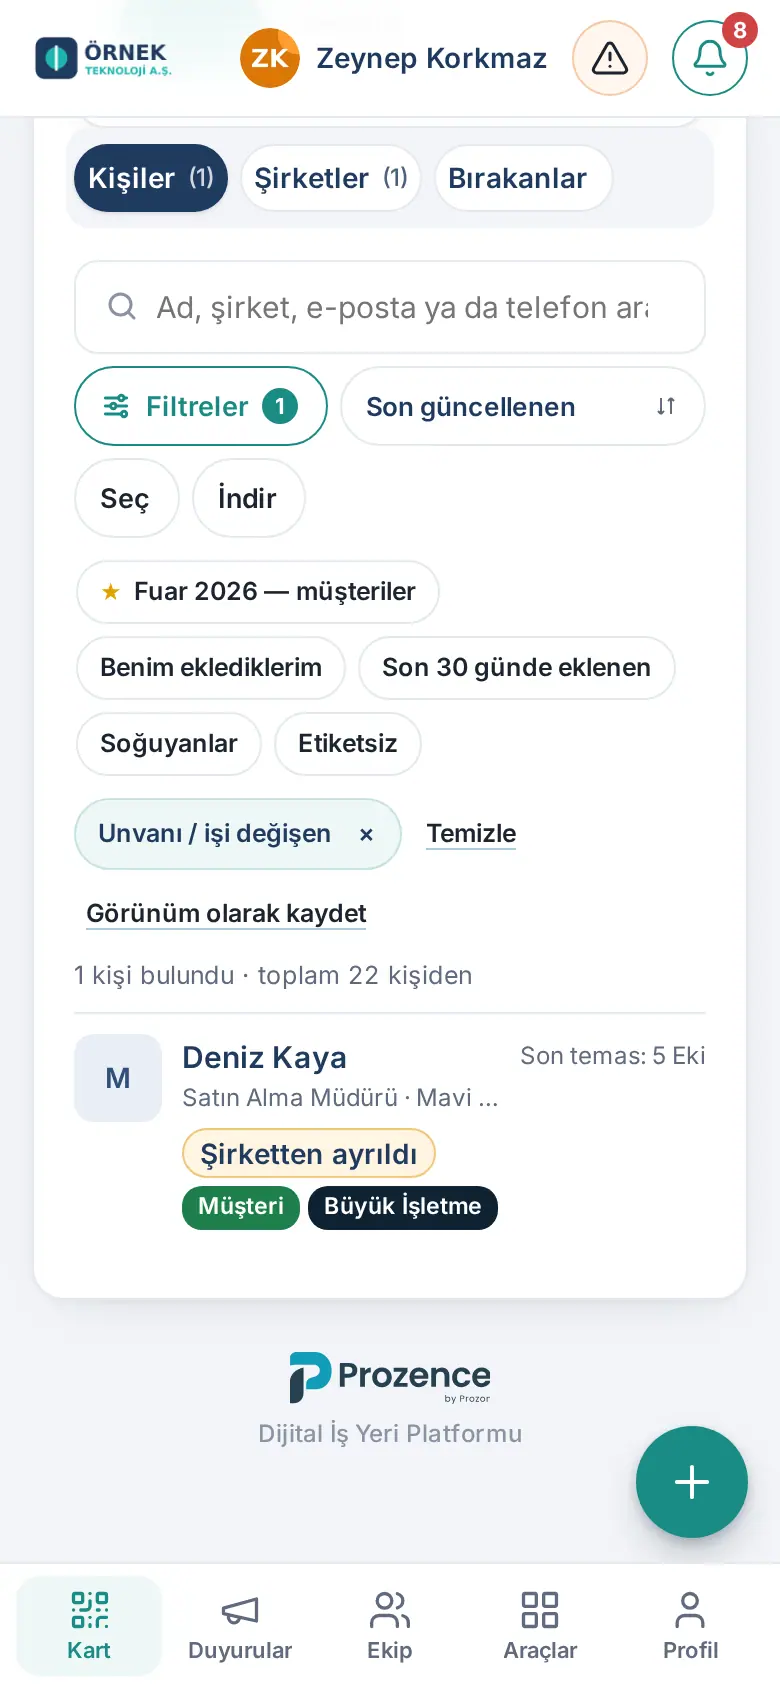
Who: Employee · Where: Customers → Filters → Status → Title or job changed
What it does: If the same person comes back with a different job title or company through a new business card, an email signature or left details, the app notices this and shows it to you.
- Tap Filters and select Title or job changed under Status.
- The list shows change badges: New job title, New company, Left the company or Update suggestion.
- Tap the person and look at the About the person → Job title and work history section.
- If there is an update suggestion ("Possible change: …"), tap Approve and update if it is correct, or Ignore if it is not.
Important: Suggestions from the web do not change the record automatically; the record is updated and goes to the CRM when you approve.
Customer birthdays
Who: Employee · Where: Contact details → About the person → Birthday
- In the contact details, open the About the person section at the bottom.
- In the Birthday row, select the Day and Month.
- Tap Save.
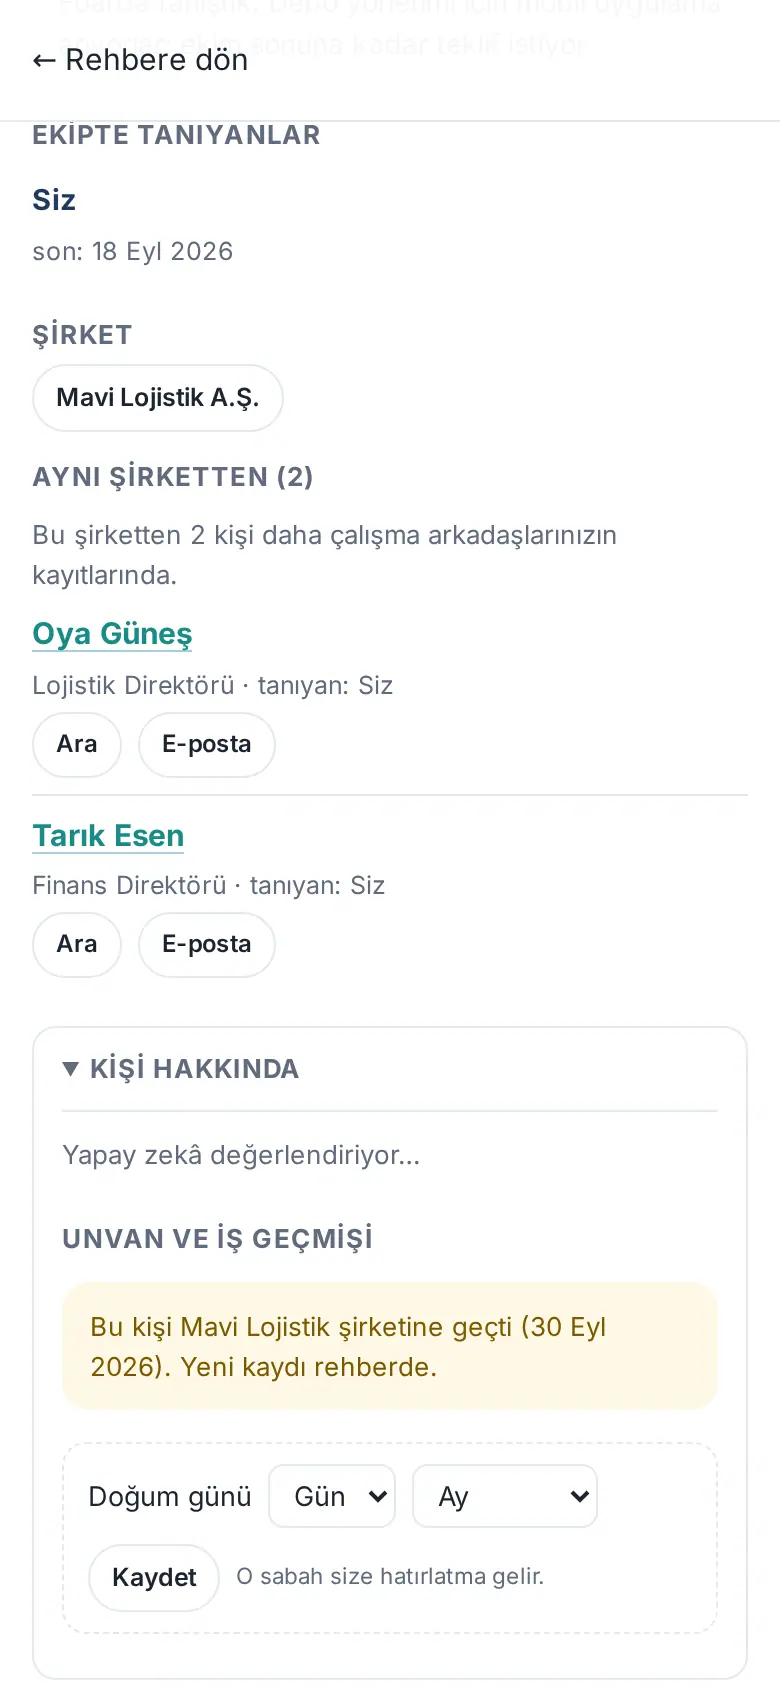
On the morning of the birthday, the owners of the record get a reminder. No automatic email goes to the customer. In the calendar, the birthday is visible only to people who can see the record.
Company view
Who: Employee · Where: Customers → Companies
What it does: Shows customers by company. You see all the people at a company, the company information and the company notes together.
- In Customers, select the Companies tab. Each company shows a logo or initials, the number of people, the domain name and tags. To search, use the Search companies box.
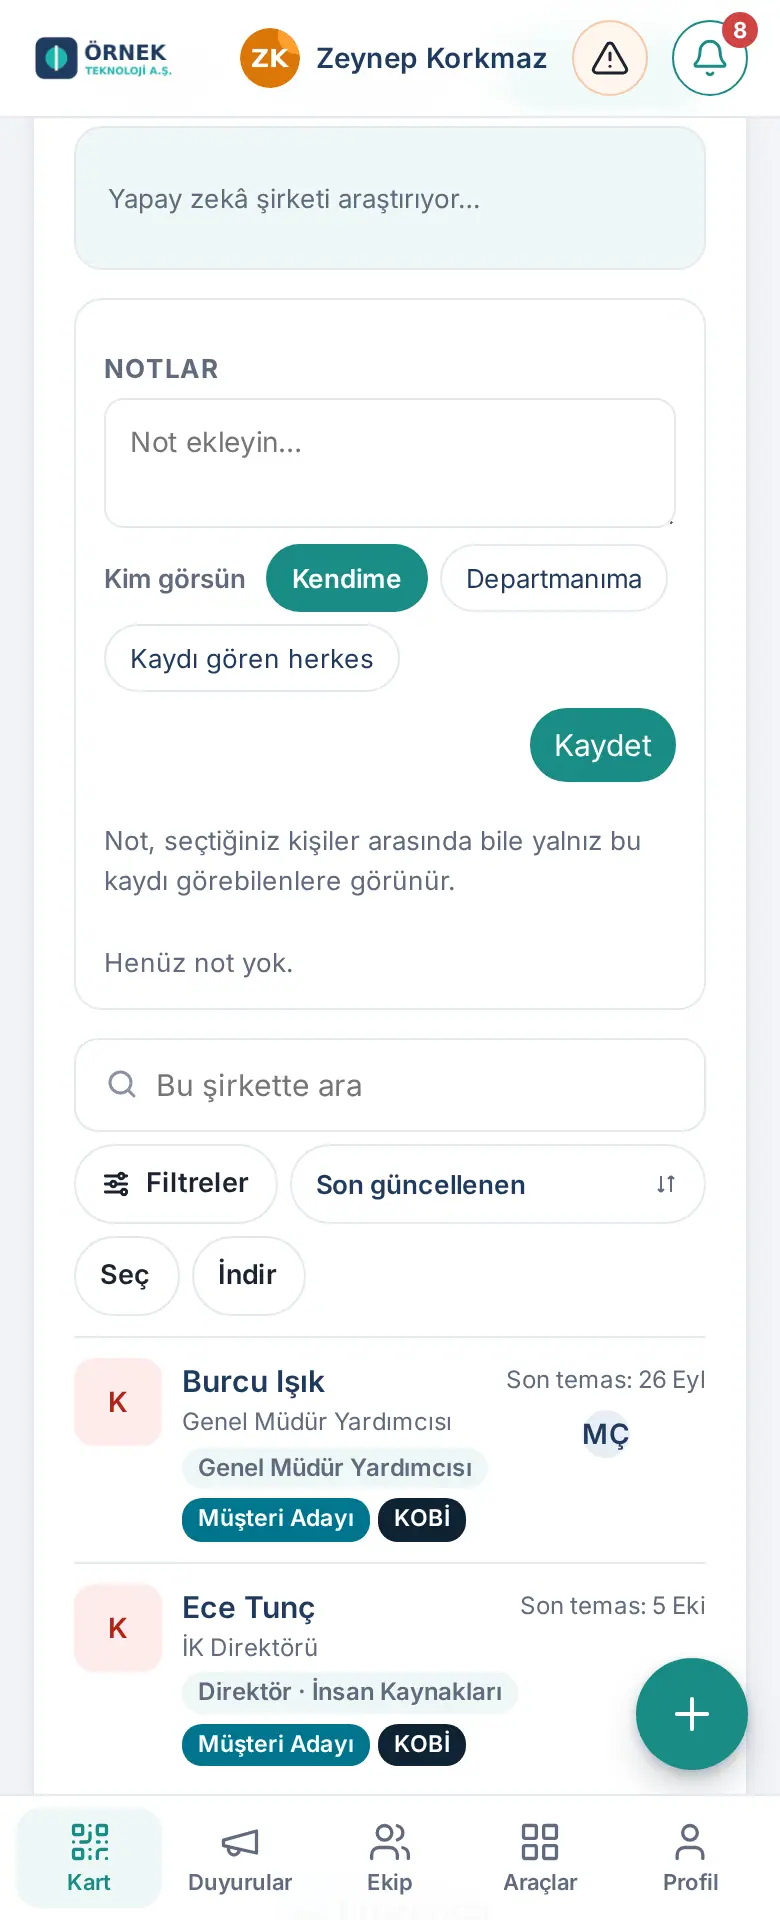
- Tap a company. At the top, you see ‹ Companies (back), the company name and the Org chart button.
- If your company turned it on, the company information box contains information that AI collected (industry, number of employees, province, short description, links). To refresh the information, tap Refresh.
- In the Notes section, add a note to the company (same steps as person notes, see Adding a note).
- The people at the company are listed at the bottom. Use Search this company to search within the company.
Tip: You can also go to the company from the contact details: tap the company name or More… → People at the company.
Important: A tag given to a company applies to everyone at the company. Only authorized people change company tags.
Org chart
Who: Employee · Where: Company view → Org chart
What it does: Arranges the people at a customer company by position or department. You see who the decision makers are.
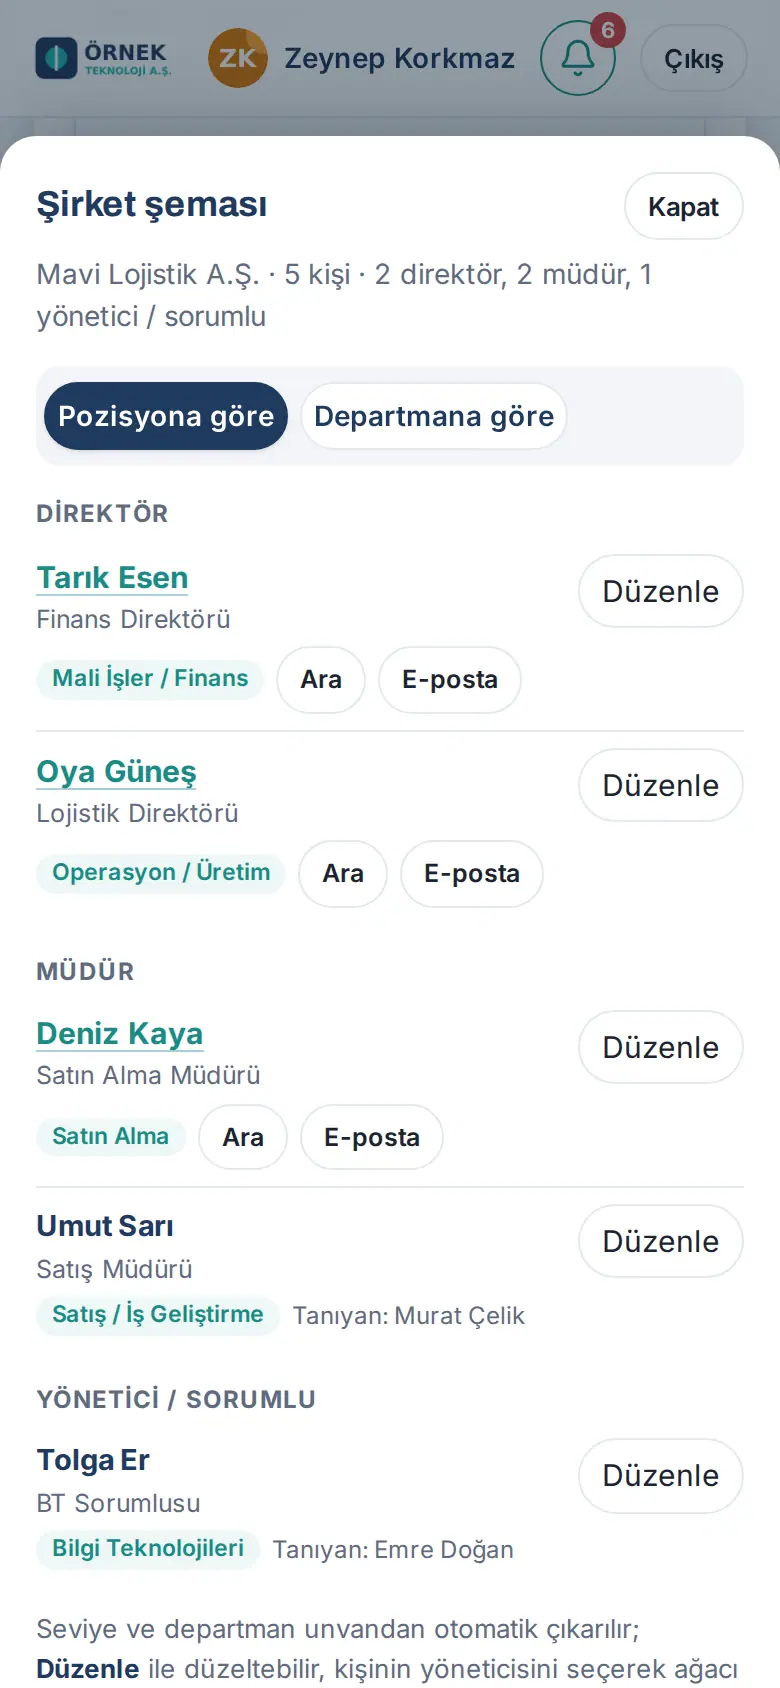
- In the company view, tap Org chart.
- Select the view:
- By position: people are arranged by level (e.g. Director, Manager, Supervisor / Lead). People who have a manager selected appear below that manager.
- By department: people are grouped by department (e.g. Purchasing, Accounting / Finance).
- Each person shows the job title, the department or level, the Call / Email buttons and Known by: … information.
- If the level or department is wrong, tap Edit next to the person. Select the Level, Department and Manager fields and tap Save. A person corrected manually shows "corrected manually".
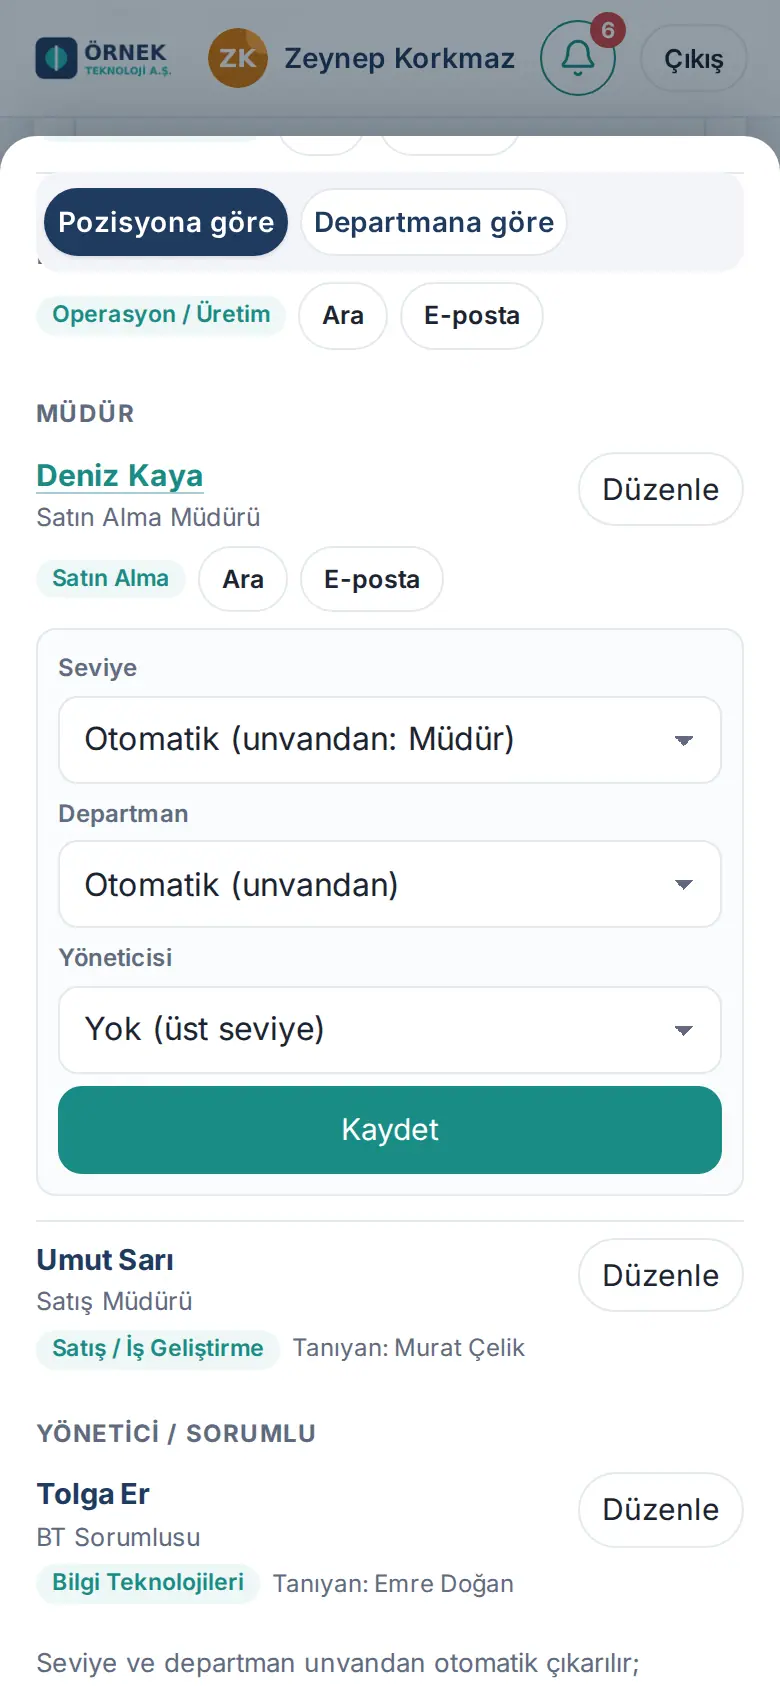
Tip: The level and department are derived automatically from the job title (Automatic (from job title)). You only need to correct the wrong ones. You build the company tree when you select a manager for a person.
Important: Contact information of people in other employees' records does not appear in the chart.
People who left their details through your card
Who: Employee · Where: Customers → Left details
What it does: Lists the people who opened your digital business card and left their contact information with Leave my details (see 01. Digital business card and Identity Kit).
- In Customers, select the Left details tab.
- Each person shows the badge "Left details through your card". Tap the person; in the details, the Where, Subject and Note rows contain what the person wrote.
- If no one has left their details yet, the list shows "No one has left details through your card yet."
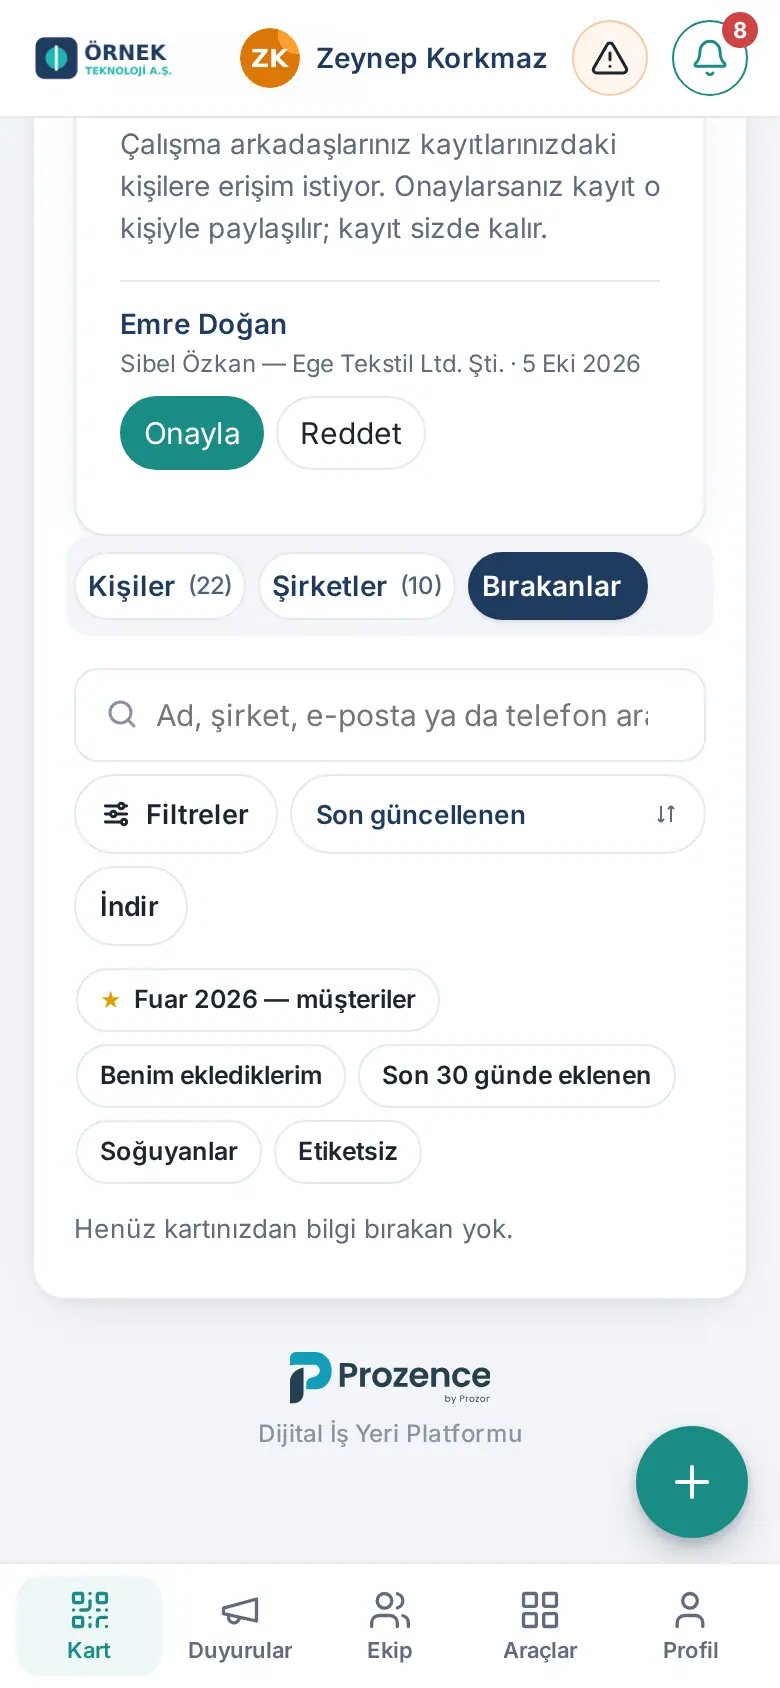
Tip: When someone leaves their details, you get an email. If your company turned it on, you also get a follow-up reminder a few days later.
Finding cooling customers
Who: Employee · Where: Customers → quick filter Cooling (or Filters → Last contact)
What it does: Finds the customers you have not contacted for a long time, so you can reach them again before you lose the relationship.
Each record has a last contact date. These count as contact: scanning the card, adding a note, dictating a note, Send my card, the person leaving details through your card, and adding by email. Changing a tag, sharing or a field does not count as contact.
- Tap the Cooling quick filter below the search box. Or select Filters → Last contact → No contact (… days) and tap Show … results.
- To bring the people with the longest time without contact to the top, choose Longest without contact in the sort box.
- Only cooling people stay in the list. The row shows text such as "No contact for 4 months" and the Cooling badge.
- Tap the person and reach them again with Call, Email or Send my card.
- After the conversation, add a note to the person. A note and Send my card update the last contact date; the person leaves the cooling list. Only calling or writing in your email app does not count as last contact.
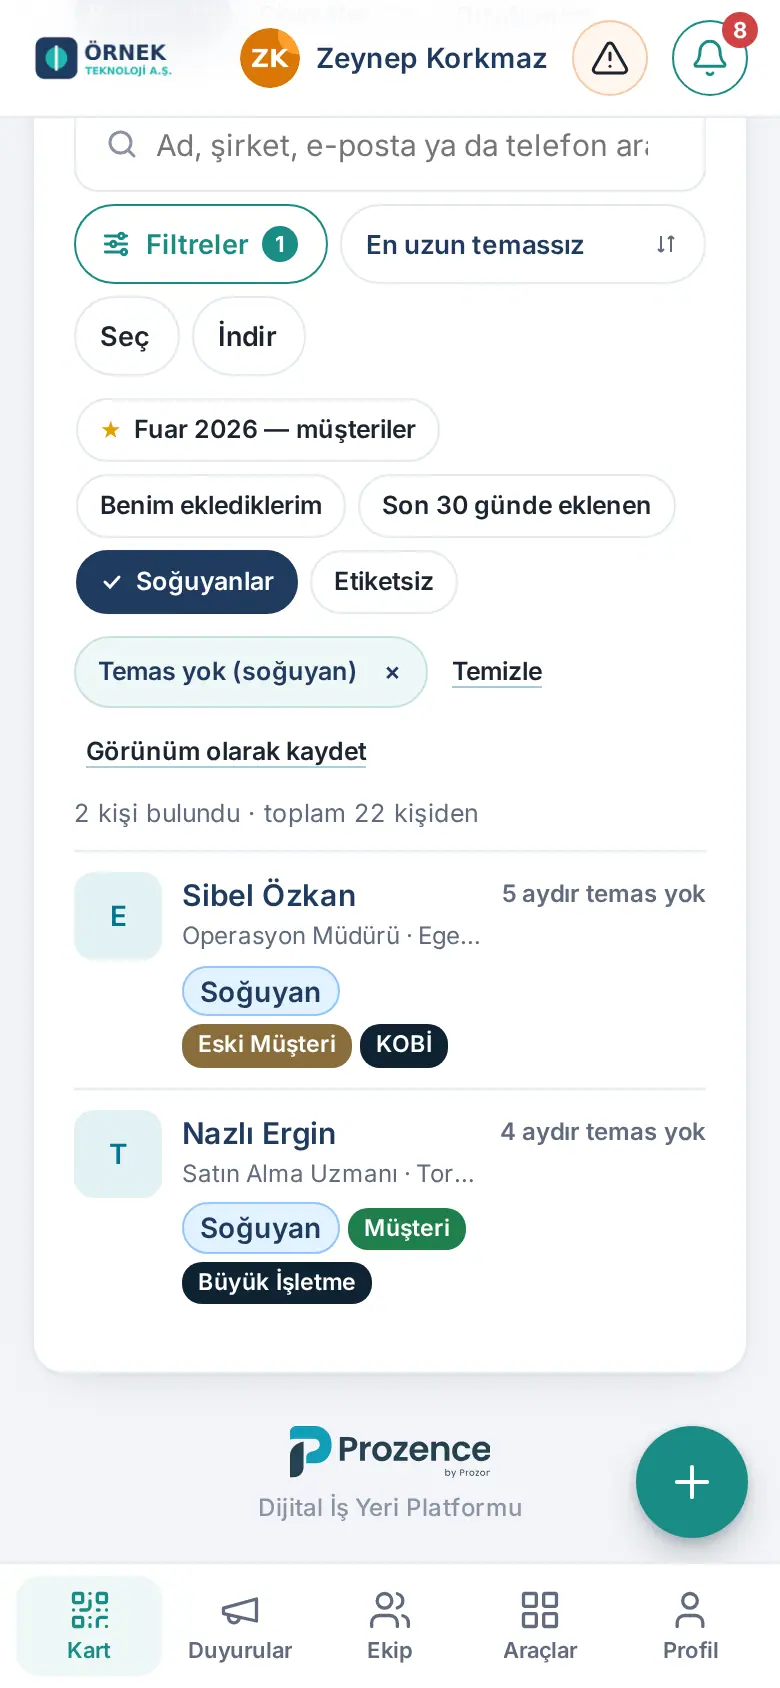
Tip: Your company decides after how many days a customer counts as "cooling" (default 90 days). If your company turned it on, on the first working day of each month you get the 10 most important cooling customers of you and your team by email and phone notification. You can turn off this summary in Profile → Notifications (see 09. Notifications).
My sales summary
Who: Employee (using the customer directory) · Where: Bottom menu Tools → Today (on a computer, Board → Today)
What it does: Shows your sales work at a glance.
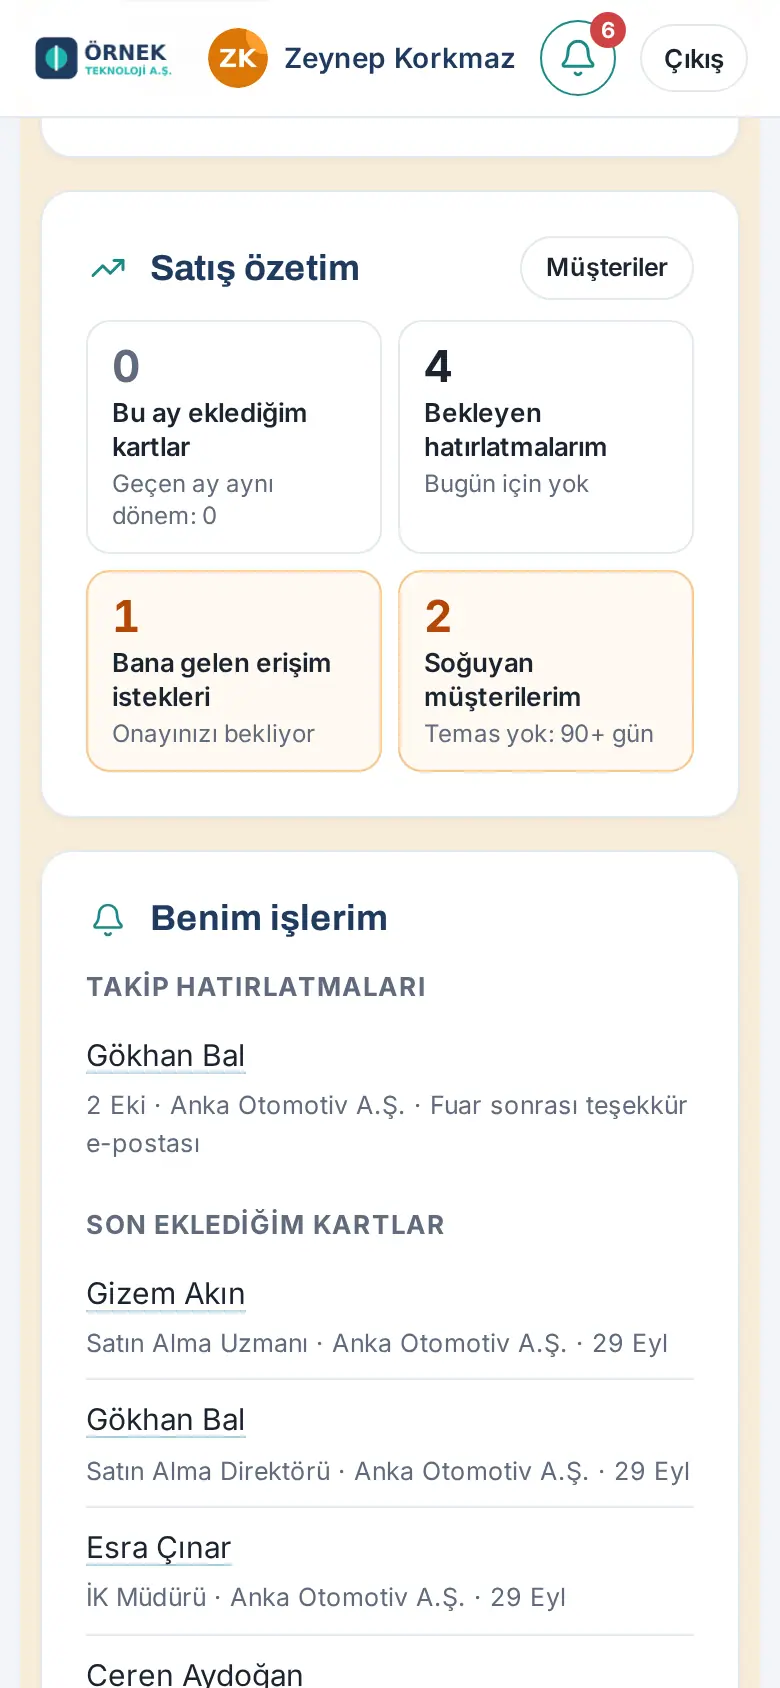
The My sales summary box has four numbers:
| Box | What it shows |
|---|---|
| Cards I added this month | The number of people you added this month; comparison with the same period last month |
| My pending reminders | Pending follow-up reminders; those due today and overdue |
| Access requests for me | Access requests waiting for your approval |
| My cooling customers | Customers you have not contacted for a long time |
- Tap Tools and open Today.
- In the My sales summary box, tap a number. The related place opens: the filtered Customers list, Reminders or Access requests.
- To go to the customer list, tap Customers in the box.
Downloading the list (export)
Who: Employee · Where: Customers → Download
What it does: Downloads the customer list that you can see as a CSV file that opens in Excel, or as a vCard file that you add to your phone contacts.
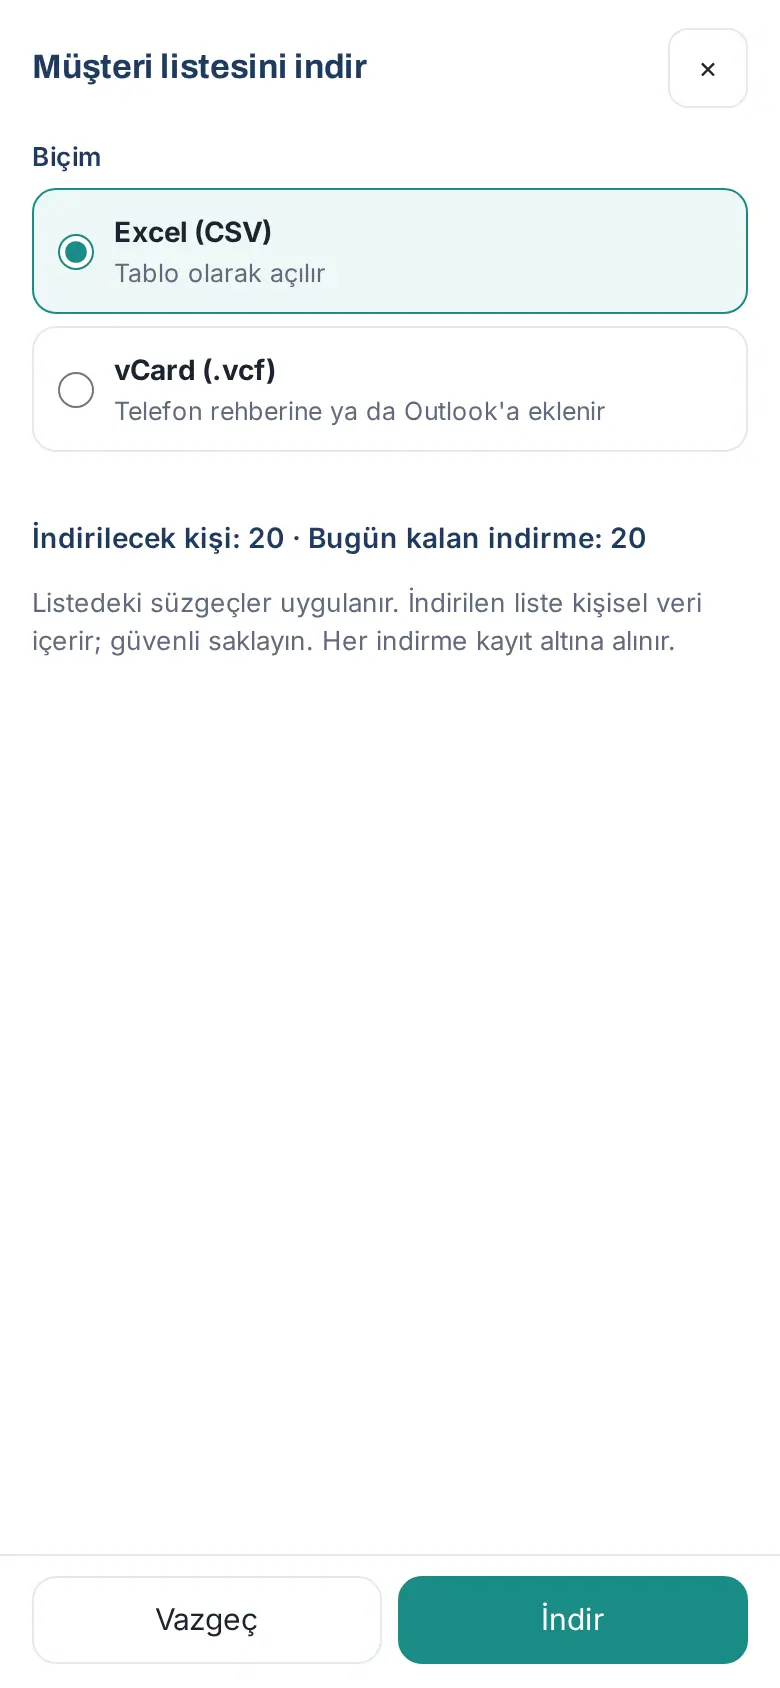
- If you want, search or filter the list first. The download uses the current filters, search and sort order. For example, to download only the contacts added from phone contacts, first select Filters → How added → Phone contacts. To download only certain people, tick them with Select and tap Download selected (see Selecting several people).
- Tap Download. The Download customer list window opens.
- Select the Format:
- Excel (CSV): opens as a table.
- vCard (.vcf): adds to your phone contacts or to Outlook.
- Check the number of Contacts to download and your Downloads left today.
- Tap Download.
Important:
- The downloaded list contains personal data; store it securely and do not share it.
- You can download at most 20 times a day. Each download is recorded.
- Only authorized roles can download the catalog of the whole company (see 12. Customer directory administration).
Bulk import from a file
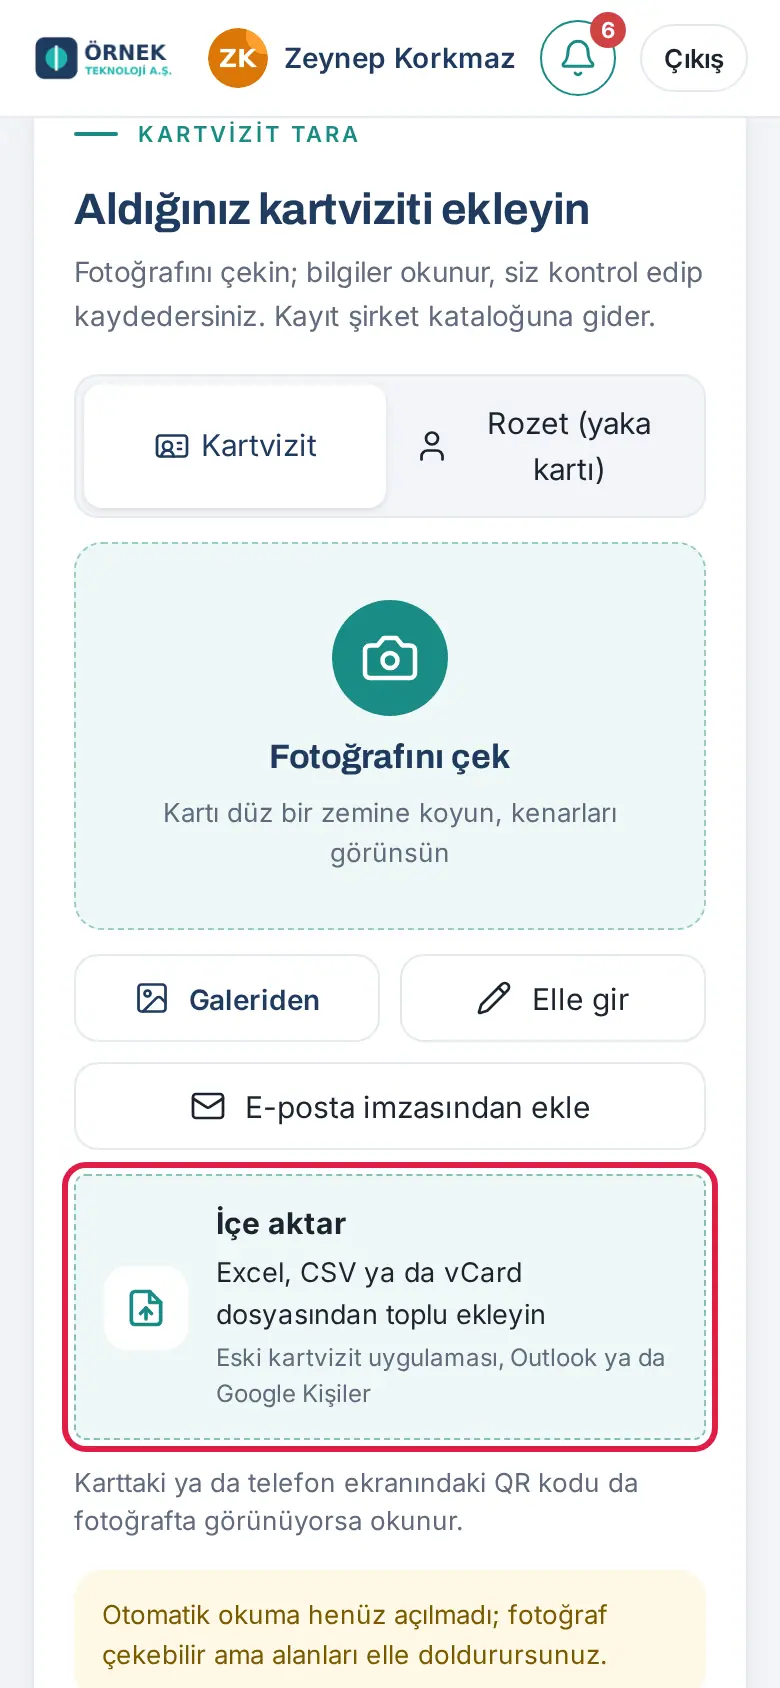
Who: Employee · Where: Bottom menu Card → Add card → Import
What it does: Adds the customers from your previous business card app, Outlook, Google Contacts or your phone contacts in one go. If the same person is already in the directory, a second record is not created.
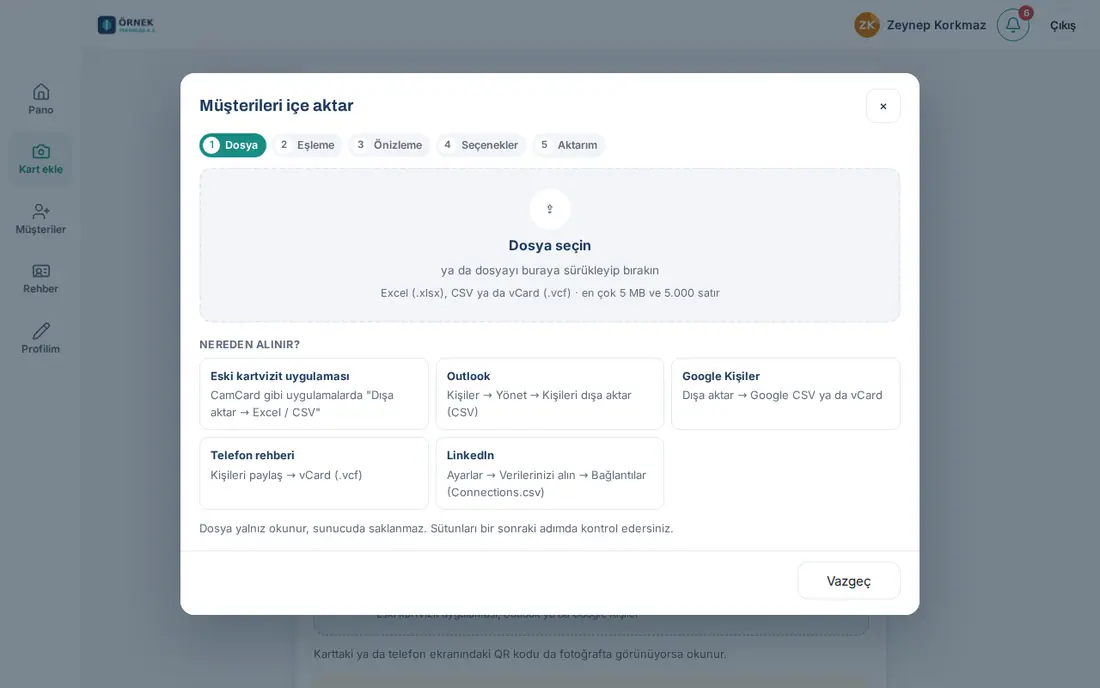
Before you start: Prepare your file. Supported formats: Excel (.xlsx), CSV and vCard (.vcf); at most 5 MB and 5,000 rows. The window also tells you where to get it:
- Previous business card app: in apps such as CamCard, "Export → Excel / CSV".
- Outlook: People → Manage → Export contacts (CSV).
- Google Contacts: Export → Google CSV or vCard.
- Phone contacts: Share contacts → vCard (.vcf).
- LinkedIn: Settings → Get a copy of your data → Connections (Connections.csv).
-
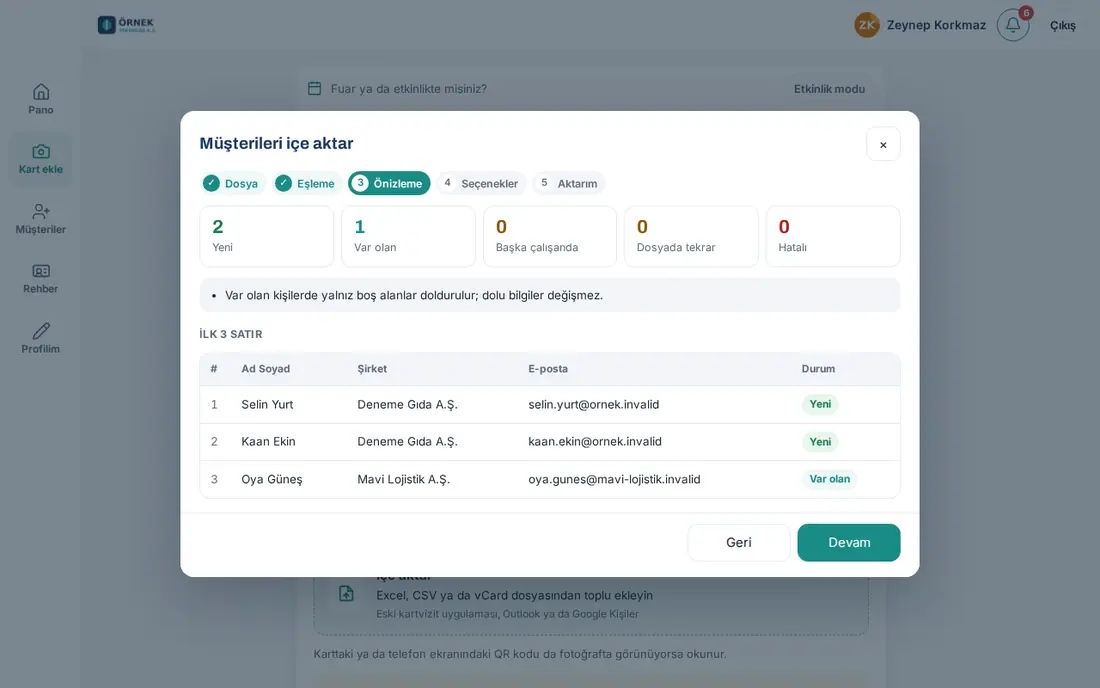
On the Add card screen, tap the Import card. The Import customers window opens. There are five steps: File, Mapping, Preview, Options, Import.
-
File: Tap Choose a file or drag the file into the box.
-
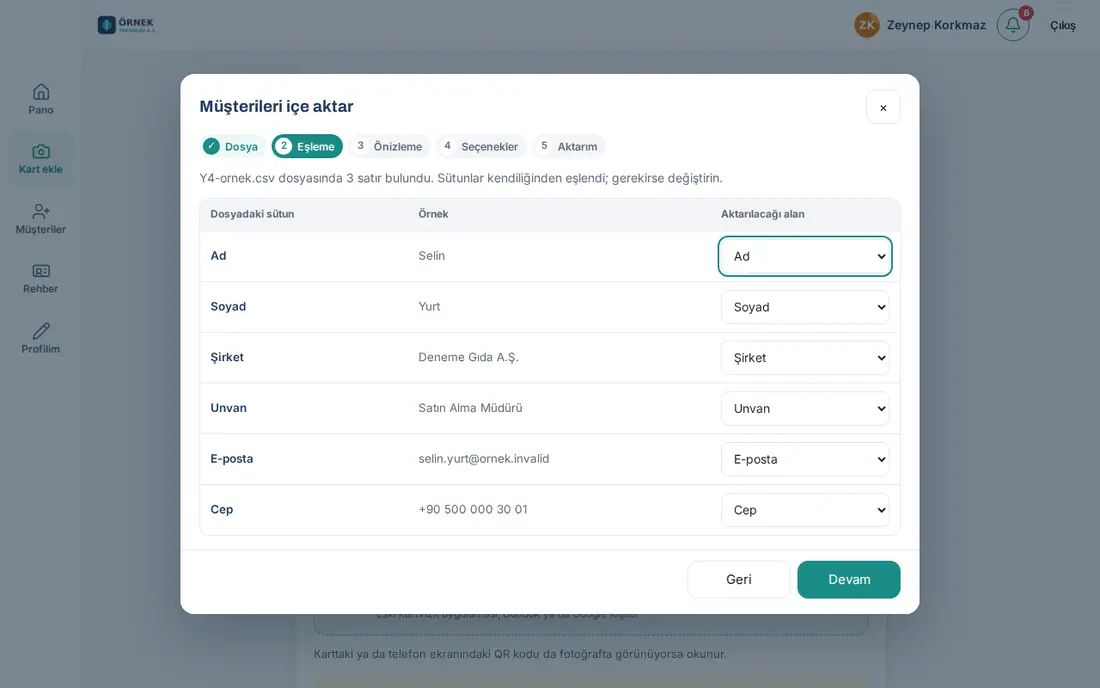
Mapping: Check which field each column in the file goes into (Column in file, Example, Import into field). Known headers are mapped automatically; change them if necessary. At least a name, email or mobile column must be mapped. Tap Continue.
-
Preview: The rows are classified:
- New: people who are not in the directory are added.
- Existing: you already have the person; only empty fields are filled in, existing information does not change.
- With another employee: the person is in another employee's record; they are skipped during the import, only their number is shown.
- Duplicate in file and Invalid: skipped.
Check the list of the first rows and tap Continue.
-
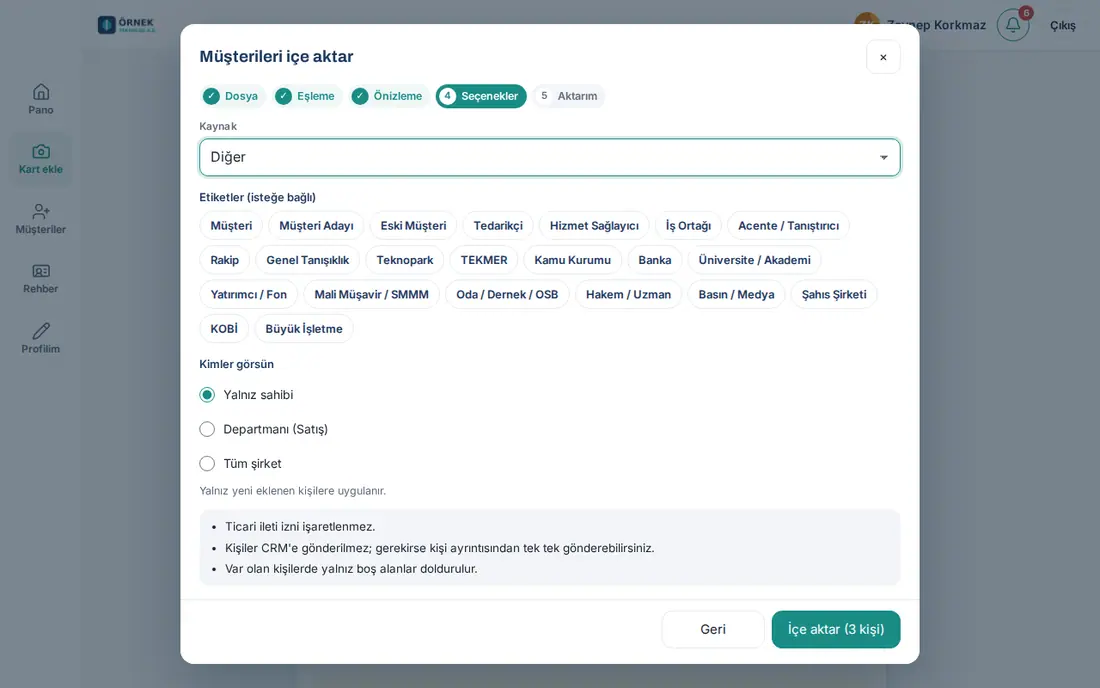
Options: Select the Source (e.g. Trade show / Event), optionally Tags (optional), and Who can see (Owner only, Their department, Whole company).
-
Tap Import (N contacts).
-
Import: The progress bar fills. When it is complete, Import completed appears; the numbers for Added, Updated (empty fields filled), Unchanged and Skipped are shown. If there are invalid rows, get the list with Download invalid rows (CSV). Go back to the list with Go to customers.
Tip:
- It is easier to import large files from a computer.
- If the import stops because of an error, tap Continue where it stopped without closing the window. If you close the window, the rows already processed stay saved; import the file again for the rest. Running it again does not create duplicate records.
Important:
- For imported people, commercial message consent is not ticked. Update the people who gave consent one by one.
- Imported people are not sent to the CRM.
- The Who can see selection applies only to newly added people.
- The file is only read; it is not stored on the server.
Merging two records of the same person
Who: Employee (owner of both records) and team manager · Where: Contact details → More… → Merge with another record…
What it does: If the same person is in two separate records (e.g. one with the company name "Mavi Lojistik A.Ş.", the other "Mavi Lojistik"), combines the two records into one.
Before you start: You can merge only your own records and your team's records. You cannot merge a record that is only shared with you.
- Open the details of the record to keep (e.g. Deniz Kaya — Mavi Lojistik A.Ş.).
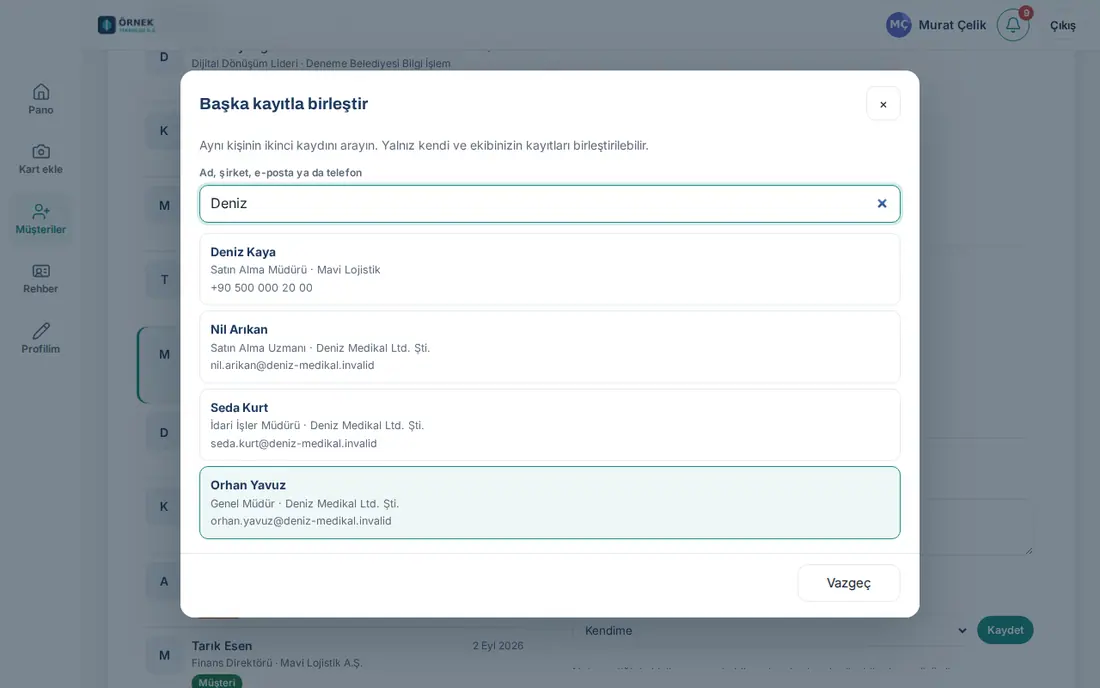
- Tap More…, then Merge with another record….
- In the Name, company, email or phone box, search for the second record of the same person and select it in the list.
- A comparison table opens: Field, Record to keep, Record to merge in. For each field, select which value to keep. The value that is not selected appears crossed out.
- To change which record to keep, tap Swap. To select a different record, tap Choose another record.
- Read the warnings above the table (e.g. "The two records are at different companies. Make sure they are the same person.").
- If everything is correct, tap Merge.
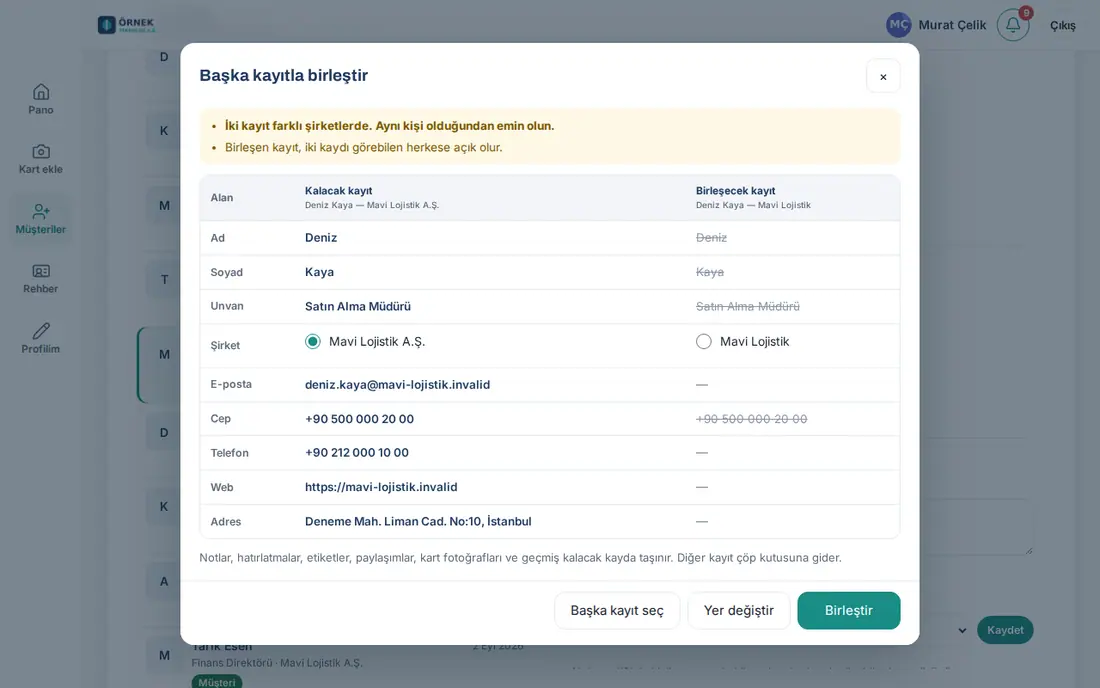
Notes, reminders, tags, shares, card photos and history move to the record you keep. The other record goes to the trash. The owners of both records get a notification.
Important:
- The merged record becomes visible to everyone who could see either of the two records.
- You cannot undo a merge in the app; if necessary, contact your administrator (the record in the trash can be restored from WordPress).
Customer directory on a computer
Who: Employee · Where: On a computer, left menu → Customers
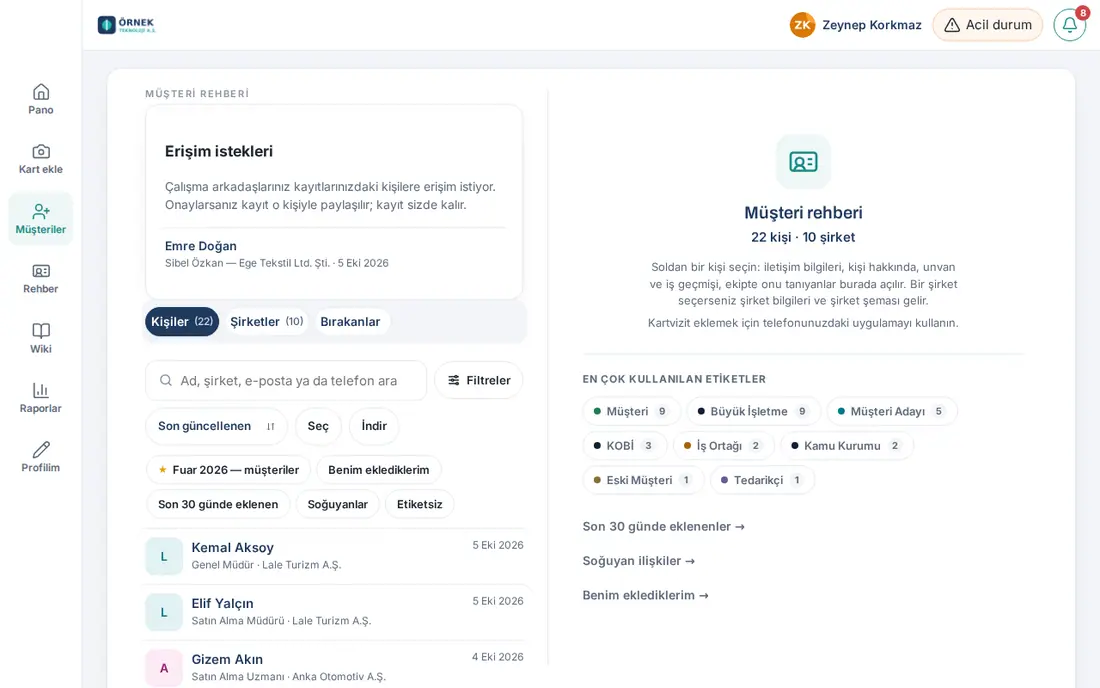
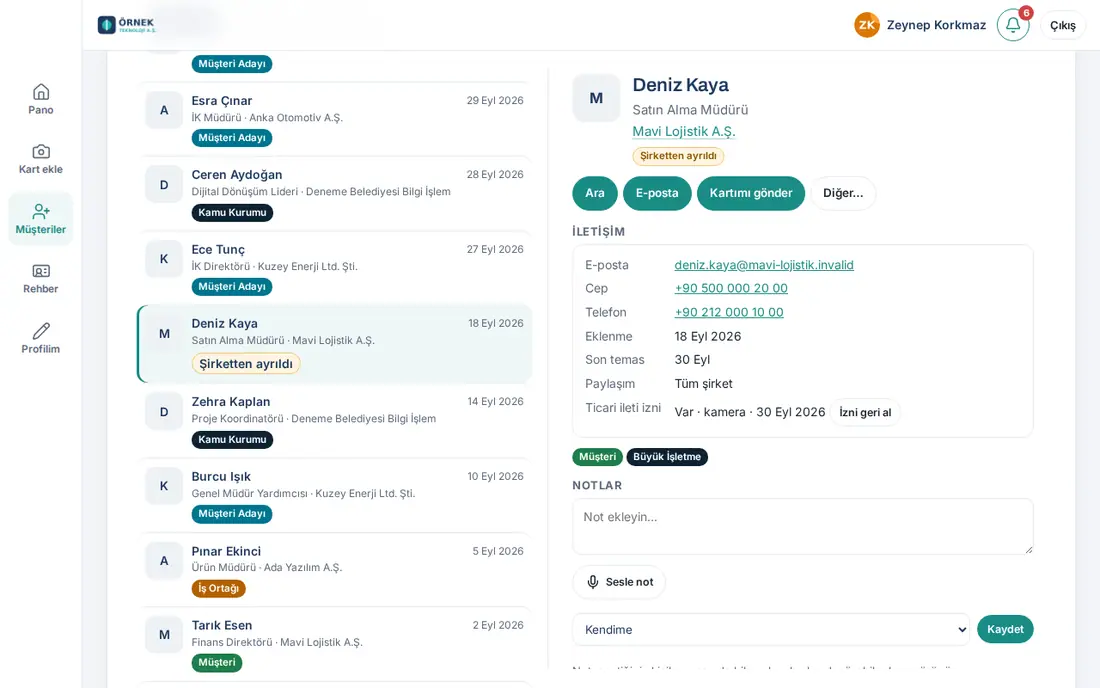
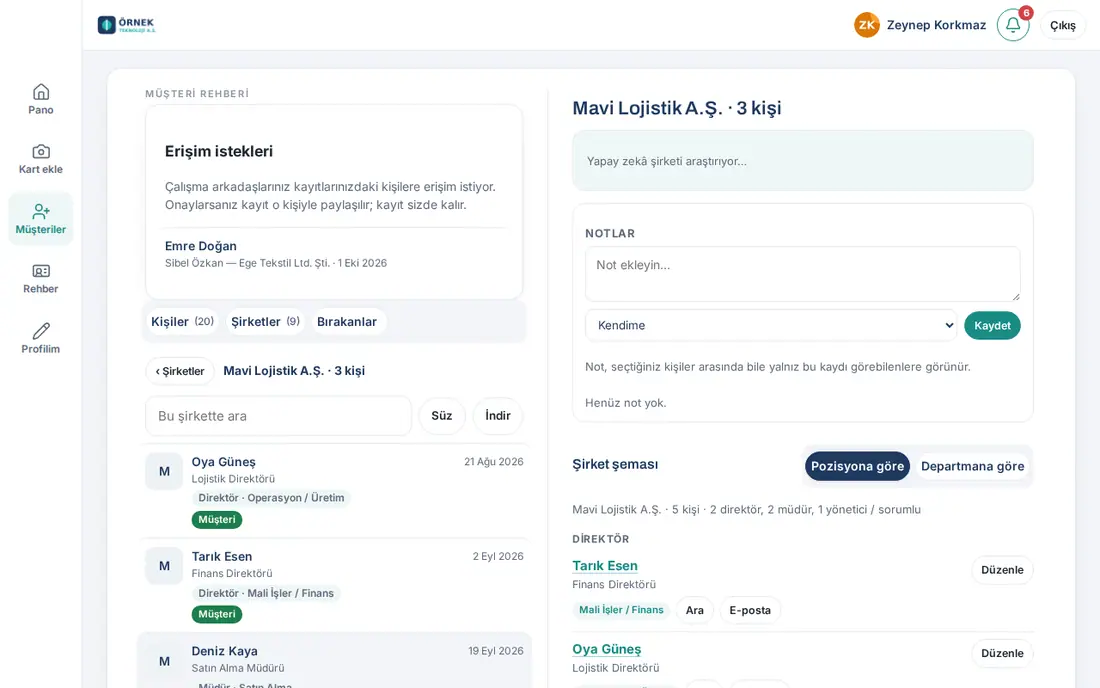
What it does: On a wide screen, the list is on the left and the details of the selected person or company open on the right. You can move between people without leaving the list.
- Click Customers in the left menu. The panel on the right shows the total number of people and companies, the Most used tags (click one to filter by it) and the shortcuts Added in the last 30 days, Cooling relationships and Added by me.
- Click a person in the list on the left. The contact details open in the right panel: buttons, Contact, Notes, Known by the team, Company, From the same company and About the person. All actions are the same as on the phone.
- If you click a company, the right panel shows the company information, company notes and the Org chart (By position / By department).
Tip: To add business cards, use the app on your phone; the camera gives better results on a phone. Importing from a file and merging are easier on a computer.