23. Requests
Screenshots show the Turkish interface of Prozence with fictional "Örnek Teknoloji A.Ş." data; the English interface has the same layout.
With Requests, you send a problem or a need, such as a computer fault, an access card, toner or air conditioning, to the right team. Each request gets a tracking number (e.g. T-2026-0018); in the app you follow which step the request is at, who handles it and the team's replies. The teams that handle requests (IT, facilities…) see incoming requests in one list, follow the target time, reply quickly with canned replies and measure resolution times on the Overview board.
This chapter is for employees who open requests and for the people who handle requests. For defining the categories, target times, handlers and canned replies, see 31. Request, mailroom, purchasing and fixed asset management.
Who: Employee · Request handler (category handler, requests operator)
In this chapter
- The Requests box and My requests
- Opening a request
- Following the status of your request
- Replying to a request that needs information
- Confirming or reopening a resolved request
- Cancelling a request
- The incoming requests list (request handlers)
- Taking on a request and writing a reply
- Using a canned reply
- Asking the requester for information
- Resolving or closing a request, and changing the priority or topic
- The Overview board: resolution times
- How the target time and the measures are calculated
- Common warnings
Before you start: The Requests module is off by default in the company. If you do not see the Requests box, the module is not turned on in your company; ask your manager or your IT team. The screens in this chapter use data from the fictional company "Örnek Teknoloji A.Ş.".
The Requests box and My requests
Who: Employee · Where: Tools → Services → Requests (on a computer, Board → Services)
What it does: Shows the number, status, topic and handler of the requests you opened in one list.
- Tap Tools in the bottom menu.
- Select Services in the strip at the top.
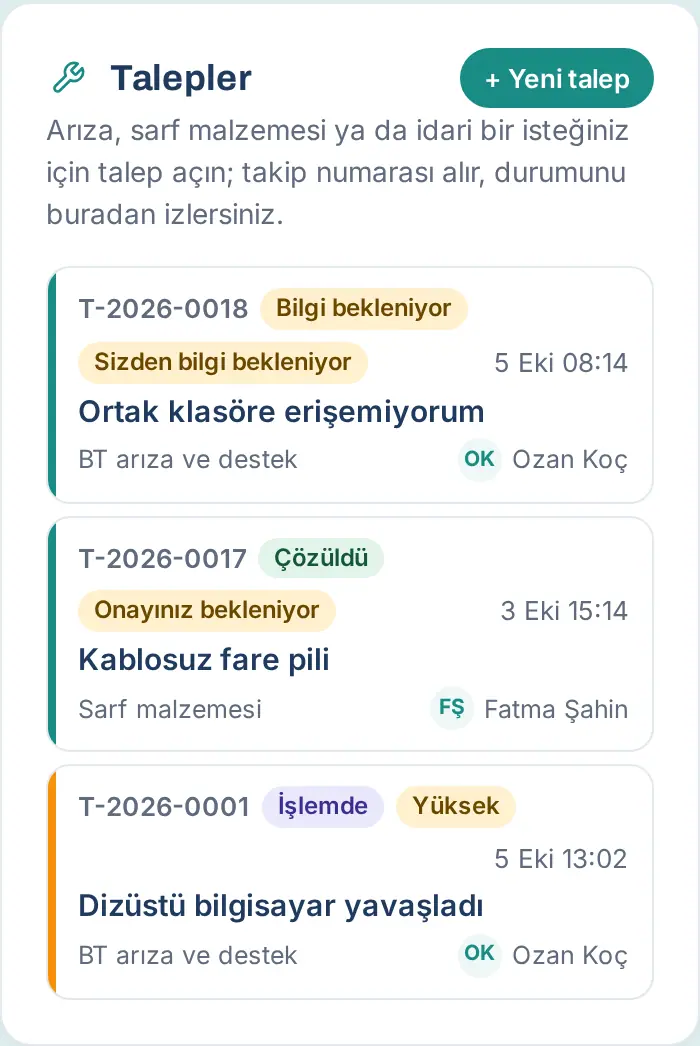
- Go to the Requests box. The last 50 requests you opened are listed, the newest at the top.
- Each row shows the request number, status, time opened, title, topic (category) and the name of the person who handles it. The colored strip on the left of the row shows the priority (orange: high, red: urgent).
- A request that waits for something from you has an additional badge:
- Information needed from you: the team asked you for information (see Replying to a request that needs information).
- Awaiting your confirmation: the request is resolved and waits for your confirmation (see Confirming or reopening a resolved request).
- Tap a request to see its details.
Result: If you have no requests, the box says "You have no requests yet. Tap “New request” for a fault, supplies or an admin need."
Tip:
- Your open requests (including resolved ones that wait for your confirmation; at most 3) also show in the Tools → My Space → My requests box. There, + New request opens a new request and All requests takes you to the Requests box (see 06. Board and intranet).
- If you handle requests, the My requests, Incoming requests (N) and Overview tabs show at the top of the box. My requests always shows only the requests you opened.
Opening a request
Who: Employee · Where: Tools → Services → Requests → + New request
What it does: Sends a problem or a need to the right team. The request goes to the handlers of the category you select by phone notification and email.
Before you start: The categories and their handlers depend on your company. Sample categories: BT arıza ve destek ("IT faults and support"), Facilities, Sarf malzemesi ("supplies"), Bina ve tesis bakım ("building and facility maintenance").
- In the Requests box, tap + New request.
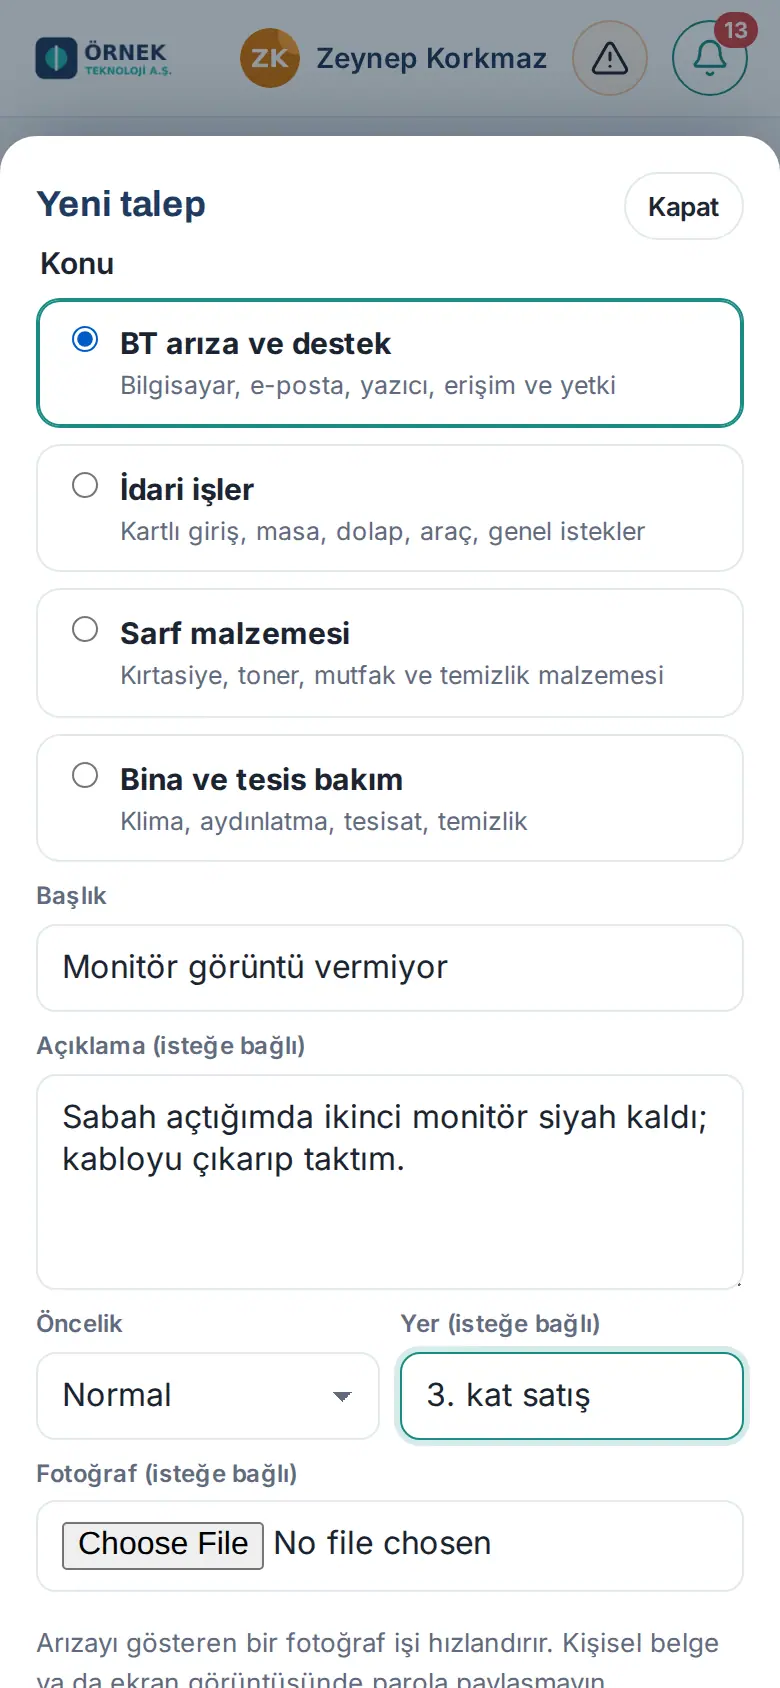
- Under Subject, select a category. The description below the category shows which needs belong to it (e.g. "Bilgisayar, e-posta, yazıcı, erişim ve yetki" — "computer, email, printer, access and permissions").
- Type a Title (at least 3 characters, e.g. "Monitör görüntü vermiyor" — "the monitor shows no picture").
- If you want, write in the Description (optional) box what happened, since when and what you tried.
- Select the Priority: Low, Normal, High or Urgent. The priority changes the target resolution time (see How the target time and the measures are calculated).
- If you want, type the place in the Place (optional) field (e.g. "3. kat satış" — "3rd floor, sales").
- If you want, add a photo that shows the problem with Photo (optional). On a phone, the back camera opens.
- Tap Send request.
Result: The message "Request received: T-…" shows; the request is added to the top of your list with the New status.
Common errors:
- "Choose a topic." — you did not select a category.
- "Write a short title (at least 3 characters)." — the title is too short.
- "The photo can be at most 4 MB." / "The photo must be JPEG, PNG or WebP." — select another photo.
- "You’ve opened many requests; try again shortly." — you opened many requests in a short time.
- "Requests are turned off at this company." — the module was turned off.
Important: Make sure that no personal document or password on a screen shows in the photo. The note on the form also reminds you of this: "A photo of the problem speeds things up. Don’t share personal documents or passwords in screenshots."
Following the status of your request
Who: Employee · Where: Requests → tap the request
What it does: Shows which step the request is at, who handles it and the messages with the team.
- In the Requests box, tap your request. The request window opens.
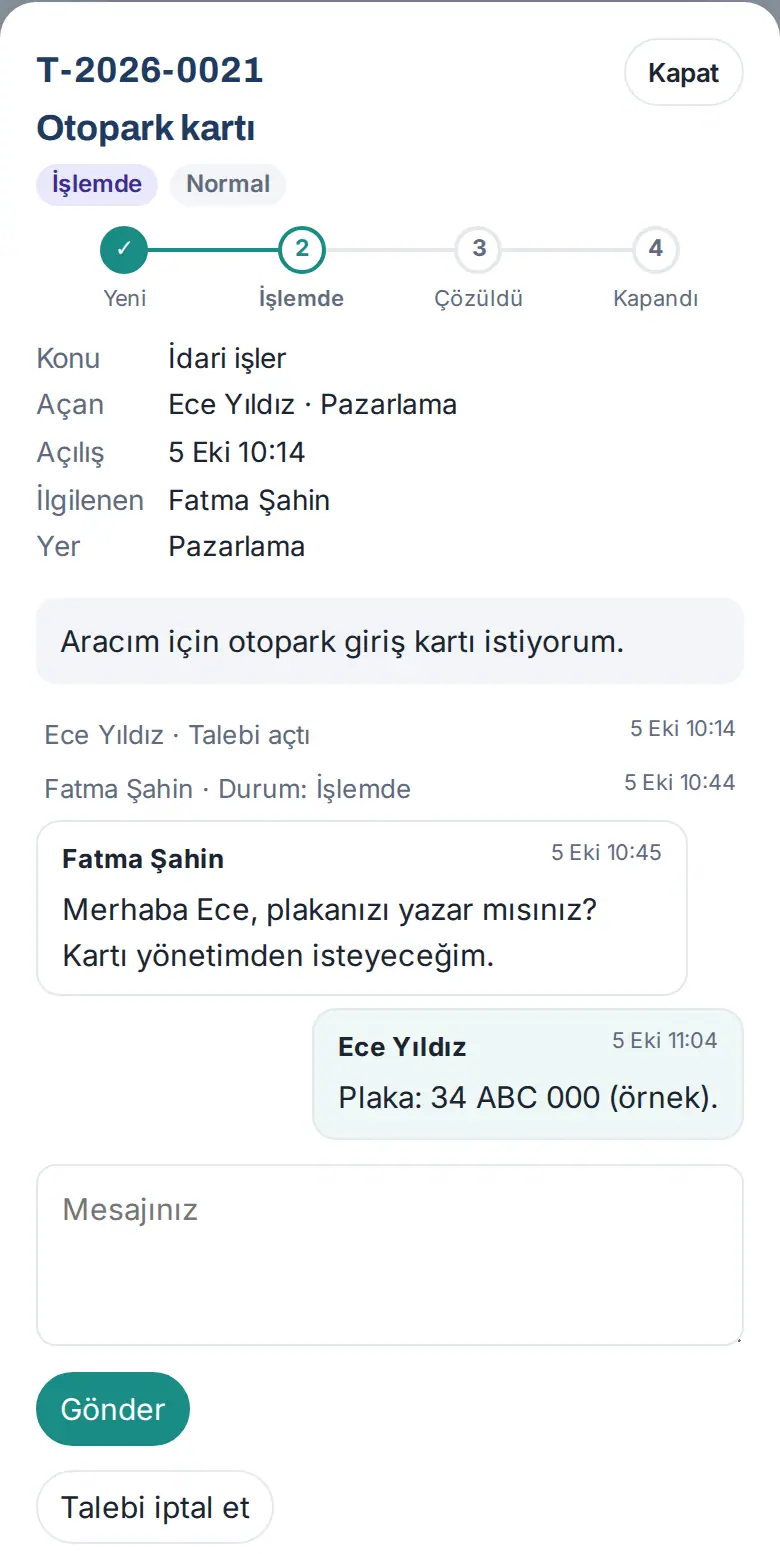
- The number, title, status and priority show at the top.
- Below them, there is a four-step status bar: New → In progress → Resolved → Closed. While the team waits for information from you, the second step is named Waiting for info.
- Read the Subject, Opened by, Opened, Handled by and Place rows.
- If there is a reply, the measure tiles show: First response (the time until the team's first reply) and, if resolved, Resolution (the time until it was resolved).
- At the bottom, the messages and the history of the request (e.g. "Ozan Koç · Status: In progress") are listed in time order.
- To write to the team, type in the Your message box and tap Send.
Statuses: New · In progress · Waiting for info · Resolved · Closed · Cancelled.
Tip: You get a notification when your request gets a reply, or when its status or the person who handles it changes (see 09. Notifications).
Replying to a request that needs information
Who: Employee · Where: Requests → request with the Information needed from you badge
What it does: If the team asks you for information to resolve your request, the request goes back to work with your reply.
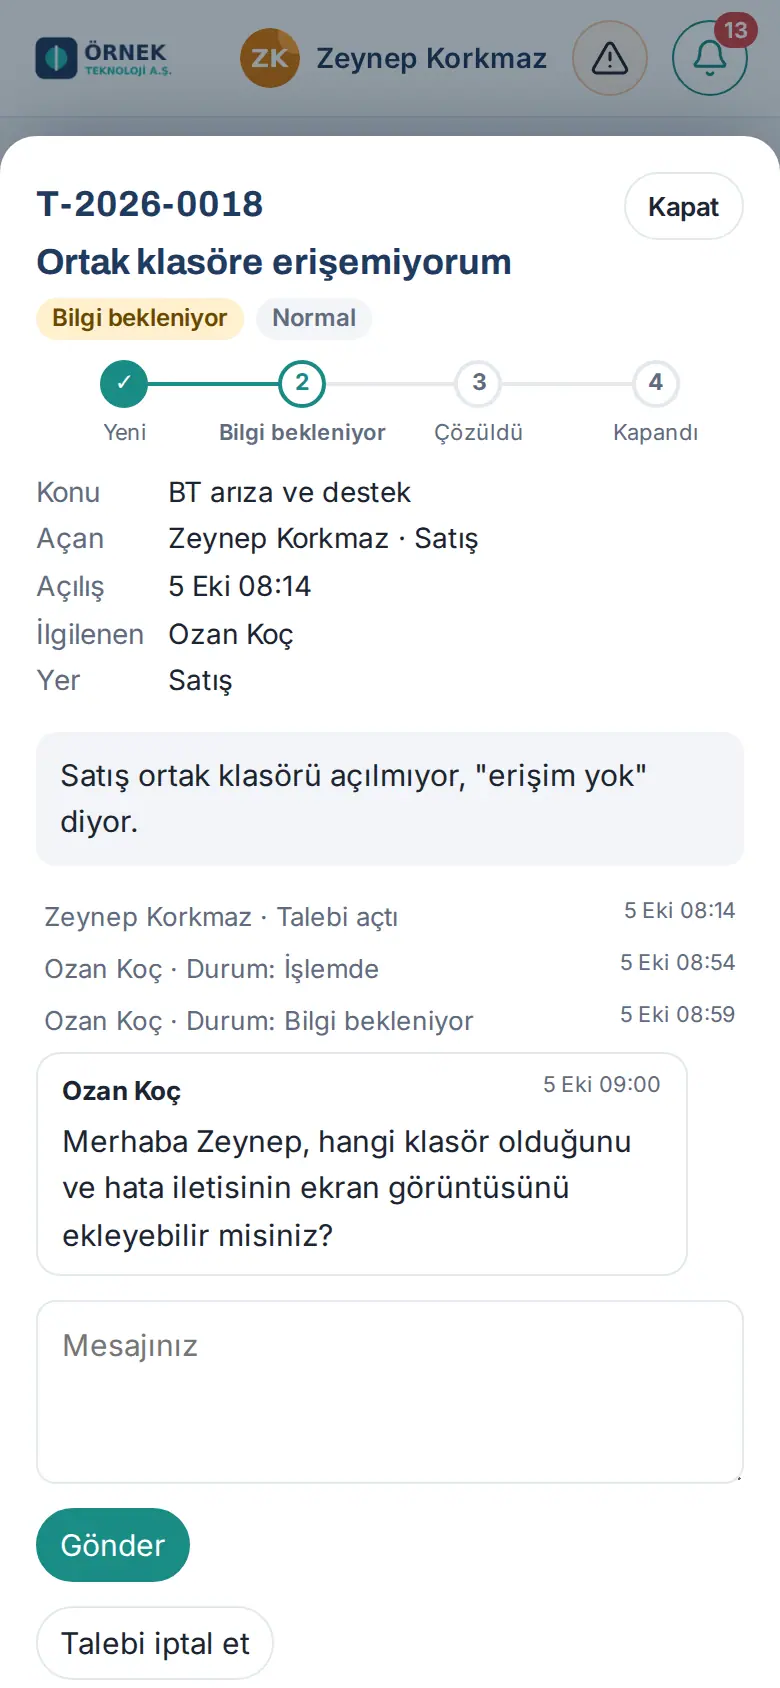
- Tap the notification, or open the request with the Information needed from you badge in the Requests box.
- Read the team's message (e.g. "hangi klasör olduğunu ve hata iletisinin ekran görüntüsünü ekleyebilir misiniz?" — "can you add which folder it is and a screenshot of the error message?").
- Type the requested information in the Your message box.
- Tap Send.
Result: The message "Sent." shows; the request goes back to In progress and the person who handles it is told.
Tip: While the request is Waiting for info, the target time stops; during this time the request is not counted as "overdue". The faster you reply, the faster the problem is solved.
Confirming or reopening a resolved request
Who: Employee · Where: Requests → request with the Awaiting your confirmation badge
What it does: If the problem is really solved, you close the request with a rating; if it is not solved, you reopen it.
- Tap the notification "Talebiniz çözüldü" ("your request is resolved"), or open the request with the Awaiting your confirmation badge.
- Go to the Is the problem solved? section at the bottom of the window.
- If the problem is solved, select a star from 1 to 5 and tap Confirm and close.
- If the problem continues, you can write what happens in the Your message box, then tap Still a problem. The text you wrote is added to the request.
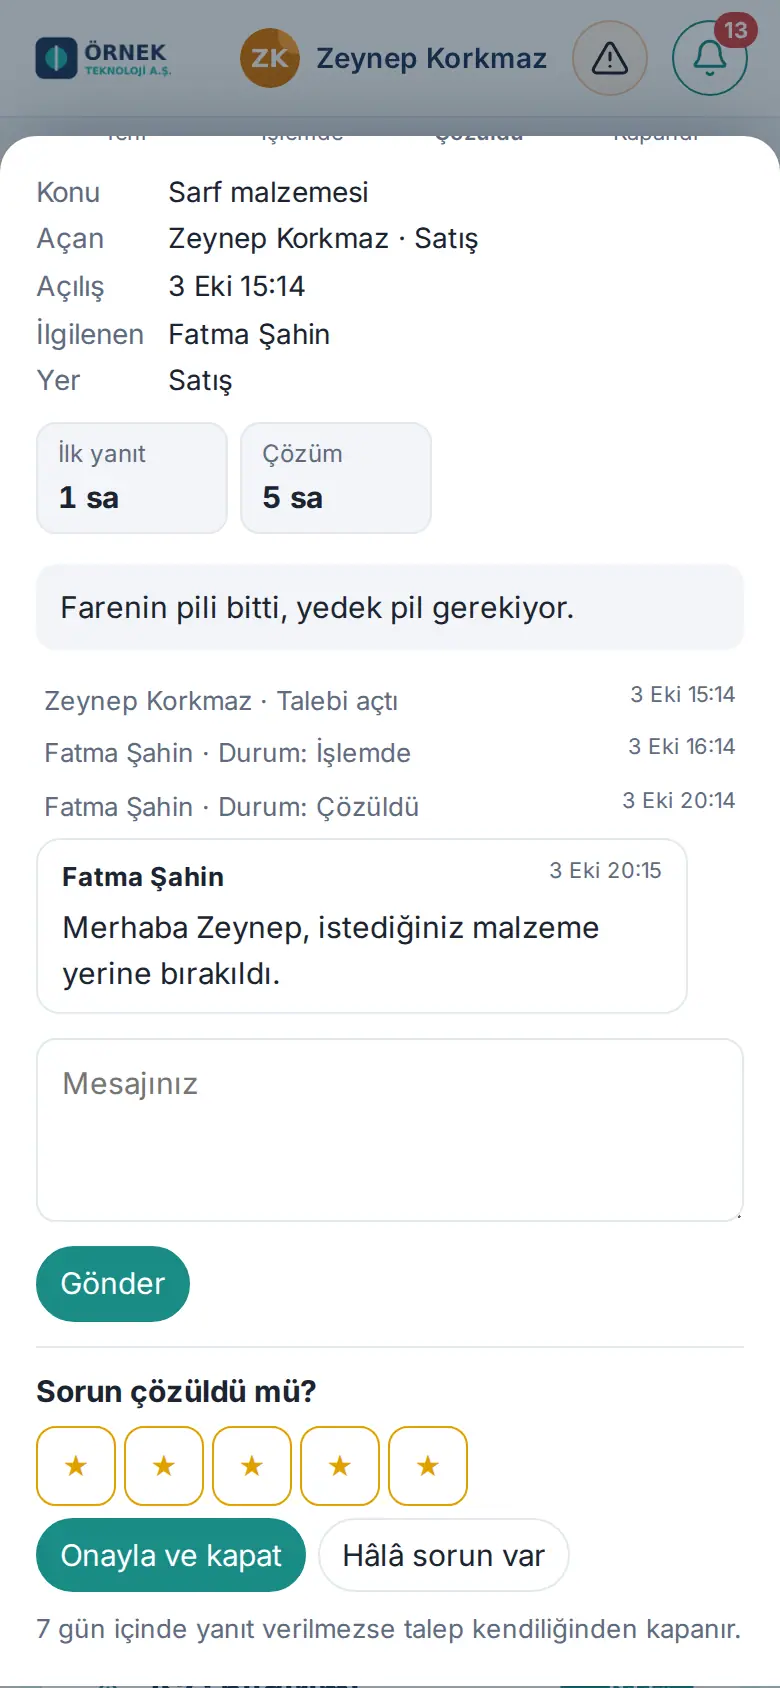
Result: If you confirm, the message "Thank you; the request is closed." shows and the request becomes Closed. If you tap Still a problem, the message "Request reopened." shows; the request becomes In progress and the person who handles it is told.
Important: If you do not reply to a resolved request within 7 days, the request closes automatically ("If there’s no response within 7 days, the request closes automatically."). If you tap Confirm and close without selecting a star, the warning "Choose a rating from 1 to 5." appears.
Cancelling a request
Who: Employee (who opened the request) · Where: Request window → Cancel request
What it does: You withdraw a request that is no longer needed.
- Open your request.
- Tap Cancel request.
- At the question "Talep iptal edilsin mi?" ("Cancel the request?"), tap Yes, cancel. If you change your mind, tap Cancel.
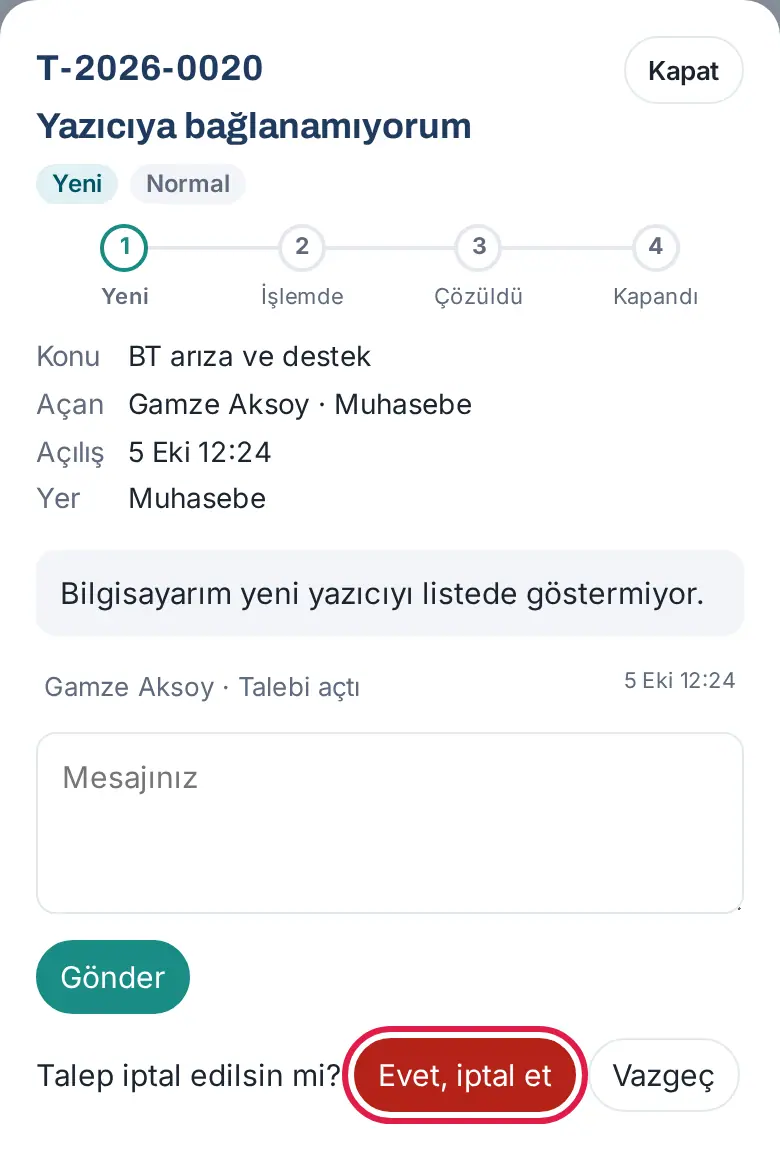
Result: The message "Request cancelled." shows; the request becomes Cancelled.
Important: Only open requests (New, In progress, Waiting for info) can be cancelled. For a resolved or closed request, the warning "The request can’t be cancelled." appears.
The incoming requests list (request handlers)
Who: Category handler, requests operator, Admin · Where: Board → Services → Requests → Incoming requests
What it does: Shows at a glance all the open requests that come to you and your team, how much time is left until the target time and who waits for a reply.
Before you start: Only request handlers see this tab (see chapter 31):
- a category handler sees only the requests of their own categories;
- the Module admin, Operator and Viewer roles of the Requests module and Admins see all categories;
- a Viewer sees the list and the Overview but cannot handle requests.
- Click Board in the menu on the left and open the Services tab at the top. On a phone, select Tools → Services.
- In the Requests box, click the Incoming requests (N) tab. The number in brackets is the number of open requests.
- Click one of the status boxes at the top to filter the list:
- Open — new, in progress and waiting-for-info requests;
- Awaiting response — requests nobody has replied to yet;
- Assigned to me — the ones you took on;
- Overdue — the ones past their target time (red);
- Waiting for info — the ones waiting for a reply from the requester;
- Resolved (30 days) — the ones resolved in the last 30 days; below it, "today N" shows;
- All.
- If you want, type in the search box (Search number, title, person or location) or select a category in the All categories list.
- Read the rows. Each row shows:
- on the left, the priority strip (red: urgent, orange: high);
- the status and priority badges;
- the target time badge: "3,6 h left", "1,2 h overdue" or "Clock paused" (while waiting for info);
- the Awaiting response badge (if the request has no reply yet);
- the topic, the person who opened it and their department;
- the initials and name of the person who took it on, or "Unassigned";
- at the bottom, the target time bar (green → orange → red).
- Click a request to open the request window.
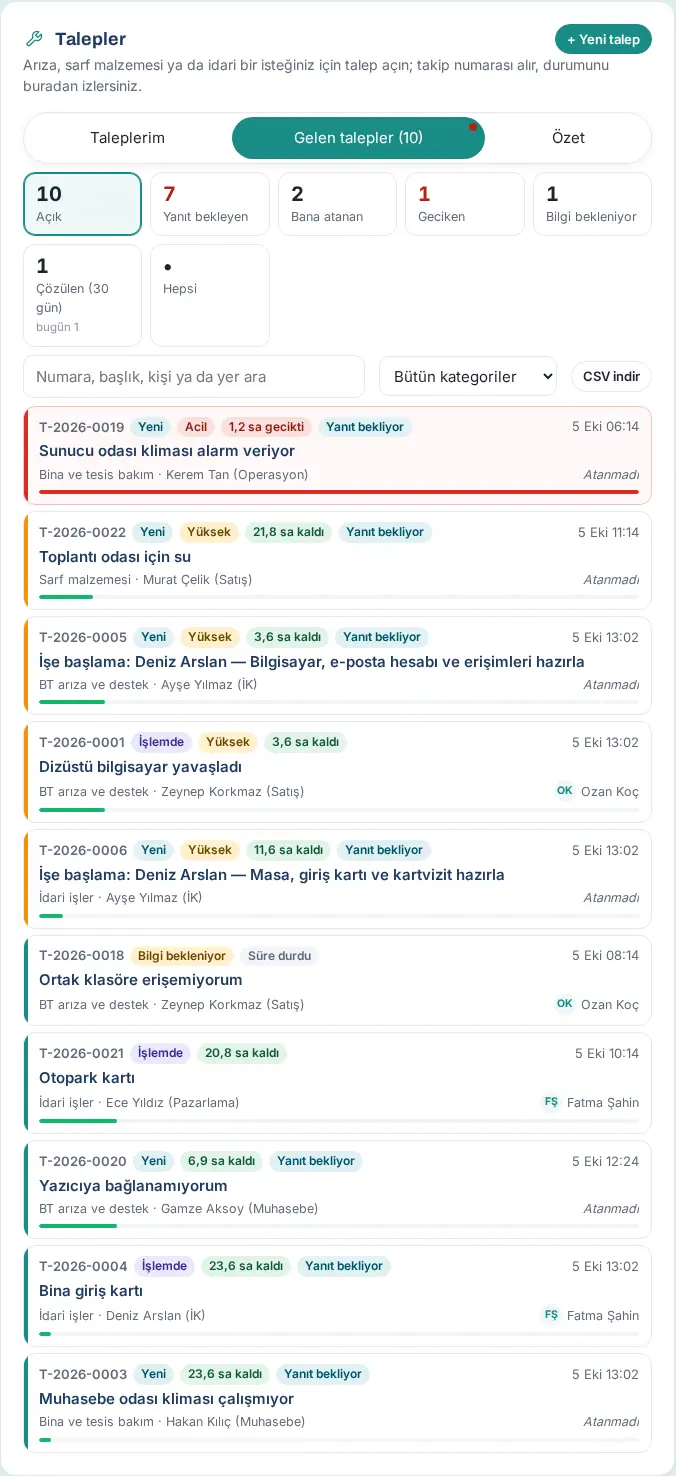
Result: Overdue and urgent requests stay at the top of the list; they are marked with a red background.
Tip:
- Download CSV exports the requests in the list to a file; the file also has the "Time to target (h)" and "Awaiting response" columns.
- The list shows at most 300 requests ("Showing the first 300 requests; narrow the filter.").
- Department tasks in a new employee's onboarding also come as requests (e.g. "İşe başlama: Deniz Arslan — Bilgisayar, e-posta hesabı ve erişimleri hazırla" — "Onboarding: Deniz Arslan — prepare the computer, email account and access").
Important: When the target time is passed, the person who handles the request (if the request is not assigned to anyone, the category handlers) gets the notification "Request is past its target time" once. The check runs every hour.
Taking on a request and writing a reply
Who: Category handler, requests operator · Where: Incoming requests → request
What it does: You take the request yourself, write to the requester or add a note that only the team sees.
- In Incoming requests, click the request.
- Read the target time ("Target: 5 Oct 20:24") and the target time bar at the top of the window, and the Subject, Opened by, Opened, Handled by, Target and Place rows below them. If the First response tile says "No response yet", nobody has replied to the request.
- If you want to reach the requester, click Call or Email.
- To take the request, click Take it on. The request becomes In progress and your name is written in the Handled by row.
- To give it to someone else, select the person in the Handled by list at the bottom. The message "Assignment saved." shows.
- To write to the requester, type in the message box and click Send.
- If you want only the team to see it, first select the Internal note (requester won’t see it) checkbox, then click Send.
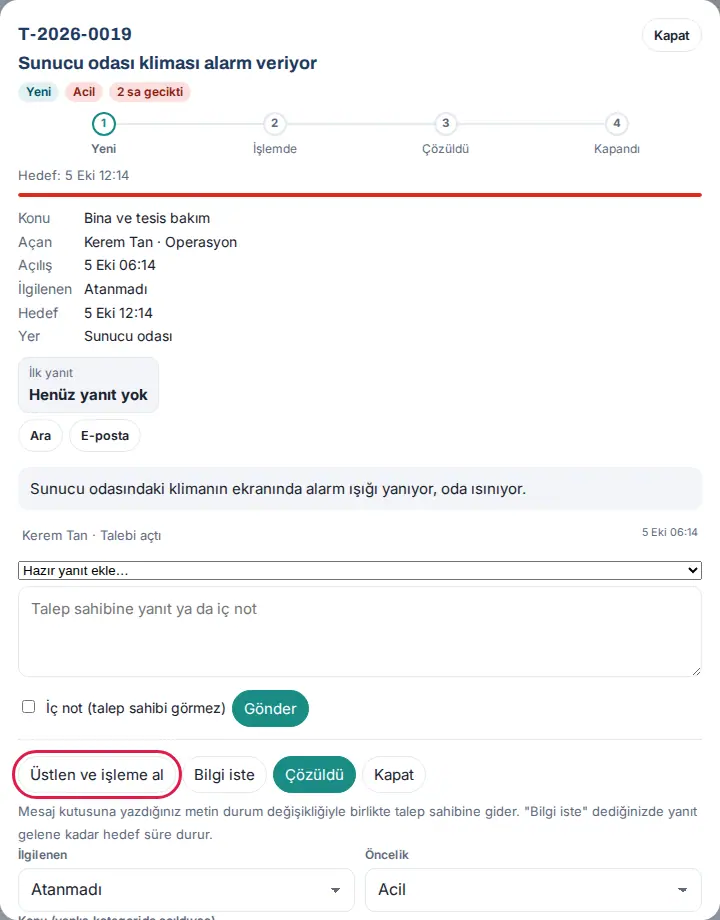
Result: The message "Sent." shows. Your first reply other than an internal note, or your first status change, is recorded as the First response time of the request.
Tip: The text you type in the message box also goes to the requester together with the status buttons (Ask for info, Resolved). The note at the bottom of the window reminds you of this: "Text in the message box is sent to the requester with the status change."
Common errors:
- "The message can’t be empty." — the message box is empty.
- "A request can only be assigned to this category’s handlers or an Admin." — the person you selected is not a handler of this category.
- "You can only view this request." — your role is Viewer.
- "You can’t write to a closed request; open a new one if needed."
Using a canned reply
Who: Category handler, requests operator · Where: Request window → Insert canned reply…
What it does: You add replies you write often (password reset, screenshot request, supplies delivered…) to the message box with one selection.
Before you start: The Requests module admin defines the canned replies (see chapter 31). If there are no canned replies, the list does not show. Employees who open requests do not see this list.
- Open the request window.
- Open the Insert canned reply… list above the message box.
- Select a reply (e.g. Ekran görüntüsü isteği — "screenshot request").
- The text is added to the message box. In the text,
{ad}is already replaced with the requester's name and{no}with the request number (e.g. "Merhaba Gamze, …" — "Hello Gamze, …"). - If necessary, edit the text.
- Click Send, Ask for info or Resolved.
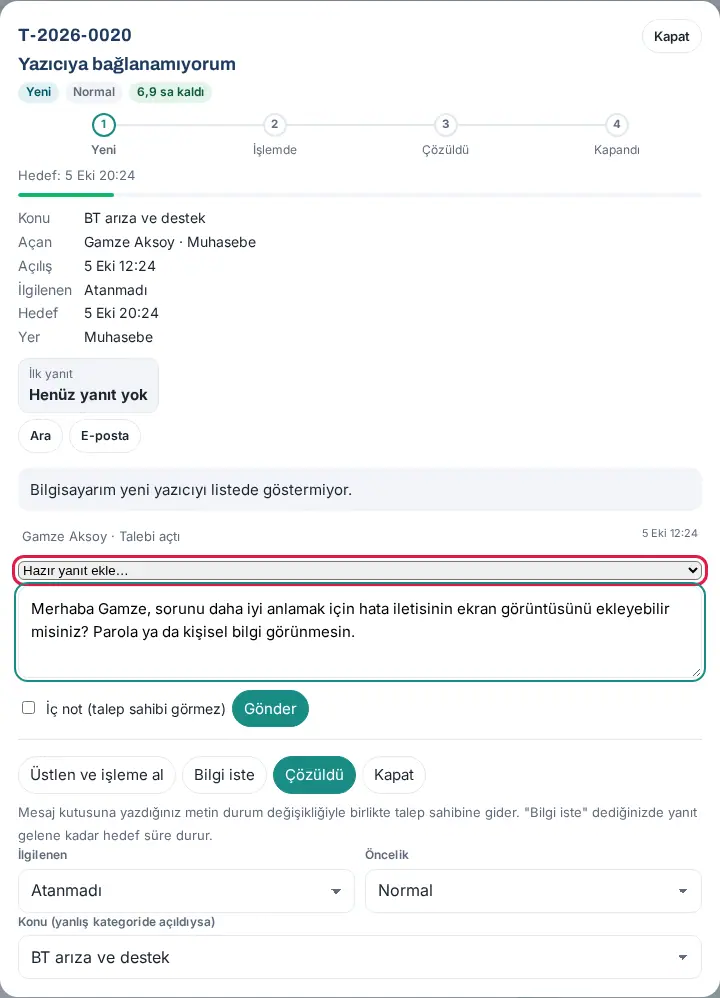
Tip: If there is already text in the message box, the canned reply is added below it, on a new line.
Asking the requester for information
Who: Category handler, requests operator · Where: Request window → Ask for info
What it does: You ask the requester for the information needed to resolve the request. The target time stops until the reply comes.
- Type in the message box what you need (e.g. the canned reply Ekran görüntüsü isteği).
- Click Ask for info.
Result: The request becomes Waiting for info. In the list, the target badge says "Clock paused". The requester gets a notification, and the Information needed from you badge shows in their list. When the requester replies, the request goes back to In progress; the waiting time is added to the target, and the overdue mark goes away.
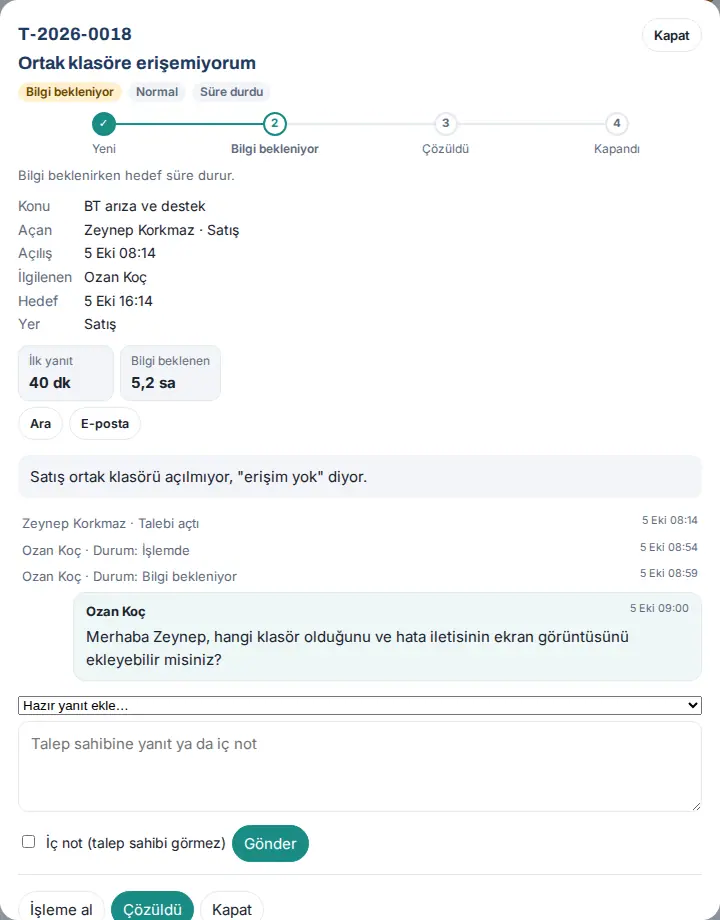
Common error: If you click Ask for info while the message box is empty, the warning "Write in the message box what you need from the requester." appears.
Resolving or closing a request, and changing the priority or topic
Who: Category handler, requests operator · Where: Request window
What it does: When the work is done, you mark the request as resolved, close a request that is not needed, or correct the priority or topic of a request that was opened wrongly.
Resolving:
- Type in the message box what you did (e.g. the canned reply Parola sıfırlandı — "password reset").
- Click Resolved.
Result: The request becomes Resolved and the requester gets a "resolved" notification. The requester closes it with a rating or reopens it with Still a problem (a reopened request is counted as "Reopened" in the Overview). If there is no reply within 7 days, the request closes automatically.
Closing: For a request that is not needed or is a duplicate, type the reason in the message box and click Close. The request becomes Closed without waiting for the requester's confirmation; the closing time counts as the resolution time.
Priority and topic:
- Select the new priority in the Priority list. The message "Priority changed; target time recalculated." shows.
- If the request was opened in the wrong category, select the correct one in the Topic (if opened in the wrong category) list. The message "Topic changed; the new category’s handlers were notified." shows.
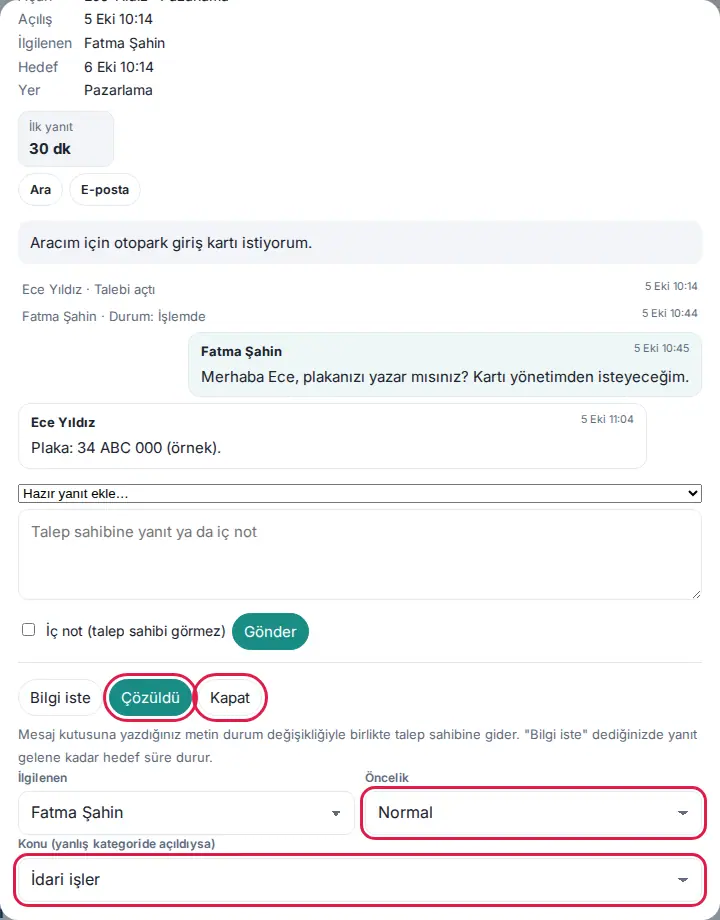
Important: Use Close only for requests that are not needed or are duplicates; for normal work, use Resolved so that the requester confirms the result.
The Overview board: resolution times
Who: Category handler, requests operator, requests viewer, Admin · Where: Board → Services → Requests → Overview
What it does: Shows on one screen, for the period you select, how fast requests are answered and resolved, how many are resolved within the target time and how satisfied users are.
Before you start: The Overview tab is available only to request handlers and viewers. An employee who opens requests does not see this tab ("The overview is only available to people who handle requests.").
- In the Requests box, click the Overview tab.
- Select the period: Last 7 days, Last 30 days or Last 90 days.
- Read the indicator boxes:
- Open requests (below it, how many wait for a reply);
- Overdue (below it, how many wait for information);
- First response (median);
- Resolution time (median) (below it, the 90th percentile, e.g. "%90 · 29,8 h");
- Resolved on target (percentage and number of resolved requests);
- Reopened (the share of requests where Still a problem was selected);
- Satisfaction (average rating and number of votes).
- In the Last 14 days: opened and resolved chart, compare the requests opened and resolved by day.
- Read the Age of open requests (newer than 1 day … older than 7 days) and Resolution time distribution (shorter than 1 hour … longer than 3 days) bars.
- In the By category and By assignee tables, compare the Request, Open, Resolved, First response, Resolution (median), On target and Rating columns for each row.
- For a more detailed report, click Detailed report; Reports → Requests opens (see 19. Reports).
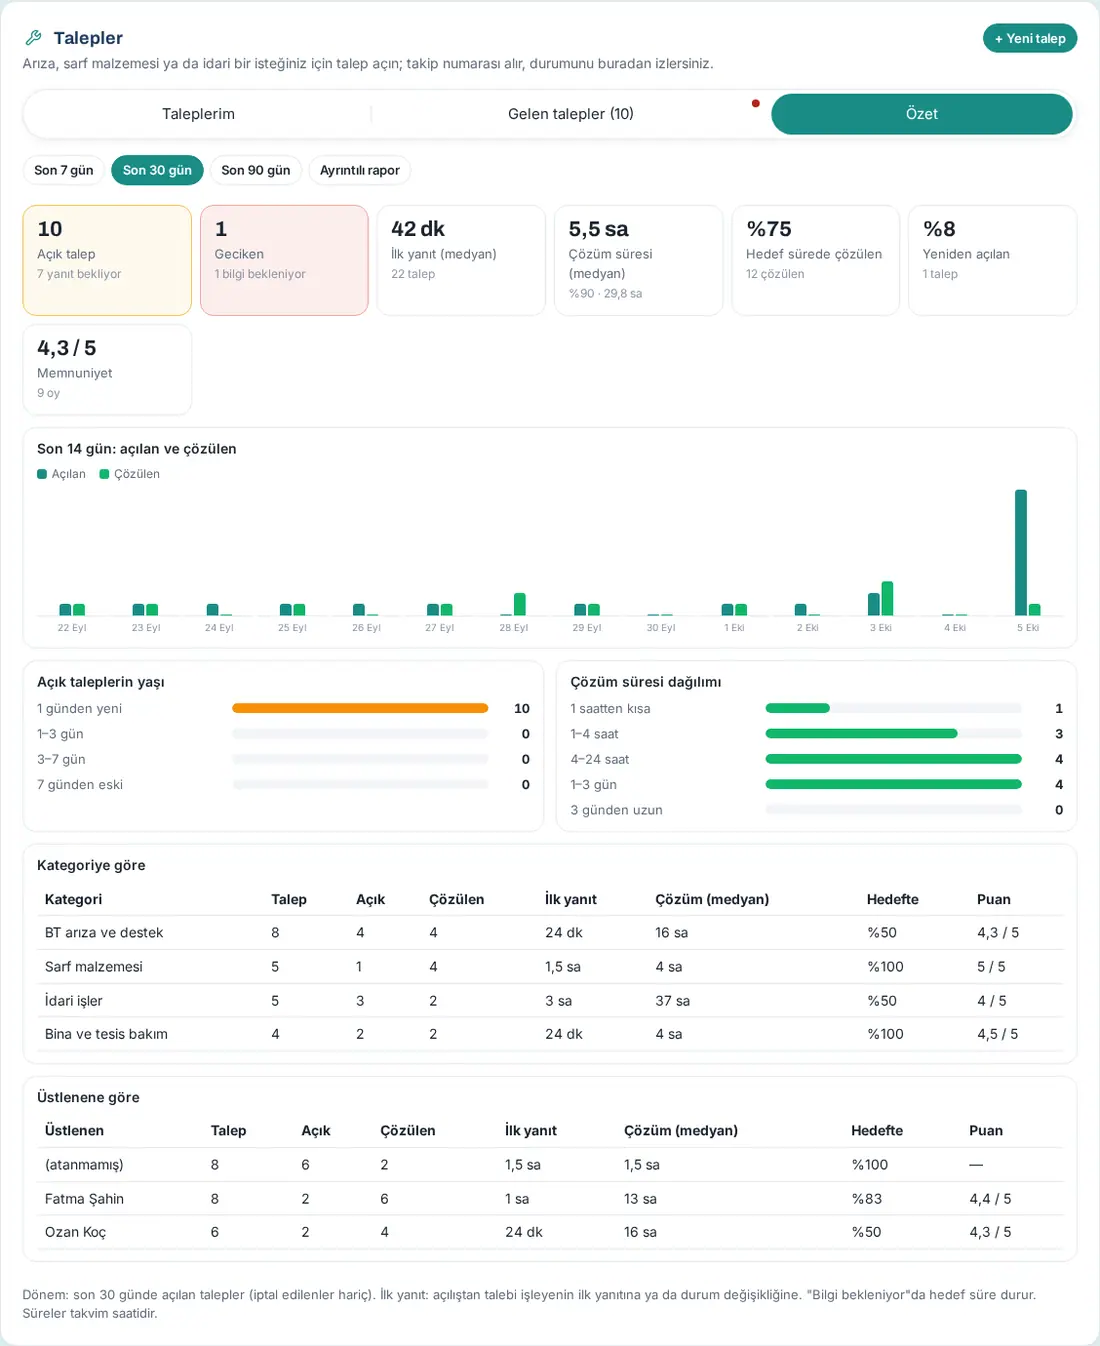
Tip: The median (the middle value) is used instead of the average: one very long request does not distort the result. The median shows that half of the requests took less than this time and half took longer.
Important: The medians, on target, reopened, satisfaction and the two tables count the requests opened in the selected period. Open requests, Overdue and Age of open requests show the requests that are open now, independent of the period; the chart always shows the last 14 days. Cancelled requests are not counted. At most 5,000 requests are scanned.
How the target time and the measures are calculated
Who: Request handler, module admin
Target time:
- Each category has a target resolution time (in hours; in the sample setup, IT 8, facilities 24, supplies 48, building 24).
- The priority changes the time: Urgent ×¼, High ×½, Normal ×1, Low ×2. Example: in the IT category, the target is 8 hours; for an urgent request, it is 2 hours.
- While the request is Waiting for info, the time stops. When the request leaves this status, the waiting time is added to the target.
- When the priority or topic changes, the target is recalculated; the waiting time up to that moment is added to the new target.
- The times are calendar hours; working hours and holidays are not taken into account.
Measures:
| Measure | What it means |
|---|---|
| First response | The time from opening to the handler's first reply or first status change. Internal notes, assignments and the requester's own messages are not counted. |
| Resolution | The time from opening to Resolved (or directly to Close). Cancelled requests are not counted. |
| Waiting for info | The total time the request stayed in Waiting for info. |
| On target | A request is counted as "on target" if it was resolved before the target time. |
| Reopened | Requests where the requester selected Still a problem. |
| Satisfaction | The average of the 1–5 ratings given by requesters. |
Common warnings
| Message | Where | What to do |
|---|---|---|
| "Incoming requests are only for category handlers." | Incoming requests | You must be a category handler or a requests operator; contact the module admin. |
| "The overview is only available to people who handle requests." | Overview | For the same reason, the tab is not available to you. |
| "You can’t assign this request." | Handled by list | Only request handlers assign requests. |
| "You can’t write to a closed request; open a new one if needed." | Request window | Open a new request. |
| "Only a resolved request can be reopened." | Still a problem | A request cannot be reopened before it is resolved; write a message. |
| "Ratings (1–5) can only be given to resolved requests." | Confirm and close | The request must be resolved and a star must be selected. |
| "Requests are turned off at this company." | New request | The module was turned off; contact the module admin. |