17. Expenses, business advances and per diem
Screenshots show the Turkish interface of Prozence with fictional "Örnek Teknoloji A.Ş." data; the English interface has the same layout.
You enter the expenses you pay for work, with their receipts, from your phone. An expense goes through the approval of your manager, additional approvers if necessary, and then accounting, and is then reimbursed to you. Before a trip you can request a business advance, and you can have your daily travel allowance (per diem (harcırah)) calculated automatically according to company policy.
This chapter is for employees and approvers (managers). For settings, the accounting screen and exports, see 18. Expense management and accounting.
In this chapter
- My expenses box
- Adding an expense (with a receipt)
- Adding an item without a receipt
- Adding per diem (daily travel allowance)
- Submitting an expense and warnings
- Following the status of an expense
- Correcting an expense returned for correction
- Requesting an advance (business advance)
- Offsetting expenses against an advance
- Approving expenses as an approver
Before you start: The expense module is off by default in the company. If you do not see the My expenses box, ask your manager or your IT team. Business advances and per diem are turned on separately; if they are off, the Request advance and Add per diem buttons do not show.
My expenses box
Who: Employee · Where: Tools → My Space → My expenses (on a computer, Board → My Space)
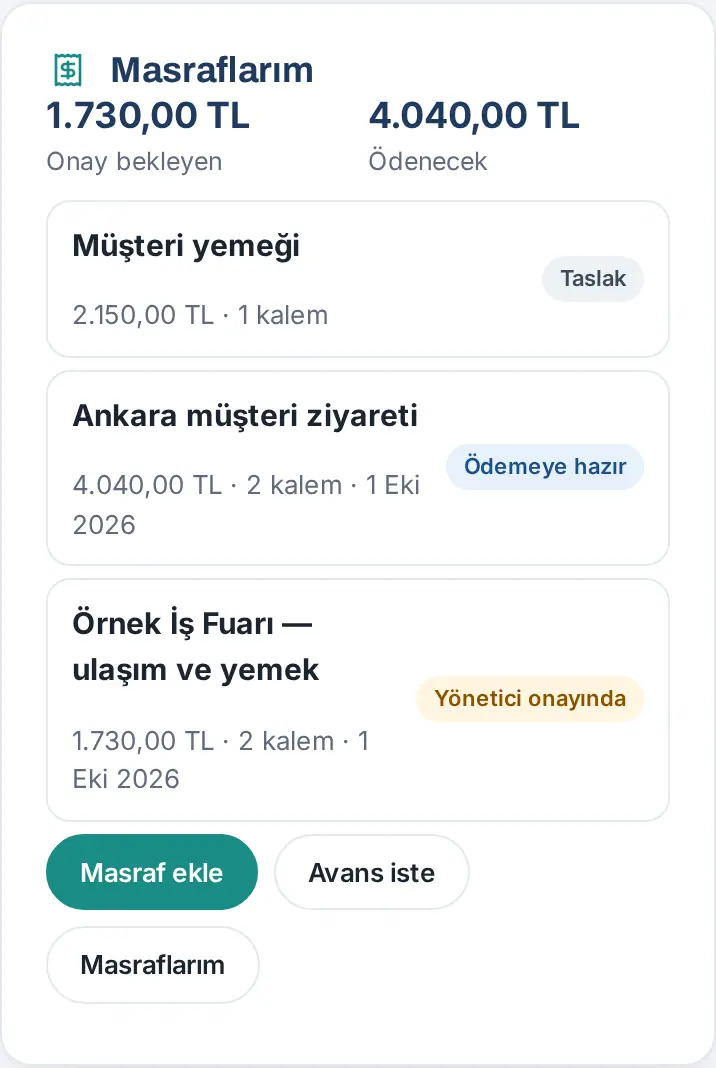
What it does: Shows at a glance the total that waits for approval, the total to be paid to you, and your latest expenses with their statuses.
- Tap Tools in the bottom menu and select My Space in the strip at the top; go to the My expenses box. On a computer, it is under Board → My Space. You can also get there by tapping the My expenses tile at the top of the Today screen.
- Two totals show at the top: Awaiting approval and To be paid.
- Below, your latest expenses are listed with their statuses (Draft, Awaiting manager, Ready for payment …). Tap an expense to open its details.
- The buttons in the box are: Add expense, Request advance, My expenses (the full list). If you are an approver, Awaiting approval (N) also shows; if you are in accounting, Accounting and Report also show.
Tip: On a phone, you can also get to Add expense from the + button at the bottom right (see 00. Getting started).
Adding an expense (with a receipt)
Who: Employee · Where: My expenses → Add expense
What it does: Collects the expenses you paid for a job (one or more receipts) in one expense.
- Tap Add expense.
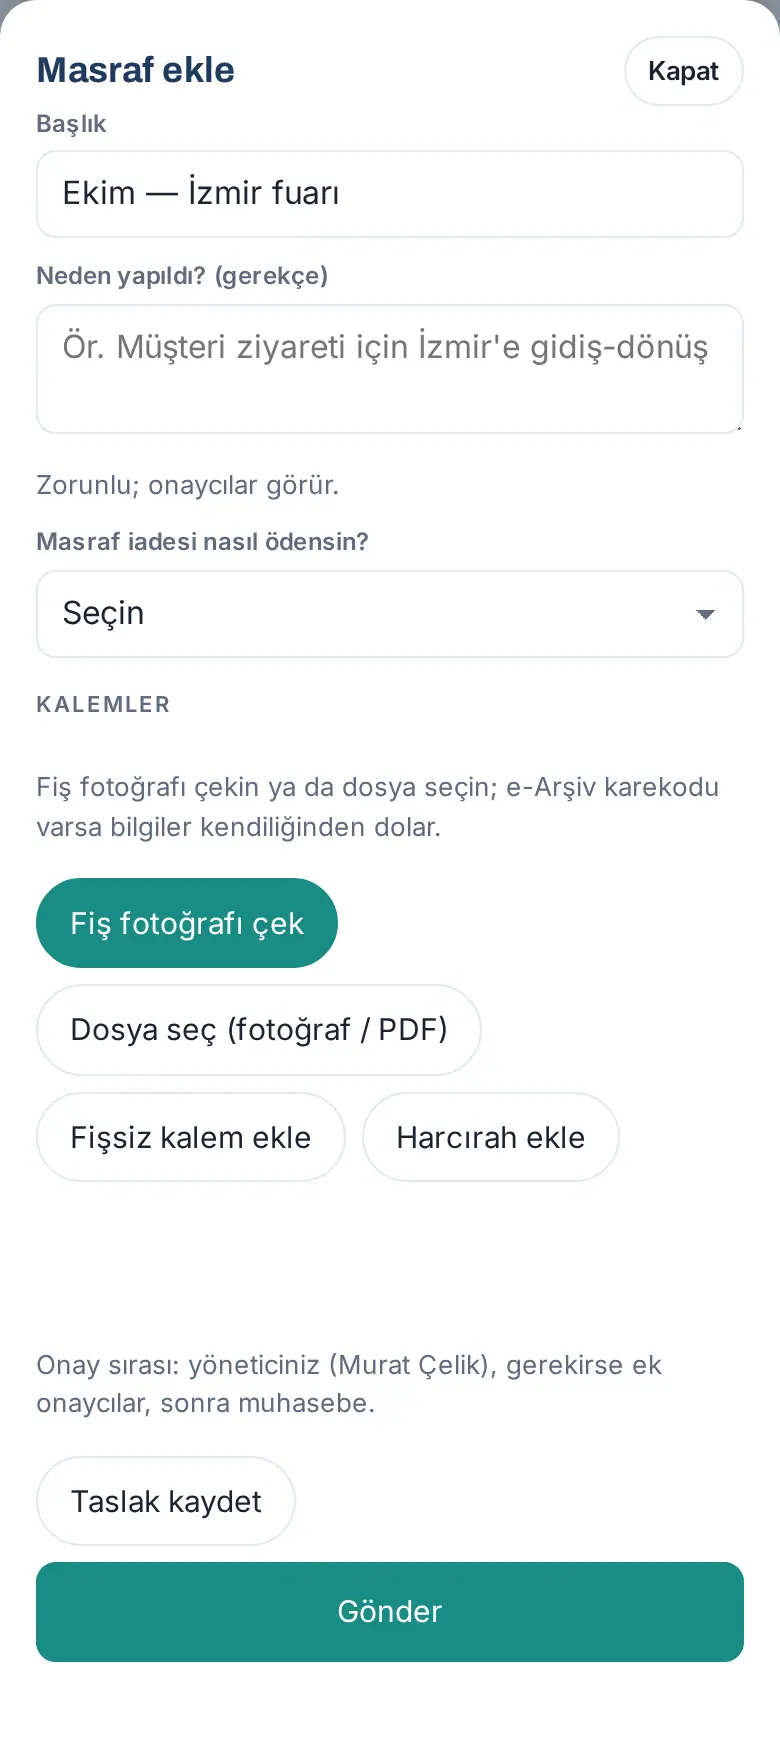
- Write a Title (e.g. "October — İzmir fair").
- Fill in the Why was it spent? (reason) field. The reason is mandatory; the approvers see it.
- From the How should the reimbursement be paid? list, select a method that your company offers (e.g. Bank transfer, Via payroll).
- In the Items section, tap Take receipt photo and take a photo of the receipt. If the photo is on your computer or you have a PDF invoice, use Choose file (photo / PDF).
- If the receipt has an e-Archive / e-Invoice QR code (Turkish electronic invoice systems), the details (vendor, tax number, date, document number, amount, VAT) fill in automatically and the item is marked "verified by QR code". A receipt with a QR code is read on your device; it is not sent out.
- If there is no QR code and your company turned it on, the receipt is read with AI; always check the fields.
- On each item, check the Date, Category, Amount (incl. VAT), VAT rate and, if necessary, the Vendor, Document no. and Description fields. For an item in a foreign currency, enter the exchange rate on the document date.
- For other receipts, do step 5 again. An expense can have more than one item and receipt.
- If you are not finished, tap Save draft; if it is ready, tap Send (see Submitting an expense).
Tip: The photo is made smaller on the phone (a maximum of 2000 pixels); make sure that the full receipt and its text are readable, and put the receipt on a flat surface.
Important: If you enter the same receipt twice, the system warns you or blocks the submission (according to the company rule).
FAQ:
- How long is my draft kept? A draft that has never been submitted is deleted, together with its receipts, if it is not changed for 180 days.
- Who sees the receipt? You, the people in the approval chain, accounting and the module admin.
Adding an item without a receipt
Who: Employee · Where: Add expense → Add item without receipt
What it does: Enters small expenses that have no receipt (e.g. parking, bridge toll).
- In the expense window, tap Add item without receipt.
- Write the date, category, amount and description.
- Save or submit the expense.
Important: Your company sets an upper limit for items without a receipt; an item without a receipt above the limit gives a warning or cannot be submitted.
Adding per diem (daily travel allowance)
Who: Employee · Where: Add expense → Add per diem
What it does: Calculates the daily allowance for your out-of-town or international business trip according to company policy. You do not write the amount; the system calculates it.
Before you start: Per diem is entered after the trip; the return date cannot be after today. If you need money before the trip, request a business advance.
- In the expense window, tap Add per diem.
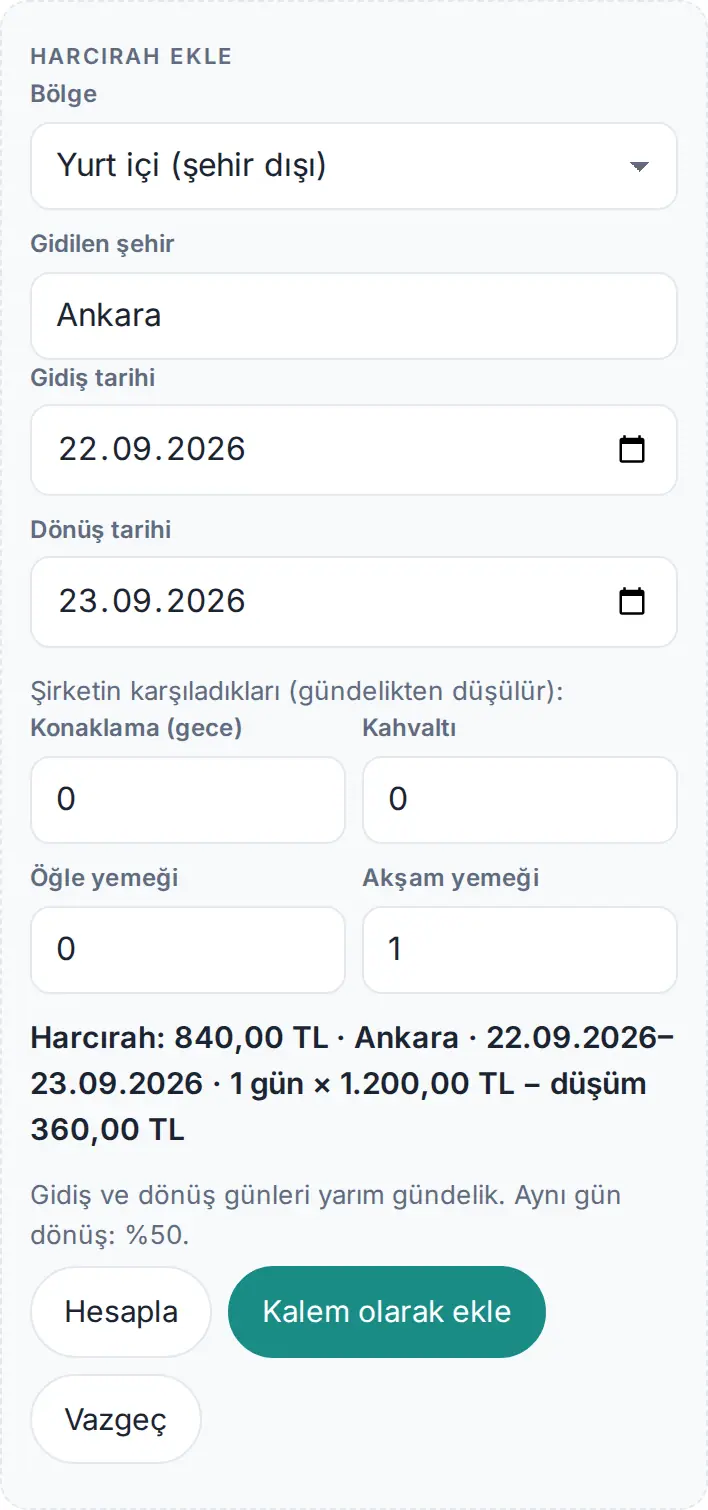
- Select the Region: Domestic (out of town) or Abroad.
- For a domestic trip, enter the Destination city; for a trip abroad, select the Country.
- Select the Departure date and Return date.
- In the Covered by the company section, write the number of nights and meals that the company paid for: Accommodation (nights), Breakfast, Lunch, Dinner. These are deducted from the daily allowance.
- Tap Calculate. The calculation row shows the number of days, the daily amount and the deduction (e.g. "1 day × 1.200,00 TL − deduction 360,00 TL").
- If it is correct, tap Add as item. For per diem abroad, you must enter the exchange rate on the return date.
How is it calculated?
- On multi-day trips, the departure and return days count as half days (company setting).
- For a same-day return, a percentage of the daily allowance is paid (default 50%).
- Abroad, the amount and currency depend on the country's group (A / B / C).
- A multiplier can apply according to your job title (e.g. 1,5 for managers).
- For domestic trips, the part above the tax exemption limit set by the company shows as "taxable" in payroll.
Important: If you enter a second per diem for the same dates, the system warns you or blocks the submission. An expense can have a maximum of 10 per diem items.
Submitting an expense and warnings
Who: Employee · Where: Expense window → Send
What it does: Sends the expense for approval. If something does not follow the company rules, it warns you first.
- In the expense window, tap Send.
- If a rule warning shows (item without a receipt, category limit, weekend date, VAT amount does not match, date too old, duplicate document…), read the warning.
- If it is a warning, you can write a short explanation and tap Submit anyway; the approvers see your explanation. If you want to correct it, tap Go back and fix.
- If it is a block, you must correct it first.
- When you submit, the expense becomes Awaiting manager. The approval order shows at the bottom of the window (e.g. "Approval order: your manager (Murat Çelik), additional approvers if needed, then accounting.").
Important: After you submit an expense, you cannot change it. If an approver requests a correction, the expense goes back to draft.
Following the status of an expense
Who: Employee · Where: My expenses → tap the expense
- In the My expenses box, tap the expense.
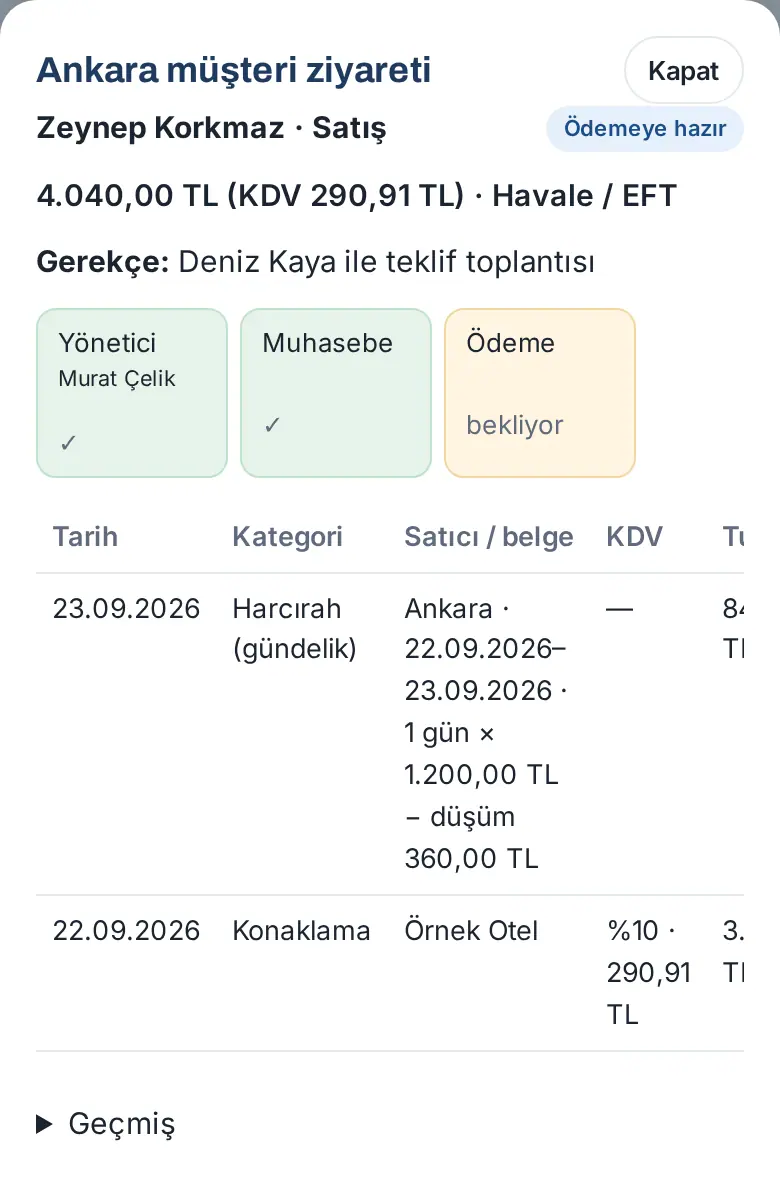
- The approval steps show as boxes at the top: Manager (with the name), additional approvers, Accounting, Payment. A completed step shows ✓; a waiting step shows "pending".
- Below are the items (date, category, vendor / document, VAT, amount) and the receipt image with View; the History is at the bottom.
Statuses: Draft · Awaiting manager · Awaiting additional approval · With accounting · Ready for payment · Paid · Rejected · Cancelled. Business advances also have Paid out (open) and Closed. Accounting approval, payment, rejection, a correction request and a cancellation made by someone else reach you as a phone notification (no email is sent). There is no notification for manager and additional approvals; follow the steps in the expense details.
Correcting an expense returned for correction
Who: Employee
- Tap the "A correction was requested on your expense" notification or open the expense in My expenses. The approver's note shows in the details.
- The expense is in Draft status; make the requested correction.
- Tap Send. The approval order starts again from the beginning.
Requesting an advance (business advance)
Who: Employee · Where: My expenses → Request advance
What it does: You get money from the company before a trip or a job; later you deduct your expenses from this advance.
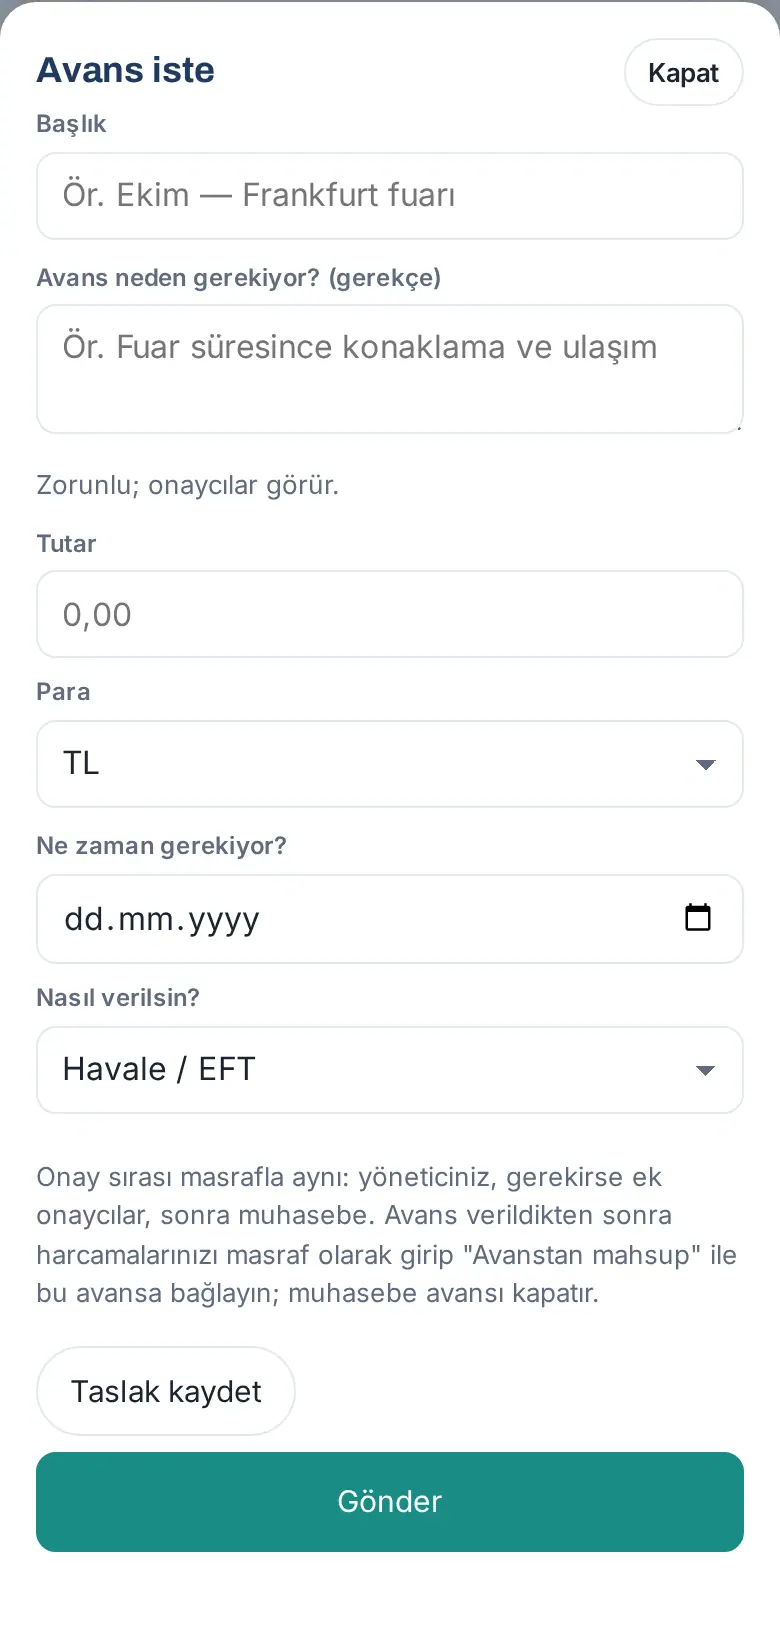
- Tap Request advance.
- Fill in the Title, Why is the advance needed? (reason), Amount and Currency fields. For a currency other than TL, also enter today's exchange rate.
- Select the When is it needed? date and How should it be paid? (e.g. Bank transfer).
- Tap Send. The advance goes through the same approval order as an expense: your manager, additional approvers if necessary, then accounting.
- When accounting pays the advance, you get a "Your advance has been paid" notification; the advance becomes Paid out (open).
Important:
- Your company can set an upper limit for one advance and the number of open advances per person (usually 1). While you have an advance that is not closed, you cannot submit a new one.
- If an advance is still not closed a specific time after it is paid out (default 30 days), you get a reminder once a week.
Offsetting expenses against an advance
Who: Employee · Where: Add expense → Offset against an advance?
What it does: Links the expenses you paid with the advance to the advance. These expenses are not paid to you separately; they are deducted from the advance.
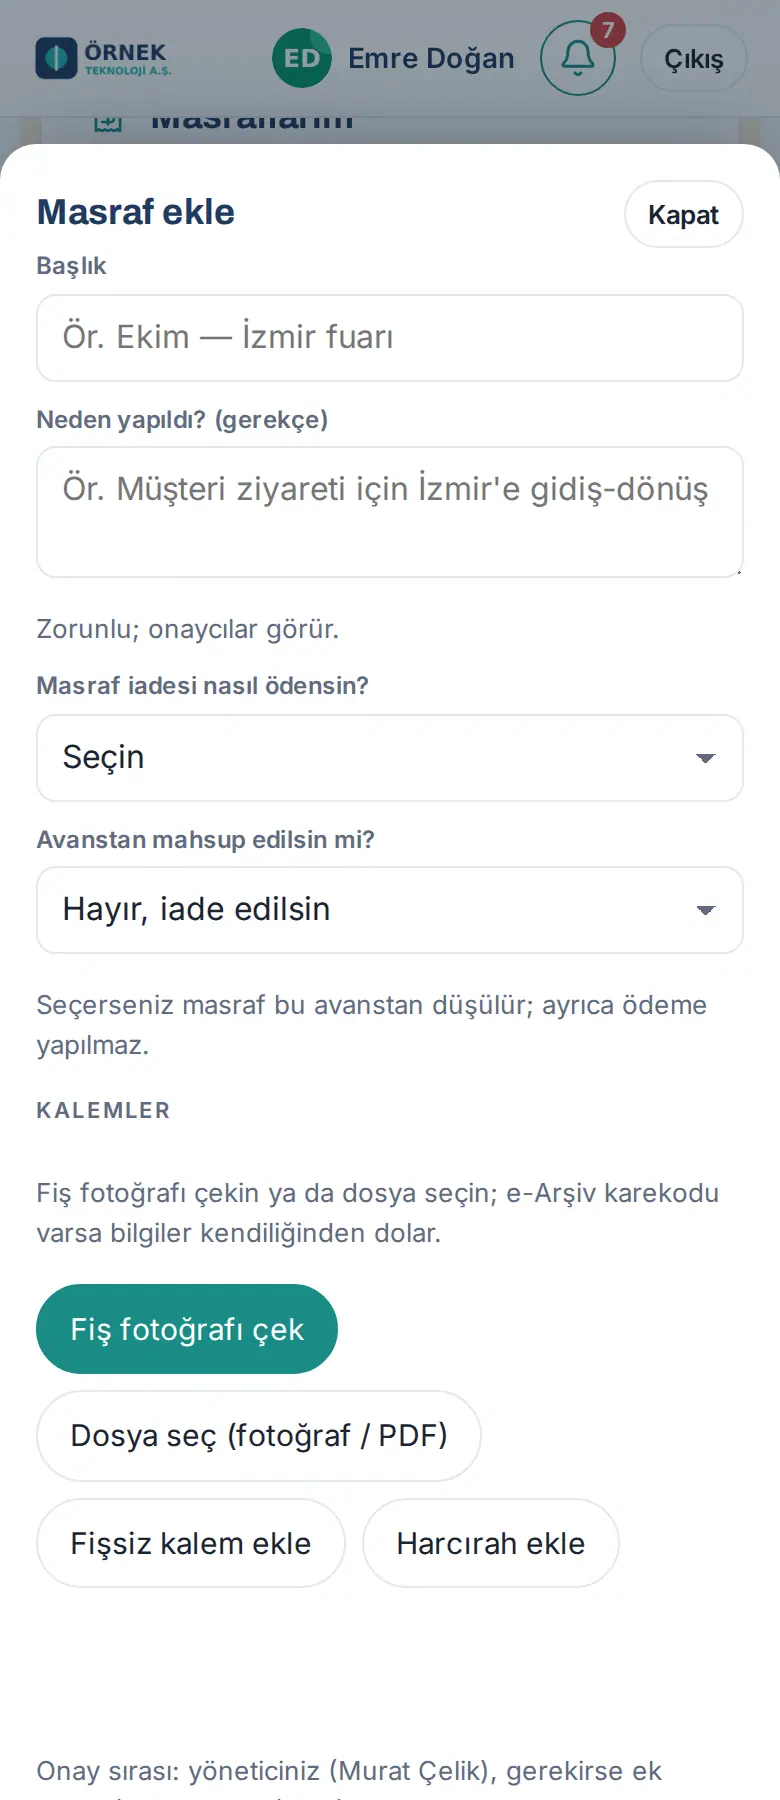
- While your advance is in Paid out (open) status, tap Add expense.
- From the Offset against an advance? list, select your advance (e.g. "Frankfurt fair · 20.000,00 TL left"). When you select it, the payment method is not asked.
- Add the items (receipts, per diem) as usual and tap Send.
- After your expenses are approved, accounting closes the advance:
- If your expenses are less than the advance, you pay the remaining amount back to the company (bank transfer, cash desk or payroll deduction).
- If your expenses are more than the advance, the difference is paid to you.
Tip: The remaining amount of the advance shows as "Open advance (left)" in the My expenses box.
Approving expenses as an approver
Who: Manager, additional approver · Where: My expenses → Awaiting approval (N)
What it does: You approve or reject the expense and advance requests of your team, or request a correction.
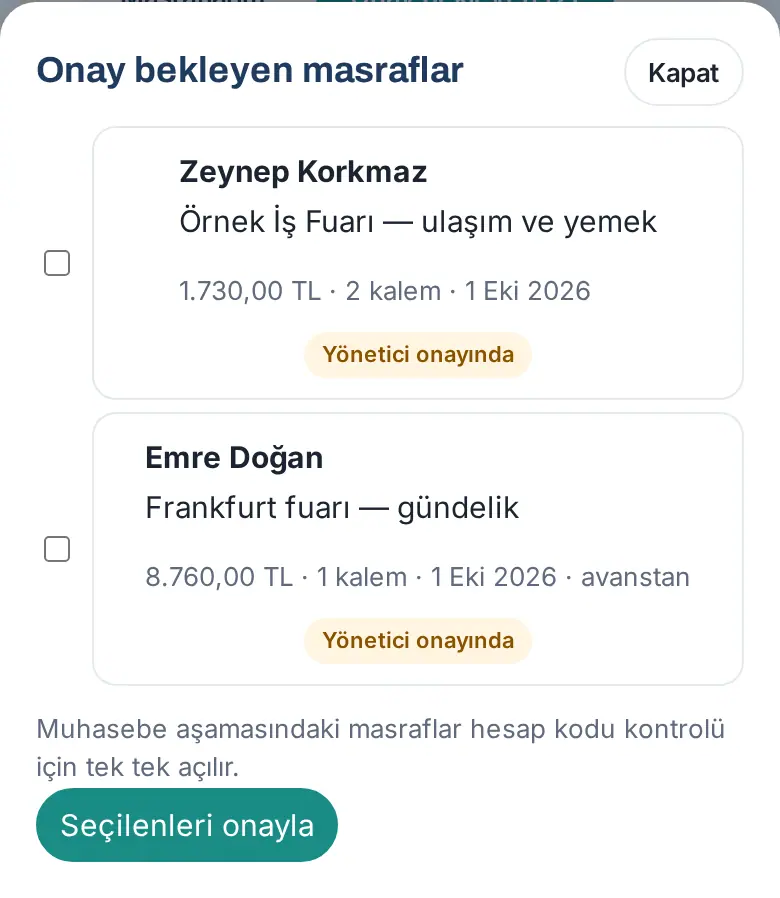
- Tap the "Expense awaiting your approval" notification (or email), or tap Awaiting approval (N) in the My expenses box.
- The list shows the person, title and amount. You can tick more than one expense and approve them together with Approve selected.
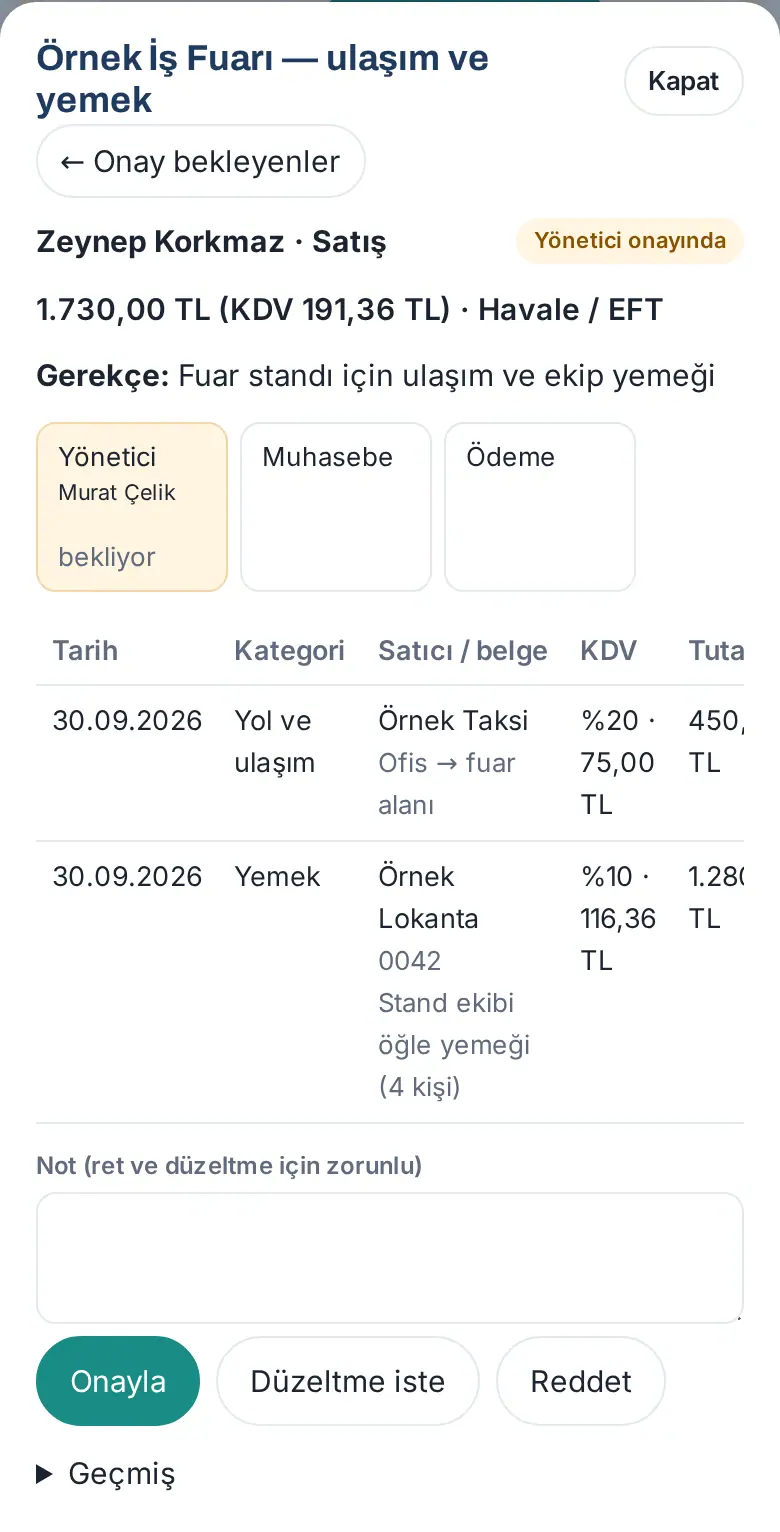
- Tap an expense: examine the items, receipts (View), rule warnings and the employee's explanation.
- Make a decision:
- Approve: the expense goes to the next approver or to accounting.
- Request correction: you must write a note; the expense goes back to the employee as a draft.
- Reject: you must write a note; the expense is rejected and the employee is told.
Important:
- You cannot approve your own expense.
- If you are on leave, the person covering for you can also approve.
- If the expense changed after it was submitted, the approval stops; request a correction or reject it.
- If the advance of an expense linked to an advance was closed in the meantime, the expense cannot be approved; request a correction, and the employee removes the advance selection and submits again.