03. Adding cards (business card scanning)
Screenshots show the Turkish interface of Prozence with fictional "Örnek Teknoloji A.Ş." data; the English interface has the same layout.
You add the business cards, trade show badges or email signatures you receive to the company's customer directory in a few seconds. The details are read from the photo; you check them and save. You can also add a contact from your phone's contacts by sharing it with the app; the contact card is created automatically. If the same person is already in the directory, a second record is not created.
Who: Employee
In this chapter
- Add card screen
- Adding with a business card photo
- Reading a trade show badge
- Entering manually
- Adding from an email signature
- Checking and saving
- Taking a dictated note
- If the person is already in the directory
- If another employee added the same card before
- Adding a card without a connection
- Scan card shortcut and start screen
- Adding by forwarding an email to the shared mailbox
- Adding a contact by sharing it from your phone's contacts (Android)
- Choosing from phone contacts on the Add card screen
- Uploading a vCard file
- If the shared contact is already in the directory
- Import preview when you share several contacts
- Adding an iPhone contact by email
- Adding from phone contacts: FAQ
Add card screen
Who: Employee · Where: Card in the bottom menu → Add card
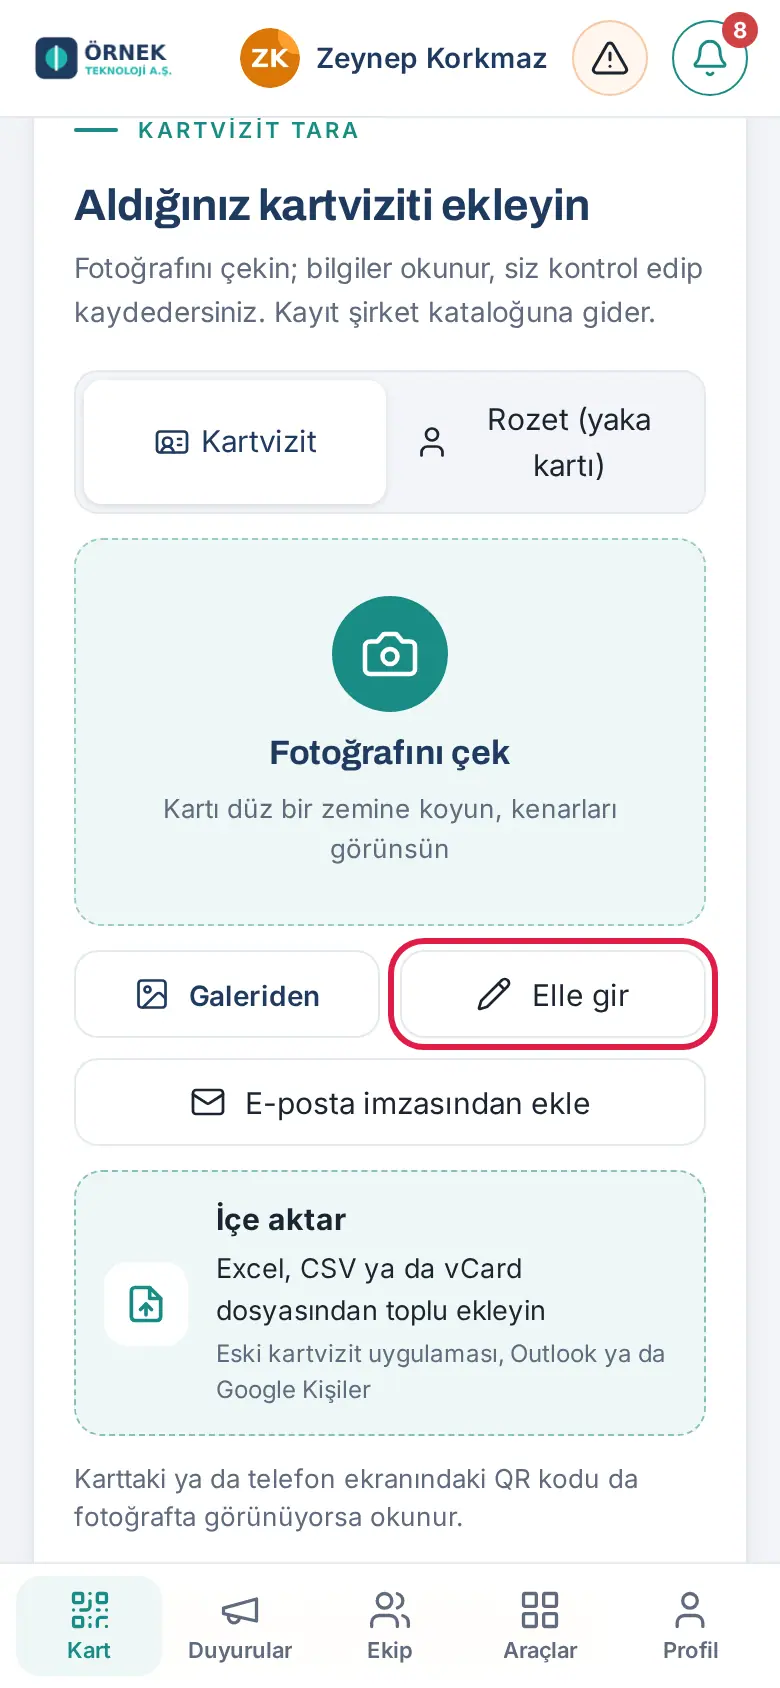
The Add card screen has these options:
- the Business card / Badge (name tag) choice;
- Take a photo and From gallery;
- Enter manually;
- Add from email signature;
- Choose from phone contacts: selects a contact from your phone's contacts; it is shown only in Android browsers that support this feature (0.99.47; see Choosing from phone contacts on the Add card screen);
- Upload vCard file: creates a card from a contact file (.vcf); it is shown on every phone and computer (0.99.47; see Uploading a vCard file);
- Import: add in bulk from an Excel, CSV or vCard file.
The Event mode bar at the top is used at trade shows and events (see 05. Events and trade fairs).
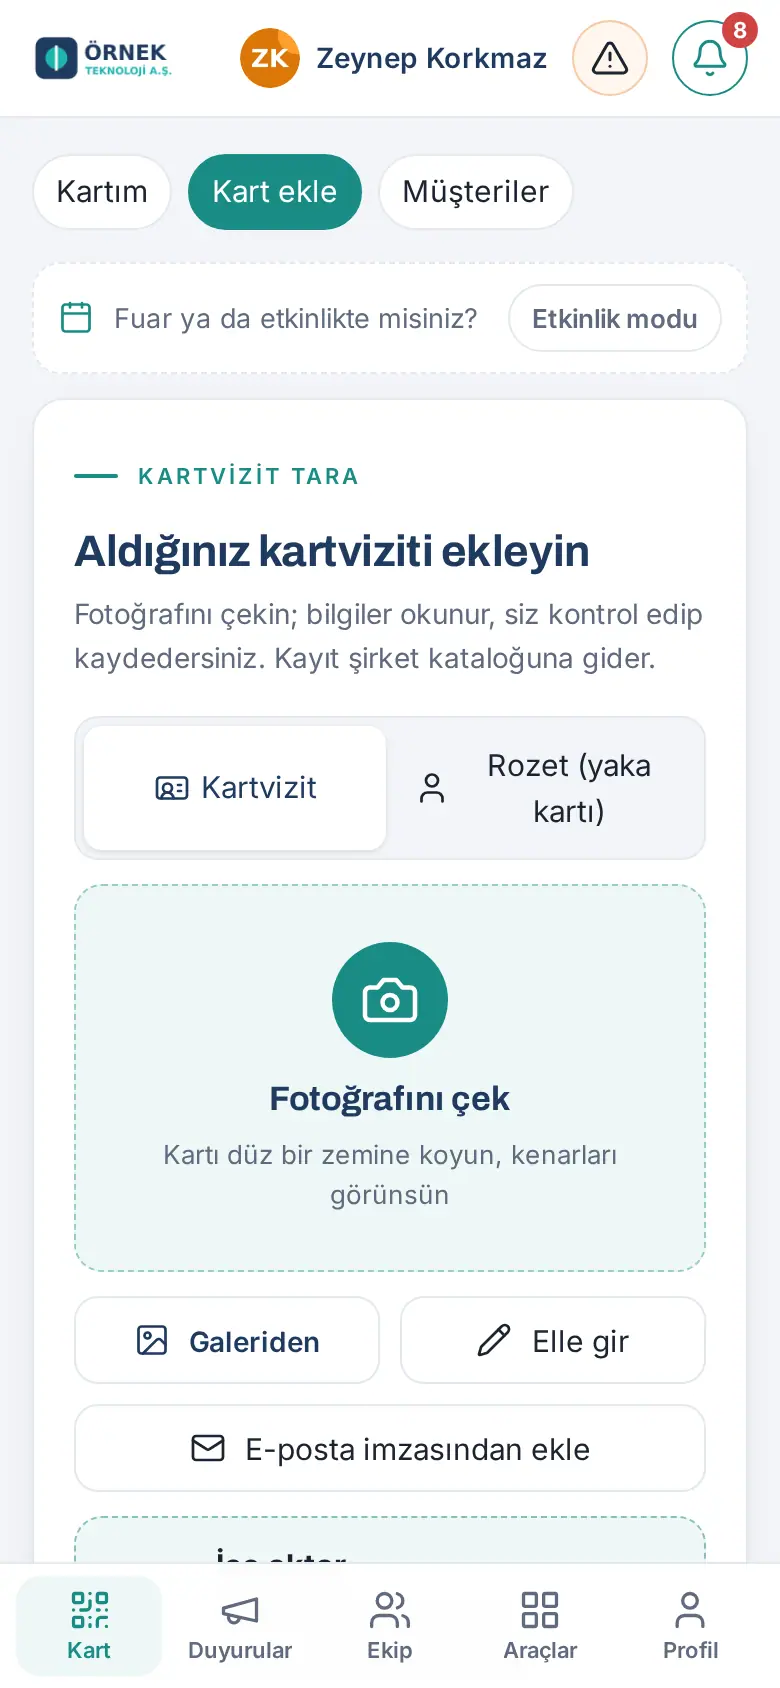
Adding with a business card photo
Who: Employee · Where: Add card → Take a photo
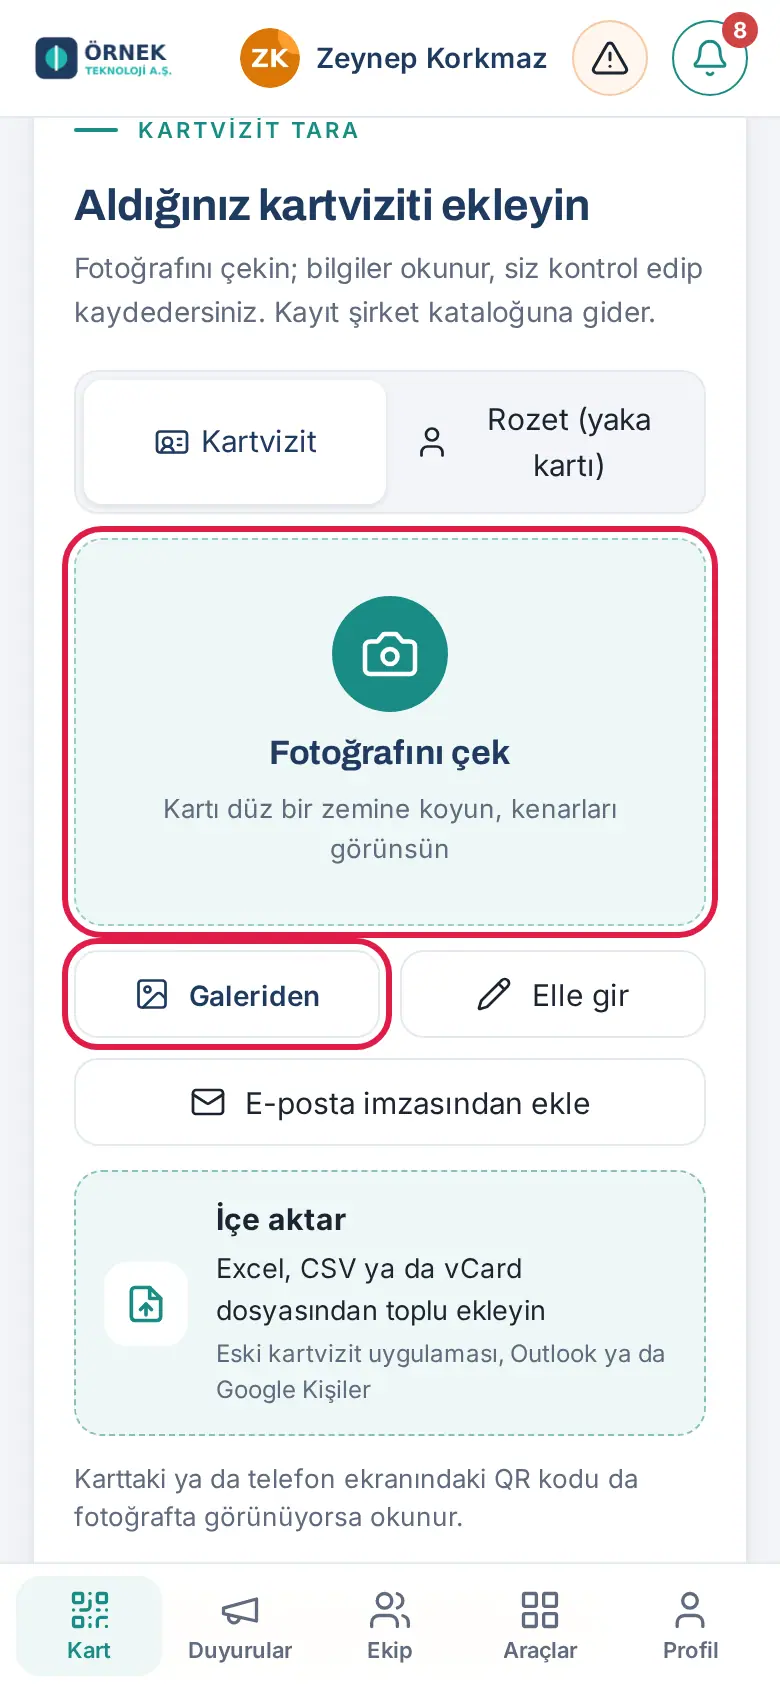
- Put the card on a flat surface; make sure its edges are visible.
- Make sure Business card is selected and tap Take a photo. The camera opens.
- Take a photo of the card. If the back of the card also has details, add it with Back on the check screen.
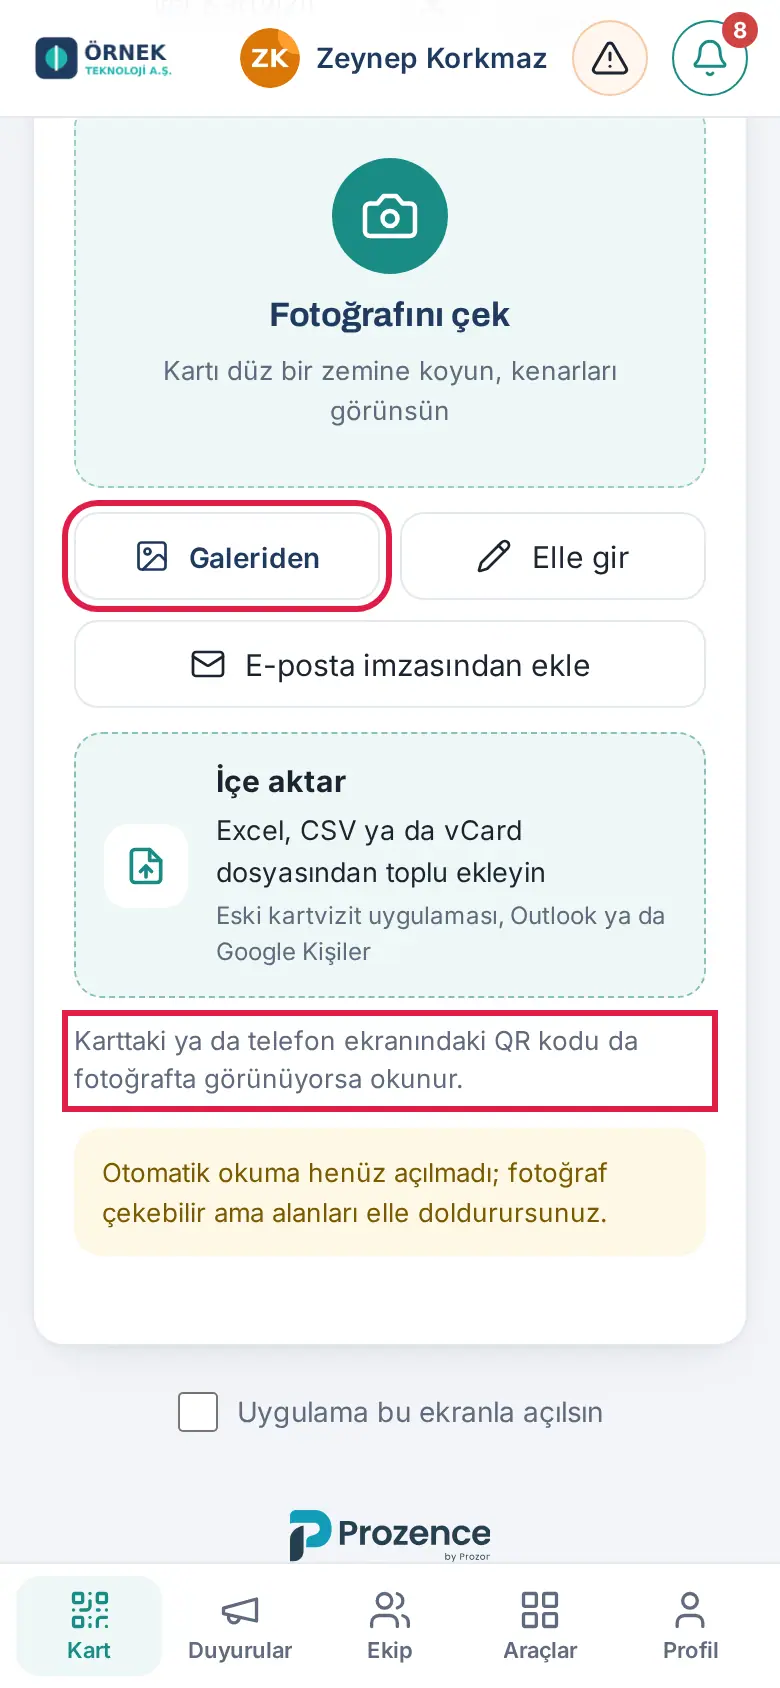
- The details are read (a few seconds). If the photo also contains a QR that is on the card or on a phone screen, the QR is read too and has priority.
- Continue with the steps in Checking and saving.
Tip:
- If the photo is in your gallery, use From gallery. A card photographed sideways or upside down is corrected automatically.
- A card photo that you take with the camera in the app or in the browser is not saved to your phone's gallery (0.99.11). For the Prozence mobile app, see 20. Prozence mobile app.
Important:
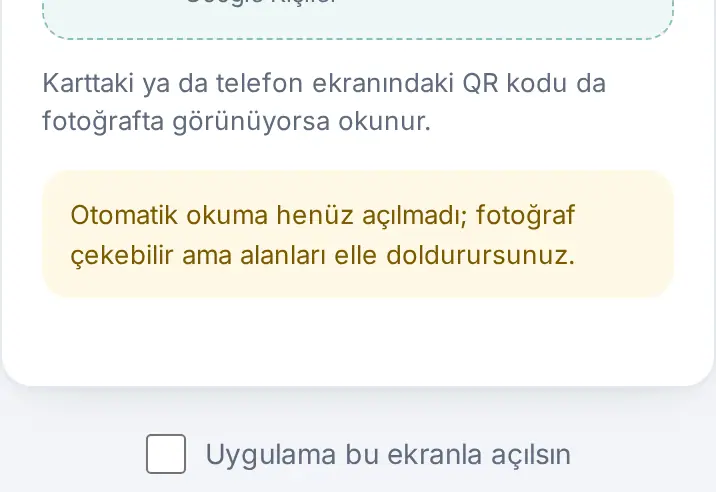
- If automatic reading is not turned on in your company, the photo is still saved but you fill in the fields yourself (the warning "Automatic reading is not turned on yet").
- For reading, the card image can be sent to an AI service abroad; a note about this shows on the screen.
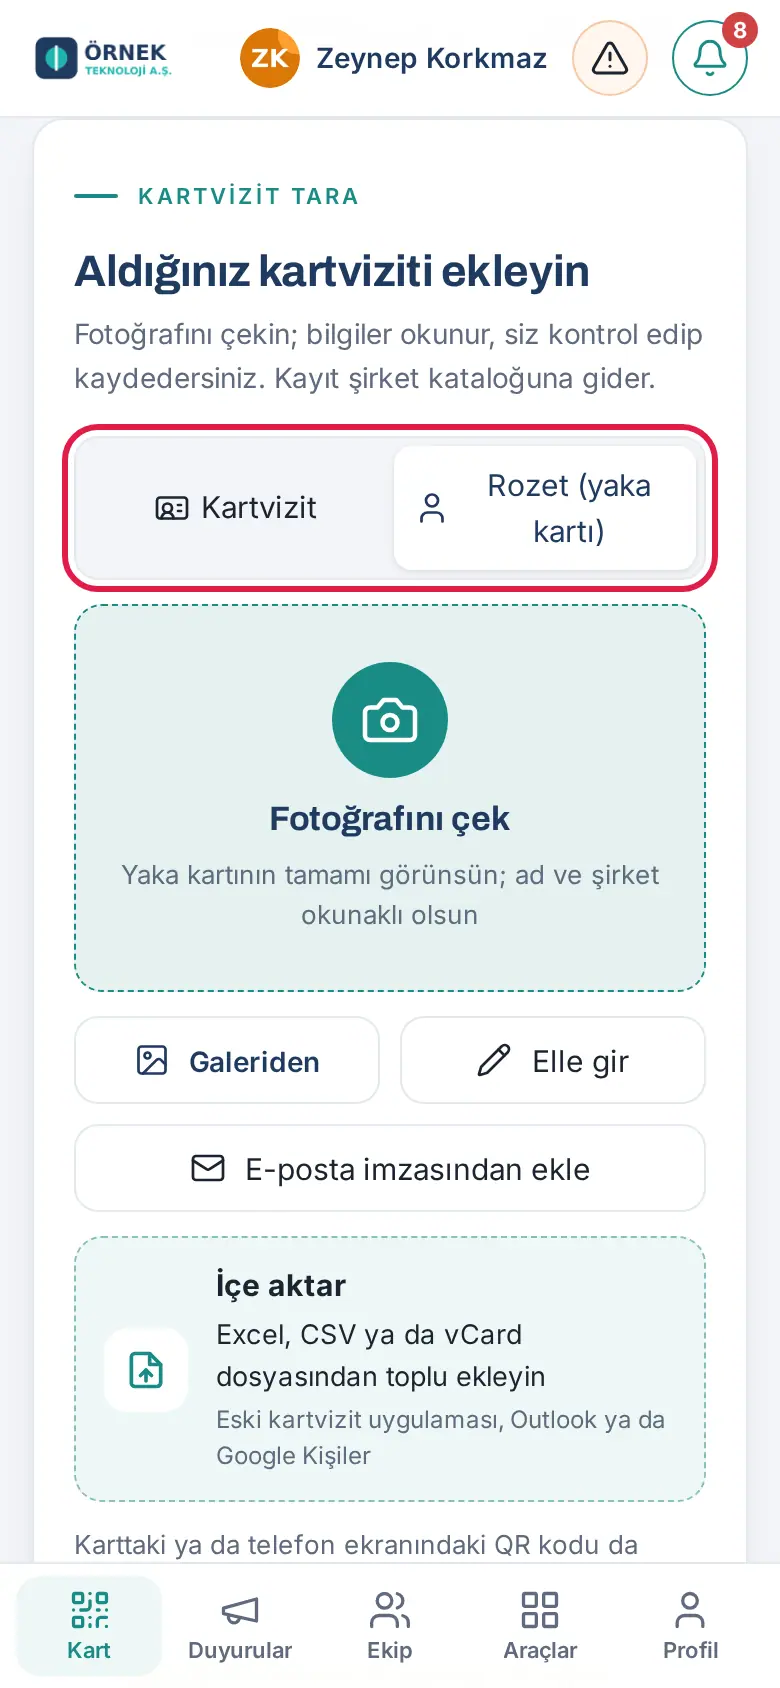
Reading a trade show badge
Who: Employee · Where: Add card → Badge (name tag)
- On the Add card screen, select Badge (name tag). The choice is remembered on this device.
- Tap Take a photo and take a photo of the badge.
- The first name, surname, company and job title are read. The event name, texts such as "visitor / attendee" and sponsor logos are not treated as personal details.
- The source is set automatically to "Trade show / Event" (or to "Rozet" ("badge") if it is in the list).
Entering manually
Who: Employee · Where: Add card → Enter manually
- Tap Enter manually.
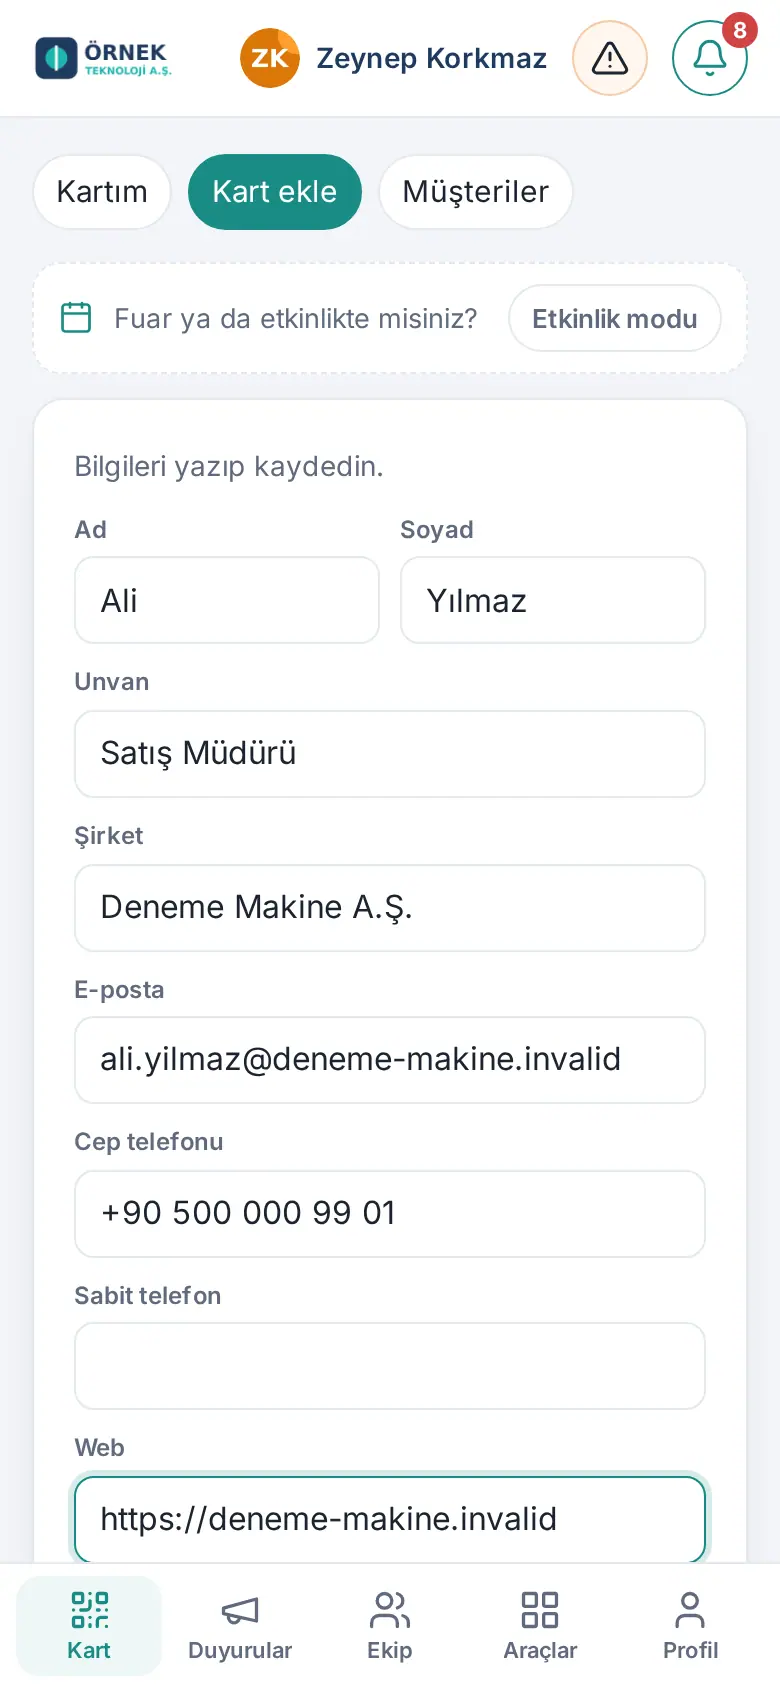
- Fill in the fields: First name, Surname, Job title, Company, Email, Mobile phone, Landline, Web, Address, LinkedIn, Note.
- Continue with Checking and saving.
Adding from an email signature
Who: Employee · Where: Add card → Add from email signature
What it does: Without a business card, you add a person from the signature of an email you received.
- Copy the signature in the email (or the whole email).
- Tap Add from email signature and paste the text (maximum 6,000 characters).
- Check the details that were read and save.
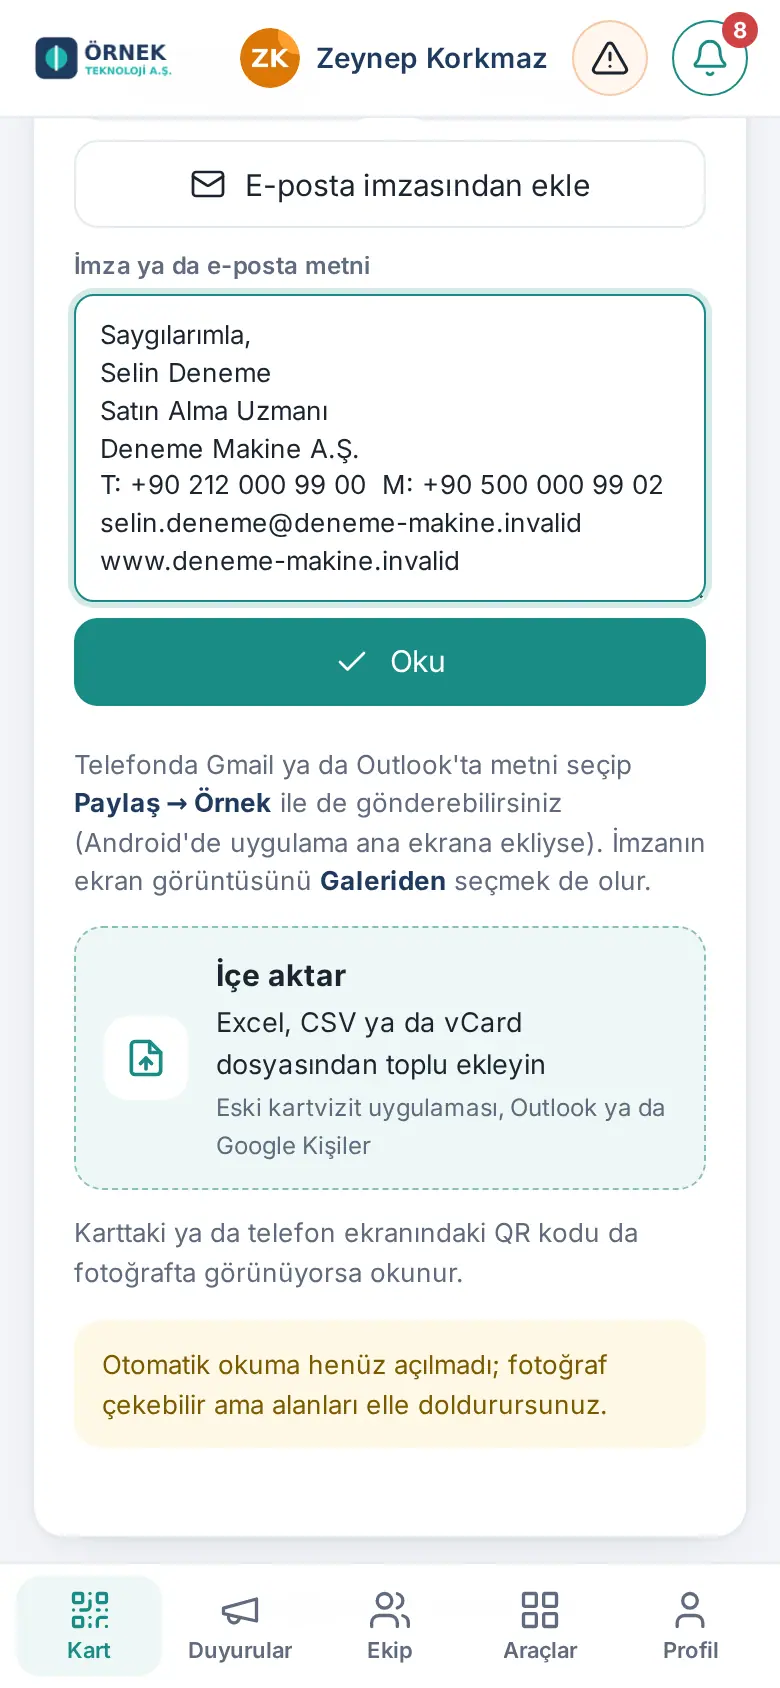
Tip: On a phone, you can also select the text in the email and send it by selecting the app in the Share menu (on Android, if the app is added to the home screen).
Checking and saving
Who: Employee · Where: Add card → check form
- Check the fields that were read. A field that looks wrong (e.g. a phone number with missing digits) is marked; correct it.
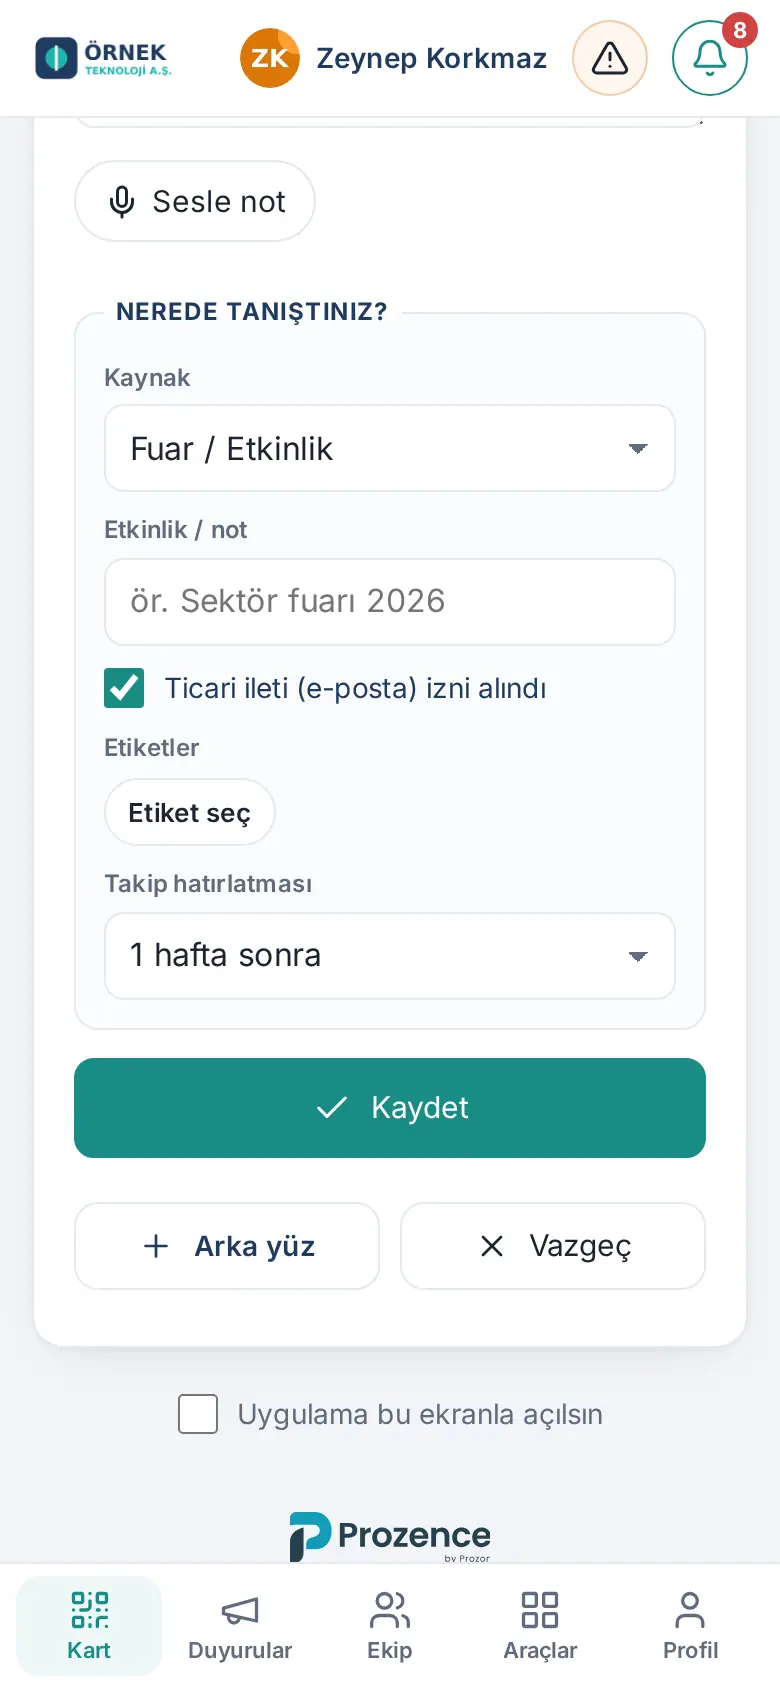
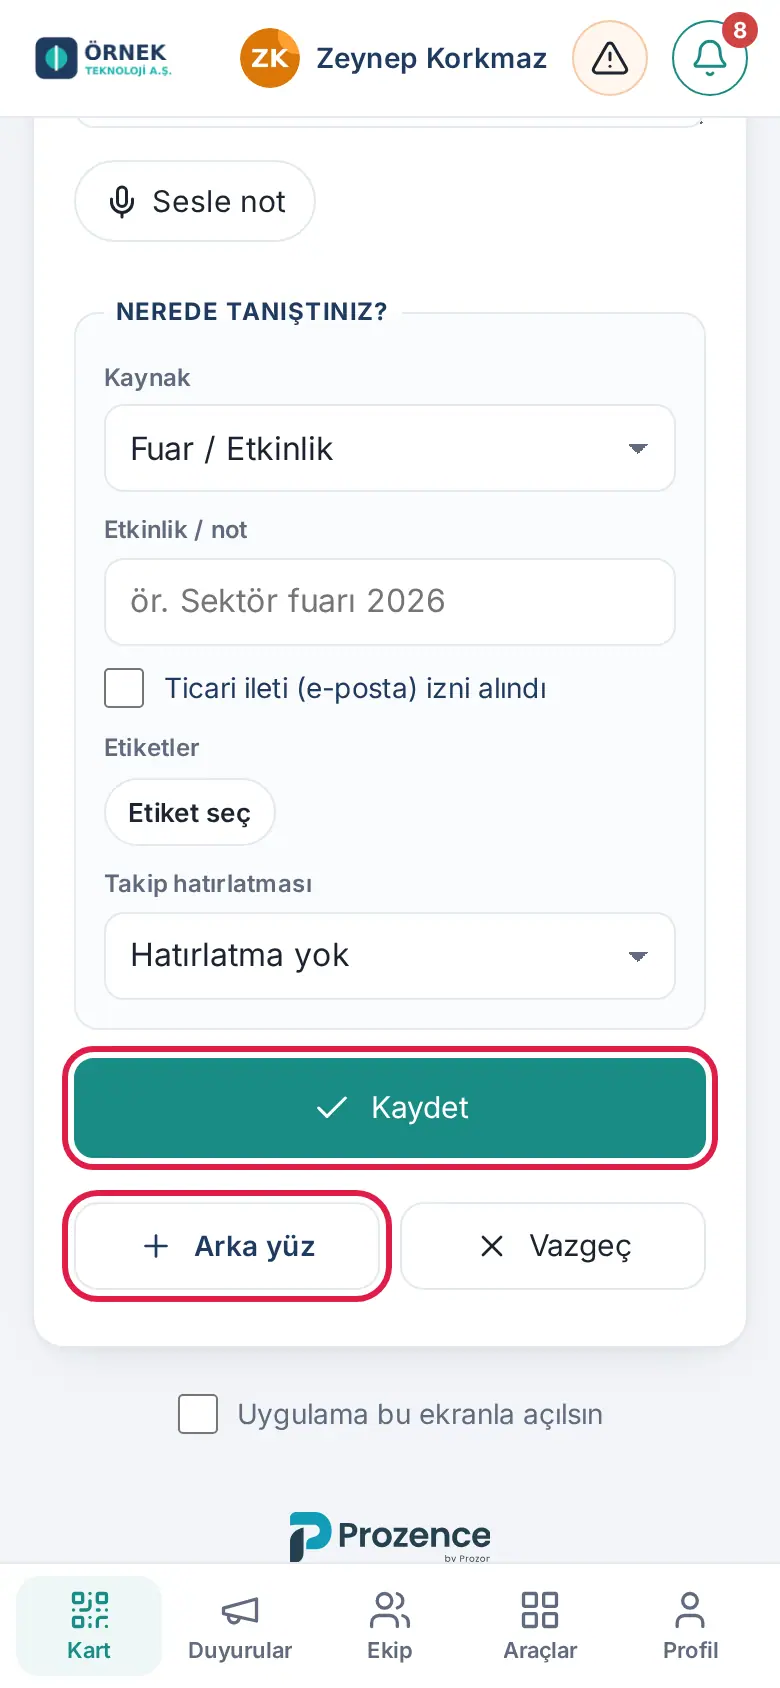
- Fill in the Where did you meet? section:
- Source: e.g. Trade show / Event, Referral, Website.
- Event / note: e.g. the name of the event.
- If you got the person's consent, tick the Commercial message (email) consent obtained box.
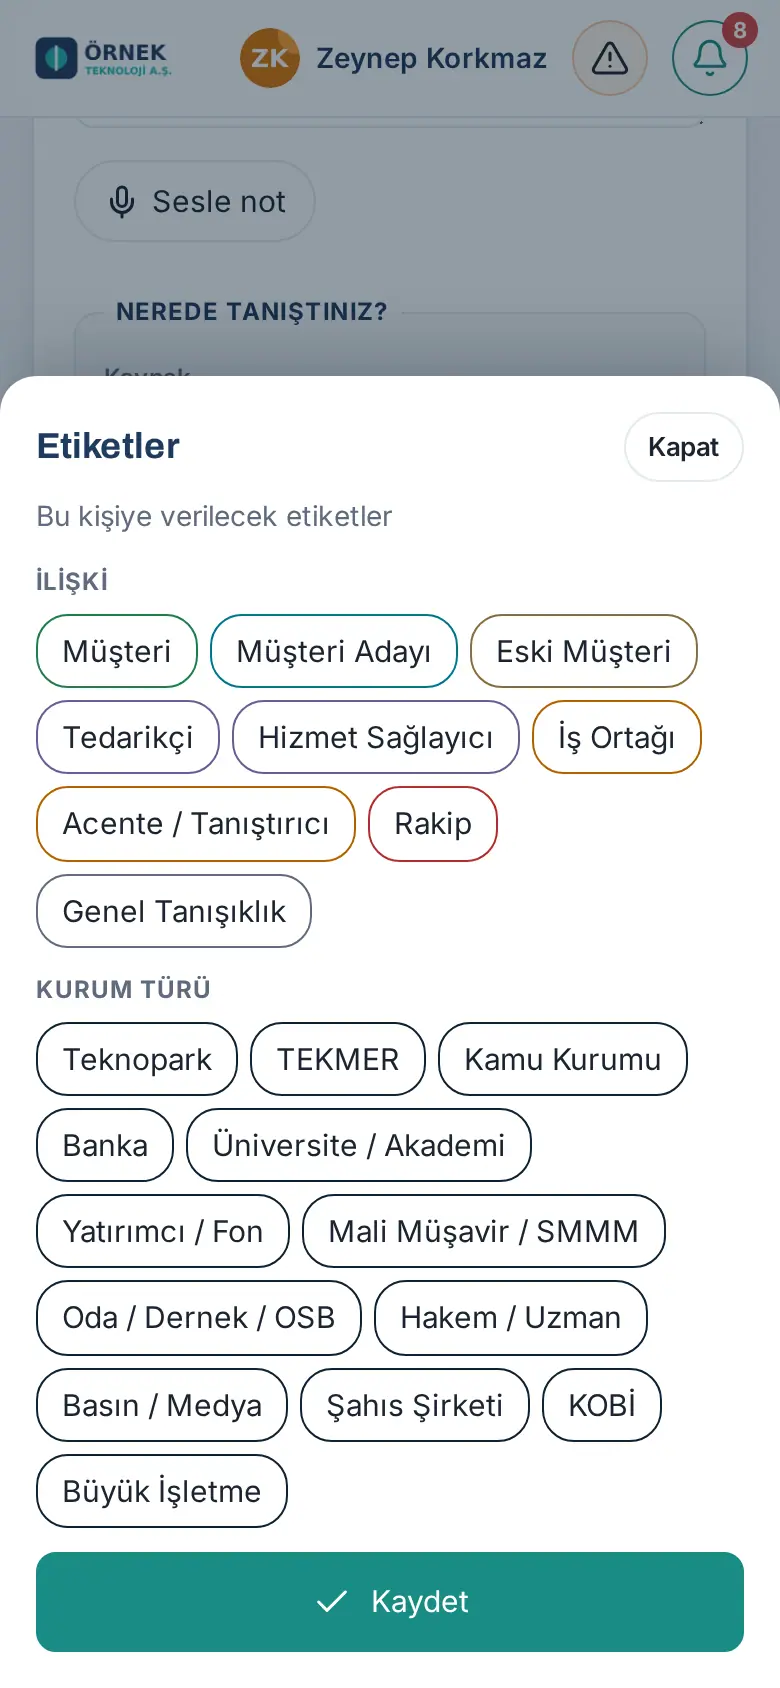
- If you want, add tags from Tags (Select tag) (e.g. Prospect).
- Select a Follow-up reminder: No reminder, In 3 days, In 1 week, In 2 weeks, In 1 month.
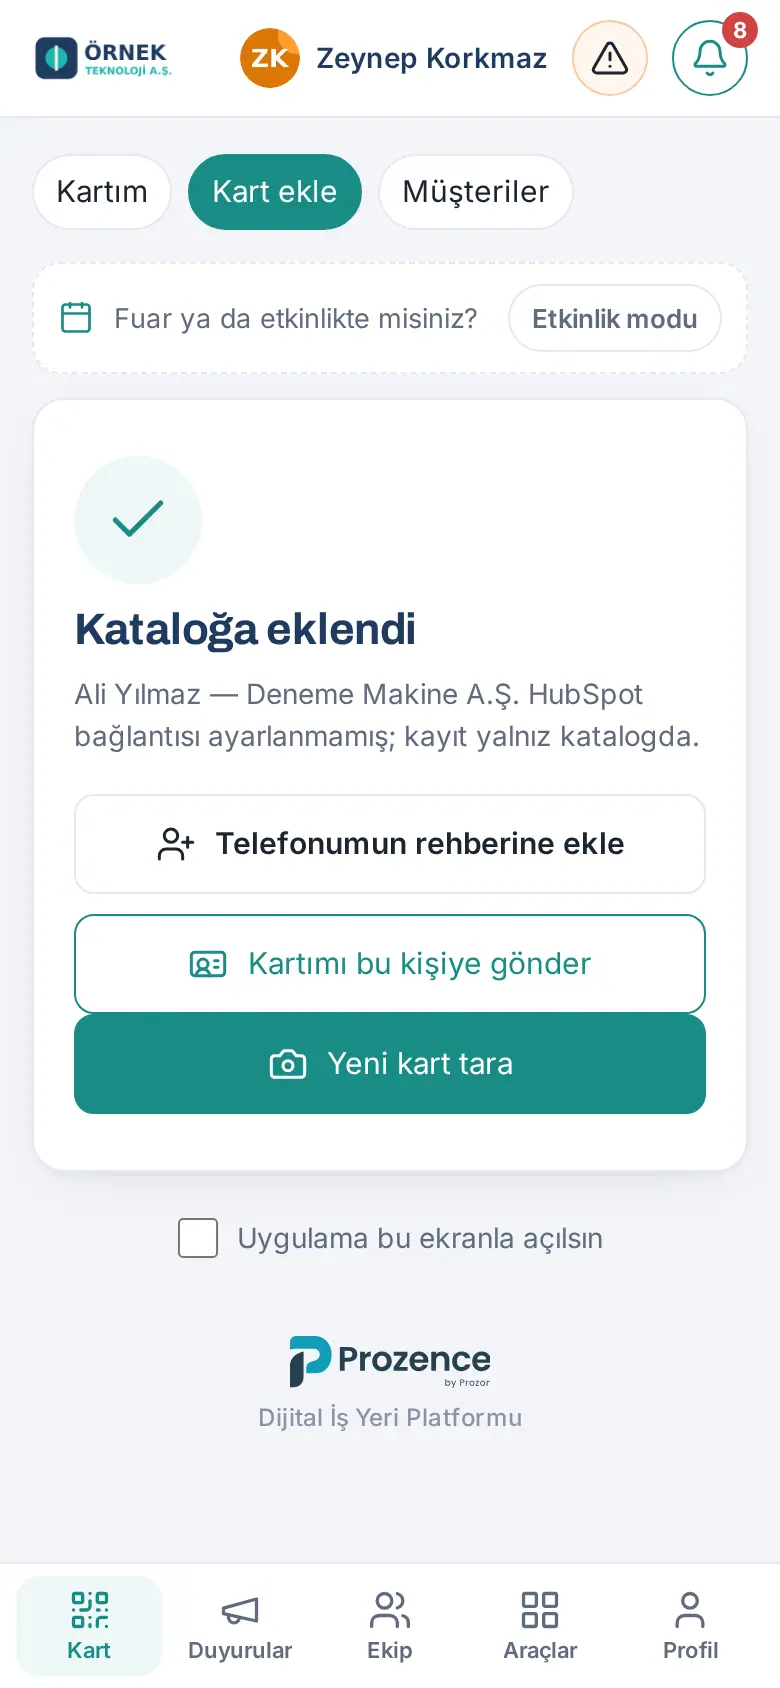
- Tap Save. The result screen shows the status of the record and whether it went to the connected CRM.
- On the result screen, you can also save the person to your own phone contacts with Add to my phone's contacts. With Send my card to this person, you send your own card immediately (see 01. Digital business card and Identity Kit); Scan new card goes to the next card.
- If Send my card automatically is on and you scanned the card with a photo or a QR, the result screen shows "Your card is being emailed automatically."; you do not need to send it separately (0.99.16; see 01. Digital business card and Identity Kit).
Tip: In trade show mode, the form also shows the trade show's interest level, interests and qualification questions (see 05. Events and trade fairs).
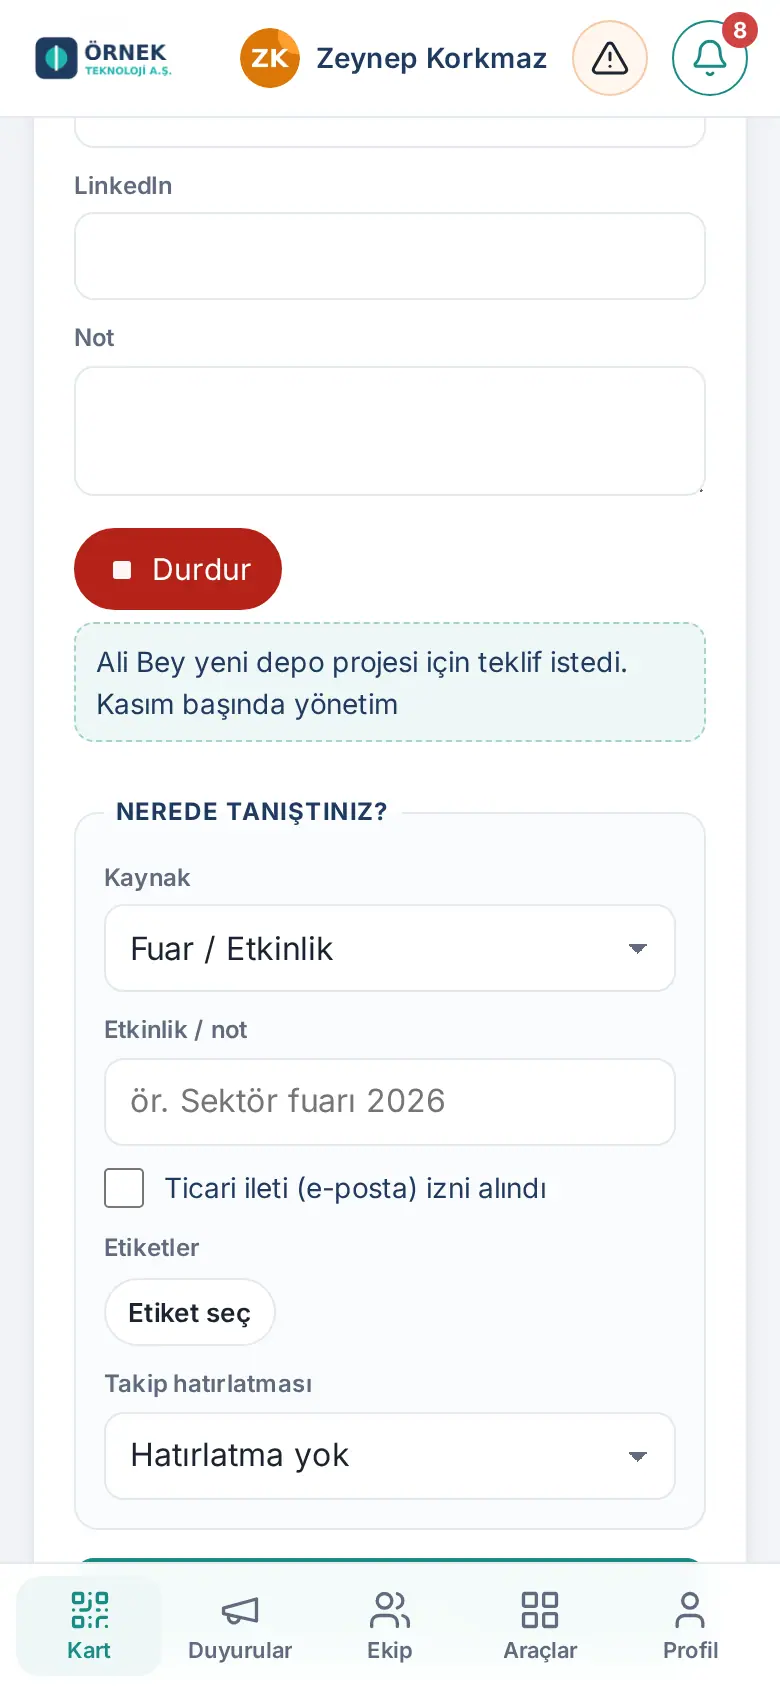
Taking a dictated note
Who: Employee · Where: Add card → Note → Dictate
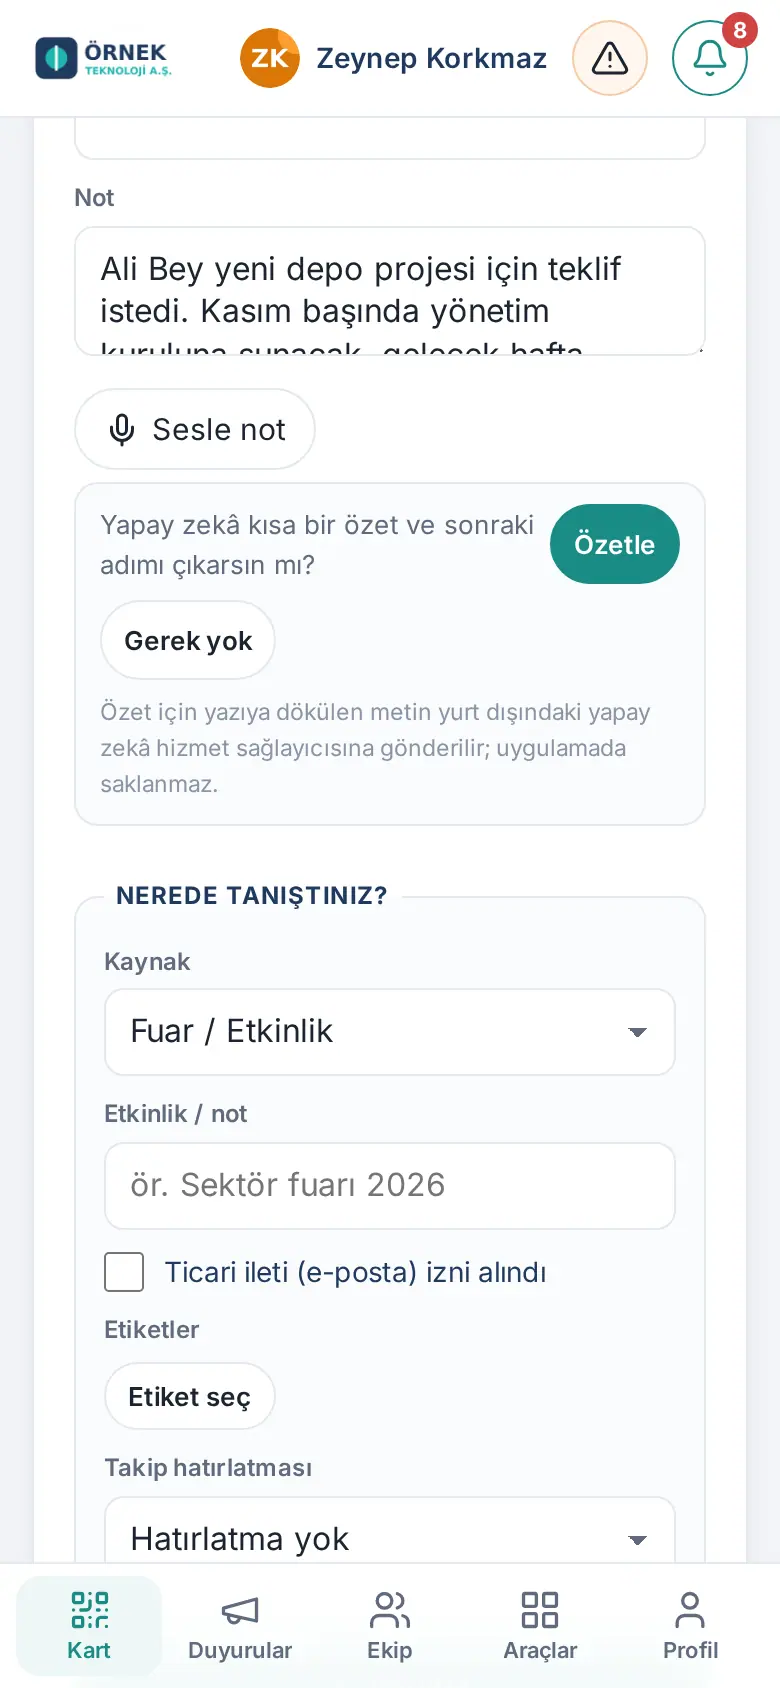
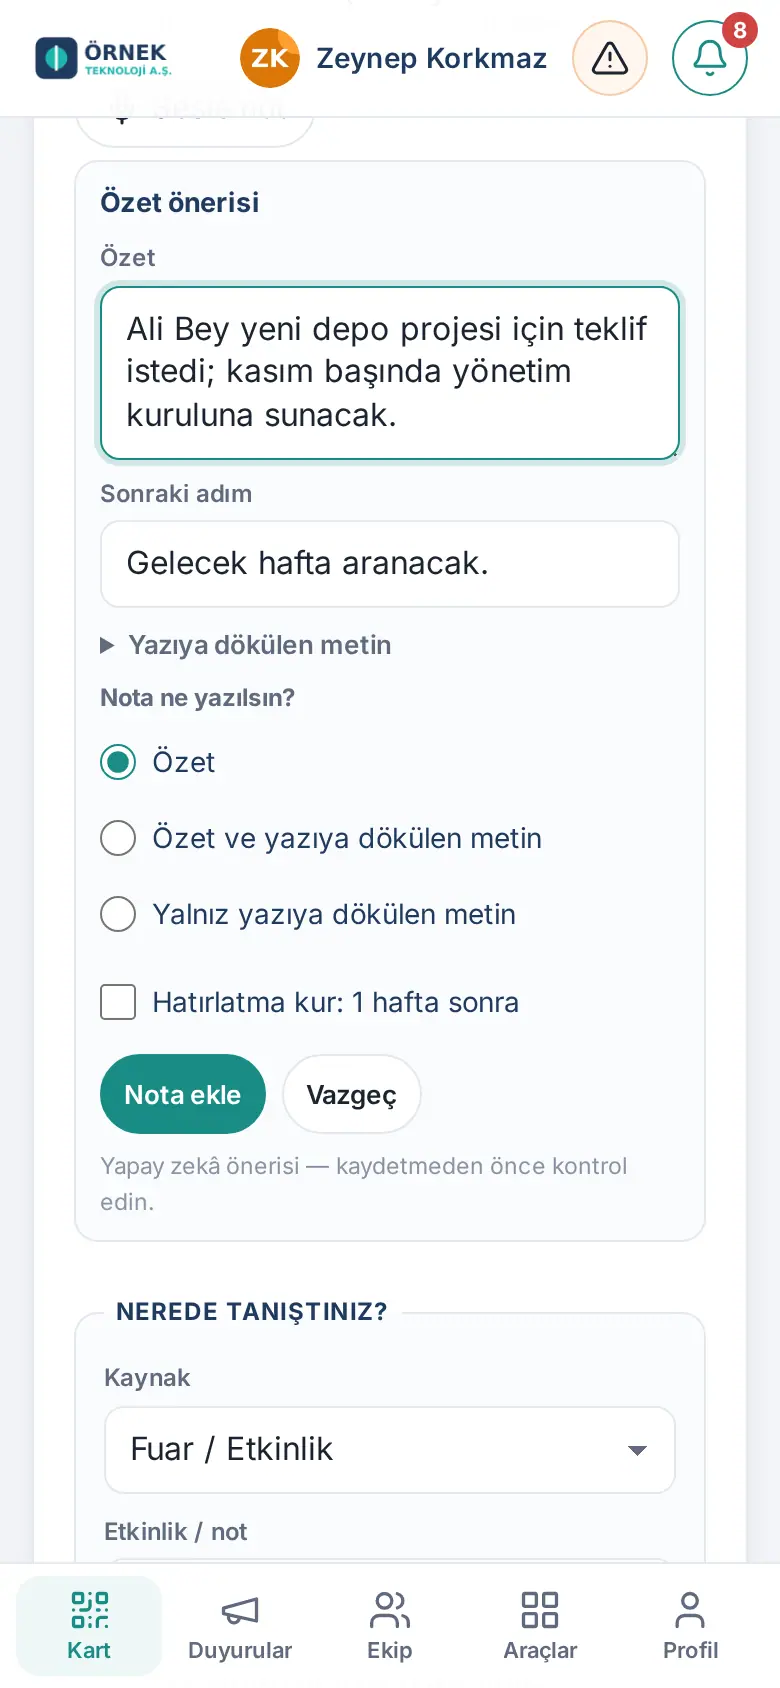
What it does: Right after a meeting, you take a note by speaking; your speech is transcribed. If you want, AI suggests a short summary, a next step and a reminder.
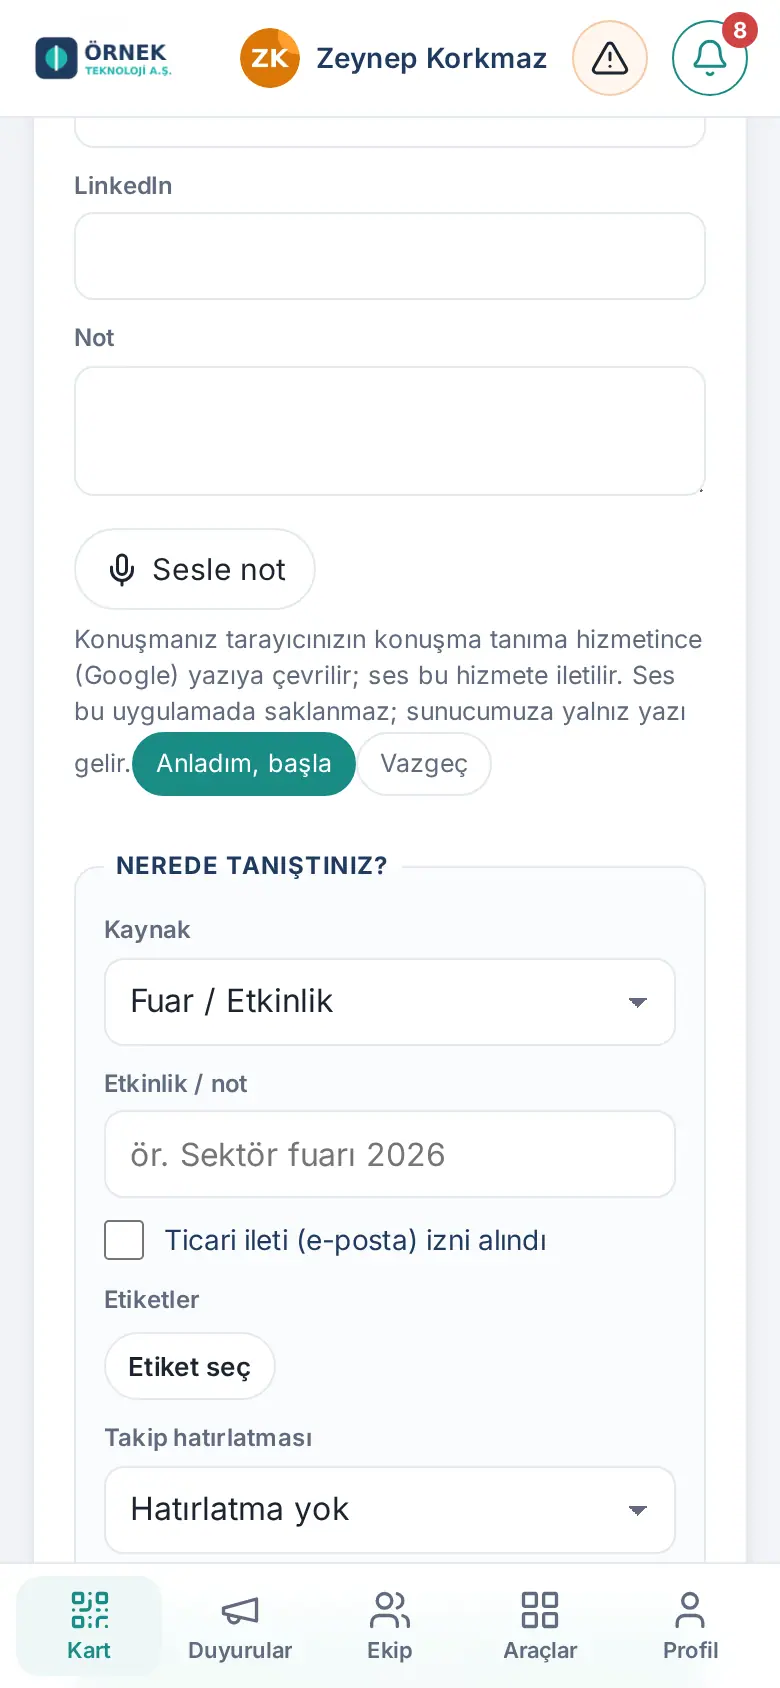
- Tap Dictate next to the note field.
- The first time, a short information screen shows: it says that your speech is transcribed by the browser's service and that the audio is not recorded. Tap Got it, start and give the browser permission to use the microphone.
- Speak; the text shows live. When you finish, tap Stop. The text is added to the note field.
- If you want, tap Summarize. Edit the suggested summary and next step, tick the reminder if necessary, then tap Add to note.
Important:
- The audio is not stored.
- For the summary, only the transcribed text is sent. The customer's name and company are added only if you select them.
- If the microphone button does not show, the permission settings of the company website may block the microphone (see 16. Troubleshooting).
If the person is already in the directory
Who: Employee · Where: Add card → check form
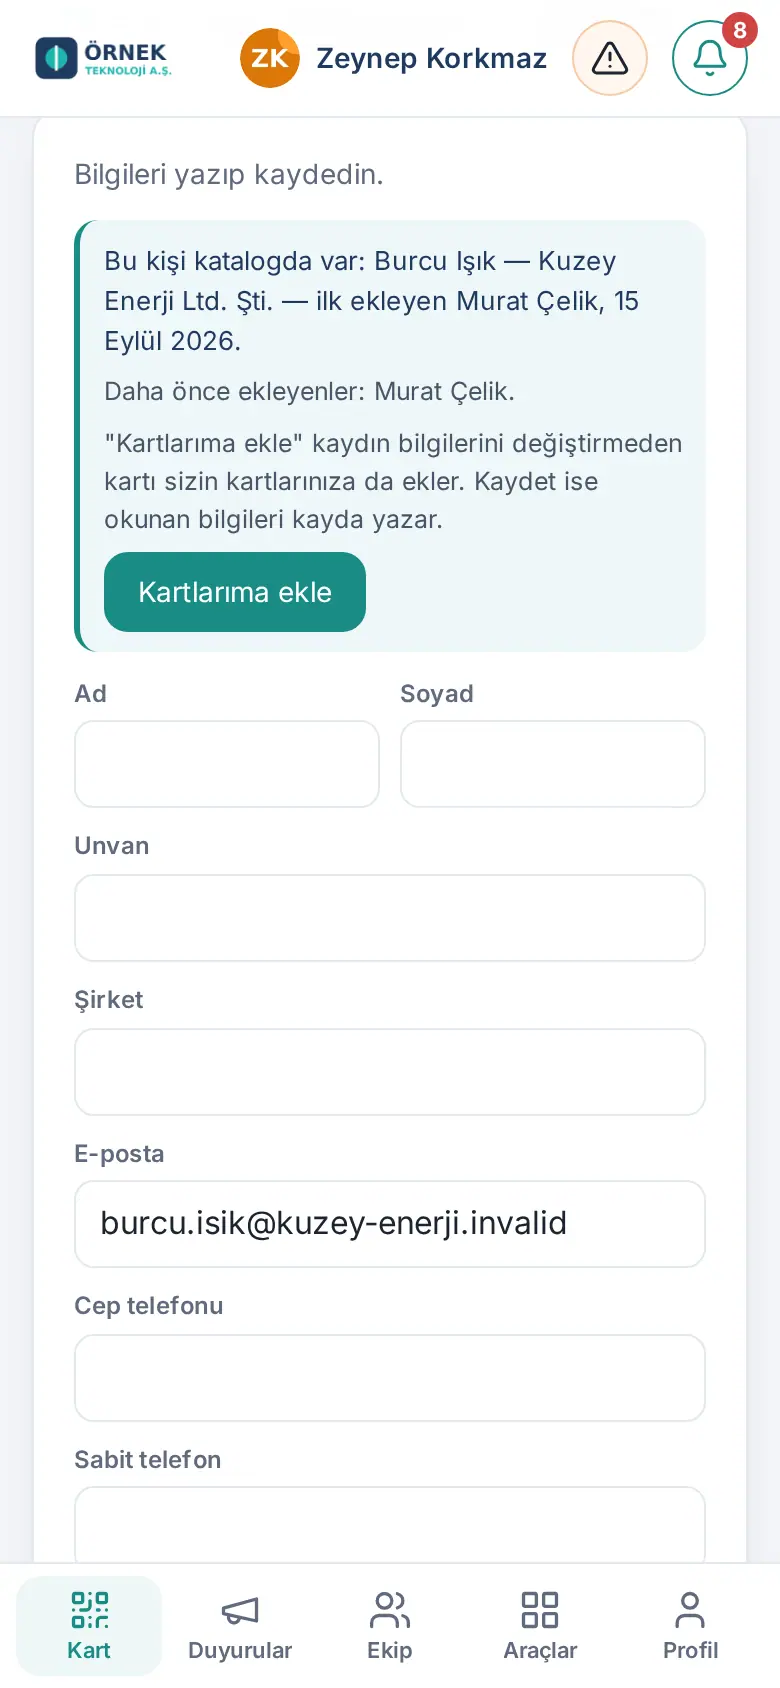
What it does: A second record is not created for the same person. The system recognizes the person by email or mobile phone and tells you what to do.
- If you can see the record: the system shows the record. With Add to my cards, you add the person to your own list. The details of the record do not change; only the empty fields are filled. If you are not the owner of the record, the box also shows the line "Added before by: …".
- If the record belongs to another employee, is not shared with you, and you added the person manually or from an email signature: you cannot see its details. Tap Request access. A request goes to the record owner; if they approve, the record is shared with you.
- If you scanned the same business card with a photo or a QR: see If another employee added the same card before.
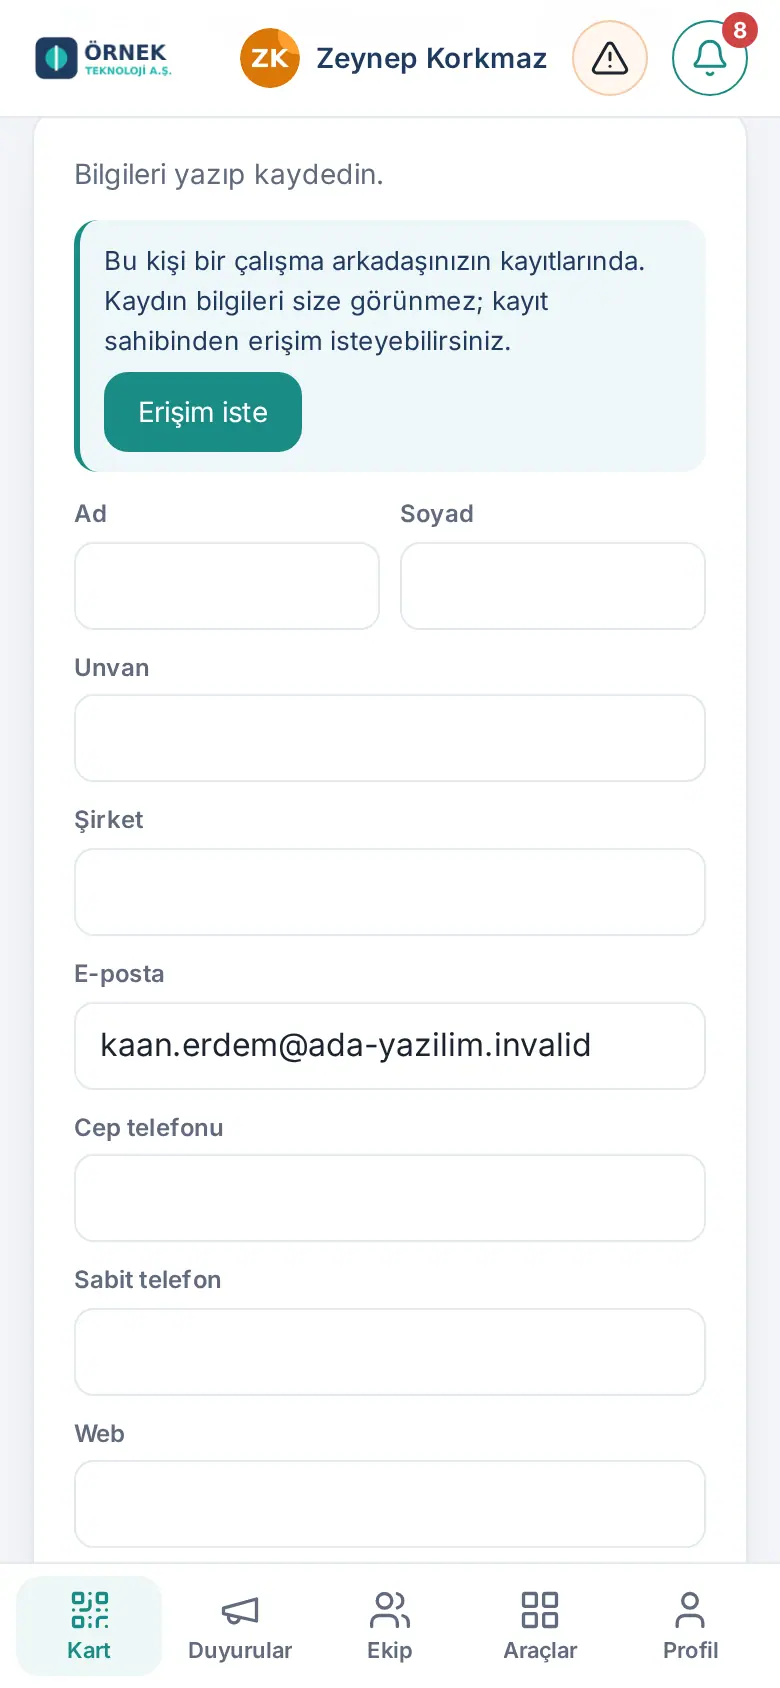
Important: If only the name and the company are similar (and the email or the mobile phone is not the same), a separate record is created; the name of the other employee is not shown.
If another employee added the same card before
Who: Employee · Where: Add card → Take a photo / QR → check form and result screen
What it does: At a trade show, the same customer can give business cards to more than one employee. If a colleague added the card you scan before you, the record is saved for you too, and you see who added it. Thus you know who talked to the same customer.
Before you start: This behavior is the company's default setting. If your company selected "Send an access request" in Admin, the Request access flow works instead (see 12. Customer directory administration).
- Take a photo of the business card with Take a photo, or scan its QR.
- After the card is read, this note shows at the top of the check form: "A colleague has already added this card. When you save, the card is added to your cards too; the record's details do not change, only empty fields are filled." At this step, no names are shown.
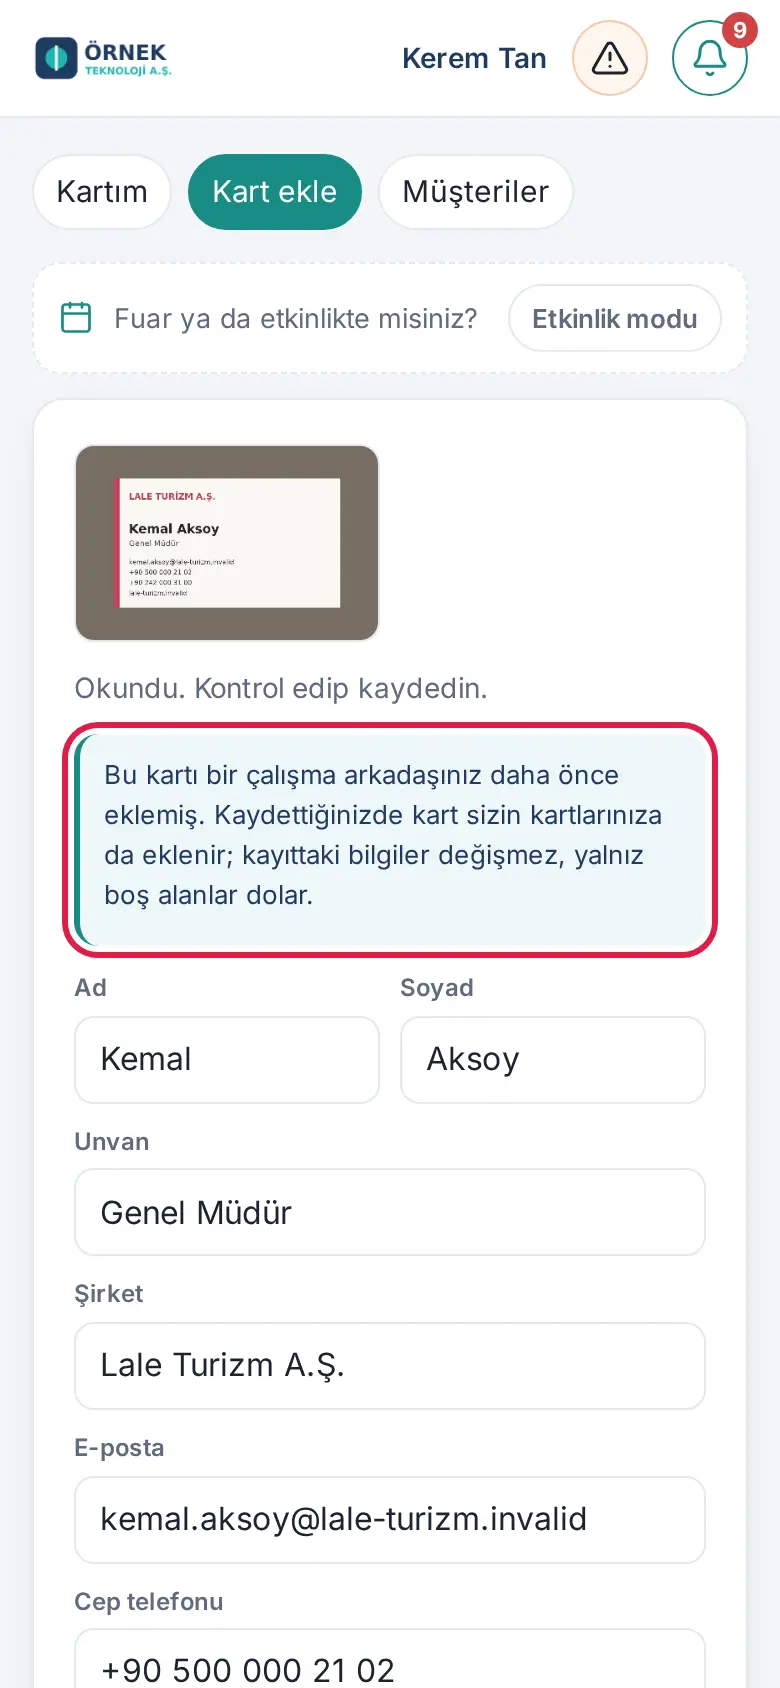
- Check the details and tap Save.
- The title of the result screen is This card was added before. Below it, you see who added it, e.g. "Zeynep Korkmaz and Ece Yıldız added this card before; we saved it for you too." The same message also shows for a short time as an alert at the bottom of the screen. If there are more than five people, it shows "… and 2 others".
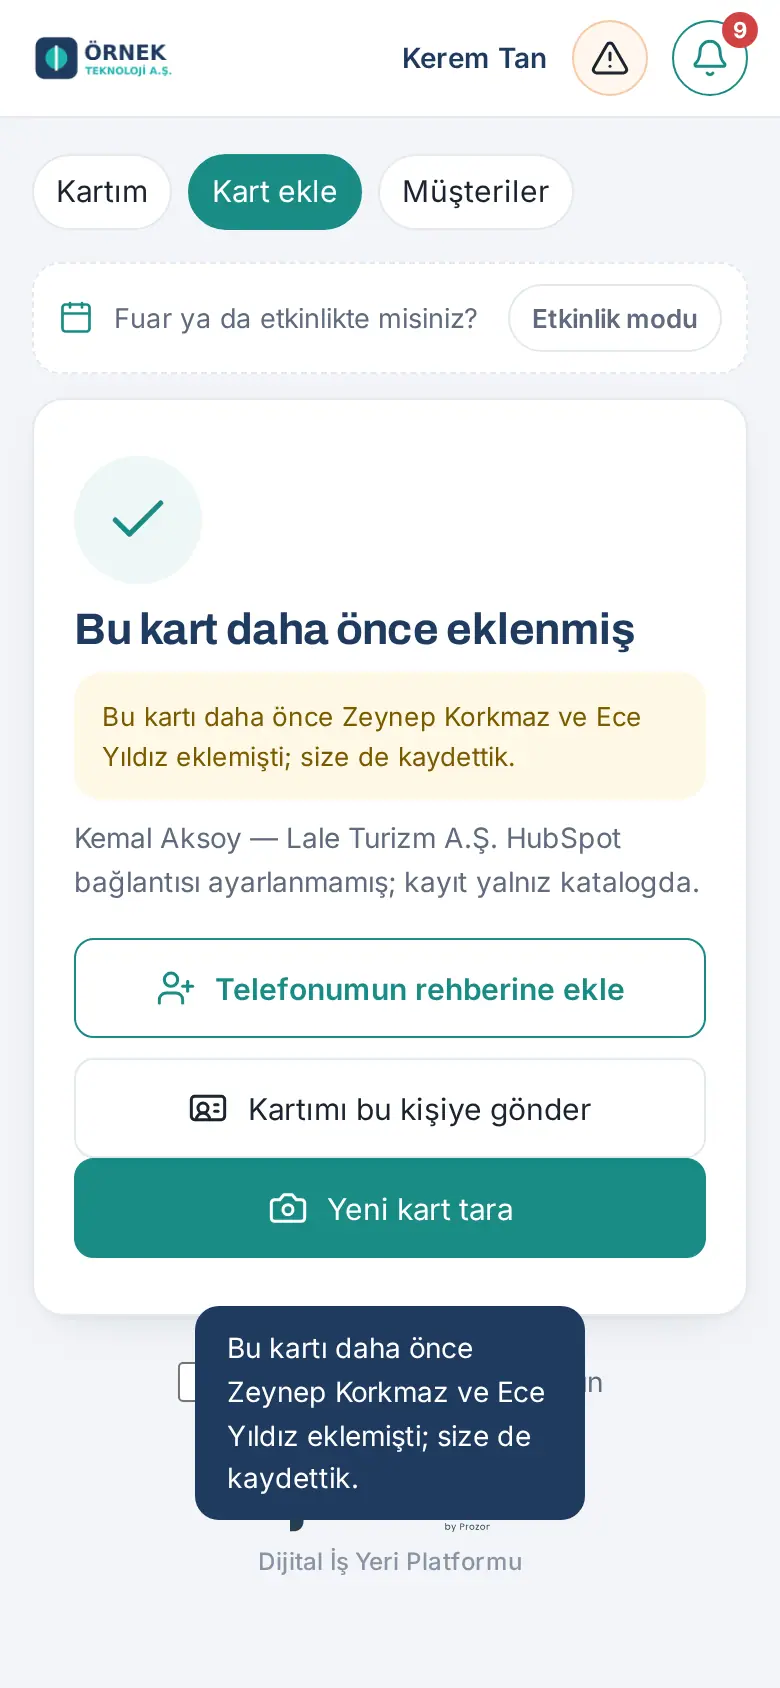
Result: The record is now in your cards too. The filled-in details in the record do not change; only the empty fields are filled from the card you scanned.
Important:
- Private notes (notes that only their writer sees) are not visible to you.
- If the card is already in your list, no warning shows.
- Employees who left the company are not in the list of people who added the card before.
Adding a card without a connection
Who: Employee
What it does: When there is no internet in the trade show hall, you take photos of the cards and process them later.
- When there is no connection, take a photo of the card. The card is saved on this device and a box with the number of pending cards ("N pending") shows on the screen.
- When the connection comes back, tap Process next; the card is read, and you check and save it.
- The card is linked to the trade show or event where you took the photo.
- You can delete a card you do not need with Delete next.
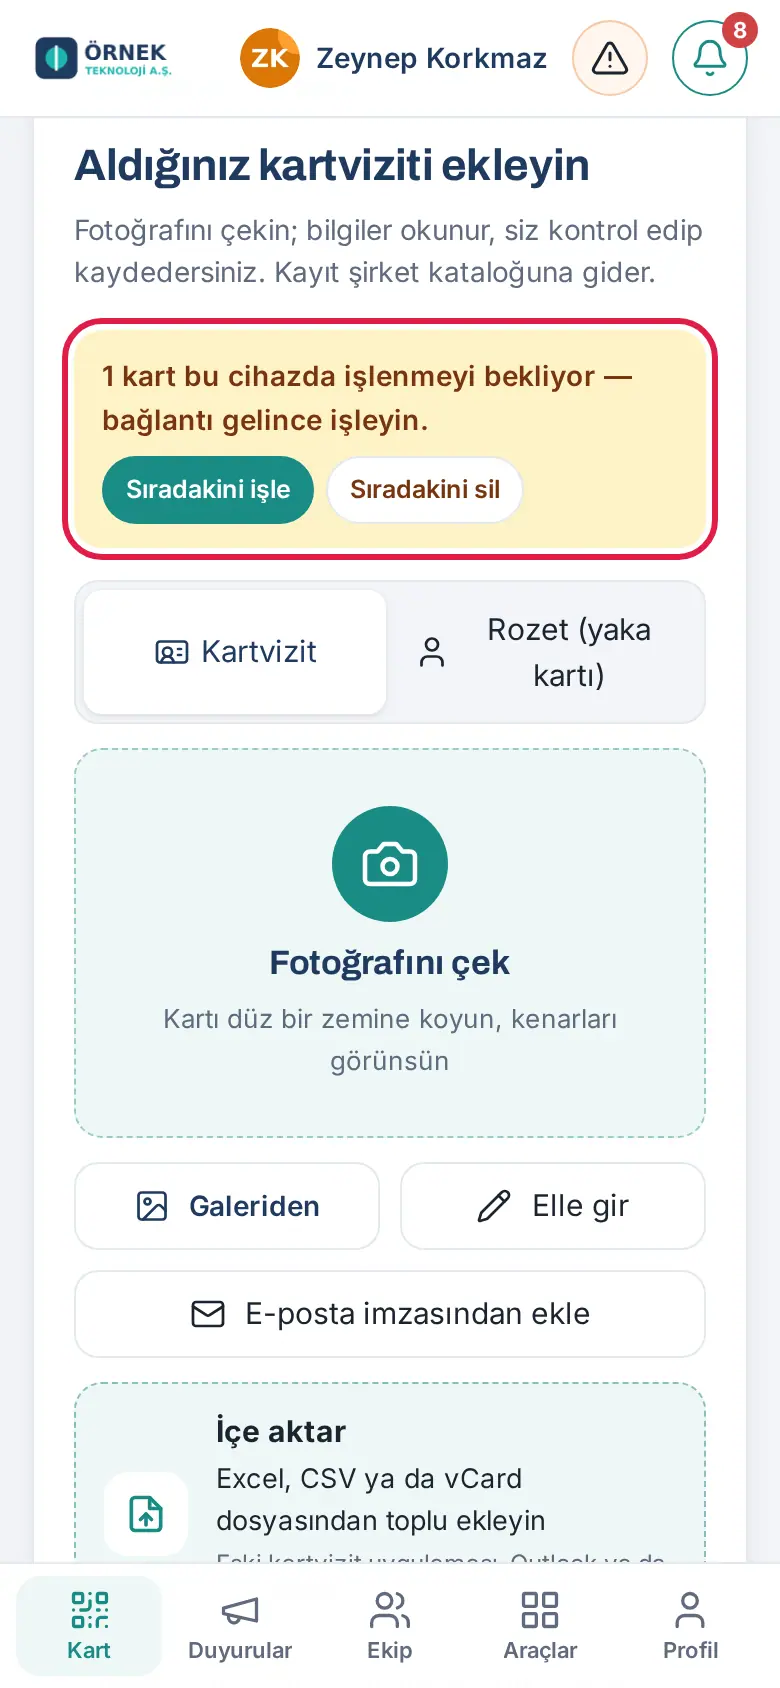
Important: Pending cards stay only on that phone and in that browser. If you clear the browser data, they are lost.
Scan card shortcut and start screen
Who: Employee
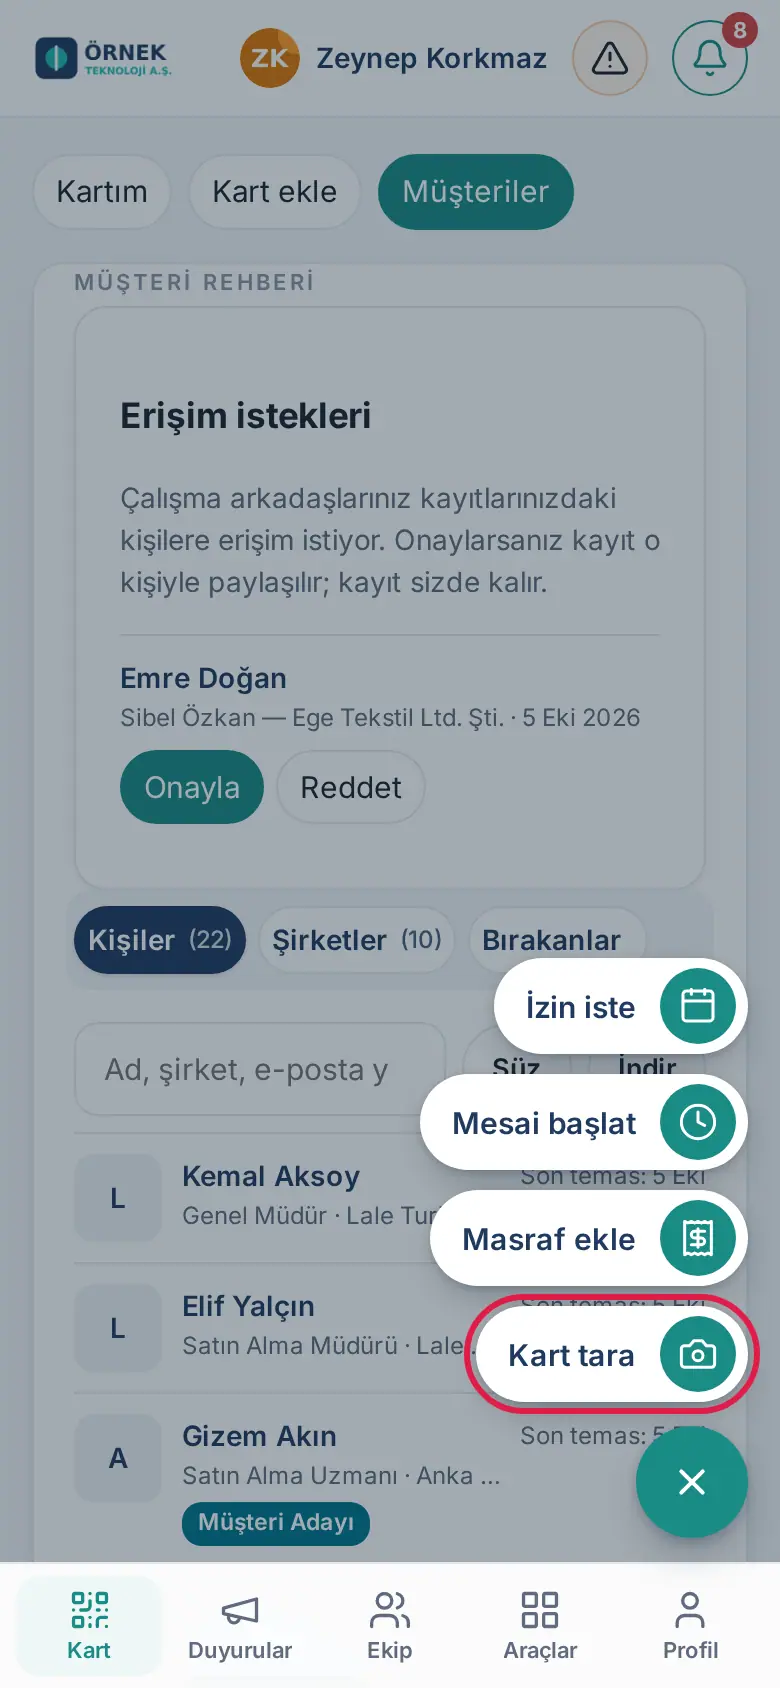
- Button at the bottom right on a phone: If only one shortcut is turned on, it is the Scan card button. Tap it to open the Add card screen and the camera. If more than one module is turned on, the button becomes the + menu: Request leave, Start work / End work, Add expense, Scan card.
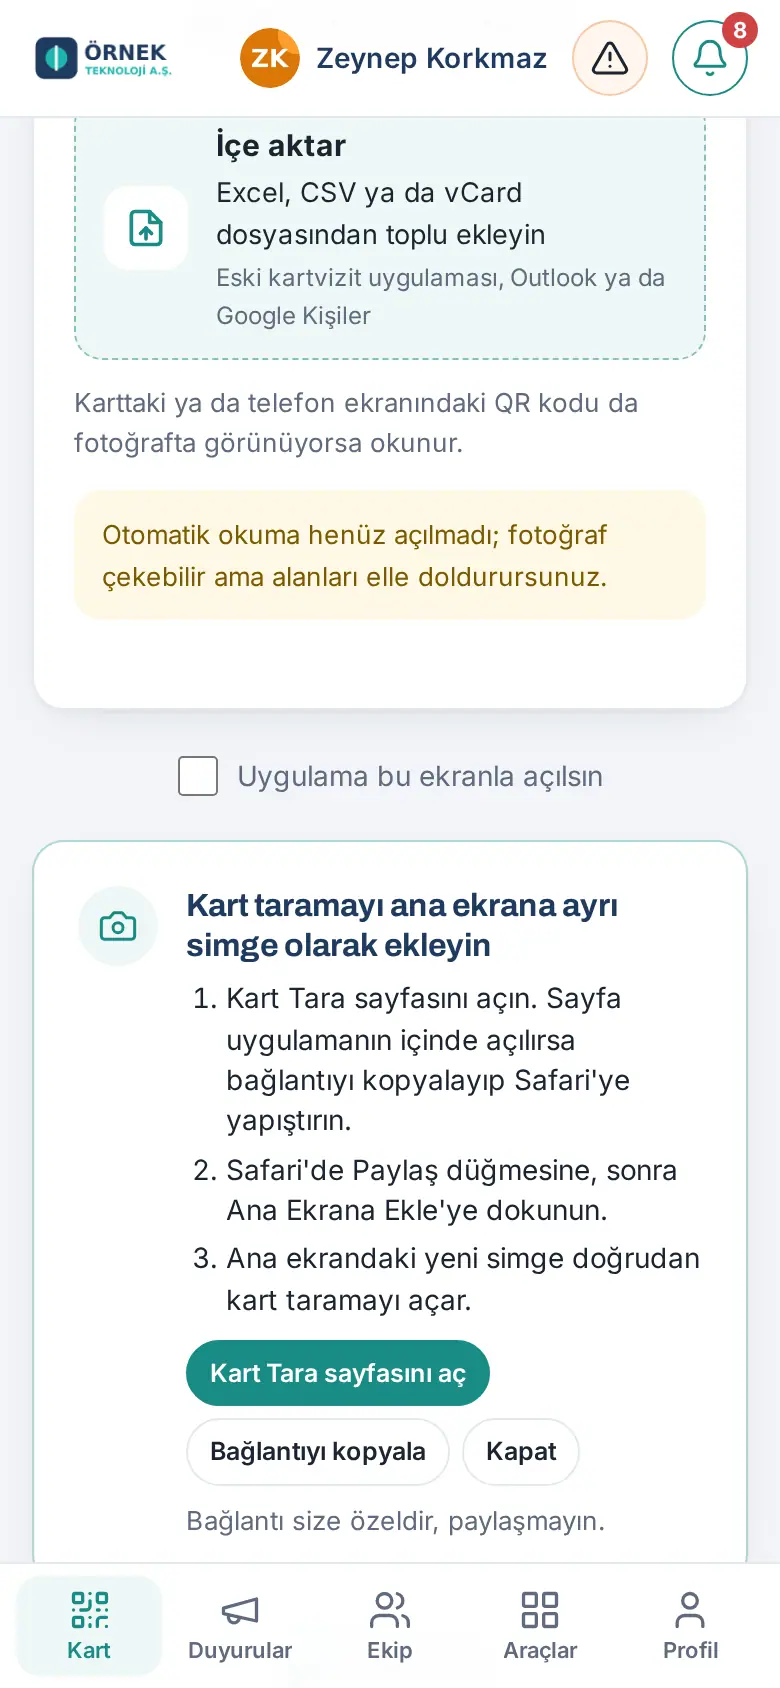
- Start screen: With Open the app on this screen at the bottom of the Add card screen, you make the app always start directly on Add card.
- Android: Touch and hold the icon on the home screen to see the shortcuts; the first shortcut is "Scan card".
- iPhone: You can add Scan Card to the home screen as a separate icon; the tip is shown on the screen.
Adding by forwarding an email to the shared mailbox
Who: Employee
If your company set up a shared mailbox (e.g. kartvizit@sirketiniz.com), you forward a customer's email to that address. In a few minutes, the system finds the external people in the email and adds them to your list. When you forward it, you can write a short instruction above the email (e.g. "only add the person in the signature").
Email with a vCard (.vcf) attachment (0.99.47): If the email has a contact file (.vcf), AI is not used; the contacts in the file are read directly and added to your list. This is how you share a contact from an iPhone (see Adding an iPhone contact by email). If the contact is already in the directory, only the empty fields are filled in; if the contact is in a colleague's records, an access request goes to the record owner. You get the result as a notification.
Important:
- Forward the email from your own work email address; an email forwarded from another address is not processed.
- Internal addresses are not added; a maximum of 5 people are added from one email. From a vCard attachment, a maximum of 25 people are added (at most 5 attachments, each at most 1 MB).
- The processed email is deleted from the mailbox; its content is not stored.
- A contact added by email has no Undo; edit the record in Customers.
Adding a contact by sharing it from your phone's contacts (Android)
Who: Employee · Where: On an Android phone, the Contacts app → contact → Share → Prozence
What it does: You add a customer saved in your phone's contacts to the company's customer directory with one tap. The contact card is created automatically; you do not have to fill in a form.
Before you start:
- The app must be added to your phone's home screen with Chrome (see 00. Getting started).
- Open the app on this phone at least once and sign in.
- If you added the app to the home screen before, it can take up to one day until Prozence accepts contacts in the share menu (after the phone refreshes the app information).
- On your phone, open the Contacts app and tap the contact.
- Tap Share. If the phone asks for a format, select the vCard file (.vcf).
- In the share menu, tap Prozence. The app opens on the Add card screen.
- The card is created automatically. A window opens from the bottom with the title Added to your contacts and a line such as "Deniz Örnek added to your contacts."
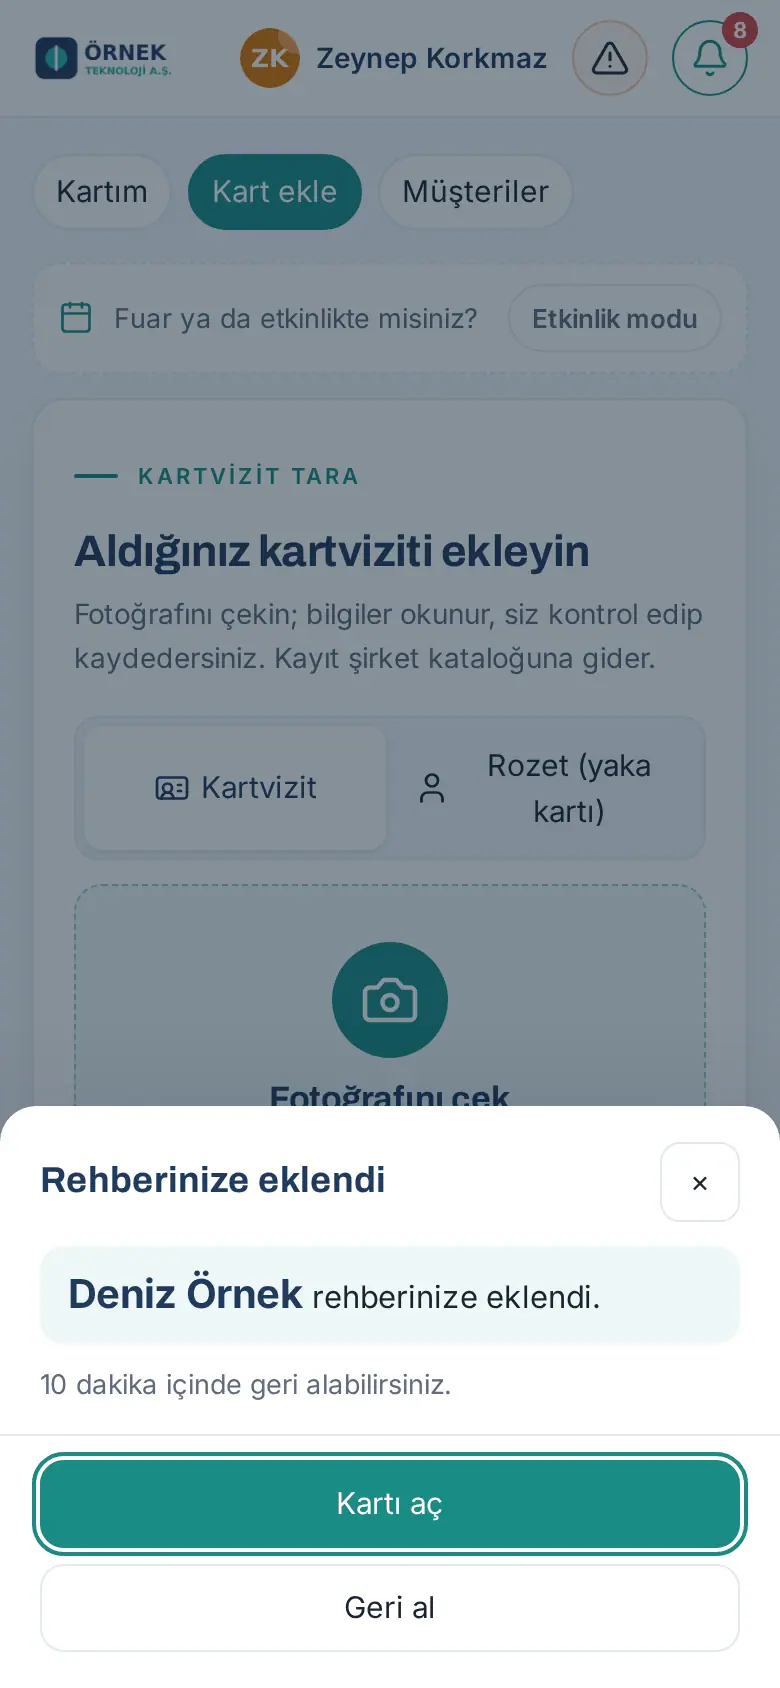
- To see the contact, tap Open card. The Customers screen opens with the contact's details.
- If you added the contact by mistake, tap Undo within 10 minutes. The window shows Card undone and "… removed from your contacts."; close it with Close.
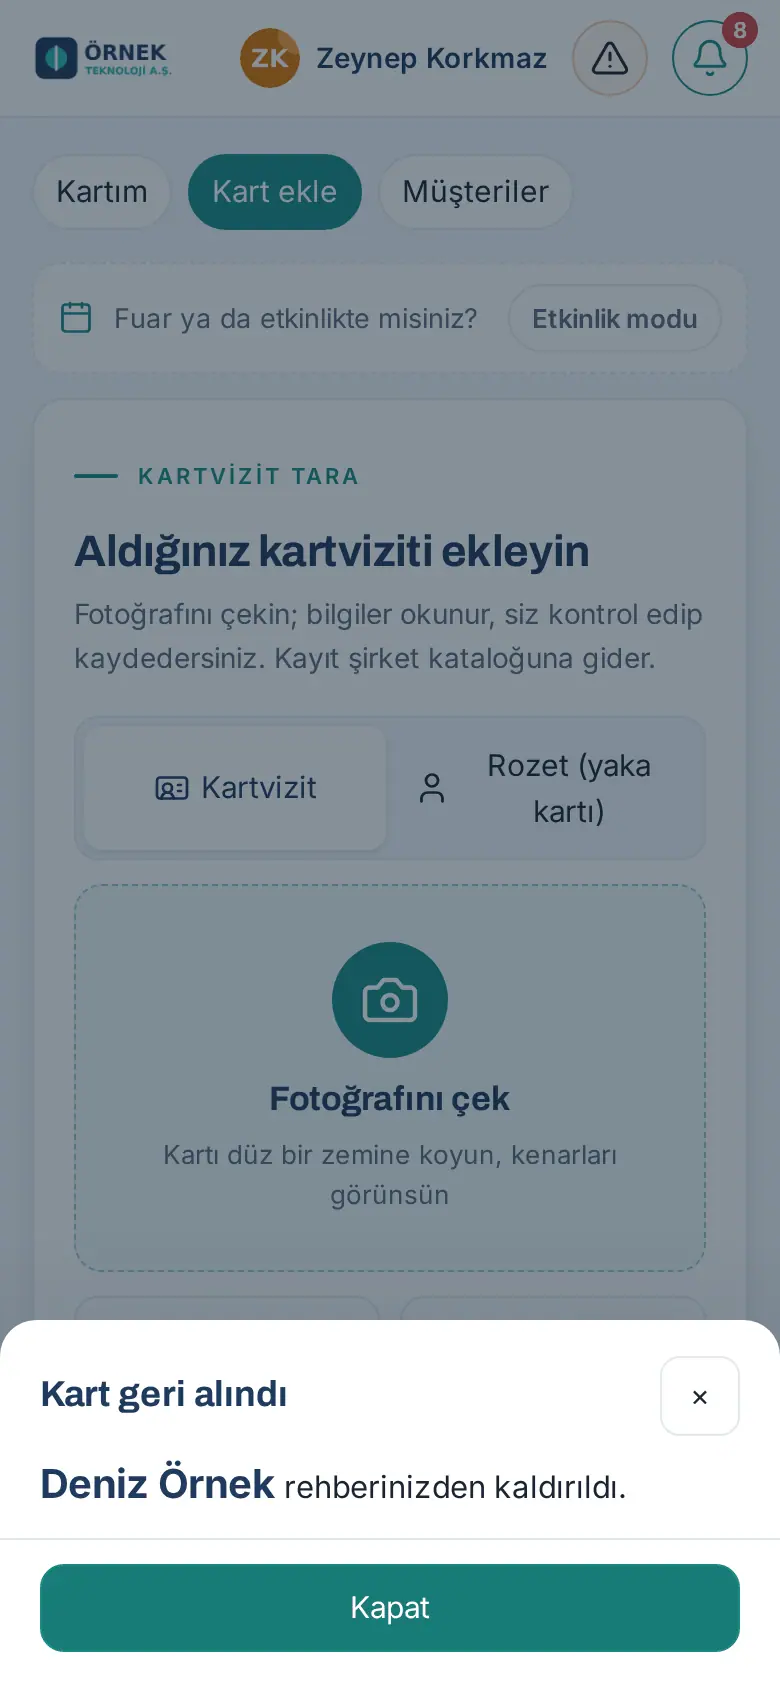
Result: The contact is added to your cards. The record gets the contact's first name, last name, company, job title, email addresses and phone numbers, website, address and note. If the contact has a photo and your company keeps card photos, the photo is added as the card image. The source is "Phone contacts". Who can see the record depends on your company's default sharing (see 12. Customer directory administration).
Tip:
- If a CRM is connected in your company, the window shows "Will be sent to the CRM (…) in 10 minutes." If you undo the card, the contact never goes to the CRM.
- If the contact has no name, the name is taken from the email address, or if there is none, from the phone number; the window shows the note "The contact had no name; it was taken from the email or phone. You can correct it on the card."
- A second email address and a second mobile number from your contacts do not appear as separate fields in the record; they are written to the contact's note as "Diğer iletişim" ("other contact details") and are used to recognize the same person.
Important:
- Commercial message (email) consent is not ticked (see Adding from phone contacts: FAQ).
- Undo is only for the newly created card, and only the person who added the card can use it. When the time is over, the window shows "The undo period (10 minutes) has ended. You can edit the card in Customers."
- If a colleague also added the same card to their cards in the meantime, the card is not deleted: "Another colleague also added this card in the meantime; it was not deleted."
- If the page Paylaşılan kişi alınamadı ("shared contact could not be received") opens, the app is not ready on that phone yet. This page is shown only in Turkish. Tap Uygulamayı aç ("open the app"), then share the contact again or use Uploading a vCard file. The shared file is not read or stored.
- The shared file can be at most 1 MB. If the app does not open within 10 minutes after you share, the window shows "The shared contact was not found or is older than 10 minutes. Share the contact again."
Choosing from phone contacts on the Add card screen
Who: Employee · Where: Bottom menu Card → Add card → Choose from phone contacts
What it does: Without leaving the app, you select one or more contacts from your phone's contacts and add them.
Before you start: The Choose from phone contacts button is shown only in browsers that support access to phone contacts (Chrome on Android). It is not shown on iPhone or on a computer; there, use Uploading a vCard file or Adding an iPhone contact by email.
- In the bottom menu, tap Card, then Add card.
- Tap Choose from phone contacts. The phone's contact picker opens.
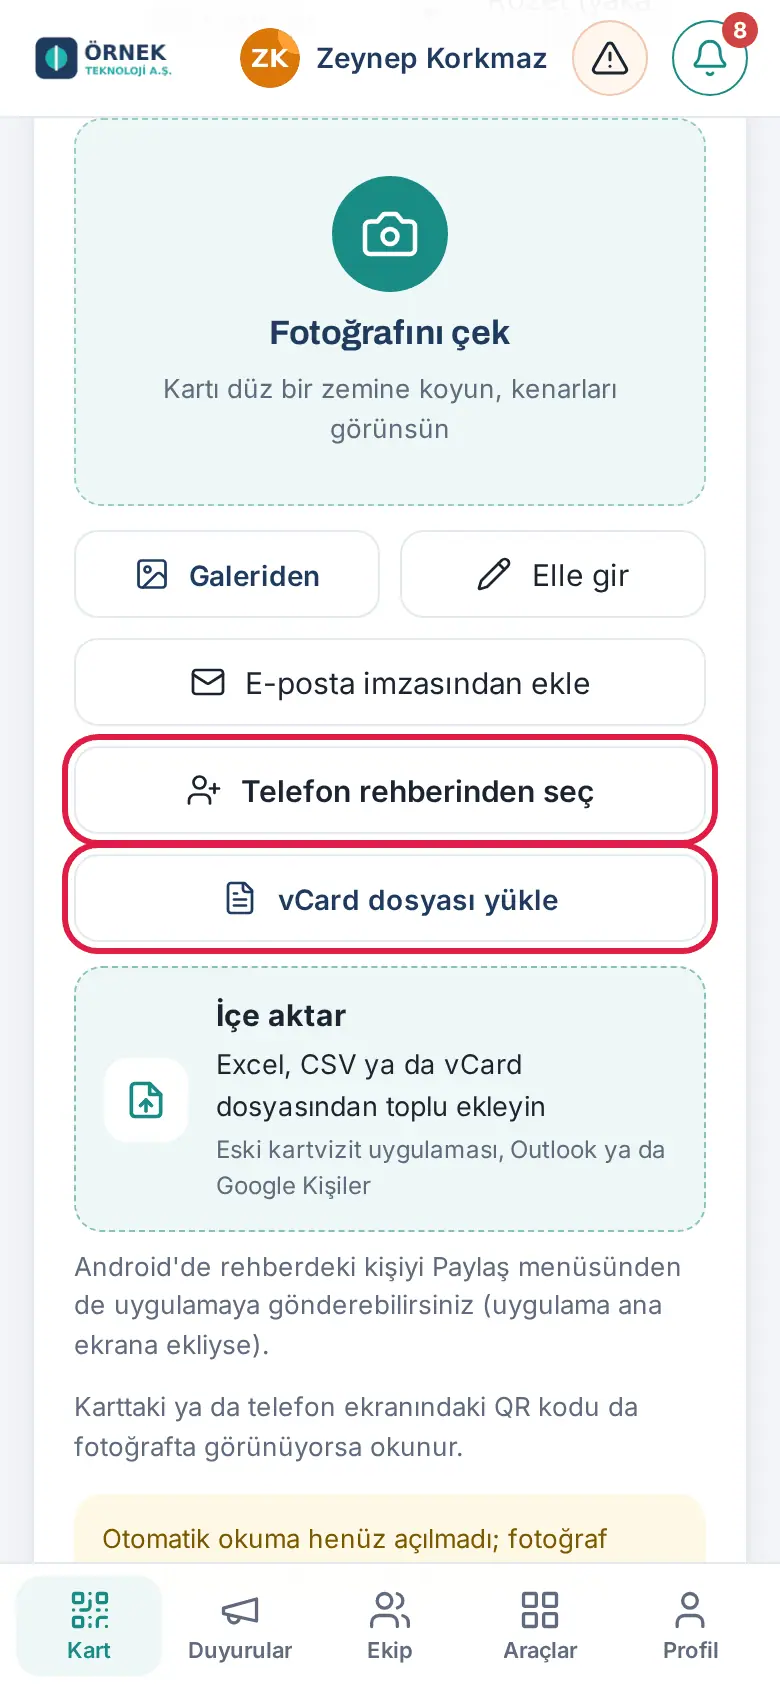
- Select one or more contacts and confirm your selection.
- If you selected one contact, the card is created automatically and the Added to your contacts window opens (Open card, Undo; see Adding a contact by sharing it from your phone's contacts (Android)). If you selected more than one contact, the import preview opens.
Important: The phone's contact picker gives only the name, email and phone. Add details such as company and job title by opening the card and entering them, or share the contact from the Contacts app (sharing sends all the details).
Uploading a vCard file
Who: Employee · Where: Bottom menu Card → Add card → Upload vCard file
What it does: You create a card from a contact file (.vcf) saved on your phone or computer. This button is shown on every phone and computer.
- On the Add card screen, tap Upload vCard file.
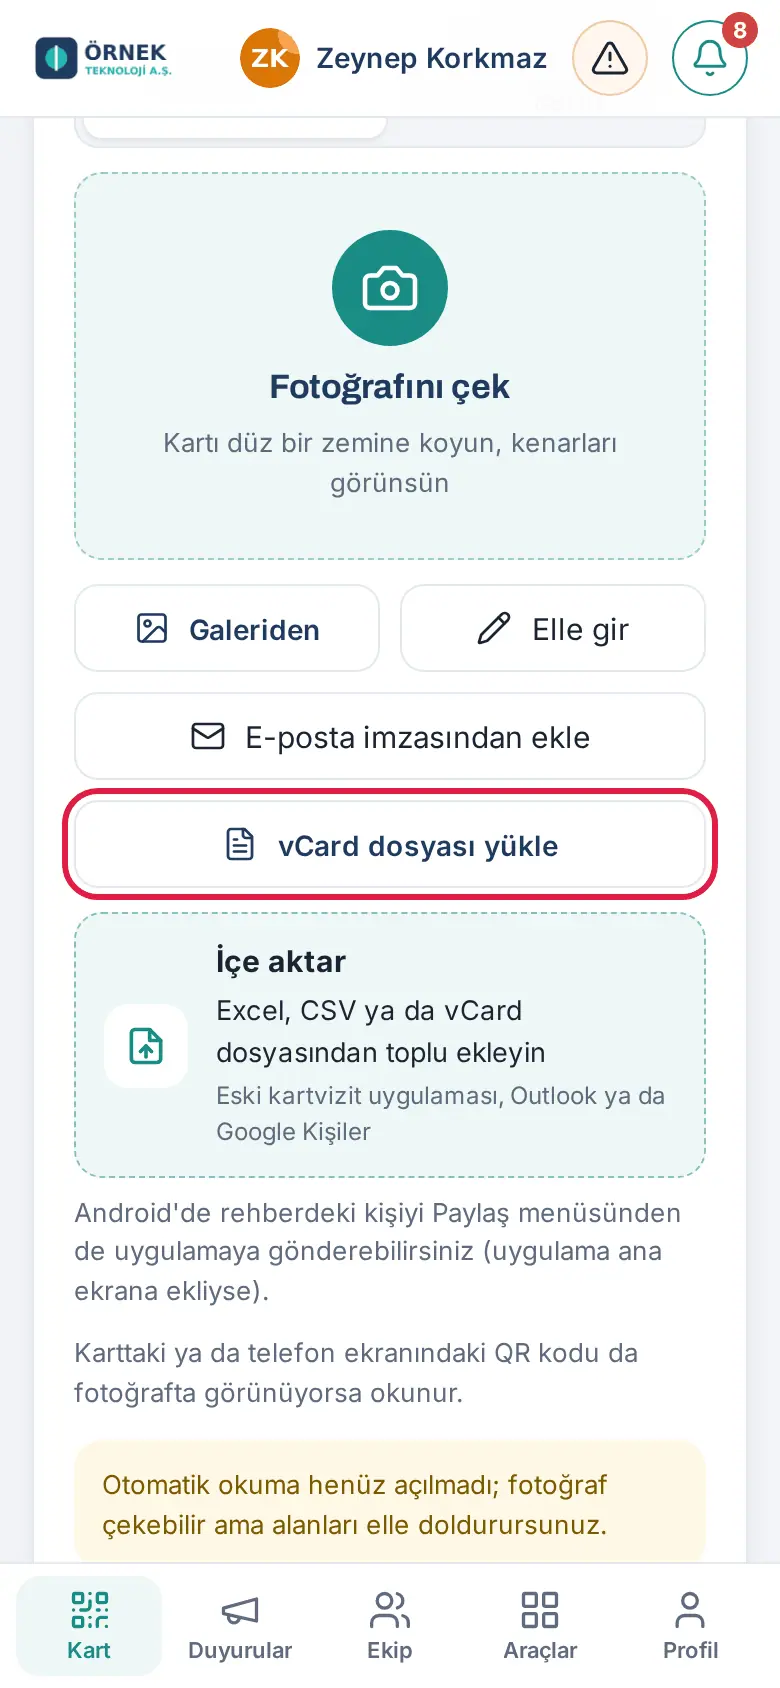
- Select the contact file (.vcf or .vcard). On iPhone, first save the file to the Files app.
- If the file has one contact, the card is created automatically and the Added to your contacts window opens (Open card, Undo). If the file has more than one contact, the import preview opens.
Common errors:
- "This file is not a vCard (.vcf)." — the file you selected is not a contact file.
- "A vCard file can be at most 1 MB." — the file is too large. Add many contacts with 04. Customer directory.
- "The contact has no name, email or phone." — the contact in the file does not have enough details to create a card.
- "Today's save limit reached." — the daily save limit of Add card is reached; try again tomorrow.
If the shared contact is already in the directory
Who: Employee · Where: The window that opens after sharing, Choose from phone contacts or Upload vCard file
What it does: A second card is not created for the same person; you choose what to do. The system recognizes the person by email or mobile phone (a second email address and mobile number from your contacts are also checked).
- If the person is in your cards or in a record shared with you, the This contact already exists window opens. It shows "… is already in your contacts." or "… is already in contacts shared with you."
- The Missing fields: line shows the fields that are empty in the record and filled in the contact you shared (e.g. Job title). If there is no new information, it shows "The shared contact has no new details to fill empty fields in the record."
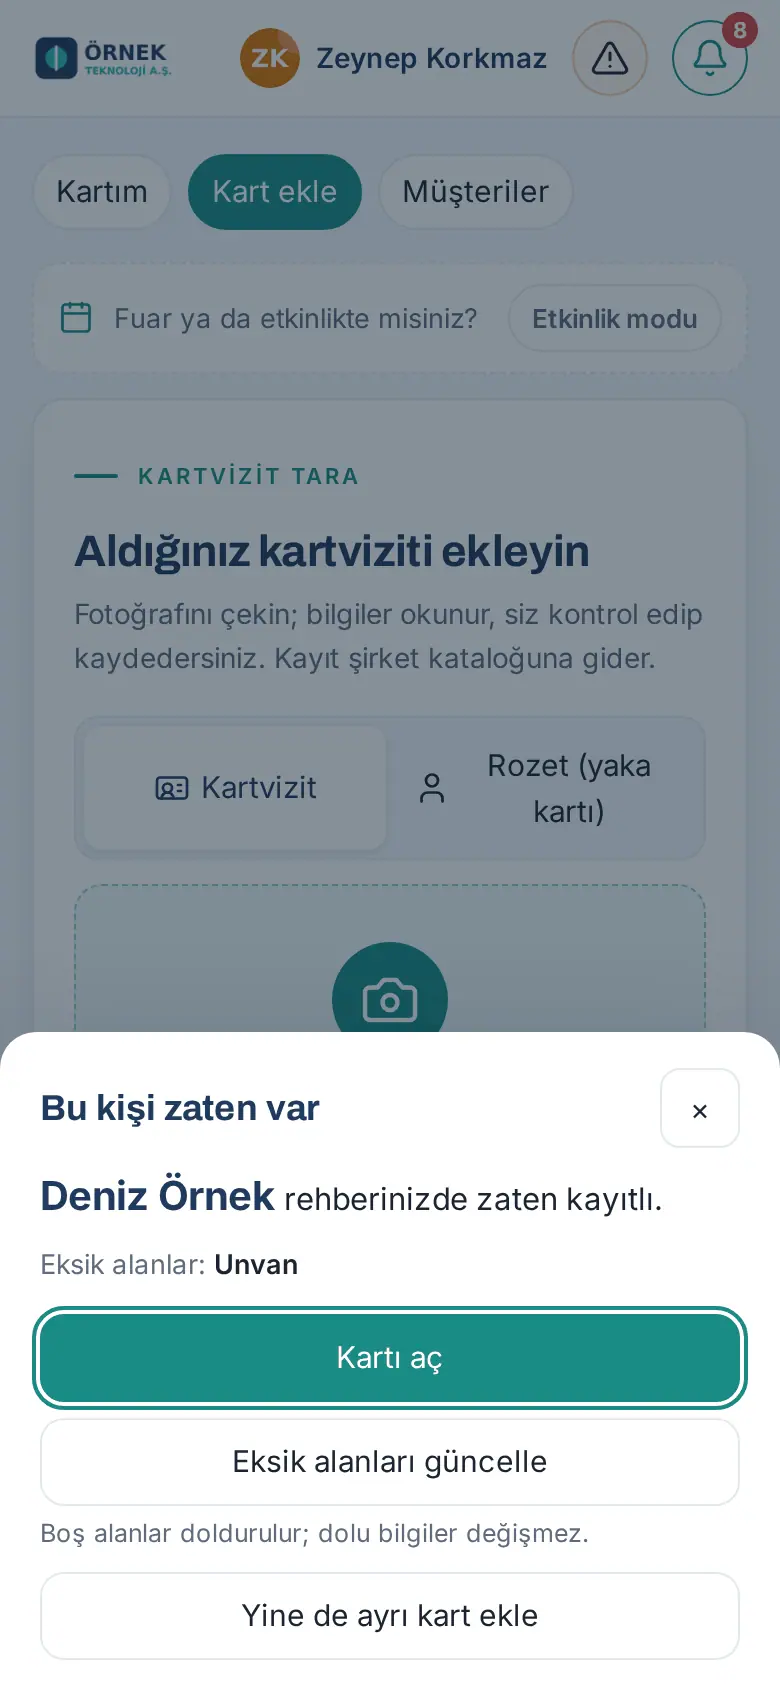
- Select:
- Open card: opens the existing record in Customers.
- Fill in missing fields: only empty fields are filled in; existing details do not change. The Card updated window shows Fields added:.
- Add as a separate card anyway: a second card is created and the Added to your contacts window opens (you can remove it with Undo within 10 minutes).
If the person is in a colleague's records: if the record is not shared with you, you cannot see its details. The This contact is in a colleague's records window opens, no new card is created, and an access request goes to the record owner (see If the person is already in the directory). Close it with OK.
Important:
- Make your choice within 15 minutes. After that, the window shows "This choice has expired. Share the contact again."
- Fill in missing fields cannot be undone.
- If there is only a similar name and company in a colleague's record, a separate card is created.
Import preview when you share several contacts
Who: Employee · Where: The Import customers window that opens when you share, select or upload more than one contact
What it does: When you share more than one contact, the cards are not created automatically. You first see the contacts, then confirm.
- The Import customers window opens directly at the Preview step. At the top, a note such as "Contacts shared from the phone: 2. Review and confirm; none are added until you confirm." is shown.
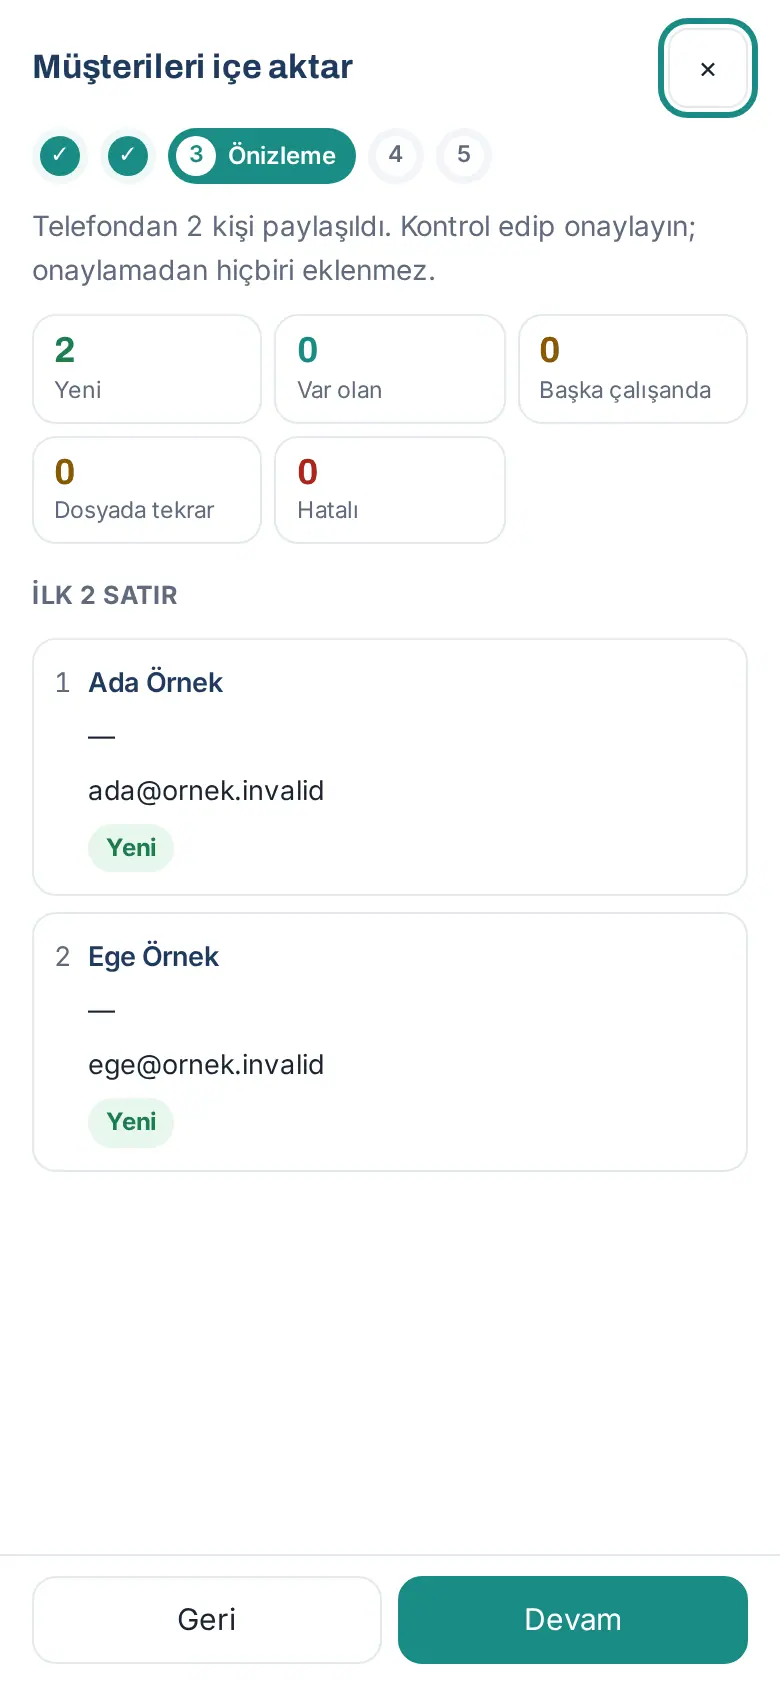
- Check the New, Existing, With another employee, Duplicate in file and Invalid numbers and the contacts. Tap Continue.
- In the Options step, select the Source, optionally Tags (optional), and Who can see.
- Tap Import (N contacts). When the import is complete, the result numbers are shown.
For the details of the steps, see 04. Customer directory.
Important:
- No contact is added until you confirm. You cannot select contacts one by one: you confirm all of them or close the window.
- The source of contacts added this way is "Phone contacts". The bulk import rule applies: there is no Undo, the contacts are not sent to the CRM, and commercial message consent is not ticked.
Adding an iPhone contact by email
Who: Employee · Where: On iPhone, Contacts → contact → Share Contact → Mail
What it does: On iPhone, the app does not appear in the share menu. You send the contact by email to the company's business card mailbox; the contact is added to your cards in a few minutes.
Before you start: Your company must have turned on the shared mailbox (see Adding by forwarding an email to the shared mailbox). If the mailbox is on, its address is shown in the tip on the Add card screen.
- Find the mailbox address in the tip at the bottom of the Add card screen (e.g.
kartvizit@ornek.invalid).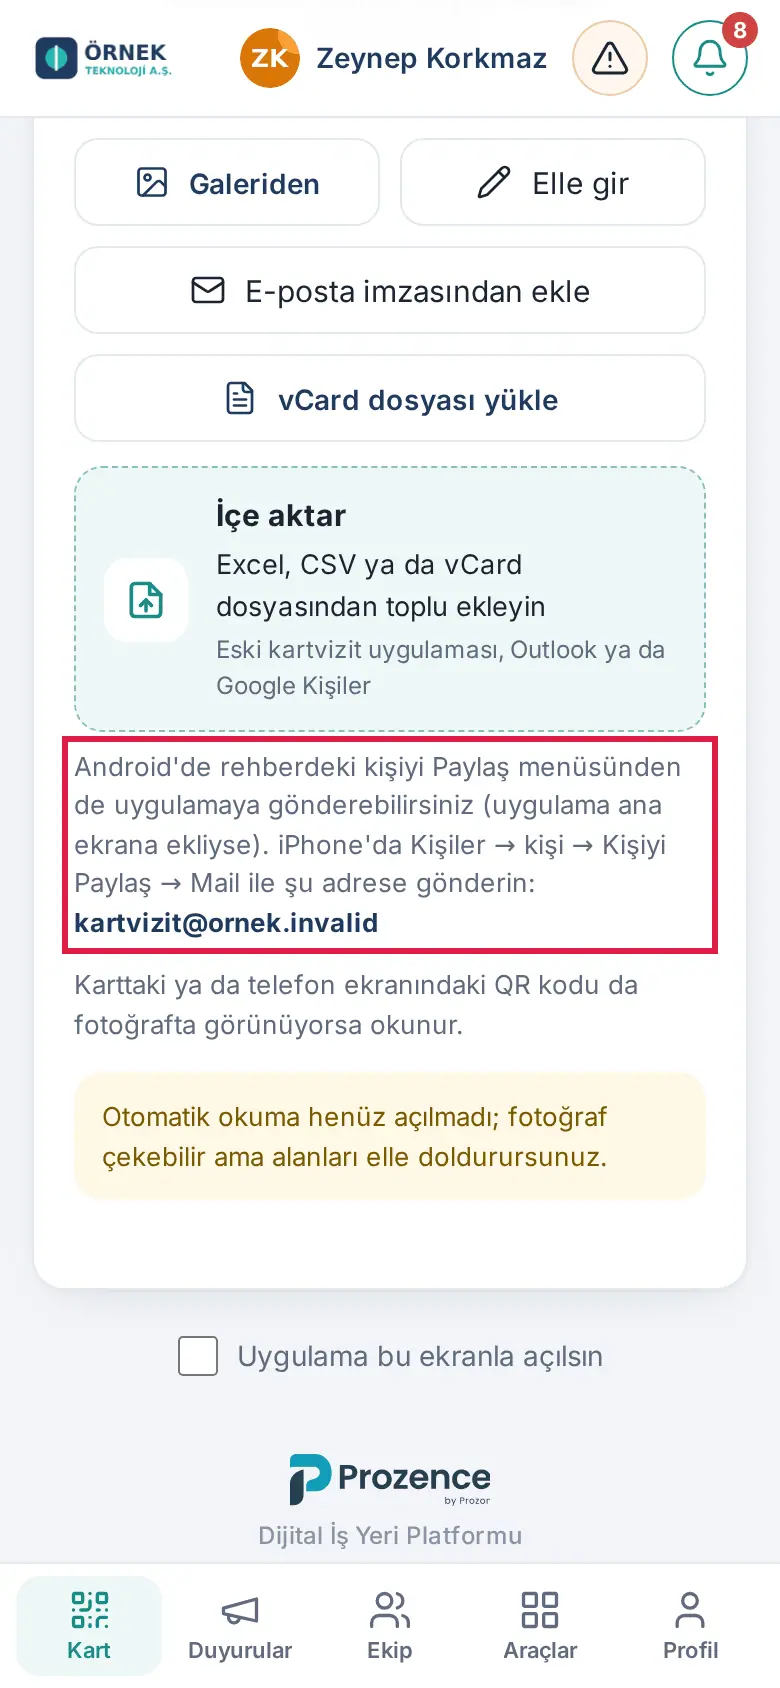
- On iPhone, open the Contacts app and tap the contact.
- Tap Share Contact, then Mail. The contact file (.vcf) is attached to the email.
- Enter the mailbox address as the recipient and send the email from your own work email address.
- In a few minutes, the contact is added to your cards and you get a notification.
Important:
- A contact added by email has no Undo; if necessary, edit the record in Customers.
- If the contact is already in your cards, only the empty fields are filled in.
- If the tip does not show a mailbox address, the mailbox is turned off in your company. Save the contact to Files and use Uploading a vCard file.
Adding from phone contacts: FAQ
Who: Employee
FAQ:
- Why is commercial message consent not ticked? The entry in your phone does not show that the person gave you consent for commercial emails. So the consent box is not ticked. If you did not get consent from the person, do not send them commercial emails (see 04. Customer directory).
- How long can I use Undo? For 10 minutes after the card is added. When the time is over, the window shows "The undo period has ended." and the button disappears. After that, edit the record in Customers.
- When does the contact go to the CRM? A single contact added by sharing, Choose from phone contacts or Upload vCard file is sent to the CRM when the undo period ends (after 10 minutes); if you undo it, it is never sent. A contact added by email (the iPhone way) is sent immediately, like other email records. Contacts added from the import preview for several contacts are not sent to the CRM.
- Why is there no direct sharing on iPhone? On iPhone, Safari and apps added to the home screen do not appear in the share menu and cannot access phone contacts. Direct sharing on iPhone will come with version 1.1 of the Prozence mobile app. Until then, use Adding an iPhone contact by email or Uploading a vCard file.
- How do I find the contacts I added from my phone? Customers → Filters → How added → Phone contacts (see 04. Customer directory).