25. Shuttle and canteen
Screenshots show the Turkish interface of Prozence with fictional "Örnek Teknoloji A.Ş." data; the English interface has the same layout.
This chapter describes how to use the company shuttle and the canteen. You select your shuttle route and stop, report that you will not ride today, or ride another shuttle if there is a free seat. In the canteen, you look at the menu, report whether you will come to lunch, scan the QR code at the entrance and register your guest. The screens that the shuttle driver and the canteen attendant use are also in this chapter.
Who: Employee · Shuttle driver · Canteen attendant
For the settings of the routes, the menu and the canteen entrance, see 32. Shuttle, meal, visitor and emergency management.
In this chapter
- Opening the shuttle box
- Selecting a shuttle route and stop
- Reporting that you will not ride today
- Riding another shuttle today
- Live shuttle notifications
- Driver screen: trip, stops and passengers
- Viewing the meal menu
- Reporting lunch attendance
- Rating the menu
- Entering the canteen with the QR code
- Bringing a guest to the canteen
- Canteen attendant: opening and monitoring entry
Before you start: The company turns on the shuttle and the meal menu separately. If you do not see the Shuttle or Meal menu box, that service is off in your company. Seat availability, "ride another shuttle" and live shuttle notifications need your company to turn on the Live shuttle feature; the canteen QR code needs Canteen entry to be on.
Opening the shuttle box
Who: Employee · Where: Tools → Services → Shuttle
What it does: The shuttle box shows the vehicle and driver of the route you selected and the morning and evening times of your own stop. Today's trip information and the number of free seats are also here.
- In the bottom menu, tap Tools.
- In the strip at the top, select Services.
- Scroll down to the Shuttle box.
On a computer, open Board in the menu on the left and click the Services tab at the top.
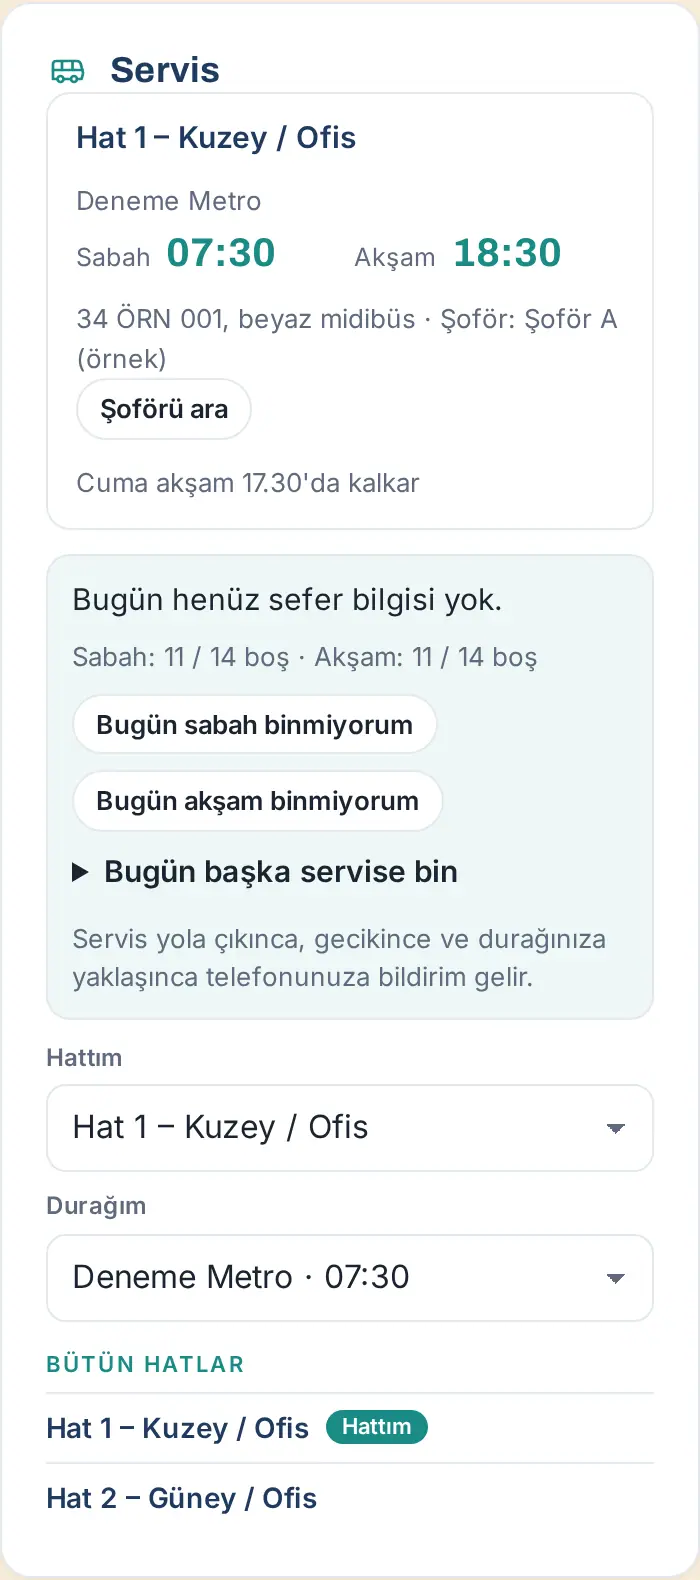
The box shows:
- The name of your route and your stop; the Morning and Evening times are in large type.
- The vehicle plate and the driver's name; the Call the driver button.
- The route note (e.g. "Cuma akşam 17.30'da kalkar" ("Leaves at 17.30 on Friday evenings")).
- Today's trip line: if the trip has not started, it says "No trip information yet today."
- If your company entered the number of seats, a free seats line (e.g. "Sabah: 11 / 14 free · Akşam: 11 / 14 free" ("Morning: 11 / 14 free · Evening: 11 / 14 free")) (0.99.26).
- The All routes list: tap the name of a route to open its stop and time table. My route is shown next to your route.
Tip: The Today’s lunch and shuttle box on the Today screen also summarizes your shuttle and the day's menu.
Selecting a shuttle route and stop
Who: Employee · Where: Tools → Services → Shuttle → My route / My stop
What it does: You save the route you use and your stop. The driver sees you in the passenger list of this stop; shuttle notifications come for this stop.
- In the Shuttle box, tap the My route list and select your route. If you do not use the shuttle, select I don’t use the shuttle.
- Tap the My stop list and select your stop. The list shows the morning time of each stop (e.g. "Deneme Metro · 07:30").
- Your selection is saved immediately. The message "Your shuttle choice has been saved." appears.
Result: The name of your route and the times of your stop appear at the top of the box. If you did not select a stop, it says "Choose your stop to see your times here."
Tip: If you select I don’t use the shuttle, the message "Your shuttle choice has been removed." appears; you do not get shuttle notifications.
Reporting that you will not ride today
Who: Employee · Where: Tools → Services → Shuttle
What it does: If you will not ride the shuttle today, you tell the driver in advance. The driver does not wait for you; the free seat becomes available to another employee.
Before you start: You must have selected a route, and Live shuttle must be on in your company.
- In the Shuttle box, tap the I'm not riding this morning or I'm not riding this evening button.
- The message "Driver notified: you're not riding today." appears. The button changes to Morning: not riding (or Evening: not riding) and changes color.
- If you change your mind, tap the same button again. The message "Your shuttle booking is restored." appears.
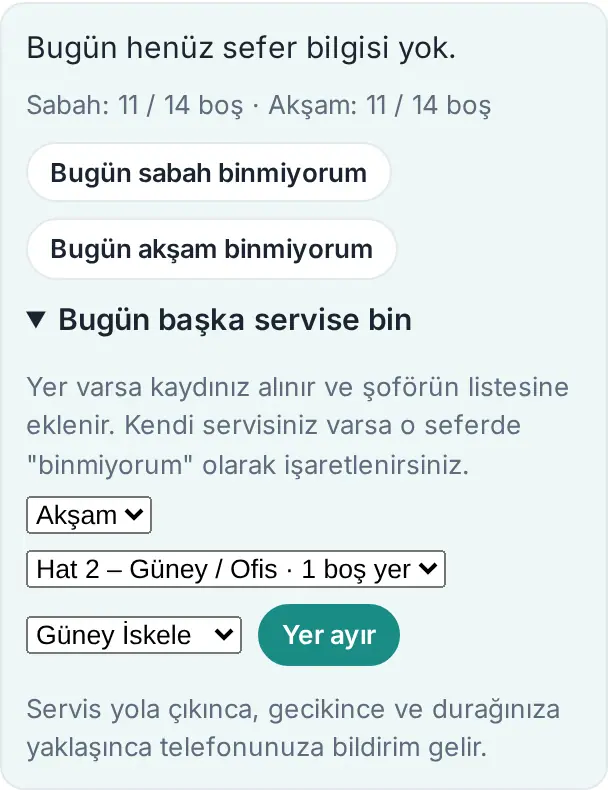
Result: On the driver's screen, your name is crossed out and "— bugün binmiyor" ("— not riding today") is shown next to it. You do not get shuttle notifications for that trip.
Common errors:
- "Bugünkü sabah seferi tamamlandı." ("Today's morning trip is completed.") (or evening): the trip has ended; you can no longer change the mark.
- "Choose your route first.": first select your route and stop.
Riding another shuttle today
Who: Employee · Where: Tools → Services → Shuttle → Ride another shuttle today
What it does: If you come from or go to another district today, you ride the shuttle of another route if there is a free seat. Your booking is added to the list of that route's driver. An employee who has no shuttle of their own can also ride a shuttle this way if there is a free seat.
Before you start: Live shuttle must be on in your company. If no number of seats was entered for the routes, there is no seat limit.
- In the Shuttle box, tap the Ride another shuttle today line. The line opens.
- In the first list, select the trip: Morning or Evening.
- In the second list, select the route. Each route shows the number of free seats next to it (e.g. "Hat 2 – Güney / Ofis · 1 free seats"). A full route shows "· full" and you cannot select it.
- In the third list, select the stop where you will get on.
- Tap Reserve a seat. The message "Your seat is reserved; you’ve been added to the driver’s list." appears.
Result: The box shows a line such as "This morning on another shuttle: Hat 2 – Güney / Ofis · Sahil Durağı" and the Cancel button. If you have your own shuttle, you are automatically marked as "not riding" on that trip.
To cancel: Tap Cancel on the line. The message "Your booking on the other shuttle was cancelled." appears and the "not riding" mark on your own shuttle is removed. If you had marked I'm not riding this morning (or evening) yourself before, that mark stays.
Common errors:
- "Choose the route and the stop.": the route or the stop is empty.
- "No free seats on this trip (3 seats).": the route became full while you were selecting; select another route.
- "The shuttle has already passed this stop.": the trip has passed the stop you selected.
- "This trip is completed.": the trip has ended.
- "This is already your shuttle.": you selected your own route; you do not need to do anything for your own route.
Important: If you reserved a seat and will not ride, always tap Cancel; the seat becomes available to another employee.
Live shuttle notifications
Who: Employee · Where: Phone notification; Tools → Services → Shuttle
What it does: When the driver starts the trip and as the shuttle passes the stops, you get a notification on your phone. You are also told if the shuttle is late or if there is no trip that day.
Before you start: You must have selected a route and a stop. Phone notifications must be on (see 09. Notifications).
On the morning trip, the notifications come in stop order:
- When the driver taps Yola çıktım ("I've set off"), the people waiting at the first stop get "Shuttle approaching your stop", the people at the second stop get "Servis yolda" ("Shuttle on the way") (2 stops left to your stop), and the others get "Shuttle has departed".
- Each time the driver taps Tamam ("Done") at a stop, the next stop gets "Shuttle approaching" and the stop after it gets "Servis yolda".
- For a delay, you get "Shuttle delayed" (e.g. "servis yaklaşık 10 dakika gecikecek" ("the shuttle will be about 10 minutes late")); if the trip is cancelled, you get "No shuttle today".
On the evening trip, everyone gets the "Shuttle has departed" notification once.
The shuttle box also shows live information: "Morning trip · on the way · son durak: Deneme Metro · 10 dk gecikme (07:42)" ("Morning trip · on the way · last stop: Deneme Metro · 10 min delay (07:42)"). The trip statuses are: not departed yet, on the way, completed, cancelled.
Tip: Each stop gets each notification only once. You get no notifications for a trip on which you said I'm not riding this morning (or evening); if you reserved a seat on another shuttle, you get the notifications of that shuttle.
Driver screen: trip, stops and passengers
Who: Shuttle driver · Where: The driver link sent by facilities (no sign-in)
What it does: The driver opens the trip screen on their phone with a secret link for their own route. The driver marks departure, the stops passed and whether the passengers got on; the passenger notifications go out based on this.
Before you start: You get the driver link from facilities (the shuttle manager). The link is personal; the driver does not open a Prozence account (see the driver link in chapter 32).
- Open the driver link on your phone. The route name, date, vehicle and occupancy are shown (e.g. "5 Ekim Pazartesi · 34 ÖRN 001, beyaz midibüs · 3 / 14 dolu" ("Monday 5 October · 34 ÖRN 001, white minibus · 3 / 14 taken")).
- Select the trip with the Sabah ("Morning") or Akşam ("Evening") button.
- The stops are listed in order; each stop shows the time, the number of passengers and the passenger names. The names of people who will not ride today are crossed out ("— bugün binmiyor"); people from another shuttle have "— bugün bu serviste" ("— on this shuttle today") next to their names.
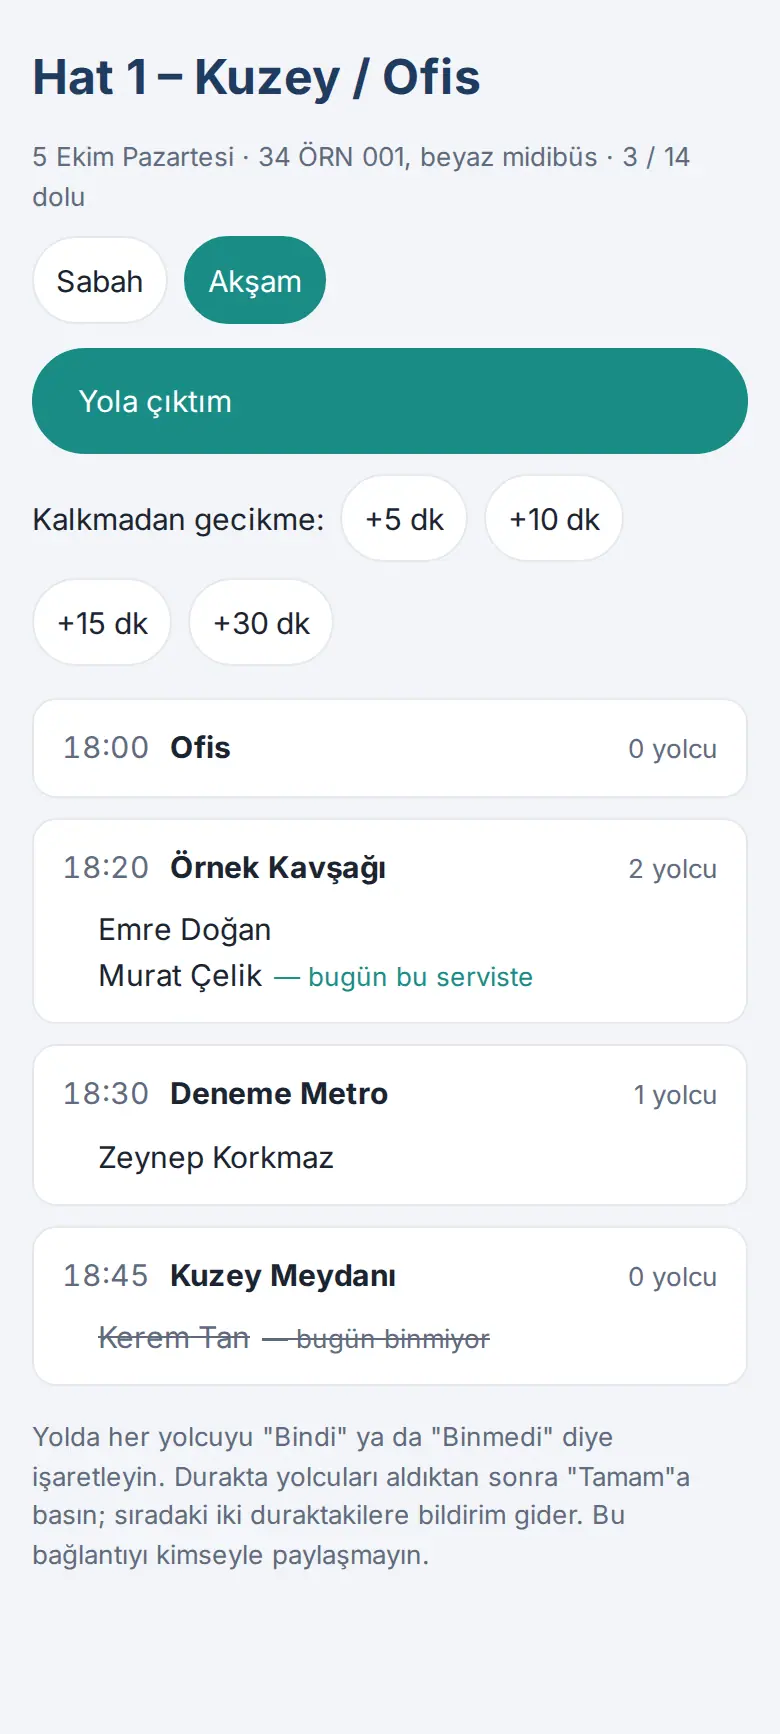
- When you set off, tap Yola çıktım. A line such as "Yolda · çıkış 07:05" ("On the way · departed 07:05") appears at the top of the screen and the message "Yolculara bildirim gitti." ("Passengers notified.") appears.
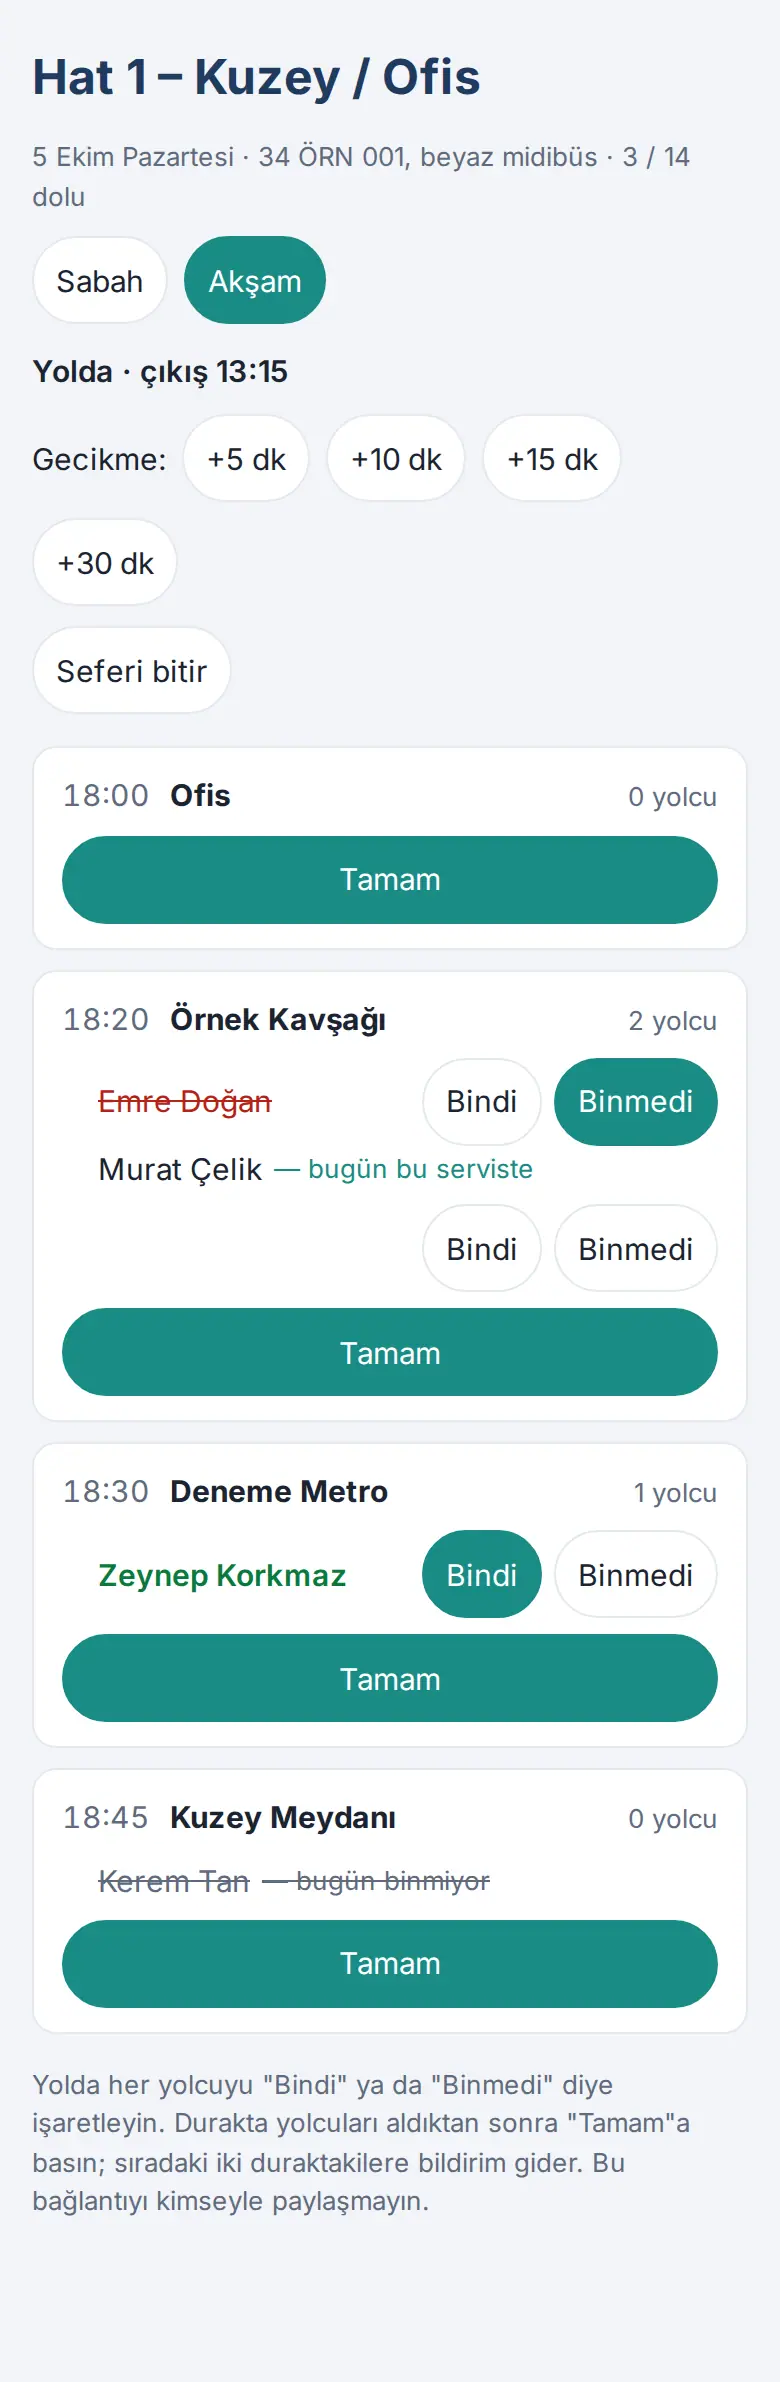
- For each passenger, tap Bindi ("Boarded") or Binmedi ("Didn't board"). A passenger who got on is shown in green, a passenger who did not is shown in red and crossed out. If you marked the wrong one, tap the same button again; the mark is removed.
- After you pick up the passengers at a stop, tap the stop's Tamam button. The next two stops get a notification.
- If there is a delay, tap one of the +5 dk, +10 dk, +15 dk or +30 dk ("+5 min" … "+30 min") buttons on the Gecikme: ("Delay:") line. The message "… dk gecikme bildirildi." ("… min delay reported.") appears. You can also report a delay before the trip starts from the Kalkmadan gecikme: ("Delay before departure:") line.
- When the trip ends, tap Seferi bitir ("End trip") and confirm the "Sefer bitirilsin mi?" ("End the trip?") question.
Common errors:
- "Önce "Yola çıktım" deyin." ("First tap "Yola çıktım"."): Bindi / Binmedi and Tamam work only on a trip that is on the way.
- "Devam eden sefer var; önce onu bitirin." ("A trip is in progress; end it first."): before you start the other trip, close the open trip with Seferi bitir.
- "Gecikme bildirimi 5 dakikada bir gönderilebilir." ("A delay notice can be sent once every 5 minutes."): you cannot report a second delay within a short time.
- "Şoför ekranı kapalı" ("Driver screen closed") page: the link was renewed or the live shuttle was turned off. Ask facilities for the new link.
Important: Do not share this link with anyone. Anyone who has the link sees the passenger list and can send notifications.
Viewing the meal menu
Who: Employee · Where: Tools → Services → Meal menu
What it does: Shows this month's menu of the company canteen day by day.
- On the Services screen, scroll down to the Meal menu box.
- The Today menu is shown at the top. If there is no menu today, the first day with a menu in the next 7 days is shown. The note for the day (e.g. "Bugün tatlı ikramı var." ("Dessert is served today.")) is shown below it.
- Below, the first 5 days with a menu after today are listed. For the remaining days of the month, tap the Next days (n) button; for past days, tap the Past days (n) button.
- To see another month, use the ‹ and › buttons next to the month name.
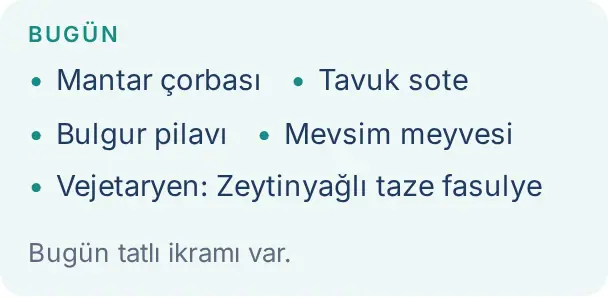
Tip: If your company turned on menu rating, past days show the average star rating and the number of votes. If it says "No menu has been entered for this month.", the menu has not been entered yet.
Reporting lunch attendance
Who: Employee · Where: Tools → Services → Meal menu → Lunch attendance
What it does: You tell the kitchen in advance on which day you will not come to lunch. The kitchen prepares the correct number of meals.
Before you start: Your company must have turned on lunch attendance reporting. By default, everyone is counted as Attending.
- In the Meal menu box, scroll down to the Lunch attendance section. The coming days with a menu are listed (Today, Tomorrow, …).
- Tap the Attending button next to the day on which you will not come to lunch.
- The button changes to Not at lunch and the message "Kitchen notified: you won't be at lunch." appears.
- If you change your mind, tap the same button again. The button changes back to Attending ("You're attending lunch.").
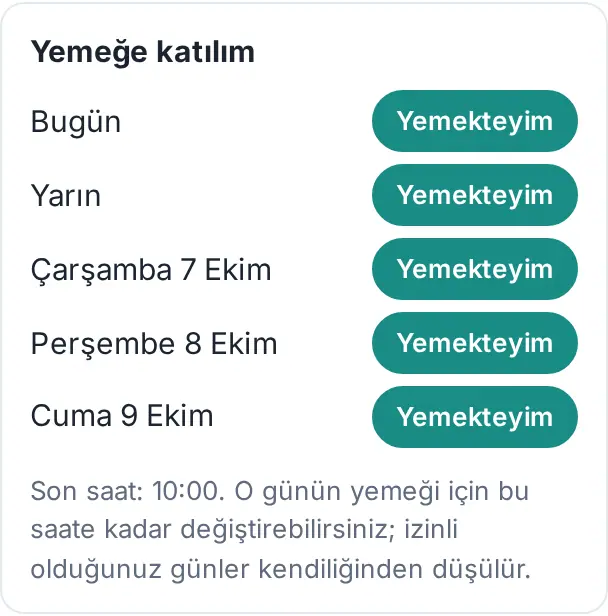
Important: Each day has a cut-off time (shown at the bottom of the section, e.g. "Son saat: 10:00" ("Cut-off: 10:00")). After the cut-off time, the warning "The deadline for this day has passed (cut-off 10:00)." appears and you cannot change that day's selection. Days on which you are on leave are subtracted automatically; you do not need to report them.
Rating the menu
Who: Employee · Where: Tools → Services → Meal menu → Rate the menu
What it does: You rate the meal you ate with 1–5 stars and, if you want, write a short comment. The meals manager sees the ratings and comments anonymously.
- Scroll down to the Rate the menu section. Today's menu (after lunch) and the menus of the last 3 days are listed.
- On the day you want to rate, tap a star from 1 to 5.
- If you want, type a note in the Short comment (optional, shown anonymously) box.
- Tap Send rating. The message "Thanks, your rating was saved." appears.
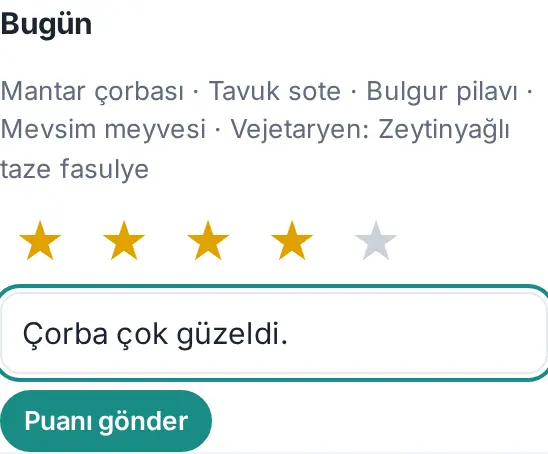
Tip: To change your rating, change the stars and tap Update.
Common errors:
- "This day can't be rated: no menu, lunch time hasn't come yet, or it's older than 3 days."
- "You weren't at lunch that day.": you cannot rate a day for which you selected Not at lunch.
Entering the canteen with the QR code
Who: Employee · Where: The QR code screen at the canteen entrance
What it does: The screen at the canteen entrance shows the QR code of the day. You scan the QR code with your phone; your entry is recorded. This is how the company counts how many people eat in the canteen.
Before you start: You must be signed in to Prozence on your phone. If you are not, you are asked to sign in first. The canteen attendant must have opened the entry.
- Point your phone's camera at the screen at the canteen entrance and scan the QR code.
- Tap the link that opens. Prozence opens and your entry is recorded.
- The Enjoy your meal! window appears; your entry time is shown below it (e.g. "Giriş: 12:30" ("Entry: 12:30")).
- If you have a guest, tap the I have guests button in the window (see Bringing a guest to the canteen). If not, close the window.
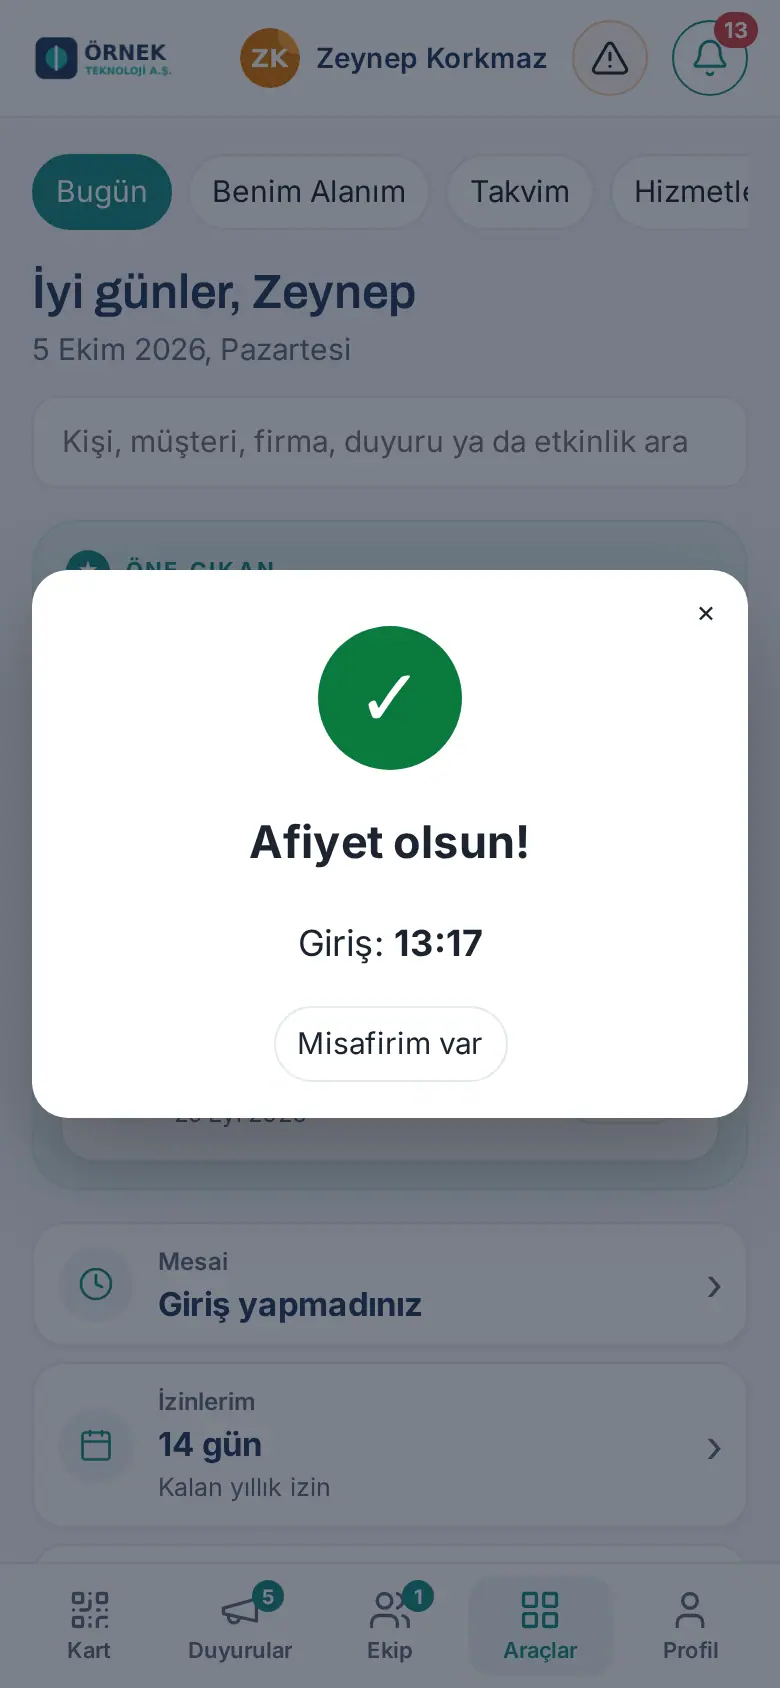
Result: In the Canteen section of the Meal menu box, Your entry today and the time are shown. If you scan the QR code again on the same day, no new record is created; your first entry time is shown.
Common errors: If the entry cannot be recorded, the Entry not recorded window appears and shows the reason:
- "The QR code has expired; scan the current code on the screen.": the QR code changes every 30 seconds. Scan the current code on the screen again.
- "Canteen entry is closed right now.": the attendant has not opened the entry yet or has closed it.
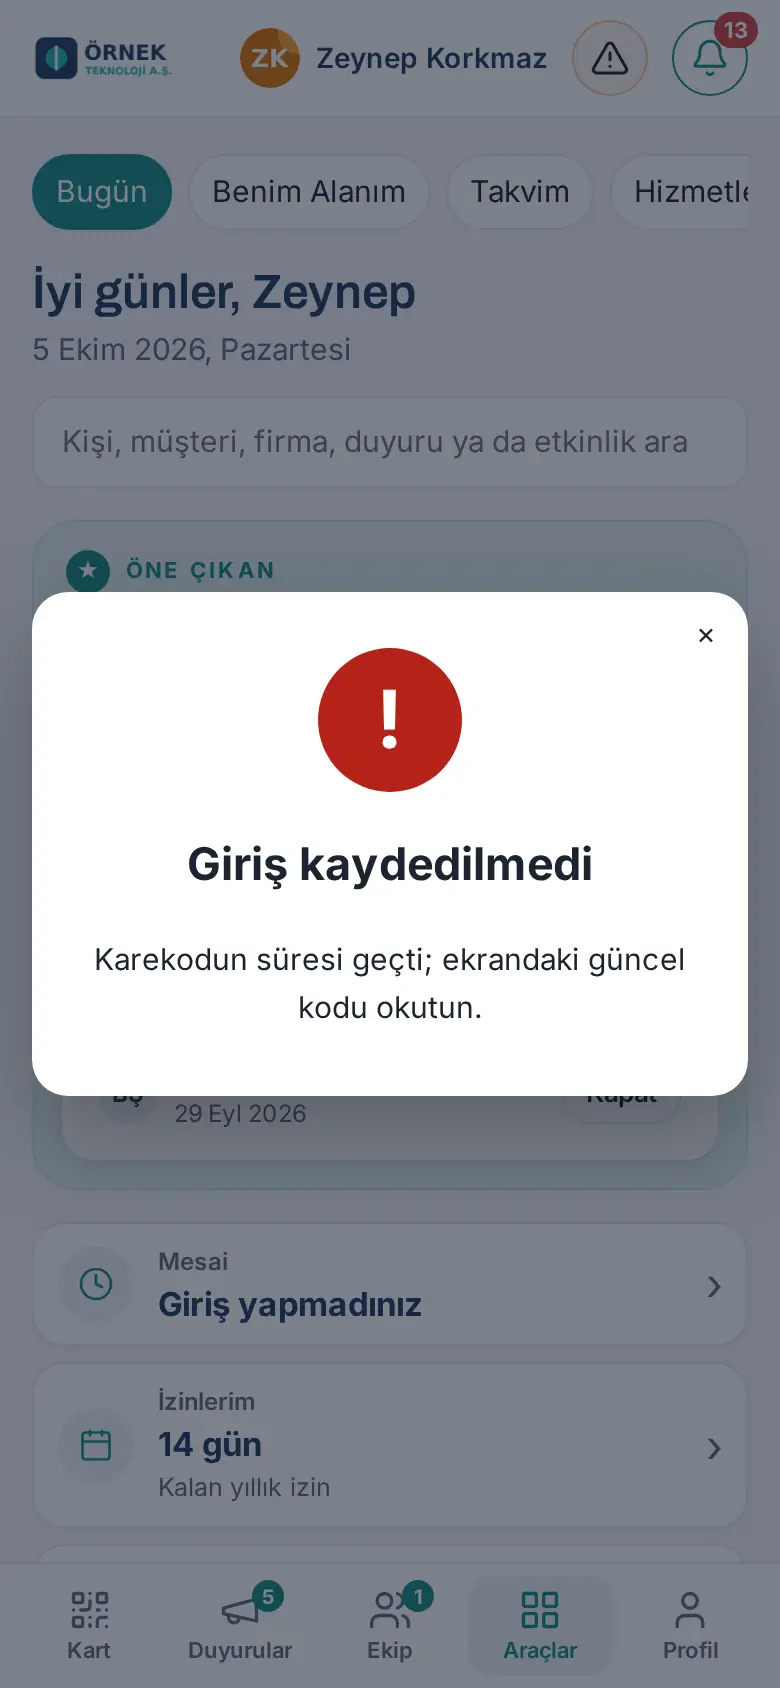
Important: Do not send a photo of the QR code to anyone else; the code becomes invalid within a short time and the entry is recorded only in the name of the person who scans it.
Bringing a guest to the canteen
Who: Employee who is allowed to bring guests · Where: Tools → Services → Meal menu → Canteen → I have guests today
What it does: You enter the name and company of the guests you bring to the canteen. The canteen attendant sees your guests on their own screen.
Before you start: Your company must have given you the right to bring guests (all employees or selected employees). If you do not have this right, the I have guests today line is not shown. You can also enter your guests before you enter the canteen.
- In the Canteen section of the Meal menu box, tap I have guests today. (After a QR code entry, the I have guests button in the Enjoy your meal! window also brings you here.)
- The description shows the maximum number of guests you can bring per day (e.g. "Günde en çok 2 misafir." ("At most 2 guests a day.")).
- Type the guest's name in the first line (Full name) and their company in the second line (Company).
- For another guest, tap + Guest and fill in the new lines. To delete a line, tap Delete.
- Tap Save. The message "Your guests were saved." appears.
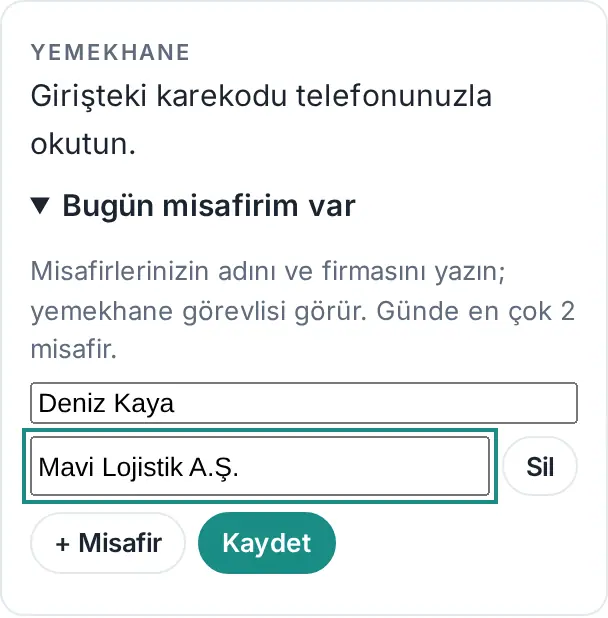
Result: The section shows the My guests (n) line and the names of the guests. If you delete all lines and save, the message "Your guest entry was removed." appears.
Common errors:
- "Enter each guest’s name.": the name in a line is empty.
- "You can bring up to 2 guests a day.": you reached the upper limit (your company sets the number); + Guest does not add a new line.
- "You are not allowed to bring guests to the canteen.": your right was removed; talk to the meals manager.
Important: Your guests are only for the canteen record; they are not linked to the reception's visitor log. If your guest enters the building as a visitor, also create a visitor pre-registration.
Canteen attendant: opening and monitoring entry
Who: Canteen attendant (Meals and canteen → Operator), meals manager, services manager · Where: Board → Services → Meal menu → Canteen QR code
What it does: At lunch time, you open the QR code of the day on the screen at the entrance. You see live how many people entered, the latest entries and today's guests. You add an employee who has no phone manually.
Before you start: The meals manager must have turned on Canteen entry and assigned you as the attendant (see canteen entry settings in chapter 32). Use a tablet or a computer as the screen at the entrance.
- On the device at the canteen entrance, open Prozence and go to Board → Services.
- In the Canteen section of the Meal menu box, click Canteen QR code.
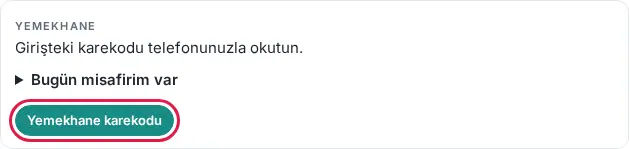
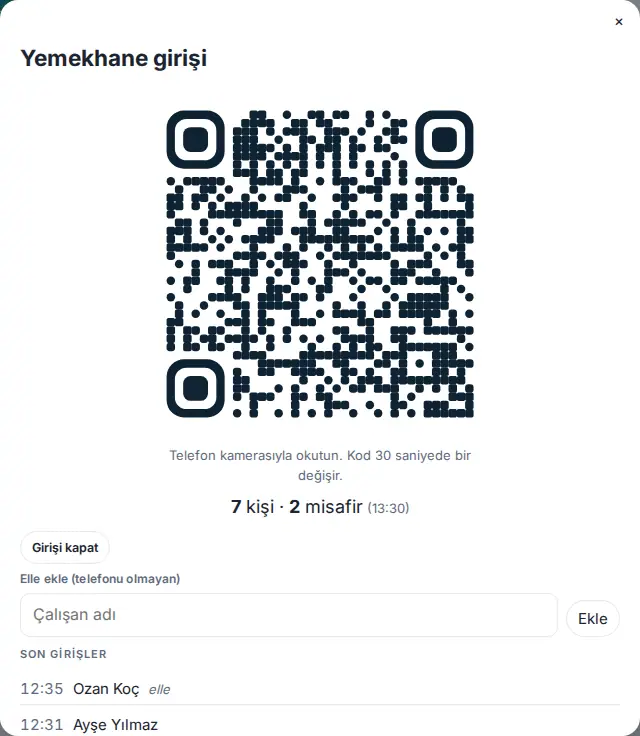
- In the Canteen entry window, if entry is closed, click Open entry. The message "Canteen entry opened." appears and the QR code is drawn.
- Leave the window open. The QR code changes automatically every 30 seconds ("Scan with the phone camera. The code changes every 30 seconds.").
- The current counts are shown below the QR code (e.g. "7 people · 2 misafir (13:30)" ("7 people · 2 guests (13:30)")). The Latest entries list shows the time and name; the Today’s guests list shows the guest's name, company and the employee who brought them.
- If an employee without a phone comes, type their name in the Add manually (no phone) box, select them in the list and click Add. The message "Added." appears and the record is shown in Latest entries with the "elle" ("manual") label. There is no button on this screen to undo a manually added record; make sure you select the correct person.
- When lunch time ends, click Close entry. The message "Canteen entry closed." appears; the QR code becomes invalid.
Common errors:
- "Pick an employee from the list.": after you type the name, select it in the suggestion list.
- "Canteen entry is turned off in this company.": the meals manager has not turned on canteen entry, or the Meal menu is off.
- "This screen is for the canteen attendant.": you do not have the attendant role; talk to the meals manager.
Tip: The entries, guests and per-person counts for the day and past days are in Reports → Canteen (see 19. Reports).
Important: Keep the QR code screen open only at the canteen entrance. A photo of the code is valid for 60 seconds at most; even so, do not project the screen to other places.