06. Board and intranet
Screenshots show the Turkish interface of Prozence with fictional "Örnek Teknoloji A.Ş." data; the English interface has the same layout.
The Board is your company's internal communication area: announcements, surveys and policies are in Company Agenda; posts, celebrations and the suggestion box are in Team Square; the day's overview is in Today; your own actions are in My Space. You write to your colleagues in Messages and see your own meetings in Calendar → My calendar; managers follow the daily breakdown by office with the Offices today box. The boxes you see depend on the modules your company has turned on and on the Board layout; if you do not have a box, that feature is turned off in your company.
Who: Employee · Manager (Offices today and the office report) · For notification settings, see 09. Notifications; for reports, see 19. Reports.
In this chapter
- Getting to know the Board
- Today: the day's overview
- My Space
- Offices today (managers)
- Office report: day and month
- Opening your payslip and confirming receipt
- Reading company announcements
- Liking and congratulating on an announcement
- Sharing an announcement on LinkedIn
- Reading content in your own language (translation)
- Answering a company survey
- Reading and confirming company policies
- Answering a Pulse survey
- Searching the Wiki
- Asking the Wiki a question (AI)
- Adding and editing Wiki articles
- Announcing a Wiki article to its readers
- Following vision and goals
- Adding and updating a personal goal
- Following Team Square
- Posting on Team Square
- Responding to an invitation and voting in a survey
- Sharing a venue recommendation
- Sharing a "Heads-up" alert
- Celebrations and birthdays
- Entering your birthday
- Sending a suggestion, complaint or question
- Following the reply to your submission
- Messages: connecting to Google Chat
- Chatting in Messages
- Starting a new message
- Hiding meeting chats and conversations
- Removing the Messages connection
- Viewing the company calendar
- Viewing your own meetings (My calendar)
- Subscribing to the company calendar
- My tasks
- Important links
- Onboarding checklist for new employees
- Searching the Board
Getting to know the Board
Who: Employee · Where: On a phone, bottom menu Announcements, Team, Tools (on a computer, Board on the left)
What it does: Shows what you find in each part of the Board.
On a phone, the Board is spread over three buttons:
| Bottom button | Section that opens | What it contains |
|---|---|---|
| Announcements | Company Agenda | Announcements, Wiki, Company policies, Pulse, Surveys, Vision and goals |
| Team | Team Square and Directory | Employee board, Celebrations · 7 days, Team news, Team, Suggestions and complaints |
| Tools | Today, My Space, Calendar, Services | Today: the day's overview, your links, your tasks and From the team; My Space: Onboarding, Work time, My leave, My expenses, My requests, My assets, Customer satisfaction; Calendar: Next 14 days, My birthday; Services: see 07. Internal services |
The red number on a button shows new content in that section that you have not seen yet.
The Top bar is the same on every screen (0.99.15, 0.99.19):
| Item in the top bar | What it does |
|---|---|
| Company logo | Opens the Board and goes to the top of the page. On a computer, if you click it while holding Ctrl (Cmd on a Mac) or with the middle mouse button, the Board opens in a new tab. |
| Messages | Opens the panel where you write to your colleagues. The red number on it is the number of unread conversations. On a phone, only the speech bubble icon shows. It exists only if your company has set up Messages (see Messages: connecting to Google Chat). |
| Bell | Notifications and Waiting for you (see 09. Notifications). |
| Emergency, I’m Safe | Emergency shows for everyone if your company has turned it on. The I’m Safe button exists only for emergency responders and Admin; when a check-in starts, the other employees reply from the banner at the top of the screen (see 27. Emergencies, occupational safety and the occupational physician). |
Tip: The sign-out button is not in the top bar; it is at the bottom of My profile (see 00. Getting started).
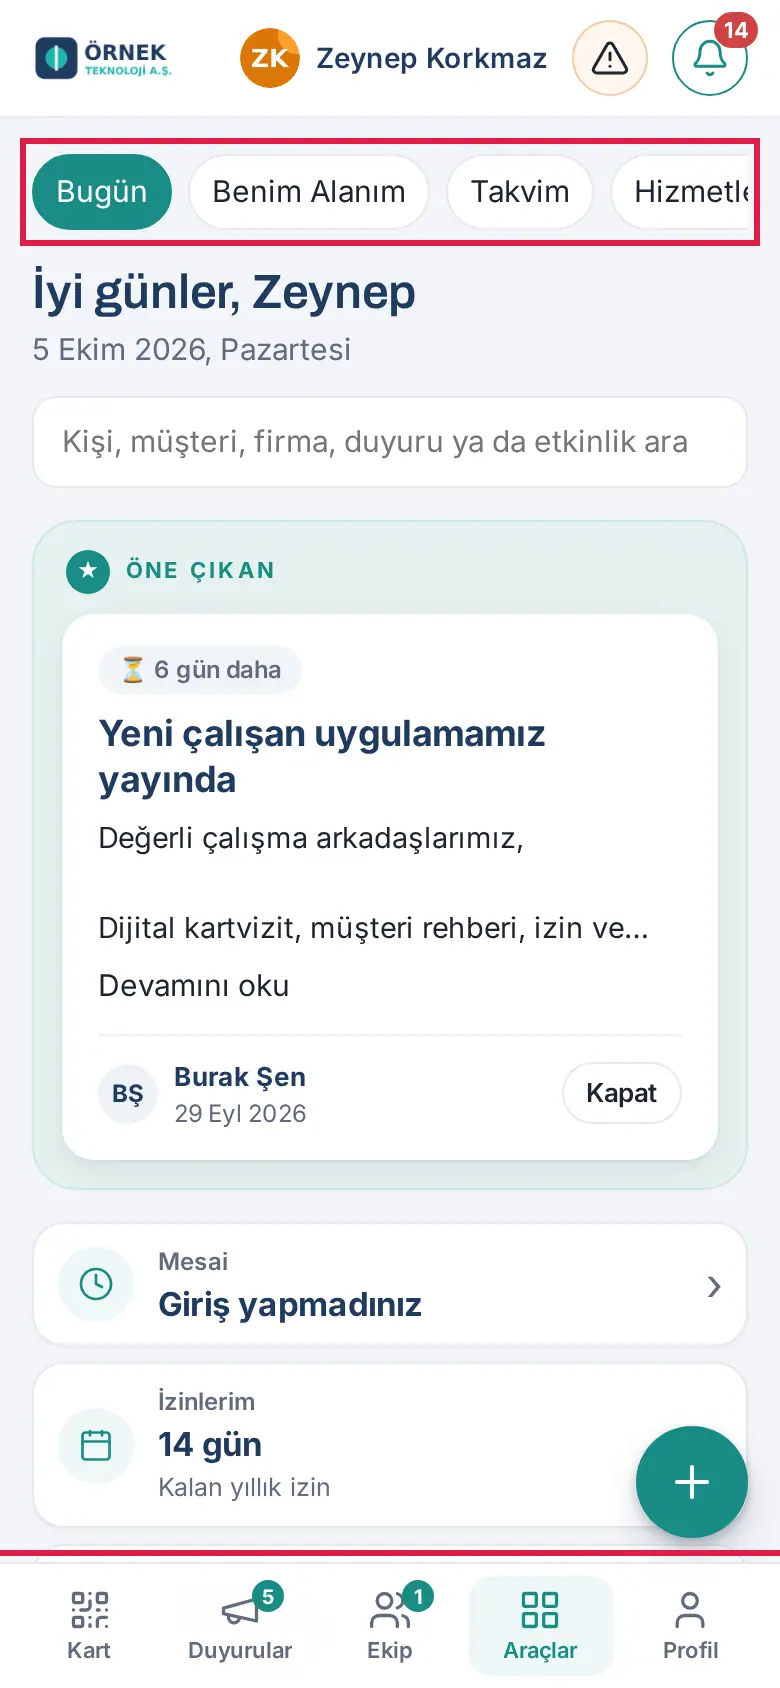
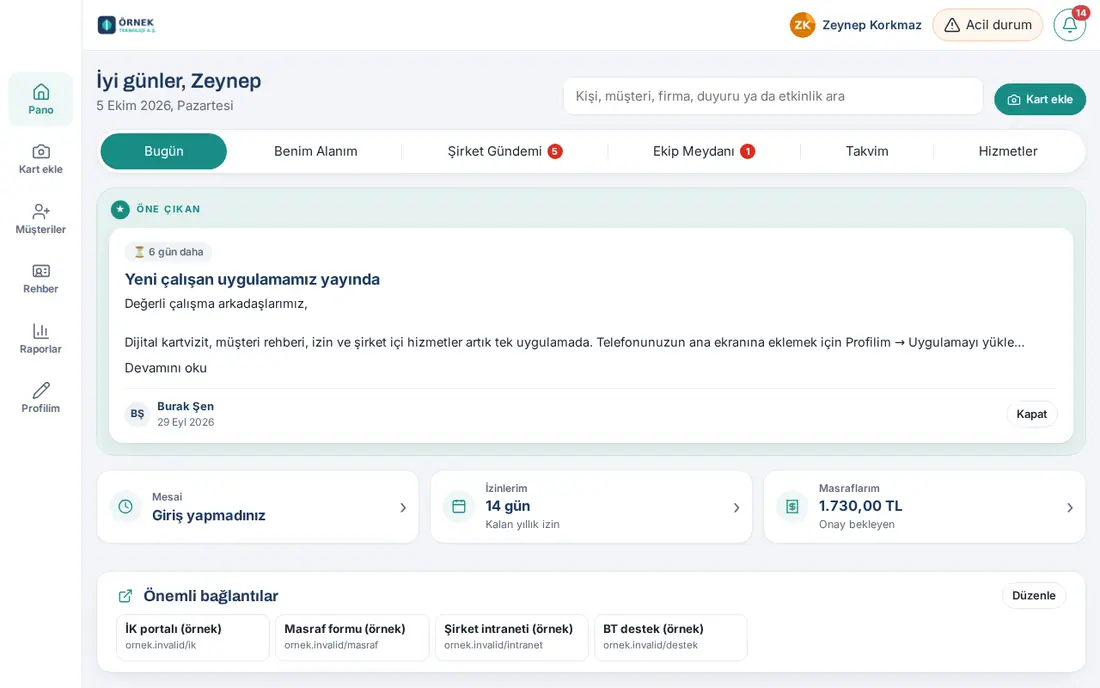
On a computer, click Board in the left menu. The tabs at the top are, in order: Today, My Space, Company Agenda, Team Square, Calendar and (if turned on) Services. The Today tab is the same as the Today screen on the phone. The My Space tab shows only if at least one of its boxes (work time, leave request, expenses, requests, assets, onboarding or customer satisfaction) is turned on for you (see My Space).
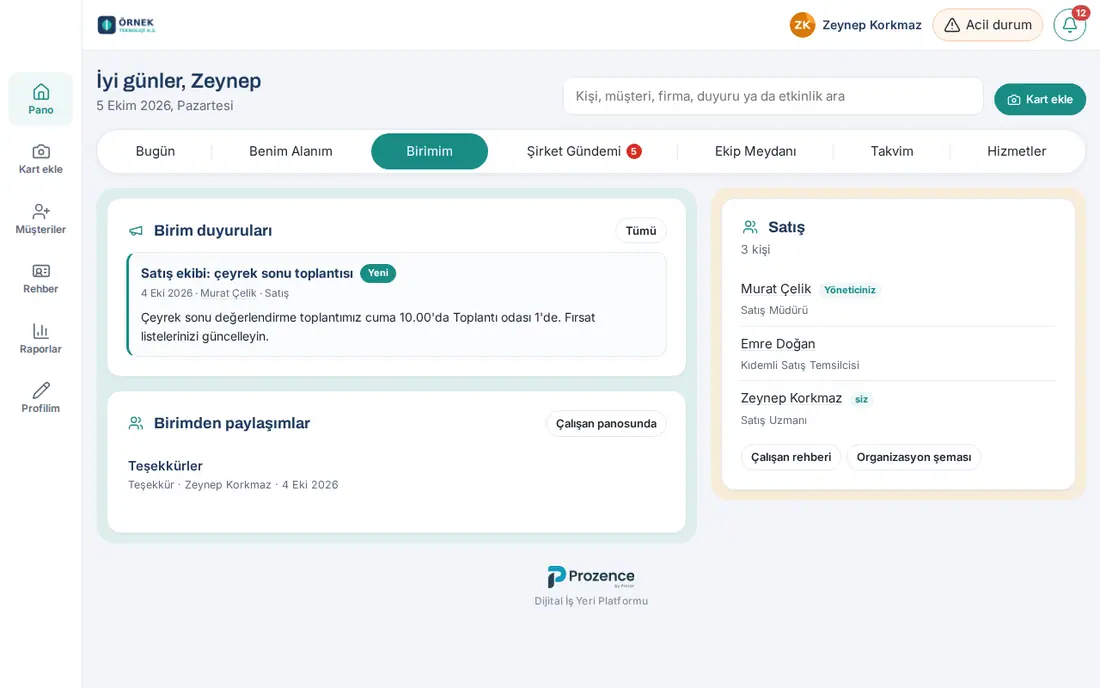
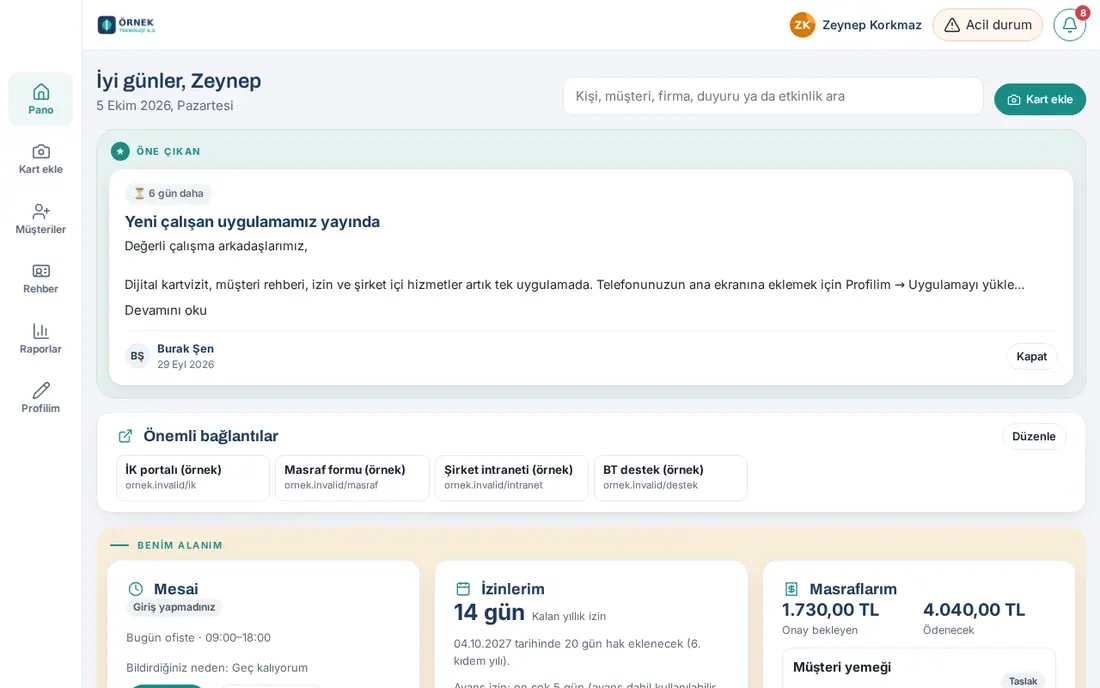
Your company may have chosen a different layout for the Board:
- Unit-focused layout: The My unit tab is added after My Space. Here you see your unit's announcements (Unit announcements), posts from your unit (Posts from your unit) and the list of your unit colleagues.
- Single-page layout: There are no tabs. At the top (below the Featured announcement) is the Important links strip, and below it the My Space row (Work time, My leave, My expenses and your other personal boxes that are turned on, side by side). Below it, three columns stand side by side: Company Agenda (including the Wiki and Pulse), Team Square and Today (your tasks, card, team, calendar, birthdays…). At the bottom, if your company has turned it on, there is a full-width Services row; the service boxes are spread over several columns.
Tip: Your company decides the Board layout and the start screen on the phone. To choose your own start screen, see 00. Getting started.
Today: the day's overview
Who: Employee · Where: Tools → Today (on a computer, Board → Today)
What it does: Collects the important information of the day and your own tasks on one screen. For details, you go to the related section.
- Tap Tools in the bottom menu. The Today tab opens. On a computer, Today is the first tab of the Board.
- If there is a Featured announcement, it appears at the top of the screen. Read all of it with Read more. When you finish, tap Close; if the announcement requires confirmation, the button is called I have read and understood.
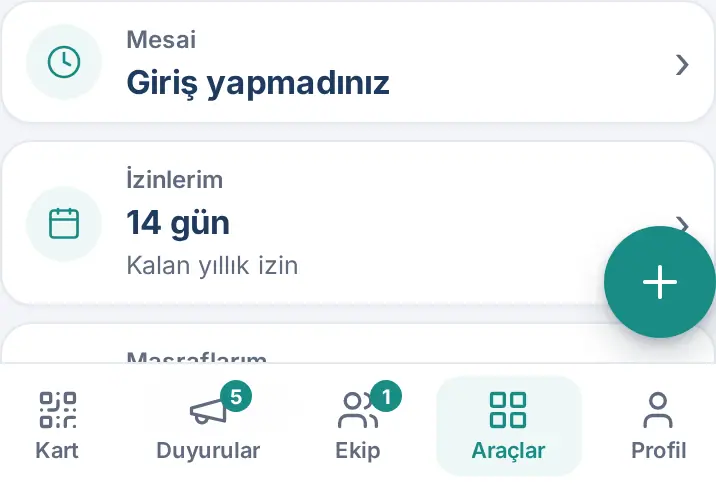
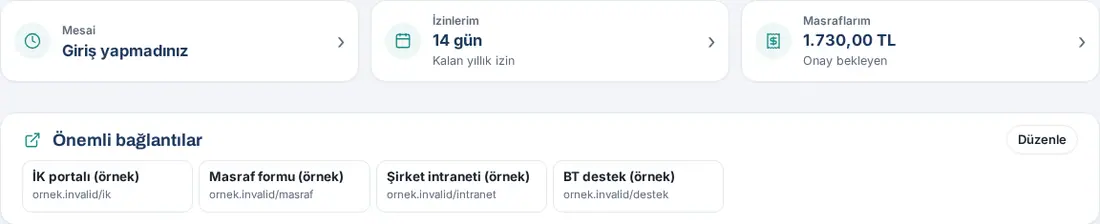
- Right below are the summary tiles: My meetings, Work time, My leave and My expenses. Each tile shows your short status (what it can show is in the table below). If something needs attention, the tile is highlighted in orange.
- Tap a tile. My meetings opens the Calendar tab with My calendar selected (see Viewing your own meetings (My calendar)). The other tiles open My Space and go to the related box (see My Space).
- Right below the tiles, Important links stands in a single full-width row. On a phone, this strip scrolls sideways; swipe it with your finger to see the other links (see Important links).
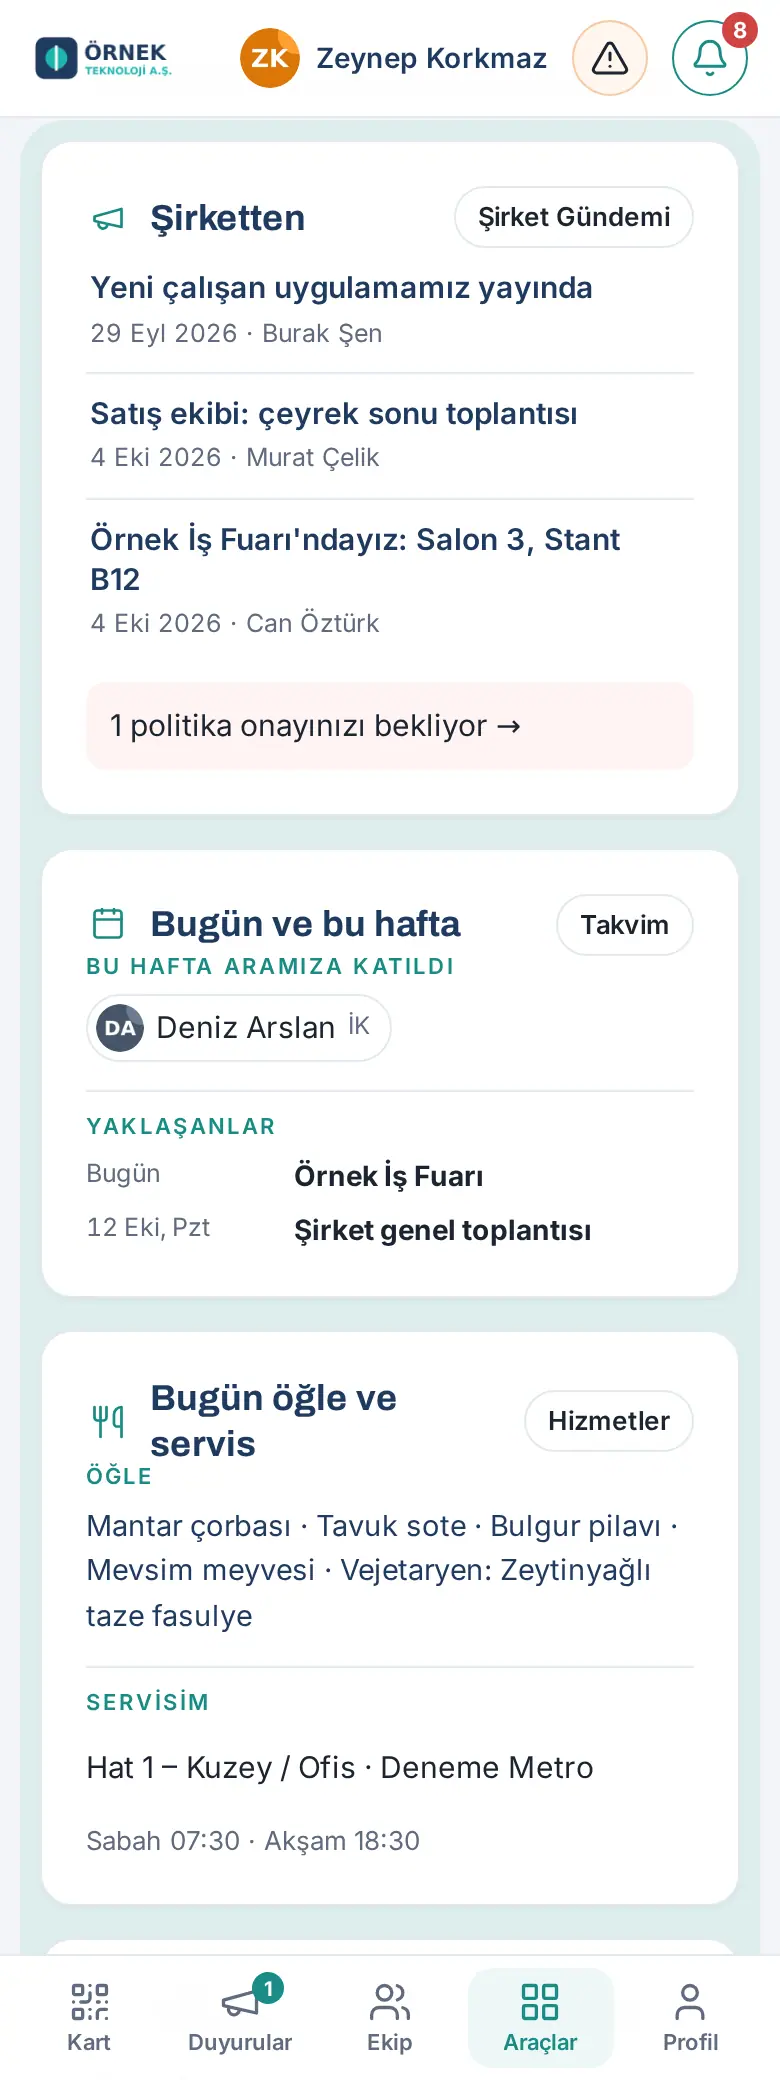
- The From the company box contains the last three announcements. If a policy is waiting for you to read it, the line "… policies awaiting your confirmation →" appears below; tap it to go to the policy list.
- The Today and this week box shows who is celebrating today, who joined us this week and upcoming events. Tap a person to open their profile.
- If your company uses the meal and shuttle modules, the Today’s lunch and shuttle box shows the day's menu and your shuttle route.
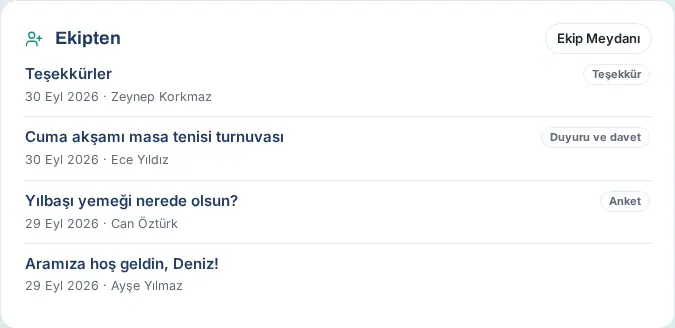
- The From the team box at the bottom of the left column brings the latest from Team Square: the last 3 open posts on the Employee board (posts shared today have the Today badge) and the 2 newest team news items. Tap a post to open its details. For everything, tap Team Square at the top right of the box.
- Your own boxes are in the right column (further down on a phone): My sales summary, My tasks and My card. If you are a manager or a work time owner, the Offices today box is above them (see Offices today (managers)).

What do the summary tiles show?
| Tile | When it appears | Large text | Bottom line | When you tap it |
|---|---|---|---|---|
| My meetings (0.99.33) | If your company has set up the Google Workspace or Microsoft 365 calendar connection and My calendar is not turned off | The time and name of today's next meeting (e.g. "15.00 · Mavi Lojistik — proposal meeting"); "No more meetings today" if there are no other meetings today; "Could not be read" if the calendar cannot be read | "1 more meeting today" or "Last meeting today" | Calendar → My calendar |
| Work time | If work time (PDKS, time and attendance) is turned on | Your status today: "Not checked in", "At the office", "From home", "Remote", "On site", "You've checked out" | "In 08:52", "Today: 6 h 10 min" or, in orange, "Missing check-out: …" | My Space → Work time |
| My leave | If leave requests are turned on | Your remaining annual leave (e.g. "14 days") | "Annual leave remaining", "Pending approval: 2 days"; if you are a manager, "Awaiting approval (n)" in orange | My Space → My leave |
| My expenses | If expenses are turned on | The amount awaiting approval or to be paid; otherwise "No pending expenses" | "Awaiting approval", "To be paid"; if you are an approver, "Awaiting approval (n)" in orange | My Space → My expenses |
Tip: The button at the top right of each box (Company Agenda, Calendar, Services, Team Square) takes you to the detailed section.
Important:
- Summary tiles show only for the modules that are turned on in your company. The single-page layout has no summary tiles; Important links and My Space are open at the top of the page.
- The From the team box exists only in the tabbed and unit-focused layouts; the single-page layout does not have it because the Team Square column is already visible. If there are no posts or news to show, the box does not appear.
- The Onboarding and Customer satisfaction boxes are no longer in Today; they are in My Space.
The other boxes in Today are described elsewhere:
- My sales summary: 04. Customer directory
- My tasks and Important links: at the end of this chapter (see My tasks)
- My card: shows how many times your card was viewed and saved to contacts in the last 30 days. Open my card opens your card, Share opens the sharing options (see 01. Digital business card and Identity Kit).
My Space
Who: Employee · Where: Board → My Space (on a phone, Tools → My Space)
What it does: Brings your personal actions together in one place. You start and end your work time, request leave, enter expenses, request advances, open your payslip, follow your requests and confirm the items assigned to you. If you have just started, your onboarding checklist is also here.
Before you start: My Space shows only if at least one of its boxes is turned on in your company: work time (PDKS), leave request, expenses, payroll, requests, assets, occupational physician, purchasing, onboarding or customer satisfaction. You also see it if you are the owner of one of these modules.
- On a phone, tap Tools in the bottom menu and select My Space in the strip at the top. On a computer, click the My Space tab on the Board.
- The boxes that are turned on in your company appear in this order:
- Onboarding: shows only if your onboarding process is running or you were given an onboarding task, and it is the first box. See Onboarding checklist for new employees.
- Work time: starting and ending work time, monthly summary, correction requests. See 22. Time and attendance.
- My leave: your remaining leave, requesting leave and the status of your requests. See 21. Employee leave.
- My expenses: adding expenses and receipts, Request advance, per diem (harcırah). See 17. Expenses, business advances and per diem.
- My payslips: your monthly payslips and their receipt status. See Opening your payslip and confirming receipt.
- My requests: a short list of your open requests (see below). For the whole requests module, see 23. Requests.
- My assets: the company items handed over to you and receipt confirmation. See 28. Fixed assets and asset assignment.
- Occupational physician: appointments and encrypted written consultations with the occupational physician (Book appointment). See 27. Emergencies, occupational safety and the occupational physician.
- Purchasing: your purchase requests and + Purchase request. See 24. Parcels, mailroom and purchasing.
- Customer satisfaction: the last 90 days' results of the satisfaction survey in your email signature. See 02. Email signature.
- Do your action with the buttons inside the box. Work time, My leave and My expenses are the same as in the previous version. Onboarding, My assets and Customer satisfaction appear as short cards (see below).
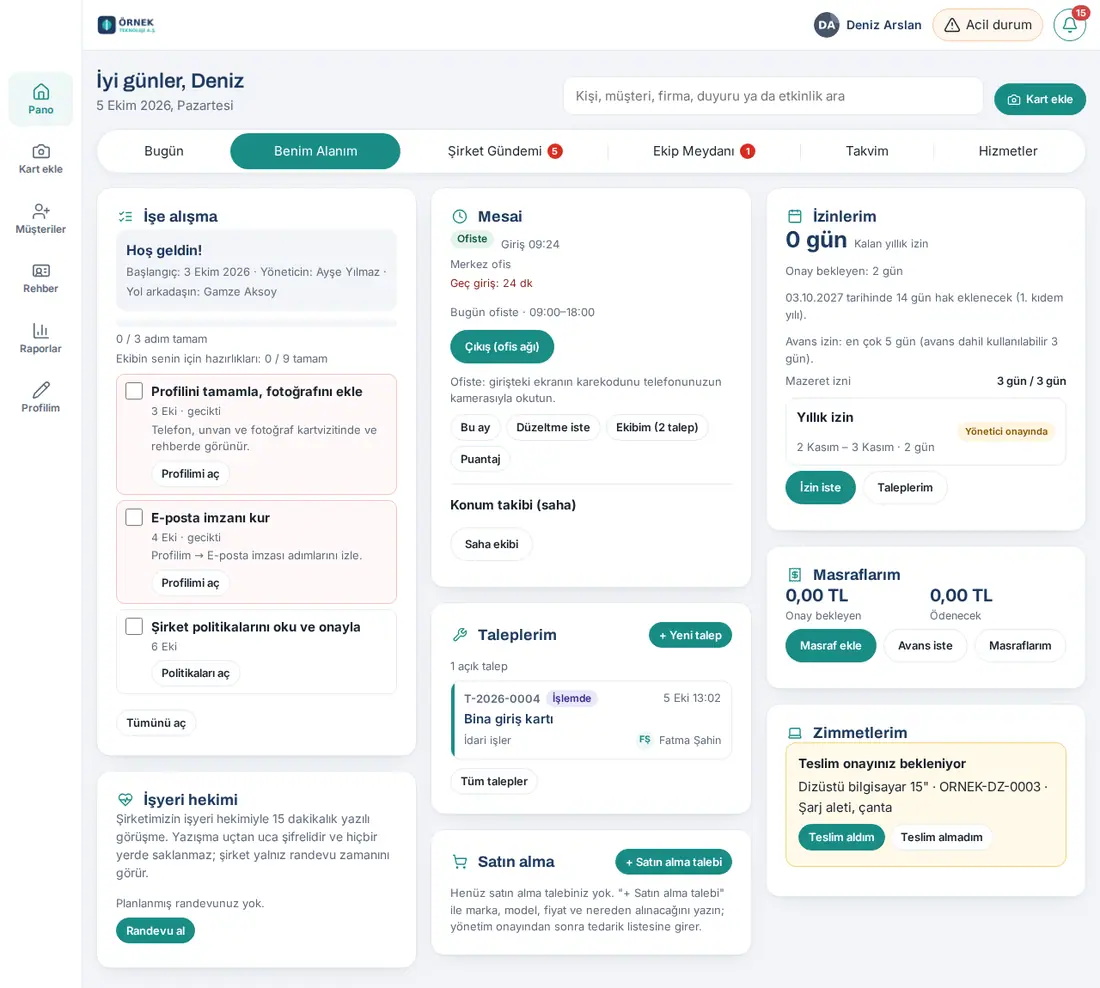
My requests short list:
- The top of the box shows how many open requests you have (e.g. "2 open requests"). Open requests are those with the status New, In progress, Waiting for info or Resolved; at most 3 of them are listed. Tap a request to open it.
- For a new request, tap + New request.
- For all your requests, tap All requests. Services → Requests opens; the whole requests module (including the Incoming requests queue for owners) is there.
Short card, Open all and Collapse: Onboarding, My payslips, My assets and Customer satisfaction are shown as short cards. If there is more than the card shows, an Open all button appears (in the card's last row of buttons, for example next to Processes; at the bottom of the card if it has no button row); tap it to open the card at full width in the grid. To bring it back to its previous size, tap Collapse. On a computer, the boxes are arranged in three columns and each box takes only its own height; no gap is left next to a tall box, and shorter boxes fill the space below.
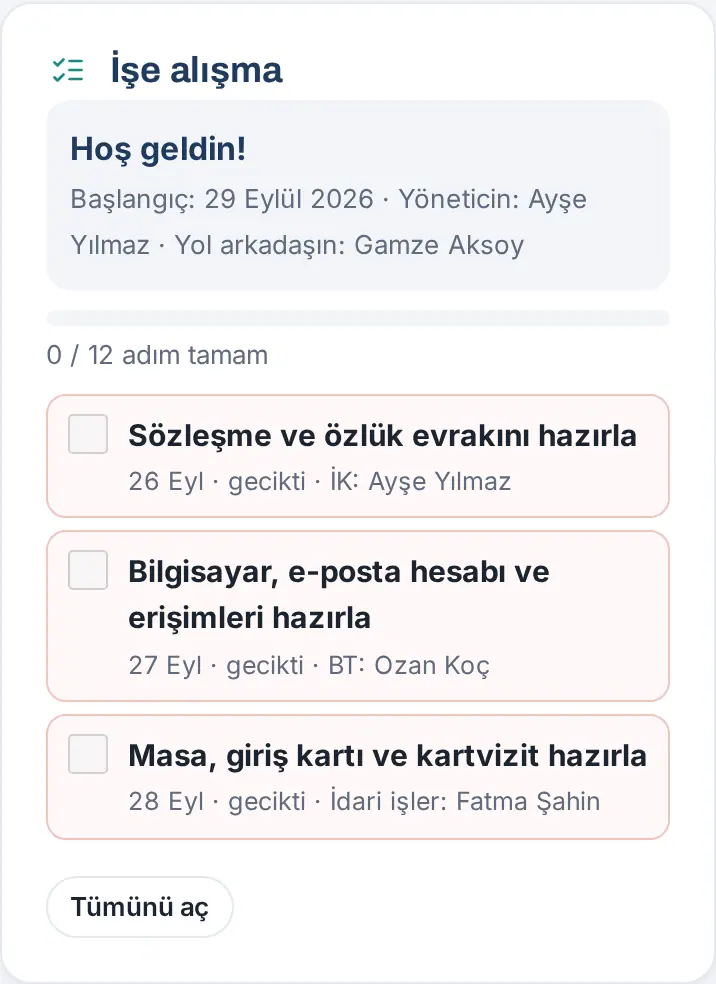
- Onboarding: Welcome!, the start date, the manager and buddy line, the progress bar, "x / y steps done" and only the next 3 steps that are not done. The welcome text and the completed steps are in Open all. If you were given tasks for someone else, the first 3 of your tasks show. If you come from a notification or from Waiting for you in the bell, the card opens fully.
- My payslips: the 3 newest payslips and all payslips awaiting your receipt show. Older months are in Open all.
- My assets: items waiting for your receipt confirmation always show; of your other items, the first 3 and the line "and N more items". The description text and the asset owner's My assets / Assets tabs are only in Open all. When you collapse the card, it goes back to the My assets view.
- Customer satisfaction: the rate and the breakdown show; the short card shows the line "Recent comments: n", and the comments themselves are in Open all. For owners, the Report button (Reports → Customer satisfaction) stays on the card; the settings are in Admin → Modules → Customer satisfaction.
Shortcuts to My Space:
- Tap the Work time, My leave or My expenses tile at the top of Today (see Today: the day's overview).
- The work time, leave, expense, payslip, onboarding and asset rows in the bell (Waiting for you) and the notification links on these topics also open My Space (see 09. Notifications).
By Board layout:
- In the Tabbed and unit-focused layouts, My Space is the tab right after Today. Its short summary shows at the top of the Today tab.
- In the single-page layout there are no tabs and no summary tiles. My Space is a row at the top of the page, below Important links; its boxes stand side by side.
Tip: If you are a manager, or an HR or accounting owner, the approval, balance, timesheet and expense actions are also inside the same boxes (see 29. Time and attendance management, 30. Employee leave management and 18. Expense management and accounting). For asset and fixed asset owners, see 31. Request, mailroom, purchasing and fixed asset management.
Offices today (managers)
Who: Manager · Work time owner and viewer · Admin · Where: Tools → Today → Offices today (on a computer, Board → Today, right column)
What it does: Shows at a glance, for each office, how many people came to work today, how many did not come, who is on leave, remote or in the field, and how many guests came.
Before you start:
- The box appears only if work time (PDKS) is turned on in your company.
- Admin, work time owners and the people who are Work time viewers in the permission table see all employees and guests. "All employees" appears at the bottom of the box.
- Managers see only their team (the employees who report to them directly and indirectly) and their team's guests. "Your team" appears at the bottom of the box.
- Other employees do not have this box.
- For a correct picture, the office each employee belongs to must be selected in the Work time settings (Work time → Settings → Saved offices → Choose employees; see 29. Time and attendance management). Employees without a selected office are counted in the No office assigned row.
- Tap Tools in the bottom menu; Today opens. On a computer, open the Today tab of the Board.
- Go to the Offices today box. On a computer, it is at the top of the right column, above My sales summary and My tasks; on a phone, these boxes are further down.
- Read the line below the heading: the scope and the time (e.g. "All employees · as of 13:27"). On weekends and public holidays, it says "Not a working day; absences are not counted".
- Each office is a separate row: the office name at the top and the numbers below it (e.g. "Head Office" — "9 present · 1 absent · 2 remote · 3 guests"). present always shows; absent shows only on working days; on leave, remote, in the field and guests show only if they are greater than zero. If there are employees without a selected home office, the No office assigned row appears at the bottom.
- If some of the people who came to an office have checked out, "Inside now: N" appears below the row.
- For details, tap an office row: the office report opens with that office highlighted. For the report of all offices, tap Report at the top right of the box (see Office report: day and month).
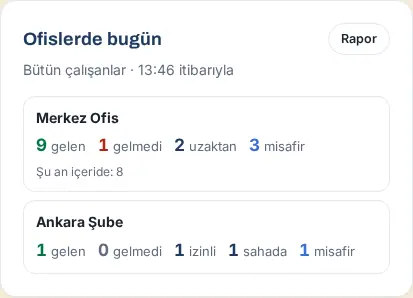
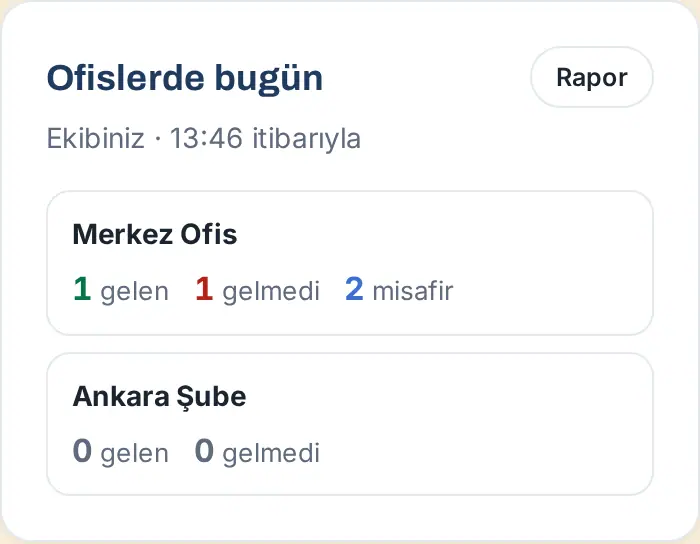
How are people counted? (per person, for that day)
| Situation | In which office | How it is counted |
|---|---|---|
| Has a check-in record at an office | The office where they checked in (where they went) | present. If their home office is a different one, the report shows "home office: …"; they are not counted as "absent" at their home office. |
| Has only a from-home / remote or field record | Their home office | remote or in the field |
| No record, approved leave | Their home office | on leave |
| No record, no leave, working day | Their home office | absent (not counted on weekends and public holidays) |
| Has a work time correction approved by the manager | Their home office | present |
| A visitor was let in that day | The office where the host is checked in at that moment; otherwise the host's home office | guests (those inside and those who left) |
| No home office selected | The No office assigned row | With the rules above |
Tip: The box refreshes each time you open the Board. The numbers do not change second by second; for the current status, refresh the page.
Important: Office settings and assigning employees to offices are the job of the Work time module; you cannot change them from this box. The "absent" number is calculated by the person's current home office.
Office report: day and month
Who: Manager · Work time owner and viewer · Admin · Where: Today → Offices today → Report (or an office row)
What it does: In the Day view, it shows by name, office by office, who came, who did not come, who was on leave, remote or in the field on the day you select, and the guests. In the Month view, it gives the monthly occupancy of the offices and the numbers day by day; you download the table as CSV.
Before you start: You must be able to see the Offices today box. Managers see only their team in the report too; the window shows the note "Your team (employees reporting to you) and your team’s guests."
Day view
- In the Offices today box, tap Report or an office row. The Office report window opens with the Day tab selected.
- To go to another day, use the ‹ (previous day) and › (next day) buttons or the date box. When you are on today, › is disabled. When you are on a past day, the Today button takes you back to today.
- Below the date, for today, you see "current status as of …"; below it is a short explanation of the counting rule.
- Each office is a separate section: the office name, "N assigned employees" and the numbers. Below them are expandable lists: Present, Absent, On leave, Remote, In the field, Guest (with the number of people next to each). To open or close a list, tap its heading. An Absent list longer than 8 people starts closed.
- Present: name and first check-in time; for today, the inside or left label; for someone who came from another office, "home office: …".
- Guest: the visitor's name and company, "→ host", the check-in and check-out time; the inside label if they are still inside.
- If you opened the report from a row, that office's section is highlighted and the page scrolls to it.
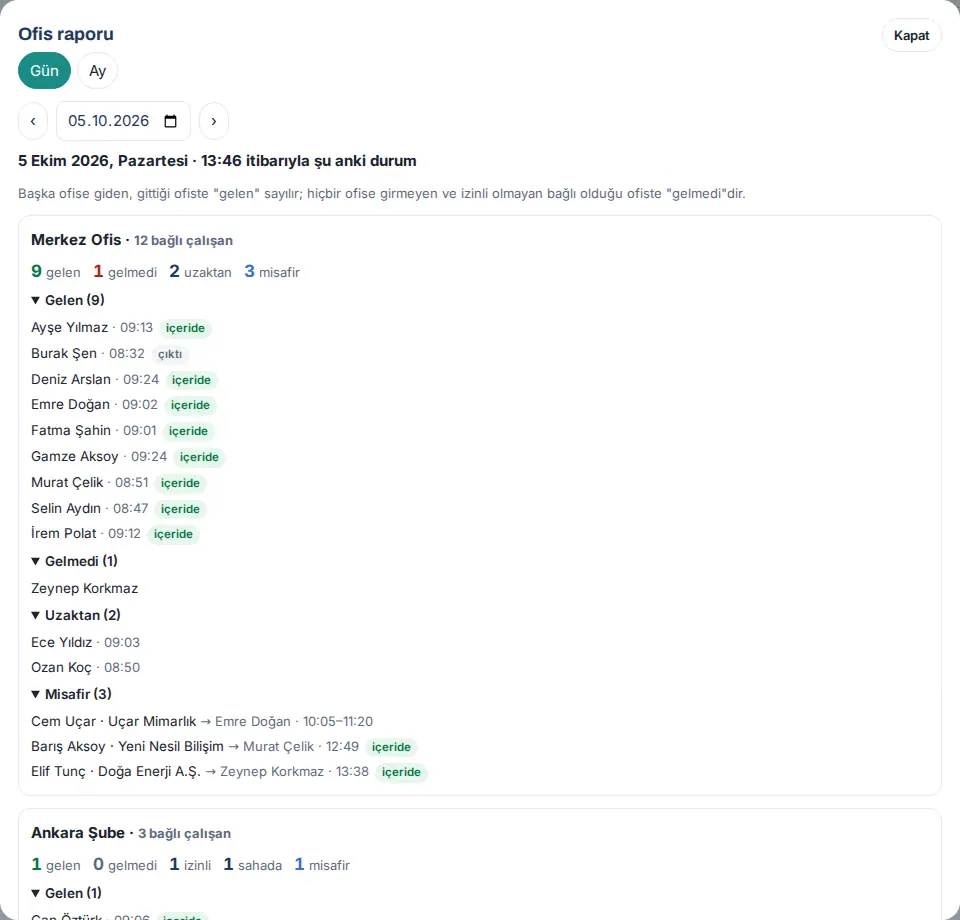
Month view
- At the top of the window, tap Month. The current month opens.
- Go to previous months with ‹; › appears only when you are on a past month.
- Read the office summary table at the top: Office, Assigned staff, Working days, Avg. present / day, Occupancy, Absent, On leave, Remote, In the field, Guest.
- In the Day by day table below it, the newest day is at the top. Each cell has the format "present / absent · +guests". Weekend and holiday rows have a gray background and do not show "absent".
- To see the list of people for a day, tap the date of that day; the report switches to the Day view for that day.
- To download the table, tap Download CSV. The file downloads with the name
ofis-raporu-<month>.csvand the message "CSV downloaded." appears. Columns: Date, Office, Assigned, Present, Present from another office, Absent, On leave, Remote, In the field, Guests, Working day. - To close the window, tap Close (on a computer, the Esc key also closes it).
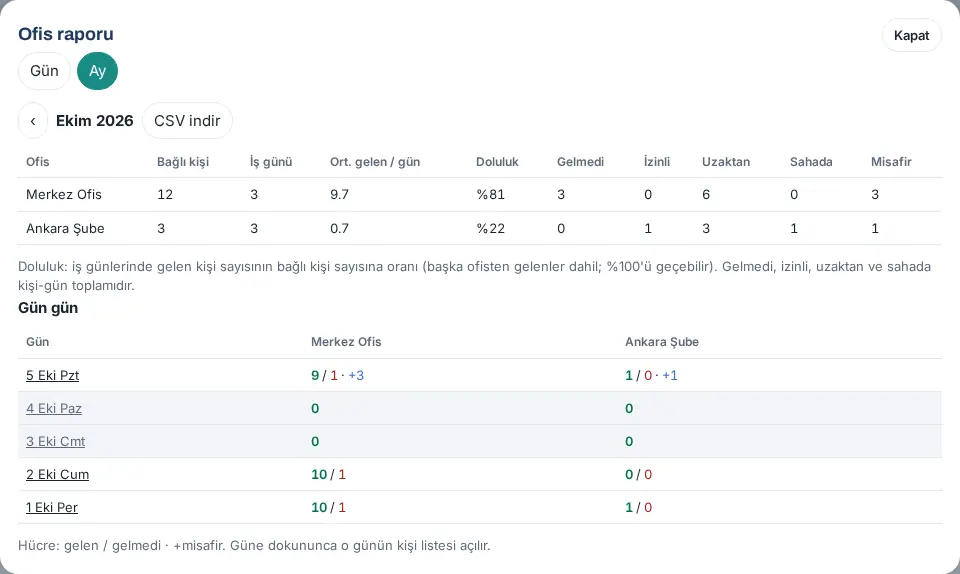
How is occupancy calculated? It is the ratio of the number of people who came on working days to the number of assigned people. Because people who came from another office are also counted, it can be more than 100%. The Absent, On leave, Remote and In the field columns are person-day totals for the month.
Common messages:
- "There is no report for a future day." / "There is no report for a future month." — You selected a future date.
- "The office breakdown is visible to managers and attendance officers." — You are not allowed to see the report.
- "No employees are assigned to this office. Choose them in Work time → Settings → Saved offices → "Employees"." — No employees have been assigned to that office yet.
Important:
- For past days too, "absent" is counted by the employee's current home office (the history of office changes is not kept).
- In the month report, past days are kept in the cache for a few hours; the cache is refreshed when an employee's office changes.
- In the Prozence phone app, downloading the CSV may not work, depending on your device; if needed, download the report from a computer.
Tip: For working hours and late arrivals per person, see 19. Reports.
Opening your payslip and confirming receipt
Who: Employee · Where: Board → My Space → My payslips
What it does: You open the monthly payslip that HR uploaded. The first time you open a payslip is recorded as confirmation of receipt (tebliğ): the time, the verification method and the document's fingerprint are stored. This proves that you received the payslip without signing a paper.
Before you start: The My payslips box shows only if your company has turned on the payroll module. When a new payslip arrives, the top of the box says "1 payslip awaits your confirmation of receipt"; if your company chooses, you also get a phone notification.
- In My Space, find the My payslips box. Each row shows the period (e.g. "September 2026") and the status: Awaiting receipt or Receipt confirmed.
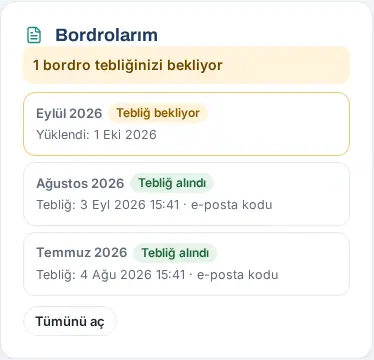
- Tap the payslip marked Awaiting receipt. The window shows where the code will be sent (e.g. "The code is sent to ze••••@ornek.invalid.").
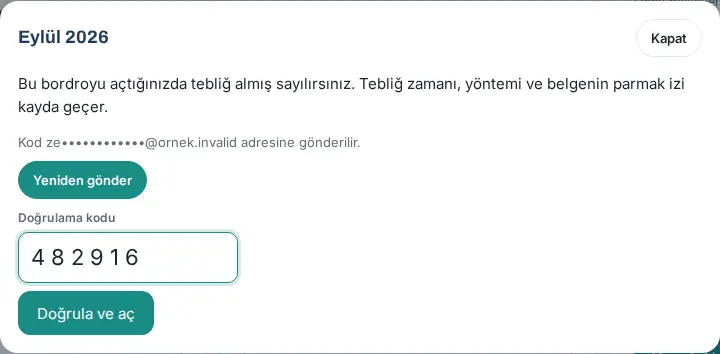
- Tap Send code. Depending on the company setting, the code arrives at your email address or by SMS on your mobile phone. The code is valid for 10 minutes; if it does not arrive, tap Resend.
- Type the 6-digit code in the Verification code box and tap Verify and open.
- The payslip opens in the window. The time and method of receipt are shown at the top. Open PDF opens the payslip in a new tab, Download saves it to your device.
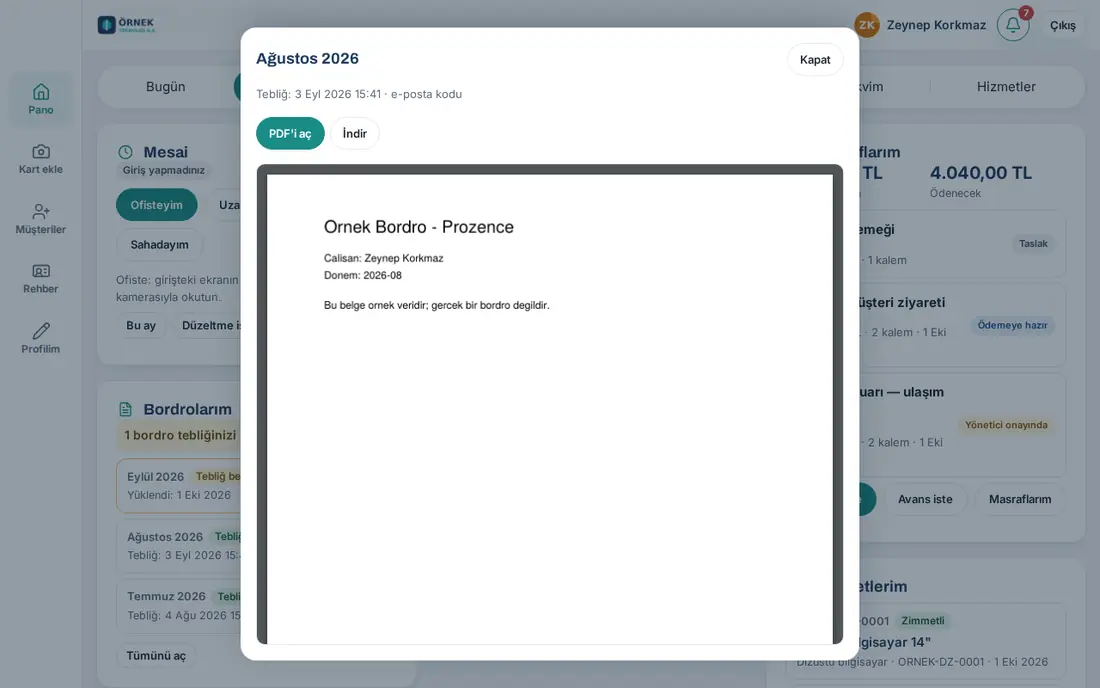
Opening a payslip with receipt already confirmed: Tap the row marked Receipt confirmed. No code is asked; the payslip opens directly.
Differences by company:
- Direct opening: If your company does not ask for a code, the window shows the I confirm receipt, open button. Tap it to open the payslip; the time and the IP address are still recorded.
- Link: If your payslip is kept in your company's own system, the window shows an Open payslip button and the payslip opens in a new tab. The receipt record is still kept here.
- Adjustment: If HR corrects a payslip for which you already confirmed receipt, you see a new row for the same month with the Adjustment label. Open the new payslip with the same steps.
Tip: If the window says "There is no email address on your card" or "There is no mobile number on your card", the code cannot be sent. Contact HR; HR can choose another verification channel for you. Do not share the code with anyone; HR never asks for your code.
FAQ:
- Can HR see my payslip? Payroll owners (HR) can open the payslip when needed. Every opening is written to the audit log and does not affect your confirmation of receipt.
- I opened the payslip by mistake. Is that a problem? No. Confirmation of receipt shows that you received the payslip; if you disagree with its content, contact HR.
Reading company announcements
Who: Employee · Where: Bottom menu Announcements → Announcements box
What it does: You read the announcements of the company and of your department.
- Tap Announcements in the bottom menu. Company Agenda opens.
- In the Announcements box, announcements are sorted from newest to oldest. Announcements pinned to the top have the Fixed label, and announcements featured for a limited time have the Featured · … more days label. Announcements you have not seen have the New label.
- To see only news from the company, tap Company news; to go back to all of them, tap All.
- For long announcements, tap Read more. To shorten them, tap Shorten.
- If an announcement has an attached file, tap the Attachment: … button to open it.
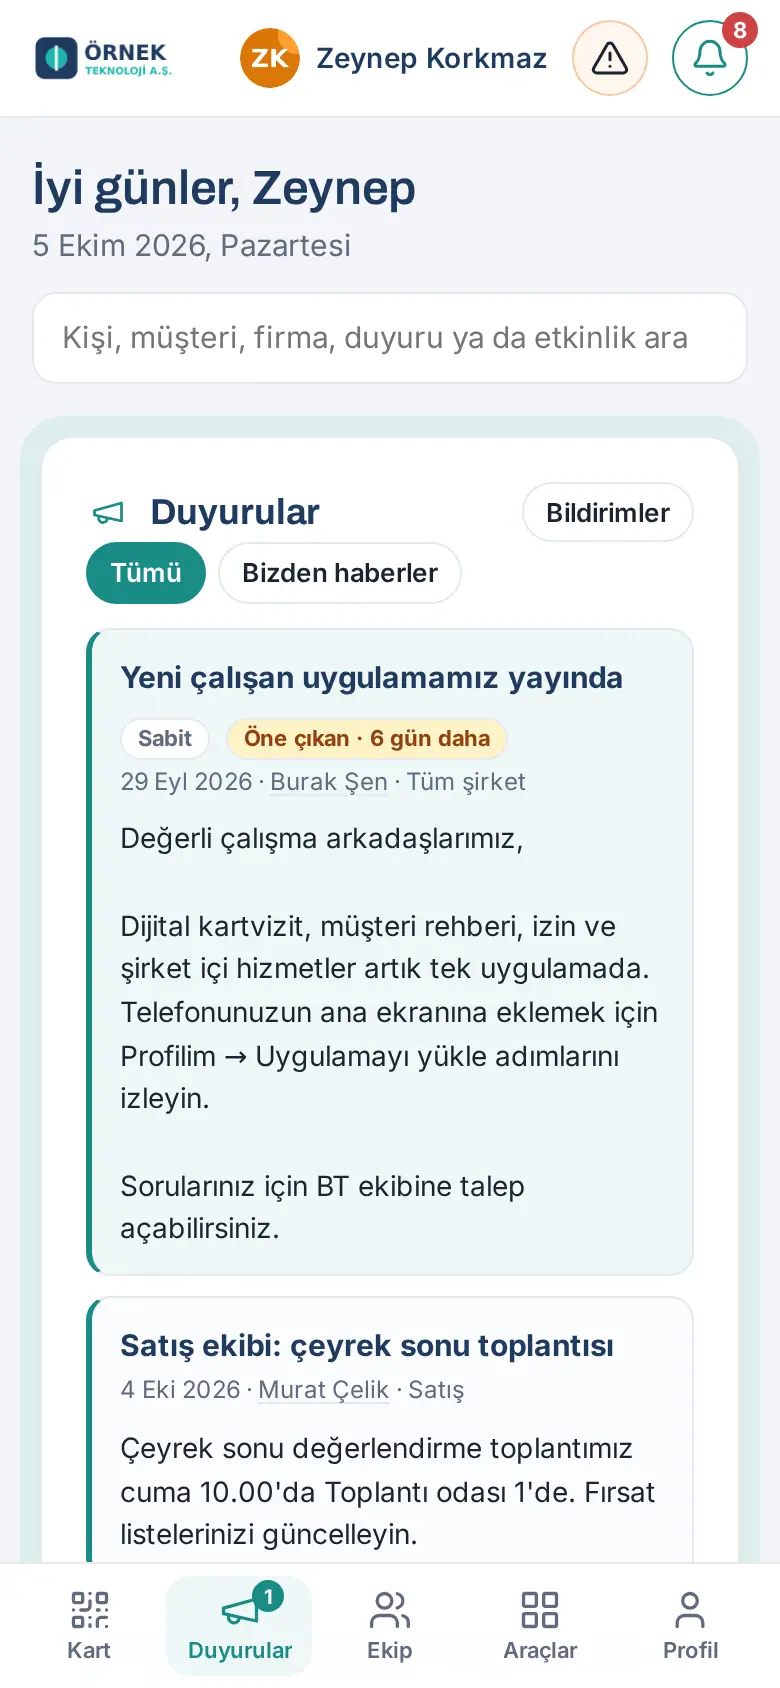
Below each announcement, you see the date, the author and who it was sent to (e.g. Whole company or a department name). Announcements about new employees, new positions and work anniversaries appear in the Team news box in Team Square.
Tip: You select the announcement types for which you get phone notifications with the Notifications button (see 09. Notifications).
Important: You need permission to publish an announcement. If you have permission, the + New announcement button appears in the box. The author and managers see in Reports → Communications how many people saw the announcement and tapped Read more, as numbers only; who read it is not listed (see 19. Reports).
Liking and congratulating on an announcement
Who: Employee · Where: Announcements → Announcements or Team → Team news
What it does: You react to company news, new employees and anniversary announcements.
- Tap the ♡ button below the announcement to like it. If you tap it again, the like is removed. ♡ and 🎉 Tebrik et ("congratulate") appear only on news-type announcements (Company news, new joiners, new positions, work anniversaries); general company announcements do not have them.
- To write a congratulation, tap 🎉 Tebrik et.
- Write your message in the Your congratulations message box and tap Send.
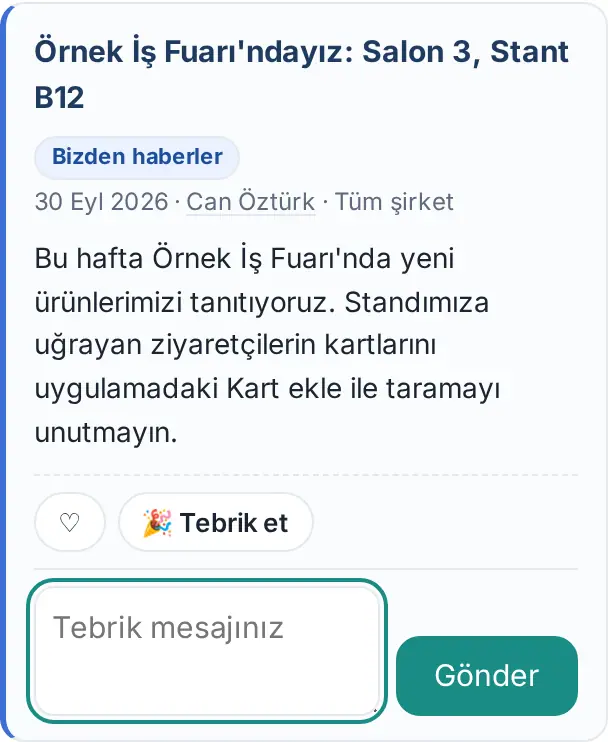
Tip: To delete your own congratulation, tap the × button next to it.
Sharing an announcement on LinkedIn
Who: Employee (sharing) · People allowed to publish announcements (turning it on) · Where: Announcements → Announcements
What it does: Employees share news the company wants to make public (a trade fair, an award, a new product) on their own LinkedIn account with one tap.
The Share on LinkedIn button appears on an announcement only if its author turned this option on. The option can be turned on only for the Announcement and Company news categories sent to the Whole company; it cannot be turned on for announcements sent to a department, for policies, or for person-related announcements such as new joiners, new positions and work anniversaries.
To share:
- Tap the Share on LinkedIn button below the announcement.
- LinkedIn opens in a new tab with the post text ready. If you are not signed in to LinkedIn, sign in first.
- Read the text, change it if you like, and post it on LinkedIn. Nothing is shared until you post it.
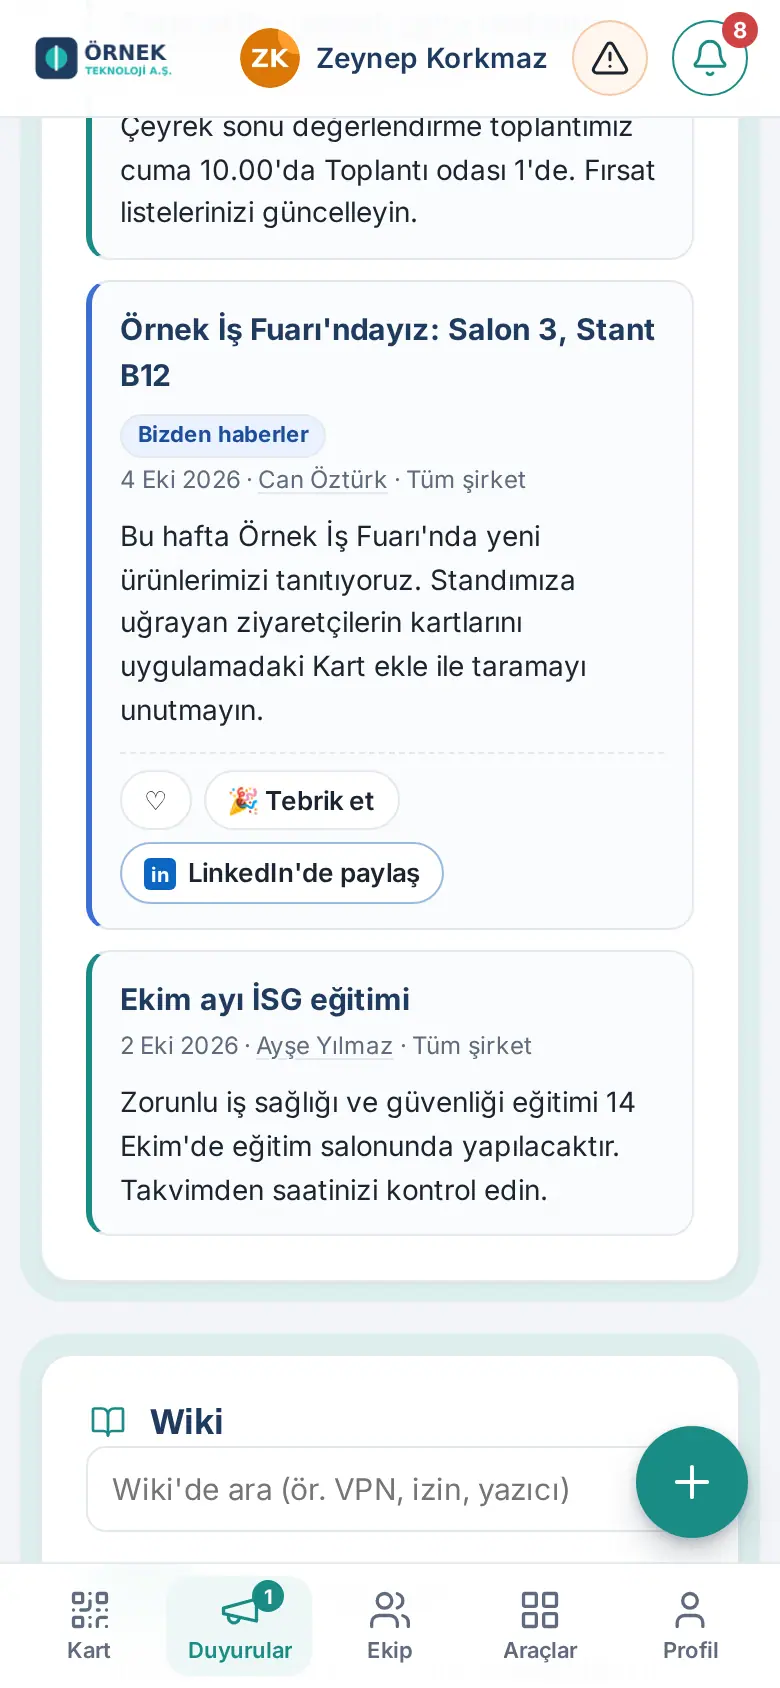
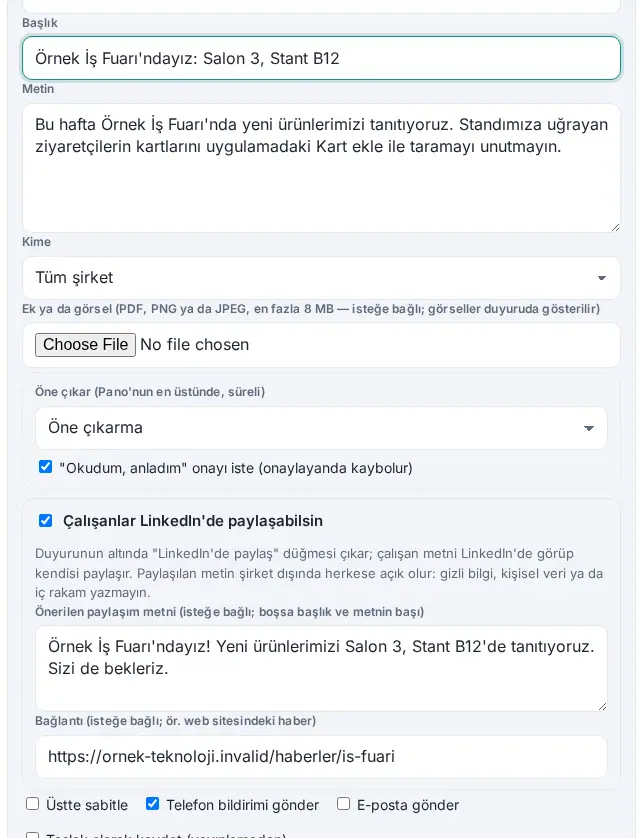
To turn it on while writing the announcement:
- Tap + New announcement, or tap Edit on your own announcement.
- In To, select Whole company; in Category, select Announcement or Company news. With any other selection the box does not appear.
- Tick Employees can share on LinkedIn.
- Optionally, write the Suggested post text (up to 1,200 characters). If you leave it empty, the title and the start of the announcement text are used.
- Optionally, enter the address of the news item on the website in Link. The address must start with https://; the link is added to the end of the text.
- Tap Publish.
Important: The shared text becomes public outside the company. Do not put confidential information, personal data or internal figures in the suggested text.
Tip: The author sees on the card how many people tapped Share on LinkedIn. The same number is in the LinkedIn column in Reports → Communications (see 19. Reports). This number shows who tapped the button; the app cannot know whether the post was actually published on LinkedIn.
Reading content in your own language (translation)
Who: Employee · Where: Announcements, Wiki articles, Team Square posts and comments → Translate
What it does: If your company has turned on content translation, you read announcements, Wiki articles and Team Square posts in your app language. The translation is done by AI.
- Content that can be translated has a Translate button below it. If your app is in Turkish, the button appears only on content written in another language. If your app is in another language, it appears on all content.
- Tap Translate. The title and text appear in your app language; the AI translation · Original: … note below shows the content's original language.
- To go back to the original text, tap Show original.
- When you open the comments of a Team Square post, other people's comments have a small Translate link below them.
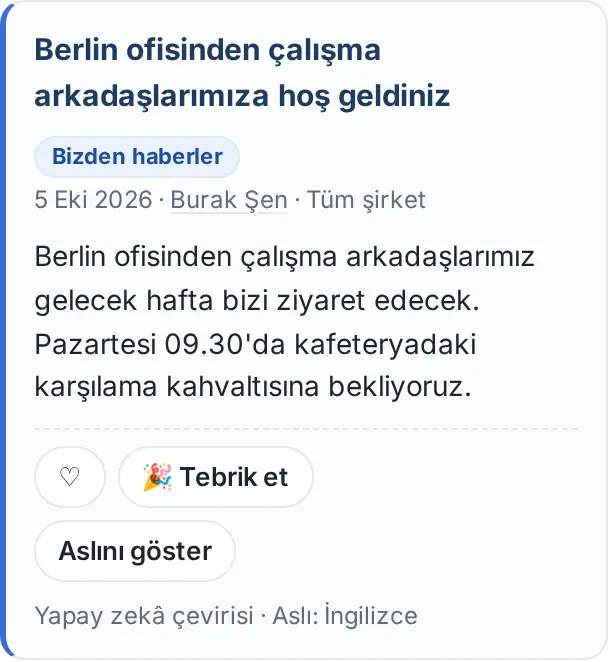
Tip: If your company has chosen Automatic translation and your app is in a language other than Turkish, content is translated automatically as it comes into view. To see the original text, tap Show original as before. You change your app language in My profile (see 15. Multiple companies, language, KVKK and license).
Important: AI translation can make mistakes; base important decisions on the original text. User guide articles are not translated, because the English version of the guide is ready. If you see the warning "Translation isn't available right now. Try again shortly.", try again a little later.
Answering a company survey
Who: Employee · Where: Announcements → Surveys
What it does: You answer the surveys that the company or your department opens.
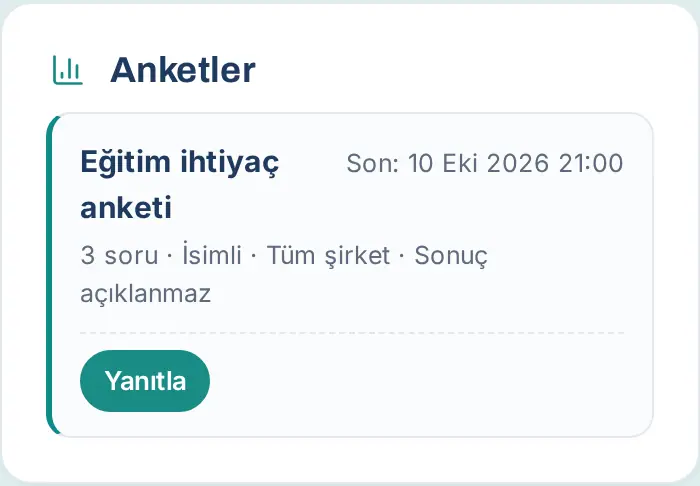
- In the Surveys box, see the survey's name, the number of questions, whether it is named or anonymous, and its deadline.
- Tap Reply.
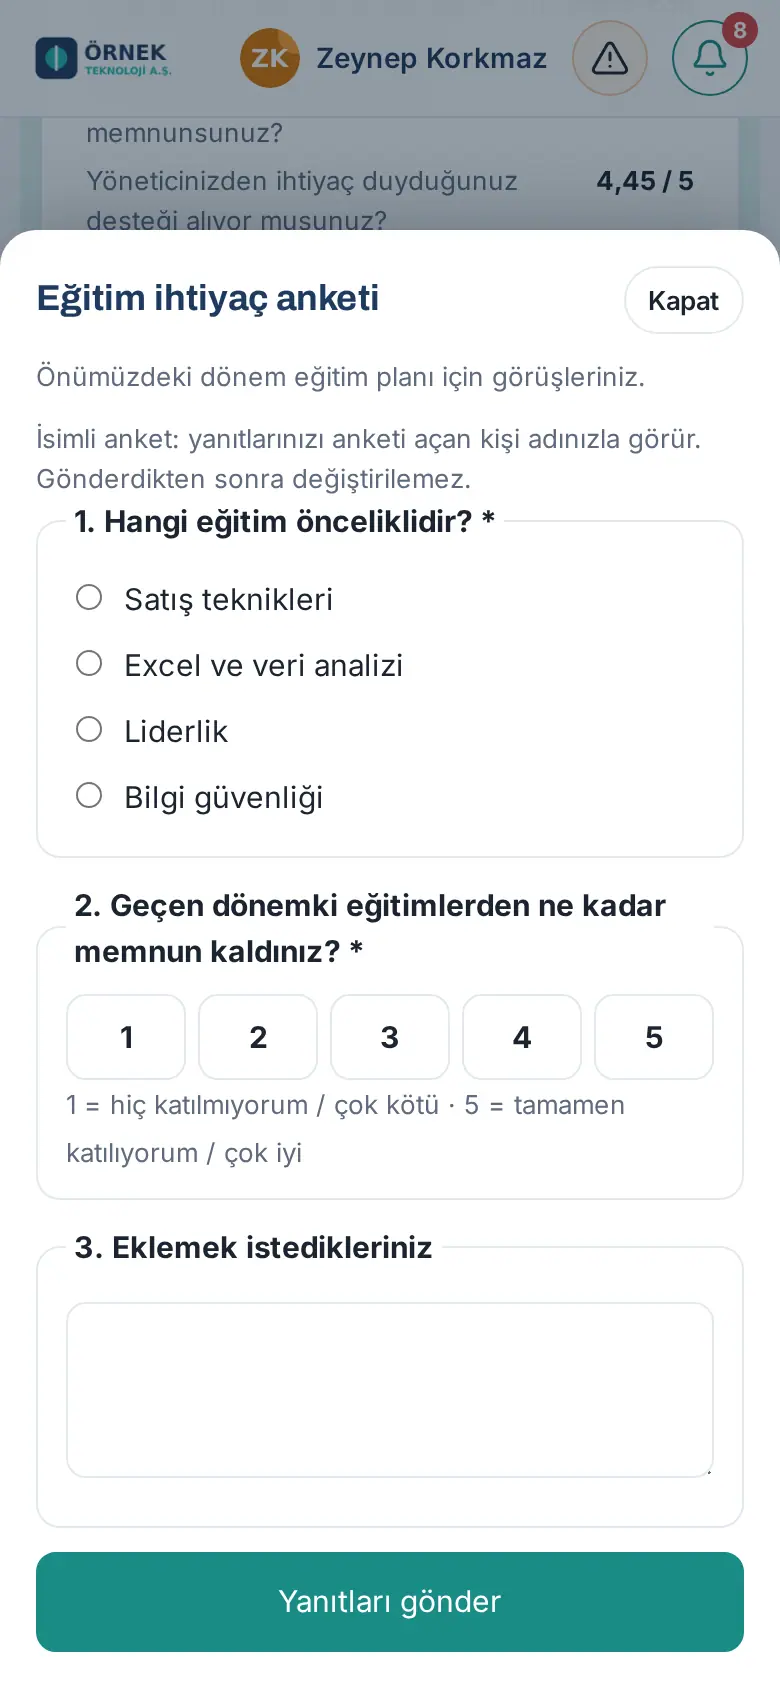
- Read the description at the top of the window. It tells you whether the survey is named or anonymous and whether you can change your response later.
- Answer the questions. Questions with an asterisk (*) are required. In rating questions, 1 means "strongly disagree / very poor" and 5 means "strongly agree / very good".
- Tap Submit responses.
Important:
- In a Named survey, the person who opened the survey sees your responses with your name.
- In an Anonymous survey, your response is not matched with your name; it is only known that you responded.
- If the survey does not allow it, you cannot change your response after you send it. If it allows it, the Change my response button appears until the survey ends; in an anonymous survey, you can change your response only from the device you responded on.
FAQ:
- Can I see the results? The person who opens the survey decides: the results are shown to the respondent immediately, when the survey ends, or never. The survey card shows a note such as "Results are not published".
Reading and confirming company policies
Who: Employee · Where: Announcements → Company policies
What it does: You read the company rules (information security, remote work, etc.). You confirm the policies that require confirmation after you read them.
Before you start: The text "… policies pending" in the box heading shows how many policies are waiting for you.
- In the Company policies box, see the policies. Each one shows the category, the version and the type (Requires confirmation or Information). Status label: for a pending policy, Awaiting your confirmation (policies that require confirmation), Not read (information) or New version, followed by · son … ("due …") if there is a deadline; if the deadline has passed, Expired · …; once done, Approved · … or Read · ….
- Tap the name of the policy. The policy opens on a separate page.
- Scroll to the end of the text and read it.
- For a policy of the Information type, your reading is saved automatically when you reach the end of the text.
- For a policy of the Requires confirmation type, the box at the bottom opens when you reach the end. Tick the I have read and understood the policy and will follow it. box.
- Tap Approve. The text "✓ Approved" appears.
- To go back to the Board, tap ← Board at the top left.
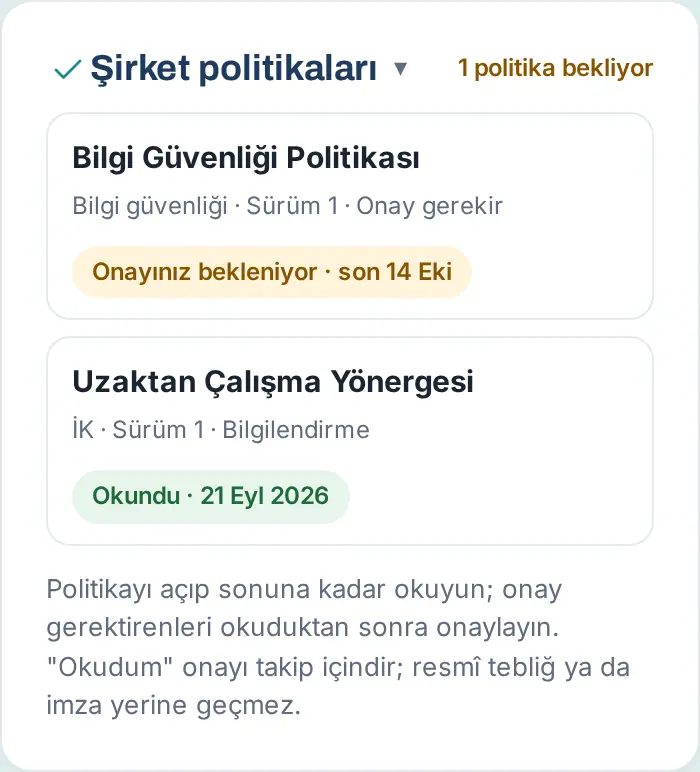
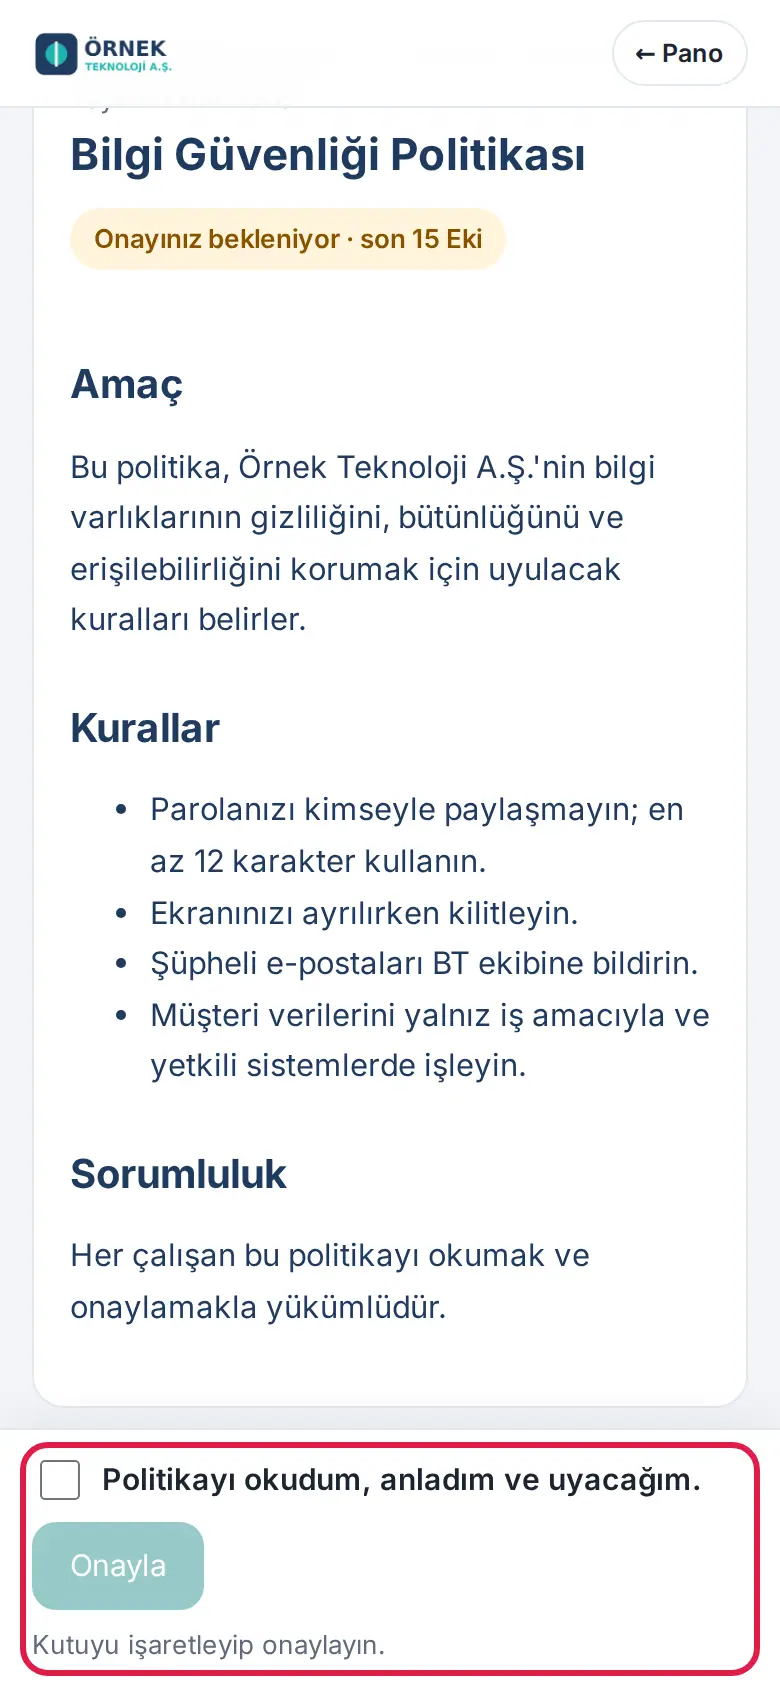
Tip: When you have read all policies, the box moves to the bottom of Company Agenda and stays collapsed. To open it, tap the Company policies heading.
Important:
- The confirmation box does not open before you reach the end of the text; the screen only shows "Read the text to the end to confirm."
- If a policy changes, you are asked to read and confirm the new version again. At the top of the page, the What changed in this version: note summarizes the change.
- You get a reminder notification when the deadline is near and when it has passed.
- As the note at the bottom of the app also says, the "I have read it" confirmation is for tracking; it does not replace an official notification or a signature.
Answering a Pulse survey
Who: Employee · Where: Announcements → Pulse
What it does: Pulse is a short, anonymous satisfaction survey that the company opens at regular intervals (e.g. once a month). It takes about one minute to answer.
- When a round is open, the Pulse box shows This period’s pulse survey is open. Below it, you see the number of questions and the deadline.
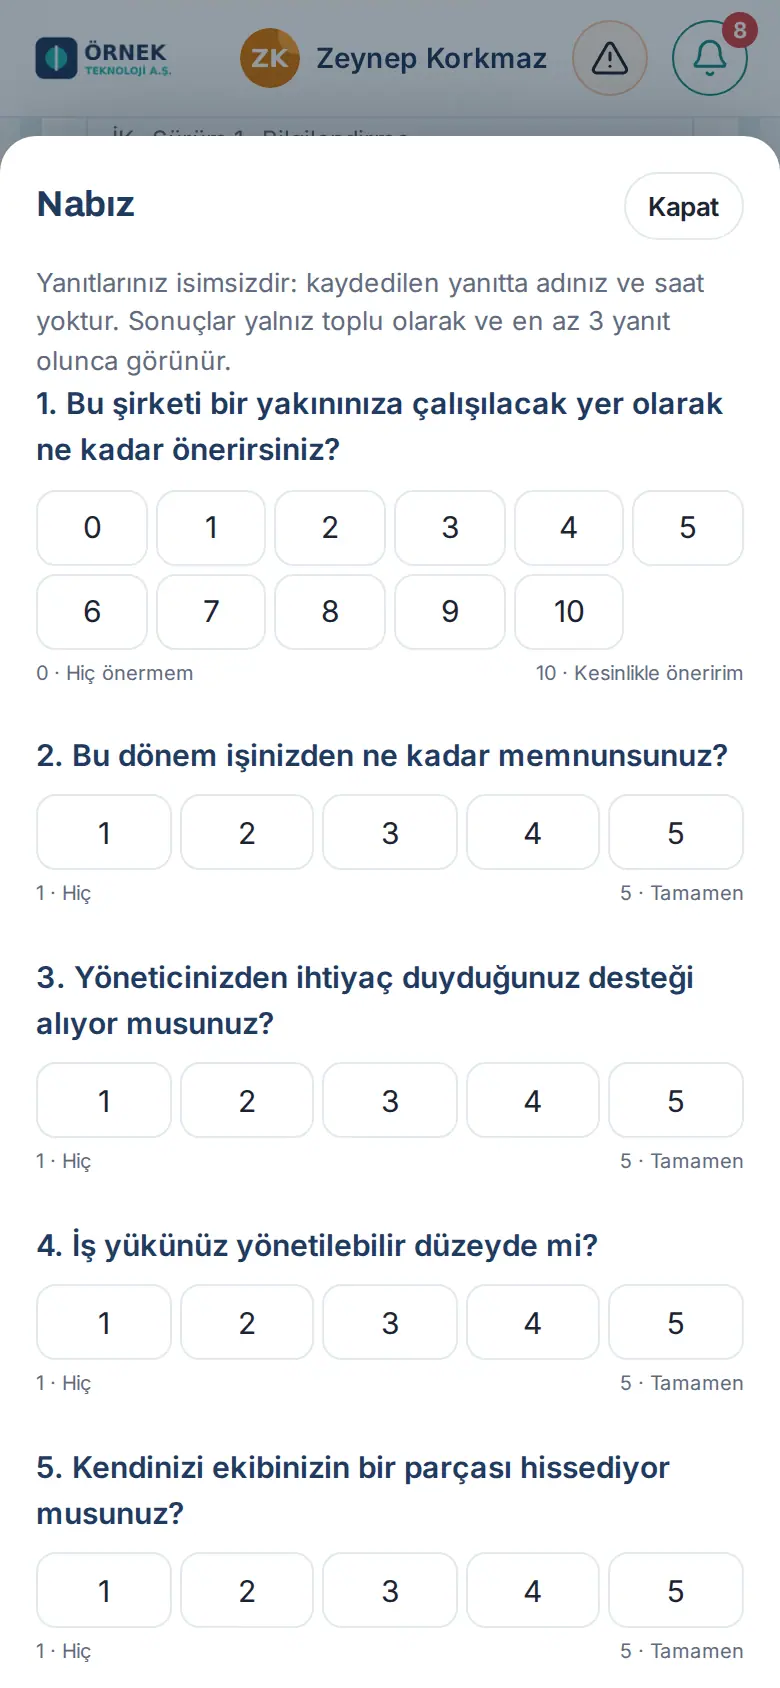
- Tap Reply.
- In the first question, select a score from 0 to 10 (0 · Not at all likely, 10 · Extremely likely).
- In the other questions, select a score from 1 to 5 (1 · Not at all, 5 · Completely).
- If your company added a comment question, you can write a comment if you want.
- Tap Send. The message "Thanks, your response was saved anonymously." appears.
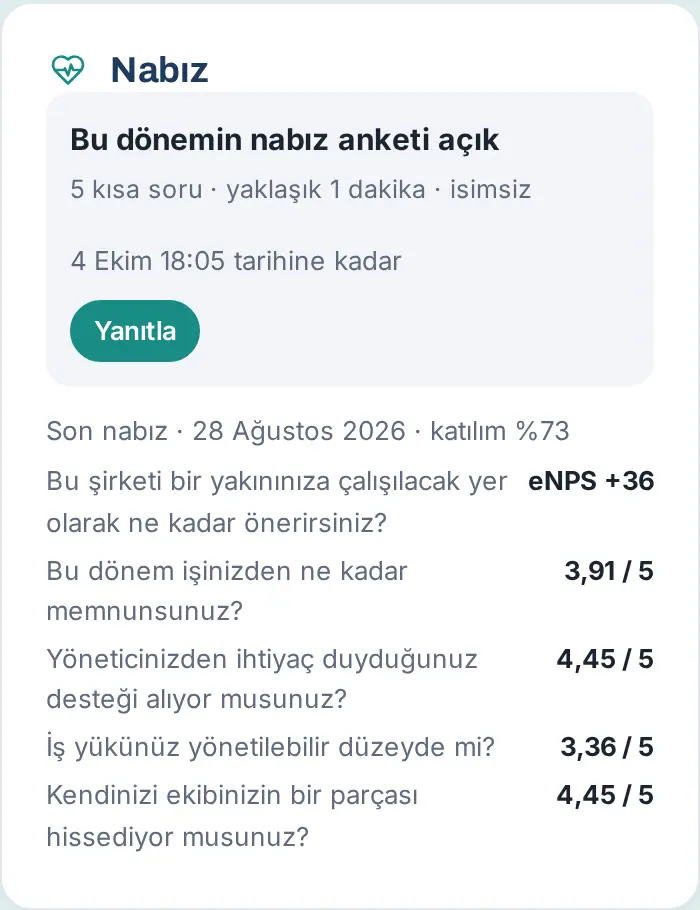
Tip: If your company chose to share it, the company-wide result of the last closed round (participation, eNPS and question averages) appears in the Pulse box. eNPS is a score that shows how much employees recommend the company as a place to work.
Important: Your response is truly anonymous: the saved response does not contain your name or the time. Results appear only in aggregate and only when there are enough responses. One day before the round ends, you get a reminder if you have not responded yet.
Searching the Wiki
Who: Employee · Where: On a computer, Wiki in the left menu; on the phone, Announcements in the bottom menu → Wiki in the strip at the top
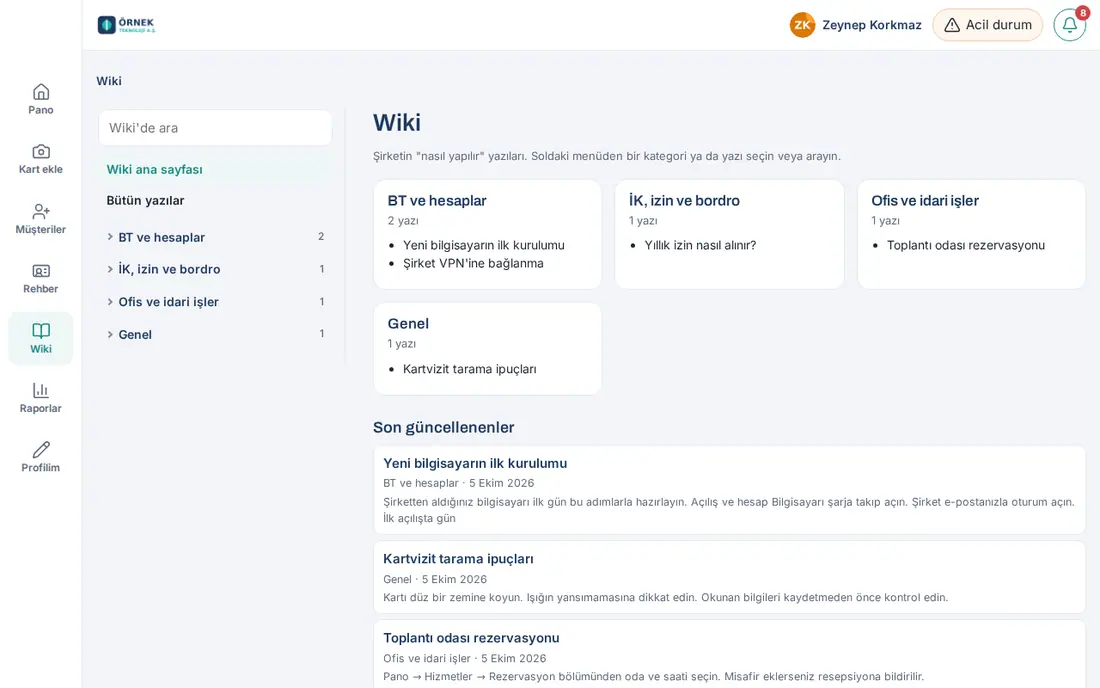
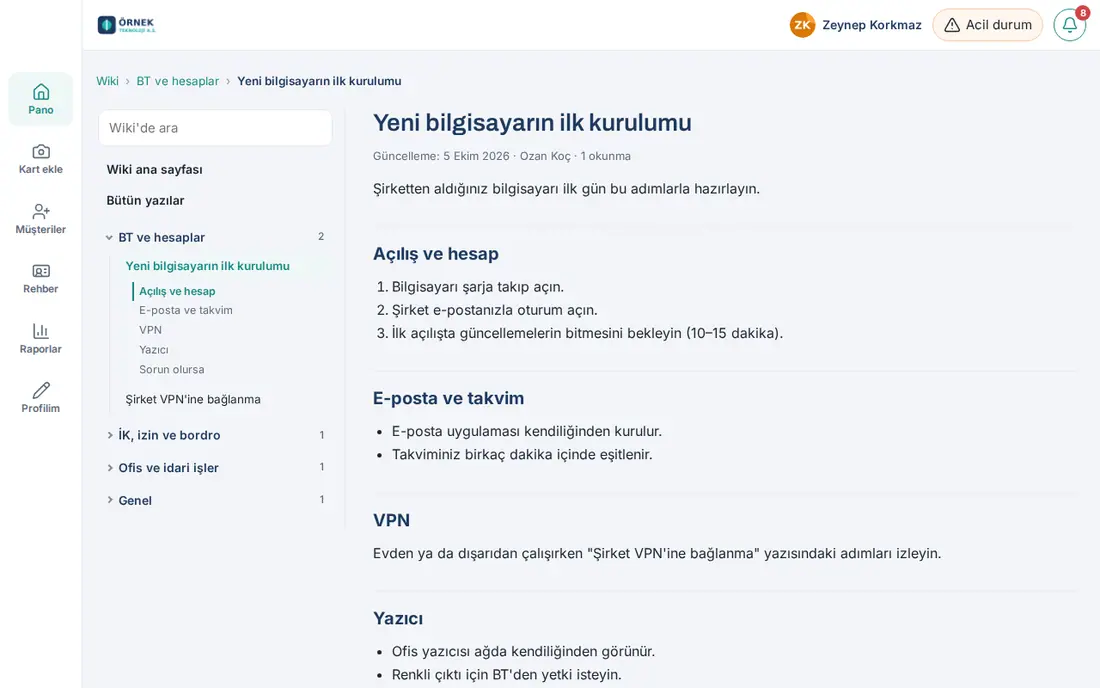
What it does: The Wiki is the knowledge base where the company collects its "how to" articles (e.g. connecting to the VPN, requesting leave, booking a meeting room). Articles open on a separate Wiki page. On a computer, the app menu is on the left, the Wiki menu next to it and a wide reading area on the right.
- On a computer, click Wiki in the left menu. On the phone, tap Announcements in the bottom menu, then Wiki in the strip at the top. The Wiki home opens. Wiki appears selected in the menu; if you tap Wiki in the menu again while reading an article, you go back to the home page.
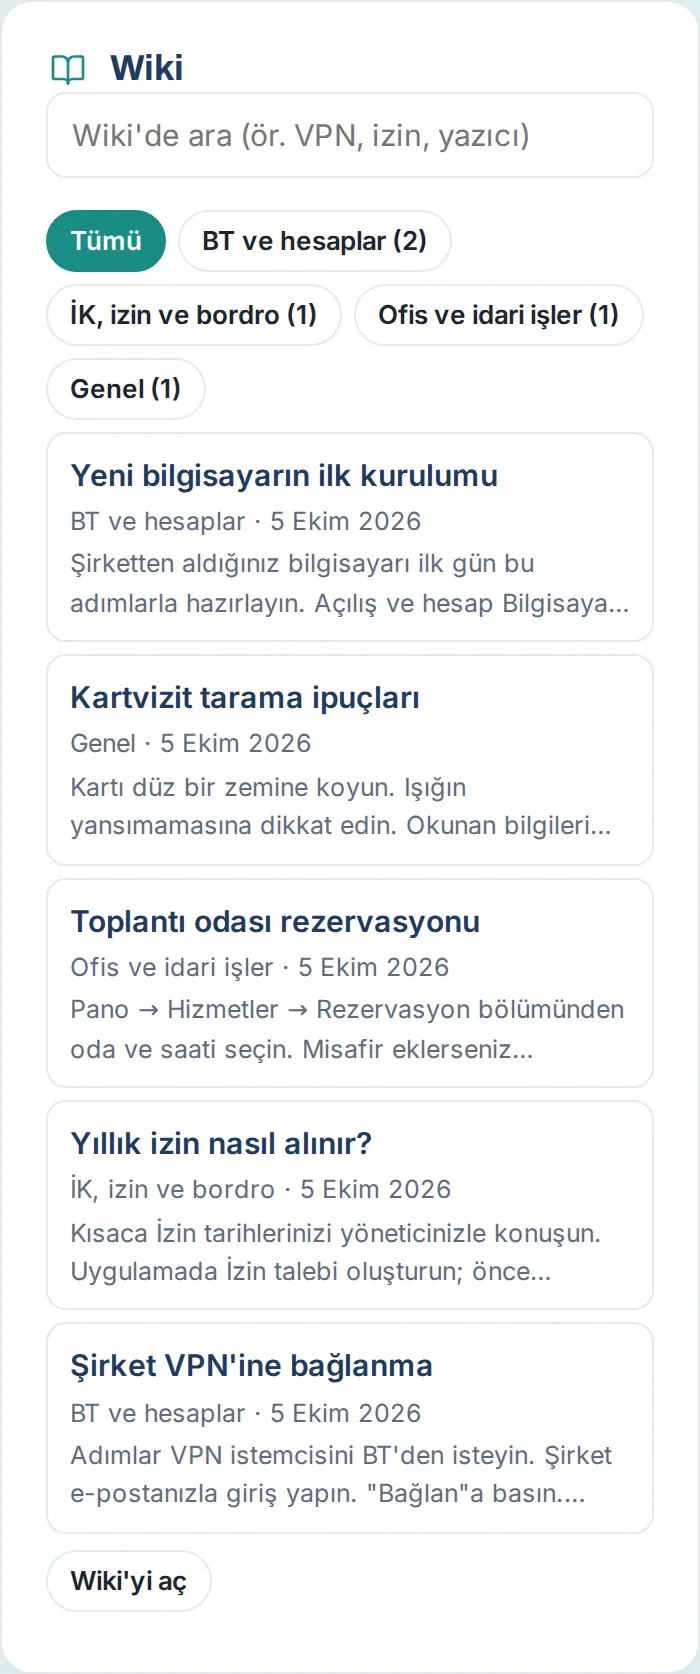
- The Wiki box on the Board also shows the company's articles: important articles are pinned to the top, and you filter the list by tapping a category (e.g. IT and accounts (2)). User guide chapters are not in this list; you go to the guide with the User guide (… sections) button. When you tap an article or Open Wiki, the Wiki page opens.
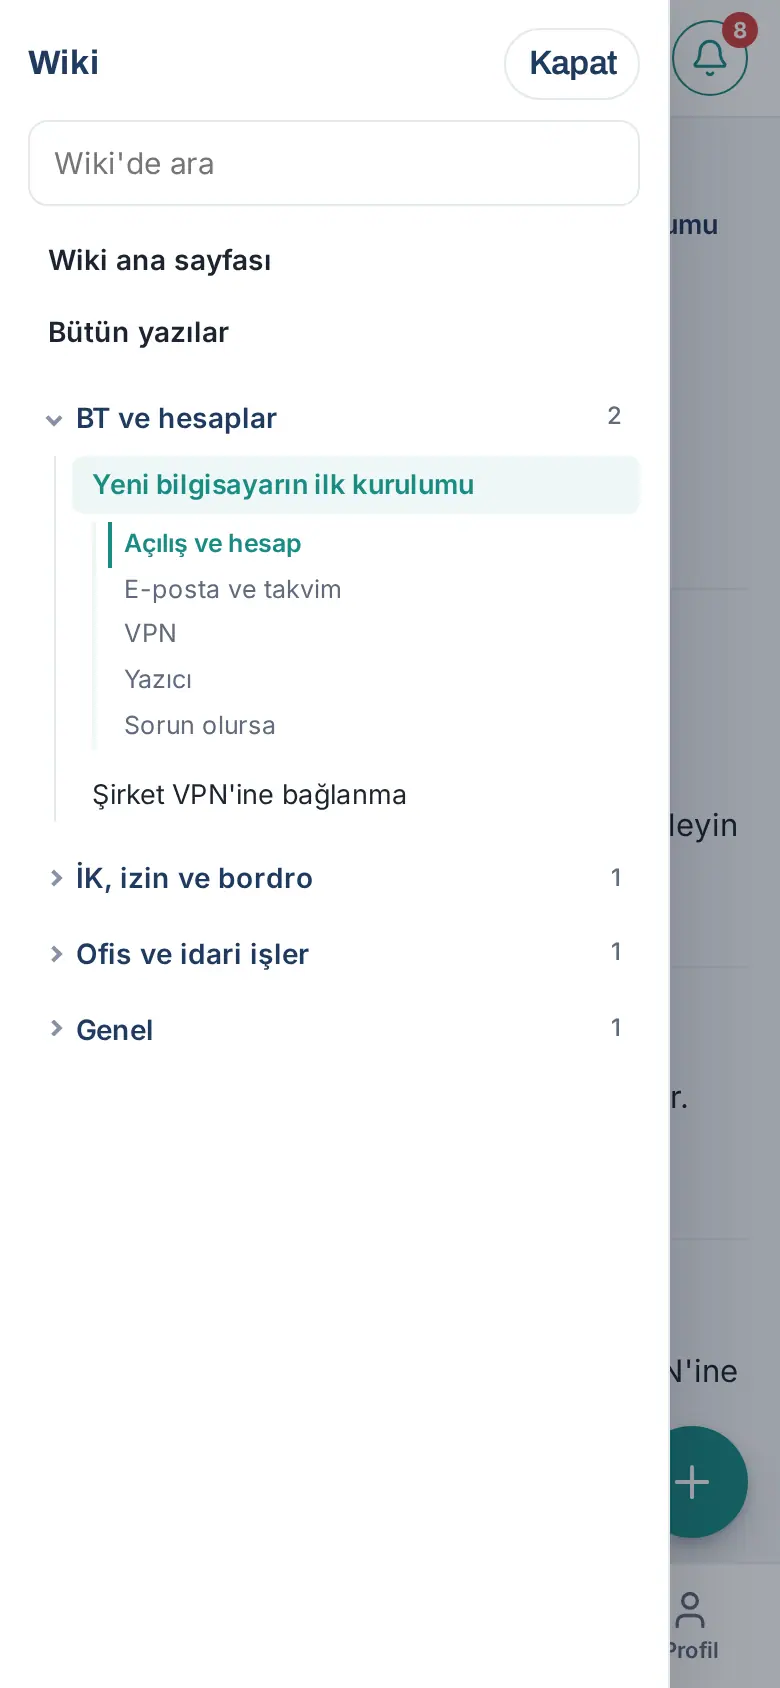
- The Wiki menu lists the categories and their articles. Tap a category name to expand or collapse its articles, and tap an article to read it. Wiki home shows the categories and recently updated articles; All articles shows all of them.
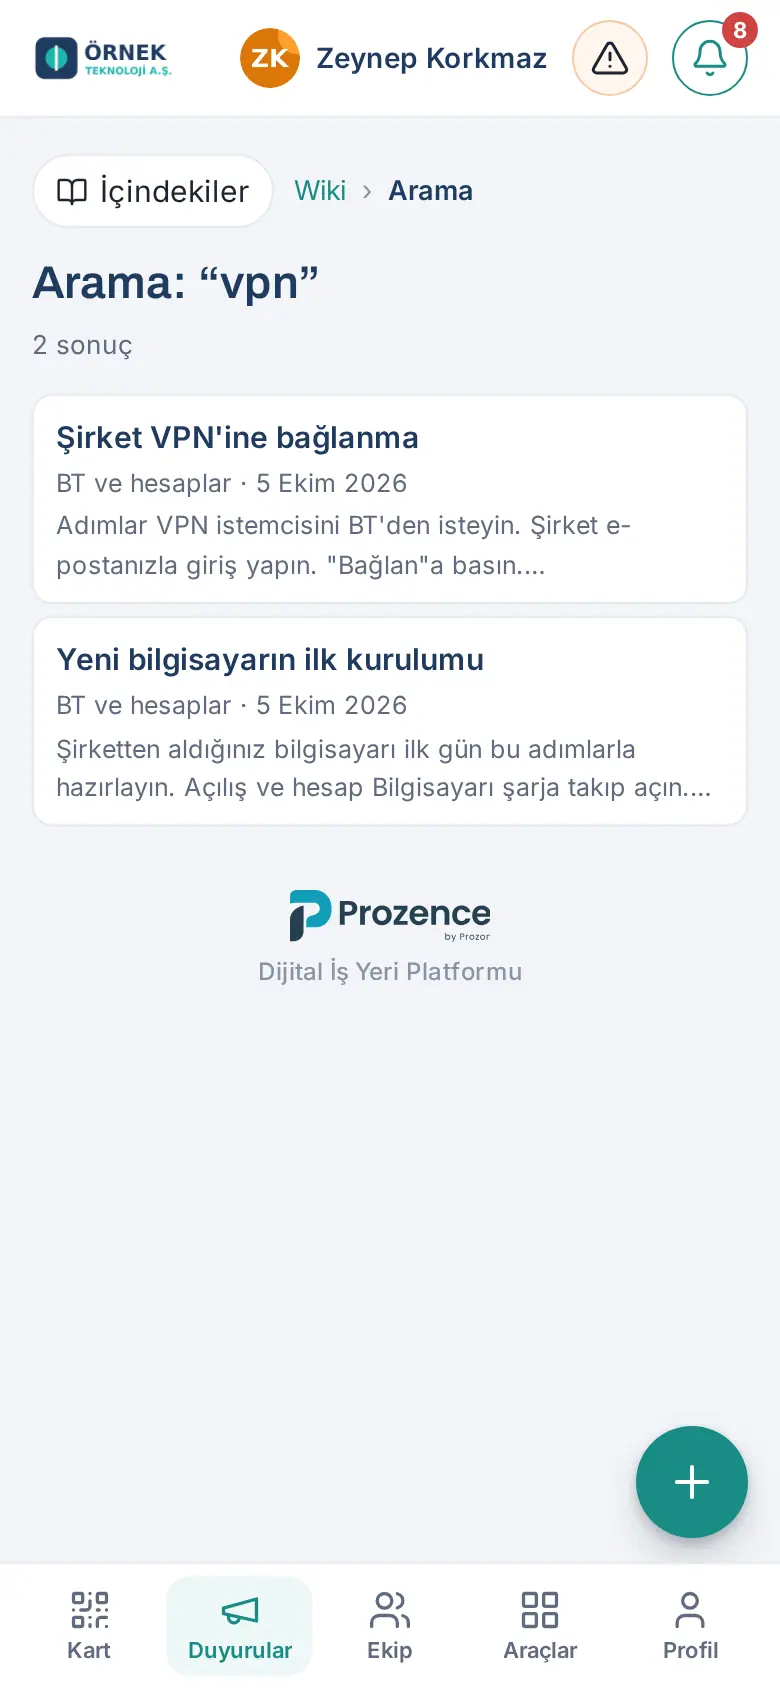
- To search, type a word in the Search the wiki box in the Wiki menu. The search covers titles, tags and text; Turkish letters and upper / lower case do not matter (typing "sifre" also finds "Şifre"). Searched words are counted without recording who searched; Wiki managers look at searches with no results to find missing articles.
- The headings of the open article are listed under it in the Wiki menu. Tap a heading to scroll to that section; as you read, the current section is highlighted.
- At the end of the article you can move to the Previous and Next article in the same category. In the bar at the top (Wiki › category › article) you can go back to the category or to the Wiki home.
- Answer the Was this helpful? question below the article with Yes or No. If you select No, you can write briefly what is missing; your note goes to the article's editors.
- To send the article to a colleague, tap Copy link. The link opens this article directly.
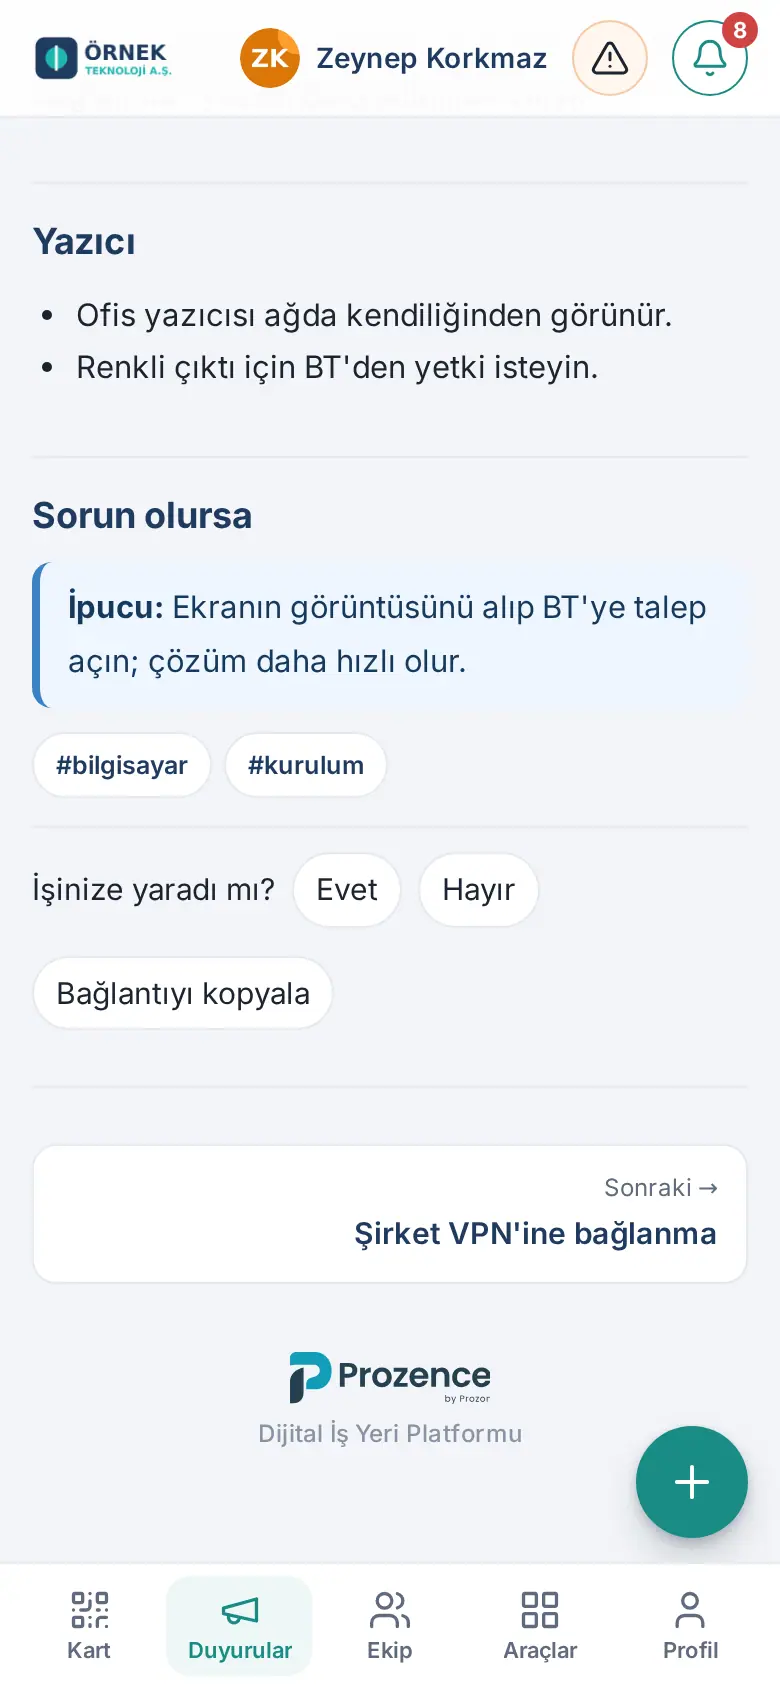
Tip: If a Wiki article is in another language or your app is not in Turkish, a Translate button may appear below the article (see Reading content in your own language (translation)).
Tip: On the phone, the Wiki menu is behind the Contents button above the article. Tap it and the menu slides in from the side; it closes by itself when you choose an article or heading. To close it, tap Close or anywhere outside the menu.
Important: If the article's review date has passed, the warning "This article is past its review date; information may be out of date." appears at the top. If you cannot find what you are looking for, open a request to the related unit (see 23. Requests).
Asking the Wiki a question (AI)
Who: Employee · Where: Wiki home and search results → Ask the Wiki
What it does: You ask what you need without opening articles one by one (e.g. "How do I take annual leave?"). AI prepares the answer only from the Wiki articles you can see (including the user guide) and company policies, and shows the sources as links.
- On the Wiki home, type your question in the Ask the Wiki box and tap Ask. When you search, the box comes pre-filled with your search words.
- A short, step-by-step answer appears under Answer.
- Under Sources, the article and section the answer is based on (e.g. Yıllık izin nasıl alınır? › Kısaca) appear as links. Tap a source for details; the article opens in the Wiki. Policy sources are marked (policy).
- If no answer is found, you see "I couldn't find the answer to this question in the Wiki." You can search with the same words using Search the wiki or open a request to the relevant unit.
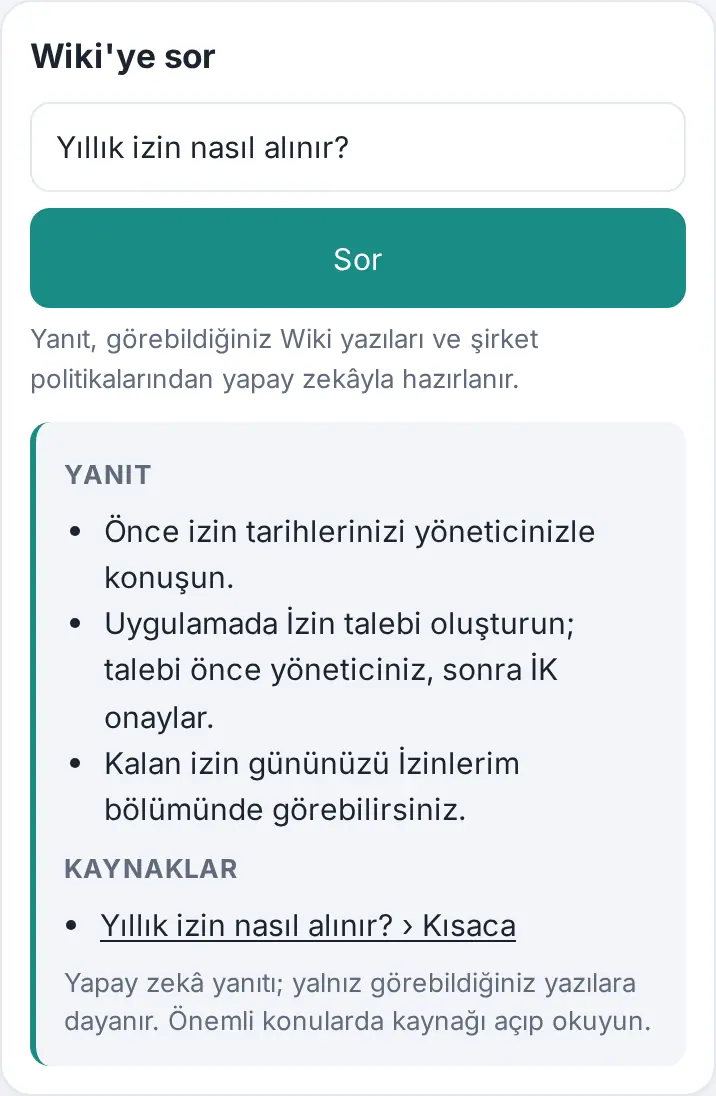
Tip: Short questions about a single topic give the best results. If your app is in another language, the answer comes in that language too.
Important: The box appears only if your company has turned on Ask the Wiki. AI answers can be wrong; for important matters, open and read the source. Your question and the related sections are sent to an AI service (Anthropic, USA) to produce the answer; who asked is not recorded. You can ask at most 20 questions per hour.
Adding and editing Wiki articles
Who: Wiki editor (category editor, general editor or Admin) · Where: Wiki → + Article
What it does: You add new articles and update existing ones in the categories you edit. Articles are edited inside the Wiki page; no separate window opens.
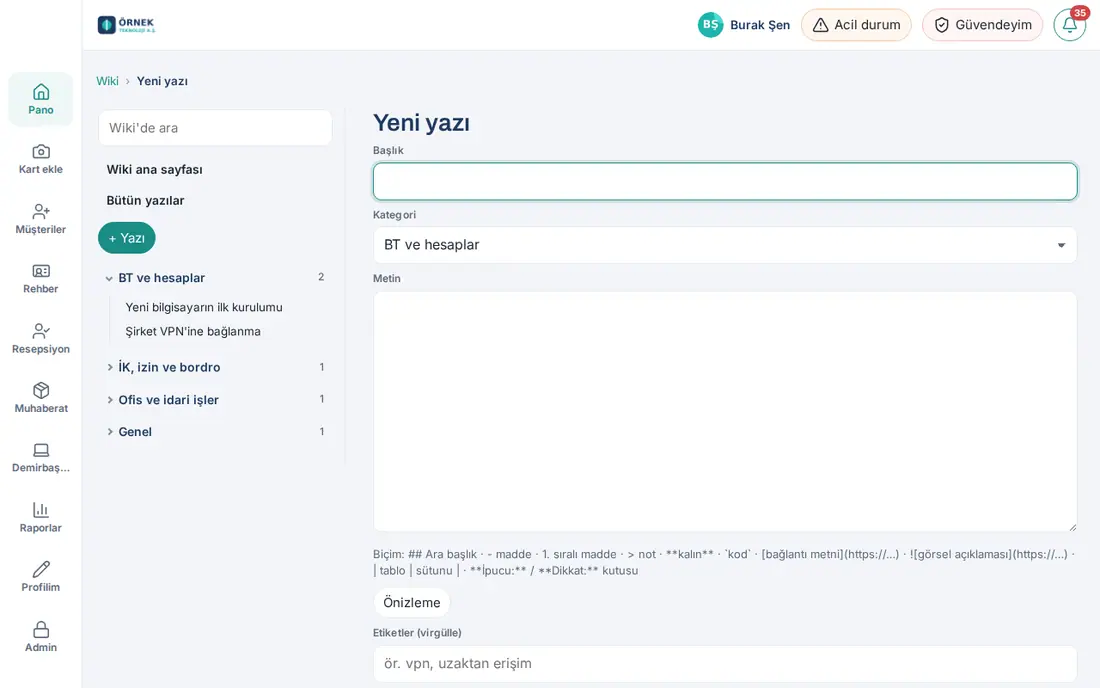
- In the Wiki menu, tap + Article. If a category is open when you tap it, that category is preselected.
- Fill in Title, Category and Text. In the text you can use
## Subheading,- item,**bold**and[link](https://…). Subheadings are listed in the Wiki menu while reading. - To see how the article will look, tap Preview.
- In Who can see, open the article to everyone or only to the selected departments, people, company roles or module permissions. Use Who cannot see to add exceptions. The number of people who can see it appears at the bottom.
- Tap Save. The article opens and takes its place in the Wiki menu. If you are an Admin, an announcement question opens below an article you have just published (see Announcing a Wiki article to its readers).
- To update an existing article, tap Edit below it. To discard your changes, tap Cancel; the article opens unchanged.
Important: If you edit articles imported from the user guide, your changes are kept; the guide's new version does not remove them unless the Admin ticks "Overwrite editors' changes" at the next import.
Announcing a Wiki article to its readers
Who: Admin · Where: Wiki → article → Announce to readers
What it does: You announce an article you have published or updated to the employees who can see it, by phone notification and / or email. An employee who taps the notification goes straight to the article.
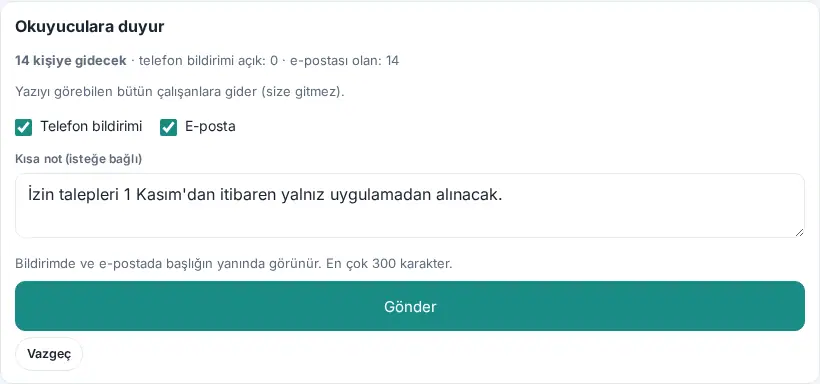
- When you publish a new article, the The article is published. Announce it to readers? box opens below it by itself. For an existing article, tap Announce to readers below the article.
- The box shows how many people it will go to ("Will go to 14 people"), with the number of people who have phone notifications on and who have an email address. For a restricted article it says that it goes only to employees covered by the access rule.
- Leave one or both of Phone notification and Email selected.
- If you want, type why they should read it in the Short note (optional) box (up to 300 characters). The note is shown next to the title in the notification and the email; if you leave it empty, the first lines of the article are sent.
- Tap Send. "Announced: N people" appears; below the article, the Last announcement line (date, number of people, channel, sender) is shown.
Tip:
- The announcement follows the article's Who can see rule. For example, an article open only to the Board of Directors is announced only to the Board of Directors.
- The email has the title, a short summary and an Open the article link.
Important:
- People who see the article outside the rule only because they are an Admin or a category editor, and you, do not get the announcement. A draft cannot be announced.
- If the same article was announced in the last 24 hours, you must select Send anyway (this article was announced in the last 24 hours) to send it again. You can send up to 10 announcements per hour.
- Phone notifications reach only employees who have turned notifications on (see 09. Notifications).
Following vision and goals
Who: Employee · Where: Announcements → Vision and goals
What it does: You see the company's vision, mission and values, and how far the goals have progressed.
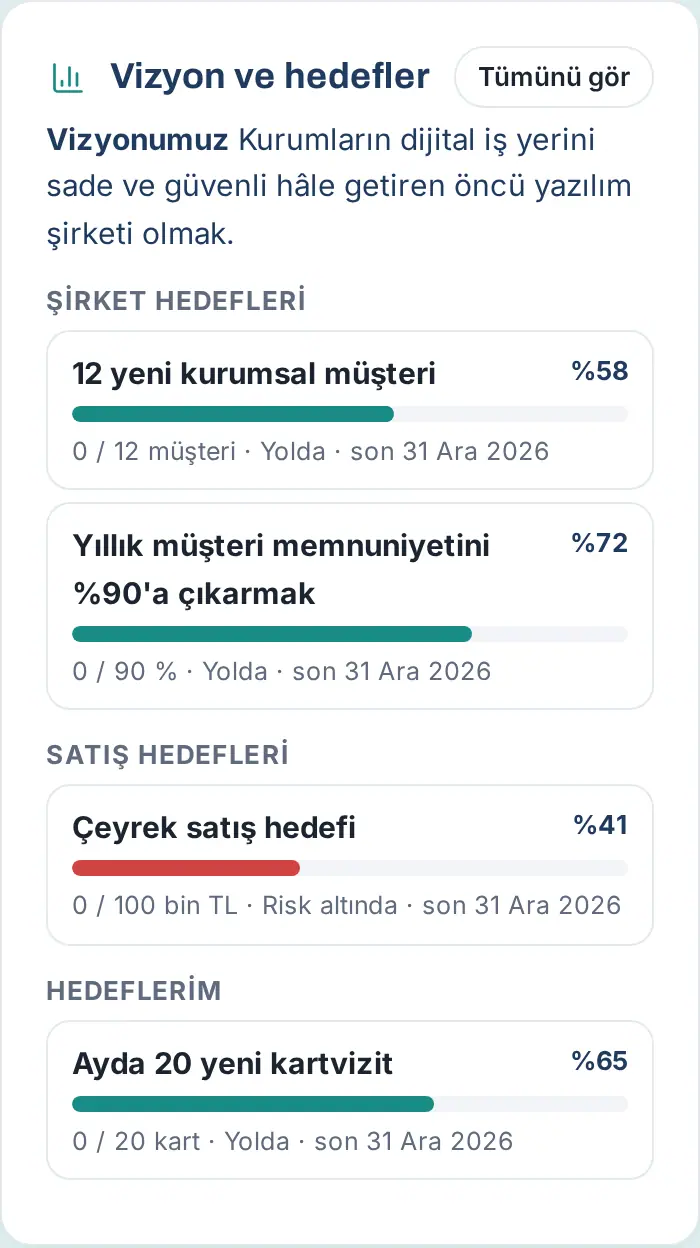
- The Vision and goals box shows the company's vision and the progress bars of the company and department goals and of your personal goals.
- Each goal shows the percentage, the achieved / target value, the status (Planned, Yolda ("on track"), At risk, Completed) and the end date.
- To see everything, tap See all. The window contains Our vision, Our mission, Our values and all goals.
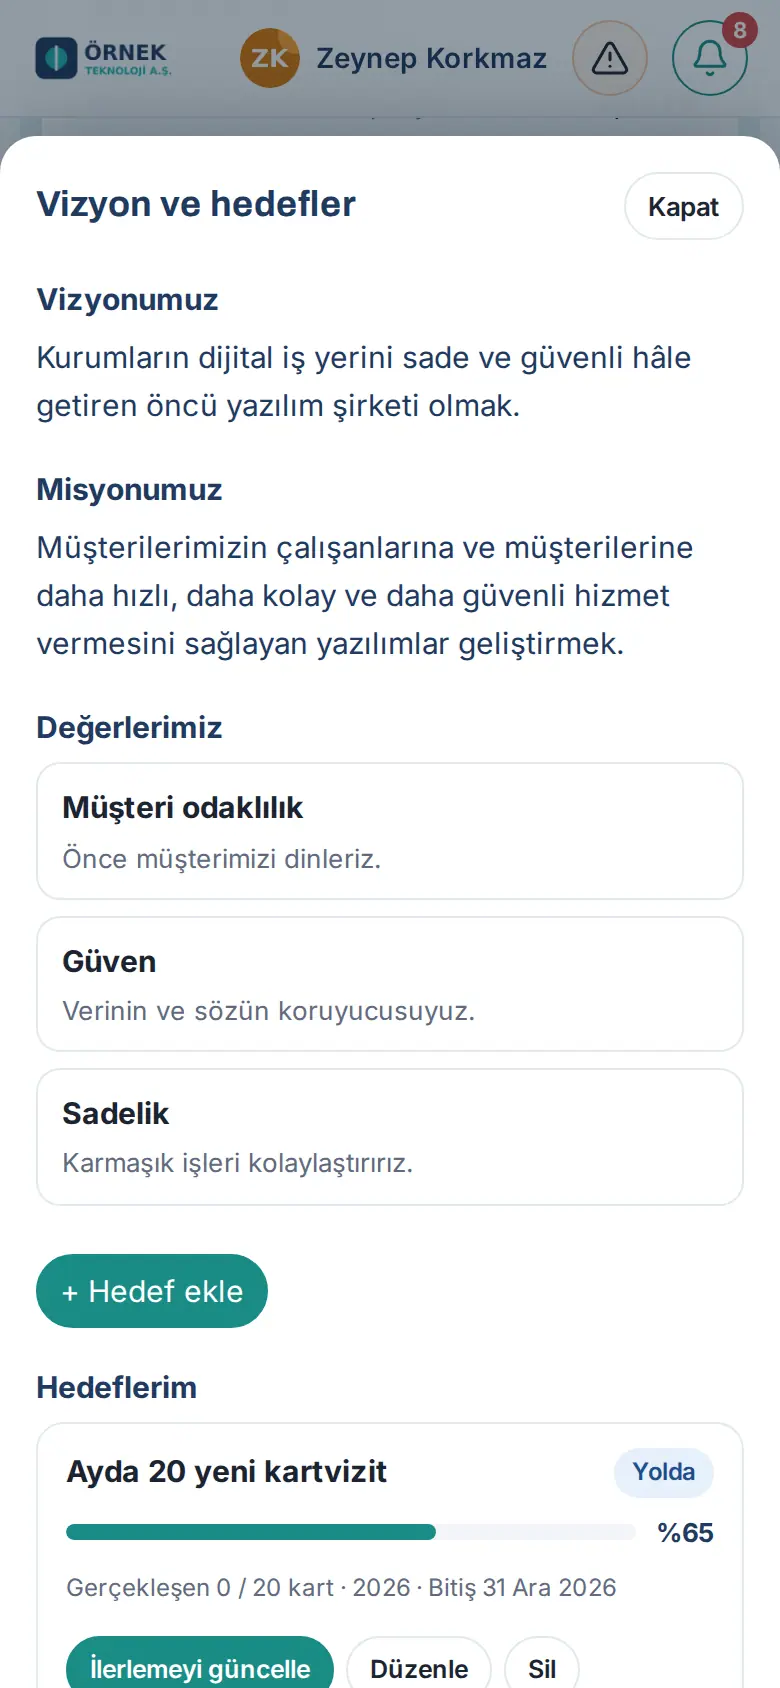
Important: All employees see the company and department goals. Only you and your managers in the organization chart see your personal goal.
Adding and updating a personal goal
Who: Employee · Where: Announcements → Vision and goals → See all
What it does: You add your own goal and update its progress.
Before you start: Every employee has the My personal goal option. Your personal goal is seen and updated by you, your managers in the organization chart and the app administrators.
Adding a goal:
- Tap See all, then + Add goal.
- In the Scope list, make sure My personal goal is selected.
- Write your goal in the Goal field.
- If you want, fill in the Description (optional), Period (optional) (e.g. 2026) and End date (optional) fields.
- If the goal is measured with a number, write the Numeric target (optional) and the Unit (e.g. 20 and "cards").
- Tap Add the goal.
Updating progress:
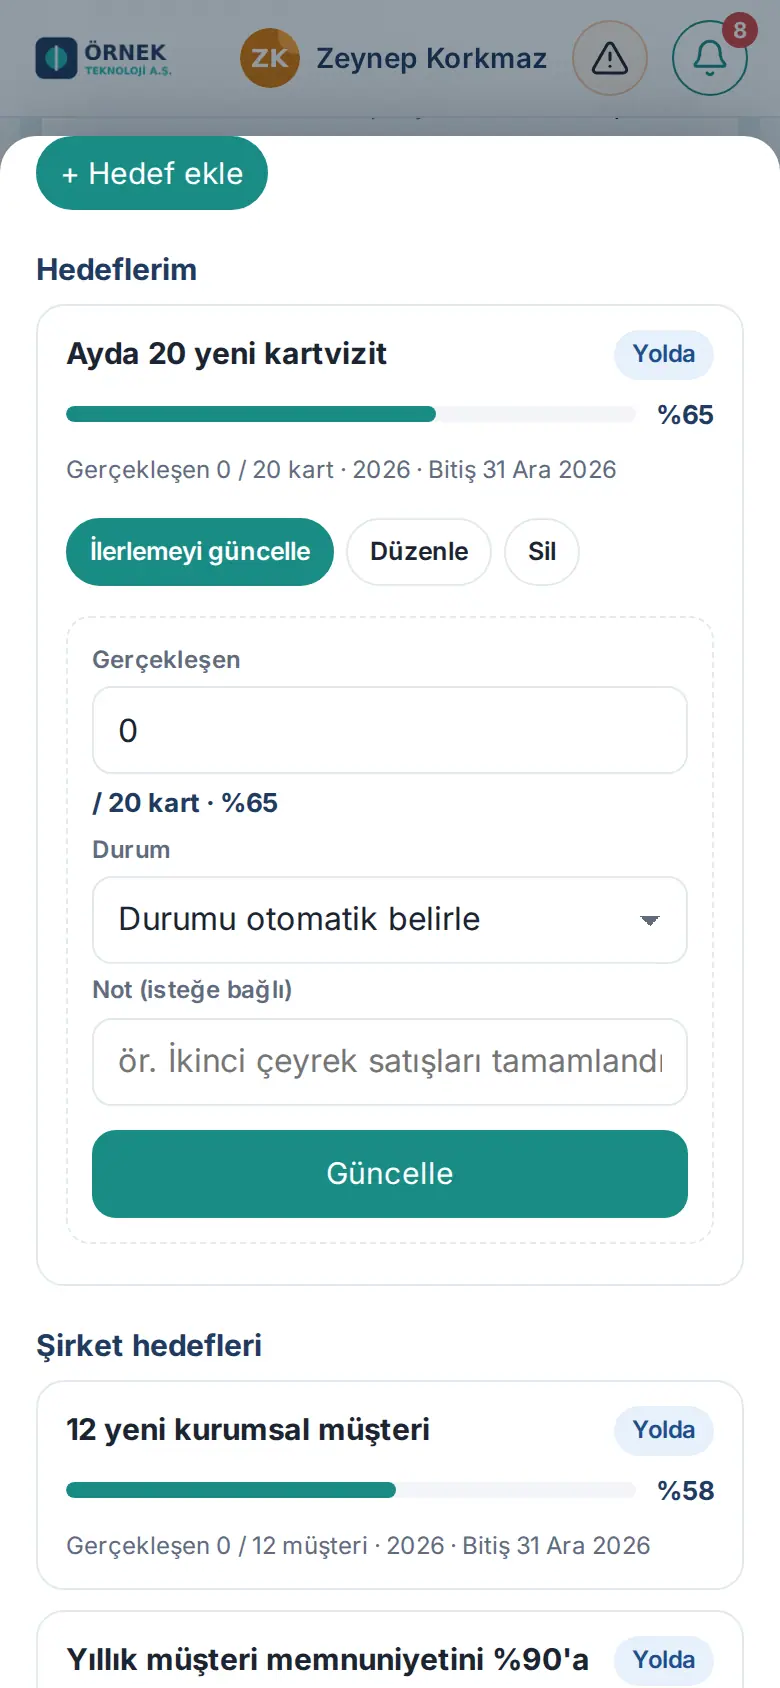
- Under My goals, tap the Update progress button of your goal.
- Write the value you reached in the Achieved field.
- In the Status list, leave Set status automatically or select a status.
- If you want, write a Note (optional) and tap Update.
Tip: To change a goal, use Edit; to remove it, use Delete. You get a notification when your manager adds a goal for you or your team.
Following Team Square
Who: Employee · Where: Bottom menu Team → Team Square
What it does: Team Square is the area where employees share among themselves: listings, invitations, surveys, thank-yous, venue recommendations, alerts and useful content.
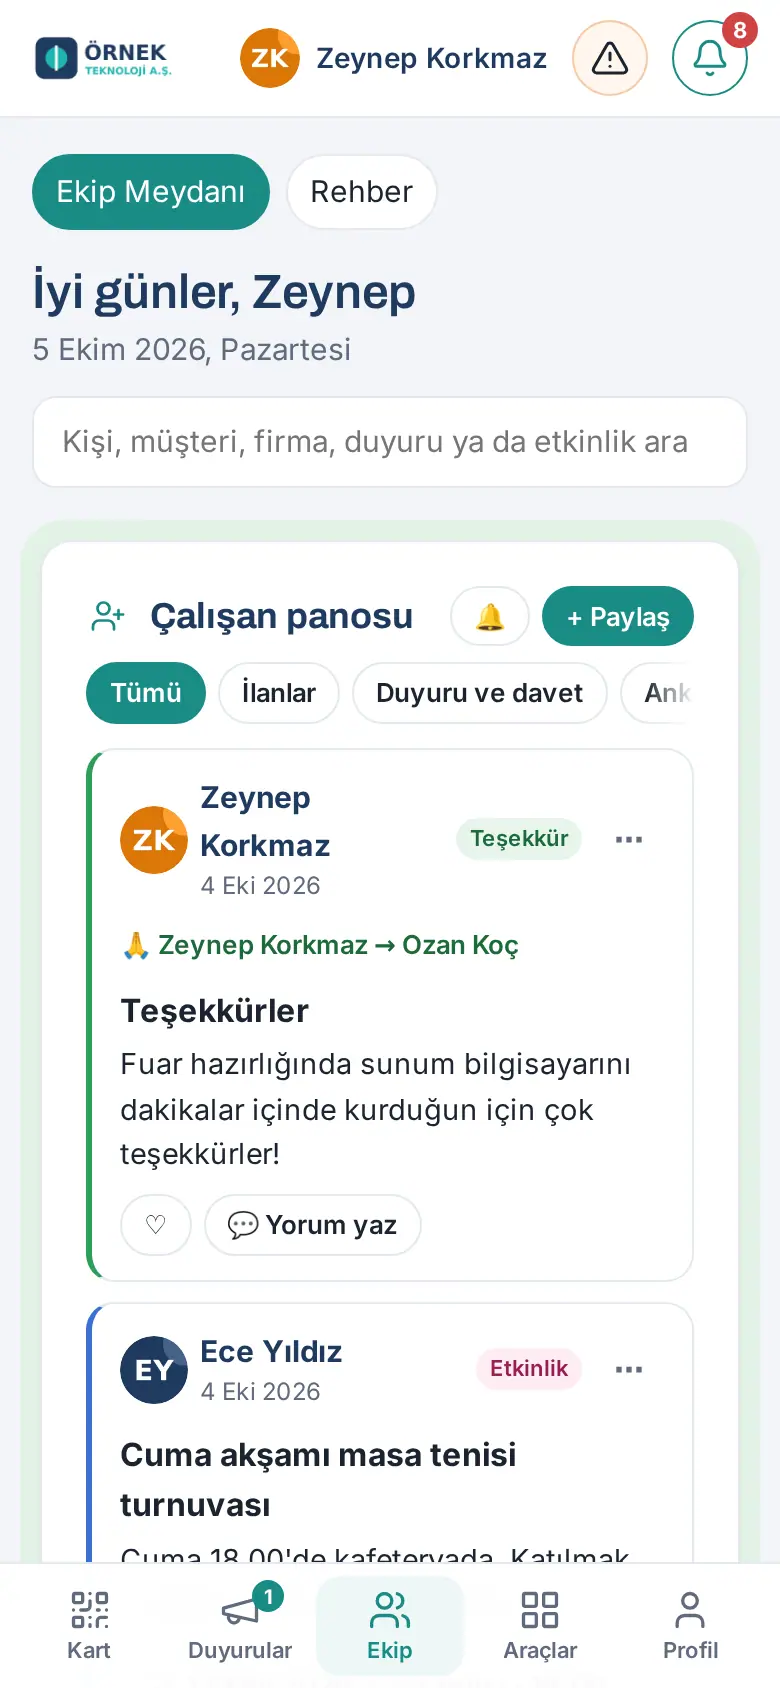
- Tap Team in the bottom menu. The Team Square tab opens.
- In the Employee board box, posts are sorted from newest to oldest.
- To filter by type, use the buttons at the top: All, Listings, Announcements and invitations, Surveys, Thank you, Venues, Heads-up, Useful content. For your own posts, tap Mine. To see expired posts, tick Archive.
- To like a post, tap ♡; to write a comment, tap 💬 Yorum yaz ("write a comment").
- For listings, use ✉️ Message the listing owner to send the owner a message that only the two of you can see.
Other boxes in Team Square:
- Celebrations · 7 days: see Celebrations and birthdays.
- Team news: new joiners, new positions and work anniversary announcements. Filters: All, New joiners, New positions, Anniversaries.
- Team: the list of your colleagues; the Employee directory, Organization chart, Customer directory and Useful contacts buttons (see 08. Directory and organization).
- Suggestions and complaints: see Sending a suggestion, complaint or question.
Important: If you see an inappropriate post, tap the ⋯ button at the top right of the post, then Report inappropriate content. If several different people report it, the post is hidden automatically and the administrators review it.
Posting on Team Square
Who: Employee · Where: Team → Employee board → + Share
What it does: You share a listing, an invitation, a survey, a thank-you, a recommendation or useful content with your colleagues.
- In the Employee board box, tap + Share. The Share window opens.
- Select the post type:
- 🏷️ Listing: Type (For sale, For rent, Free to give away, Searching, Lost / found, Carpool), Title, Description, Price (optional), Deadline (optional).
- 🎉 Announcement / invitation: Type (Engagement, Wedding, Birth, Mezuniyet ("graduation"), Event, Concert, exhibition, show, Other), Title, Description. If you enter the Date, Time and Place in the Invitation (optional) section, employees can respond whether they will attend.
- 📊 Survey: Question, Description (optional), Options (2–6) (for more options, + Option), Deadline (optional). If you do not enter a deadline, the survey stays open for 7 days.
- 🙏 Thanks: select the employee in the To list and fill in the Title (optional) and Your thank-you message fields.
- 📍 Venue recommendation: see Sharing a venue recommendation.
- ⚠️ Heads-up: see Sharing a "Heads-up" alert.
- 💡 Useful content: Type (Article, Video, Podcast, Book, Training / course, Tool / app, Other), Title, Description and Link (required).
- In listings, announcements / invitations, venue recommendations and Heads-up posts, you can add photos with Photos (up to 3) if you want.
- Select in the Who can see list: Whole company, only your own department (e.g. Only Satış), People I select or Everyone except those I select.
- Tap Board rules to read the rules and tick the I have read the board rules and will follow them. box.
- Tap Share.
Tip:
- The person you thank always gets a notification and an email.
- The useful content you share also appears on your profile under "Shared content".
- To remove your own post early, use ⋯ → Archive or Delete.
Important:
- The Board is for employees; do not share commercial advertising or political content.
- Do not share your own or other people's personal data (ID number, address, health information, etc.).
- Photos are made smaller and their location information is deleted; only employees see them.
- For listings, the sale and the handover are your responsibility; the company is not an intermediary.
- Expired posts go to the archive and are deleted after some time.
Responding to an invitation and voting in a survey
Who: Employee · Where: Team → Employee board
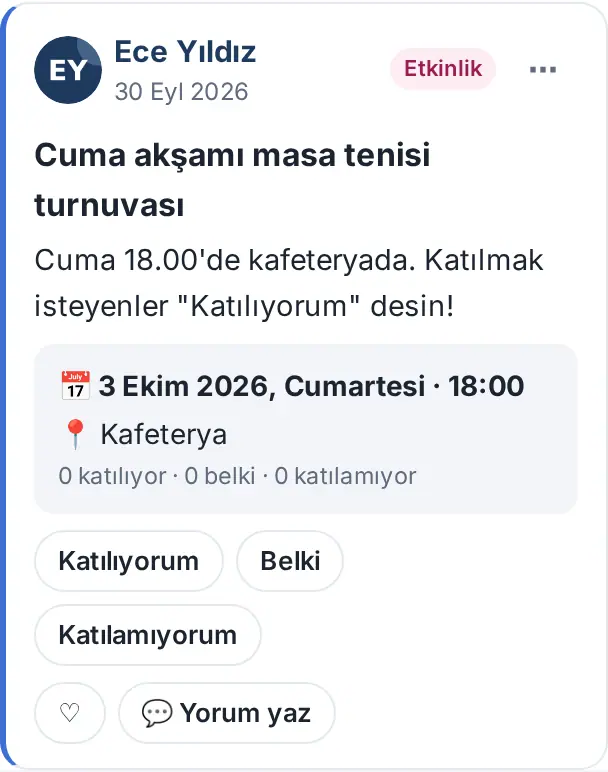
Responding to an invitation:
- A dated invitation shows the date, time and place. Below it, you see how many people are attending.
- Tap Attending, Maybe or Not attending. You can change your answer later; if you tap the selected answer again, your answer is removed.
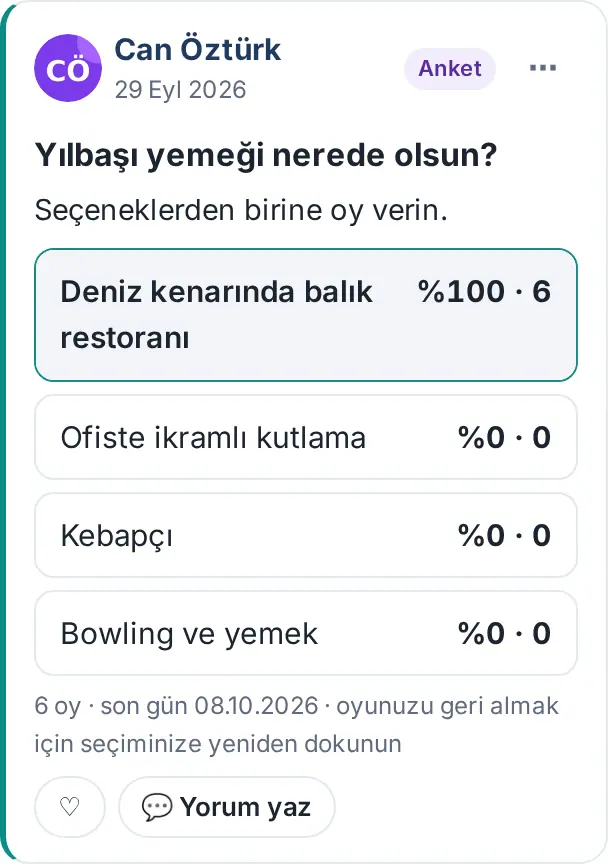
Voting in a survey:
- Tap one of the options. Your vote is saved and the results appear with percentages and the number of votes.
- To take back your vote, tap your selection again.
Tip: When you get an event invitation, the line "You are invited to an event" appears in the Waiting for you list in the bell (see 09. Notifications).
Important: Only the person who shared the survey sees who selected what.
Sharing a venue recommendation
Who: Employee · Where: Team → Employee board → + Share → 📍 Venue recommendation
What it does: You recommend a restaurant, café, takeaway or tradesperson you like to your colleagues.
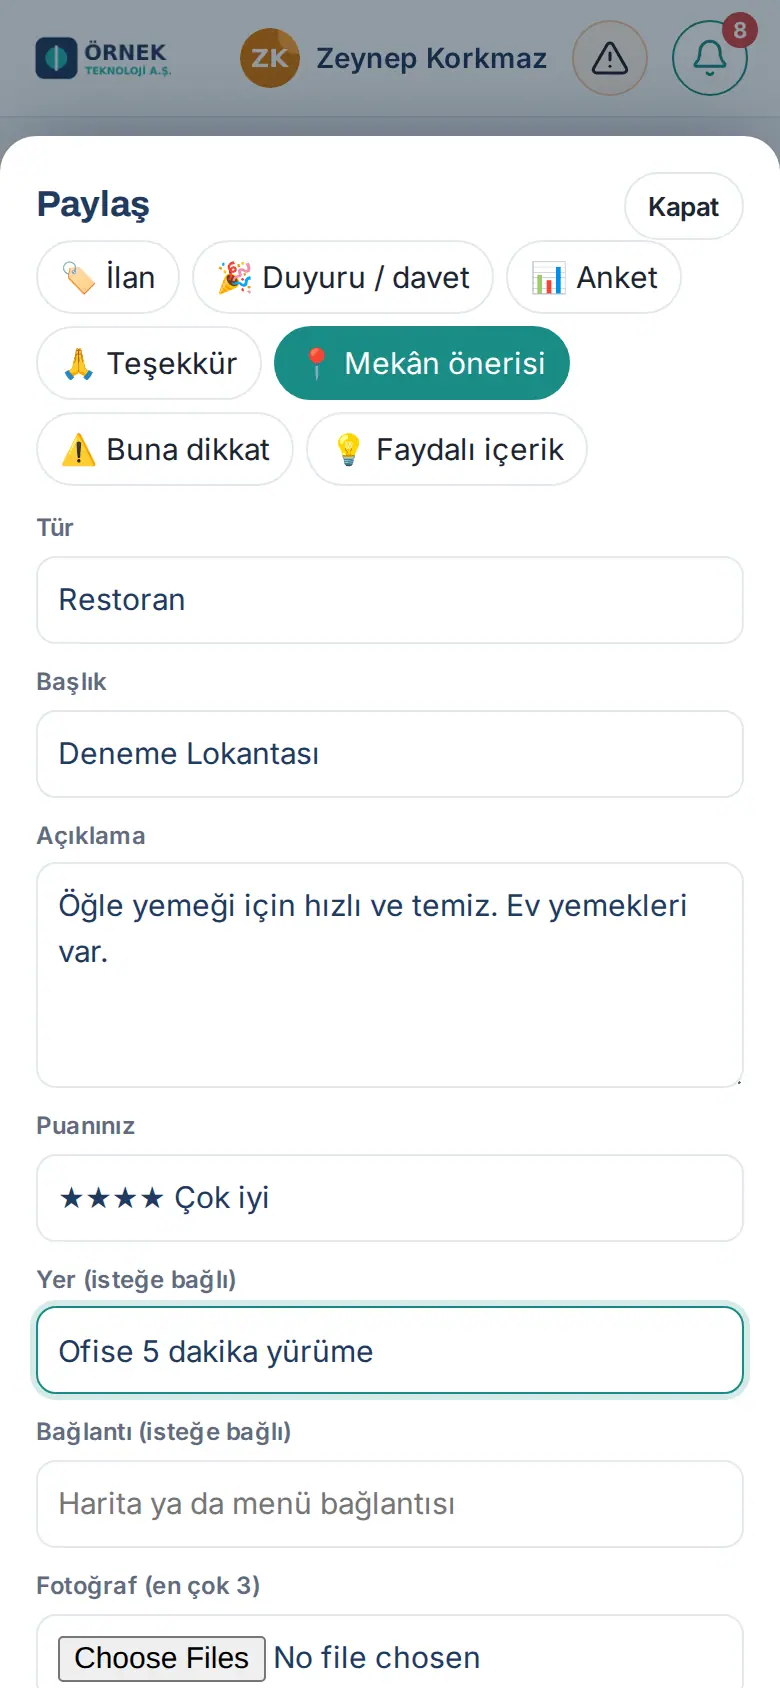
- Tap + Share, then 📍 Venue recommendation.
- Select the Type: Restoran ("restaurant"), Kafe ("café"), Takeaway, Service / tradesperson, Other.
- Write the name of the place in the Title field and your opinion in the Description field.
- Select a rating in the Your rating list (★ Poor … ★★★★★ Excellent) or leave it as Without rating.
- If you want, add a Place (optional), a Link (optional) (a map or menu link) and a photo.
- Select Who can see, confirm the board rules and tap Share.
Tip: Venue recommendations stay published for one year. If the same place is in the Useful contacts list in the Directory, the employees' rating appears on the address card as "Employee rating" (see 08. Directory and organization).
Sharing a "Heads-up" alert
Who: Employee · Where: Team → Employee board → + Share → ⚠️ Heads-up
What it does: You announce a problem in the office, in a common area or with a service that your colleagues need to know about (e.g. a wet floor, a broken door). The alert appears with a red border.
- Tap + Share, then ⚠️ Heads-up.
- Select the Type: Venue / service, Office and common areas, Security, Other.
- Write a Title and a Description.
- If you want, add a photo.
- Select Who can see, confirm the board rules and tap Share.
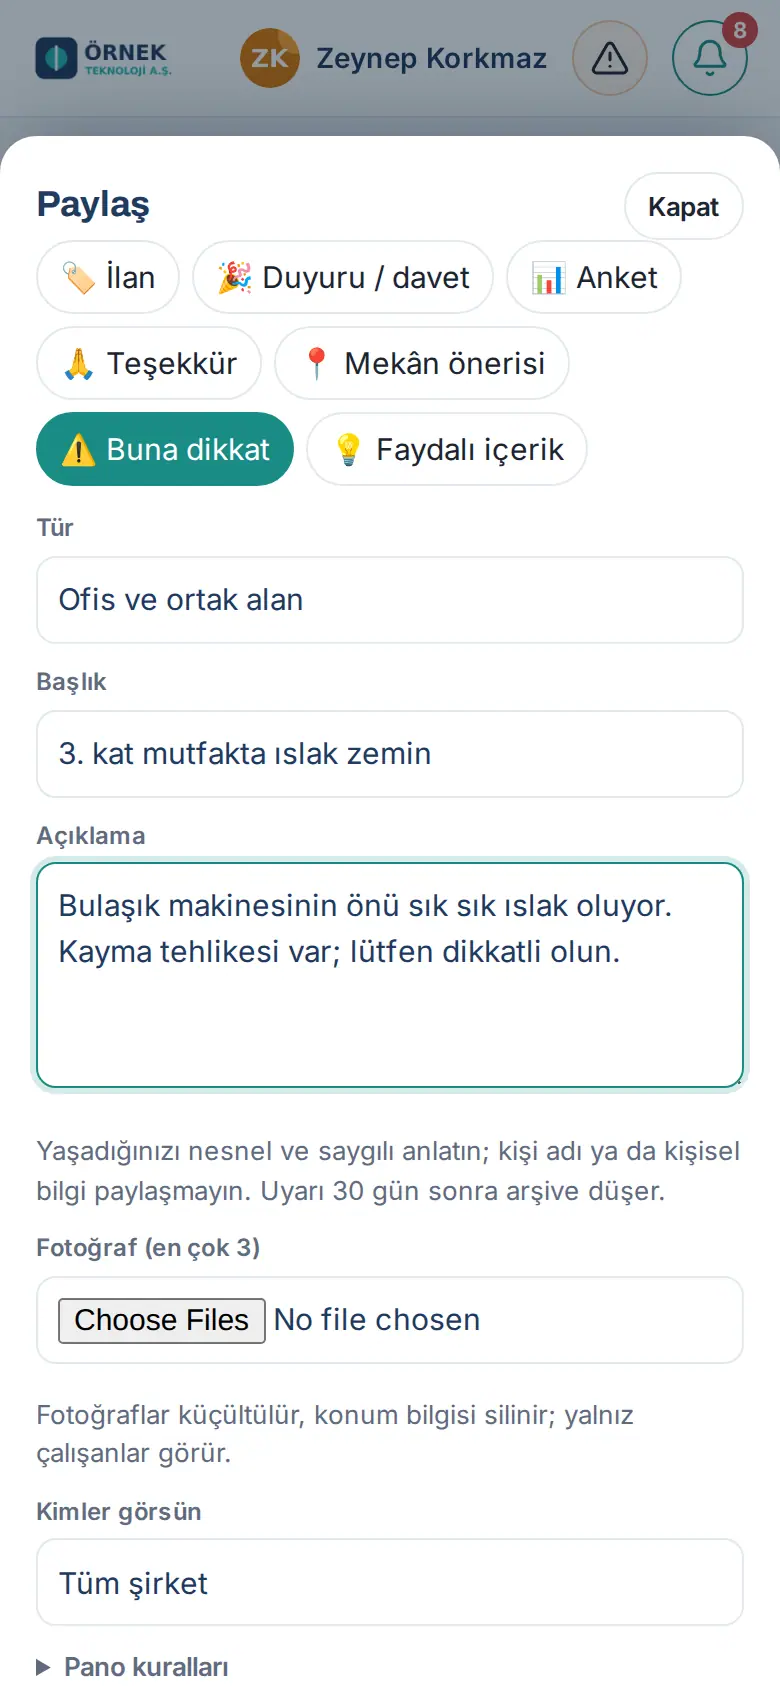
Important: Describe what happened objectively and respectfully; do not share names or personal information. The alert goes to the archive after 30 days. Also report a serious occupational safety issue with a Safety report (see 27. Emergencies, occupational safety and the occupational physician).
Celebrations and birthdays
Who: Employee · Where: Team → Celebrations · 7 days
What it does: You see your colleagues who have a birthday or a work anniversary today and in the next 7 days.
- Tap Team and scroll down to the Celebrations · 7 days box.
- Celebrations are grouped by day. For work anniversaries, the number of years is shown.
- Tap a person to open their profile.
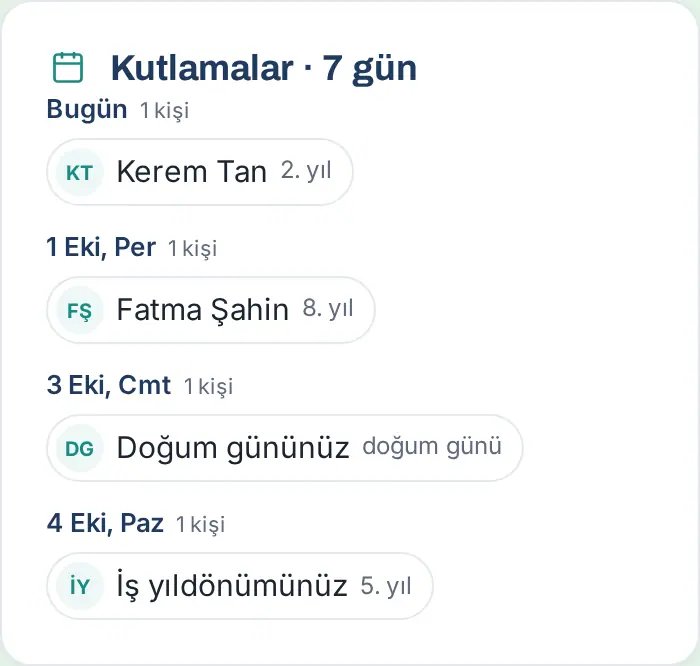
Tip: Your own birthday and work anniversary appear as "Your birthday" and "Your work anniversary". On your birthday, you get a celebration email and notification from the company.
FAQ:
- Why do I not see some birthdays? Birthdays are shown within the scope that the employee allowed and the company selected (e.g. only your department).
Entering your birthday
Who: Employee · Where: Tools → Calendar → My birthday
What it does: Saves your birthday (without the year), and you select whether your colleagues can see it.
- Tap Tools, then Calendar, and scroll down to the My birthday box.
- If you entered it before, tap Change.
- Select the day and month. The year is not asked.
- If you want your colleagues to see it, tick the box (e.g. Let colleagues in my department see my birthday).
- Tap Save.
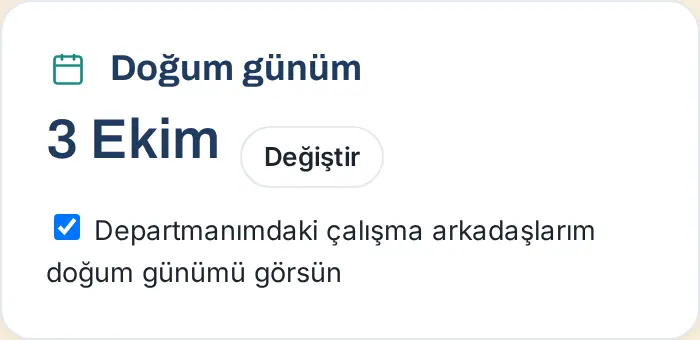
Important: If you do not tick the box, your birthday is visible only to you. You always get the company's celebration.
Sending a suggestion, complaint or question
Who: Employee · Where: Team → Suggestions and complaints
What it does: You send your suggestion, complaint or question to the related people. If you want, you send it anonymously.
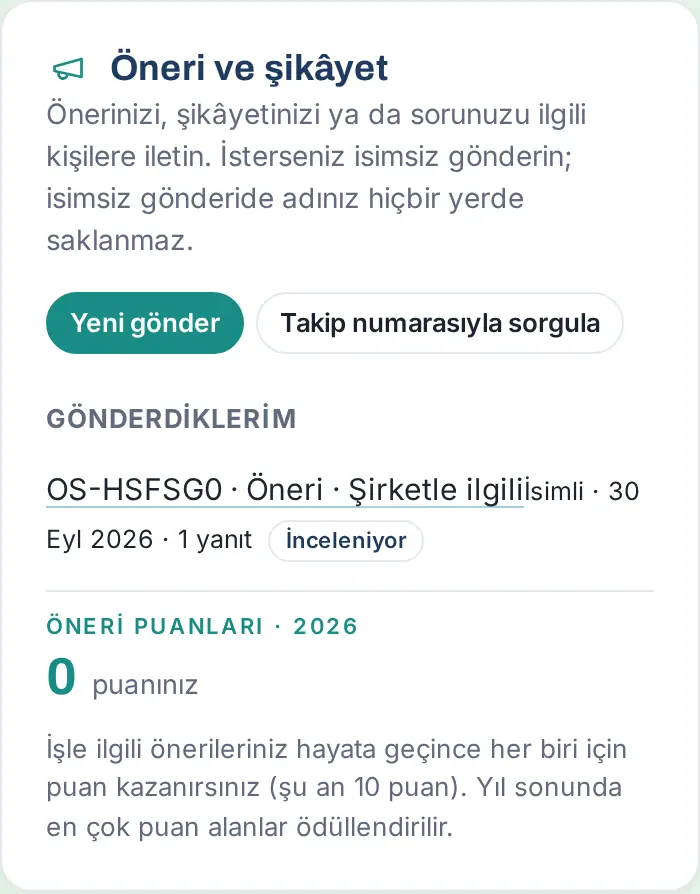
- Tap Team and scroll down to the Suggestions and complaints box.
- Tap Send new.
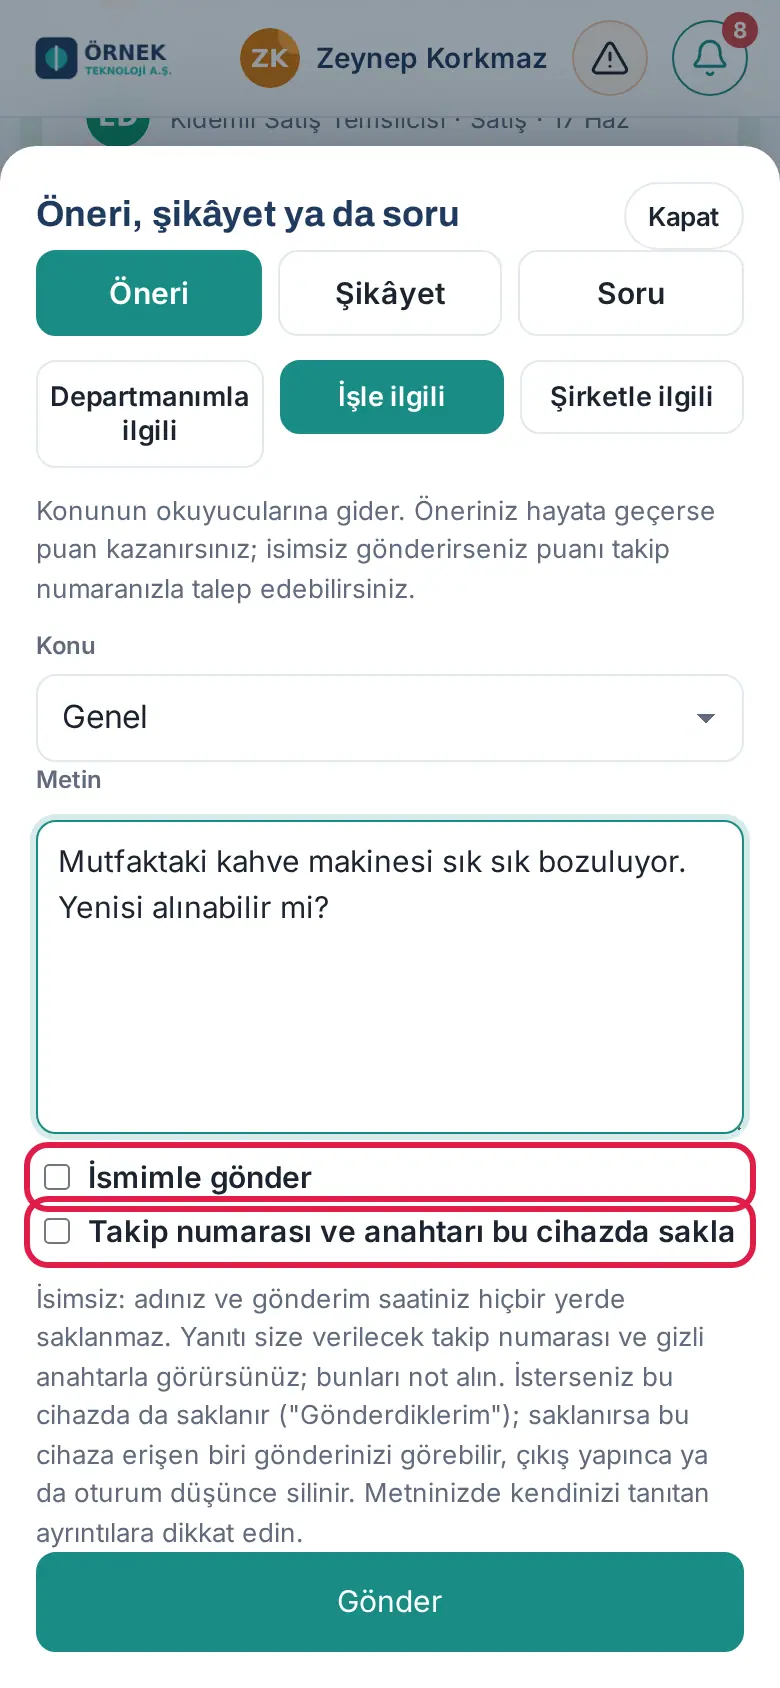
- Select the type: Suggestion, Complaint or Question.
- Select the scope:
- About my department: goes to your manager (even if you send it anonymously).
- About the work and About the company: go to the readers of the topic.
- Select a topic in the Subject list (e.g. General, Human resources, Office and work environment, Software and tools).
- Write at least 10 characters in the Text field.
- If you want to send it with your name, tick Send with my name. If you do not tick it, the submission is anonymous.
- If you send it anonymously and want the tracking information to be kept on this device, tick Keep the tracking number and key on this device.
- Tap Send.
- Your tracking number (starts with
OS-) appears on the screen. For an anonymous submission, a secret key is also shown. Write down both or keep them with Copy / Download.
Important:
- For an anonymous submission, your name and the time you sent it are not stored anywhere. Watch out for details in your text that identify you.
- The secret key is not shown again. If you lose it, you cannot see the reply to your anonymous submission from another device.
- If you keep the tracking information on this device, anyone with access to the device can see your submission. This information is deleted when you sign out.
Tip: If your company has turned on suggestion rewards, you earn points when your work-related suggestion is implemented. Your points appear at the bottom of the box under the Suggestion points heading. If you sent it anonymously, open the submission and tap Claim the points to take the points; in this case, your name is disclosed only to the readers of that suggestion.
Following the reply to your submission
Who: Employee · Where: Team → Suggestions and complaints → Sent by me / Look up by tracking number
What it does: You see the status of your submission and the reply, and you write additional information.
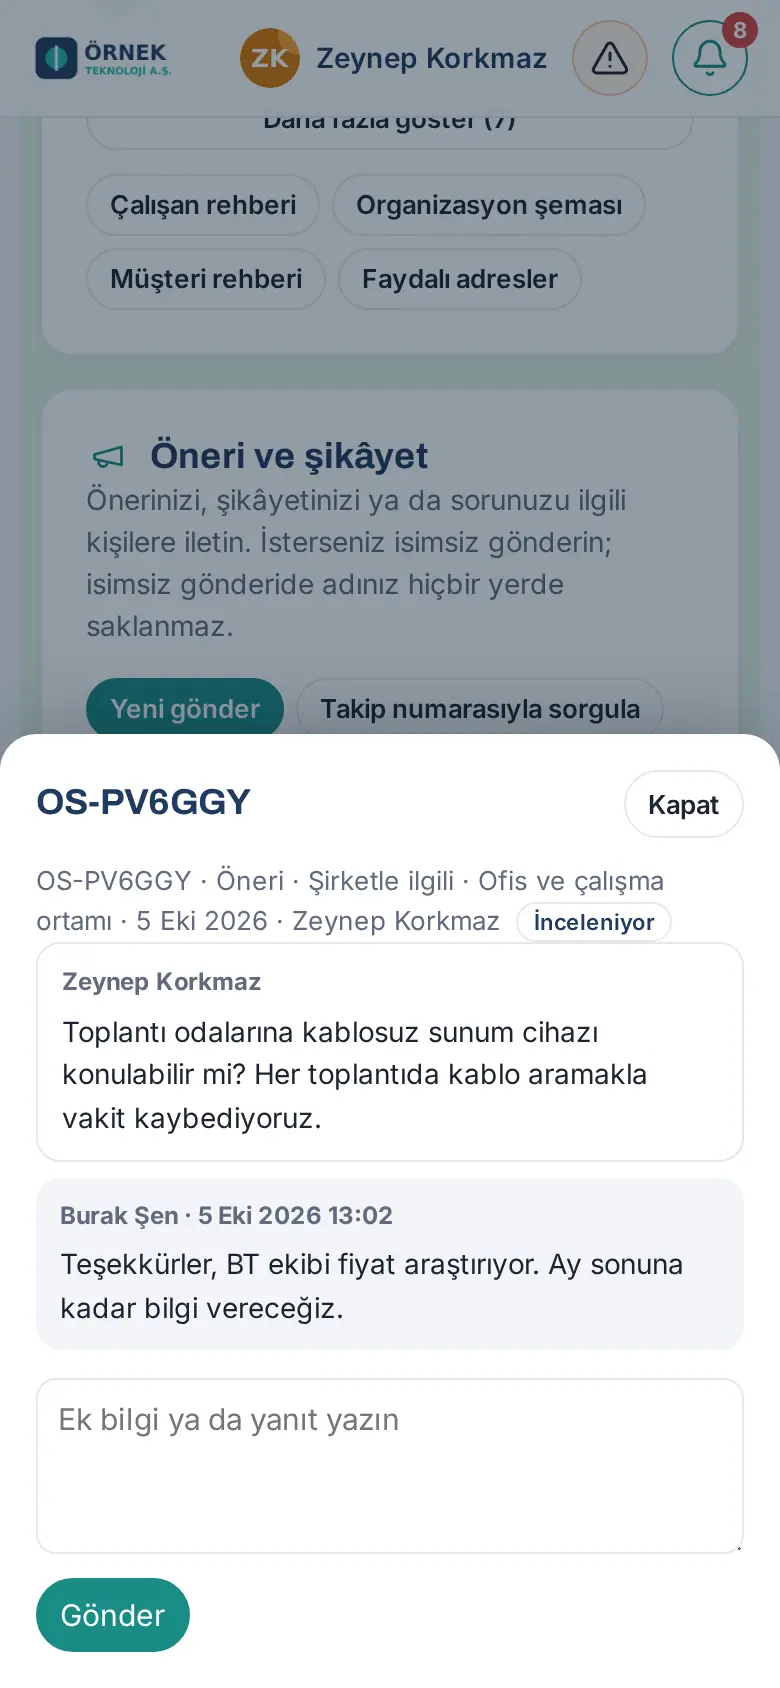
- Your named submissions and the anonymous submissions you kept on this device are listed under Sent by me. Status labels: New, Under review, Answered, Closed, Implemented.
- Tap a submission. The text you wrote and the replies appear.
- To give additional information, write in the Write additional information or a reply box and tap Send.
Looking up from another device (anonymous submission):
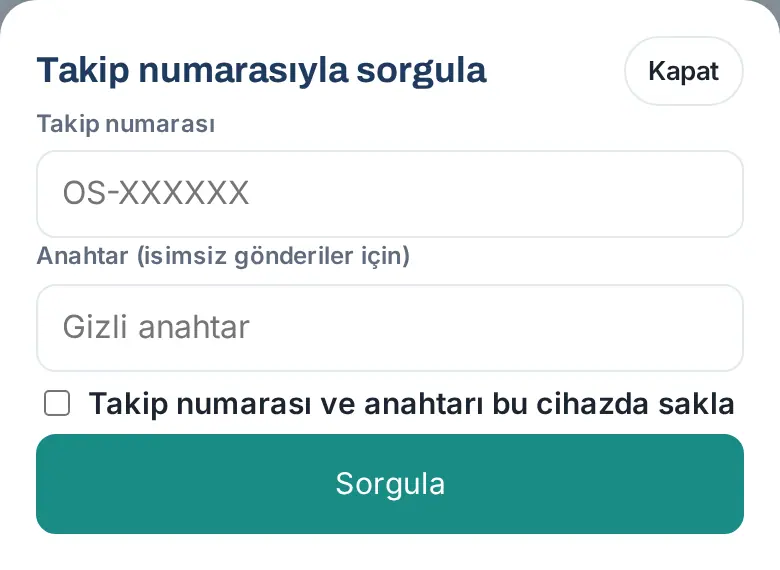
- Tap Look up by tracking number.
- Fill in the Tracking number and Key (for anonymous submissions) fields.
- Tap Look up.
Tip: When your named submission gets a reply, you get a notification and an email. For an anonymous submission, no notification comes; check the reply with your tracking number.
Messages: connecting to Google Chat
Who: Employee · Where: Top bar → Messages (on a phone, the speech bubble icon)
What it does: Messages lets you write to your colleagues and to the whole company without leaving the app. It runs on your company's Google Chat: messages go out with your name and also appear in Google Chat. For this, you connect your Google account once.
Before you start:
- The Messages button appears only if your company has set up and turned on Messages (Admin → Integrations → Messages; see 13. Integrations).
- You connect with your company Google account. The email of the Google account must be the same as the email in your Prozence record; a personal Gmail account cannot be connected.
- Messages does not appear in a shared device session.
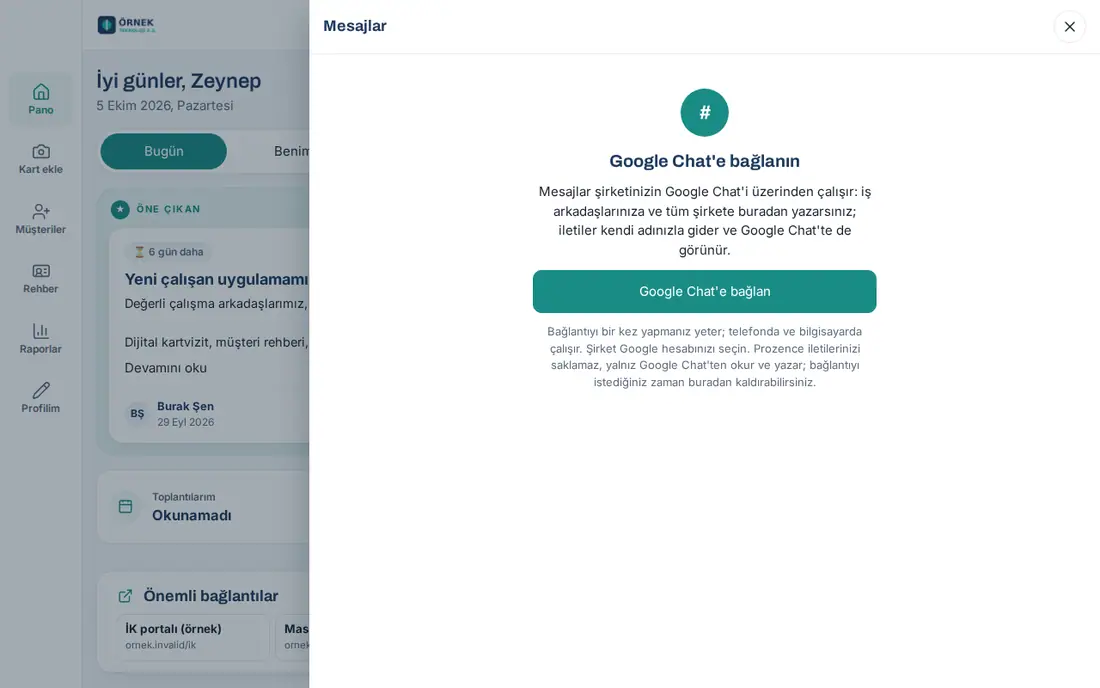
- Click Messages in the top bar (on a phone, tap the speech bubble icon). On a computer, the panel opens from the right; on a phone, it opens full screen.
- If you are not connected, the "Connect to Google Chat" screen appears. Tap Connect to Google Chat.
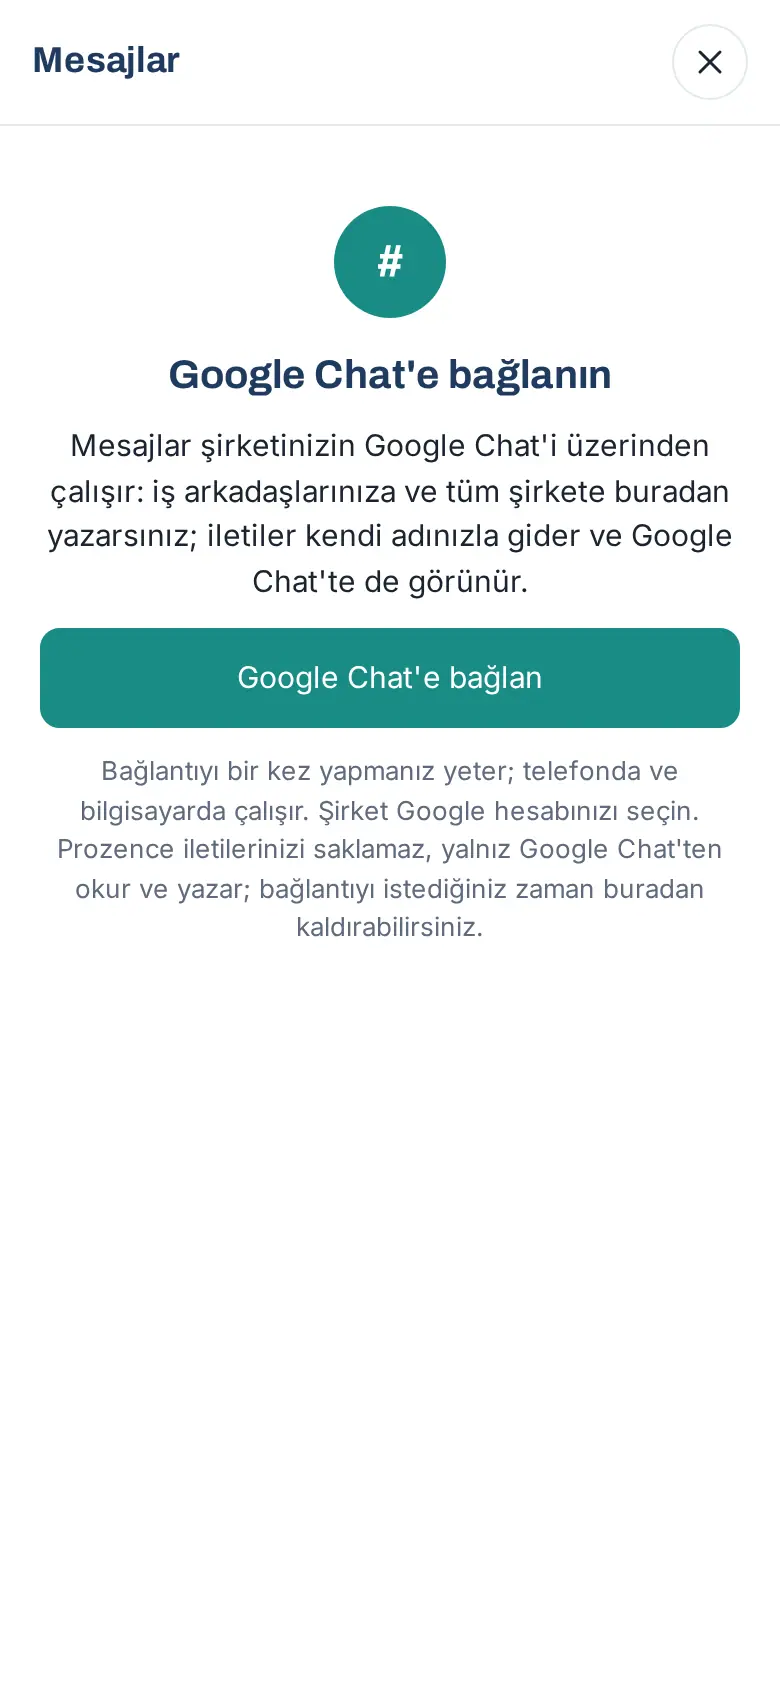
- Google's sign-in screen opens. Select your company Google account.
- On Google's consent screen, tick all the requested permissions and confirm.
- You return to the app and the message "Google Chat connected." appears. Your conversations are listed in the panel.
In the Prozence phone app: The consent screen opens in an external browser window, and the panel shows "Finish connecting in the window that opened, then come back here." When you finish the consent and return to the app, the panel refreshes automatically.
Common messages:
- "The connected Google account (…) does not match the email in your Prozence record (…). Try again with your company account." — You selected the wrong Google account.
- "Not all permissions were granted on the Google consent screen. Connect again and tick them all."
- "Connection cancelled." — You cancelled on the Google screen.
- "The connection request has expired. In Prozence, press "Connect to Google Chat" again in Messages." or "The connection session did not match or has expired. Try again from Messages."
- "Google client details are wrong (Admin → Integrations → Messages)." — There is an error in the setup; tell your administrator.
- "Your record has no email address." — Ask HR to add your work email to your record.
Tip: You need to connect only once; it works on both the phone and the computer. Prozence does not store your messages; it only reads from and writes to Google Chat.
Important: These steps could not be shown with a real Google account on the demo site; the images show the screen of an employee who is not connected.
Chatting in Messages
Who: Employee · Where: Top bar → Messages
What it does: You read your one-to-one conversations, your group chats and the Whole company space, and you reply to them.
Before you start: You must be connected to Google Chat (see Messages: connecting to Google Chat).
- Click Messages in the top bar. The red number on the button is the number of unread conversations.
- Your conversations appear in the list on the left:
- Whole company is always at the top (the Google Chat space that your company selected).
- One-to-one conversations show the other person's name and photo; group chats show the Group label and other spaces show the Space label.
- An unread conversation has a dot next to it.
- To find a conversation, type in the Search conversations box.
- Click a conversation. The messages open on the right (full screen on a phone): the sender's name (in groups and spaces), the time and the message. Links can be clicked.
- For older messages, click Older messages at the top.
- Type your message in the box at the bottom (Write a message in a one-to-one conversation; Write to everyone in Whole company, group chats and spaces) and click Send. On a computer, Enter sends and Shift+Enter starts a new line. A message can be at most 4000 characters.
- Messages that contain an attachment, an image or a card show "Attachment or card: open in Google Chat". To open the conversation in Google Chat, click Open in Google Chat in the header.
- To close the panel, click the close button at the top right or press Esc. On a phone, you go back from a conversation to the list with the back arrow.
Image: The connected panel (with messages) cannot be shown on the demo site; it needs a Google Chat connection. For where the panel opens, see the connection image above.
Common messages:
- "You are not a member of this space yet. Join it in Google Chat or ask your manager to add you." — You are not a member of the Whole company space.
- "Your Google Chat connection is no longer valid. Connect again." / "Your Google Chat connection has expired. Connect again." — Tap Connect to Google Chat in the panel again.
- "Google Chat can't be reached right now. Try again shortly." — Google cannot be reached for a while.
- "The message is empty." / "A message can be at most 4,000 characters."
Tip: While the panel is closed, the unread number refreshes once a minute. Instant phone notifications come from the Google Chat app.
Important: Sending attachments, editing / deleting messages, reactions and thread replies are not available in Messages; use Google Chat for these. A new group chat or space opened in Google Chat appears in the list automatically.
Starting a new message
Who: Employee · Where: Messages → New message
What it does: Opens a one-to-one conversation with a colleague you have not written to before.
- In the Messages panel, click New message.
- Type the person's name or job title in the Search people (name, title) box.
- Select the person in the list. If you already have a one-to-one conversation, it opens; otherwise, a new conversation opens.
- Type your message and click Send.
From a profile: If you click Send message on a colleague's profile, Messages opens on the same page with a one-to-one conversation with that person (see 08. Directory and organization).
Common messages:
- "This conversation was just opened and Google did not accept the first message from here. Press "Open in Google Chat" and write the first message there; later messages go from here." — Click Open in Google Chat above the message box and write the first message in Google Chat.
- "Couldn't start a Google Chat conversation with this person (they may not use Google Chat or may be outside the company)."
- "This person's record has no email." / "No matching people."
Image: Cannot be shown on the demo site (needs a Google Chat connection).
Hiding meeting chats and conversations
Who: Employee · Where: Messages → Show meeting chats, Hide from list, Hidden
What it does: Hides the chats that Google Meet opens for each meeting and the conversations that do not interest you, so that they do not crowd the list. Hiding affects only your list in Prozence; the conversation in Google Chat is not touched.
Meeting chats:
- Meeting chats (chats whose name ends with a date, such as "… - 2 Oct") are hidden in the list by default and are not included in the unread number.
- To see them, tick the Show meeting chats box at the top of the list. Your choice is saved.
Hiding a conversation:
- Open the conversation.
- Click Hide from list in the header. The message "Conversation hidden from the list; it is under "Hidden"." appears.
- To see hidden conversations, click Hidden (n) at the top of the list, next to Show meeting chats (this button does not appear if there are no hidden conversations or while you are searching); they are listed in a faded color. To close them, click Close hidden (n).
- To undo, open the conversation and click Show in list. The message "Conversation is back in the list." appears.
Tip: The Search conversations box also finds hidden conversations. Hidden conversations are not included in the unread number.
Important: The Whole company space cannot be hidden ("This conversation cannot be hidden.").
Image: Cannot be shown on the demo site (needs a Google Chat connection).
Removing the Messages connection
Who: Employee · Where: Messages → bottom of the list → Remove connection
What it does: Removes Prozence's access to your Google Chat account.
- Open the Messages panel.
- Below the conversation list, find the "Connected account: …" line and click Remove connection.
- Confirm the question "Remove your Google Chat connection? Your messages in Google Chat will not be deleted.".
- The message "Google Chat connection removed." appears and the panel goes back to the "Connect to Google Chat" screen (see Messages: connecting to Google Chat).
Tip: The connection of an employee who leaves the company and of a deleted record is removed automatically. The access is also revoked on Google's side.
Image: When the connection is removed, the panel goes back to the screen in the connection image.
Viewing the company calendar
Who: Employee · Where: Tools → Calendar → Next 14 days (on a computer, Board → Calendar)
What it does: You see the company events, public holidays, birthdays, work anniversaries and the people on leave for the next 14 days in one list.
- Tap Tools in the bottom menu, then Calendar. On a computer, click the Calendar tab on the Board.
- In the Next 14 days list, events are sorted by day. The type of event is shown with a colored line and the text below it (e.g. "Company event", "Work anniversary", "On leave · Yerine: …").
- To filter, use the buttons at the top: All, Events, Celebrations, Time off, Customers.
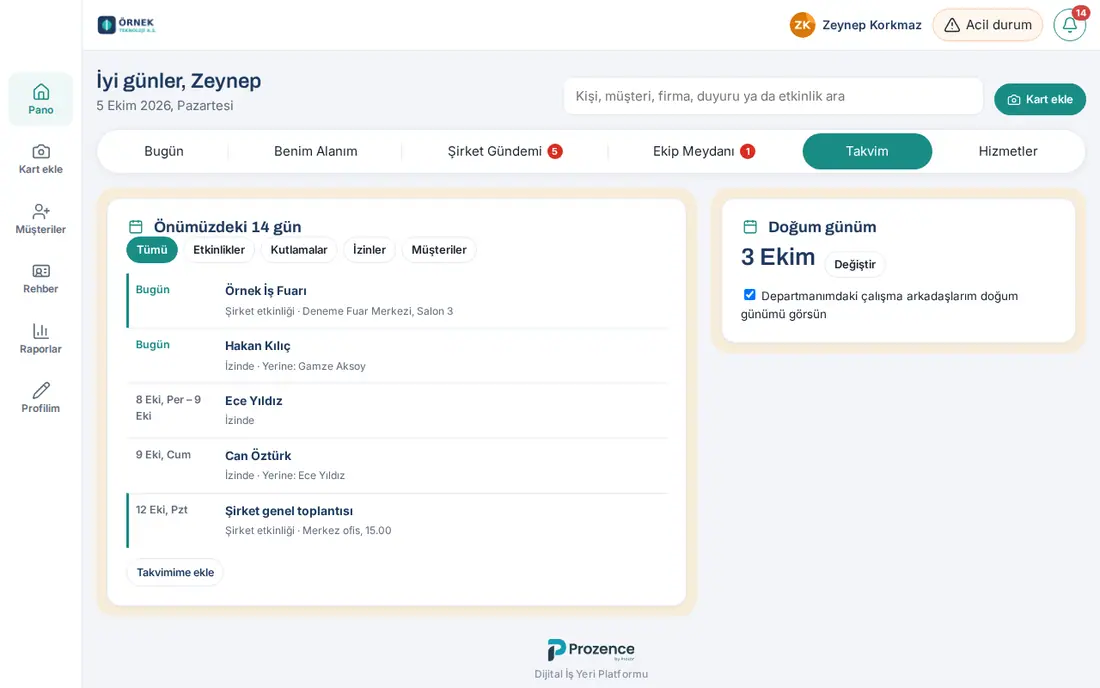
- If your company has set up the personal calendar connection, the All · My calendar · Company selection also appears above the list. In this case, the filter buttons appear only while Company is selected; for your own meetings, see Viewing your own meetings (My calendar).
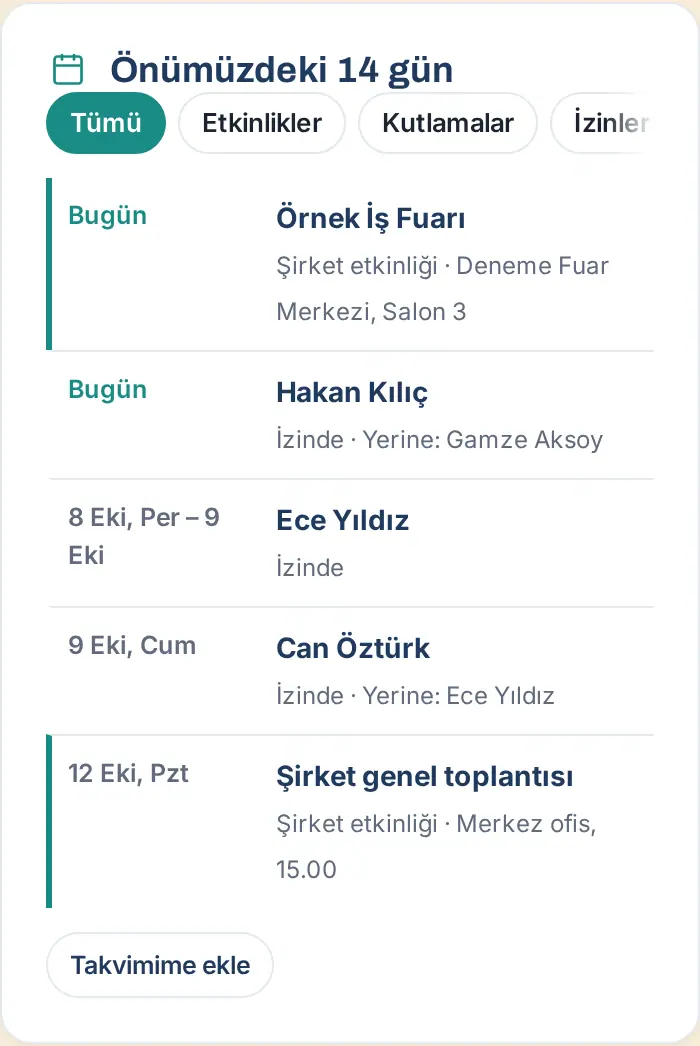
Tip: The Customers filter shows the birthdays of the customer contacts you have access to. If a colleague on leave shows "Yerine: …" ("covering: …"), send work to that person during that time.
Important: You need permission to add an event. If you have permission, the + Event button appears in the box.
Viewing your own meetings (My calendar)
Who: Employee · Where: Tools → Calendar → My calendar (on a computer, Board → Calendar)
What it does: Shows the meetings of the next 14 days from your own Google Calendar or Outlook calendar on the Calendar tab, together with the company calendar. You go to a meeting with the Join button.
Before you start:
- Your company must have set up the Google Workspace (service account) or Microsoft 365 connection. You do not need to connect anything yourself.
- In Admin → Calendar and Board → Calendar → Employees’ own calendars, the option "Everyone sees their own Google / Outlook calendar on the Calendar tab (My calendar)" must be ticked (it is ticked by default).
- If one of these two conditions is missing, the Calendar tab looks as before: the All · My calendar · Company selection and the My meetings tile do not appear.
- Tap Tools in the bottom menu, then Calendar. On a computer, click the Board → Calendar tab.
- In the selection above the Next 14 days box, select My calendar.
- All: the company calendar and your own calendar together, day by day. Within a day, all-day events come first, then the meetings in time order.
- My calendar: only your own meetings.
- Company: only the company calendar; the Events, Celebrations, Time off, Customers filters appear only here.
- Each meeting shows the date ("Today" for today), the title, the time (e.g. "10.00–11.00") and the place if there is one. All-day events show "All day".
- If the meeting has a Google Meet, Teams, Zoom or Webex link, tap Join; the meeting opens in a new tab.
- To open the meeting in your calendar program (Google Calendar or Outlook), tap its title.
- Below the list, you see "Only you can see this · Google Calendar · time". To update immediately, tap Refresh.
- If you do not want to see your own calendar on this tab, tap Don’t show my calendar here. To turn it back on, tap Show in My calendar.
My meetings in Today: While My calendar is on, the My meetings tile appears at the top of Today. It shows the time and name of today's next meeting and, below it, "N more meetings today" or "Last meeting today". Tap it to open this screen with My calendar selected (see Today: the day's overview).
Messages you may see on the screen:
- "Loading your calendar…"
- "You have no meetings in the next 14 days."
- "You have hidden your calendar on this tab." (with Show next to it)
- "Your record has no work email, so your calendar cannot be read."
- "Your calendar could not be read: …" — There is a problem with the connection; the My meetings tile shows "Could not be read". If it continues, tell your administrator.
- "You refreshed too often. Please wait a moment." — Refresh can be used at most 20 times in 10 minutes.
Privacy:
- Only you see your calendar; your manager and your colleagues cannot see it.
- A meeting marked "Private" in Google appears as "Busy"; its title, place and link are not shown.
- Meetings that you declined, cancelled meetings and "working location" entries are not shown.
- Meetings are not stored permanently; a temporary cache of a few minutes is used.
Important: My calendar is read-only. You create and change meetings and respond to invitations in Google Calendar or Outlook. Only your primary calendar is read; shared calendars and calendars you subscribed to do not appear.
Image: The demo site has no Google / Microsoft calendar connection, so the My calendar screen cannot be shown; the image shows how the Calendar tab looks without the connection.
Subscribing to the company calendar
Who: Employee · Where: Tools → Calendar → Add to my calendar
What it does: You see the company calendar (holidays, events, birthdays, work anniversaries, leave, and the birthdays of the customers you have access to) in your own Google Calendar or in Outlook. The calendar updates automatically.
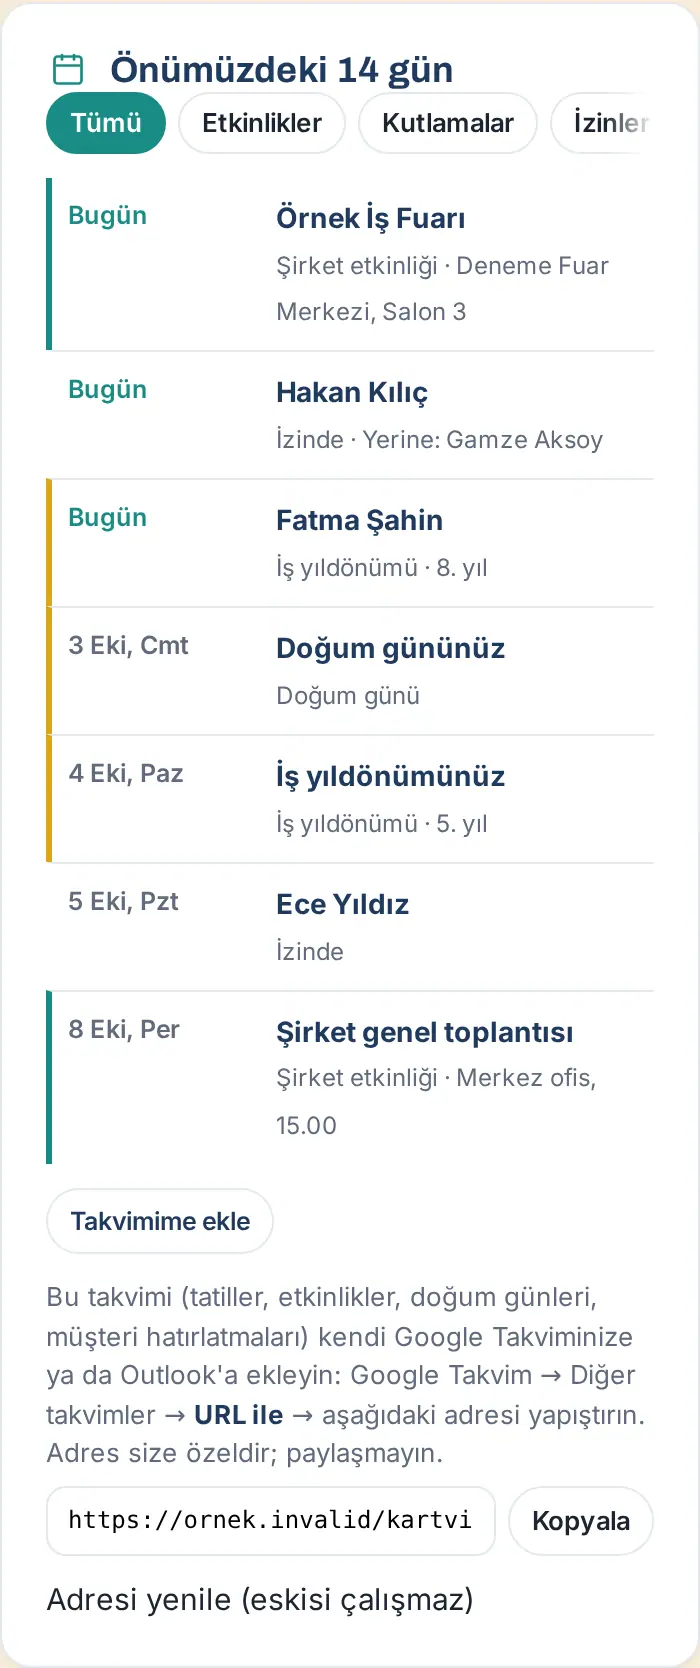
- On the Calendar screen, tap Add to my calendar below the list.
- Your personal calendar address appears. Tap Copy.
- Open your calendar program:
- Google Calendar: Other calendars → From URL → paste the address you copied → Add calendar.
- Outlook: Add calendar → Subscribe from web → paste the address.
- In a few minutes, the company calendar appears in your program as a separate calendar.
Important:
- The address is personal to you; do not share it. A person who gets the address can see your calendar.
- If you shared the address by mistake, tap Renew link (the old one stops working) and confirm. Calendars where you added the old address do not update; add the new address again.
FAQ:
- A change does not appear in my calendar program immediately. Google Calendar and Outlook subscriptions refresh at intervals (every few hours). For up-to-date information, look at the calendar in the app.
My tasks
Who: Employee · Where: Tools → Today → My tasks (on a computer, Board → Today)
What it does: Collects the tasks that you need to follow up in one list.
- On the Tools → Today screen, scroll down to the My tasks box.
- The box can show:
- Follow-up reminders: your customer follow-up reminders due by tomorrow.
- Customer job title / job change suggestions that are waiting for your approval.
- Cards I added recently: the customer cards you added most recently.
- Messages: cards shared with you and replies to your notes.
- Shortcuts for an ongoing trade fair or for post-fair thank-you emails that are waiting.
- Tap a row to open the related record.
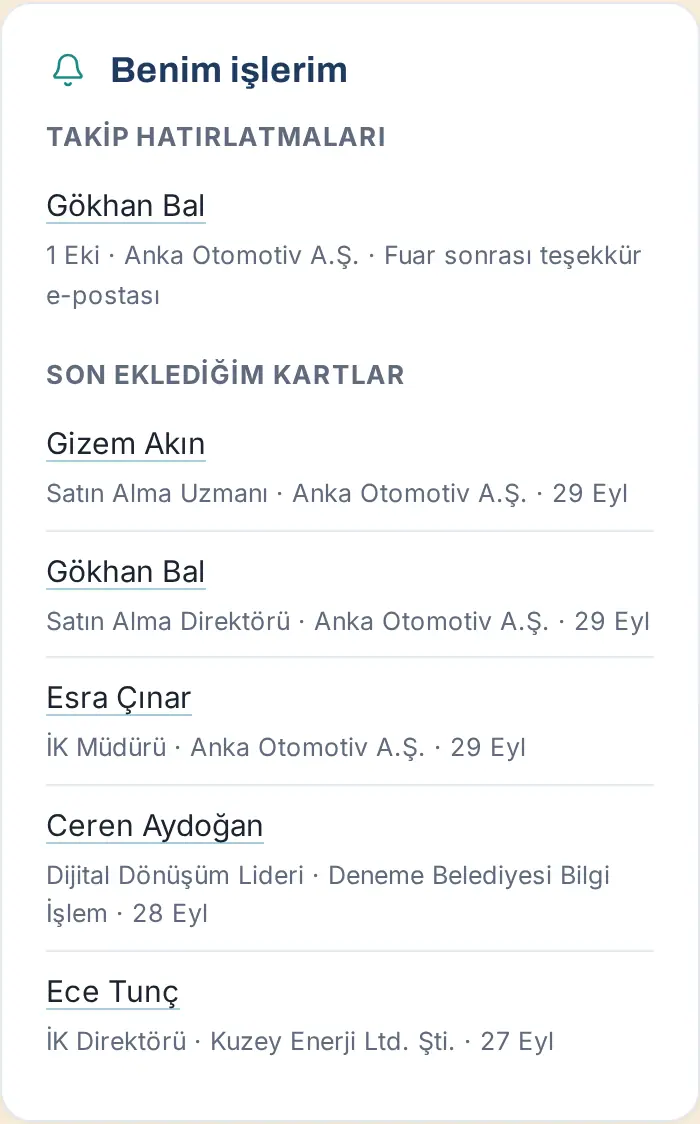
Tip: If there are no pending tasks, the box shows "Nothing pending for today.". For adding reminders and customer cards, see 04. Customer directory.
Important links
Who: Employee · Where: Tools → top of Today → Important links (on a computer, Board → Today; in the single-page layout, the top of the page)
What it does: You reach the web addresses that the company added and that you use often (HR portal, support page, etc.) with one tap.
- Important links stands at the top of Today, right below the Work time / My leave / My expenses tiles, in a single full-width row. In the single-page layout it is at the top of the page (below Featured, above the My Space row).
- Tap a link to open it. On a phone, the strip scrolls sideways; swipe it with your finger to see the other links.
- To add your own link or change the order, tap Edit.
- Fill in the Name (e.g. Leave form) and Adres (https://…) ("address") fields and tap + Add.
- To change the order, use the ↑ and ↓ arrows next to the link.
- Tap Save. To cancel, tap Cancel.
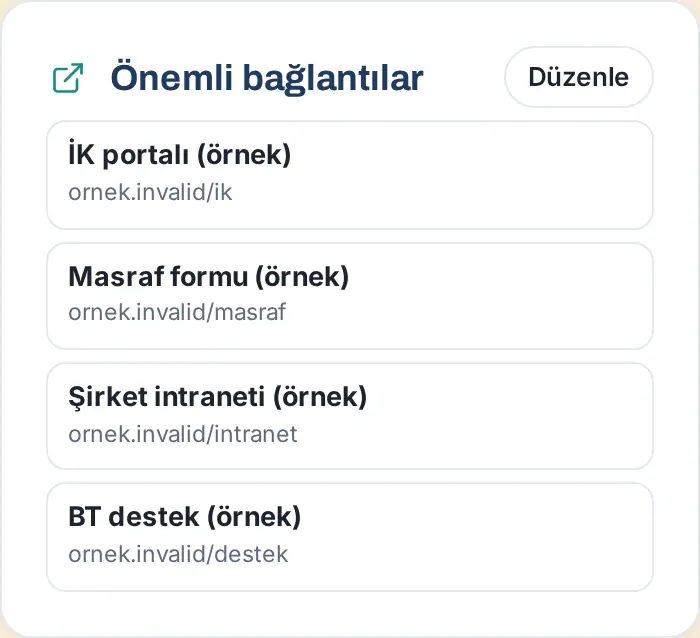
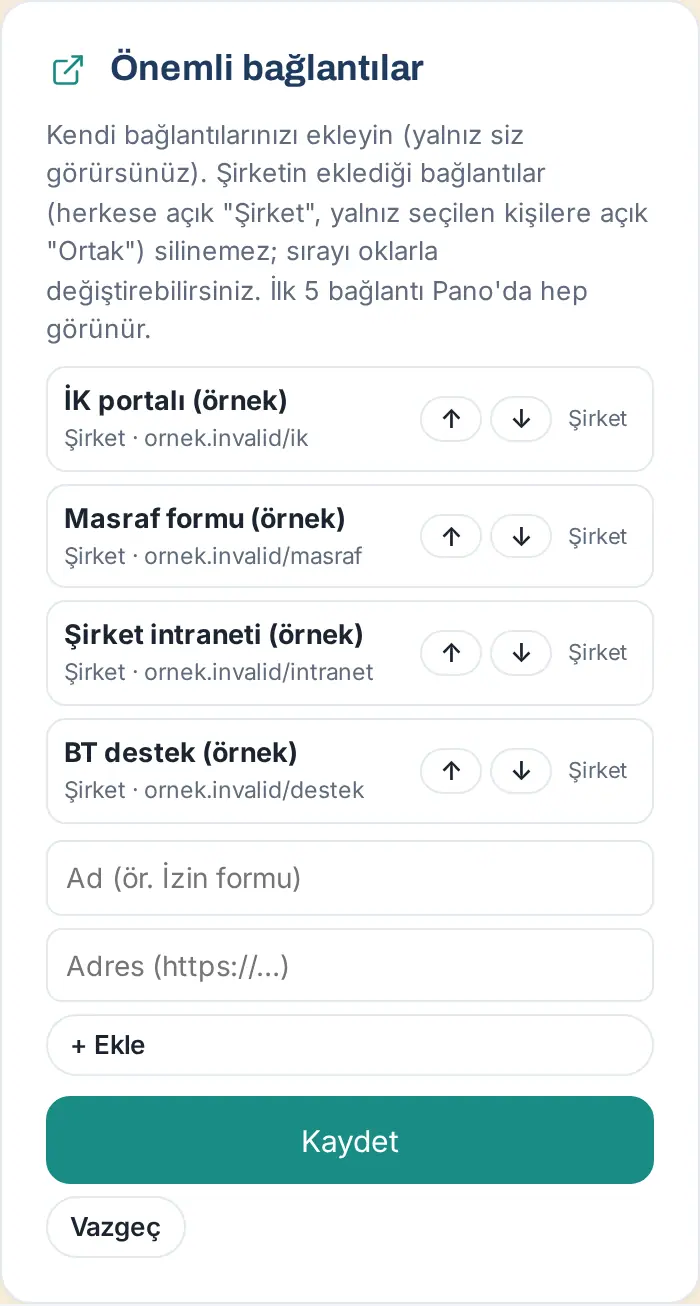
Tip: Only you see the links you add. You can remove your own link with Delete. The first 6 links always appear; for the rest, tap Show all (n) (n is the total number of links). To shorten the list again, tap Show less.
Important: Links that the company added (labeled Company or Shared) cannot be deleted; you can only change their order.
Onboarding checklist for new employees
Who: New employee · Where: Tools → My Space → Onboarding (on a computer, Board → My Space)
What it does: Shows the tasks for your first days, who is responsible for them and their dates, step by step.
Before you start: The list appears only if HR has started your onboarding process.
- Open the Tools → My Space screen. Onboarding is the first box and appears as a short card.
- At the top, you see Welcome!, your start date, your manager and your buddy (the colleague who will help you).
- The progress bar and the "x / y steps done" line below it show how many steps are complete.
- The short card shows only the next 3 steps that are not done. Each step shows the date and the person responsible (e.g. "İK: …" for HR, "BT: …" for IT). Steps whose date has passed show "gecikti" ("overdue").
- When you complete a step that is yours, tick the box next to it. In some steps, a button such as Open my profile or Open policies takes you to the related screen.
- To see the welcome text, the completed steps and all steps, tap Open all. The card opens at full width; to undo, tap Collapse.
Tip:
- The people responsible for other steps tick them; you only see who has them.
- If you come from an onboarding notification or from the Waiting for you list in the bell, the card opens fully.
- When all steps are done, the process closes and the Onboarding box disappears from My Space.
Searching the Board
Who: Employee · Where: Tools → Today (on a computer, at the top of the Board)
What it does: You search for colleagues, customers, companies, announcements, policies, surveys, events and Team Square posts from one box.
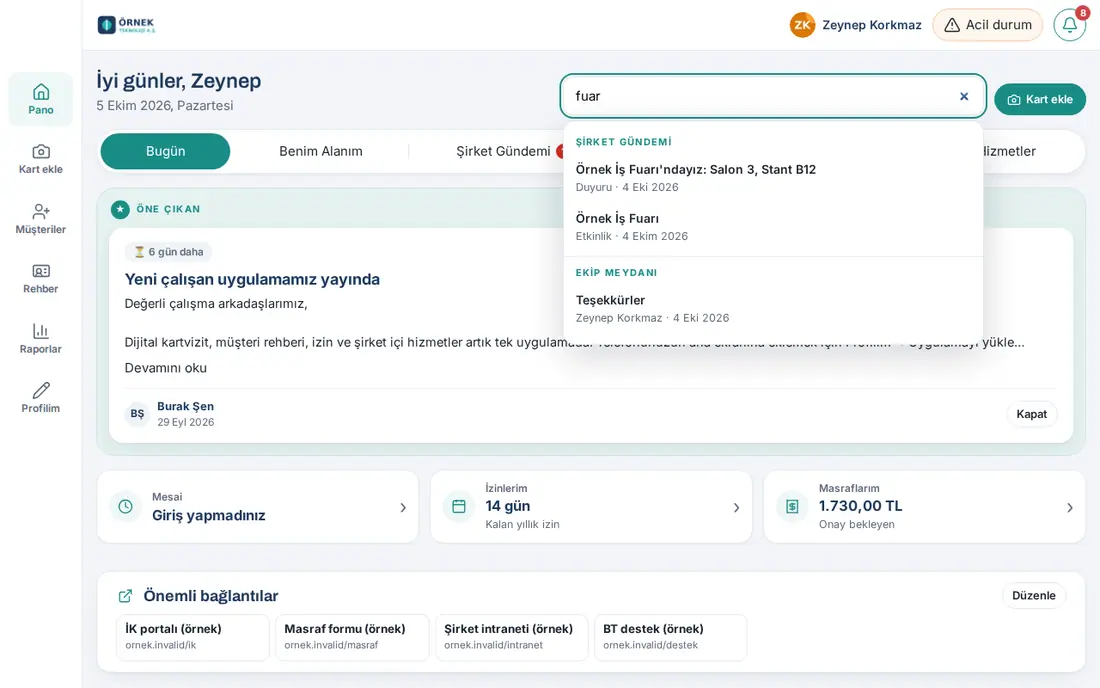
- Type at least 3 letters in the Search people, customers, companies, announcements or events box at the top.
- The results open in groups: e.g. Team, Customers, Companies, Company Agenda, Team Square, useful contacts. Each group shows at most 6 results.
- Tap a result to open it. On a computer, you can move between the results with the down / up arrow keys and open one with Enter.
- To clear the search, tap the × button in the box.
Tip: Turkish letters and upper / lower case do not matter. You can also find colleagues by their expertise and interests (see 00. Getting started).
Important: Search does not give you new access: only the customer records and announcements that you can already see appear in the results.