28. Fixed assets and asset assignment
Screenshots show the Turkish interface of Prozence with fictional "Örnek Teknoloji A.Ş." data; the English interface has the same layout.
All company items (computer, phone, monitor, furniture, vehicle, access card…) are recorded on the Assets screen. The asset officer assigns an item to an employee (asset assignment, zimmet); when the employee taps "I've received it" in the My assets box, a digital handover record is created. If an item is lost, stolen, damaged or faulty, the employee reports an incident from the app; the officer examines the incident and resolves it. Officers also do stock counts, print QR labels, import the existing inventory from Excel and add purchased products directly to the fixed assets.
This chapter is for employees and asset officers. For the settings of the asset assignment module and custom categories, see 31. Request, mailroom, purchasing and fixed asset management.
Who: Employee · Asset officer (asset operator or module admin) · Asset viewer
In this chapter
Employee
- My assets box
- Confirming receipt of an assigned item
- Item details and handover record
- Reporting loss, theft, damage or a fault (incident report)
- Confirming your item in a stock count
Asset officer
- Assets screen
- Recording an asset
- Assigning an asset
- Asset details: return, status, editing and deleting
- Following incidents
- Starting a review of an incident
- Resolving an incident: cost and fault assessment
- Starting a stock count
- Marking items in a count and counting by QR
- Printing QR labels
- Opening an asset by scanning its QR code
- Importing from an Excel or CSV file
- Adding purchases to fixed assets
Before you start: The asset assignment module is off by default in the company. If you do not see the My assets box, the module is not on in your company. Only asset officers and viewers see the Assets menu. The screens in this chapter use data from the fictional "Örnek Teknoloji A.Ş."; the QR codes on the labels point to a fictional address.
My assets box
Who: Employee · Where: Tools → My Space → My assets (on a computer, Board → My Space)
What it does: Shows the company items assigned to you, the items that wait for your receipt confirmation and a stock count that is in progress.
- Tap Tools in the bottom menu and select My Space in the strip at the top.
- Go to the My assets box.
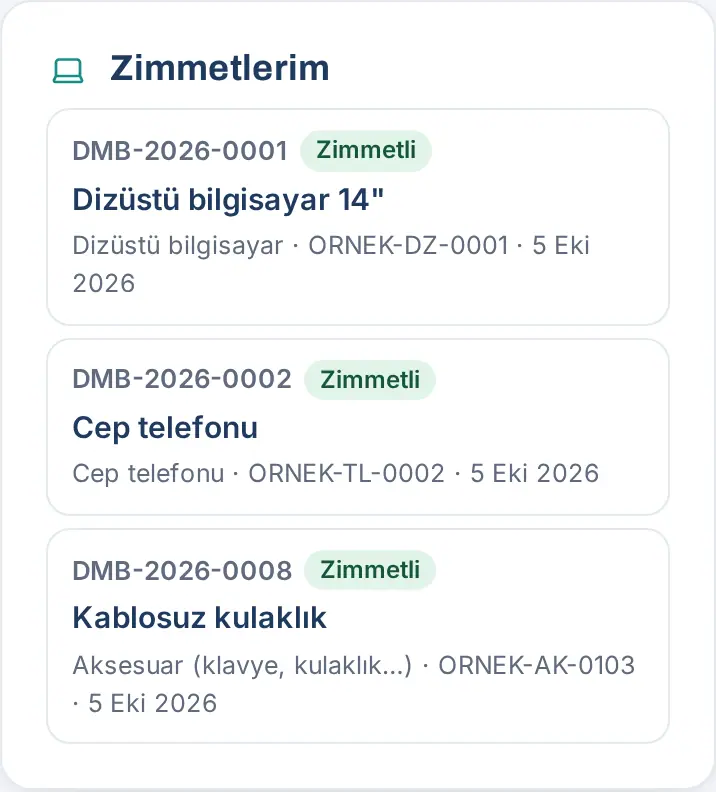
- Each item shows the asset number (e.g. DMB-2026-0001), status, item name, type, serial number and date issued.
- To see the details of an item, tap it.
Tip:
- The short card shows the first 3 items; to see all of them, tap Open all; to make the card smaller, tap Collapse.
- If an item waits for your receipt confirmation, or a count waits for you, it shows as a separate card at the top of the box and also in the Waiting for you list (see 09. Notifications).
Confirming receipt of an assigned item
Who: Employee · Where: My assets → Please confirm receipt
What it does: You confirm in the app the item that was handed to you. Your confirmation is recorded as a digital handover record.
- When the asset officer assigns an item to you, you get a phone notification. Open the My assets box.
- The Please confirm receipt card shows the item name, the serial number and the items given with it (e.g. "Charger, bag").
- If you received the item complete, tap I've received it.
- If the item did not reach you, or you got a different item, tap I didn't receive it, type a Description and tap Report.
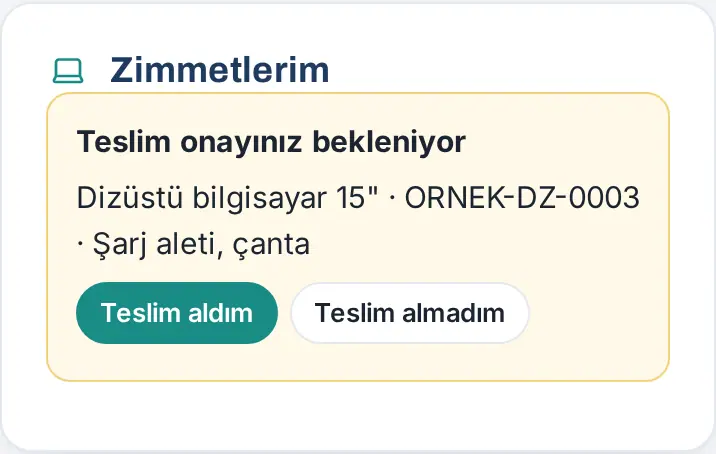
Result: If you tap I've received it, the message "Receipt confirmed; the handover record was saved." shows and the item becomes Assigned. If you tap I didn't receive it, the item goes back to storage and the asset officer is notified.
Common errors: "Write a short note (e.g. item never reached me)." — a description is required for I didn't receive it.
Tip: If the confirmation waits for more than 3 days, you get one reminder. If your company turned off receipt confirmation, the item counts as Assigned as soon as it is assigned, and this card does not show.
Item details and handover record
Who: Employee · Where: My assets → tap the item
What it does: Shows the item's details, its history and the status of the incidents you reported; gives you a paper handover record.
- In the My assets box, tap the item.
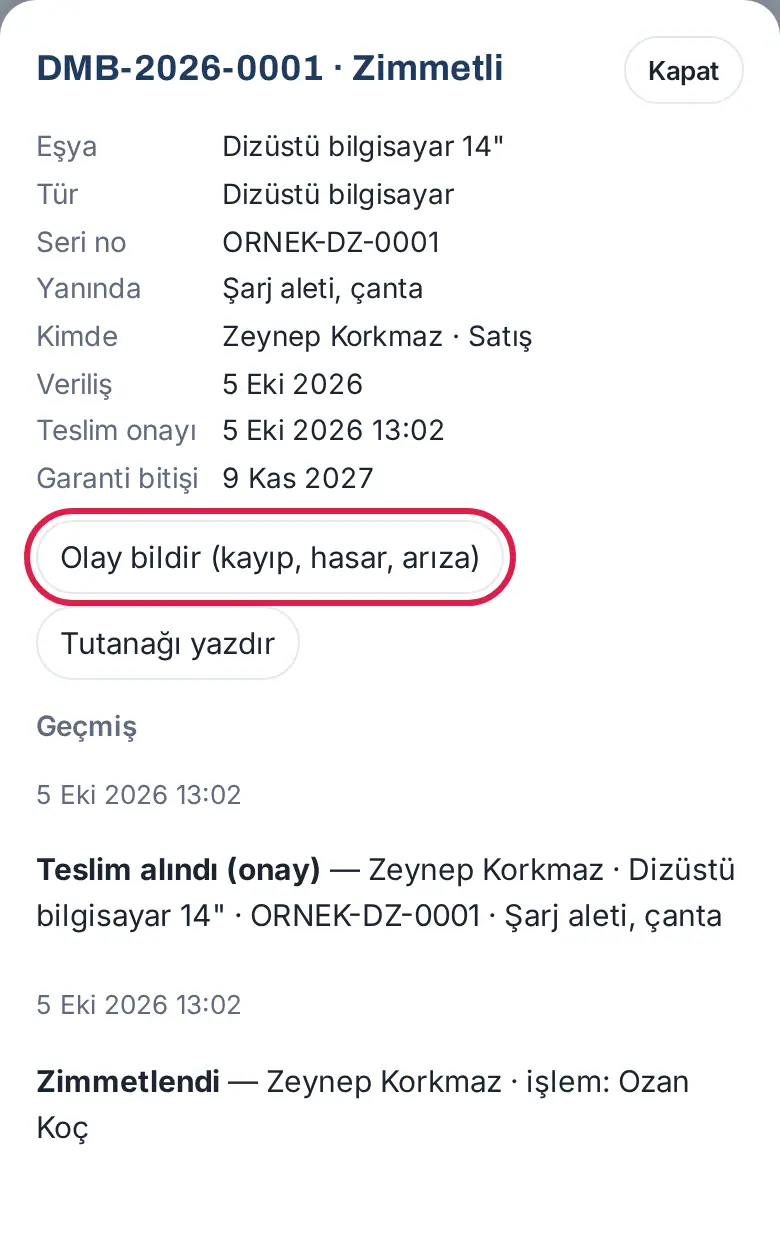
- Read the Item, Type, Serial no., Included, Holder, Issued, Receipt confirmed and Warranty end rows.
- If you reported an incident for the item, the incident number and status (New, Under review, Closed) show.
- At the bottom, the History section shows when the item was given to you and when you confirmed it.
- If you need a signed paper record, tap Print handover record.
Important: When you leave the company, you must return all items assigned to you; the asset officer records the return.
Reporting loss, theft, damage or a fault (incident report)
Who: Employee · Where: My assets → item → Report an incident (loss, damage, fault)
What it does: You report what happened to an item assigned to you to the asset officer as an official incident record. The incident gets a number (e.g. OLY-2026-0001); you follow the result here.
Before you start: You can report an incident only for an item you received (confirmed).
- In the My assets box, tap the item.
- Tap Report an incident (loss, damage, fault).
- In the What happened? list, select Lost, Theft, Damage (breakage, liquid…), Fault or Other.
- Select the When? date (today or within the last year).
- If you want, fill in the Where? (optional) field (e.g. "Customer visit, taxi").
- In the Description box, briefly describe what happened (at least 10 characters).
- If you selected Theft and you made a report to the police, select the I filed a police report check box and, if you have one, type the Report no. (optional).
- If you want, add at most 3 photos with Photo (optional).
- Tap Report.
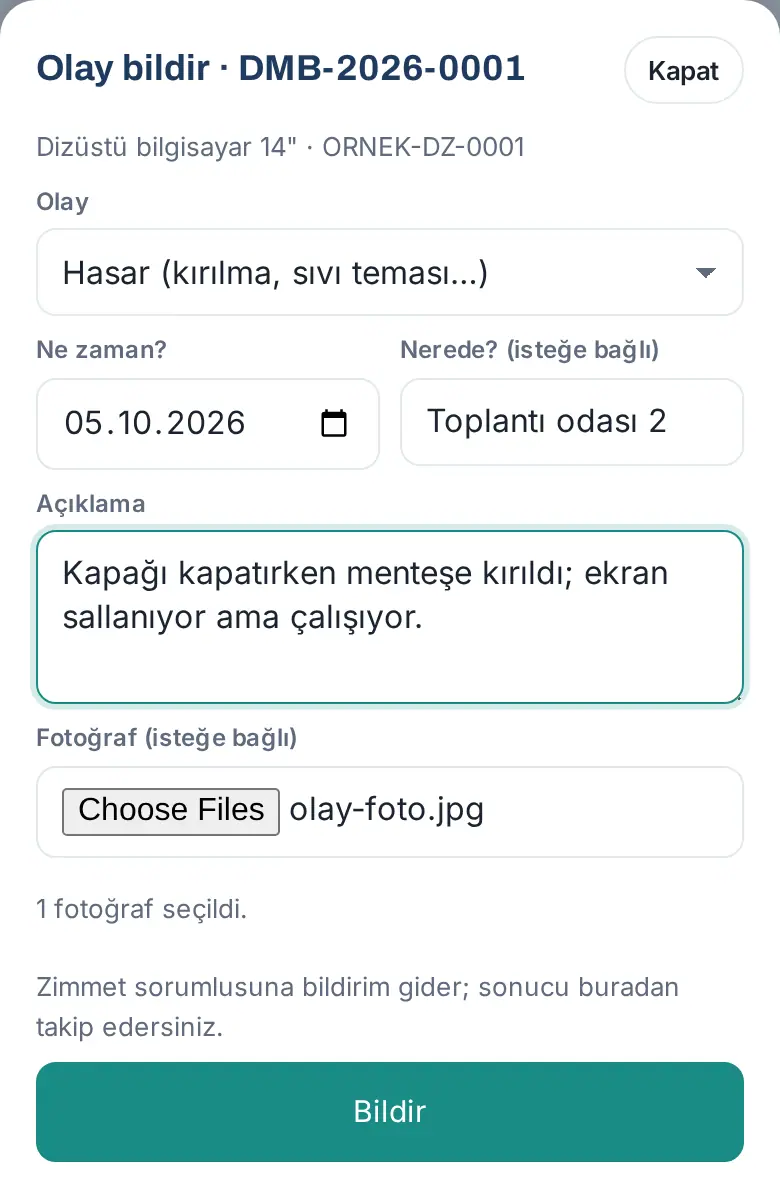
Result: The message "Reported; the asset officer will review it." shows. Asset officers get a phone notification. You are notified when the officer starts a review of the incident and when the officer resolves it.
Common errors:
- "Choose what happened." — you did not select the incident type in the What happened? list.
- "Briefly describe what happened (at least 10 characters)."
- "The incident date must be today or within the last year."
- "You can add up to 3 photos."
- "Bu eşya için açık bir … bildirimi zaten var: OLY-…." ("there is already an open … report for this item") — you cannot report the same type again while an incident of that type is open.
- "You can report incidents only for items you have received."
Tip: Photos are made smaller on the phone (1600 pixels) and kept in a protected folder; only you, the asset officers and the asset viewers see them.
Important: The cost and fault assessment entered for an incident are for the record only; no deduction is made from salary. Only asset officers and viewers see this assessment.
Confirming your item in a stock count
Who: Employee · Where: My assets → Stock count: do you still have these items?
What it does: When the company does a stock count, you confirm with one tap that the item is still with you.
- When the "Stock count" notification arrives, open the My assets box.
- The Stock count: do you still have these items? card lists the name of the count and your items that are in the count.
- If the item is with you, tap I have it.
- If the item is not with you, tap I don't have it, write the reason in the Description box (e.g. "I returned it / it got lost / someone else has it") and tap Report.
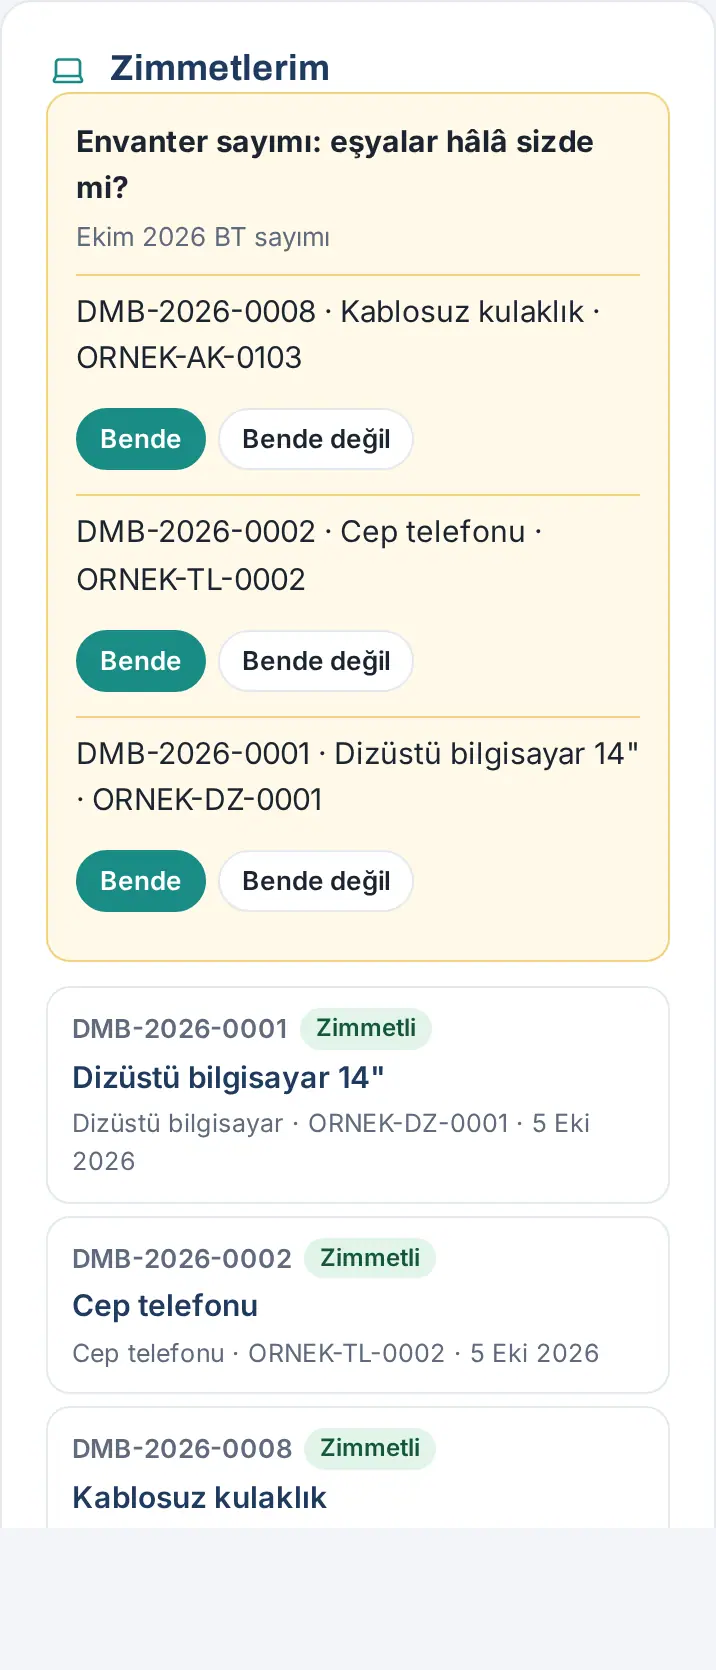
Result: If you tap I have it, the message "Thanks, confirmed." shows. If you tap I don't have it, the message "The asset officer was notified." shows.
Important: If the item was lost or stolen, I don't have it is not sufficient; also report it with Report an incident in the item details.
Assets screen
Who: Asset officer, asset viewer · Where: Left menu → Assets (on a phone, Tools strip → Assets)
What it does: Summarizes and filters all company fixed assets, and collects incidents, counts and items from purchasing in one place.
- On a computer, click Assets in the left menu. On a phone, tap Tools and select Assets in the strip at the top.
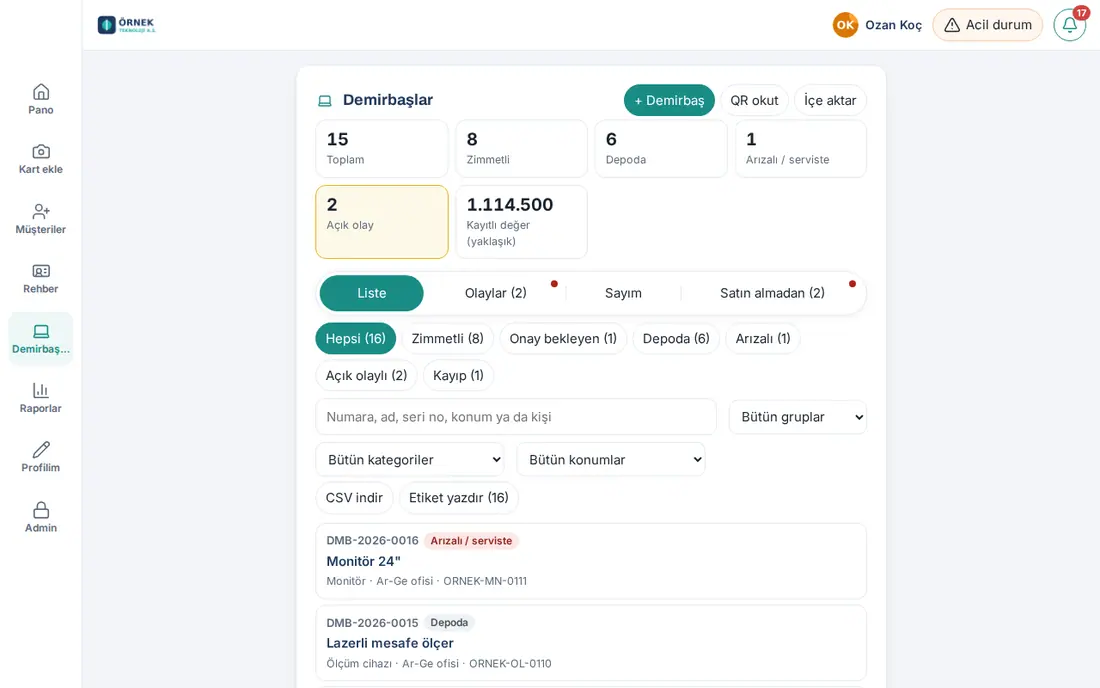
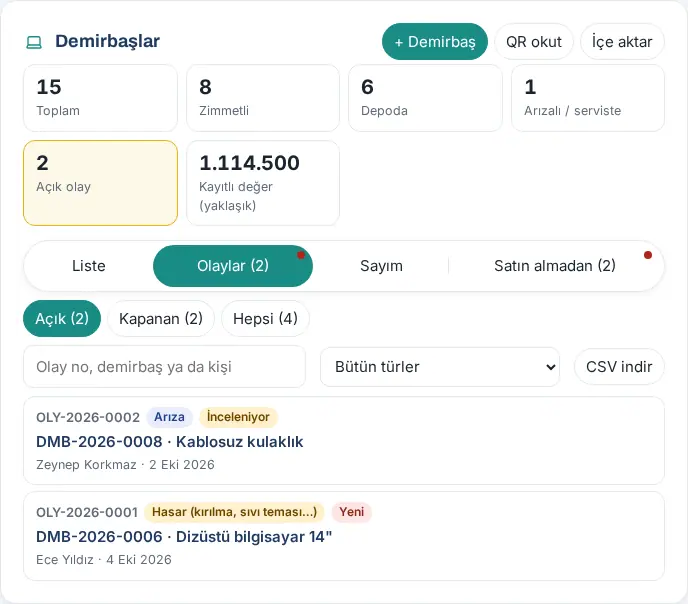
- Read the summary boxes at the top: Total, Assigned, In stock, Faulty / in service, Open incident and Recorded value (approx.). When you click a box, the list is filtered by that status.
- Tabs: List, Incidents (N), Stock count and (if the purchasing module is on) From purchasing (N). A tab with something new shows a red dot.
- In the List tab, select one of the status chips: All, Assigned, In stock, Faulty and, if there are records in that status, Awaiting approval, With open incident, With leavers, Warranty ending, Lost, Disposed.
- If you want, type in the search box (Number, name, serial no., location or person); select from the All groups, All categories and All locations lists.
- Each row in the list shows the number, status, name, category, location, holder and serial no. When you click a row, the details open.
Tip:
- Download CSV exports the filtered list to a file; Print labels (N) prints the QR labels of the items in the filtered list.
- Categories are in five groups: IT equipment, Cards, keys, SIMs, Office and furniture, Vehicles and equipment, Other.
- Recorded value is an approximate total; it does not separate currencies.
- With the Viewer role you see everything but cannot make changes ("Viewer: you can see assets, incidents and counts but cannot make changes.").
Recording an asset
Who: Asset officer · Where: Assets → + Asset
What it does: Adds a new company item to the inventory. The record gets a number and becomes In stock.
- On the Assets screen, click + Asset.
- In the Category list, select the type (e.g. Tablet). For a type that is not in the list, the module admin adds a custom category ("New category: Admin → Modules → Assets.").
- Type the Name / make-model.
- If you want, type the Serial no. (optional) and Location (optional). When you type a location, locations entered before are suggested.
- Select the Purchase date and Warranty end.
- Fill in the Supplier, Invoice no., Included items (e.g. "Case, charger") and Value (e.g. "16.500 TL") fields.
- If you want, type a Note (managers only).
- Click Save asset.
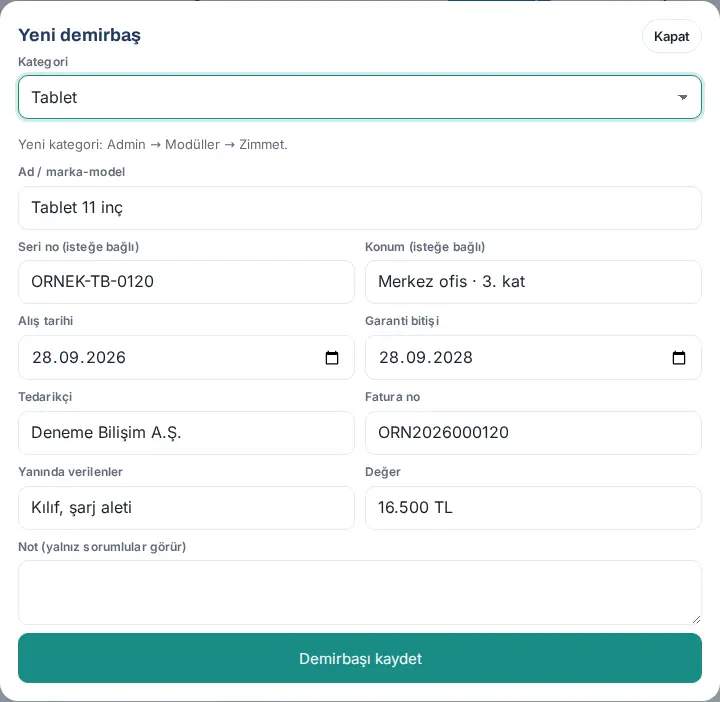
Result: The message "Asset saved: DMB-…" shows; the item is in the list as In stock.
Common errors:
- "Choose a category." — you did not select a category.
- "Enter the item's name or make-model."
- "This serial number is already registered: …." — you cannot enter the same serial number two times.
- "The purchase date cannot be in the future."
Assigning an asset
Who: Asset officer · Where: Assets → item → Assign
What it does: You give an item in storage to an employee.
- In the List, select the In stock chip and click the item.
- Click Assign.
- Type the name in the Employee box and select it in the list.
- If you want, type a Note (optional) (e.g. "New starter; with charger").
- Click Assign.
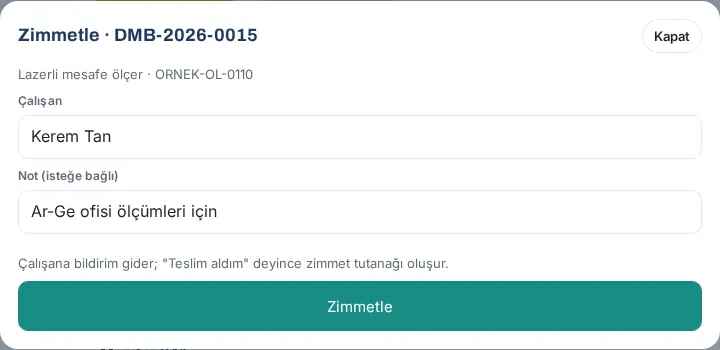
Result: The message "Assigned; the employee was notified." shows. The item becomes Awaiting receipt confirmation; when the employee taps I've received it, it becomes Assigned.
Common errors:
- "Pick the employee from the list."
- "Lost or disposed items can't be assigned."
- "This item is currently with …; take it back first."
Asset details: return, status, editing and deleting
Who: Asset officer (deleting: module admin, Admin) · Where: Assets → click the item
What it does: You see all details, incidents and history of the item; you take it back, change its status and correct its details.
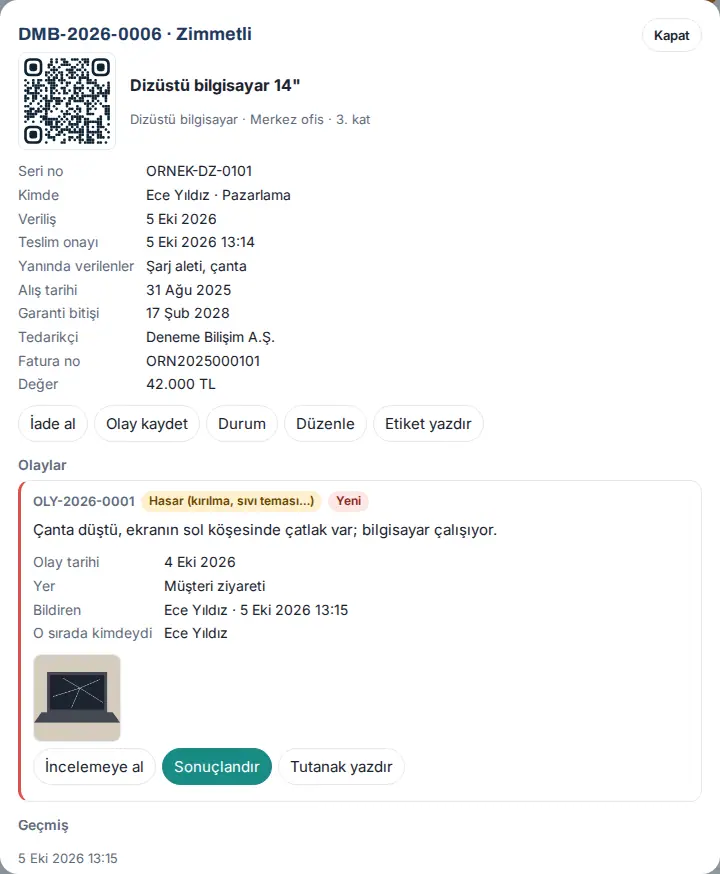
- Click the item in the list. The top of the window shows the item's QR code, name, category and location.
- Read the Serial no., Holder, Issued, Receipt confirmed, Included items, Purchase date, Warranty end, Supplier, Invoice no. and Value rows.
- Buttons (by the item's status): Assign or Take back, Record incident, Status, Edit, Print label, Delete.
- Below are the Incidents and History sections.
Taking an item back:
- Click Take back.
- If the item came back faulty, select the Item returned faulty / damaged (marked as Faulty) check box; if you want, type a note.
- Click Save return. The message "Return recorded." shows.
If there is damage or a missing part, record the cost and the assessment with Record incident after the return.
Changing the status:
- Click Status.
- In the New status list, select In stock, Faulty / in service, Lost or Disposed.
- For lost and disposed, type a Note (required for lost and disposed).
- Save. The message "Status updated." shows.
Recording an incident as an officer: If you learned of an incident before the employee reported it (e.g. you saw damage during the return), click Record incident, enter the incident type, date, place and description, and click Save incident.
Important:
- While the item is with an employee, you can select only Lost; for other statuses, take the item back first.
- Delete removes the record with its incidents and history completely ("Delete the record with its incidents and history?" → Yes, delete). You cannot delete the record of an assigned item. Except for records opened by mistake, change the status instead.
Following incidents
Who: Asset officer, asset viewer · Where: Assets → Incidents (N)
What it does: Shows all incidents that employees reported and that you recorded in one list.
- On the Assets screen, click the Incidents (N) tab.
- Select one of the filters: Open, Closed or All.
- If you want, type in the search box (incident no., asset or person) or select the incident type in the All types list.
- Each row shows the incident number, type, status (New, Under review, Closed), asset and the person who reported it. When you click a row, the asset details open.
- For a file, click Download CSV.
Tip: For incident counts, average time to close and the distribution of fault assessments, see 19. Reports.
Starting a review of an incident
Who: Asset officer · Where: Asset details → Incidents → Start review
What it does: Tells the reporter that you are dealing with the incident; if necessary, you take the item back from the employee.
- In the asset details, go to the Incidents section. The incident shows the type, description, incident date, place, reporter, the holder at that time and the photos.
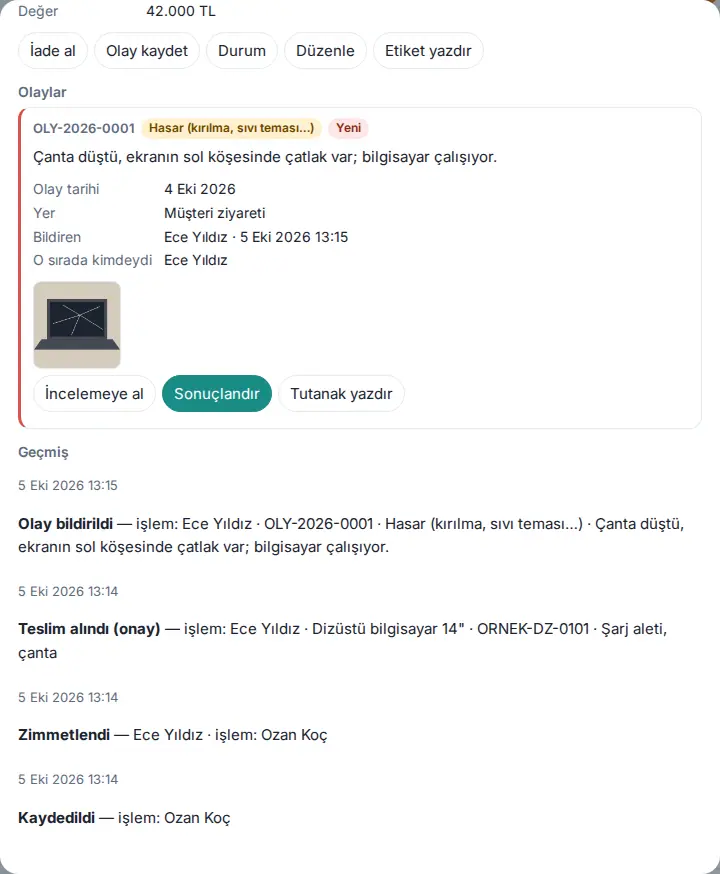
- Click Start review.
- In the Note (sent to the reporter) box, write what you will do (e.g. "Sent for service").
- If you will take the item from the employee, select the Take the item back from the employee and mark it "Faulty / in service" check box.
- Click Start review in the window.
Result: The message "Incident under review; the reporter has been notified." shows; the incident becomes Under review.
Tip: If you need an Asset Incident Report with signature fields for the incident, click Print report.
Resolving an incident: cost and fault assessment
Who: Asset officer · Where: Asset details → Incidents → Resolve
What it does: You record the result of the incident, the new status of the item, the cost and the fault assessment, and close the incident.
- On the incident, click Resolve.
- In the Result list, select the result: by incident type, Repaired, Replaced with a new one, Found, Closed as lost, Disposed or No action needed.
- In the New status of the item list, select: Keep as is (…), Return to storage, Faulty / in service, Lost or Disposed. The storage, faulty, lost and disposed options remove the item from the employee.
- If there is a cost, type the Cost (optional) (e.g. "3.200") and select the Currency.
- In the Fault assessment list, select No fault, Undetermined, Negligence or Intent.
- In the Decision / note (a reason is required for negligence and intent) box, write the decision.
- Click Close incident.
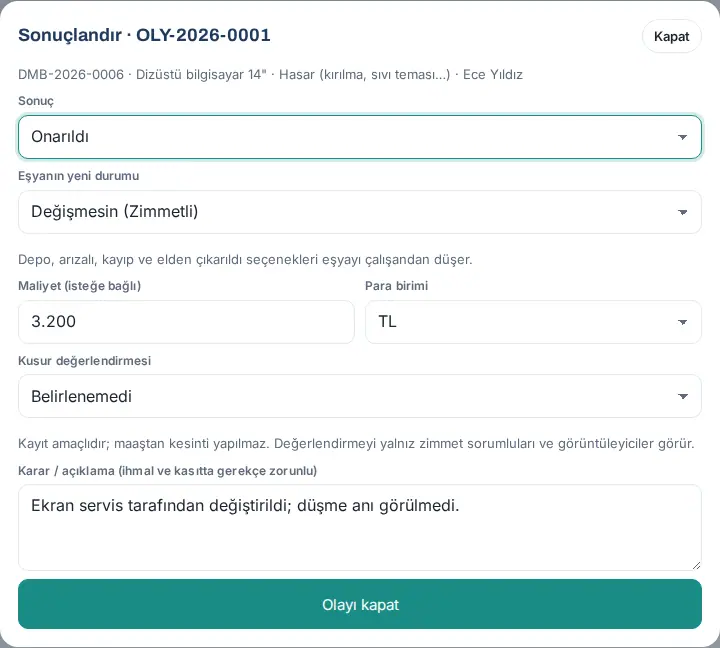
Result: The message "Incident closed; the reporter has been notified." shows; the incident becomes Closed.
Common errors:
- "Choose the outcome."
- "Choose the fault assessment."
- "For negligence or intent, write the reason (at least 10 characters)."
- "Invalid cost (e.g. 4,500 or 4500.00)."
- "This incident is closed."
Important: The assessment is for the record only; no deduction is made from salary and it is not sent to accounting. Only asset officers and viewers see the cost and the fault assessment. The employee (the reporter, or the holder of the item at that time) sees the result, the review note and the Decision / note text; write the reason for negligence or intent with this in mind. If a repaired or found item is still faulty or lost, it goes back to storage by default.
Starting a stock count
Who: Asset officer · Where: Assets → Stock count
What it does: You count whether the recorded fixed assets are really in place. If you want, you also get an "I still have it" confirmation from the employees who hold the items.
- On the Assets screen, click the Stock count tab.
- In the New stock count section, type a Count name (e.g. "2026 year-end count").
- Select the scope: Category group and Location (e.g. IT equipment, All locations).
- If you want the employees to confirm too, select the Ask assigned employees to confirm "I still have it" (phone notification) check box.
- Click Start count.
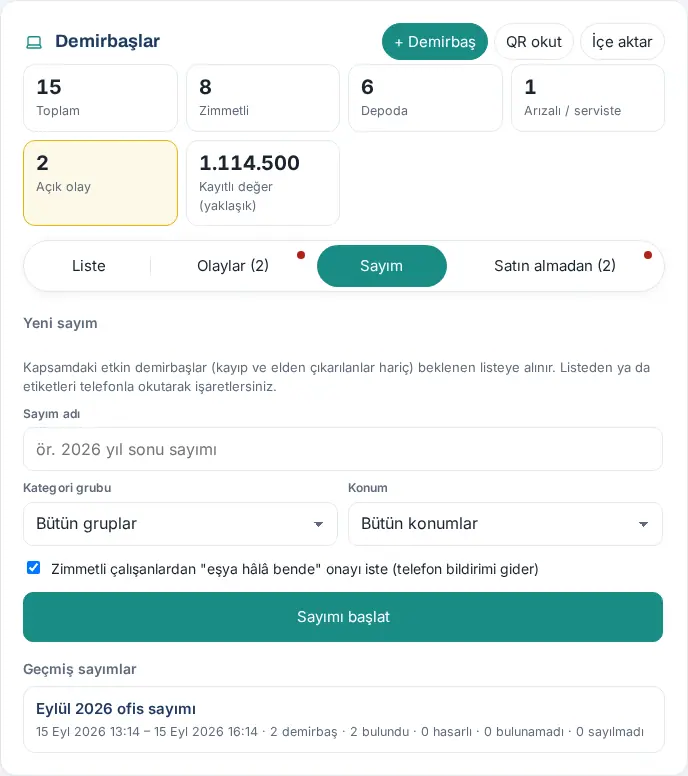
Result: The message "Count started: … assets." shows. The active fixed assets in the scope (except lost and disposed ones) are added to the expected list. The tab name becomes Stock count · in progress.
Common errors:
- "A count is already open; finish it first." — only one count can be open at a time.
- "There are no assets to count in this scope."
Tip: The Past counts list keeps the last 12 counts with their dates and results (found, damaged, not found, not counted).
Marking items in a count and counting by QR
Who: Asset officer · Where: Assets → Stock count · in progress
What it does: You count each fixed asset from the list or by scanning its label with a phone.
- Open the Stock count · in progress tab. The top shows the name of the count, the person who started it, the scope and a progress bar (e.g. "4 / 10 sayıldı (%40) · 3 bulundu · 1 hasarlı · 0 bulunamadı · 0 çalışan onayı", "4 / 10 counted (40%) · 3 found · 1 damaged · 0 not found · 0 employee confirmations").
- In the filters, select Not counted (N).
- For each fixed asset, click Found, Damaged or None.
- To count with a phone, tap Count by QR and take a photo of the QR code on the asset's label. The item is marked as Found automatically (e.g. "DMB-2026-0006 bulundu olarak işaretlendi (5/10).", "DMB-2026-0006 marked as found (5/10).").
- The employees' I have it / I don't have it answers are added to the list automatically; you are also notified of I don't have it answers.
- When the count is complete, click Finish count and click Yes, end it at the "Finish the count?" question.
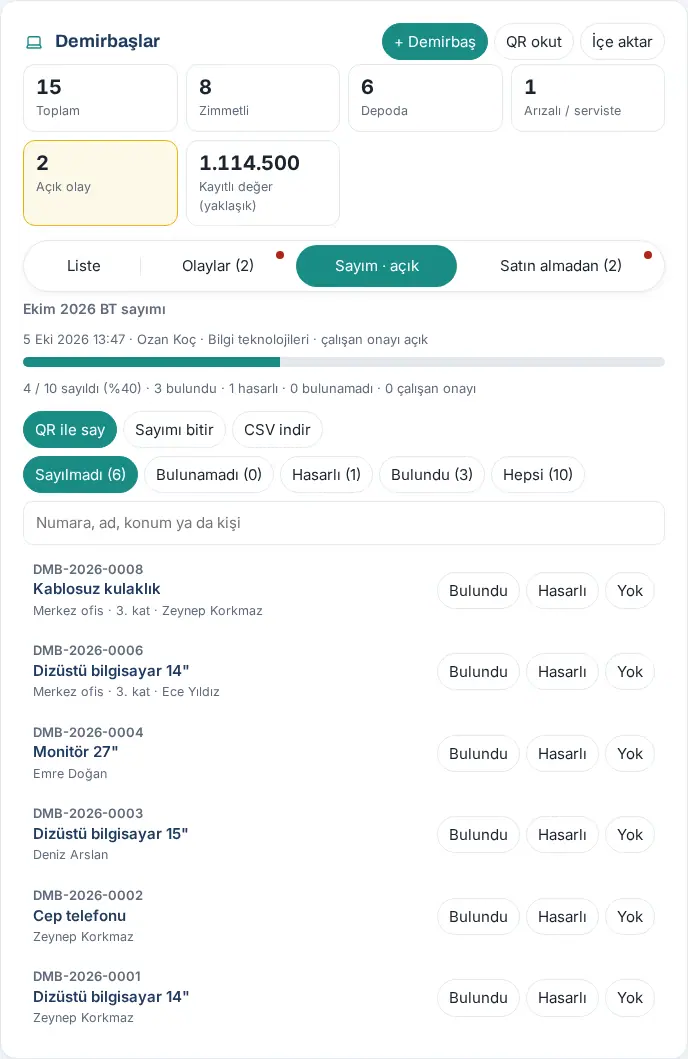
Result: The message "Count finished." shows. The Count result screen lists the items that were not found, damaged or not counted. Export the result to a file with Download CSV.
Common errors:
- "QR code could not be read. Take a close, sharp photo of the label."
- "Bu demirbaş sayımın kapsamında değil." ("this asset is not in the scope of the count")
Printing QR labels
Who: Asset officer · Where: Assets → List → Print labels (N) or asset details → Print label
What it does: You print labels with QR codes on A4 paper to attach to the fixed assets. When the label is scanned with a phone camera, the asset's record opens.
- In the List, filter the fixed assets whose labels you will print (e.g. the Assigned chip or a location). For a single item, use Print label in its details.
- Click Print labels (N).
- Select the size: Small (5 × 13 on A4) or Large (3 × 8 on A4).
- The browser's print window opens; select the printer or "Save as PDF" and print.
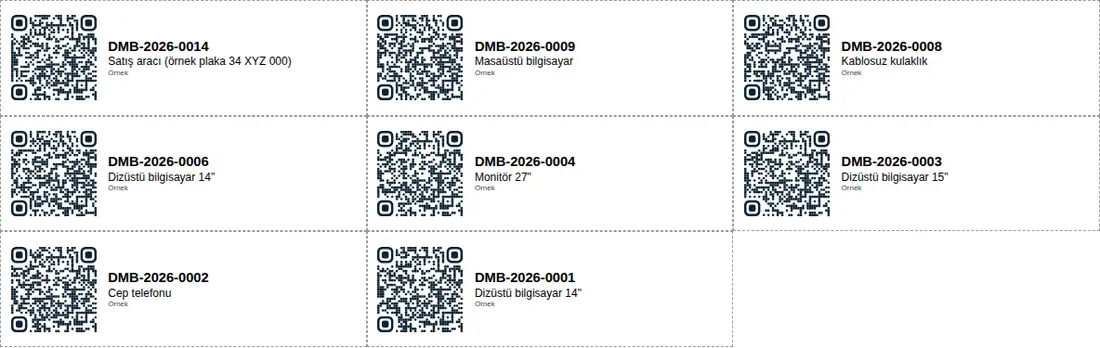
Tip: You can print the labels on A4 label sheets. The QR code is made inside the app; no external service is used.
Important: At most 300 labels are printed at one time ("Up to 300 labels; narrow with the filter.").
Opening an asset by scanning its QR code
Who: Asset officer; employee (only their own item) · Where: Assets → Scan QR or the phone's camera
What it does: You find the record of the item in your hand from its label.
- On the Assets screen, tap Scan QR.
- Take a photo of the QR code on the label. "Reading the label…" shows.
- The asset details open.
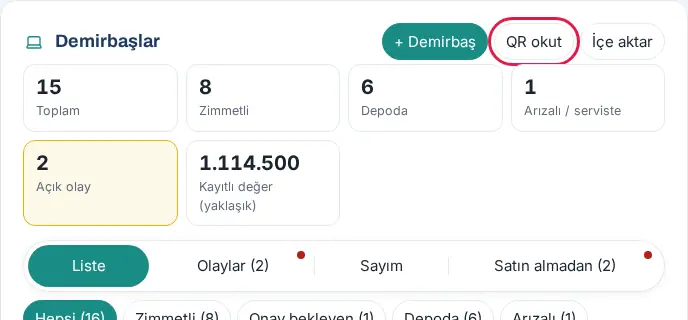
Tip: You can also scan the label with the phone's own camera: for an asset officer, the record opens in Assets; for an employee (if the item is assigned to them), it opens in My assets. An employee cannot see the record of another person's item.
Common errors:
- "QR code could not be read. Take a close, sharp photo of the label."
- "The scanned code is not an asset label."
Importing from an Excel or CSV file
Who: Asset officer · Where: Assets → Import
What it does: You move your existing inventory list (Excel .xlsx or CSV) to Prozence in one go.
- On the Assets screen, click Import. The Import (Excel / CSV) window opens.
- For a template, click Download sample file and prepare your list in this layout:
- The first row must be the header.
- Required columns: Kategori ("Category") and Ad / marka-model ("Name / make-model").
- Optional columns: Seri no ("Serial no."), Konum ("Location"), Değer ("Value"), Alış tarihi ("Purchase date"), Garanti bitişi ("Warranty end"), Tedarikçi ("Supplier"), Fatura no ("Invoice no."), Yanında verilenler ("Included items"), Not ("Note"), Zimmetli ("Assigned"; the employee's email or full name).
- Dates can be in DD.MM.YYYY or YYYY-MM-DD format.
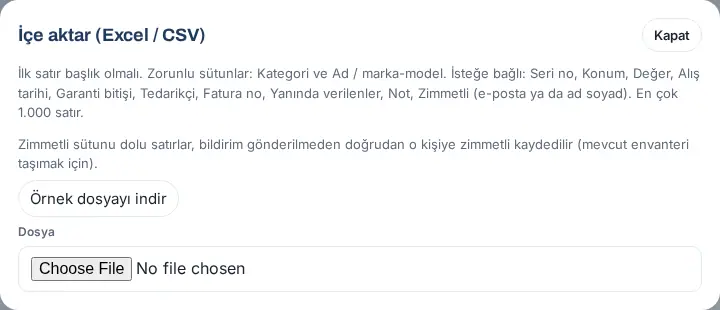
- Select your file in the File field. The preview opens.
- In the Eşleşen sütunlar ("matched columns") row, check which field each header in your file is matched to.
- In the preview table, read the Status column of each row: Ready or the reason for the error (e.g. "Kategori tanınmadı: …" ("category not recognized"), "Alış tarihi okunamadı (GG.AA.YYYY ya da YYYY-AA-GG)" ("purchase date could not be read (DD.MM.YYYY or YYYY-MM-DD)"), "This serial number is already registered: DMB-….").
- Correct the rows with errors in the file and select it again, or to import only the ready rows, click Import N rows.
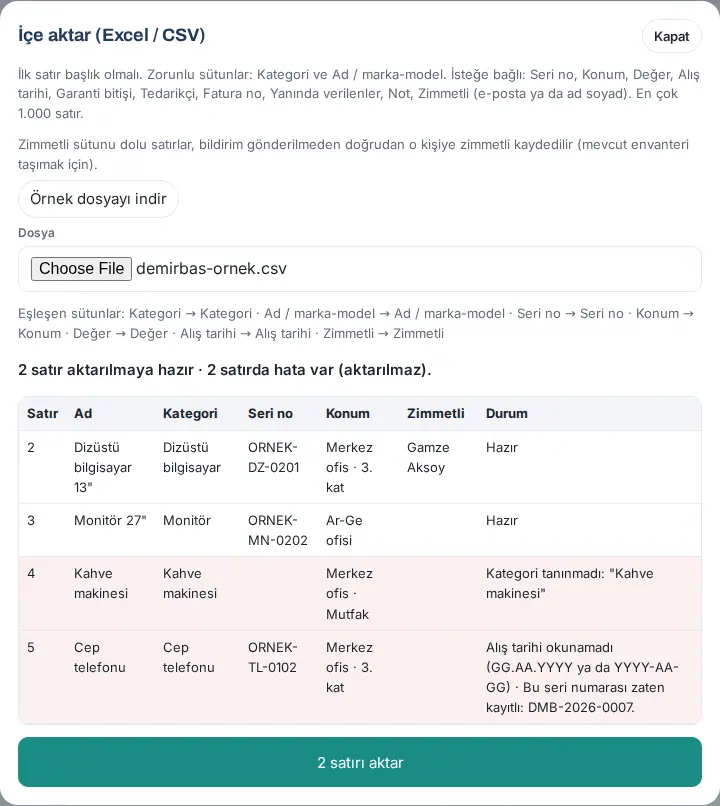
Result: The ready rows are added as fixed assets. Rows with the Zimmetli column filled in are recorded as assigned directly to that person, without a notification (to move the existing inventory).
Common errors:
- "The file needs at least the "Kategori" and "Ad / marka-model" columns. Download the sample file and fill it in."
- "The file can be at most 5 MB."
- "The preview has expired; choose the file again." — the preview is valid for 30 minutes and can be used once.
- "No rows to import were found in the file."
- "Tek seferde en çok 1000 satır aktarılır; dosyayı bölün." ("at most 1000 rows are imported at one time; split the file")
Important: At most 1,000 rows are imported at one time. The old Excel format (.xls) is not supported; save the file as .xlsx or CSV. The category name must be a built-in category or one of the company's custom categories.
Adding purchases to fixed assets
Who: Asset officer · Where: Assets → From purchasing (N)
What it does: You add products that were bought with a purchase request and received to the fixed assets, without typing the value, supplier and purchase date again.
Before you start: This tab shows only if the Purchasing module is on (see 24. Parcels, mailroom and purchasing). When a purchase request becomes Received, you get a "Purchase received: add it to assets" notification.
- On the Assets screen, click the From purchasing (N) tab. Items received in the last 12 months and not yet added to the fixed assets are listed: request code, title, requester, receipt date, product, quantity, quantity added, unit price and supplier.
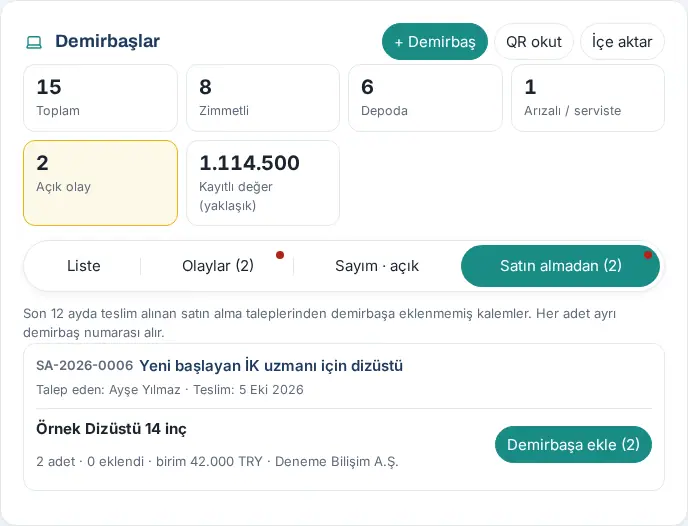
- Click the Add to assets (N) button of the item.
- In the Quantity (max. N) box, type how many you will add now.
- Select a Category.
- In the Serial numbers box, type one serial no. on each line (optional).
- If you want, fill in the Location, Warranty end and Included items fields.
- To give the product to the person who opened the request, select the Assign to the requester (…) check box.
- Click Save asset.
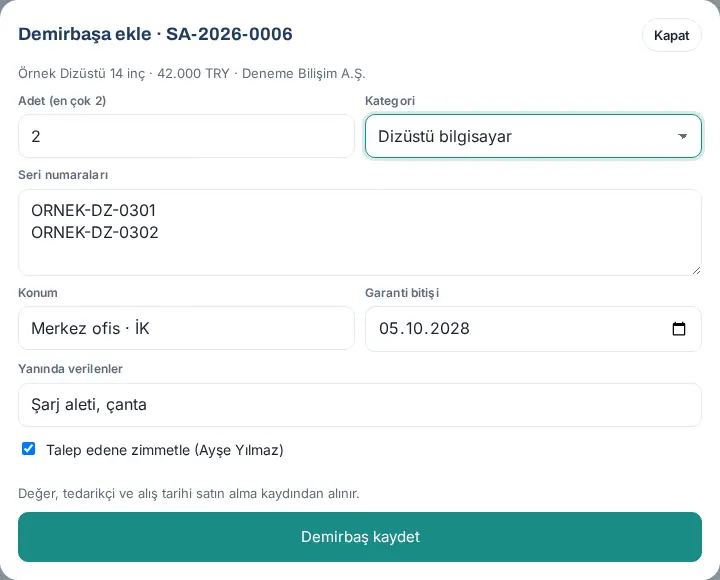
Result: Each piece gets a separate asset number; the value, supplier and purchase date come from the purchase record. The added pieces are marked on the item; when all pieces are added, the item leaves the list.
Common errors:
- "All units of this item are already assets."
- "The same serial number appears twice."
- "Adet 1 ile … arasında olmalı." ("quantity must be between 1 and …") — you cannot add more than the remaining quantity (and not more than 50 at one time).
- "Satın alma modülü kapalı." ("the purchasing module is off")