14. Services and human resources management
Screenshots show the Turkish interface of Prozence with fictional "Örnek Teknoloji A.Ş." data; the English interface has the same layout.
Most of this chapter moved to new chapters. Work time, leave, requests, mailroom, purchasing, assets, shuttle, meals, booking, visitors, emergency and OHS (occupational health and safety, İSG) management are now described in their own chapters, with tables that show what each setting does and its default. The moved headings below stay so that old links keep working, and they send you to the new place; giving roles, company vehicles, onboarding and payroll are still described in this chapter.
New chapters for administration:
- 29. Time and attendance management: the four tabs of the work time settings, saved offices, working outside the office, work schedules, QR code screen, timesheet and export to payroll software, location tracking
- 30. Employee leave management: working days, seniority tables and holidays, the rules of leave types, advance leave, approval flow, balances, receiving the signed form with a QR code
- 31. Request, mailroom, purchasing and fixed asset management: request categories and target times, canned replies, mailroom, purchasing and asset settings and permissions
- 32. Shuttle, meal, visitor and emergency management: service modules and roles, shuttle routes, meal menu and canteen check-in, booking, visitor settings, emergency plan and teams, I’m Safe, OHS reports, occupational physician
The daily work of the people in charge (processing requests, the Mailroom desk, purchasing approval, Assets, the reception desk, leave and work time approvals) is on screens that employees also use, so it is described in the employee chapters: 21. Employee leave, 22. Time and attendance, 23. Requests, 24. Parcels, mailroom and purchasing, 26. Meeting rooms and visitors and 28. Fixed assets and asset assignment. For the screens employees see, see 07. Internal services. Expense and advance management is in a separate chapter: 18. Expense management and accounting.
Who: Admin · Services manager · Human resources · Module admins and operators · Department manager
In this chapter
Described in this chapter:
- Giving roles
- Company vehicles
- Starting a new onboarding process
- Settings and templates (onboarding)
- Uploading and matching payslips
- Payslip periods, acknowledgment status and audit log
- Payslip matching details: employee no. and Turkish ID no.
- Payroll settings: verification, SMS provider and Prozon API
- Expense approvals
Moved to new chapters (the heading takes you to a short note that sends you to the new place):
- Opening services administration → 32
- Turning on service modules → 32
- Entering the meal menu → 32
- Following meal attendance and menu ratings → 32
- Setting up shuttle routes → 32
- Live shuttle: driver link and announcements to passengers → 32
- Request categories and owners → 31
- Processing incoming requests (assignment, reply, resolution) → 23
- Mailroom settings → 31
- Recording and handing over incoming parcels → 24
- Sending outgoing parcel requests → 24
- Booking resources and rules → 32
- Visitor settings and self check-in with a QR code → 32
- Reception screen: checking a visitor in → 26
- Processing near-miss and hazard reports → 32
- Safety report settings and report → 32
- Recording and assigning assets → 28
- Taking back assets, faults and losses → 28
- Asset settings → 31
- Team approvals (department manager) → 21
- Leave awaiting approval (human resources) → 30
- Entering annual leave balances → 30
- All leave requests and recording leave for an employee → 30
- Settings: leave types and rules, seniority tables, holidays → 30
- Approved leave form and QR verification → 21
- Receiving the signed form of approved leave (with a QR code) → 30
- Work time settings: recording methods, office network and QR code → 29
- Setting up a QR code screen at the entrance → 29
- Location tracking (field) settings and consent documents → 29
- Timesheet and work time report → 29
- Starting an I’m Safe check-in → 32
- Following and ending the check-in board → 32
- Assembly points and I’m Safe settings → 32
- Looking at drill results → 32
Giving roles
Who: Admin · Where: Admin → People → People and permissions
What it does: Sets who manages and who processes each service. A person sees the screens in this chapter only if they have a role.
- Services manager (duty permission): manages the whole Admin → Services section (modules, meals, shuttle, vehicles and the settings of the service modules).
- Emergency responder (duty permission): starts, follows and ends the I’m Safe check-in.
- Module permissions table: the Module admin (settings), Operator (processes records, gets notifications) and Viewer (read-only) roles for requests, mailroom, booking, visitors, work time, onboarding, safety reports (the occupational physician is also managed with this module's roles), assets, leave requests, payroll, purchasing and I’m Safe (emergency). The Preset buttons (Human resources, Facilities, Reception, Safety team) give frequently used roles with one click.
For the steps and what the roles mean in each module, see 10. Administration and setup and Module roles (permission table).
Tip: You do not need to give a separate role to a department manager. The person who is an employee's manager in the organization chart automatically approves that employee's leave and work time correction requests (see Assigning departments and managers).
Opening services administration
Explains how to open the Admin → Services screen and who sees which tab. This task moved to chapter 32. Shuttle, meal, visitor and emergency management; see Opening services administration. Also see 31. Request, mailroom, purchasing and fixed asset management: Opening the settings screens.
Turning on service modules
You turn on the meals, shuttle and company vehicle modules and the meal / shuttle extra features. This task moved to chapter 32. Shuttle, meal, visitor and emergency management; see Turning on service modules (General).
Entering the meal menu
You enter the month's menu day by day or from a CSV file. This task moved to chapter 32. Shuttle, meal, visitor and emergency management; see Entering the meal menu.
Following meal attendance and menu ratings
You follow the expected number of people per day and the menu ratings. This task moved to chapter 32. Shuttle, meal, visitor and emergency management; see Following meal attendance and menu ratings.
Setting up shuttle routes
You enter the shuttle routes, vehicles, drivers and stop times. This task moved to chapter 32. Shuttle, meal, visitor and emergency management; see Setting up shuttle routes and Following today's trips.
Live shuttle: driver link and announcements to passengers
You give the driver a link that needs no sign-in, and send passengers delay or cancellation announcements. This task moved to chapter 32. Shuttle, meal, visitor and emergency management; see Driver link and announcements to passengers. Also see 25. Shuttle and canteen: Driver screen: trip, stops and passengers.
Company vehicles
Who: Services manager · Where: Admin → Services → Vehicle
What it does: You enter the plate of the employee who was given a company car, and the tire, service, inspection, liability insurance and comprehensive insurance dates. When a date comes near, a reminder goes to the employee and to facilities. The employee sees only their own car and cannot change it.
Before you start: The Company vehicles module must be on. While it is off, the start of the section says "Company vehicles are off: not visible and no reminders are sent. Turn it on above.".
- Click + Add vehicle.
- Select the employee in the — Choose employee — list.
- Fill in the Plate (34 ABC 123) and Make / model boxes.
- Enter the dates: Tyre change (Switch to winter or Switch to summer in the list next to it), Scheduled service (a date or or km), Vehicle inspection, Liability insurance, Comprehensive insurance.
- If you want, type a Note and click Save vehicles.
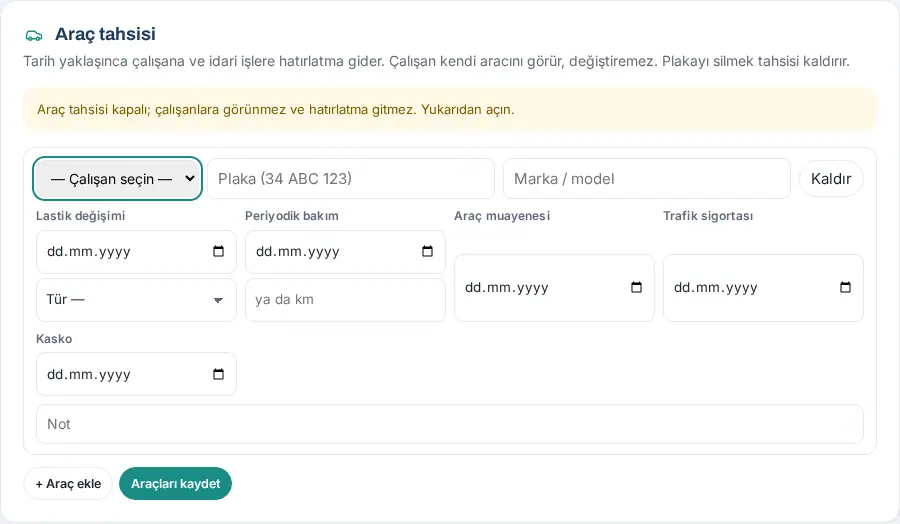
Tip: Past dates show overdue next to them, and dates that come near show coming up.
Important: You can assign only one car to an employee. To remove an assignment, click Remove in the row and save.
Request categories and owners
You set the request categories, their owners and the target resolution times. This task moved to chapter 31. Request, mailroom, purchasing and fixed asset management; see Request settings: categories and target times, Setting up canned replies and Giving permissions for requests.
Processing incoming requests (assignment, reply, resolution)
You take on incoming requests, write to the requester, ask for information and resolve them. This task moved to chapter 23. Requests; see Incoming requests list (request handlers), Taking on a request and writing a reply, Asking the requester for information, Resolving or closing a request, changing the priority and topic and Summary board: resolution times.
Mailroom settings
You set the delivery location, the reminder, the retention period, the owners and the carriers. This task moved to chapter 31. Request, mailroom, purchasing and fixed asset management; see Mailroom settings and Giving permissions for the mailroom.
Recording and handing over incoming parcels
Incoming items are now recorded on the separate Mail room desk screen and handed over with a delivery code. This task moved to chapter 24. Parcels, mailroom and purchasing; see Opening the mailroom desk, Recording an incoming item, Handing over an item and Mailroom log: incoming and outgoing.
Sending outgoing parcel requests
You give employees' shipping requests to a carrier or a courier; the old Being prepared button is now replaced by Received at mailroom. This task moved to chapter 24. Parcels, mailroom and purchasing; see Processing outgoing shipping requests.
Booking resources and rules
You set the meeting rooms and parking spaces that can be booked, the booking hours and the limits. This task moved to chapter 32. Shuttle, meal, visitor and emergency management; see Booking resources and rules and Google Calendar sync.
Visitor settings and self check-in with a QR code
You set up visitor registration, the retention period, the privacy notice and self check-in with a QR code. This task moved to chapter 32. Shuttle, meal, visitor and emergency management; see Visitor settings, welcome and check-out. Also see 26. Meeting rooms and visitors: Self check-in with a QR code (visitor).
Reception screen: checking a visitor in
At reception, you check in an expected visitor, register a visitor who comes without notice and check them out. This task moved to chapter 26. Meeting rooms and visitors; see Checking a visitor in at the reception desk, Checking a visitor out, Who is inside now and Reception: Today list and Log.
Processing near-miss and hazard reports
You review incoming OHS reports, score the risk, and open and close corrective actions. This task moved to chapter 32. Shuttle, meal, visitor and emergency management; see Processing near-miss and hazard reports.
Safety report settings and report
You turn on OHS reports and set anonymous reports and location suggestions. This task moved to chapter 32. Shuttle, meal, visitor and emergency management; see Safety report settings. Also see 19. Reports: Occupational health and safety tab in Reports.
Recording and assigning assets
Assets are now on the separate Assets screen in the left menu; you record an item there and assign it to an employee. This task moved to chapter 28. Fixed assets and asset assignment; see Assets screen, Recording an asset, Assigning an asset, Importing from an Excel or CSV file and Printing QR labels.
Taking back assets, faults and losses
You take an item back and change its status; loss, damage and faults are now reported and closed as incidents. This task moved to chapter 28. Fixed assets and asset assignment; see Asset details: return, status, editing and deleting, Following incidents, Taking an incident under review and Closing an incident: cost and fault assessment.
Asset settings
You set up the asset module, the handover confirmation, the warranty reminder and the retention period. This task moved to chapter 31. Request, mailroom, purchasing and fixed asset management; see Asset settings and special categories and Giving permissions for assets.
Team approvals (department manager)
As a department manager, you approve your team's leave requests and work time corrections. This task moved to chapter 21. Employee leave; see Approving leave as a manager. Also see 22. Time and attendance: My team: the team's status today and correction approval.
Leave awaiting approval (human resources)
As HR, you give the final approval to leave requests that the manager approved. This task moved to chapter 30. Employee leave management; see Approval flow and human resources approval and Assigning approvers and viewers.
Entering annual leave balances
You enter employees' opening balances and correct balances later. This task moved to chapter 30. Employee leave management; see Entering and correcting annual leave balances.
All leave requests and recording leave for an employee
You filter all leave requests, cancel approved leave or record leave for an employee. This task moved to chapter 30. Employee leave management; see All requests, cancellation and recording leave for an employee.
Settings: leave types and rules, seniority tables, holidays
The settings of the leave module (working days, seniority tables, public holidays, the rules of leave types, carry-over and advance leave) are now described in separate tasks. This task moved to chapter 30. Employee leave management; see Opening the settings (leave module), Working days, seniority tables and public holidays, Rules of paid and unpaid leave types and Carry-over, advance leave and backdated requests.
Approved leave form and QR verification
For approved leave, a printable A4 form with a QR code is created; the QR code shows that the form matches the record in the system. This task moved to chapter 21. Employee leave; see Printing and signing the approved leave form and Verifying the form with the QR code. Also see 30. Employee leave management: Tracking the signed form.
Receiving the signed form of approved leave (with a QR code)
You take a photo of the signed form the employee brings; the leave is found from the QR code on the form and marked as received. This task moved to chapter 30. Employee leave management; see Receiving the form with the QR code (human resources) and Tracking the signed form.
Work time settings: recording methods, office network and QR code
In 0.99.45 the work time settings were split into four tabs: General, Work locations, Work schedule, Lunch break and questions. This task moved to chapter 29. Time and attendance management; see Opening the work time settings, General tab, Work locations: the company default in offices, Editing a saved office, an office-specific check-in rule and deleting, Working outside the office: from home, remote, in the field and Work schedules and assignment order.
Setting up a QR code screen at the entrance
You show a QR code that changes every 30 seconds on the tablet at the office entrance, and protect the screen with a password. This task moved to chapter 29. Time and attendance management; see Setting up and protecting a QR code screen at the entrance.
Location tracking (field) settings and consent documents
You turn on location tracking for field employees, set the rules and mark the signed consent documents. This task moved to chapter 29. Time and attendance management; see Location tracking (field) settings and consent documents.
Timesheet and work time report
You see the monthly timesheet, download it as CSV or Excel and export it to payroll software. This task moved to chapter 29. Time and attendance management; see Timesheet and export to payroll software. Also see 19. Reports: Work time tab in Reports.
Starting a new onboarding process
Who: HR, Admin · Where: Board → My Space → Onboarding → Processes
What it does: You start a task list for an employee who is starting (or leaving). The tasks are distributed with their dates to the people responsible (HR, IT, facilities, manager, buddy, the employee).
- In the Onboarding box, click Processes. The Onboarding and offboarding window lists the In progress processes, their progress and the number of overdue tasks.
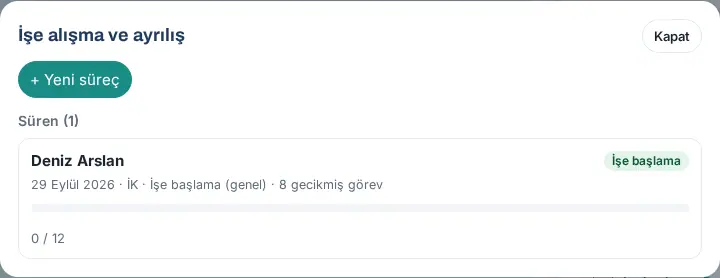
- Click + New process.
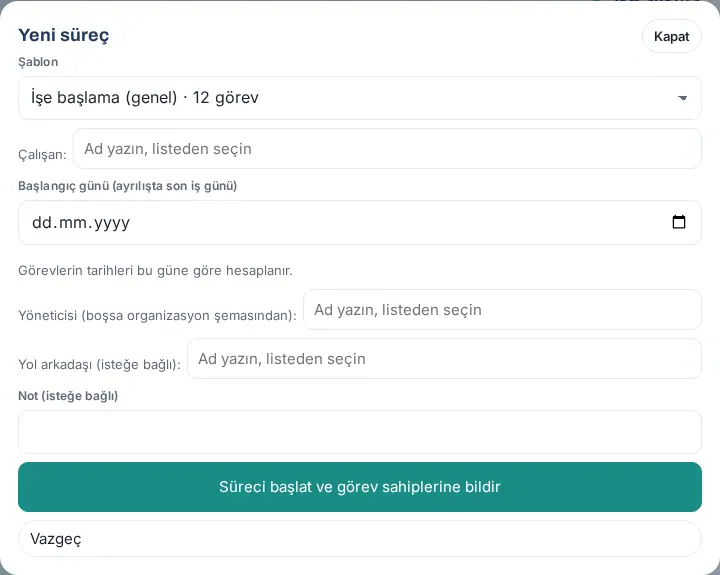
- Select the template in the Template list (e.g. "İşe başlama (genel) · 12 görev" ("onboarding (general) · 12 tasks") or "Ayrılış (genel) · 5 görev" ("offboarding (general) · 5 tasks")).
- Type a name in the Employee: box and select the person in the list.
- Select the Start date (last working day for offboarding). The task dates are calculated from this day.
- If you want, select the Manager (from the org chart if empty): and Buddy (optional): people and type a Note (optional).
- Click Start and notify task owners.
Tip: The tasks assigned to you appear in the Your tasks list of the box, with the date and any delay; mark them when they are done. The short card shows the first 3 tasks; to see all of them, click Open all. When you click a process, all its steps open; if necessary, close it with Close process → Yes, close. For the screen the new employee sees, see 07. Internal services.
Settings and templates (onboarding)
Who: Onboarding module admin · Where: Admin → Modules → Onboarding
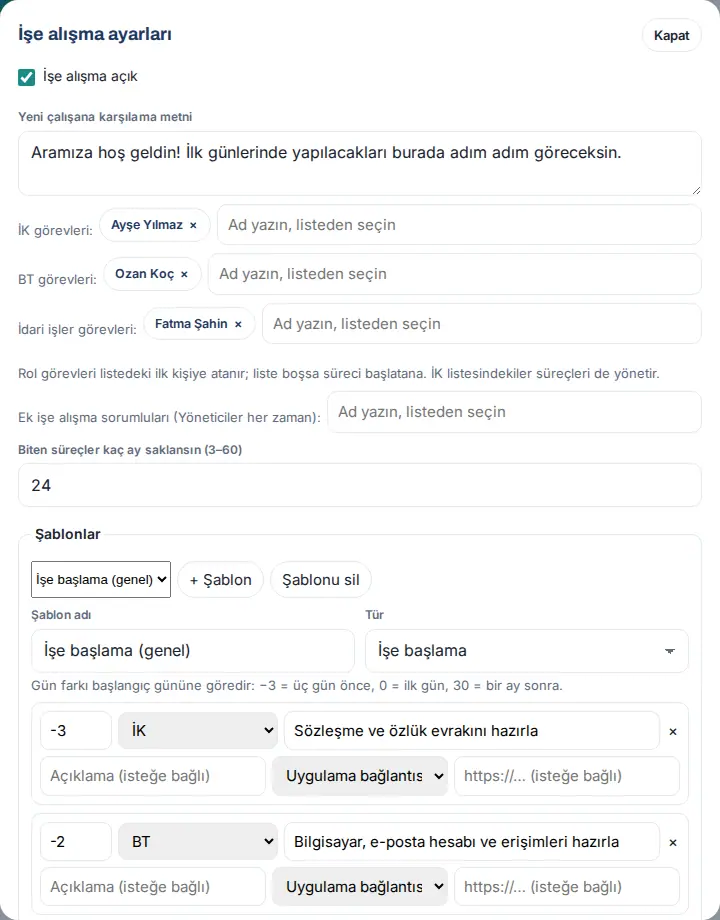
- Click Admin → Modules → Onboarding. Onboarding settings opens.
- Select the Onboarding on checkbox and type the Welcome text for new employees.
- Select the people for HR tasks:, IT tasks: and Facilities tasks:. Role tasks are assigned to the first person in the list; if the list is empty, to the person who starts the process.
- Enter the value for Keep finished processes for how many months (3–60). Add more onboarding owners as Operator in the Permissions section at the bottom of the tab.
- Under Templates, select a template. Edit the Template name and Type (Onboarding / Offboarding) fields.
- For each task, enter a title, the responsible role (The employee, Manager, Carpool, HR, IT, Facilities, Specific person), the day offset (−3 = three days before, 0 = first day, 30 = one month later) and, if you want, an app link (My profile, Company policies). Add a task with + Add task and a template with + Template.
- Click Save onboarding settings.
Uploading and matching payslips
Who: Payroll owner (HR), Admin · Where: Board → My Space → My payslips → Upload
What it does: You upload the monthly payslip PDFs in bulk. The employee number (or Turkish ID number) and the period in the file name link the payslip to the correct employee and month. The employee opens their payslip in My Space by acknowledging receipt.
Before you start: The payroll module must be on and you must have the Operator role in the My payslips row (Admin → People → People and permissions; the Human resources preset also gives this role). Enter the employees' employee numbers (see Payslip matching details). The file names must contain the employee number and the period; for example S-1004_2026-10.pdf. The period can be written as 2026-10, 202610 or 10-2026.
- In the My payslips box, click Upload. The Upload payslips window opens.
- In the Period (if not in the file name) field, select the month. The default is last month; if the file name contains a period, that period applies.
- Click PDF files and select the payslips. You can select more than one file; each file can be up to 10 MB.
- A row appears for each file: file name, matched employee and period. The status line shows Matched, No match; choose the person or Matches more than one person; choose the person. Rows without a match are yellow; select the employee in the list. If necessary, also change the period in the row.
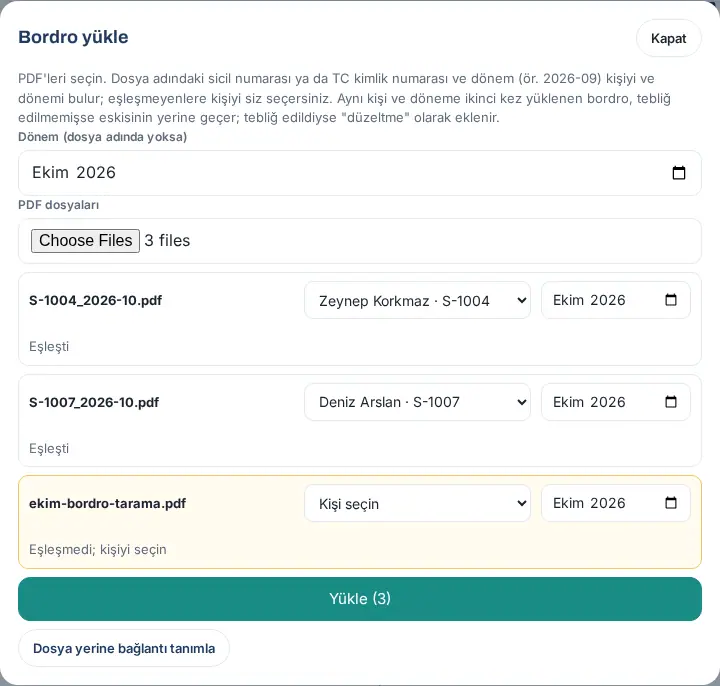
- Click Upload (3) (the number is the number of files). The files are uploaded one by one; each row shows the result. Rows with no employee selected are skipped with "No person chosen; skipped.".
A link instead of a file: If the payslips are in your company's own payroll system, open Set a link instead of a file, select the Employee and the Period, type the address that starts with https:// in the Payslip link field and click Save link. The employee opens this address after acknowledging receipt.
A second payslip for the same month:
- If the employee has not acknowledged receipt yet, the new file replaces the old one; the old file is deleted.
- If the employee has acknowledged receipt, the old payslip and the acknowledgment record are kept; the new payslip is added as a separate row with the Adjustment label, and the employee acknowledges it too.
Tip: If your payroll software gives all employees in one PDF, first split it into a separate PDF per person and give the files the employee numbers. Payslips are stored in a private folder of the website that cannot be opened from outside (pzk-bordro); with Nginx hosting such as Kinsta, an access rule must also be added for this folder; you see the status in the Private folders list in the Expense settings (see 18. Expense management and accounting).
Payslip periods, acknowledgment status and audit log
Who: Payroll owner (HR), Viewer, Admin · Where: Board → My Space → My payslips → Periods
What it does: You follow how many payslips were acknowledged each month, see who has not acknowledged, and export the proof of acknowledgment as CSV.
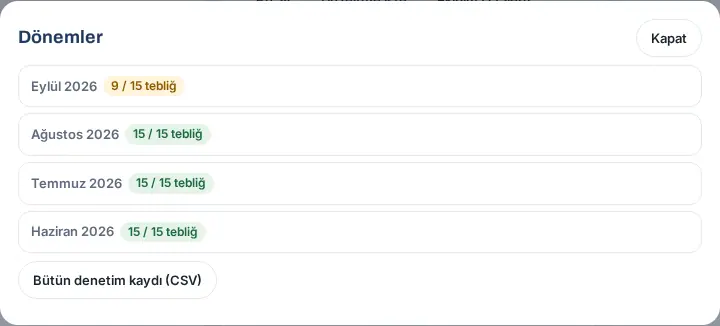
- In the My payslips box, click Periods. Each month shows a number such as "9 / 15 received"; it is green if all were acknowledged and yellow if some are missing.
- Click a month. A row appears for each employee: name and employee number, status, acknowledgment time and method (or upload date), file type (PDF or link) and the number of opens.
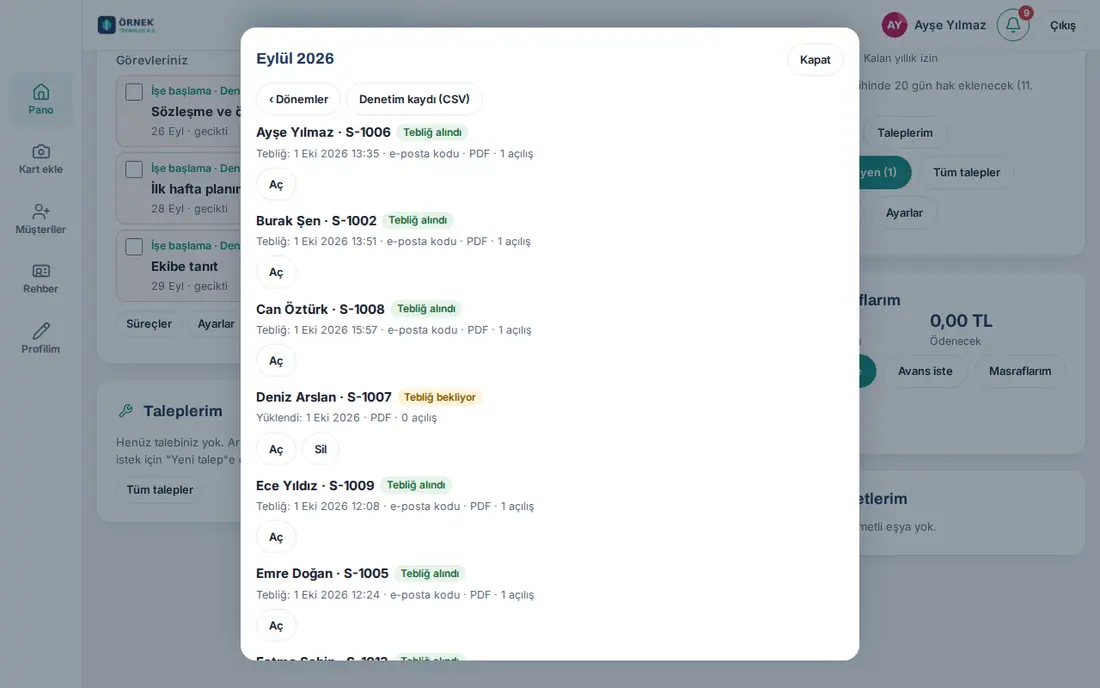
- If you are an operator, you can see a payslip with Open. This opening is written to the audit log as "İK görüntülemesi" ("HR view") and does not affect the employee's acknowledgment.
- To remove a wrong payslip that has not been acknowledged yet, click Delete → Yes, delete. You cannot delete an acknowledged payslip; to correct it, upload a new payslip for the same month.
- For proof of acknowledgment, click Audit log (CSV) (this month) or the Full audit log (CSV) button in the Periods window.
CSV columns: Çalışan (employee), Sicil (employee no.), Dönem (period), Yükleme (upload), Kaynak (source), Tür (type), Düzeltme (adjustment), Tebliğ zamanı (acknowledgment time), Yöntem (method), Kanal (channel: the masked address or number the code went to), IP, Tarayıcı (browser), PDF SHA-256 (the fingerprint of the document) and Açılış (opens).
Tip: Employees who have a payslip to acknowledge see a warning in their bell (Waiting for you) and in My Space. People with the Viewer role see the periods and the CSV, but cannot open the payslip content.
Payslip matching details: employee no. and Turkish ID no.
Who: Payroll owner (HR), Admin · Where: Board → My Space → My payslips → People
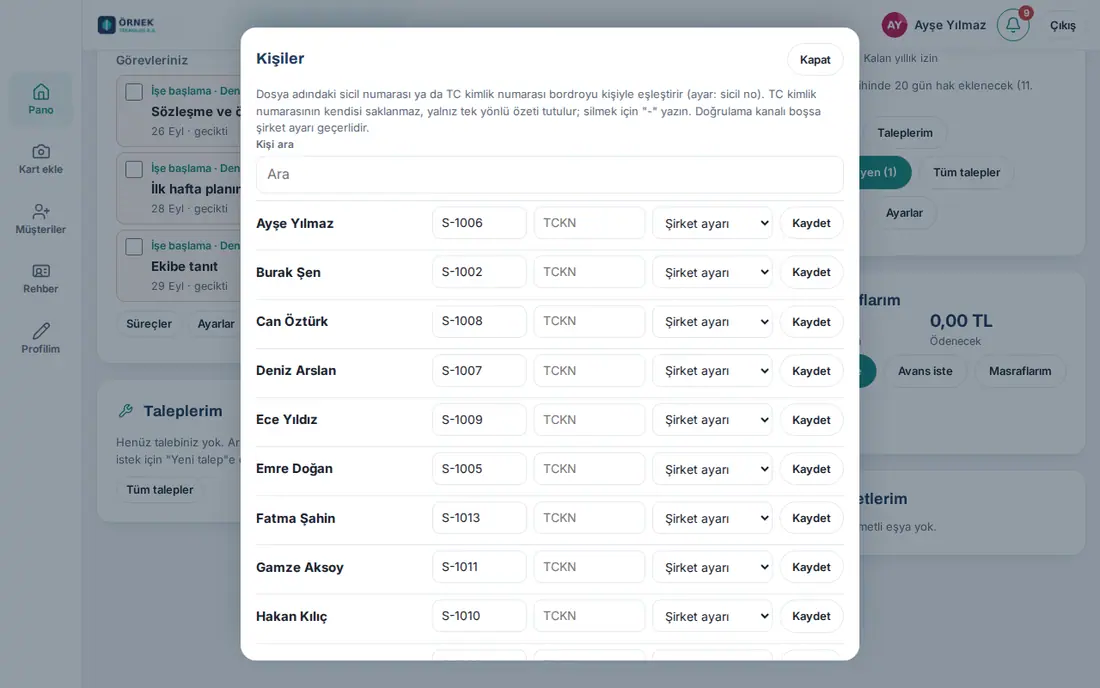
- In the My payslips box, click People. The employees are listed; filter by name or employee number with Search people.
- Type the employee's number in the Employee no. field.
- If your company matches by Turkish ID number, type the number in the National ID field. The number itself is not stored, only a one-way hash; afterwards the field shows "National ID set ✓". To delete it, type
-. - If necessary, select a verification channel for this employee in the Company setting list (Email code or SMS code).
- Click Save in the row.
Tip: The note "no email" or "no mobile" under the row shows that no code can be sent to that employee. Add an email or a mobile phone to their card, or select another channel.
Payroll settings: verification, SMS provider and Prozon API
Who: Payroll module admin, Admin · Where: Admin → Modules → Payroll
- Click Admin → Modules → Payroll. Payslip settings opens. Assign the payroll owners (HR) as Operator in the Permissions section at the bottom of the tab.
- Select the Payslip module on checkbox.
- Select the Receipt verification:
- Email code (recommended): A 6-digit code goes to the email address on the employee's card.
- SMS code: The code goes to the mobile phone by SMS; an SMS provider must be set up below.
- Direct opening (no code): The employee taps I confirm receipt, open; the time and IP are still recorded.
- For Matching from file name, select Employee no., National ID no. or Employee no. or national ID no..
- If you want, select Send the employee a phone notification when a new payslip arrives.
- If you will use SMS, select the Provider in the SMS provider section:
- Netgsm: Enter the User code, Password and Sender name.
- Other (HTTP template): enter your provider's
https://address, method (POST / GET), body and request headers. Use the{telefon}and{mesaj}placeholders. The password and request headers are stored encrypted and are not shown again; if you leave them empty, the saved value is kept; to delete them, type-.
- Click Save. For SMS, type a mobile number in the test field and click Send test SMS.
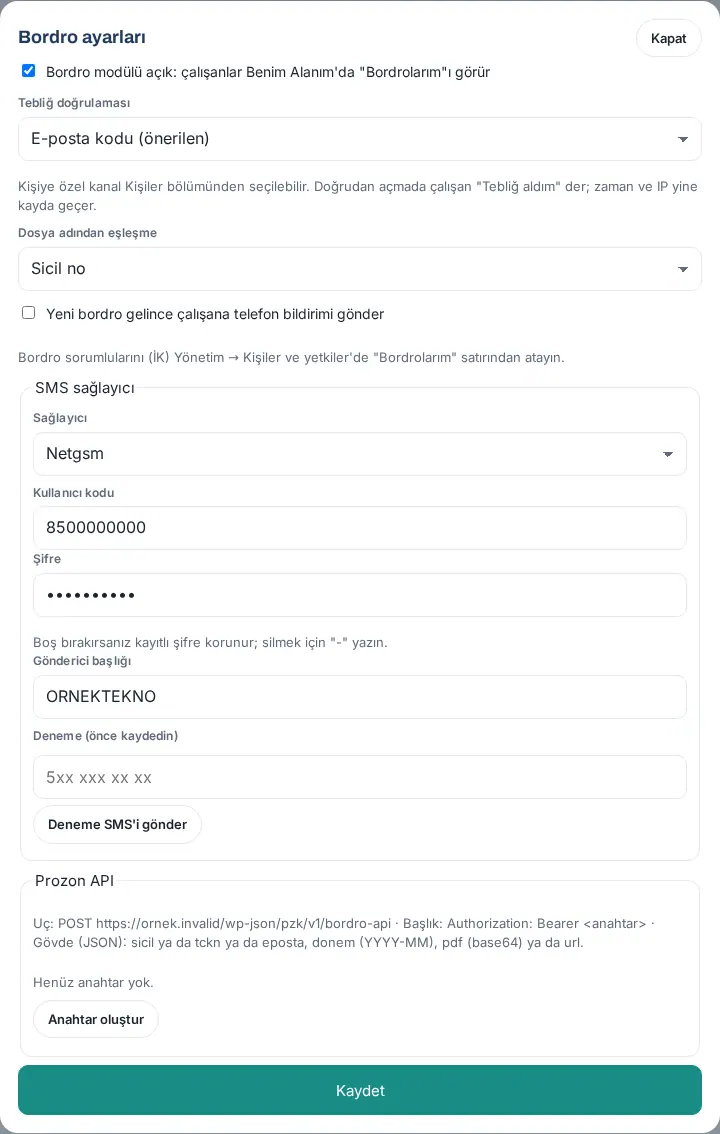
Prozon API (sending payslips from system to system): If Prozon prepares your payslips, click Create key. The key is shown only at that moment; copy it and send it to Prozon through a secure channel. Prozon sends each payslip with this key to the pzk/v1/bordro-api endpoint (employee no., Turkish ID no. or email; period; PDF or link), and the payslip goes to the employee's box automatically. A request that does not match exactly one employee is rejected. Create new key makes the old one invalid at once.
Assigning payroll owners: Assign the HR people in the My payslips row in Admin → People → People and permissions: Module admin (these settings), Operator (upload, people, opening) and Viewer (acknowledgment status and audit log).
Starting an I’m Safe check-in
After an emergency or a drill, you ask employees "Are you safe?". This task moved to chapter 32. Shuttle, meal, visitor and emergency management; see Starting an I’m Safe check-in. Also see 27. Emergencies, occupational safety and the occupational physician: Reporting an emergency (responder).
Following and ending the check-in board
You follow who is safe, who asks for help and who has not answered, and you end the check-in. This task moved to chapter 32. Shuttle, meal, visitor and emergency management; see Following and ending the check-in board.
Assembly points and I’m Safe settings
You set the assembly points, location sharing, the reminder and the default texts. This task moved to chapter 32. Shuttle, meal, visitor and emergency management; see Assembly points and I’m Safe settings.
Looking at drill results
The results of past check-ins and drills are in the Past check-ins section of the check-in board, and the drill records are on the teams screen. This task moved to chapter 32. Shuttle, meal, visitor and emergency management; see Following and ending the check-in board and Emergency response teams and drills.
Expense approvals
For expense and business advance approvals, accounting approval, payment and reports, see 18. Expense management and accounting. To approve your team's expenses as a department manager, see 17. Expenses, business advances and per diem.