11. Brand, identity and signature management
Screenshots show the Turkish interface of Prozence with fictional "Örnek Teknoloji A.Ş." data; the English interface has the same layout.
This chapter is for the Admin and the marketing team who manage how the company looks. Logos, colors and the business card design are on the Brand & Identity screen; employees' Identity Kit images (meeting background, lock screen, LinkedIn cover, printed business card…) are prepared with templates on the same screen. The email signature design, banners, distribution and analytics are all in one place, on the Email signature screen (signature center).
For what the employee sees, see 01. Digital business card and Identity Kit and 02. Email signature. For central writing to Gmail, the Outlook server rule and the Zoom connection, see 13. Integrations.
In this chapter
- Uploading logos
- Company name, subtitle and colors
- Business card design
- Managing Identity Kit templates
- Creating and editing an Identity Kit template
- Adding group brands and a banner to an Identity Kit template
- Shared background set (Meet and Teams)
- Corporate profile photo background
- Getting to know the email signature center
- Creating email signature templates
- Assigning a template to a person, department or company
- Group company logos and signature slots
- Turning on social media networks
- Out-of-office note setting
- Legal notice and short signature
- Adding and publishing banners
- Banner targeting and groups without banners
- Short note (environment note)
- Turning on the satisfaction survey in the signature
- Distribution and signature information email
- Email signature analytics
- Banner A/B test
- Approval flow: making signature changes need approval
Uploading logos
Who: App administrator · Where: Admin → Company → Brand & Identity → Logos
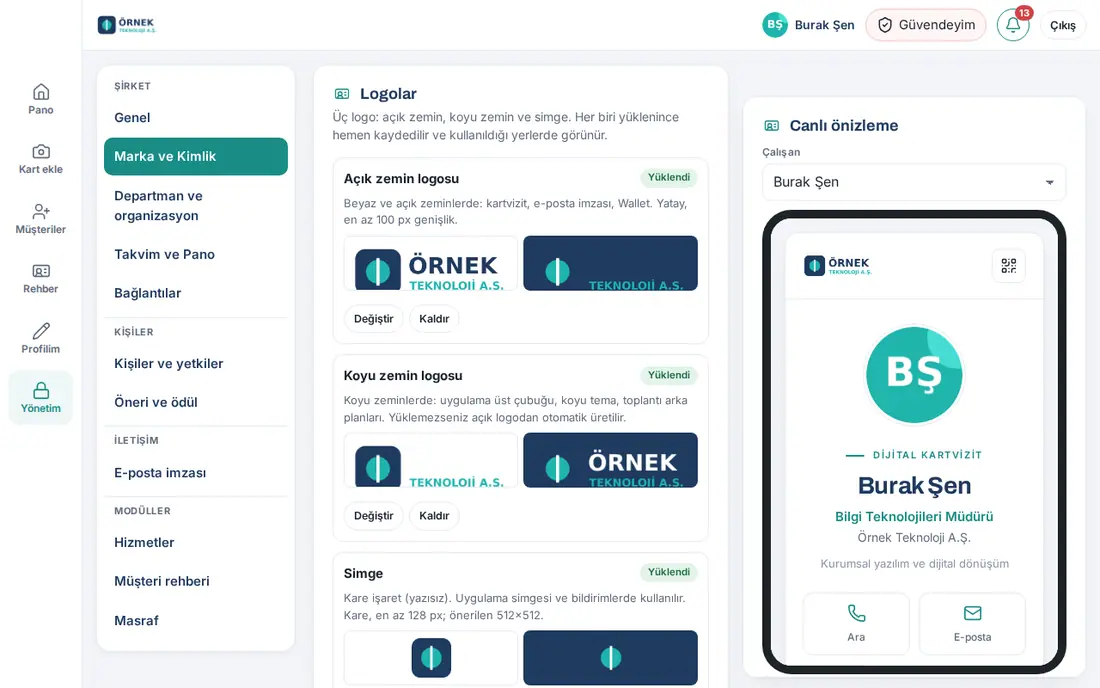
What it does: The company's three logos are used on the business card, in the email signature, on the Wallet card, in the app and in notifications.
| Logo | Where it is used |
|---|---|
| Logo for light backgrounds | White and light backgrounds: business card, email signature, Wallet. Landscape, at least 100 px wide. |
| Logo for dark backgrounds | Dark backgrounds: app top bar, dark theme, meeting backgrounds. If you do not upload it, it is generated automatically from the light logo. |
| Icon | Square mark (without text): app icon on the phone and notifications. Square, at least 128 px; 512×512 recommended. |
- On a computer, click Admin in the left menu, then click Brand & Identity.
- In the Logos box, click Change under the logo and select the file. The logo is saved as soon as it is uploaded; the status badge changes to Uploaded.
- Look at how each logo appears on light and dark backgrounds. Under the Icon card, the App, Android (masked) and Notification badge previews for the phone appear.
- If you did not upload a logo for dark backgrounds, select one option for automatic generation:
- Keep the colored mark: gray, navy and black parts turn white; brand colors stay;
- All white: the whole logo becomes white.
- To remove a logo, click Remove.
Tip:
- The file must be PNG (transparent background recommended), JPEG or WebP; up to 2 MB. You cannot upload SVG; export your vector logo as PNG.
- If there is no icon, the logo for dark backgrounds is used; if that is also missing, your initial and accent color are used.
- The card, signature and app carry your company's brand. You can turn off the small "Prozence" link at the very bottom of the pages with the Prozence bağlantısı ("Prozence link") box on the WordPress → Prozence Workplace → Şirket ve bannerlar ("Company and banners") screen.
Important: In apps already added to the phone home screen, the icon does not change immediately; it changes when the app is added again or when the phone updates it. If the Design scope is on in the email signature approval flow, the Logo for light backgrounds cannot be changed on this screen; because it is also the signature logo, it is sent for approval from Email signature → Design.
Company name, subtitle and colors
Who: App administrator · Where: Brand & Identity → Identity, colors and business card
- In the Company identity section, fill in these fields:
- Company name;
- Short name: the name of the app; appears on the phone home screen, in notifications and in emails;
- Subtitle: appears under the company name on the business card;
- Subtitle (English): used in languages other than Turkish; if empty, the Turkish one is shown.
- In the Colors section, enter the Accent and Dark colors with the color picker or as a color code (e.g. #1A8C86). If you want, click one of the ready palettes: Petrol, Navy, Emerald, Burgundy, Purple, Orange, Graphite.
- Look at the Live preview on the right. You can select another employee's card from the Employee list.
- Click Save at the bottom of the same box. Open business cards refresh within a few seconds.
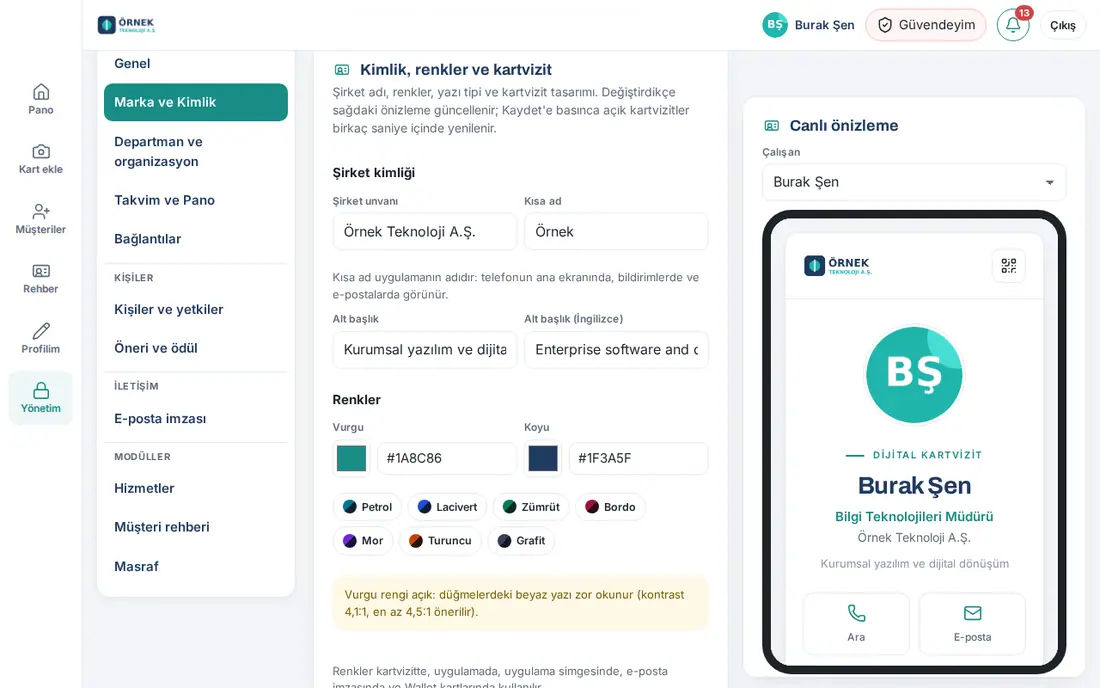
Tip: The colors are used on the business card, in the app, in the app icon, in the email signature and on Wallet cards. If the accent color is too light, a yellow contrast warning appears (e.g. "contrast 4.1:1, at least 4.5:1 recommended"): white text on buttons is hard to read. Select a darker shade.
Important: If the signature approval flow is on, changes to the company name and colors are not saved directly; they are sent for approval (see Approval flow: making signature changes need approval).
Business card design
Who: App administrator · Where: Brand & Identity → Identity, colors and business card
What it does: Without writing code, you set how the business card page of all employees looks.
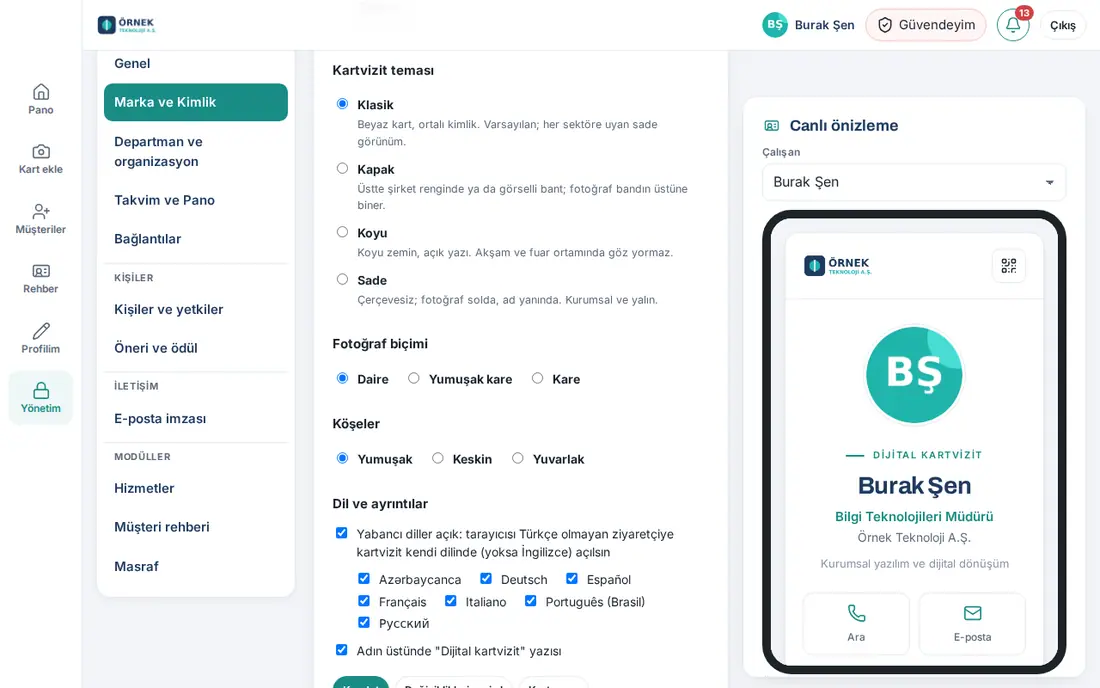
- Select a Typeface: Modern (Inter and Archivo), Classic (serif headings, Georgia) or System (the device's own typeface; fastest).
- Select a Business card theme:
- Classic: white card, centered identity (default);
- Cover: a band at the top in the company color or with an image; the photo sits on top of the band;
- Dark: dark background, light text;
- Plain: no frame; photo on the left, name next to it.
- With the Cover theme, you can upload a cover image (Upload image). The image must be landscape and at least 800 px wide; 1200×400 recommended. If there is no image, a gradient of the company colors is used.
- Select the Photo shape (Circle, Rounded square, Square) and the Corners (Soft, Sharp, Round).
- In the Language and details section, show or hide the top text with the “Digital business card” above the name checkbox. For the language options, see 15. Multiple companies, language, KVKK and license.
- Click Save. To cancel, click Discard changes; to see the result, click Open my card.
Tip: The preview changes without saving; visitors see no change until you click Save. A newly uploaded logo can look old for a few minutes because of the browser cache.
Important: On the Tasarım ("Design") and Şirket ve bannerlar screens in WordPress, these fields are read-only. You can edit them only on the Brand & Identity screen in the app.
Managing Identity Kit templates
Who: App administrator, marketing · Where: Brand & Identity → Identity Kit templates
What it does: Company templates appear in each employee's My card → My Identity Kit section. The name, job title and business card QR code are filled in automatically from each employee's own card; nobody needs to prepare an image.
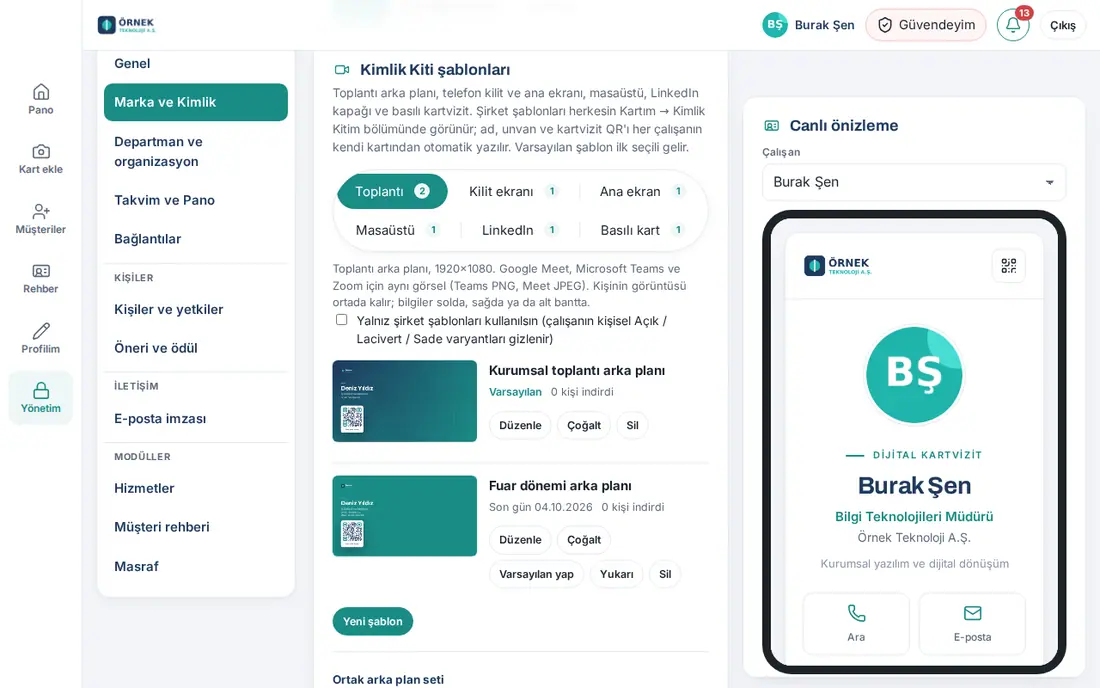
- In the Identity Kit templates box, select one of the types at the top. The number is the number of templates of that type:
- Meeting (1920×1080; Meet, Teams and Zoom background);
- Lock screen and Home screen (phone);
- Desktop (2560×1440 or 1920×1080);
- LinkedIn (cover, 1584×396);
- Printed card (85 × 55 mm).
- In the list, you see each template's preview, the Default label, the Deadline date if there is one, and how many people downloaded it (… downloaded).
- Use the buttons in the template row:
- Edit: opens the template (see Creating and editing an Identity Kit template);
- Duplicate: creates a copy with the same settings;
- Make default: makes it the template that is selected first on the employee's screen;
- Move up: changes the order;
- Delete: deletes the template.
- If you want employees to use only company templates, select the Use company templates only checkbox. For the meeting type, the employee's personal Light / Navy / Plain variants are hidden; for the other types, the built-in Dark / Light variants are hidden. The selection is saved immediately.
Tip: Each type can have up to 12 templates. When you reach the limit, New template and Duplicate are turned off.
Important: Deleting a template does not affect images employees already downloaded; it is only removed from My Identity Kit.
Creating and editing an Identity Kit template
Who: App administrator, marketing · Where: Identity Kit templates → New template (or Edit)
- Select the type at the top and click New template. For an existing template, click Edit.
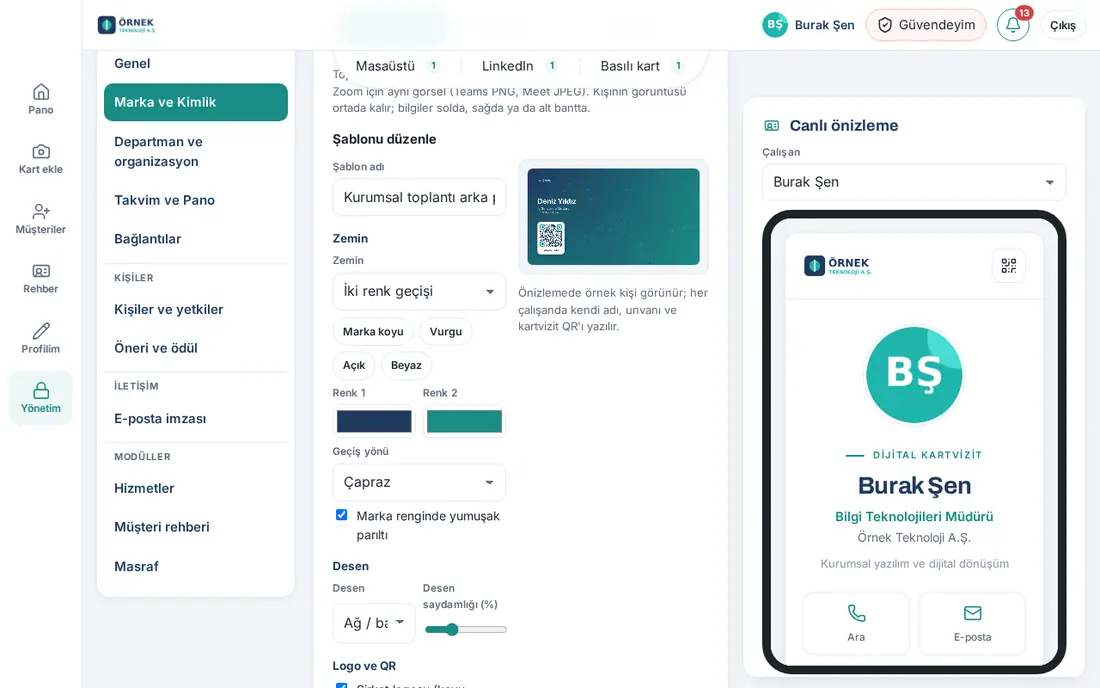
- Type a Template name (e.g. "Corporate", "Trade fair season").
- In the Background section, select the background:
- Solid colour, Two-colour gradient or Uploaded image;
- the Brand dark, Accent, Open, White buttons for ready colors; or Colour 1 and Colour 2;
- for a gradient, the Gradient direction (Diagonal, Horizontal, Vertical, From the centre) and, if you want, Soft glow in the brand colour.
- Select a Pattern (No pattern, Dots, Diagonal lines, Wave, Network / links, Grid) and set its density with Pattern opacity (%).
- In the Logo and QR section:
- the Company logo checkbox, Logo position and Logo size;
- Logo on dark backgrounds: Logo for dark backgrounds or All white (needs a logo with a transparent background);
- the Card QR checkbox and QR position;
- Details layout: Left, Right or Bottom band.
- In the Text section, select the lines to show (Name, Job title, Company, Contact (phone, email)) and select the Text colour (Automatic contrast, White, Dark).
- If you want, enter an Extra line (optional) (e.g. a slogan or campaign) and a Last day (optional; hidden from employees afterwards).
- Look at the preview on the right. The preview shows a sample person; each employee gets their own name, job title and QR code.
- Click Save. The template goes live immediately, and employees see it in the My card → My Identity Kit section. To cancel, click Cancel.
Tip: When you select the Position elements individually (logo, name, QR, group brands, banner) checkbox, you can put each element in a different place on a 3×3 grid. You cannot select the places of the image that must stay empty: the middle column where the face is in a meeting, the clock and shortcuts on the lock screen, the icons on the home screen, the left side with the profile photo on LinkedIn, and the 4 mm safety margin on the printed card.
Important: The uploaded background image must suit the type. For example, a meeting image must be landscape and at least 1280 px, a phone image must be portrait and at least 900 px, and a LinkedIn cover must be a landscape strip at least 1200 px wide.
Adding group brands and a banner to an Identity Kit template
Who: App administrator, marketing · Where: Edit template → Group brands and banner
What it does: Puts the group company logos and the signature banner from the signature on the Identity Kit image too. You prepare a campaign once; it looks the same in the signature and on the meeting background.
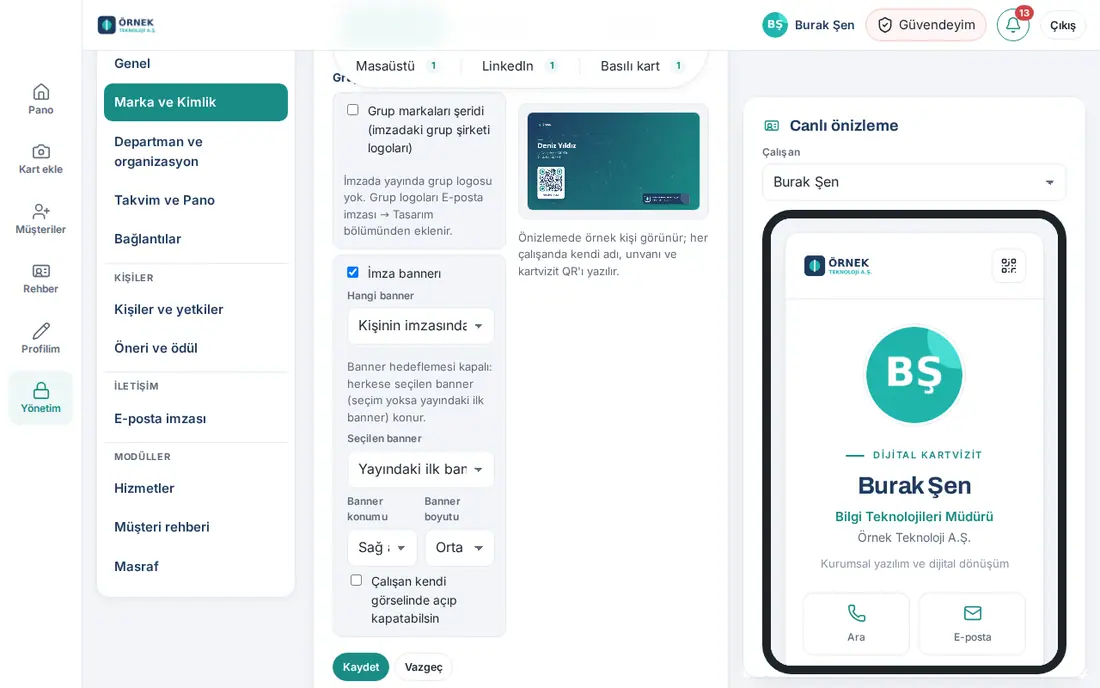
- Open the template with Edit and scroll down to the Group brands and banner section.
- Select the Group brands strip (group company logos from the signature) checkbox. Select the Strip position for the type.
- Select the Signature banner checkbox and set the options:
- Which banner: Banner in the person's signature (each employee gets the banner they see in their own signature) or Selected banner;
- Banner position and Banner size.
- If you want employees to turn these elements on and off in their own image, select the Employees can turn it on or off in their own image checkbox.
- Click Save.
Important:
- First, there must be a published group logo or banner in the signature. If not, the screen shows "No group logos are published in the signature" or "No signature banner is published" (see Group company logos and signature slots, Adding and publishing banners).
- There is no banner on the home screen image or on the printed card (it cannot be read behind the icons; on a printed card the campaign goes out of date).
Shared background set (Meet and Teams)
Who: App administrator, Google / Microsoft administrator · Where: Identity Kit templates → Meeting → Shared background set
What it does: You download, in one file, company-wide meeting backgrounds that contain no name or QR code, only the logo, pattern and background. You then assign this file to the whole company from the Google Meet or Microsoft Teams admin console.
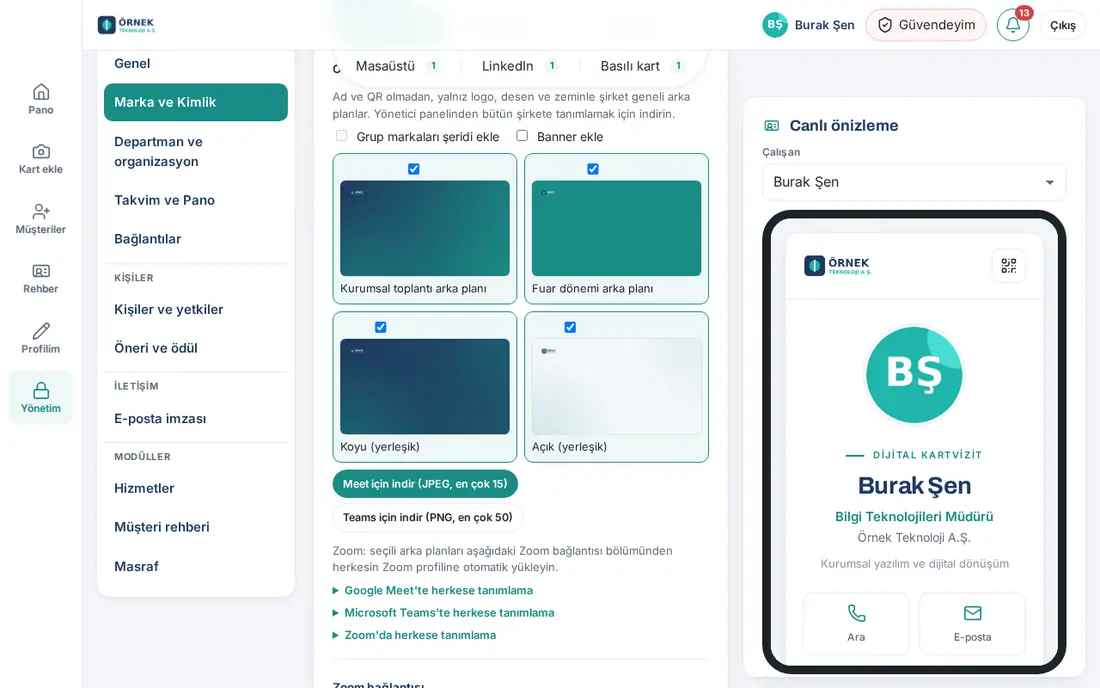
- In the Shared background set section, select the images to include in the set (company templates and the built-in Dark (built-in) / Light (built-in)).
- If you want, select the Add the group brands strip and Add banner checkboxes.
- Click Download for Meet (JPEG, up to 15) or Download for Teams (PNG, up to 50). The images download as a ZIP file.
- For the steps in the admin console, open the related instructions: Assigning to everyone in Google Meet or Assigning to everyone in Microsoft Teams.
Tip: In Zoom, backgrounds can be uploaded to everyone's profile automatically (Assigning to everyone in Zoom and Zoom connection; see 13. Integrations).
Corporate profile photo background
Who: App administrator · Where: Brand & Identity → Profile photo background
What it does: In My profile, employees use Convert to corporate photo to remove the background of their photo and place it on this background. This way everyone's photo has the same corporate look. The same photo is used on the card, in the email signature and, through directory sync, in the Google / Microsoft 365 profile.
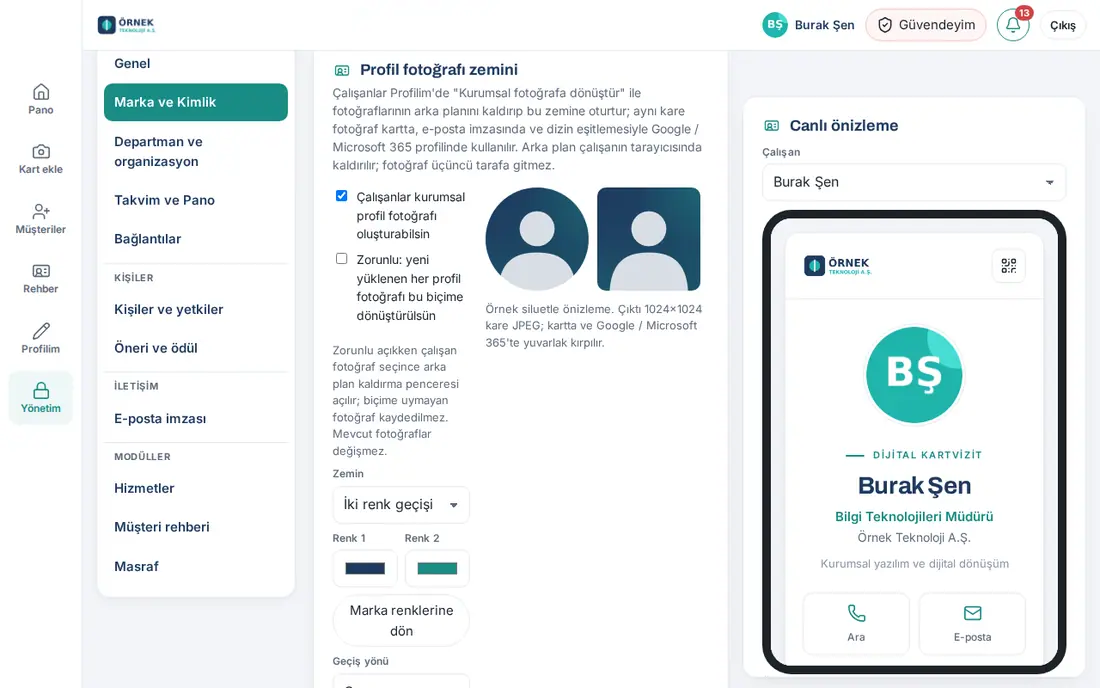
- Select the Let employees create a corporate profile photo checkbox.
- Select the Background: Solid colour or Two-colour gradient. Set Colour 1 and Colour 2; to return to the company colors, click Back to brand colours.
- For a gradient, select the Gradient direction and, if you want, select Soft glow in the brand colour.
- If you want, select a Pattern.
- If you want everyone to use this format, select the Required: convert every newly uploaded profile photo to this format checkbox.
- Look at the preview with the sample silhouette on the right and click Save.
Tip: The background is removed in the employee's browser; the photo does not go to a third party. The output is a 1024×1024 square JPEG; it is cropped to a circle on the card and in Google / Microsoft 365. For the employee steps, see 01. Digital business card and Identity Kit.
Important: While Required is on, the background removal window opens when the employee selects a photo; a photo that does not match the format is not saved. Existing photos do not change. The company's photo approval rule also applies.
Getting to know the email signature center
Who: App administrator, marketing · Where: Admin → Contact → Email signature
What it does: All signature settings are on one screen. On each tab, the signature of the employee you select is previewed live; you see the result before you save.
| Tab | What it contains |
|---|---|
| Design | Logo and colours, Templates, Template assignments, Layout elements, Group company logos, Social media (company level), Out-of-office note, Legal disclaimer and short signature |
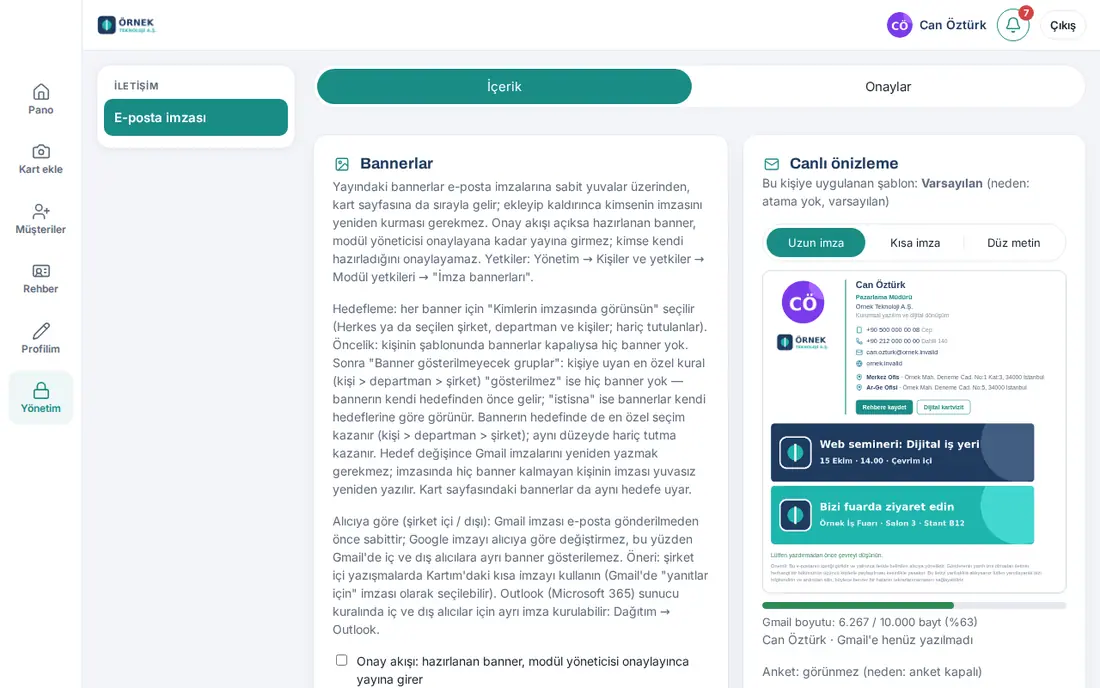
| Contents | Banners (including approval flow and targeting), Short note, Customer satisfaction survey |
| Delivery | Email platform, Gmail or Outlook distribution, Signature status per person, information emails |
| Analytics | Signature analytics and A/B banner test, Customer satisfaction report |
| Approvals | Approval flow, Awaiting approval, Change history |
- In the left menu, click Admin, then click Email signature in the Contact group.
- Select one of the tabs at the top.
- In the Live preview on the right, select a person from the Employee list. Switch between Full signature, Short signature and Plain text.
- Under the preview you see: the template applied to the person and the reason, the Gmail size (e.g. "6,270 / 10,000 bytes"), whether the survey is shown, and the banners in the person's signature.
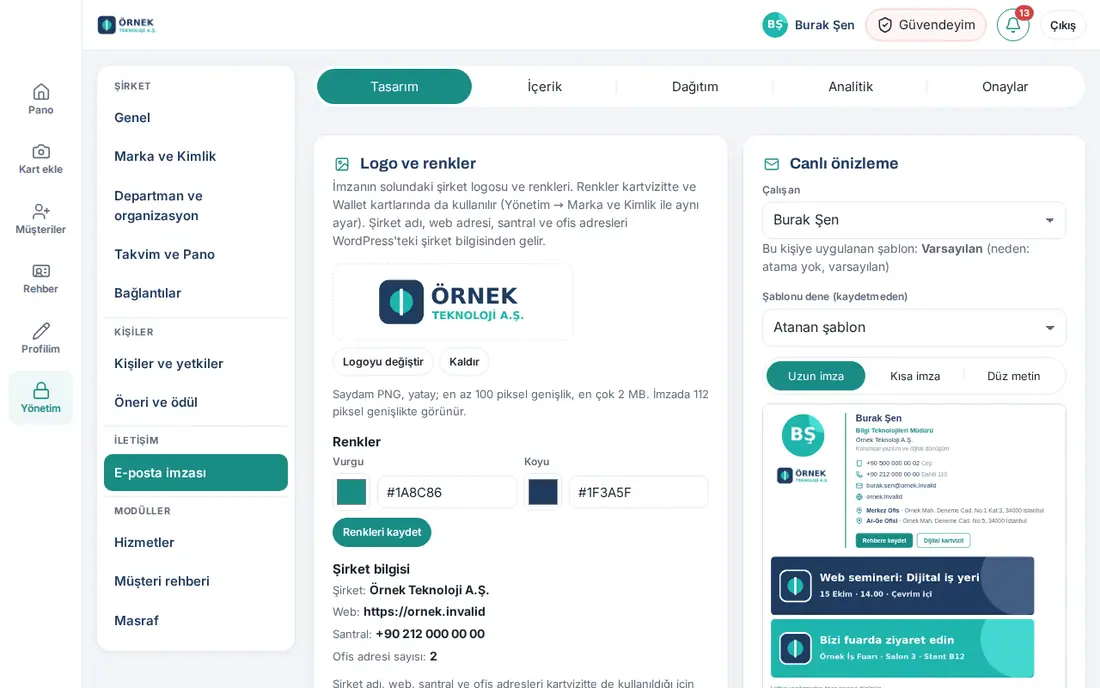
Who sees what: The Admin sees all tabs. A person who has a role in the Email signature (approval flow and banners) module in the permission table (e.g. marketing) sees only the Contents and Approvals tabs: they prepare banners and send proposals. If the Legal notice, Templates and assignments or Design scope is on in the approval flow, they also see the Design tab so that they can send proposals. A person with the View role sees only the Analytics tab. To give roles, see 10. Administration and setup.
Tip:
- The logo and colors in the Logo and colours box are the same setting as in Brand & Identity. The company name, web address, switchboard and office addresses come from the company details in WordPress (Edit in WordPress).
- A Gmail signature cannot be larger than 10,000 bytes. The size indicator in the preview warns you when it gets close to the limit.
Creating email signature templates
Who: App administrator · Where: Email signature → Design → Templates
What it does: You define different signature designs for different teams (e.g. a signature with a photo for the sales team, a plain one for accounting). The Default template is the current signature. The other templates inherit from it and store only the settings that are different.
- Type a name in the New template name field (e.g. "Sales team") and click Add template. To start from an existing template, click Copy next to it.
- In the Edit template section, select the design:
- Layout: Logo on the left, Logo on top, No logo or Single column;
- Typeface (e.g. Arial, Verdana, Georgia) and Font size (Unlikely, Normal, Large);
- Photo: Round, Square or No photo;
- Department: Short signature only, Full and short signature or Don't show.
- In the Items shown in the signature list, select the items to show: Job title, phones, Office addresses, Save-to-contacts button, Digital business card button, Schedule-a-meeting button, Social media icons, Group company logos, Banners, Customer satisfaction survey, Legal notice, Short note (environment note).
- Check the changes in the preview on the right and click Save template.
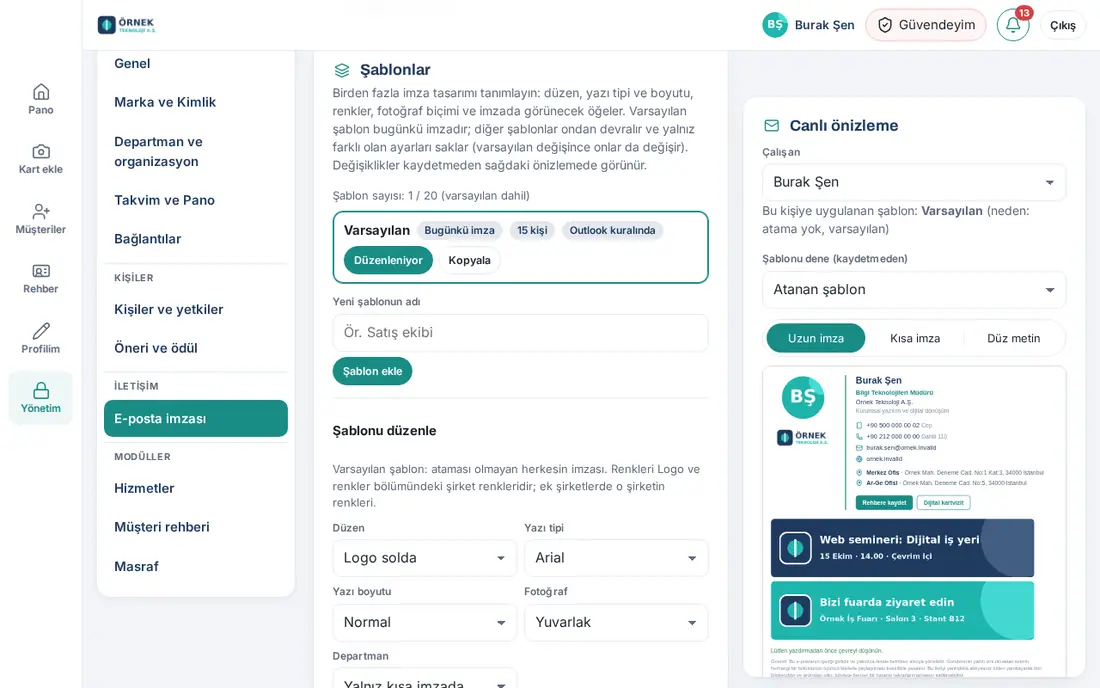
Tip: The typefaces are the ones that are safe in email programs; if the recipient does not have one, a fallback typeface is used. The on / off choice of items also applies to the short signature and the plain text signature. The email address and web address always appear.
Important: There can be up to 20 templates (including the default). When you change the default template, the templates that inherit from it also change.
Assigning a template to a person, department or company
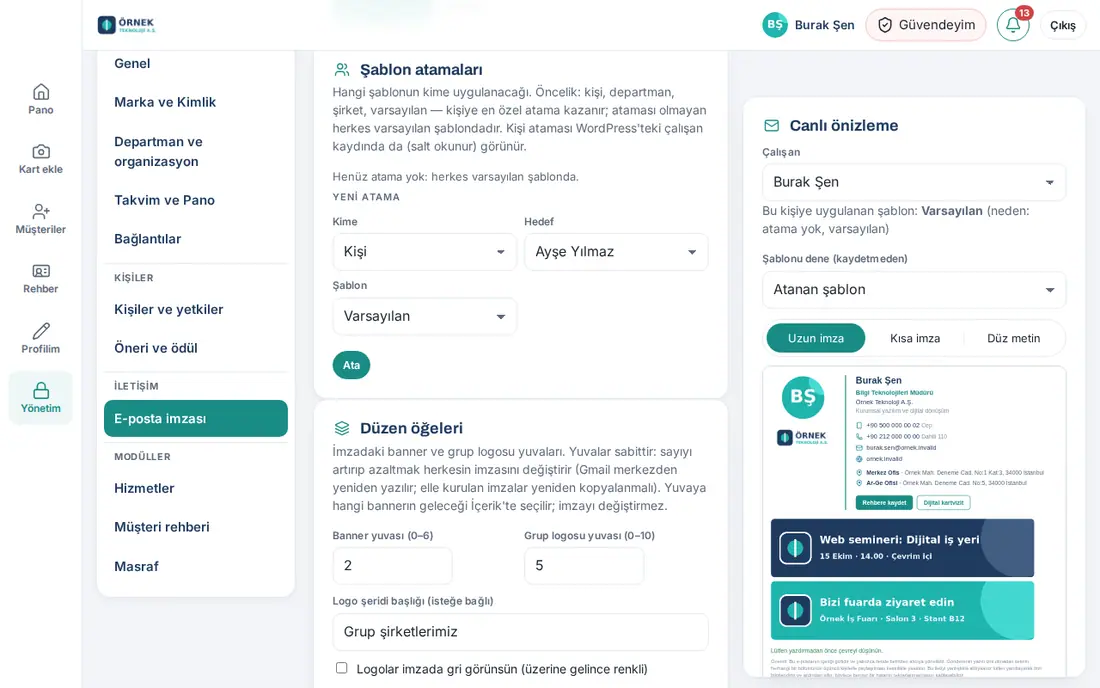
Who: App administrator · Where: Email signature → Design → Template assignments
- In the New assignment section, select Person, Department or Company from the To list.
- Select the person, department or company from the Goal list.
- Select the template from the Template list and click Assign.
- Select that person in the preview on the right. The Template applied to this person line shows the template name and the reason.
Tip:
- Order of priority: person, department, company, default. The most specific assignment for the person wins; everyone without an assignment is on the default template.
- You can select a template from the Try a template (without saving) list to see the person's signature before you make an assignment.
- Changed signatures are written to Gmail in bulk (if central writing to Gmail is on).
Group company logos and signature slots
Who: App administrator · Where: Email signature → Design → Layout elements and Group company logos
What it does: In groups made up of more than one company, you put the logos of the group companies (group brands) as a strip at the bottom of the signature. The same strip also appears at the very bottom of the business card page.
- In the Layout elements box, enter the number of slots:
- Banner slots (0–6);
- Group logo slots (0–10).
- If you want, write a Logo strip heading (optional) (e.g. "Our group companies") and select the Show logos in grey in the signature (colour on hover) checkbox.
- Click Save.
- In the Group company logos box, fill in the New logo section:
- Logo image (PNG, JPEG or WebP; up to 2 MB);
- Company name;
- Link (optional).
- Click Add logo. Repeat these steps for each logo.
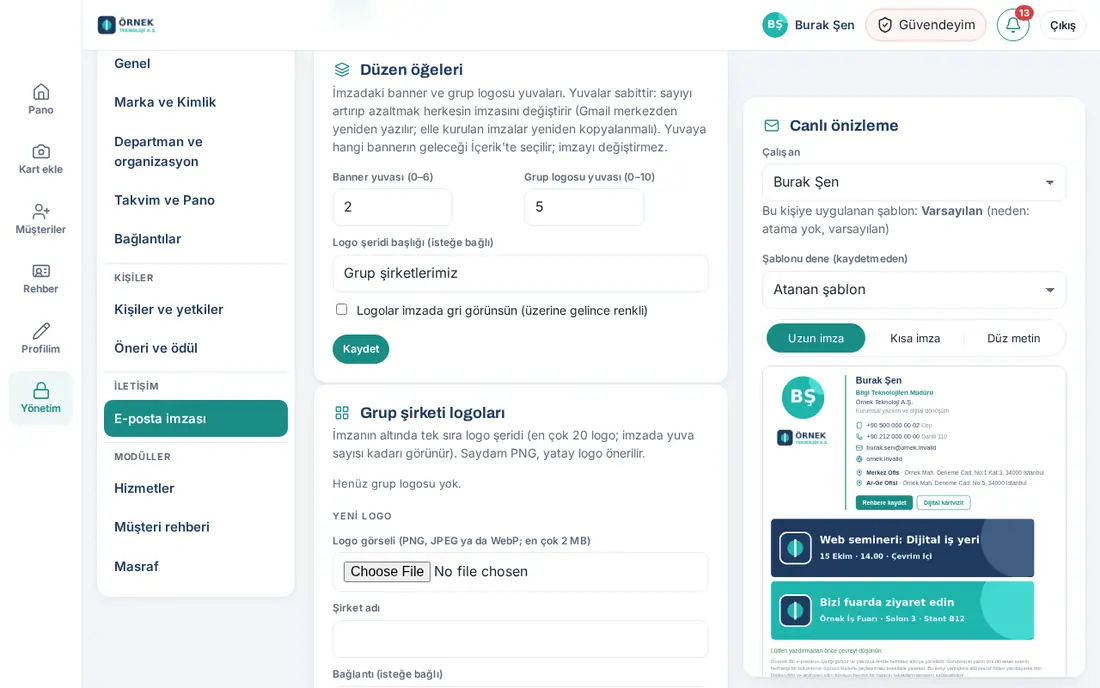
Tip: You can add up to 20 logos; the signature shows as many as there are slots. A transparent, landscape PNG logo is recommended. Because logos come from fixed slots, adding or removing a logo does not require setting up signatures again.
Important: The slots are fixed. Increasing or decreasing the number of slots changes everyone's signature: Gmail is rewritten centrally, and signatures set up by hand must be copied again.
For additional companies with their own employees in the same installation (each with its own logo and color), see 15. Multiple companies, language, KVKK and license.
Turning on social media networks
Who: App administrator, marketing · Where: Email signature → Design → Social media (company level)
What it does: The networks you select can be shown in employees' signatures and business cards. The employee adds their own link in the My card → My social media links section.
- Select the networks employees can use (e.g. LinkedIn, X, Instagram, YouTube). There are 16 networks.
- For networks where the company has its own account, type the company account address in the field next to it. In the signature of an employee who has no link of their own, the icon of that network goes to the company account.
- Click Save.
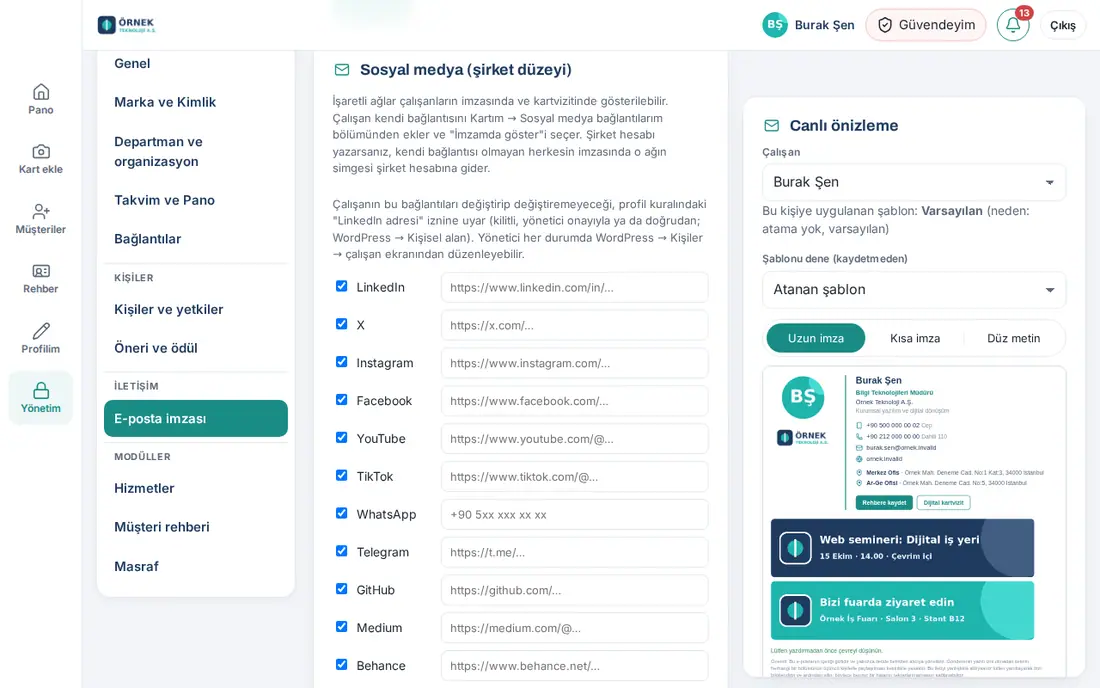
Tip: Links must start with https://; for WhatsApp, you can type a phone number. In the signature, 1–2 icons sit next to the buttons; more icons sit on a separate line under them.
Important:
- A network you turn off does not appear in anyone's signature or business card; the links employees entered are not deleted.
- Whether employees can change these links follows the LinkedIn adresi ("LinkedIn address") permission in the profile rules (see 10. Administration and setup).
Out-of-office note setting
Who: App administrator · Where: Email signature → Design → Out-of-office note
What it does: While an employee is on leave, adds a thin note line at the bottom of their signature; it is removed automatically after the end date. For the employee steps, see 02. Email signature.
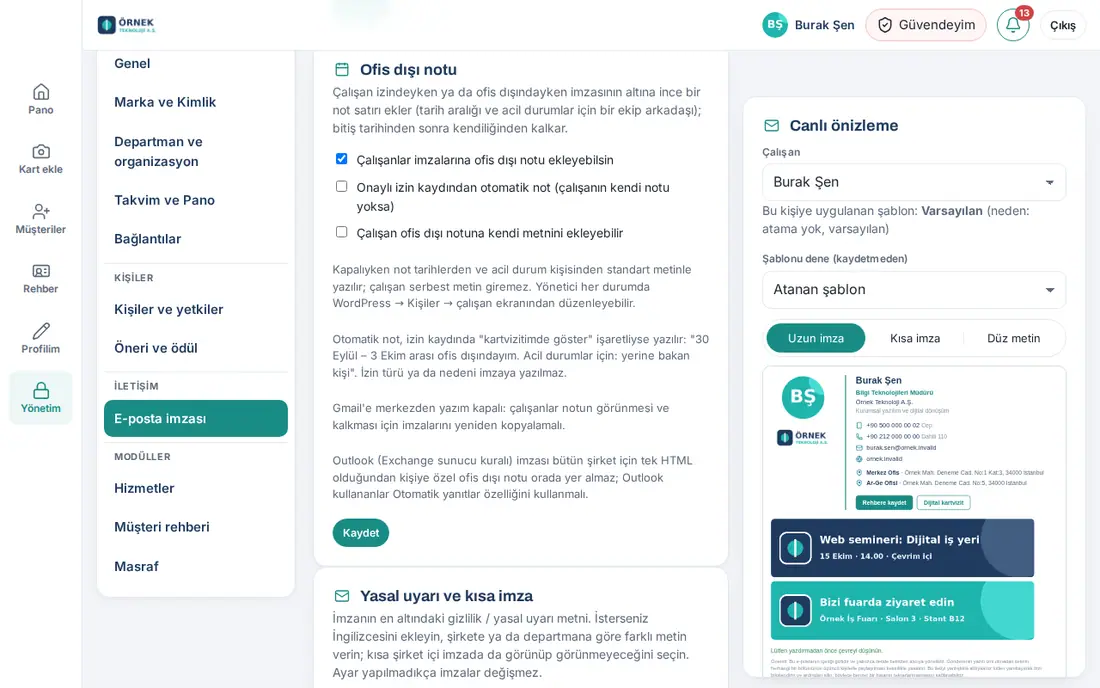
- Select the Employees can add an out-of-office note to their signature checkbox. If it is cleared, the feature is off for the whole company.
- If you want, select the Automatic note from approved leave records (if the employee has no note of their own) checkbox. The note is written if "show on my business card" is selected in the leave record.
- If you want, select the Employees can add their own text to the out-of-office note checkbox. When it is cleared, the note is written with standard text from the dates and the emergency contact.
- Click Save.
Important:
- The type or reason of leave is never written into the signature.
- If central writing to Gmail is off, employees must copy their signature again so that the note appears and is removed.
- The Outlook server rule is one HTML for the whole company, so it cannot contain a personal note; Outlook users must use the Automatic replies feature.
Legal notice and short signature
Who: App administrator · Where: Email signature → Design → Legal disclaimer and short signature
What it does: You set the confidentiality / legal notice text at the very bottom of the signature. If you want, you add an English version and give different texts by company or department.
- Type the text in the Default notice (Turkish) field.
- If you want, fill in the English version (optional; added below the Turkish) field.
- If a group needs a different text, click + Add rule in the Company or department specific texts section. In the rule that opens:
- select the Company and Department (or All companies / All departments);
- type the Turkish text or select the No legal notice for this group checkbox;
- to remove the rule, click Delete rule.
- If you want the notice in the short signature too, select the Include the legal notice in the short internal signature too checkbox.
- In the Preview section, select a Department to check the text each group will see.
- Click Save.
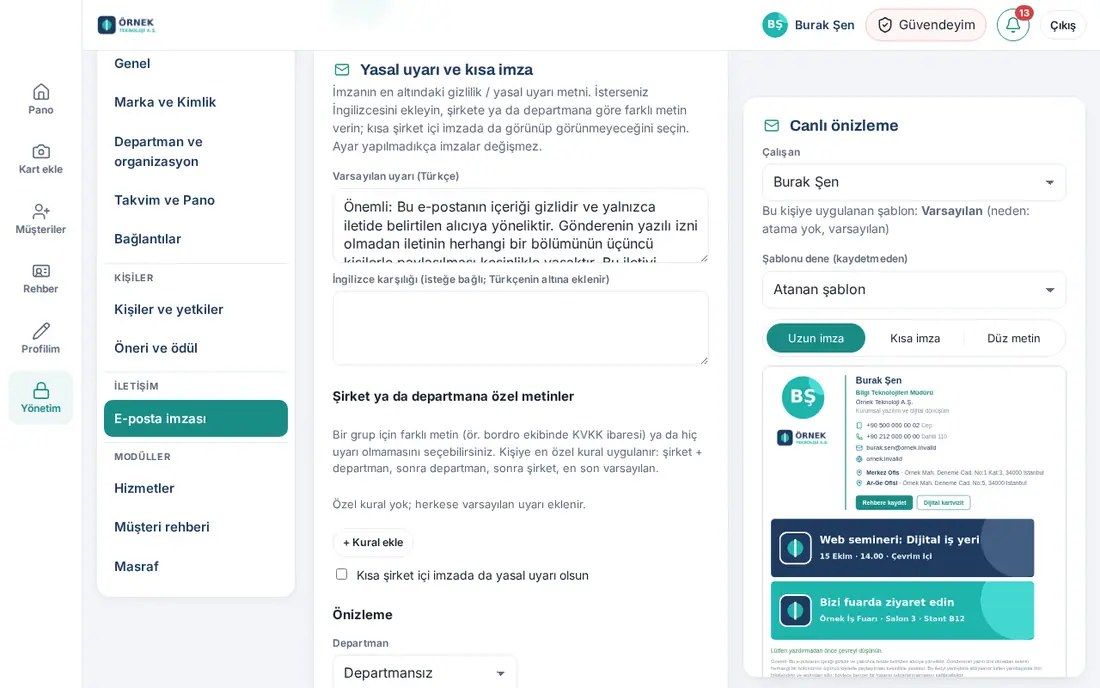
Tip: The most specific rule for the person applies: company + department, then department, then company, and finally the default. For example, you can show a KVKK (Turkey's personal data protection law) statement only for the payroll team.
Short signature: Employees use the short signature, without images or buttons, in replies and internal emails. The Department selection in the template decides whether the department appears in the short signature, and the checkbox above decides the notice. To see the short signature, click Short signature in the preview.
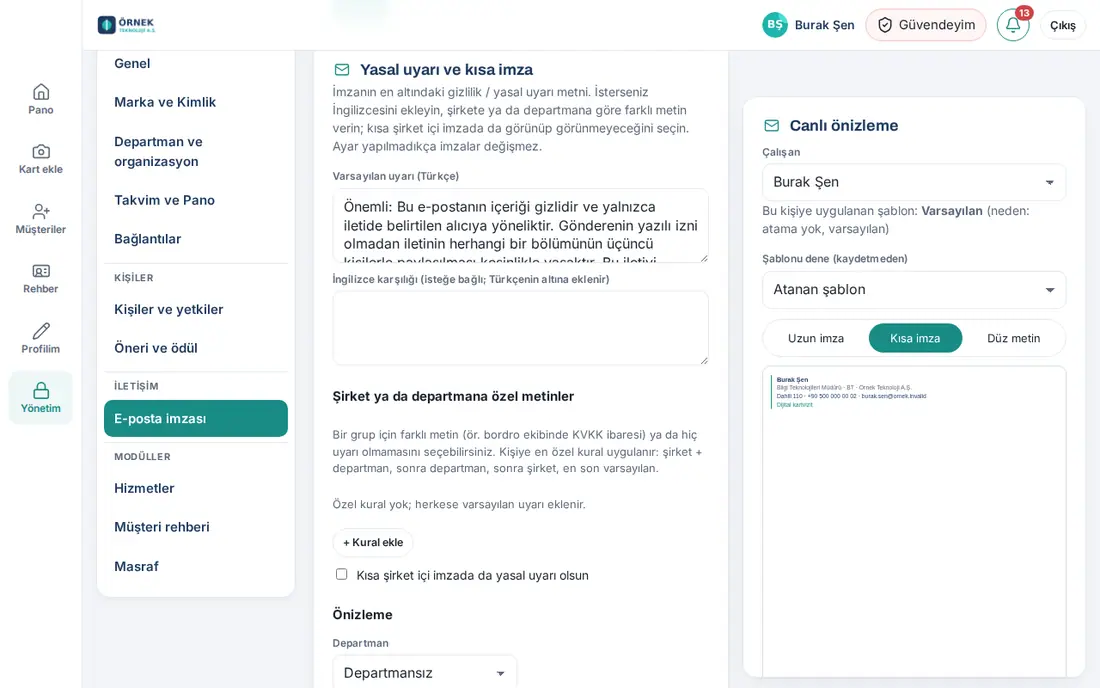
Important: Signatures do not change unless you change a setting. When you save, signatures are updated; if central writing to Gmail is off, employees copy the new signature themselves.
Adding and publishing banners
Who: App administrator, marketing · Where: Email signature → Contents → Banners
What it does: You put a campaign, event or announcement image at the bottom of the signature and on the business card page. Banners come into the signature through fixed slots; when you add or remove a banner, nobody needs to set up their signature again.
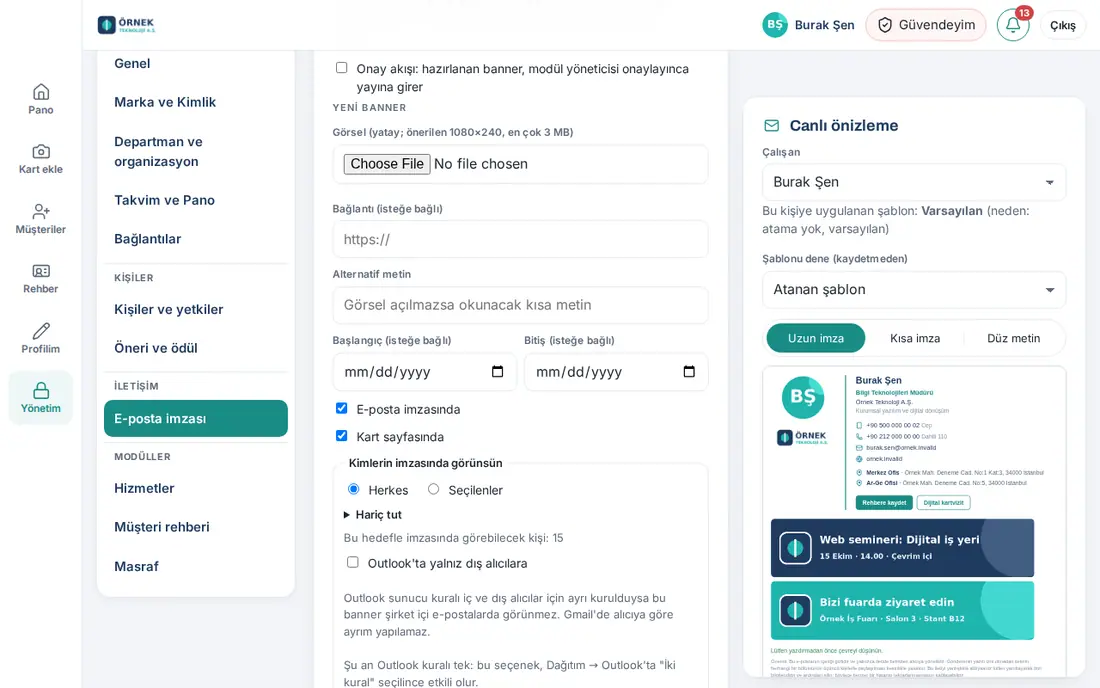
- Open the Contents tab and scroll down to the New banner section.
- Select the image in the Image (landscape; 1080×240 recommended, max 3 MB) field.
- Type the Link (optional) and the Alt text. The alt text is the short text that is read if the image does not open.
- To limit how long the banner runs, select the Start (optional) and End (optional) dates.
- Select where it appears:
- In the email signature and On the card page (both);
- only in the signature: clear On the card page;
- only on the card: clear In the email signature.
- In the Show in whose signatures section, select the target (see Banner targeting and groups without banners).
- Click Publish.
Banner list: Published banners appear in the Banner list. Under each banner, you see its target, the number of people, where it appears (e.g. "In signature · On the card page · ends 2026-10-31") and its link.
- ↑ / ↓: change the order. Published banners fill the slots in order.
- Edit: link, alt text, dates, and the Published, In the email signature and On the card page options; then Save.
- Change target: change the target, then Save target.
- Remove: removes the banner.
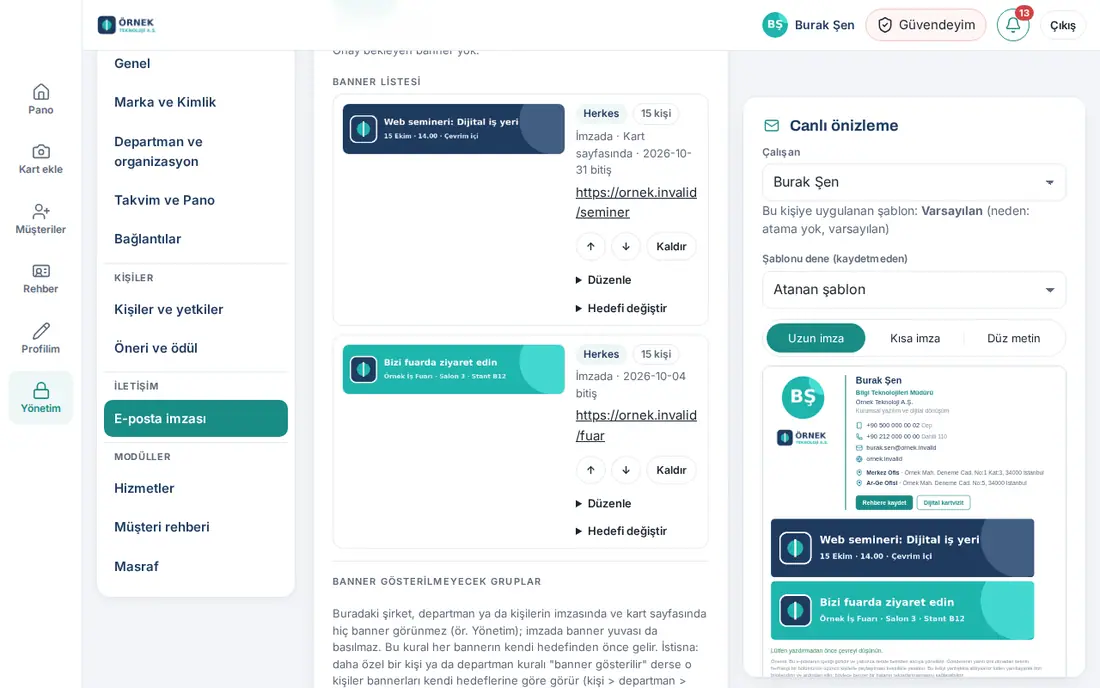
Tip: The signature shows as many banners as there are slots (at most 2 in this example). A banner whose end date has passed is unpublished automatically.
Important: If the Approval flow: a prepared banner goes live when a module admin approves it checkbox is selected, the banner is not published immediately; it goes to the Awaiting approval list. For an optional note to the approver, use the Note (for the approver; optional) field. Nobody can approve a banner they prepared themselves.
Banner targeting and groups without banners
Who: App administrator, marketing · Where: Email signature → Contents → Banners
What it does: You show each banner to everyone, or only to selected companies, departments and people. For example, a trade fair banner appears only in the sales team's signatures.
- In a new banner, or in a banner in the list, open Change target.
- In the Show in whose signatures section, select Everyone or Selected.
- For Selected, type in the Department and Person fields and select from the list. In a group structure, the Company field also appears.
- To leave some out, open Exclude and select departments or people.
- Check the People who can see it in their signature with this target number.
- For a new banner, click Publish; for an existing banner, click Save target.
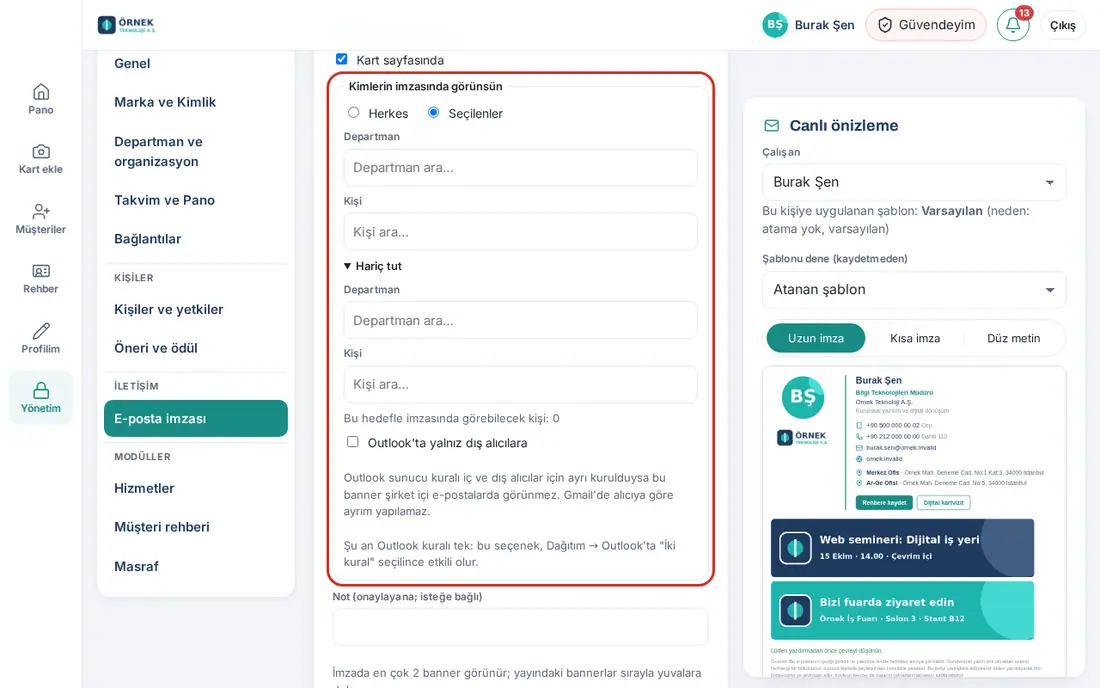
Groups without banners: If you want some people to have no banner at all in their signature (e.g. Management), open Edit rule in the Groups without banners section. Select companies, departments or people. For a more specific exception, use Exception: banners shown. Then click Save rule. This rule comes before the banner's own target; no banner slot is printed in these people's signatures either.
Tip:
- In targeting, the most specific selection wins (person > department > company); at the same level, exclusion wins.
- When the target changes, you do not need to rewrite the Gmail signatures; the banner image is selected for each person on the server. Banners on the card page follow the same target.
- Outlook: external recipients only: if the Outlook server rule was set up separately for internal and external recipients, the banner does not appear in internal emails. Gmail cannot separate by recipient.
Short note (environment note)
Who: App administrator · Where: Email signature → Contents → Short note
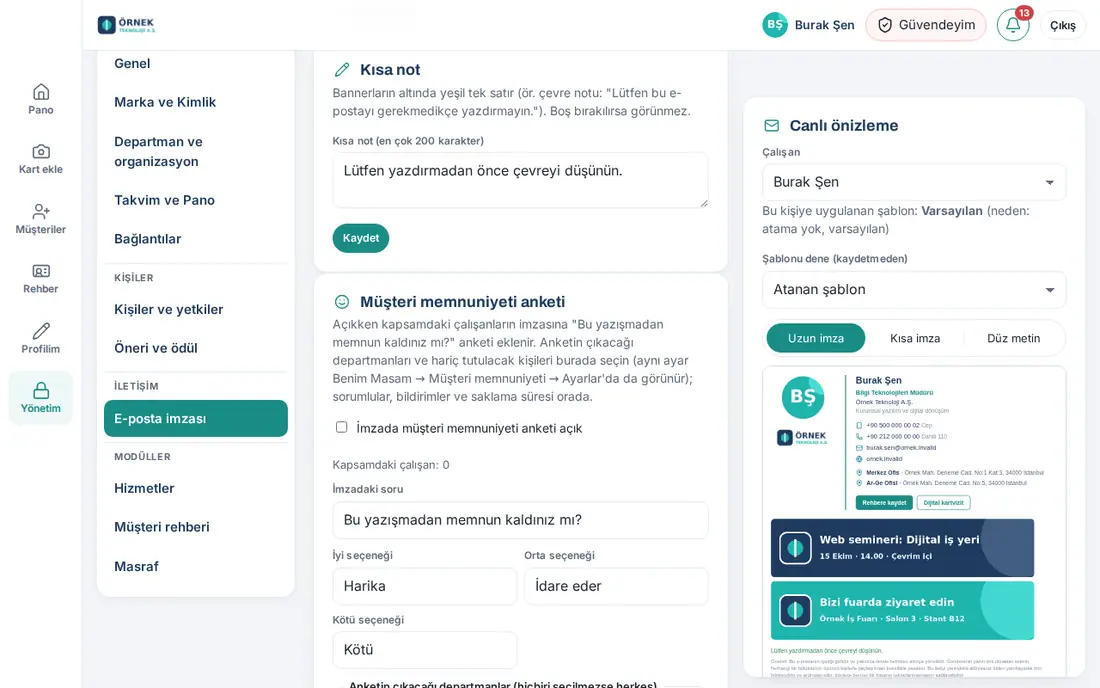
What it does: Adds a green one-line note under the banners (e.g. "Please consider the environment before printing.").
- Type the text in the Short note (up to 200 characters) field. If you do not want a note, leave the field empty.
- Click Save.
Turning on the satisfaction survey in the signature
Who: App administrator, Customer satisfaction module admin · Where: Email signature → Contents → Customer satisfaction survey
What it does: Adds the line "Were you happy with this conversation?" to the signature of employees in scope. The customer clicks an option and clicks Send; the rating is saved. For the page the customer sees, see 02. Email signature.
- Select the Customer satisfaction survey on in signatures checkbox.
- If you want, change the Question in the signature, Good option, Neutral option and Bad option texts.
- Select departments from the Departments that show the survey (none selected = everyone) list (e.g. Sales).
- Type a name in the People to exclude (no survey in their signatures) field and select from the list.
- Check the Employees in scope number and click Save.
- Select an employee in the preview. The Survey: line shows whether the survey is shown and why.
Tip: Owners, notifications, the thank-you text and the retention period are in Admin → Modules → Customer satisfaction (0.99.3): Customers can add an optional comment, Notify the employee when rated, Notify managers on a “Bad” rating, Thank-you text, Keep ratings for how many months (1–36). For the results, click Open the satisfaction report on the Analytics tab.
Important: The survey changes the signature the customer sees. When the scope changes, the Gmail signatures of employees whose signature changed are rewritten; people who set up their signature by hand must copy it again. The customer is not asked for a name or email.
Distribution and signature information email
Who: App administrator · Where: Email signature → Delivery
What it does: Sets how the signature reaches employees' email programs, lets you follow the status per person, and lets you send employees a "Your signature was updated" ("İmzanız güncellendi") information email.
- In the Email platform box, select your company's platform and click Save:
- Google Workspace: central writing to Gmail (see 13. Integrations);
- Microsoft 365: Outlook (Exchange) server rule (see 13. Integrations);
- Yandex 360: central writing to Yandex 360 (see 13. Integrations);
- Zoho Mail: central writing to Zoho Mail (see 13. Integrations);
- Other (manual): the employee copies the signature from My card and pastes it themselves (Setting up the signature by hand).
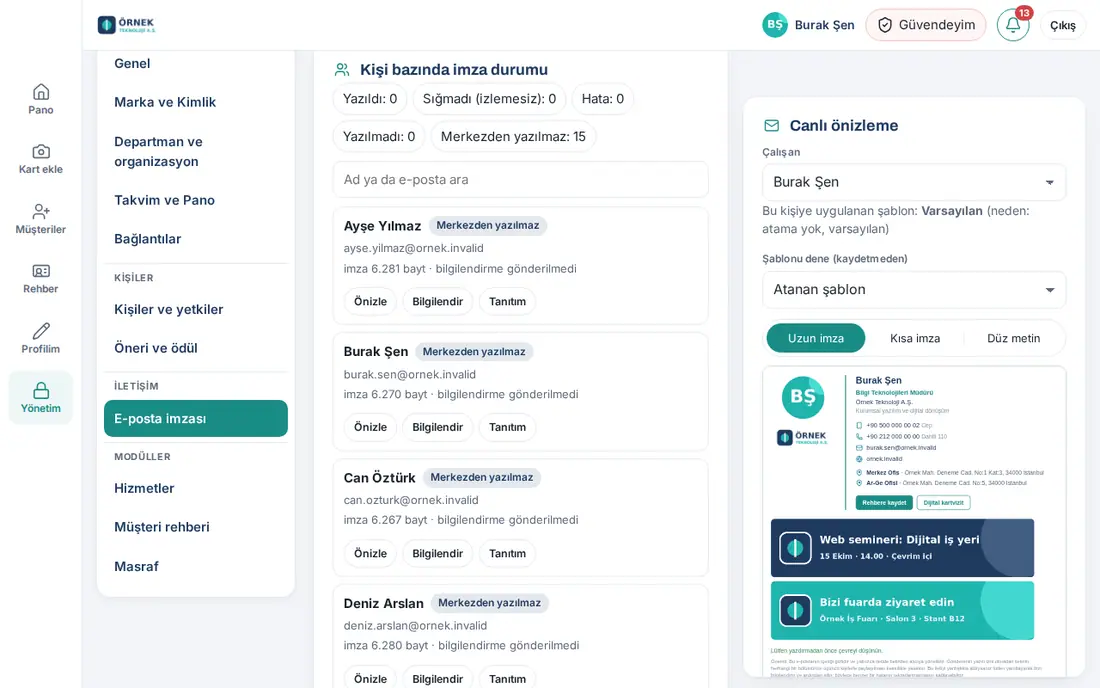
- In the Signature status per person list, see each employee's status: Written, Too long (untracked), Error, Not written, Not written centrally. Click a status to filter the list; search for a person with Search by name or email.
- In the person's row:
- Preview: opens the person's signature in the preview;
- Send info: sends the person the signature information email;
- Welcome email: sends the person a welcome email with the links to the card, tools, card scanning and Wallet.
- If Google Workspace, Yandex 360 or Zoho Mail is selected, use Send the information email to everyone in the Bulk actions section to send the email to everyone who is published.
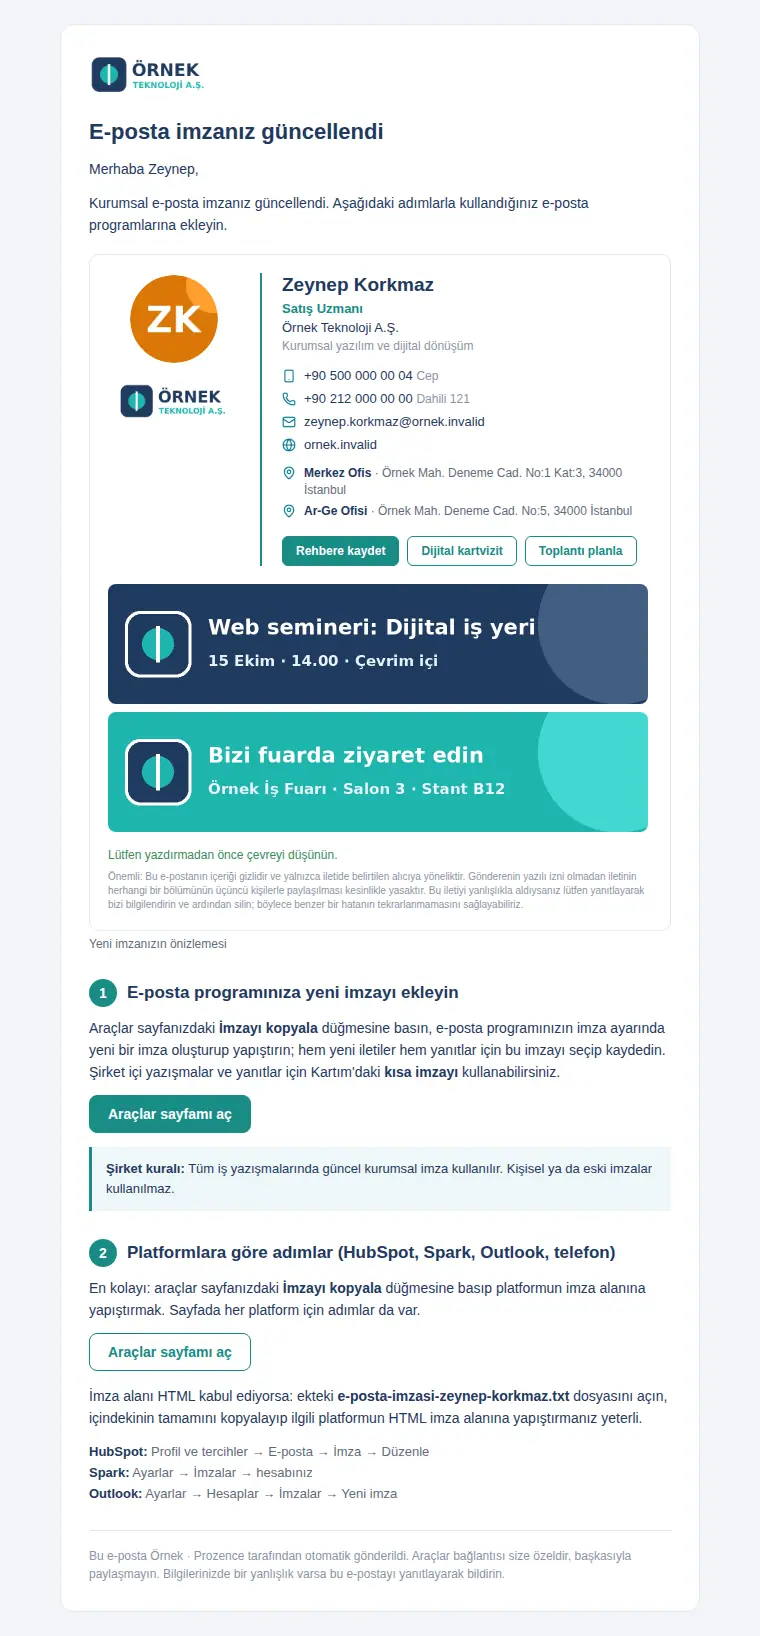
Information email: Sends the employee a preview of the new signature, the steps to select the signature in their email program, and the signature's HTML (as a .txt attachment). The employee can also get a phone notification. The email the employee sees:
Important:
- Information and welcome emails do not go out automatically; you send them with the button. Confirm the window that asks for confirmation.
- The automatic tasks of the platform that is not selected stop, but its settings are not deleted. Sign-in with Google and sign-in with Microsoft are not affected by this choice.
Email signature analytics
Who: App administrator, marketing · Where: Email signature → Analytics
What it does: Measures how many times signatures were opened, how many times their links were clicked, and which element (banner, logo, business card, meeting…) gets attention.
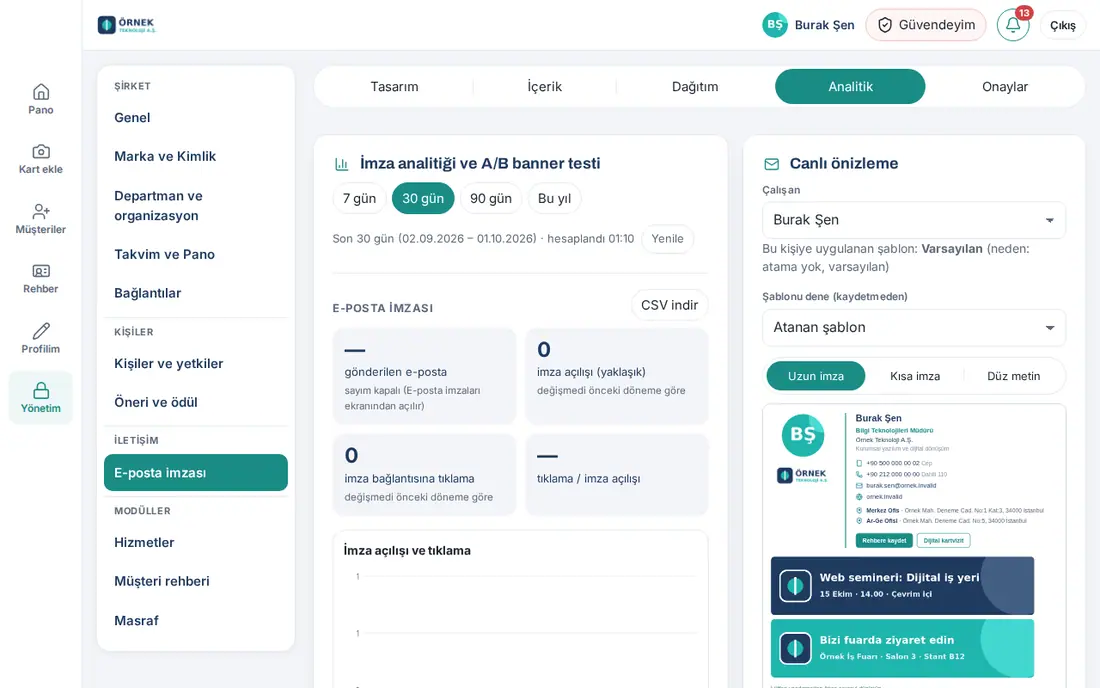
- Open the Analytics tab.
- Select the period: 7 days, 30 days, 90 days or This year. For current figures, click Refresh.
- In the Email signature boxes, see these figures: emails sent, signature opens (approx.), signature link clicks, clicks / signature open.
- Look at the chart and tables:
- the Signature opens and clicks chart;
- Items in the signature: how many clicks each element got;
- Whose signature gets the most clicks: ranking of employees.
- To examine the data in Excel, click Download CSV.
Tip: Clicks are reliable: link scanners, bots and employees signed in to the app are not counted; the same person is counted once every 6 hours. Opens are approximate, because email programs cache images.
Important: The emails sent figure appears only for Gmail and only if counting is on (Read everyone’s Gmail “Sent” count every night; see 13. Integrations). Phone and email links cannot be counted, because they open directly on the device.
Banner A/B test
Who: App administrator, marketing · Where: Email signature → Analytics → Banner A/B testi ("Banner A/B test")
What it does: You make two banners compete in the same slot. Employees are split at random into two equal groups; one group's signature shows A, the other shows B. You see which banner gets more clicks.
- In the Banner A/B testi section, type a Test name (e.g. "October campaign image").
- Select a Banner slot.
- Select the banners from the A (mevcut) ("A (current)") and B (rakip) ("B (challenger)") lists.
- Click Start test. Signatures do not need to be rewritten.
- Follow the result in the same section. If the difference is significant with 95% confidence, the winner is shown; if not, "No significant difference" is shown.
- To end the test, click End test and confirm. The result is saved to the history, and the slot returns to its normal banner.
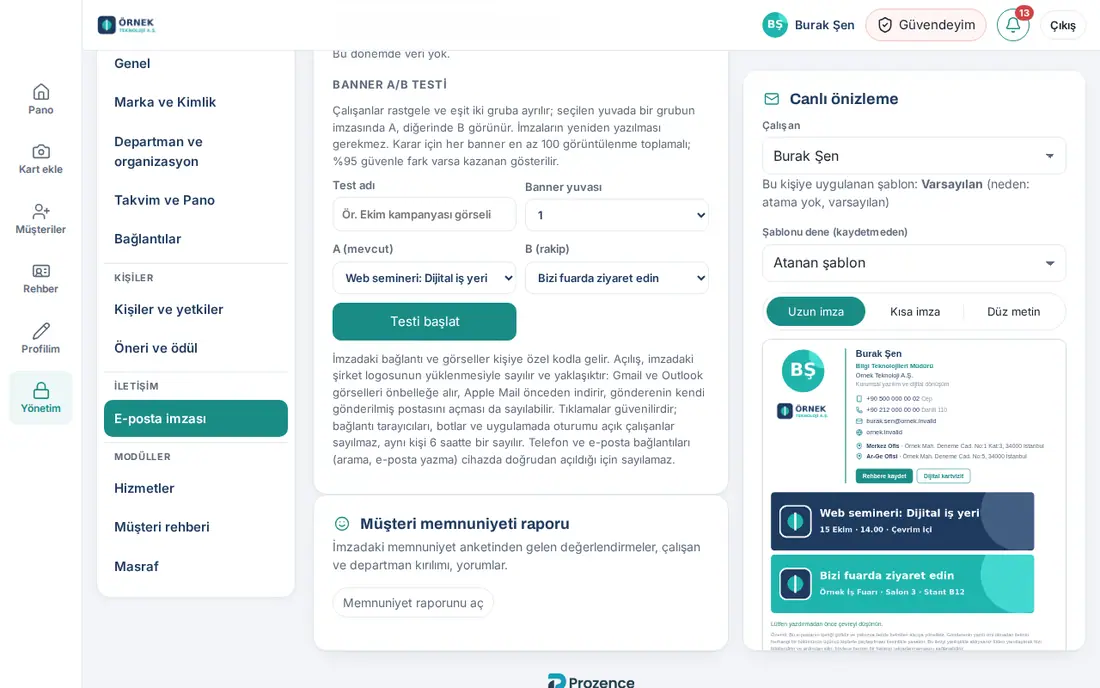
Tip: For a decision, each banner must collect at least 100 views. If the test is short, the result may not become clear.
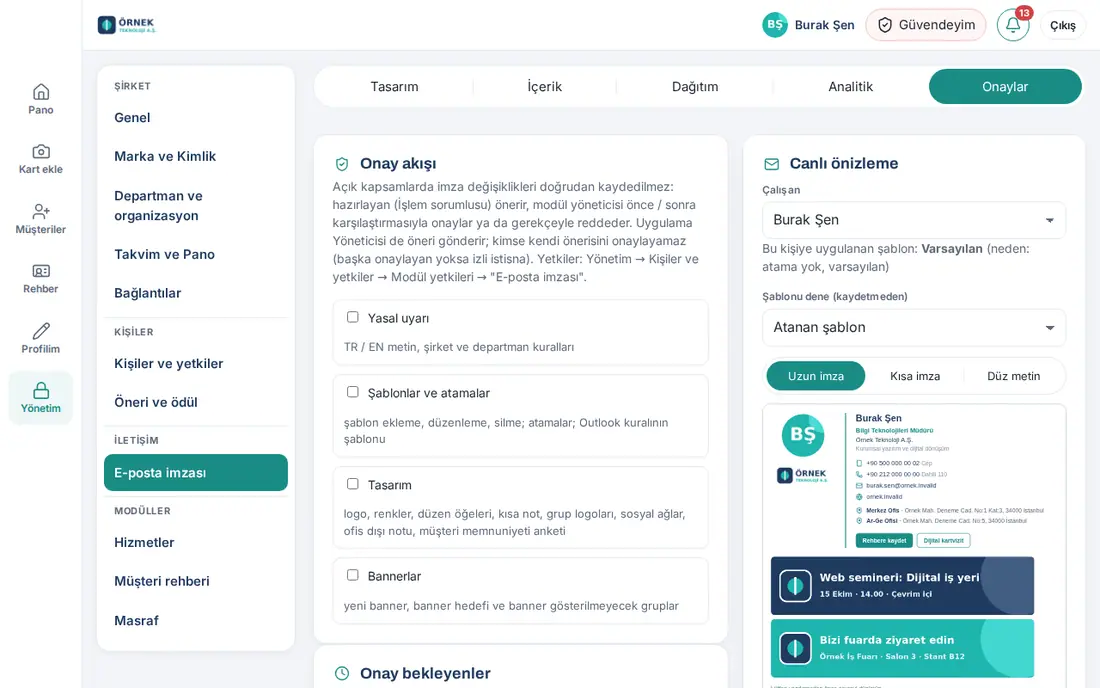
Approval flow: making signature changes need approval
Who: Email signature module admin · Where: Email signature → Approvals
What it does: Changes to the signature do not go live directly. The person who prepares them (Operator) proposes; the module admin approves with a before / after comparison or rejects with a reason. It is off by default.
- Open the Approvals tab.
- In the Approval flow box, select the scopes that you want to need approval. The selection is saved immediately:
- Legal notice: TR / EN text, company and department rules;
- Templates and assignments: adding, editing and deleting templates; assignments; the template of the Outlook rule;
- Design: logo, colors, layout elements, short note, group logos, social networks, out-of-office note, customer satisfaction survey;
- Banners: new banners, banner targets and groups without banners.
- In scopes that are on, the person who prepares a change clicks Send for approval instead of Save.
- Proposals go to the Awaiting approval list. Select an employee and compare the before / after signature.
- Click Approve and apply, or write a reason and click Reject. For banners, the button is Approve and publish. The person who prepared the change is told the result.
- In Change history, see the last 200 changes: who proposed, who approved, what changed.
Tip: Give the roles in Admin → People and permissions → Module permissions → Email signature (approval flow and banners) row: the Module admin approves, the Operator prepares (see 10. Administration and setup).
Important: Nobody can approve their own proposal. If you are the only approver, you can approve your own proposal, but the decision is written to the history as "sole approver". For the four-eyes principle, assign a second module admin.