31. Request, mailroom, purchasing and fixed asset management
Screenshots show the Turkish interface of Prozence with fictional "Örnek Teknoloji A.Ş." data; the English interface has the same layout.
This chapter describes the settings of four modules: Requests (categories, target times, handlers, canned replies), Mailroom (the mailroom, muhaberat: pickup point, reminder, carriers, default carrier, tracking addresses), Purchasing (categories, approvers, purchasing without approval) and Asset (asset assignment, zimmet: receipt confirmation, warranty reminder, retention, custom fixed asset categories). In each module, you give people their tasks in the Permissions section of the same screen.
Daily work (processing requests, logging and handing over deliveries, purchase approval, fixed assets and counts) is done on screens that employees also use; see 23. Requests, 24. Parcels, mailroom and purchasing and 28. Fixed assets and asset assignment. For a general description of the roles, see 10. Administration and setup.
Who: Admin · Services manager · Requests, Mailroom, Purchasing and Asset module admins
In this chapter
- Opening the settings screens
- Request settings: categories and target times
- Defining canned replies
- Giving permissions for Requests
- Mailroom settings
- Giving permissions for the Mailroom
- Purchasing settings
- Giving permissions for Purchasing
- Asset settings and custom categories
- Giving permissions for assets
- Reports
Before you start: All four modules are off by default in the company. You turn on each one with the first check box on its own settings screen. The screens in this chapter use data from the fictional "Örnek Teknoloji A.Ş.".
Opening the settings screens
Who: Admin, services manager, module admins · Where: Admin → Modules
What it does: The settings of the four modules are in two places:
| Module | Where |
|---|---|
| Requests | Admin → Modules → Services → Requests sub-tab |
| Mailroom | Admin → Modules → Services → Mailroom sub-tab |
| Purchasing | Admin → Modules → Purchasing |
| Asset assignment (fixed assets) | Admin → Modules → Asset |
- Click Admin in the left menu.
- In the administration menu, click Services, Purchasing or Asset in the Modules group.
- In Services, sub-tabs show at the top: General, Requests, Mailroom, Booking, Visitors, Meals, Shuttle, Vehicle, Permissions. Click the sub-tab you want.
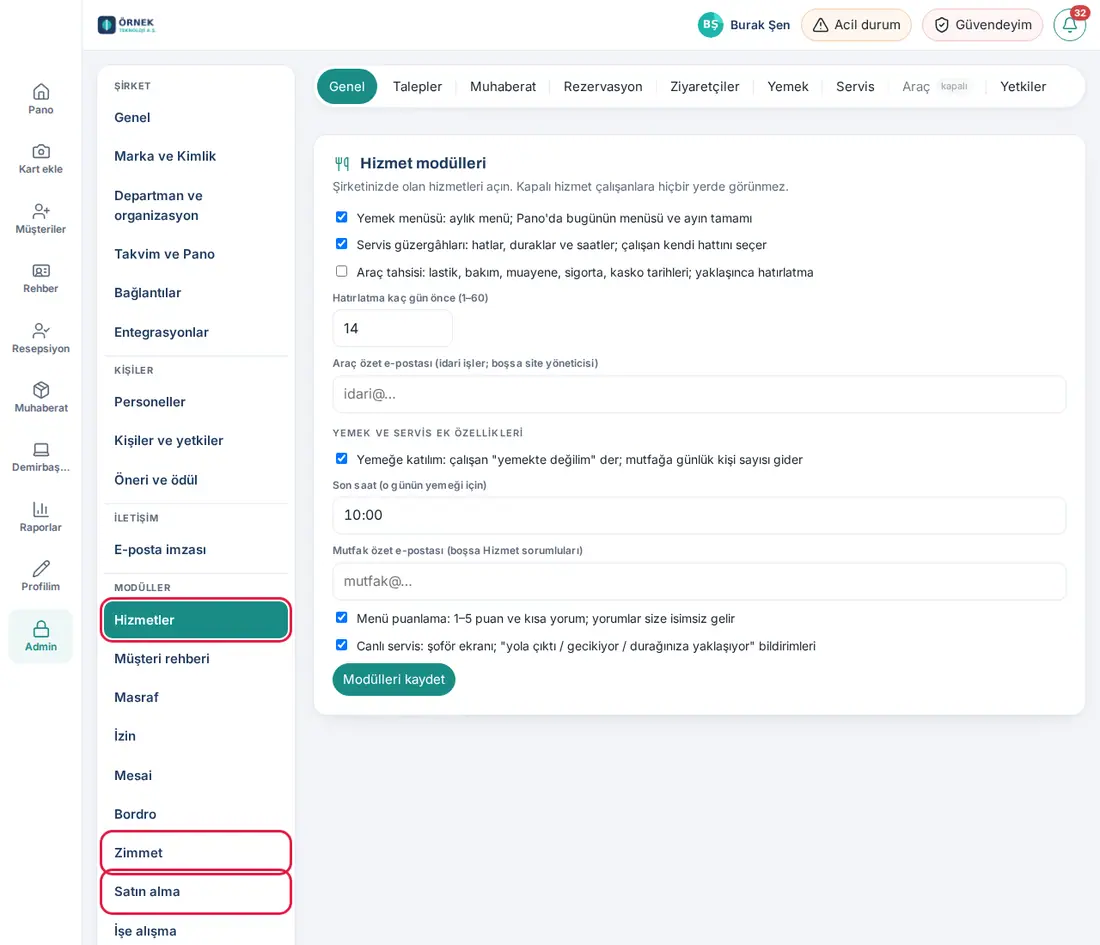
On a phone: Tap Profile → the Admin strip, then select the section with the Section: … button.
Tip:
- The sub-tabs show only the sections you have permission for. The tab of a service that is off is dimmed and has the label "off"; you can still open its settings.
- The sub-tab you select is remembered for the session; you can also move between tabs with the arrow keys.
Request settings: categories and target times
Who: Requests module admin, services manager, Admin · Where: Admin → Services → Requests
What it does: You set the request subjects that employees can open, the handlers of each subject and the target resolution time.
- Select the Requests on: employees open requests in Board → Services check box.
- Enter the value of Keep closed requests for how many months (3–120; then deleted with photo).
- In each category box (its heading shows the number of open requests, such as "Category 1 · 4 open requests"):
- Edit the Name and Description (shown in the form) fields.
- Enter the Target resolution time (hours; urgent ×¼, high ×½, low ×2) value.
- Keep the Employees can open requests in this category check box selected (if you clear it, the category does not show in the form; old requests stay).
- Type a name in the Add handler: type a name box and select the handler in the list. To remove one, click the × next to the name.
- For a new category, click + Add category.
- Click Save request settings.
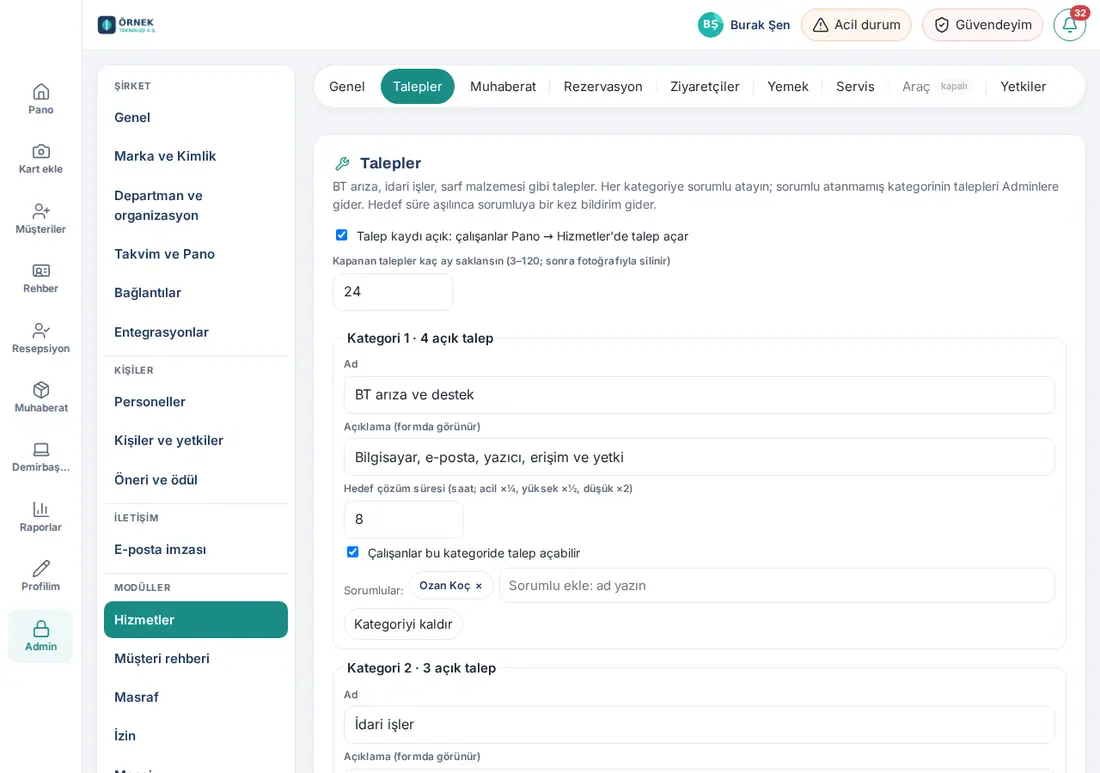
| Setting | What it does | Default |
|---|---|---|
| Requests on: employees open requests in Board → Services | Turns on the Requests box; employees can open requests. | Off |
| Keep closed requests for how many months (3–120; then deleted with photo) | Closed requests are deleted with their photos at the end of this period. | 24 months |
| Name | The name of the category shown in the form and in the lists. | BT arıza ve destek ("IT faults and support") · Facilities · Sarf malzemesi ("supplies") · Bina ve tesis bakım ("building and facility maintenance") |
| Description (shown in the form) | Shows under the category name in the new request form. | By category (e.g. "Bilgisayar, e-posta, yazıcı, erişim ve yetki", "computer, email, printer, access and permissions") |
| Target resolution time (hours; urgent ×¼, high ×½, low ×2) | Target time of a request with normal priority; the priority multiplies this time. 1–720 hours. | IT 8 · Administrative 24 · Supplies 48 · Building 24 |
| Employees can open requests in this category | Shows or hides the category in the new request form. | On |
| Handlers (Add handler: type a name) | The people who get the category's requests and get notifications. If empty, requests go to the Admins. | Empty |
| Canned replies | Ready texts that the people who process requests can select (see Defining canned replies). | None |
Result: The message "Request settings saved." shows.
Common errors:
- "This category has open requests; close them first or switch the category off." — you clicked Remove category on a category with open requests.
- "At least one category must remain." / "At most 30 categories can be defined."
- ""…" için hedef süre 1–720 saat arasında olmalı." ("the target time for "…" must be 1–720 hours")
- "Retention must be 3–120 months."
Tip: When the target time is exceeded, the person who took the request (if nobody took it, the category handlers) gets one notification. While the request is in Waiting for info status, the target time stops (see 23. Requests).
Defining canned replies
Who: Requests module admin, services manager, Admin · Where: Admin → Services → Requests → Canned replies
What it does: You define once the replies that the people who process requests often write; they select them in the request window from the Insert canned reply… list.
- In the Requests sub-tab, scroll down to the Canned replies section.
- Click + Add canned reply.
- In the Name (shown in the list) field, type a short name (e.g. "Password reset").
- In the Text box, type the reply. You can use two placeholders in the text:
{ad}— the requester's name (e.g. "Hello {ad}," → "Hello Gamze,");{no}— the request number (e.g. "write to this request ({no})" → "write to this request (T-2026-0020)").
- Delete a reply you do not need with Remove.
- Click Save request settings.
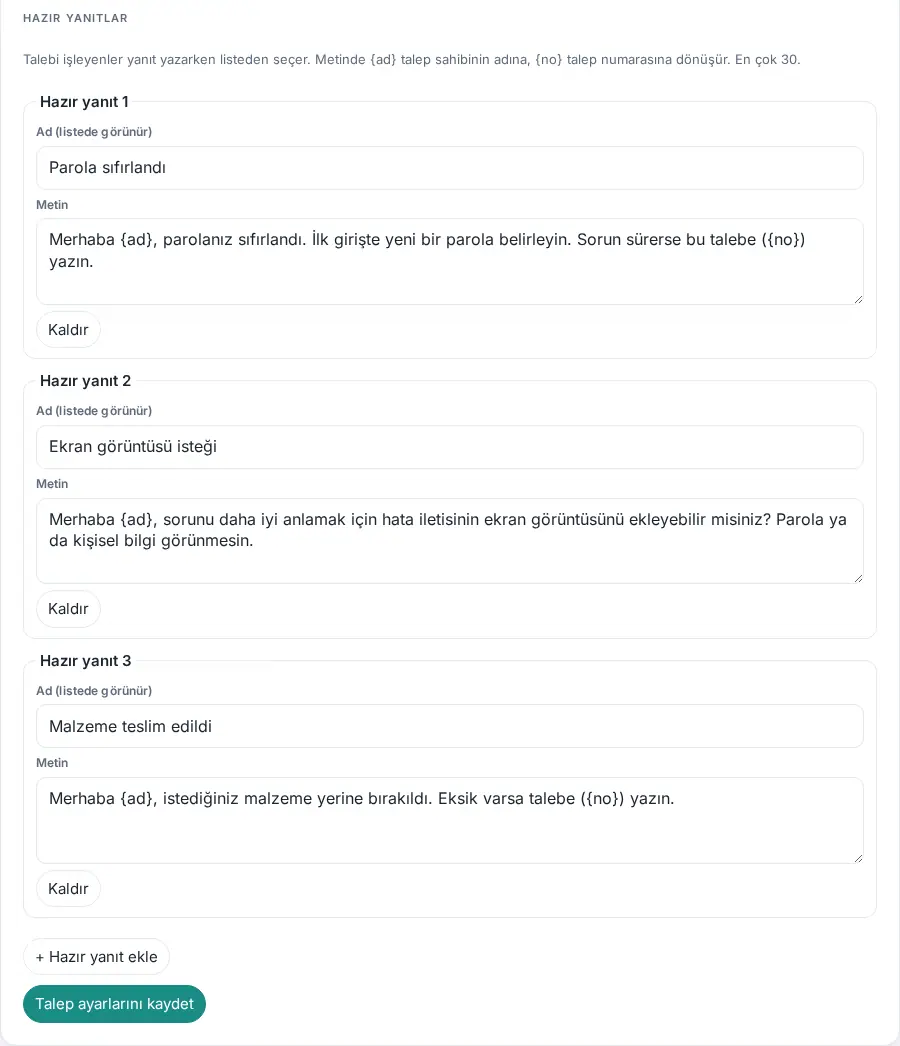
| Setting | What it does | Default |
|---|---|---|
| Name (shown in the list) | The name shown in the Insert canned reply… list in the request window. At least 2 characters. | Empty |
| Text | The text added to the message box; it accepts the {ad} and {no} placeholders. |
Empty |
Common errors:
- "A canned reply needs a name (at least 2 characters) and text."
- "At most 30 canned replies can be defined."
Tip: Only the people who process requests see the canned replies; the employee who opens the request does not. Completely empty rows are skipped when you save.
Giving permissions for Requests
Who: Admin, services manager · Where: Admin → Services → Permissions → Requests (IT, admin, supplies, facilities)
What it does: You set who manages, processes and follows requests. Category handlers are also selected in the category settings.
- In Services, click the Permissions sub-tab.
- In the Requests (IT, admin, supplies, facilities) section, type a name in the box for each role and select the person.
- To give a role to a whole department, use + Add department.
- Click the Save button of the section.
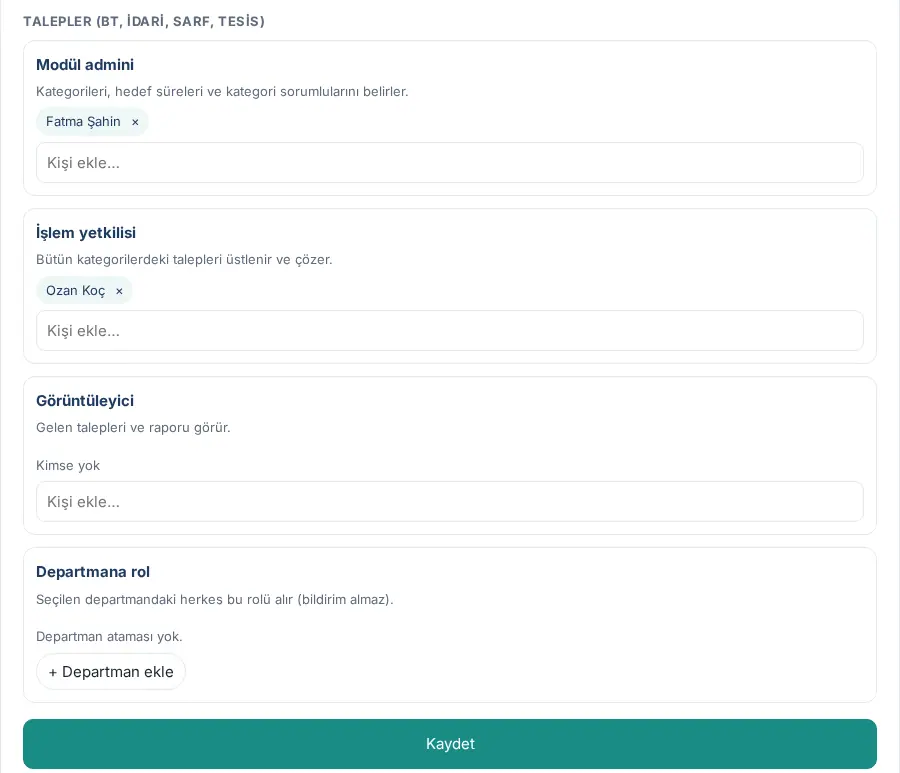
| Role | What it does | Default |
|---|---|---|
| Module admin | Sets the categories, target times and category handlers. | Nobody (an Admin can always do it) |
| Operator | Takes and resolves requests in all categories. | Nobody |
| Viewer | Sees incoming requests and the report; cannot make changes. | Nobody |
| Role by department | Everyone in the selected department gets this role (without notifications). | No department assigned |
| Category handler (in the category settings) | Sees, processes and gets notifications only for the requests of their own category. | Empty (requests go to the Admins) |
Tip: The top row in the same Permissions sub-tab (Services → Module admin) is the services manager: this person manages the whole Services tab and also sees request, mailroom, booking and visitor work.
Mailroom settings
Who: Mailroom module admin, services manager, Admin · Where: Admin → Services → Mailroom
What it does: Turns on the logging of incoming deliveries and the employees' outgoing shipping requests; you set the pickup point, the reminder, the retention period, the carriers and the tracking addresses.
- Select the Mailroom on: log incoming parcels and send pickup codes check box.
- So that employees can request shipments, select the Employees can request outgoing shipments check box.
- In the Pickup point (shown in the notification) field, type where deliveries are collected.
- Enter the Reminder for uncollected parcels (days; 0 = off; up to 3 times) and Keep entries for how many months (1–120) values.
- In the Mailroom staff row, add the staff with the Add handler: type a name box.
- Edit the Carriers (one per line) list.
- In the Default carrier list, select the carrier that is selected first when shipping.
- For tracking links, type one carrier on each line in the Tracking URL templates box:
Company | https://…{no}(e.g.Yurtiçi Kargo | https://takip.ornek.invalid/kargo?no={no}). - Click Save mailroom settings.
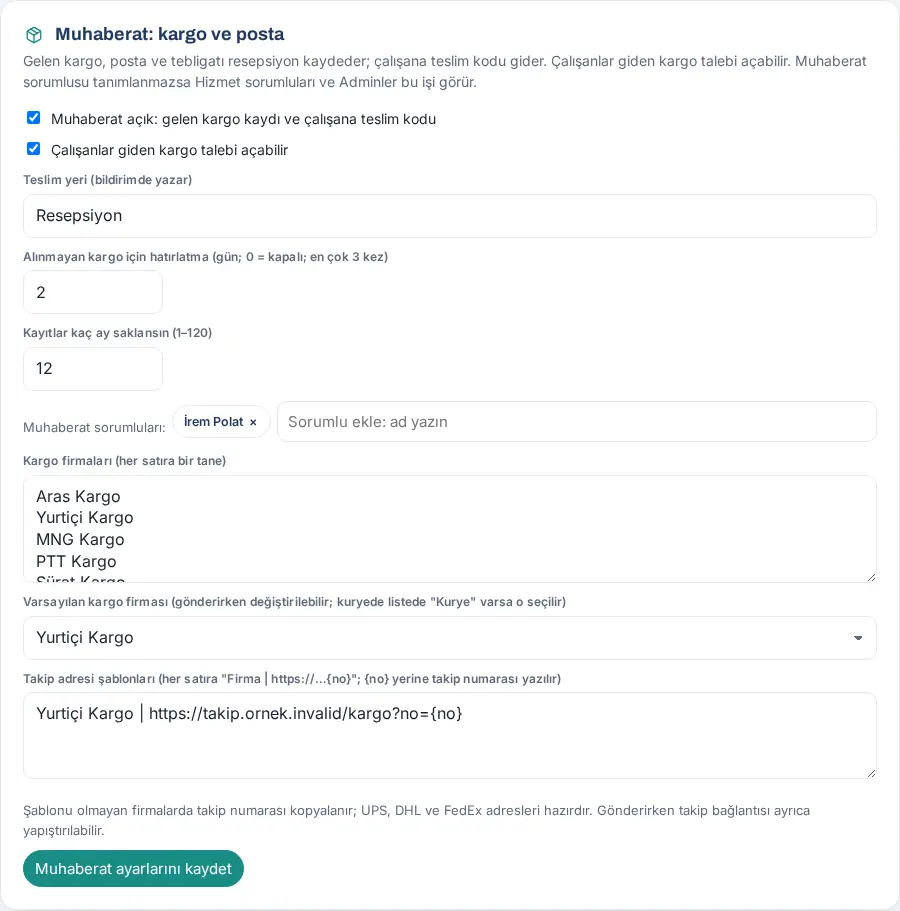
| Setting | What it does | Default |
|---|---|---|
| Mailroom on: log incoming parcels and send pickup codes | Turns on the Parcels and mail box and the Mailroom desk. | Off |
| Employees can request outgoing shipments | Shows the Send a parcel button to employees. | On |
| Pickup point (shown in the notification) | The place shown in the notification to the employee and in the Send a parcel window. | Resepsiyon |
| Reminder for uncollected parcels (days; 0 = off; up to 3 times) | How often (in days) a reminder is sent for a delivery that is not picked up (0–14). No reminder is sent for food and flowers. | 2 days |
| Keep entries for how many months (1–120) | Retention period of old mailroom records. | 12 months |
| Mailroom staff | The people who get the notifications of shipping requests and do the mailroom work. If empty, the services managers and Admins do this work. | Empty |
| Carriers (one per line) | The carrier list in the logging and shipping forms. | Aras Kargo, Yurtiçi Kargo, MNG Kargo, PTT Kargo, Sürat Kargo, UPS, DHL, FedEx, Hepsijet, Trendyol Express, Kurye ("courier"), Diğer ("other") |
| Default carrier (can be changed when sending; for courier, "Kurye" is selected if it is in the list) | The carrier selected first in the Handed to carrier form. | The first carrier in the list |
| Tracking URL templates | Makes the Track link by carrier; the tracking number replaces {no}. For a carrier without a template, the tracking number is copied; the UPS, DHL and FedEx addresses are built in. |
Empty |
Result: The message "Mailroom settings saved." shows.
Common errors:
- "Takip adresi satırı "Firma | https://…{no}" biçiminde olmalı: …" ("a tracking address line must be in the format …") — the line has no
|to separate the carrier name from the address. - "… için takip adresi https:// ile başlamalı ve {no} içermeli." ("the tracking address for … must start with https:// and contain {no}") — the address does not start with
https://or{no}is missing. - "Takip adresi verilen firma listede yok: …" ("the carrier given a tracking address is not in the list") — first add the carrier to the Carriers list.
- "At least one carrier must remain."
- "Reminder must be 0–14 days (0 = off)."
- "Retention must be 1–120 months."
Important: The tracking template is matched by carrier name. If you change the carrier name in the list, also change the name in the template.
Giving permissions for the Mailroom
Who: Admin, services manager · Where: Admin → Services → Permissions → Mailroom (parcels and post)
- In Services, click the Permissions sub-tab.
- In the Mailroom (parcels and post) section, add people to the roles.
- Click Save.
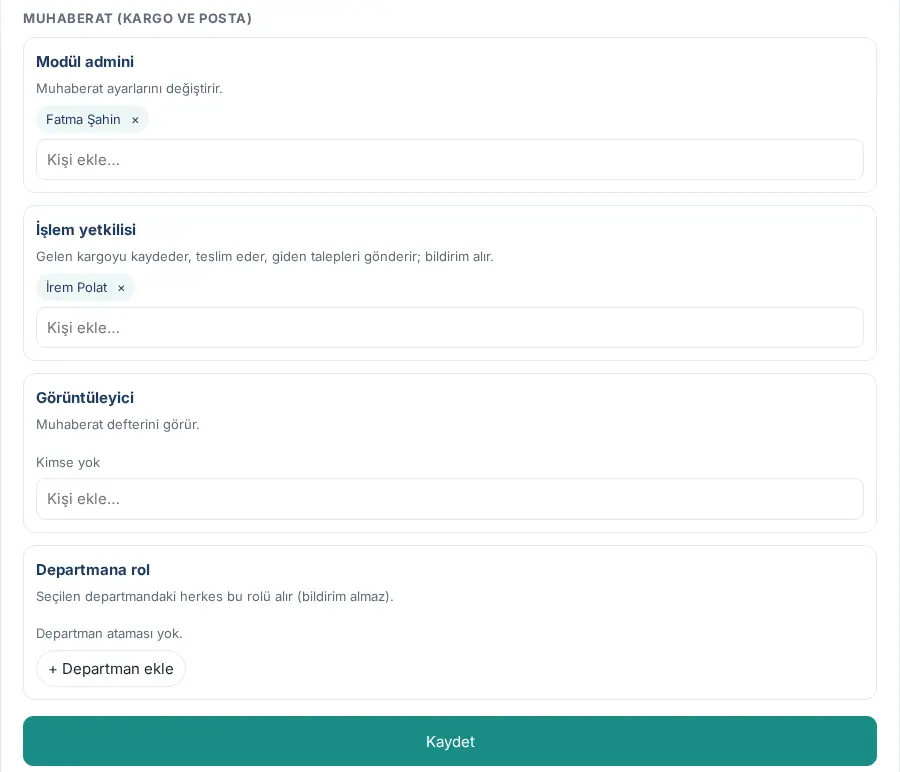
| Role | What it does | Default |
|---|---|---|
| Module admin | Changes the mailroom settings. | Nobody |
| Operator | Logs incoming parcels, hands them over, sends outgoing requests; gets notifications. Sees the Mailroom desk in the menu. | Nobody |
| Viewer | Sees the mailroom log; cannot log or hand over deliveries. | Nobody |
| Role by department | Everyone in the selected department gets this role (without notifications). | No department assigned |
Tip: If the receptionist does both visitor and mailroom work, make this person an Operator in both modules; Reception and Mailroom show as separate screens in the menu (see 32. Shuttle, meal, visitor and emergency management).
Purchasing settings
Who: Purchasing module admin, Admin · Where: Admin → Modules → Purchasing
What it does: Turns on purchase requests; you set the categories, the management approvers and the people who can purchase without approval.
- Select the Purchase requests on: employees see "Purchasing" in My Space check box.
- In the Categories list, type the name of each category and select its type (IT or Administrative). Delete a category you do not need with ×; for a new one, click + Add category.
- In the Management approval section, type names in the Approvers box and select the approvers.
- In the Purchasing without approval (skip approval by permission) section, add people to the People authorised to skip approval box.
- Enter the Limit for purchasing without approval (TRY; 0 = no limit) value.
- Click Save.
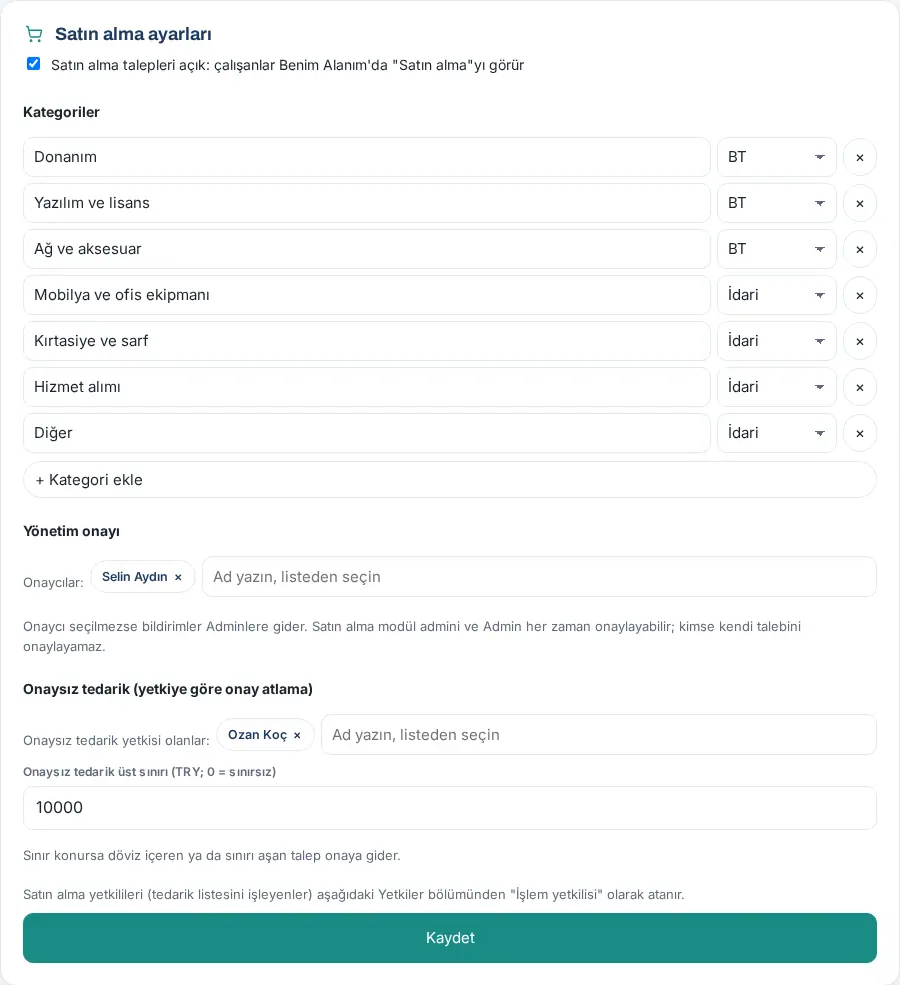
| Setting | What it does | Default |
|---|---|---|
| Purchase requests on: employees see "Purchasing" in My Space | Turns on the Purchasing box. | Off |
| Categories (name and type) | The category list in the request form; it is filtered by type. | IT: Equipment, Software and licences, Network and accessories · Administrative: Furniture and office equipment, Stationery and supplies, Services, Other |
| Approvers | The management that approves or rejects requests; gets notifications and emails. The purchasing module admin and an Admin can always approve. | Empty (notifications go to the Admins) |
| People authorised to skip approval | These people see the Add to the procurement list without approval check box in the form. | Empty |
| Limit for purchasing without approval (TRY; 0 = no limit) | If a limit is set, a request above the limit or with foreign currency cannot be added to the procurement list without approval; if the check box is selected, the request is not saved, a message shows and the person must send the request for approval (it does not go to approval automatically). | 0 (no limit) |
Result: The message "Purchasing settings saved." shows.
Common errors:
- "There must be at least one category."
- "Kategori türü BT ya da İdari olmalı: …" ("the category type must be BT (IT) or İdari (Administrative)")
- "The limit must be 0 or a positive TRY amount (0 = no limit)."
- "Purchasing settings are changed by the module admin or an Admin."
Important: Nobody can approve their own request. If there is only one approver, add a second approver for that person's own requests (or the module admin / Admin decides). Approval has one stage.
Giving permissions for Purchasing
Who: Admin, purchasing module admin · Where: Admin → Modules → Purchasing → Permissions
What it does: You set who processes the procurement list (purchasing officer) and who only follows it.
- Go to the Permissions section at the bottom of the Purchasing tab.
- Add people to each role; for a whole department, use + Add department.
- Click Save.
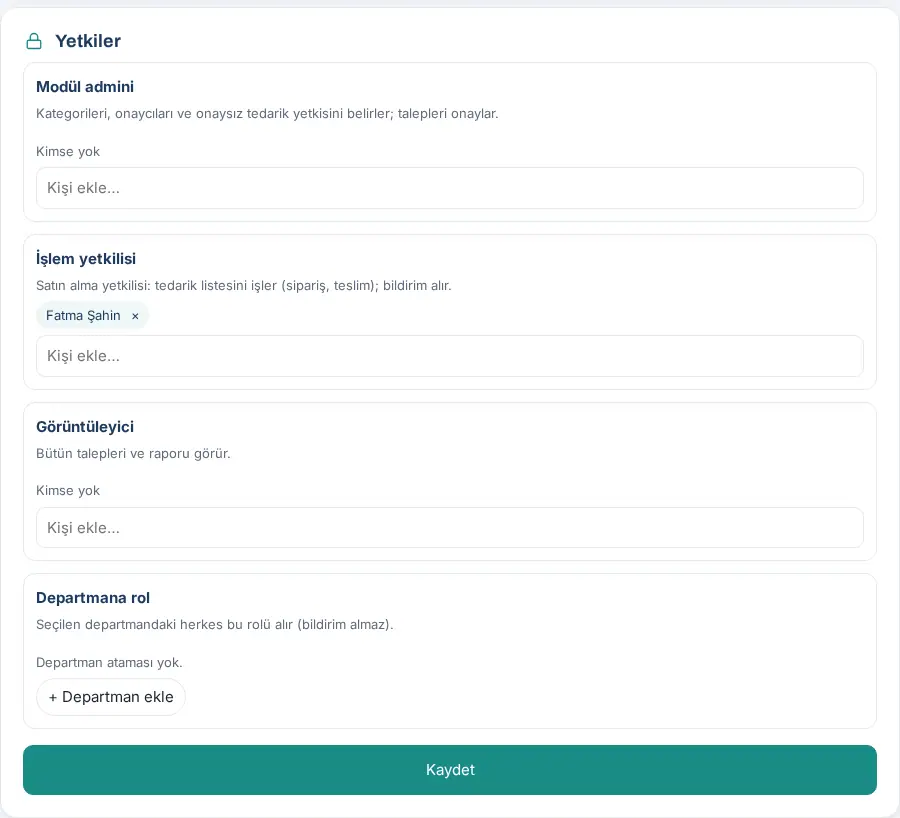
| Role | What it does | Default |
|---|---|---|
| Module admin | Sets the categories, approvers and the permission to purchase without approval; approves requests. | Nobody |
| Operator | Purchasing officer: processes the procurement list (order, receipt); gets notifications. | Nobody |
| Viewer | Sees all requests and the report. | Nobody |
| Role by department | Everyone in the selected department gets this role (without notifications). | No department assigned |
Important: If no purchasing officer is assigned, nobody processes the approved requests on the procurement list. Approvers are not a role; you select them in the Approvers setting above.
Asset settings and custom categories
Who: Asset module admin, Admin · Where: Admin → Modules → Asset
What it does: Turns on the asset assignment module and the Assets screen; you set receipt confirmation, the warranty reminder, the retention period and the company's custom fixed asset categories.
- Select the Asset module on: employees see "My assets" under My Space check box.
- Keep the Require receipt confirmation: the assignment is final when the employee confirms (recommended) check box selected.
- Enter the Warranty reminder (days before; 0 = off) and How many months to keep lost / disposed records values.
- In the Custom categories section, for a type that is not in the built-in list, click + Add category, type a Category name and select a Group (IT equipment, Cards, keys, SIMs, Office and furniture, Vehicles and equipment, Other). Delete a category you do not need with Remove.
- Click Save.
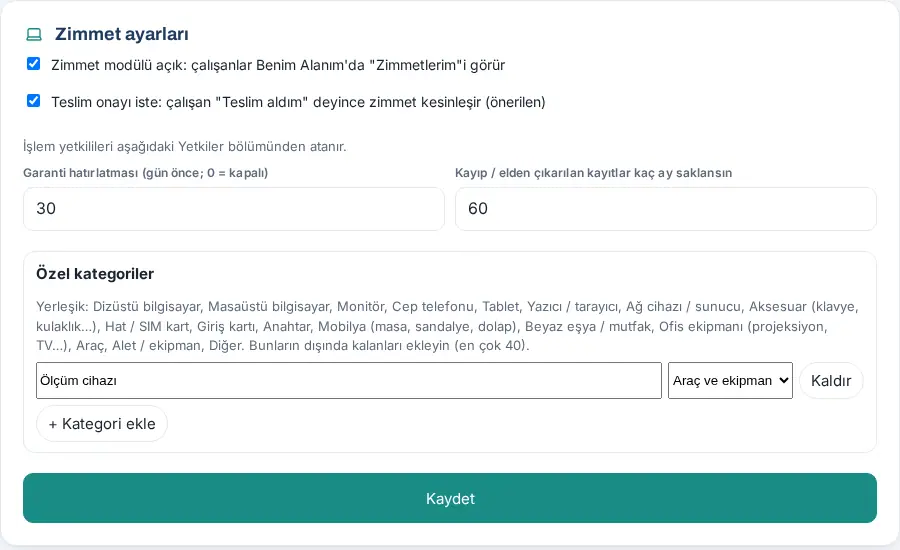
| Setting | What it does | Default |
|---|---|---|
| Asset module on: employees see "My assets" under My Space | Turns on the My assets box and, for officers, the Assets menu. | Off |
| Require receipt confirmation: the assignment is final when the employee confirms (recommended) | An assigned item stays Awaiting receipt confirmation until the employee confirms; the confirmation becomes a digital record. | On |
| Warranty reminder (days before; 0 = off) | How many days before the warranty ends a reminder is sent for a fixed asset (0–180). | 30 days |
| How many months to keep lost / disposed records | Retention period of the records of lost or disposed fixed assets (12–120 months). | 60 months |
| Custom categories (name and group) | Company categories in addition to the built-in categories (laptop, monitor, phone, furniture, vehicle …); at most 40. | None |
Result: The message "Asset settings saved." shows.
Common errors:
- ""…" adında bir kategori zaten var." ("a category named "…" already exists") — the same name as a built-in or another custom category.
- ""…" kategorisinde kayıtlı demirbaş var; önce onları başka kategoriye alın." ("there are fixed assets in the "…" category; first move them to another category") — you cannot delete a category that has records.
- "Kategori adı en az 2 karakter olmalı." ("the category name must be at least 2 characters") / "En çok 40 özel kategori eklenebilir." ("at most 40 custom categories can be added")
- "Warranty reminder must be 0–180 days (0 = off)." / "Saklama süresi 12–120 ay olmalı." ("retention must be 12–120 months")
Important: If you turn off receipt confirmation, an assigned item counts as assigned immediately and no employee confirmation is collected ("Receipt confirmation is off: the item counts as assigned immediately.").
Giving permissions for assets
Who: Admin, asset module admin · Where: Admin → Modules → Asset → Permissions
- Go to the Permissions section at the bottom of the Asset tab.
- Add the asset officers (IT, administrative affairs) as Operator.
- Click Save.
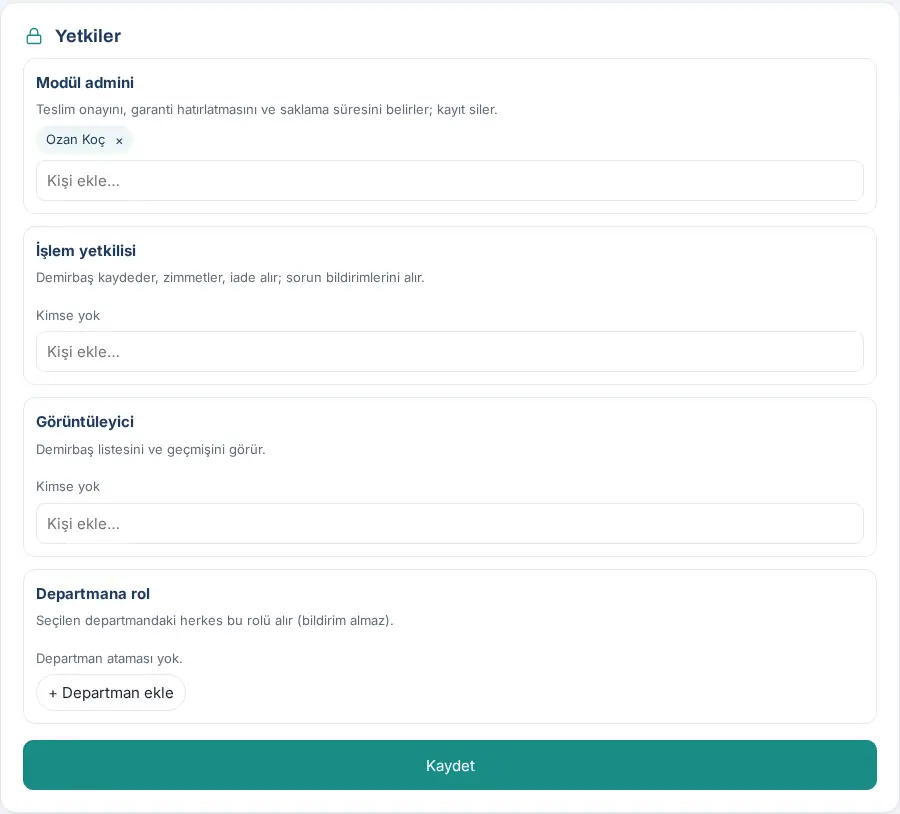
| Role | What it does | Default |
|---|---|---|
| Module admin | Sets receipt confirmation, the warranty reminder and the retention period; deletes records. Also does fixed asset work. | Nobody |
| Operator | Records fixed assets, assigns them, takes them back; gets and processes incident reports, does counts. Sees Assets in the menu. | Nobody |
| Viewer | Sees the fixed asset list, incidents, counts and history; cannot make changes. Sees the cost and fault assessment of incidents. | Nobody |
| Role by department | Everyone in the selected department gets this role (without notifications). | No department assigned |
Important: The cost and fault assessment of incidents is a personal assessment; give the viewer role only to the people who must see this information.
Reports
Who: Module admins, viewers · Where: Left menu → Reports
The reports of the four modules are on separate tabs of the Reports page:
- Requests: request counts by category, assignee and department, median times for first reply and resolution, the rate resolved within target, satisfaction (see 19. Reports). The Overview dashboard in the Requests box shows the same metrics (see 23. Requests).
- Parcel: who sent how many parcels / courier shipments, shipments by category, carrier and department, lists of incoming and outgoing deliveries (see 19. Reports).
- Purchasing: tables by category, type, department, person and status, purchasing without approval (see 19. Reports).
- Asset: assignment movements, incidents, average time to close, tables by type and by fault assessment (see 19. Reports).