10. Administration and setup
Screenshots show the Turkish interface of Prozence with fictional "Örnek Teknoloji A.Ş." data; the English interface has the same layout.
This chapter is for the app administrator who sets up and manages Prozence in the company. It explains how to upload the plugin to WordPress, the setup wizard, the Admin panel in the app, adding employees and offboarding them, profile change approvals, announcements and permissions.
You do administration in two places. Daily tasks (approvals, announcements, permissions, company settings, the employee list, most integrations) are in the Admin section in the app. Setup, license, the Microsoft app registration, the Wallet certificate and the details of employee records are in the WordPress admin panel (Prozence Workplace menu). For external service connections (Google, Microsoft, CRM, Teams, API, mobile notifications), see 13. Integrations.
This chapter is for Prozence Workplace 0.99.45.
Who: Admin, Auditor, module admins, WordPress administrator
In this chapter
- Uploading and activating the plugin in WordPress
- Setup wizard
- Checking the setup and system status
- Assigning a Prozence administrator (WordPress)
- Admin panel and section groups
- What is in the General section
- Turning on modules and sample data
- Employee list and adding a new employee
- Adding an employee
- Editing employee details
- Assigning departments and managers
- Deactivating an employee who has left
- Profile change rules and approval
- Sending an announcement to the team
- The three layers of permissions
- Permissions and what they allow (summary table)
- Who sees what
- App role and duty permissions
- Module roles (permission table)
- Assigning permissions from a module tab (module admin)
- Start screen and shortcut button on phones
- Reminding people who have not signed in
- Turning on content translation (AI)
- Turning on Ask the Wiki (AI)
- Employees without a company email: sign-in methods and invitations
- WordPress admin screens
Uploading and activating the plugin in WordPress
Who: WordPress administrator · Where: WordPress → Plugins → Add Plugin
What it does: Prozence is a plugin that you install on your company's own WordPress site. The data stays on your server and in your database.
Before you start:
- You need WordPress 6.4 or later and PHP 8.1 or later.
- The site must open over HTTPS. Sign-in with Google, phone notifications and adding the app to the phone home screen need HTTPS.
- Save the installation package you received (
prozon-kartvizit-<sürüm>.zip) to your computer. Do not unzip the package; WordPress unzips the ZIP file itself.
WordPress's own screens appear in your site's language. Below, button names are written as they appear in English WordPress; the Turkish WordPress equivalents are in parentheses.
- Sign in to the WordPress admin panel with your administrator account.
- In the left menu, click Plugins → Add Plugin (Turkish: Eklentiler menu).
- Click the Upload Plugin button at the top (Turkish: Eklenti yükle).
- Use Choose File to select the ZIP file and click Install Now (Turkish: Şimdi kur).
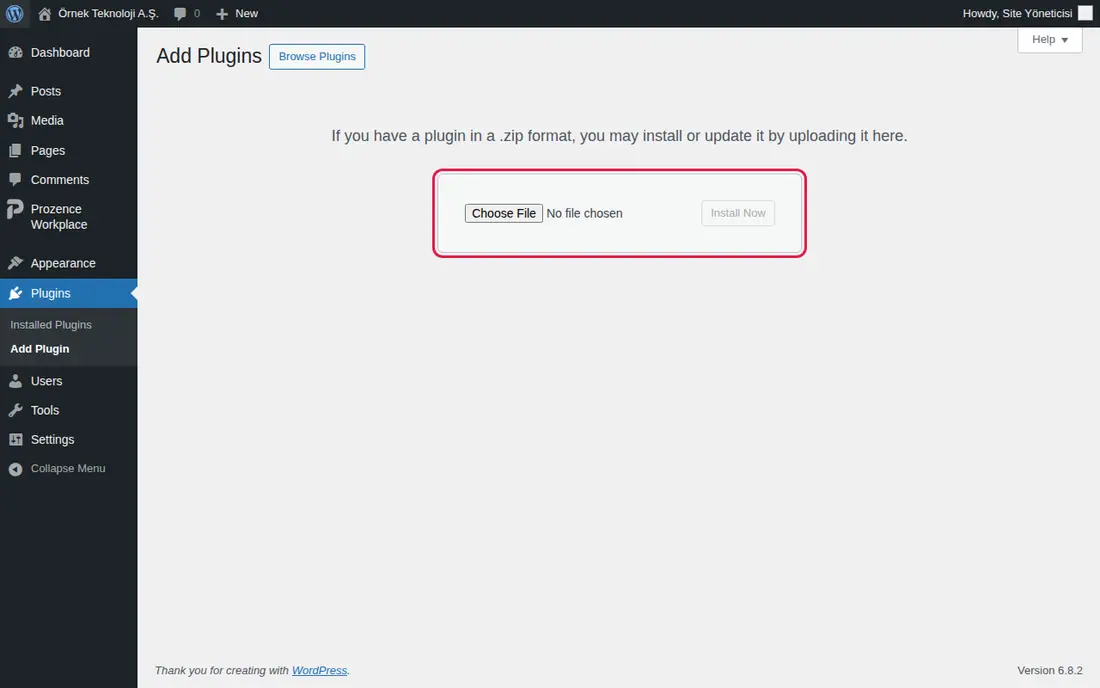
- When the installation is complete, click Activate Plugin (Turkish: Eklentiyi etkinleştir). The plugin appears in the list as Prozence Workplace, and Prozence Workplace is added to the left menu.
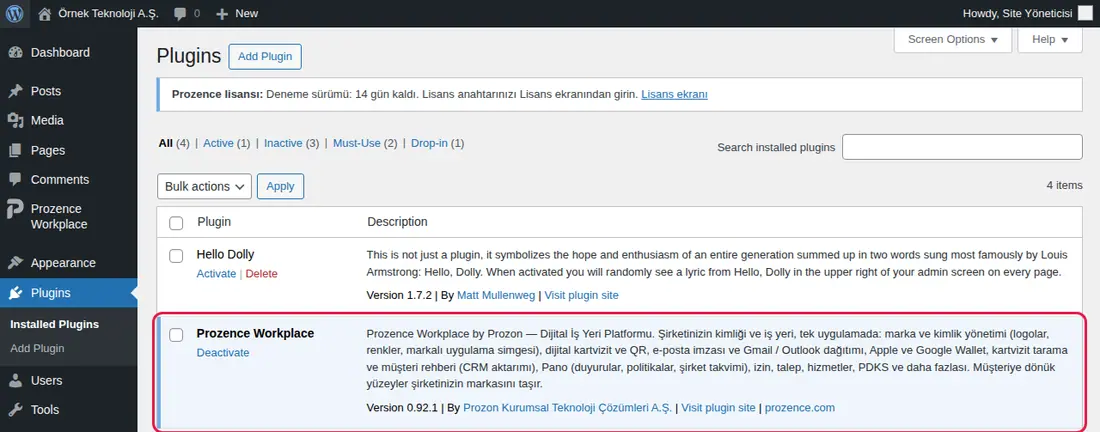
- On the first activation, the setup wizard opens.
- Open Settings → Permalinks (Turkish: Ayarlar → Kalıcı bağlantılar). If a structure such as Post name (Turkish: Yazı adı) is not selected, select it and click Save Changes (Turkish: Değişiklikleri kaydet). The business card and app addresses (
/kartvizit/…) depend on this.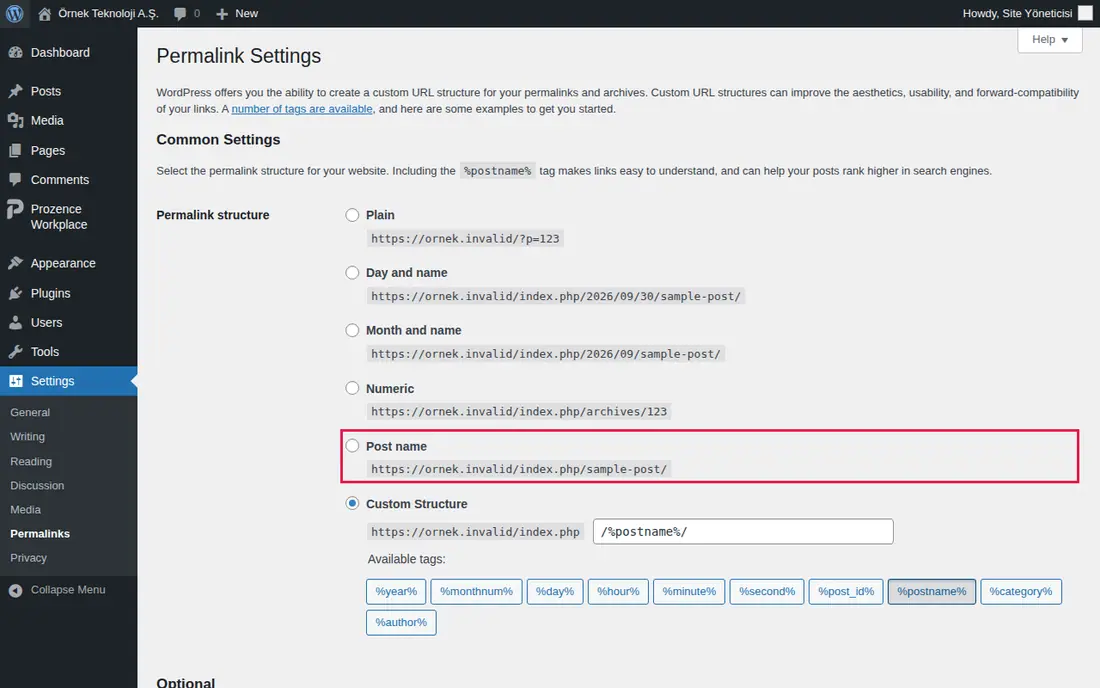
Tip: To move to a new version, upload the new ZIP file with the same steps. WordPress tells you that the same plugin is already installed and offers to replace the installed version with the uploaded one (Replace current with uploaded). Settings and data are kept.
Important:
- The installation package (ZIP) is only for uploading to WordPress. Do not change the files in it by hand.
- Back up your site before you update the live site.
Setup wizard
Who: WordPress administrator · Where: WordPress → Prozence Workplace → Kurulum sihirbazı ("setup wizard")
What it does: Sets the company details, the appearance, employee sign-in and the first employees in five steps. If you stop halfway, you can continue later from the step where you stopped.
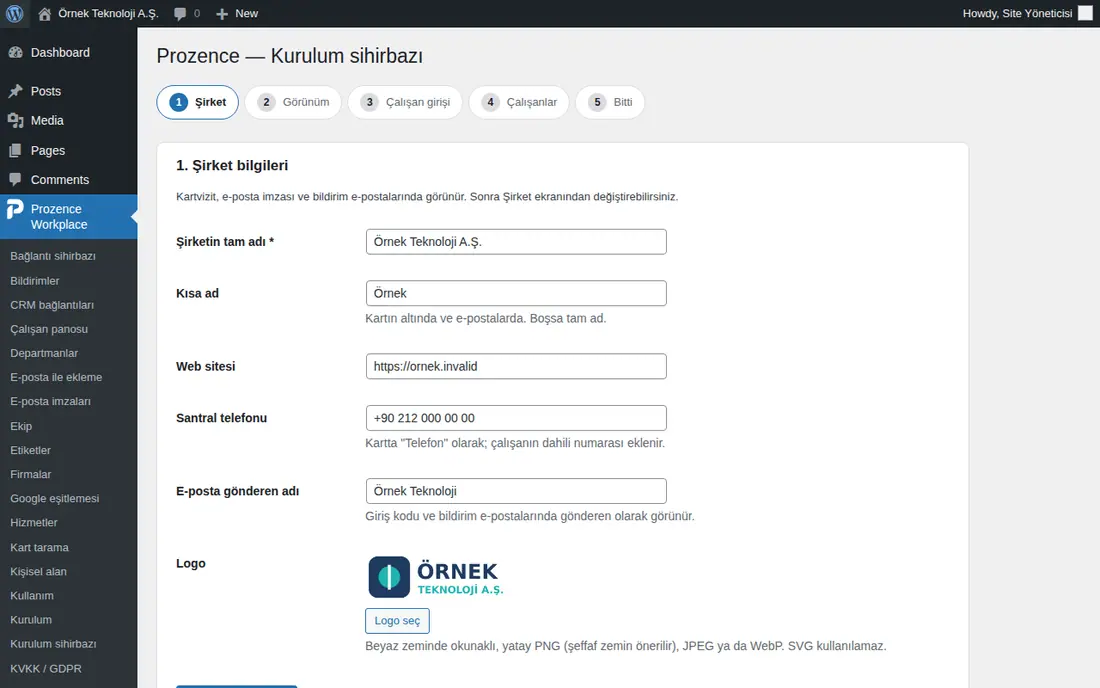
- In the Şirket ("company") step, fill in these fields and click Kaydet ve devam et ("save and continue"):
- Şirketin tam adı * ("full company name") (required);
- Kısa ad ("short name") (appears at the bottom of the card and in emails; if it is empty, the full name is used);
- Web sitesi ("website");
- Santral telefonu ("switchboard phone") (appears on the card as "Phone"; the employee's extension is added to it);
- E-posta gönderen adı ("email sender name") (appears as the sender in sign-in code and notification emails);
- Logo: use Logo seç ("select logo") to select a landscape PNG, JPEG or WebP that is easy to read on a white background. You cannot use SVG.
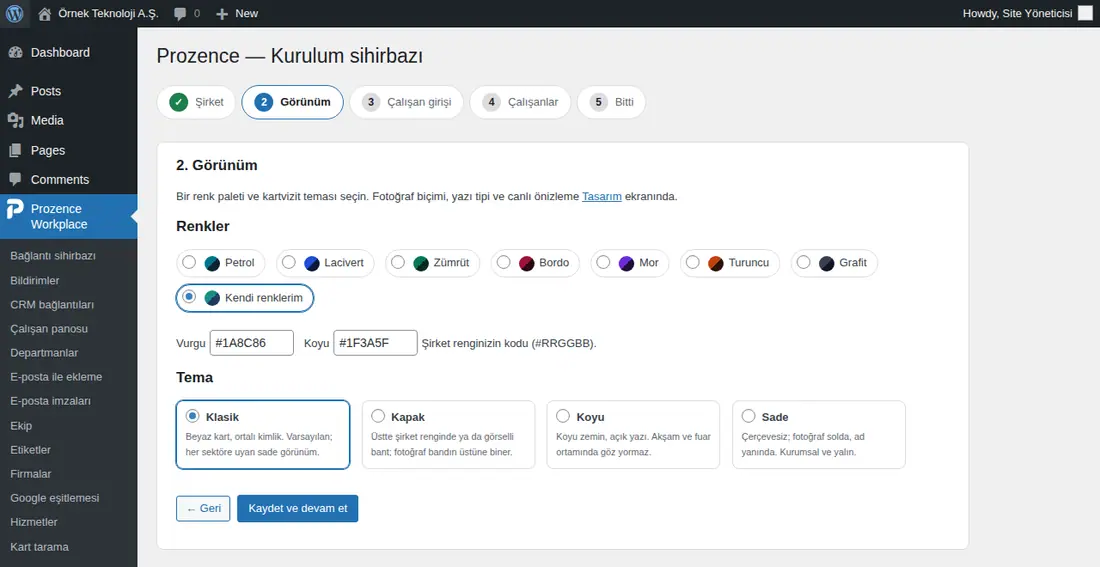
- In the Görünüm ("appearance") step, select a color palette (Petrol, Lacivert, Zümrüt, Bordo, Mor, Turuncu, Grafit: teal, navy, emerald, burgundy, purple, orange, graphite), or select Kendi renklerim ("my own colors") and type the Vurgu ("accent") and Koyu ("dark") color codes (#RRGGBB). For Tema ("theme"), select Klasik ("classic"), Kapak ("cover"), Koyu or Sade ("plain"). Click Kaydet ve devam et.
- In the Çalışan girişi ("employee sign-in") step, type your company's email domains, separated by commas, in the İzinli e-posta alan adları * ("allowed email domains") box (e.g.
ornek.invalid). Only addresses in these domains can sign in to the app. The Giriş yolları ("sign-in methods") list shows that sign-in with an email code is ready, and shows the status of sign-in with Google and Microsoft. Click Kaydet ve devam et.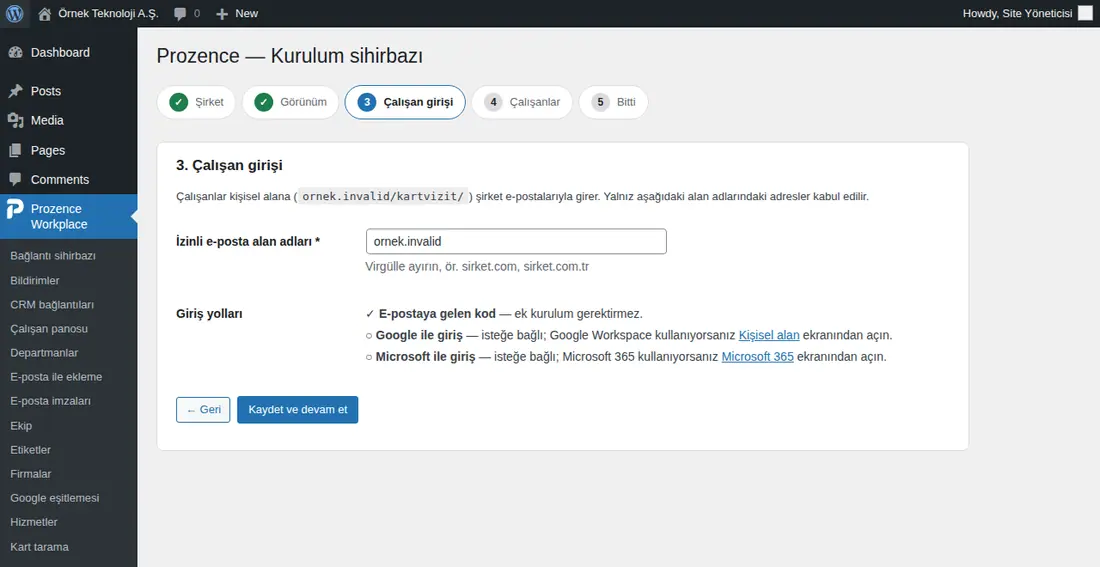
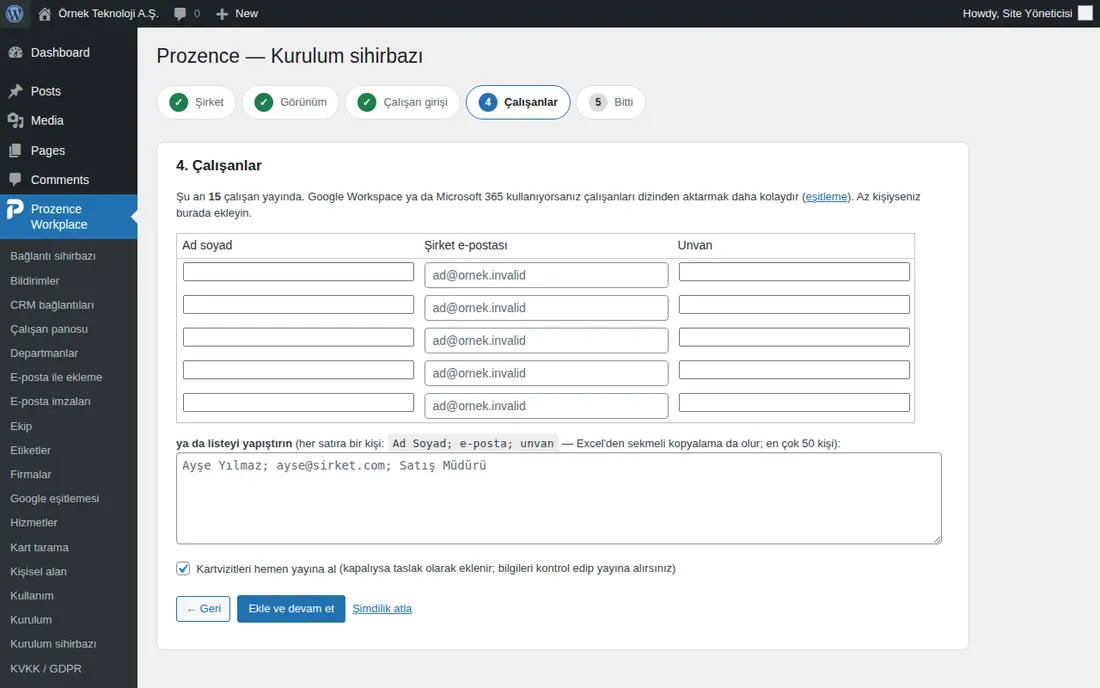
- In the Çalışanlar ("employees") step, add the employees:
- type Ad soyad ("full name"), Şirket e-postası ("company email") and Unvan ("job title") in the table rows; or
- paste
Ad Soyad; e-posta; unvan(full name; email; job title) into the ya da listeyi yapıştırın ("or paste the list") box, one person per line (you can also copy from Excel; up to 50 people). - If you want to check the details first, clear the Kartvizitleri hemen yayına al ("publish business cards now") checkbox; the people are added as drafts.
- Click Ekle ve devam et ("add and continue"). To skip this step, use Şimdilik atla ("skip for now").
- In the Bitti ("done") step, you see the status of the required steps and what is missing. The Ayarla ("set up") link next to each missing item opens the related screen. Click Sihirbazı bitir ("finish wizard").
Tip: If you use Google Workspace or Microsoft 365, it is easier to import employees from the directory than to type them by hand (see 13. Integrations).
Important: To go back, use ← Geri ("← back"). The browser's back button does not save the form.
Checking the setup and system status
Who: WordPress administrator · Where: WordPress → Prozence Workplace → Kurulum ("setup")
What it does: Shows what is missing in the setup in one list. This screen does not change any setting by itself. When the plugin is activated for the first time and a required step is missing, WordPress takes you to this screen (or to the wizard, if the setup wizard is not finished). While a required step is missing, the warning "Prozence kurulumu tamamlanmadı: N zorunlu adım eksik." ("Prozence setup is not complete: N required steps missing.") appears at the top of the Prozence WordPress screens.
Before you start: Only a user with Prozence permission in WordPress can open this screen (see Assigning a Prozence administrator (WordPress)).
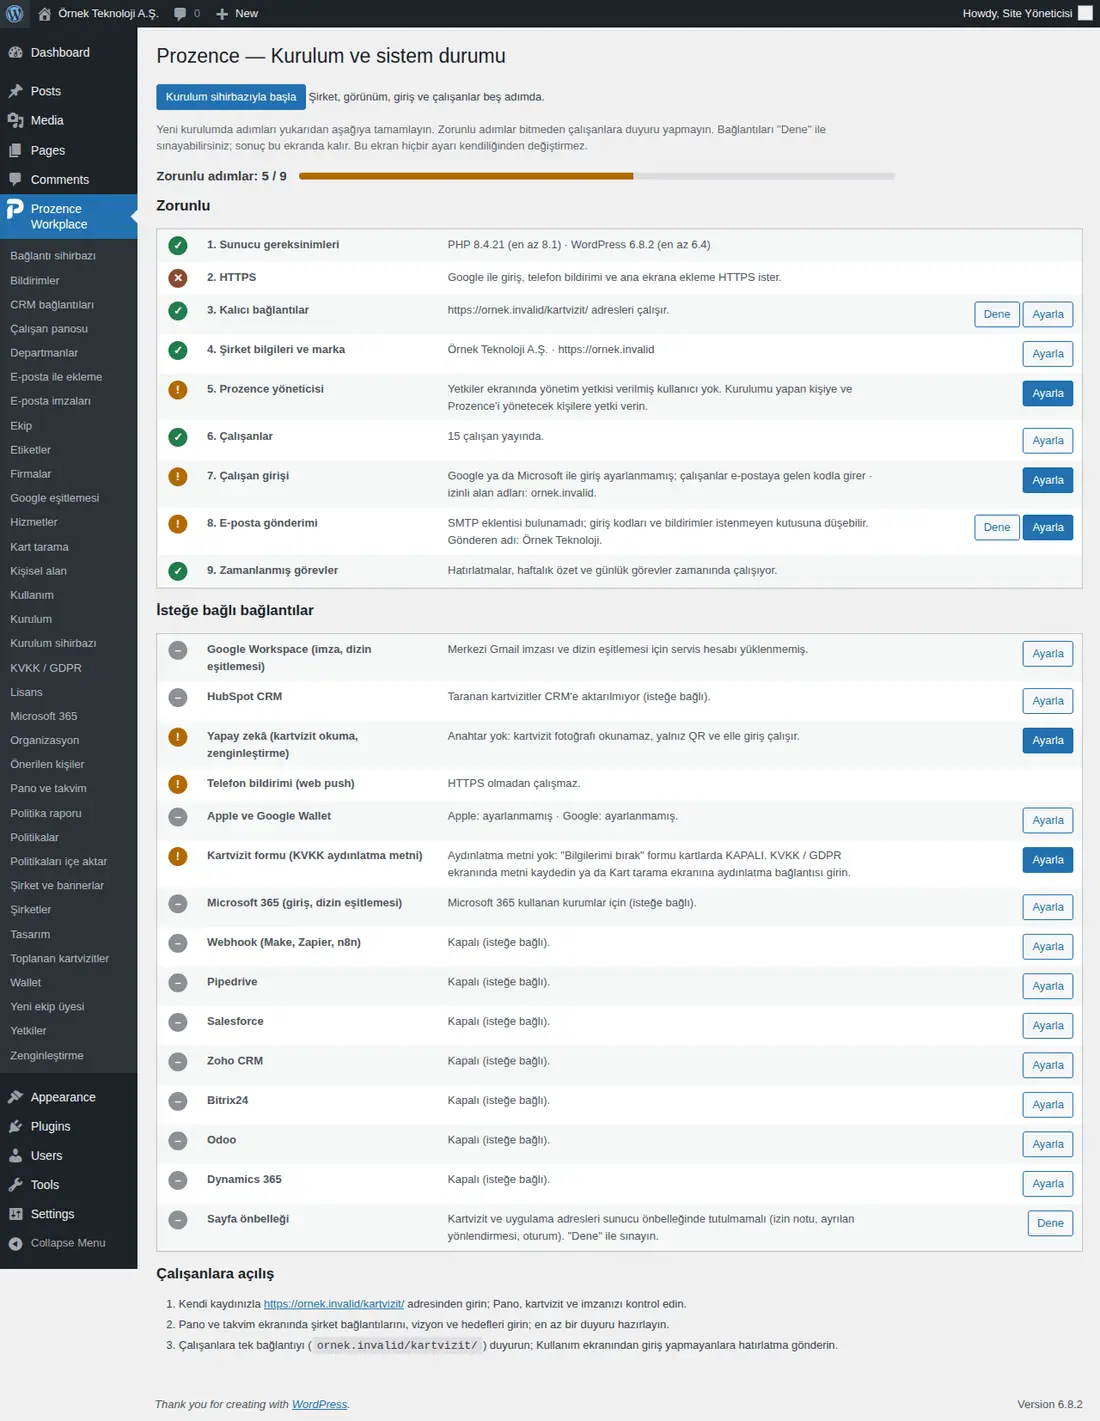
- Open the Kurulum screen. At the top, a counter such as Zorunlu adımlar: 5 / 9 ("required steps: 5 / 9") and a progress bar appear. If you did not finish the setup wizard, the button at the top is Kurulum sihirbazıyla başla ("start with the setup wizard"); if you finished it, the button is Kurulum sihirbazını yeniden aç ("open the setup wizard again").
- Look at the icon on the left of each row: green ✓ Tamam ("OK"), orange ! Dikkat ("warning"), red ✕ Eksik ("missing"), gray – Kullanılmıyor ("not used"; the optional connection is not set up).
- Complete the nine steps in the Zorunlu ("required") list from top to bottom. Click Ayarla next to a missing step; the related screen opens.
- On rows that have a Dene ("test") button (3. Kalıcı bağlantılar ("permalinks"), 8. E-posta gönderimi ("email sending"), connections that are set up, Sayfa önbelleği ("page cache")), click Dene. The result stays under the row as "Son deneme (tarih saat): …" ("last test (date time): …"). If the last test failed, the row turns red.
- In the İsteğe bağlı bağlantılar ("optional connections") list, check the status of the connections you use (second table below).
- Follow the Çalışanlara açılış ("launch to employees") list at the bottom: first sign in with your own record and check the Board, your card and your signature; enter the company links, the vision and the goals on the Board and calendar screen; then announce the single address (
…/kartvizit/) to employees.
Required steps (in order):
| Step | What is checked | Message if missing | What to do |
|---|---|---|---|
| 1. Sunucu gereksinimleri ("server requirements") | PHP 8.1+, WordPress 6.4+, PHP extensions (openssl, mbstring, curl) | "… eksik PHP eklentisi: …" ("missing PHP extension: …"), "ZipArchive yok (Apple Wallet çalışmaz)" ("no ZipArchive (Apple Wallet does not work)") | Ask your hosting company for the PHP version and the extensions |
| 2. HTTPS | The site opens over HTTPS | "Google ile giriş, telefon bildirimi ve ana ekrana ekleme HTTPS ister." ("Sign-in with Google, phone notifications and adding to the home screen need HTTPS.") | Install an SSL certificate on the site |
| 3. Kalıcı bağlantılar | The /kartvizit/ addresses work |
"Ayarlar → Kalıcı bağlantılar'da "Yazı adı" gibi bir yapı seçin; kartvizit adresleri buna bağlı." ("Select a structure such as "Post name" in Settings → Permalinks; the business card addresses depend on it.") Dene: "Giriş sayfası HTTP … döndü. Kalıcı bağlantılar ekranında "Değişiklikleri kaydet" deyin." ("The sign-in page returned HTTP …. Click "Save Changes" on the Permalinks screen.") | Save the permalinks |
| 4. Şirket bilgileri ve marka ("company details and brand") | Company name, short name, web address, logo | "Eksik: … . Kartvizit, imza ve e-postalarda kullanılır." ("Missing: … . Used on the business card, the signature and in emails.") (red if the company name is missing, orange for the others) | Setup wizard or Şirket ve bannerlar ("company and banners") |
| 5. Prozence yöneticisi ("Prozence administrator") | At least one user has Prozence permission in WordPress | "Yetkiler ekranında yönetim yetkisi verilmiş kullanıcı yok. …" ("No user has administration permission on the Yetkiler screen. …") | Assign a Prozence administrator |
| 6. Çalışanlar | Published employee records | "Yayında çalışan yok. Google eşitlemesiyle toplu aktarın ya da "Yeni ekip üyesi" ile ekleyin." ("No published employees. Import them in bulk with Google sync or add them with "Yeni ekip üyesi".") | Add employees |
| 7. Çalışan girişi | Sign-in with Google / Microsoft and the allowed domains | "Google ya da Microsoft ile giriş ayarlanmamış; çalışanlar e-postaya gelen kodla girer · izinli alan adları: …" ("Sign-in with Google or Microsoft is not set up; employees sign in with a code sent by email · allowed domains: …") (orange; sign-in with an email code still works) | If you want, turn on sign-in with Google or sign-in with Microsoft |
| 8. E-posta gönderimi | SMTP plugin (FluentSMTP, WP Mail SMTP, Post SMTP, Easy WP SMTP) | "SMTP eklentisi bulunamadı; giriş kodları ve bildirimler istenmeyen kutusuna düşebilir." ("No SMTP plugin found; sign-in codes and notifications can go to the spam folder.") Dene: "wp_mail başarısız oldu; SMTP ayarını kontrol edin." ("wp_mail failed; check the SMTP setting.") | Install and set up an SMTP plugin, then use Dene to send a test email to yourself |
| 9. Zamanlanmış görevler ("scheduled tasks") | The reminder and weekly summary tasks run on time | "Görevler … gecikmiş: …" ("tasks … are late: …") (red) or "WP-Cron kapalı (DISABLE_WP_CRON); sunucuda gerçek cron tanımlı olmalı." ("WP-Cron is off (DISABLE_WP_CRON); a real cron job must be set up on the server.") (orange) | Set up a real cron job in your hosting panel |
İsteğe bağlı bağlantılar (only the connections that are set up, or whose setup has started, are listed):
| Row | When it appears | Status messages |
|---|---|---|
| Google Workspace (imza, dizin eşitlemesi) ("signature, directory sync") | Always | "Servis hesabı: …" ("service account: …") or "Merkezi Gmail imzası ve dizin eşitlemesi için servis hesabı yüklenmemiş." ("No service account is uploaded for the central Gmail signature and directory sync.") Dene: can the service account get an access token |
| Google izinleri ("Google permissions") | If a service account is uploaded | "Henüz sınanmadı." ("not tested yet"), "N izinde sorun var." ("N permissions have a problem") or "Açık özelliklerin izinleri çalışıyor." ("the permissions of the enabled features work") (see Connection wizard) |
| HubSpot CRM and the other CRMs (Pipedrive, Salesforce, Zoho CRM, Bitrix24, Odoo, Dynamics 365, Webhook (Make, Zapier, n8n)) | HubSpot always; the others if they have a setting | HubSpot: "Erişim anahtarı kayıtlı." ("access token saved") or "Taranan kartvizitler CRM'e aktarılmıyor (isteğe bağlı)." ("scanned business cards are not sent to the CRM (optional)"); the others: "Etkin." ("active") or "Kapalı (isteğe bağlı)." ("off (optional)") |
| CRM hata kuyruğu ("CRM error queue") | If the queue has records | "N kayıt otomatik denemede durdu; CRM bağlantıları ekranından yeniden deneyin." ("N records stopped in automatic retry; retry them from the CRM connections screen.") |
| Yapay zekâ (kartvizit okuma, zenginleştirme) ("AI (business card reading, enrichment)") | Always | "Anahtar yok: kartvizit fotoğrafı okunamaz, yalnız QR ve elle giriş çalışır." ("No key: business card photos cannot be read; only QR and manual entry work.") |
| Telefon bildirimi (web push) ("phone notifications (web push)") | Always | "Anahtarlar hazır." ("keys ready"), "HTTPS olmadan çalışmaz." ("does not work without HTTPS") or "Sunucu anahtar üretemedi (OpenSSL / EC desteği)." ("the server could not generate keys (OpenSSL / EC support)") |
| Apple ve Google Wallet ("Apple and Google Wallet") / Apple Wallet sertifikası ("Apple Wallet certificate") | Always / if a certificate is uploaded | "Apple: … · Google: …", certificate problems (see 16. Troubleshooting) |
| Kartvizit formu (KVKK aydınlatma metni) ("business card form (KVKK privacy notice)") | Always | If there is no privacy notice, it says that the "Bilgilerimi bırak" ("leave my details") form is off on the cards |
| Microsoft 365 (giriş, dizin eşitlemesi) ("sign-in, directory sync") | Always | "Uygulama kayıtlı · Microsoft ile giriş açık." ("app registered · sign-in with Microsoft on") or "Microsoft 365 kullanan kurumlar için (isteğe bağlı)." ("for organizations that use Microsoft 365 (optional)") |
| Tek oturum açma (SAML) ("single sign-on (SAML)") | Always | "Kimlik sağlayıcı kayıtlı · giriş düğmesi açık." ("identity provider saved · sign-in button on"; or "… kapalı.", "off") or "Okta, Entra ID, Google Workspace, OneLogin gibi kimlik sağlayıcıyla giriş (isteğe bağlı; Admin → Entegrasyonlar)." ("sign-in with an identity provider such as Okta, Entra ID, Google Workspace, OneLogin (optional; Admin → Integrations)") (see 13) |
| Sayfa önbelleği | Always | After Dene: "Kartvizit sayfası önbellekten gelmiyor." ("the business card page does not come from the cache") or "Kartvizit sayfası sunucu önbelleğinden geliyor (…)…" ("the business card page comes from the server cache (…)…") |
Tip: You can also see the status of most of the same connections in the app, in Admin → Integrations → Status tab (0.99.13; see 13. Integrations). An Admin who has no WordPress account follows them there.
Important: Do not make an announcement to employees before the required steps are complete. Especially if E-posta gönderimi is missing, sign-in codes can go to the spam folder.
Assigning a Prozence administrator (WordPress)
Who: WordPress administrator · Where: WordPress → Prozence Workplace → Yetkiler ("permissions")
What it does: Only users who get permission here see the Prozence admin screens in WordPress. Being a WordPress administrator is not enough by itself.
- Open the Yetkiler screen.
- In the Yeni yetkili ekle ("add new authorized user") section, select the person from the — WordPress kullanıcısı seçin — ("— select a WordPress user —") list.
- Select the permission level:
- Admin: everything, including people, signatures, banners, card scanning, collected business cards, Wallet, sending notifications and permissions;
- Denetçi ("auditor"): sees only the Usage and Notifications reports and cannot change anything.
- Click Yetkili ekle ("add authorized user"). You can change the level later in the Yetkililer ("authorized users") table and click Değişiklikleri kaydet ("save changes").
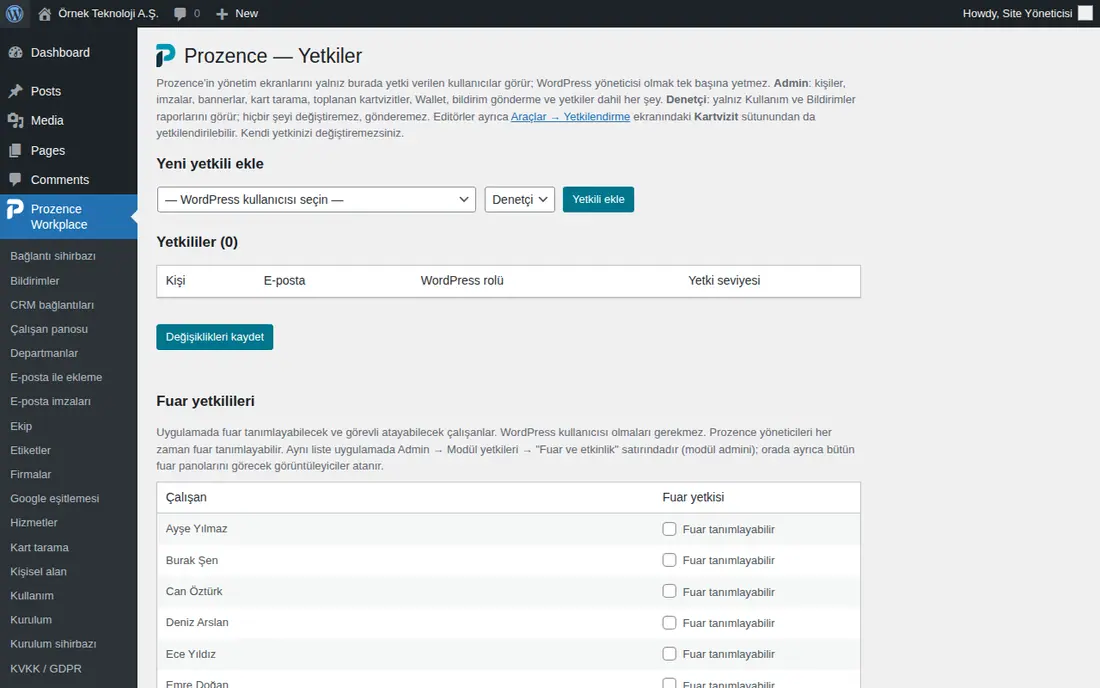
Tip: The person who manages the app does not need a WordPress account. You can give an employee the Admin role in the app (see App role and duty permissions).
Important: You cannot change your own permission. This prevents an administrator from locking themselves out by mistake.
Admin panel and section groups
Who: App administrator, module admins · Where: On a computer, Admin in the left menu; on a phone, Profile → Admin
What it does: Company settings, people and permissions, the email signature and module settings are on one screen. The sections are collected in four groups. Only people with permission see the Admin section: an Admin sees every section; an Auditor sees only the General, Integrations (Status), Employees and Email signature (Analytics) sections, read-only; module admins see only their own modules' tabs (see Who sees what (Admin menu) below).
On a computer:
- In the left menu, click Admin.
- A grouped vertical menu appears on the left of the Admin screen. Click a section; its content opens on the right. You can also move between sections with the ↑ ↓ keys on the keyboard.
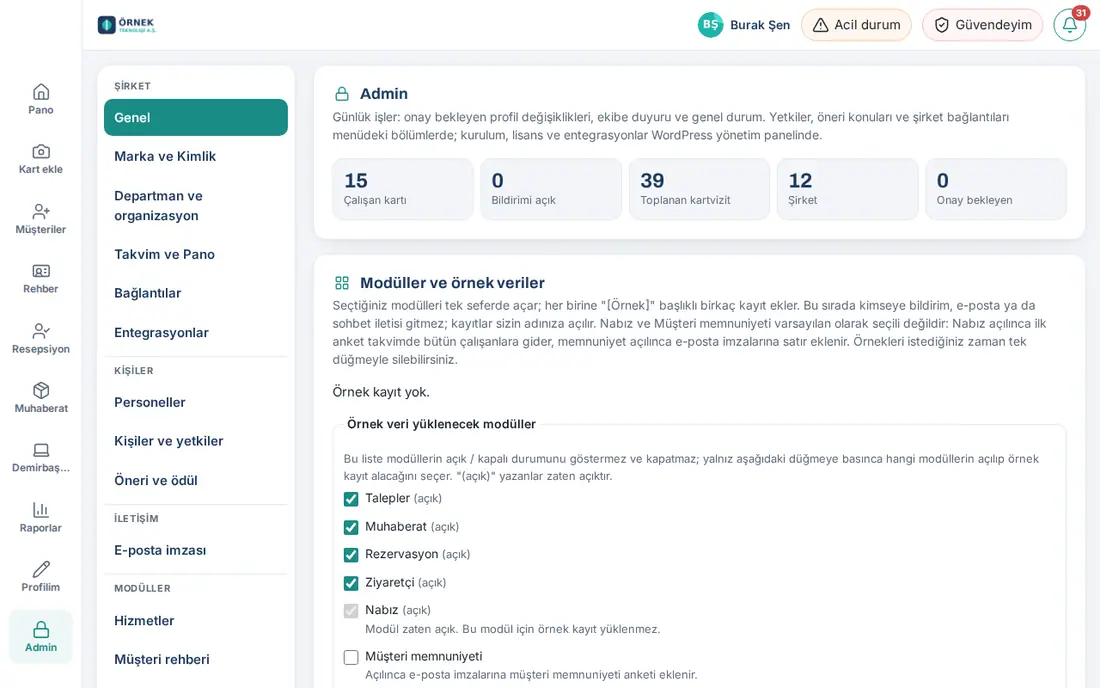
On a phone:
- In the bottom menu, tap Profile, then tap the Admin strip at the top.
- Tap the Section: General ▾ button at the top. The grouped section list opens.
- Tap a section. The list closes and the button shows the name of the section you selected.
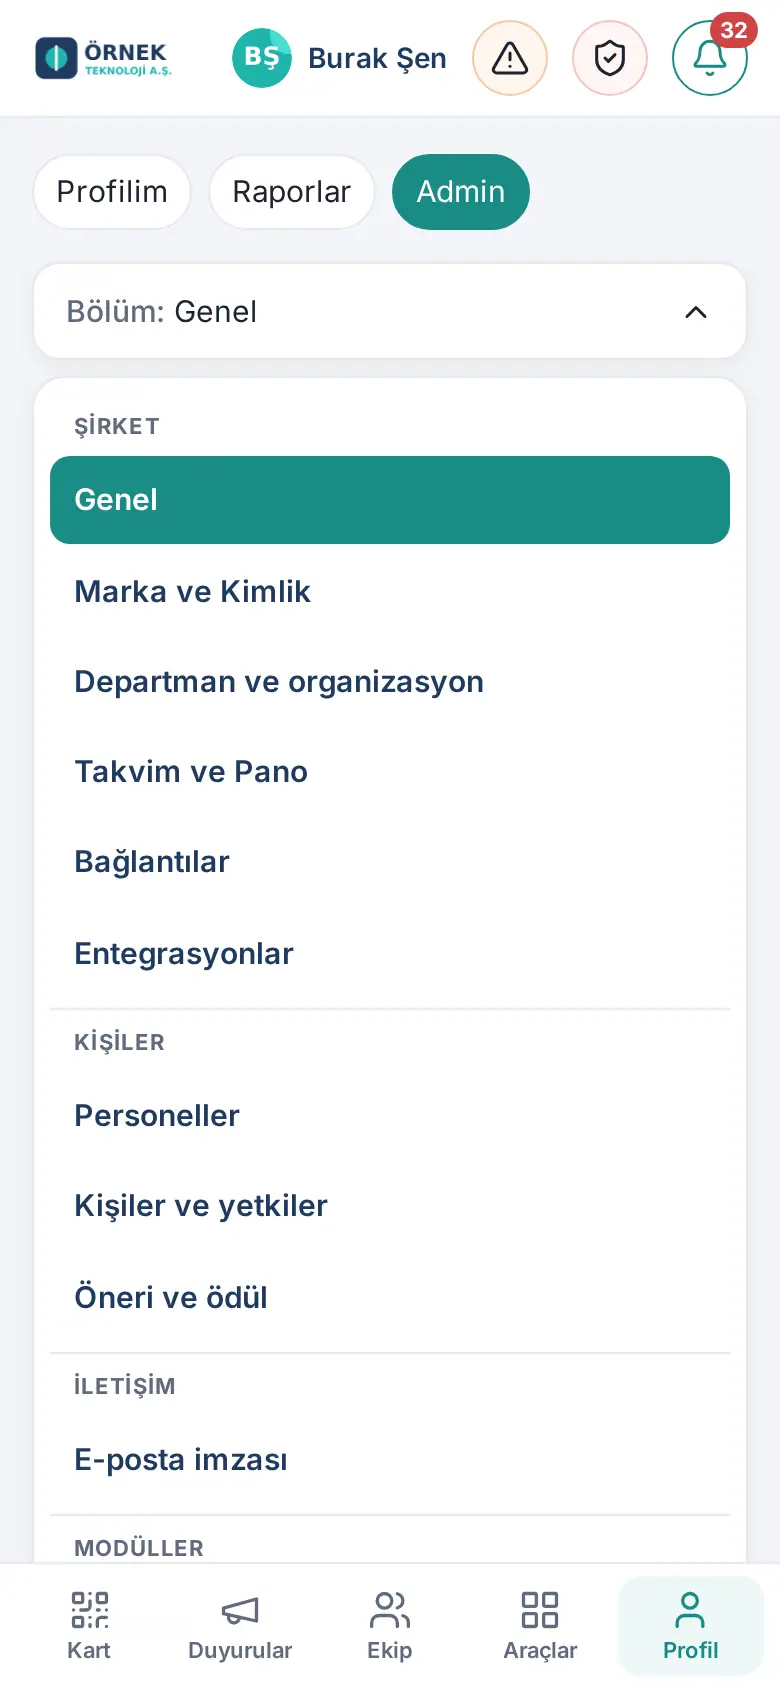
| Group | Section | What it contains |
|---|---|---|
| Company | General | Summary figures, modules, start screen, analytics, approvals, team announcement (see What is in the General section) |
| Brand & Identity | Logos, colors, business card theme, Identity Kit templates, Zoom connection (see 11. Brand, identity and signature management) | |
| Departments and organization | Department list, employees' managers and departments | |
| Calendar and Board | Board view, holidays and external calendars, birthdays, company events | |
| Links | Company links on the Board (updated in 0.99.13: chat channels moved to Integrations) | |
| Integrations | Status, Google / Microsoft, CRM, Directory and sign-in, Chat channels, Messages, HR & accounting, Microsoft Teams, API keys, App review account, Mobile notifications sub-tabs (0.99.13; see 13. Integrations) | |
| People | Employees | All employees, their sources (Google Workspace / Microsoft 365 / manual / bulk) and adding new employees (0.99.7; see Employee list and adding a new employee) |
| People and permissions | App roles, announcement permission, duty permissions, module permission table | |
| Suggestions and rewards | Suggestion and complaint topics, readers, reward settings | |
| Contact | Email signature | Signature design, content and banners, distribution, analytics (see 11. Brand, identity and signature management) |
| Modules | Services | Sub-tabs: General, Requests, Mailroom, Booking, Visitors, Meals, Shuttle, Vehicle, Permissions (0.99.23; see 32. Shuttle, meal, visitor and emergency management) |
| Customer directory | Card reading, sources, tags, sharing (see 12. Customer directory administration) | |
| Expense | Expense settings (see 18. Expense management and accounting) | |
| Leave | Leave settings: types, seniority tables, working days, holidays, rules (see 30. Employee leave management) | |
| Work time, Payroll, Asset, Purchasing, Onboarding, OHS, Pulse, Customer satisfaction, Wiki | The module's settings (0.99.3; Purchasing 0.99.22; see 14. Services and human resources management) |
Every module tab has two sections: … settings and Permissions (see Assigning permissions from a module tab (module admin)). The boxes on the user screens have no Settings button.
Apart from the Admin menu, operators have work screens in the main menu on the left: Reception (visitor operators, 0.99.24), Mailroom (mailroom operators, 0.99.28), Assets (asset owners and viewers, 0.99.42) and Reports, which everyone can open (0.98.0).
Who sees what (Admin menu):
- A person with the Admin role sees all sections.
- A person with the Auditor role sees only the General (summary and analytics), Integrations (only the Status tab, read-only), Employees (list) and Email signature (Analytics tab) sections, and cannot change anything.
- Module admins see only their own modules' tabs. For example, the services manager sees Services, the work time module admin sees Work time, and the leave module admin sees Leave.
- A group that has no section the person can see does not appear in the menu at all; a person who has no section at all has no Admin menu.
- For a full summary of the roles, see Who sees what.
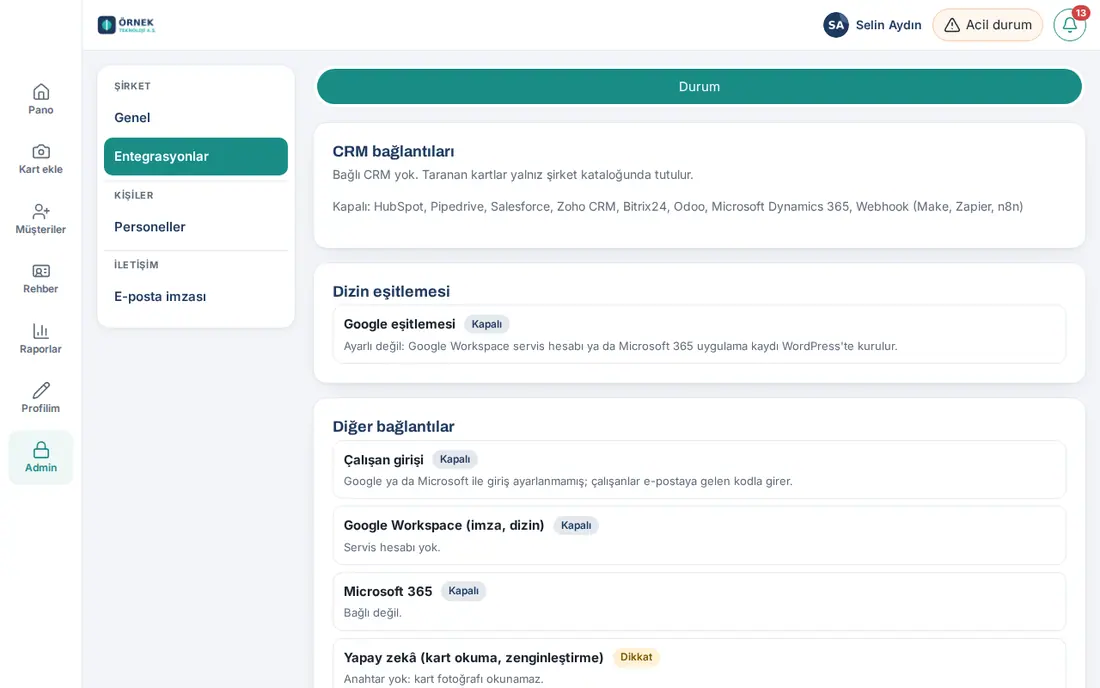
Tip: The old Banners section was removed. Banners are now in Email signature → Contents tab.
What is in the General section
Who: App administrator · Where: Admin → Company → General
From top to bottom, the General section contains these boxes:
| Box | What it does |
|---|---|
| Admin (summary) | Employee card, Notifications on, Collected business card, Company, Awaiting approval counts |
| Content translation | AI translation of announcements, Wiki and Team Square content (see Turning on content translation (AI)) |
| Ask the Wiki | Employees ask the Wiki questions with AI (see Turning on Ask the Wiki (AI)) |
| Modules and sample data | Turning on modules in one go (see Turning on modules and sample data) |
| Start screen on phones and Shortcut button on phones | The first screen and the floating button on the phone (see Start screen and shortcut button on phones) |
| Analytics | Card, view, adoption and activity counts; 7 days, 30 days, 90 days, This year; Download CSV (see 15. Multiple companies, language, KVKK and license) |
| Never signed in to the app | Sign-in reminder (see Reminding people who have not signed in) |
| Company policies | Read status of the policies, Bekleyenlere hatırlat ("remind those pending"), Politikaları düzenle ("edit policies") |
| Profile changes awaiting approval | Employees' profile requests (see Profile change rules and approval) |
| Team announcement | Announcement by phone notification and email (see Sending an announcement to the team) |
| Latest announcements and links | Sent announcements and shortcuts to WordPress screens |
Tip: Email signature analytics and the banner test are in Admin → Email signature → Analytics tab. The Open button under the Analytics box in General takes you there.
Turning on modules and sample data
Who: App administrator · Where: Admin → Company → General → Modules and sample data
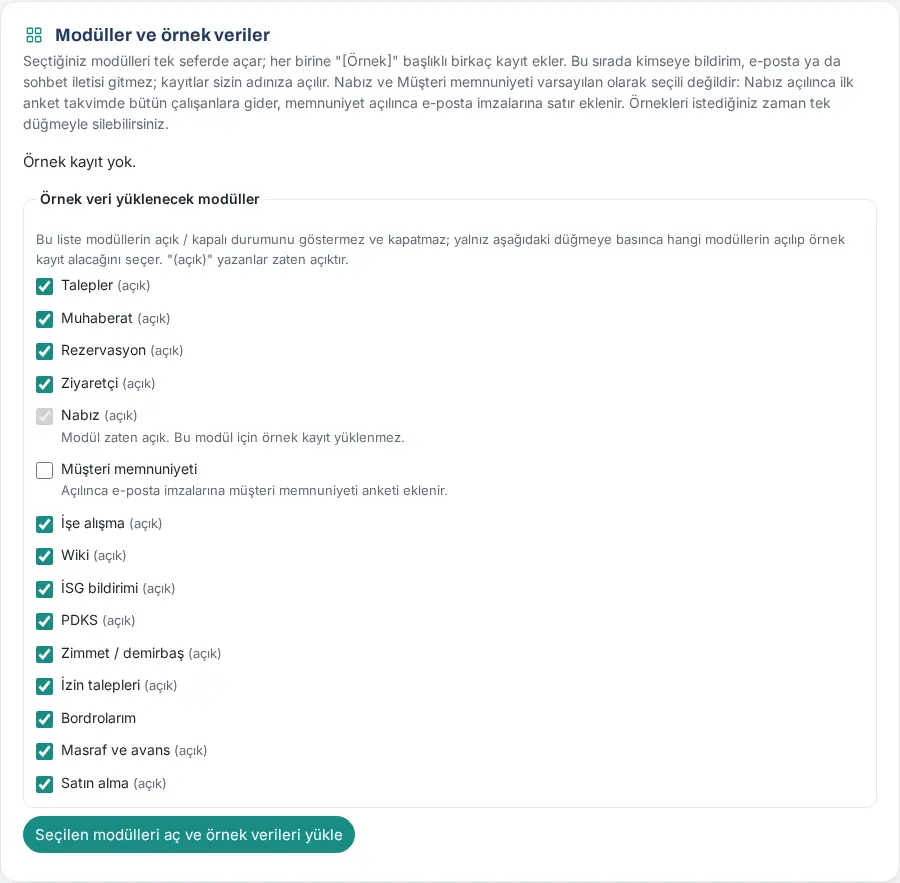
What it does: Turns on the modules you select in one go and adds a few demo records titled "[Örnek]" ("sample") to each one. This way you see how the modules look before you open them to employees.
- In the Modules to load sample data into list, select the modules you want to turn on. Modules that are already on show (on) next to them; no sample records are loaded for a module that is already on ("The module is already on. No sample records are loaded for this module."). This list does not turn modules off.
- Click Turn on selected modules and load sample data. The page reloads; the box shows the number of sample records.
- When you finish testing, click Delete sample data and confirm with Yes, delete. Only the "[Örnek]" records are deleted.
Important:
- During this, no notification, email or chat message goes to anyone; the records are created in your name.
- The list contains every module that can be turned on or off: Requests, Mailroom, Booking, Visitor, Pulse, Customer satisfaction, Onboarding, Wiki, Safety report, time and attendance (PDKS), Assets / inventory, Leave requests, My payslips, Expenses and advances and Purchasing (added in 0.99.22). If Expense is selected, a draft expense [Örnek] Müşteri yemeği ("[Sample] Customer meal") is added in your name; as a draft it does not go for approval. If My payslips is selected, a fictional payslip for last month is added in your name (it waits for acknowledgment; no notification goes to anyone). The Customer directory is the core product and is not in this list (Admin → Customer directory).
- Sample record counts are shown with module names (e.g. "Zimmet 2 · İzin 1 · Masraf 1").
- Pulse and Customer satisfaction are not selected by default. When Pulse is on, the first survey goes to all employees when it is due. When Customer satisfaction is on, a survey line is added to email signatures.
Employee list and adding a new employee
Who: Admin (adds), Auditor (view only) · Where: Admin → People → Employees
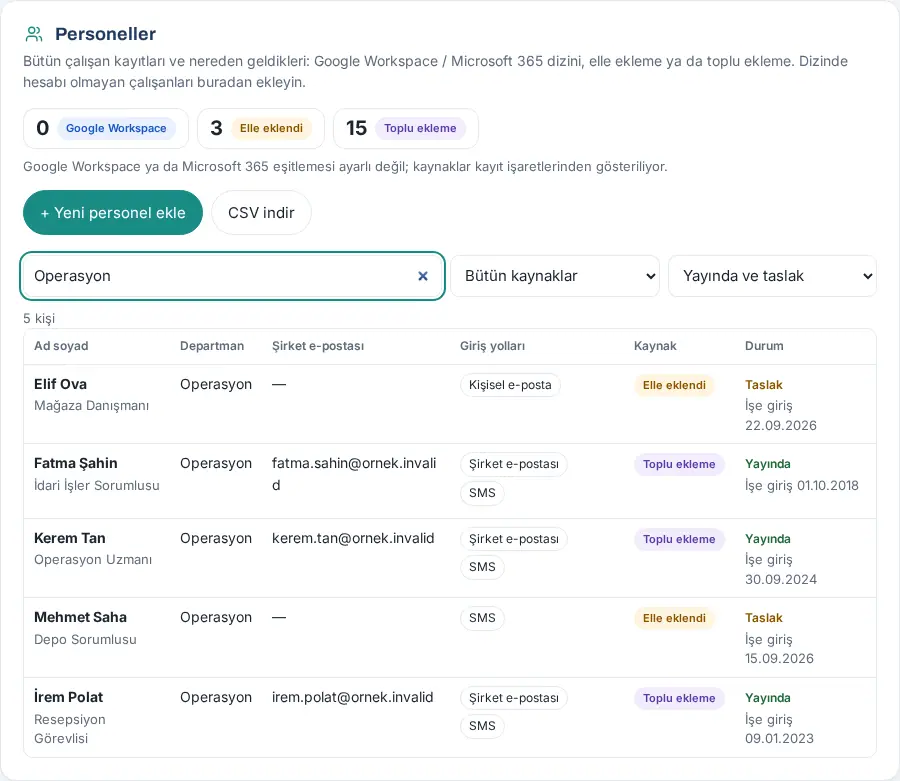
What it does: You see all employee records in one list, together with where each one came from: the Google Workspace or Microsoft 365 directory, SCIM (Entra ID / Okta), manual entry or bulk import. You add employees who have no directory account (field, production, store, warehouse) here, without going to WordPress.
Reading the list:
- In Admin, click Employees in the People group of the left menu.
- The source counts appear at the top: Google Workspace or Microsoft 365, SCIM, Added manually, Bulk import (a source with a count of 0 does not show). Click a count to filter the list to that source; click it again to remove the filter.
- Below them you see the time of the last directory comparison and the number of addresses in the directory.
- Type a name, job title, department or email in the search box. In the boxes next to it, select the source and the status (Published and draft, Published, Draft, Left, All).
- Each row shows the name and job title, department, company email, Sign-in methods (Company email, Personal email, SMS), the source badge and the status. A person with no sign-in method shows a red No sign-in method.
- To take the list to Excel, click Download CSV.
How the source is decided:
- Google Workspace / Microsoft 365: the person's company email was found in the directory at the last directory comparison (aliases included; suspended and archived accounts do not count), or the record was created as a "new employee" by directory sync.
- SCIM: the employee came from Entra ID or Okta through SCIM (0.99.37; for older records, also a person who has a SCIM external ID). SCIM comes before the directory comparison: the person shows the SCIM badge even if they are found in the directory.
- Bulk import: the record came from the Çalışanlar step of the setup wizard and is not in the directory.
- Added manually: the record was added on this screen or by hand in WordPress.
- If sync is set up, an Admin can read the directory again with the Compare with directory button. This changes no records; it only updates the source badges. For setting up sync, see 13. Integrations.
Adding a new employee (Admin):
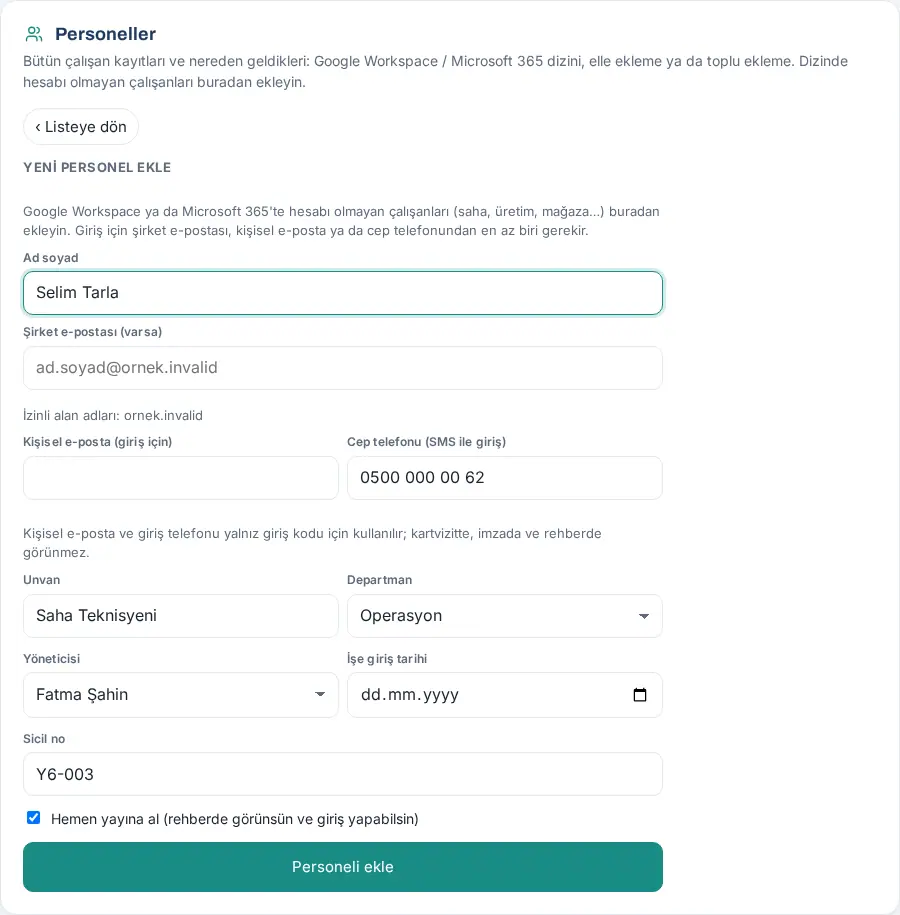
- Click + Add new employee. The Add new employee form opens in place of the list; to go back to the list, click ‹ Back to list.
- Type the employee's first and last name in the Full name box.
- Fill in at least one field for sign-in:
- Company email (if any): it must end with one of the allowed domains (shown below the box);
- Personal email (for sign-in);
- Mobile phone (SMS sign-in).
- If you want, fill in Job title, Department, Manager, Start date and Employee no..
- If the person must appear in the directory and be able to sign in now, keep Publish now (show in directory and allow sign-in) selected; if you clear it, the record is a draft.
- Click Add employee. A green box shows the person's name; the person appears in the list with the Added manually badge.
- If there is no company email, use Open sign-in methods in the green box to give an invitation link or QR code (see Employees without a company email: sign-in methods and invitations).
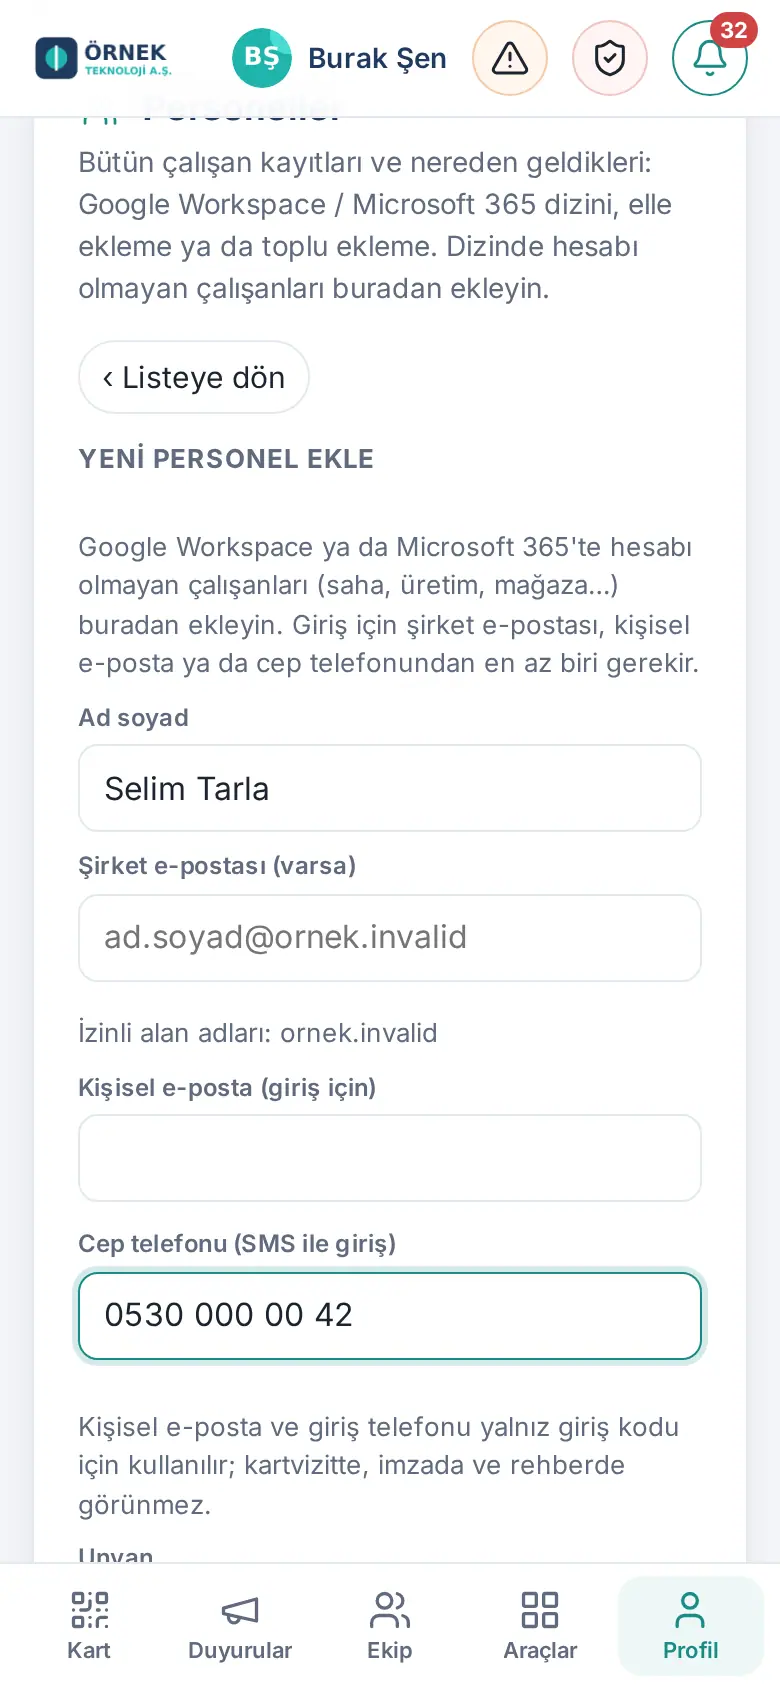
Tip: The personal email and the sign-in phone are used only for the sign-in code; they do not appear on the business card, in the signature or in the directory. The mobile phone on the business card, the photo and the other card details are filled in later from the record in WordPress or by the person in their own profile. You cannot edit rows in the list; the list shows up to 3,000 records.
Common errors and warnings:
| Message | Cause | What to do |
|---|---|---|
| "Enter first and last name (3–80 characters)." | The full name is missing or is one word | Type the first and last name together |
| "Enter at least one sign-in method: company email, personal email or mobile phone." | No sign-in method | Fill in at least one of the three fields |
| "Şirket e-postası izinli alan adlarından biri olmalı (…). Kişisel adresi "Kişisel e-posta (giriş için)" alanına yazın." ("The company email must be in one of the allowed domains (…). Type the personal address in the "Personal email (for sign-in)" field.") | A personal address was typed in the company field | Move the address to the Personal email (for sign-in) field |
| "A record with this company email already exists." | The same company email is in another record | Open the existing record on the Ekip ("team") screen |
| "Choose the department from the list." / "Choose an active employee as manager." | A department that is not in the list, or a manager who has left | Select from the list |
| "Start date must be YYYY-MM-DD." | The date format is wrong | Use the date picker |
| "Today's limit for adding was reached." | More than 200 additions in one day | Continue the next day or use the bulk import of the setup wizard |
| "Google Workspace ya da Microsoft 365 eşitlemesi ayarlı değil (WordPress → Prozence → Eşitleme)." ("Google Workspace or Microsoft 365 sync is not set up (WordPress → Prozence → Eşitleme).") | Compare with directory was clicked before sync was set up | First set up directory sync |
| "Adding employees requires Admin permission." | An Auditor or a module admin tried to add | Ask an Admin |
Important:
- If the same company email or the same sign-in phone is in another record, the person is not added and a warning appears.
- You select the department from the list; add a new department first in the Departments and organization section.
- An Auditor sees the list but cannot add; the + Add new employee and Compare with directory buttons appear only for an Admin.
Adding an employee
Who: App administrator (with Prozence permission in WordPress) · Where: WordPress → Prozence Workplace → Yeni ekip üyesi ("new team member")
What it does: Opens a business card, an email signature and app sign-in for a new employee. The person signs in to the app with the email address in their record.
Before you start: You can also add an employee who has no directory account in the app, without going to WordPress (see Employee list and adding a new employee). To add many people at once, use the Çalışanlar step of the setup wizard or directory sync (see 13. Integrations).
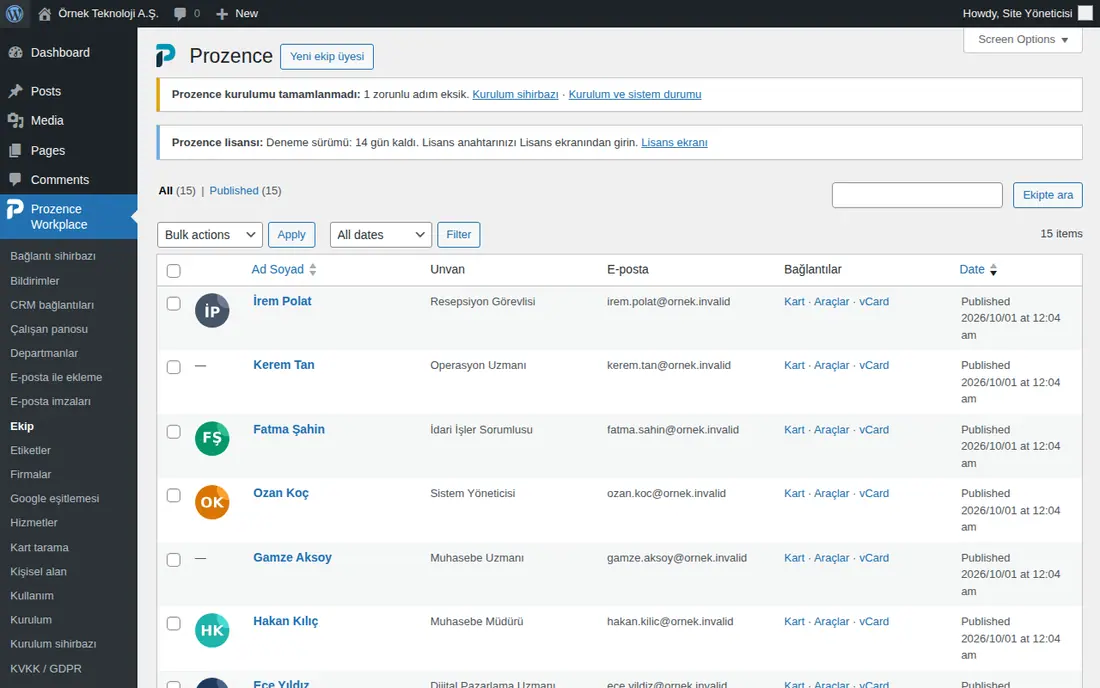
- Click Yeni ekip üyesi. (There is also a Yeni ekip üyesi button at the top of the Ekip screen, which is the employee list.)
- Type the employee's name in the Ad Soyad ("full name") box at the very top.
- Fill in the Kartvizit bilgileri ("business card details") box:
- Unvan and, if you want, Unvan (İngilizce) ("job title (English)");
- E-posta ("email") (required; the company email, which the person uses to sign in to the app);
- Cep telefonu ("mobile phone"), Santral dahili ("switchboard extension");
- Kişisel WhatsApp ("personal WhatsApp"), Kurumsal WhatsApp ("corporate WhatsApp"), LinkedIn adresi ("LinkedIn address"), Toplantı planlama bağlantısı ("meeting scheduling link") (not shown on the card if empty);
- Kartta görünecek ofisler ("offices shown on the card") (the addresses come from the Şirket ve bannerlar screen).
- Select a photo in the Fotoğraf ("photo") box on the right. A square photo with the face in the center gives the best result.
- If you want, enter the İşe giriş tarihi ("start date") and Doğum günü (yılsız) ("birthday (without year)") in the Takvim ("calendar") box.
- Click Publish (Yayımla in Turkish WordPress). After you save, the card link and QR code appear in the Kart ve araçlar ("card and tools") box on the right.
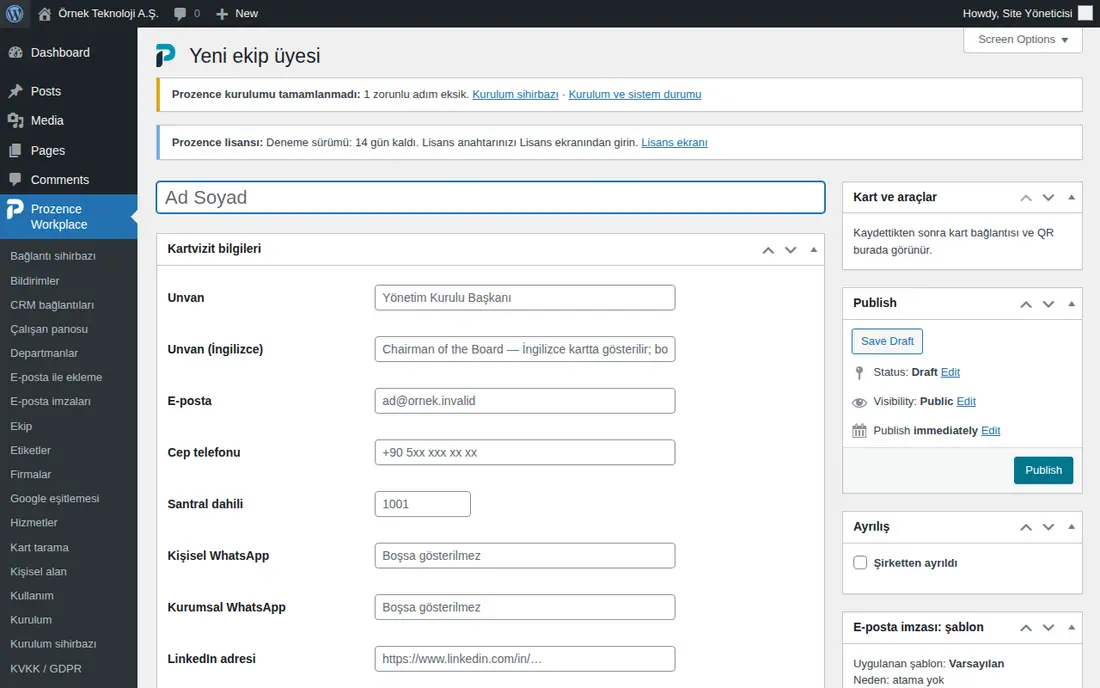
Tip: If you do not want to publish the record yet, use Save Draft (Turkish: Taslak olarak kaydet). The card of a person in draft does not open, and the person cannot sign in to the app, because sign-in matches only published records.
Important: The email address must end with one of the allowed domains you set in the setup wizard; otherwise the employee cannot sign in.
Editing employee details
Who: App administrator (with Prozence permission in WordPress) · Where: WordPress → Prozence Workplace → Ekip
What it does: You update the details that employees cannot change themselves, such as name, job title, email, extension and office.
- Open the Ekip screen. The list shows each employee's job title, email and the Kart · Araçlar · vCard ("card · tools · vCard") links.
- To search, type a name in the box at the top right and click Ekipte ara ("search team").
- Click the employee's name. The edit screen opens.
- Correct the fields you want to change. Additional boxes:
- E-posta imzası: şablon ("email signature: template"): shows the signature template applied to the person and the reason; template assignments are made in the app;
- E-posta imzası: sosyal medya ("email signature: social media") and E-posta imzası: ofis dışı notu ("email signature: out-of-office note");
- Görev geçmişi ("position history") (+ Yeni görev ("+ new position")): job title and department changes;
- Hakkında (profil yazısı) ("about (profile text)");
- Kartta önerilen kişiler ("people suggested on the card").
- Click Update (Turkish: Güncelle). The card and signature are updated immediately.
Tip: When you save, an employee whose signature changed can get a "your signature was updated" notification (see 02. Email signature).
Important: You do not change the employee's department and manager on this screen; you change them in the Departments and organization section in the app (see Assigning departments and managers).
Assigning departments and managers
Who: App administrator · Where: Admin → Company → Departments and organization
What it does: Departments go to the organization chart, to announcement targets and to the units on the Board. Each employee's manager sets the organization chart and the leave approval.
- In the Departments box, edit the department names. Type new departments in the New departments (one per line) box.
- Click Save departments.
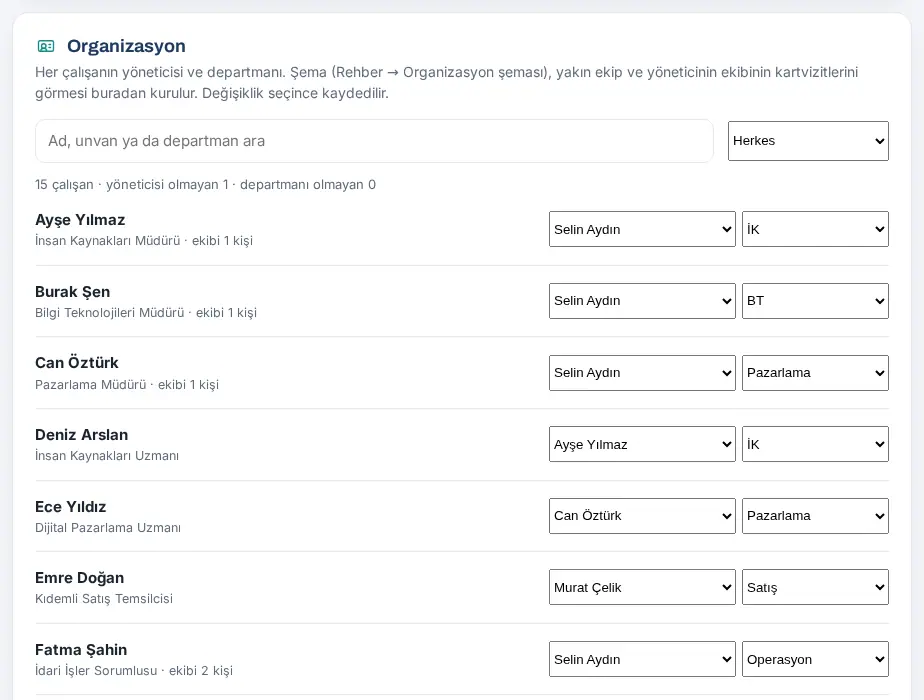
- In the Organization box, each employee's row has two lists:
- the first list is the employee's manager (— No manager (top level) — for the person at the top);
- the second list is the department.
- When you change a selection, it is saved immediately; there is no separate save button.
- To find what is missing, select Without a manager or Without a department in the filter on the right.
Important:
- You cannot delete a department that has employees. If you rename a department, the employees and posts move to the new name.
- You cannot put a person under someone from their own team (loops are not accepted).
Deactivating an employee who has left
Who: App administrator (with Prozence permission in WordPress) · Where: WordPress → Ekip → employee → Ayrılış ("offboarding") box
What it does: The card of an employee who has left does not just close; when someone scans the printed QR code or opens the old link, a page that says "no longer with us; for these topics you can contact …" opens with the card of the person who covers for them.
- On the Ekip screen, click the employee's name.
- In the Ayrılış box on the right, select the Şirketten ayrıldı ("left the company") checkbox.
- Select the Ayrılış tarihi ("leaving date").
- Select an employee in the Yerine bakan kişi ("person covering") list. If you select no one, — Şirketin genel iletişim bilgileri — ("— the company's general contact details —") is shown.
- If you want, type a Kartta görünecek not (isteğe bağlı) ("note shown on the card (optional)") (e.g. "Teklif ve sözleşme konuları" ("quotes and contracts")).
- If the business cards the person scanned should go to the person covering, keep Taradığı kartvizitleri yerine bakana devret ("hand over the business cards they scanned to the person covering") selected.
- Click Update (Turkish: Güncelle).
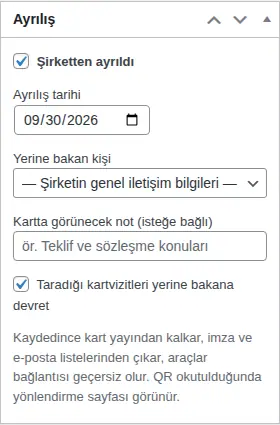
When you save:
- the card is unpublished and removed from the email signature and email lists;
- the person's app link becomes invalid and their open sessions are closed;
- their card in Wallet becomes invalid (see 13. Integrations).
Tip: If directory sync is on, employees who are suspended in Google or Microsoft are suggested in the Possibly left list (see 13. Integrations).
Important: If you selected it by mistake, clear the Şirketten ayrıldı checkbox and click Update. The offboarding details are deleted, but the card does not go back to published by itself; publish the record again with Publish.
Profile change rules and approval
Who: App administrator · Where: Admin → Company → General → Profile changes awaiting approval (rules: WordPress → Kişisel alan ("personal space"))
What it does: Employees change details such as their photo and mobile phone in My profile. You decide which fields need approval.
Setting the rules:
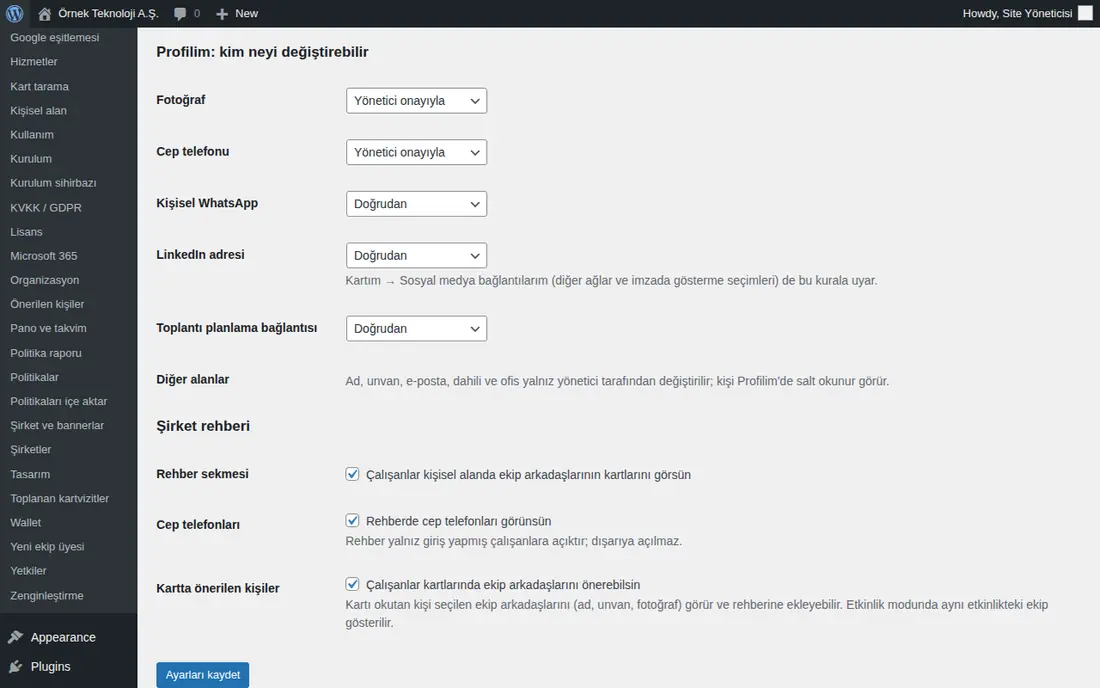
- In WordPress, open the Prozence Workplace → Kişisel alan screen.
- In the Profilim: kim neyi değiştirebilir ("My profile: who can change what") section, select one option for Fotoğraf, Cep telefonu, Kişisel WhatsApp, LinkedIn adresi and Toplantı planlama bağlantısı:
- Kilitli (yalnız yönetici) ("locked (administrator only)"): the employee cannot change it;
- Yönetici onayıyla ("with administrator approval"): the change goes to the card after approval;
- Doğrudan ("direct"): the change goes to the card as soon as it is saved.
- Click Ayarları kaydet ("save settings").
Approving or rejecting:
- When an employee changes a field that needs approval, users with Prozence Admin permission in WordPress get a "… profil değişikliği onayı bekliyor" ("… profile change awaiting approval") email (people who have only the Admin role in the app do not get this email). The Awaiting approval count in the General section goes up.
- Open Admin → General → Profile changes awaiting approval. Each request shows the old and new value (e.g. "Cep telefonu: eski → yeni" ("mobile phone: old → new")).
- Click Approve. The change goes to the card immediately.
- If you do not accept it, click Reject. If you want, type a reason in the box that opens (it is sent to the person; you can leave it empty).
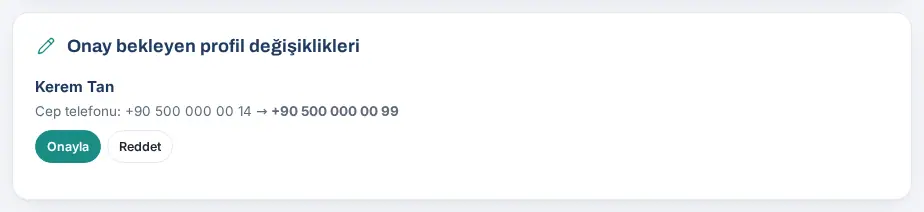
The employee gets the result by email and phone notification. While the request waits for approval, the employee can withdraw it (see 00. Getting started).
Tip: You can also approve the same requests in the Bekleyen profil değişiklikleri ("pending profile changes") section at the top of the Kişisel alan screen in WordPress.
Important: Only an administrator changes the name, job title, email, extension and office; the employee sees them read-only in My profile.
Sending an announcement to the team
Who: App administrator · Where: Admin → Company → General → Team announcement
What it does: Sends a short announcement by phone notification and email to all employees or to those who have notifications on.
- In the Team announcement box, type the Title (up to 80 characters) and the Message.
- If you want, type an address in the Link (optional) box.
- In the Channel and recipients section, select the channels: Phone notification and/or Email.
- Select the recipients: All employees or Only those with notifications on.
- Click Send and accept the confirmation question. The bottom of the screen shows how many people, devices and emails it went to.
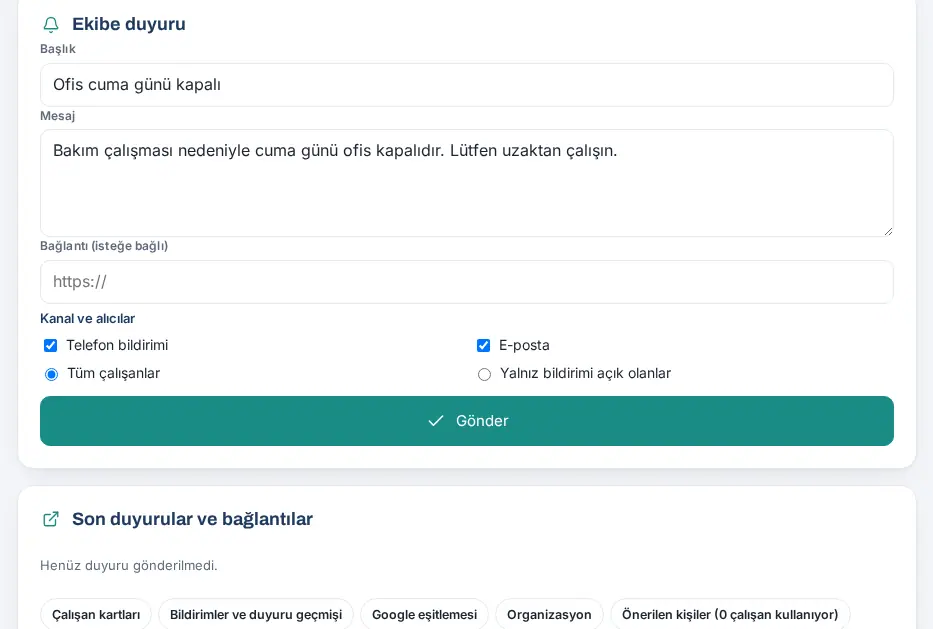
The sent announcements are listed in the Latest announcements and links box.
Message to selected people (WordPress):
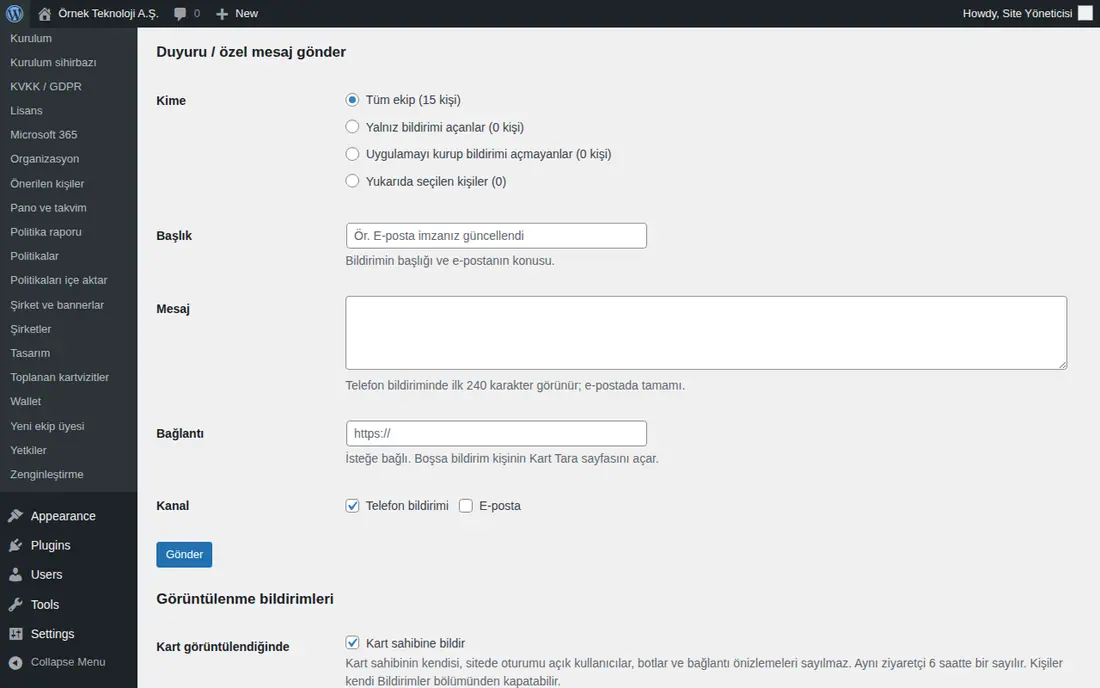
- In WordPress, open the Prozence Workplace → Bildirimler ("notifications") screen.
- In the Kimler bildirim alabiliyor? ("who can get notifications?") table, select the people.
- In the Duyuru / özel mesaj gönder ("send announcement / private message") section, select Yukarıda seçilen kişiler ("people selected above") for Kime ("to"). The other options are: Tüm ekip ("whole team"), Yalnız bildirimi açanlar ("only those who turned on notifications"), Uygulamayı kurup bildirimi açmayanlar ("those who installed the app but did not turn on notifications").
- Type the Başlık ("title"), the Mesaj ("message") and, if you want, the Bağlantı ("link"), select the Kanal ("channel") and click Gönder ("send").
Tip: To publish a lasting announcement in the Company Agenda on the Board, use Board → Company Agenda → + New announcement (see 06. Board and intranet). So that other employees can publish announcements, give them announcement permission (see App role and duty permissions).
Important: You cannot take back an announcement after you send it. The phone notification shows the first 240 characters of the message; the email contains all of it.
The three layers of permissions
Who: Admin · Where: Admin → People → People and permissions
What it does: In Prozence, who does what is set in three layers. Each layer has its own place.
| Layer | Roles | Where it is given | What it does |
|---|---|---|---|
| Company role | Admin, Auditor | People and permissions, the first list in the person's row | An Admin manages everything and counts as module admin in all modules. An Auditor sees the Admin section read-only. |
| Module role | Module admin, Operator, Viewer | People and permissions → Module permissions, or Admin → Modules → module → Permissions | A module admin manages the module's settings and permissions; an operator enters, approves and processes records; a viewer only reads. |
| Line manager | — (not a role) | Departments and organization (the employee's manager) | Gives the leave, expense and work time approvals for their team. |
Old names: the app role Manager is now Admin, View is now Auditor; Module manager is now Module admin, Operator (Turkish: İşlem sorumlusu) is still Operator (Turkish: İşlem yetkilisi). The assignments carried over as they were; you do not need to assign them again.
Pages:
- My Space: everyone's personal tasks (request leave, add expense, my requests…).
- Admin: settings and permissions. The boxes on the user screens have no Settings button.
- WordPress panel: setup and technical tasks (license, integration keys, KVKK (Turkey's personal data protection law), sync).
Tip: Assign the people responsible for a module (HR, accounting, the OHS team, reception…) as Operator of that module; notifications go to them. Each employee sees their own roles and where they come from in Profile → My profile → My permissions (0.99.9; see 00. Getting started).
Permissions and what they allow (summary table)
Who: Admin, module admins, HR · Where: Admin → People → People and permissions; Admin → Modules → module → Permissions
What it does: Before you give a person a permission, you see in one table what that permission opens. Permissions add up: one person can have more than one row (e.g. both line manager and Viewer in the Leave module).
| Permission | Where it is given | What the person can do |
|---|---|---|
| Employee (no permission) | — | Board, Add card, Customers, Directory, My profile and Reports → My reports. Does their own leave, expense, work time, request and other tasks. The Admin menu does not appear. |
| Line manager | Admin → Departments and organization (the employee's manager) | Gives the leave, expense and work time correction approvals for their team; sees their team's expense, leave and work time data in the Reports → Management view (see 19. Reports). Cannot change settings. |
| Viewer (module role) | Module permissions or module tab → Permissions | Sees that module's lists and reports read-only (e.g. an asset viewer opens the Assets screen). Cannot change records. |
| Operator (module role) | Same place | Processes that module's records (approves, saves, hands over, resolves) and gets the module's notifications. Sees the work screens: a visitor operator sees Reception, a mailroom operator sees Mailroom. Cannot change settings. |
| Module admin (module role) | Module permissions (only an Admin gives it) | In Admin → Modules, sees only their own module's tab; changes the module's settings; assigns Operator and Viewer in that module. Cannot give the module admin role and cannot change their own role. |
| Services manager | People and permissions → checkbox | Manages the whole Services tab in Admin; also sees request, mailroom, booking and visitor work. |
| Emergency responder | People and permissions → checkbox | Starts and ends the I’m Safe check-in, sees the check-in board, and gets an instant notification for people who answer "I need help". |
| Announcement right (To their department / To the whole company) | People and permissions → second list | Publishes announcements in the Company Agenda to their own department or to the whole company. |
| Fuar yetkilisi ("trade fair manager") | WordPress → Yetkiler | Creates trade fairs, assigns staff and edits all trade fairs (see 05. Events and trade fairs). |
| Auditor (company role) | People and permissions → first list; or the Prozence Denetçi level in WordPress | In Admin, sees General (summary and analytics), Integrations → Status, the Employees list and Email signature → Analytics read-only. Cannot change any setting; does not see secret keys, people's names or the details of the CRM queue. To see the whole company in module reports, the person gets the Viewer role in the modules (preset Senior management (view only)). |
| Admin (company role) | People and permissions → first list; or the Prozence Admin level in WordPress | The whole Admin menu. Counts as module admin in all modules. Adds employees, publishes announcements, approves profile changes, gives permissions, sets up integrations, creates API keys, turns on the app review account. Also has the permissions of the emergency responder. |
| Prozence permission in WordPress | WordPress → Prozence Workplace → Yetkiler | Opens the Prozence screens in WordPress (setup, license, Google service account, Microsoft 365, Wallet certificate, KVKK). The Admin level sees everything; the Denetçi level sees only the Usage and Notifications reports. In the app, the person is automatically Admin or Auditor; you cannot change this role in the app. |
Tip: To see all of a person's roles in one list, open Module permissions → By person. The person also sees their own roles in My profile → My permissions.
Important:
- Give the Admin role only to people who really manage the whole company. API keys and integration settings are open to Admins.
- If the person who created an API key loses the Admin role or leaves, that key stops working (see 13. Integrations).
Who sees what
Who: Admin, Auditor · Where: On a computer, the left menu and Admin; on a phone, the bottom menu and Profile → Admin
What it does: Sums up which screen is visible to whom and who can make changes there. The menu shows only the screens the person can open.
| Screen | Who sees it | Who changes it |
|---|---|---|
| Board, Add card, Customers, Directory, My profile (and My permissions) | Everyone | Everyone, their own records |
| Reports → My reports | Everyone (if the module is on) | — (read-only) |
| Reports → Management view | People who are Viewer, Operator or Module admin in the module (whole company); line managers (only their team: expense, leave, work time); Admin | — (read-only; CSV can be downloaded) |
| Reception | Visitor operators, services manager, Admin | The same people |
| Mailroom | Mailroom operators, services manager, Admin | The same people |
| Assets | Asset Viewer and above, Admin | Asset Operator and above, Admin |
| Admin → General | Auditor, Admin | Admin |
| Admin → Employees | Auditor (list), Admin | Admin (+ Add new employee, Compare with directory) |
| Admin → Integrations | Auditor (only Status), Admin (all tabs) | Admin |
| Admin → Email signature | Auditor (Analytics), email signature module admin, Admin | Module admin, Admin |
| Admin → Brand & Identity, Departments and organization, Calendar and Board, Links, People and permissions, Suggestions and rewards | Admin | Admin |
| Admin → Modules → module tab (settings and Permissions) | That module's admin; the services manager for Services; Admin (all) | The same people (only an Admin gives the Module admin role) |
| WordPress → Prozence Workplace screens | Users with Prozence permission in WordPress | Only the Admin level |
Example (demo company): Ayşe Yılmaz (HR) is admin of the Leave, Work time, Onboarding, Pulse and Wiki modules, so she sees only these five tabs in the Admin menu. Selin Aydın (Auditor) sees only General, Integrations, Employees and Email signature.
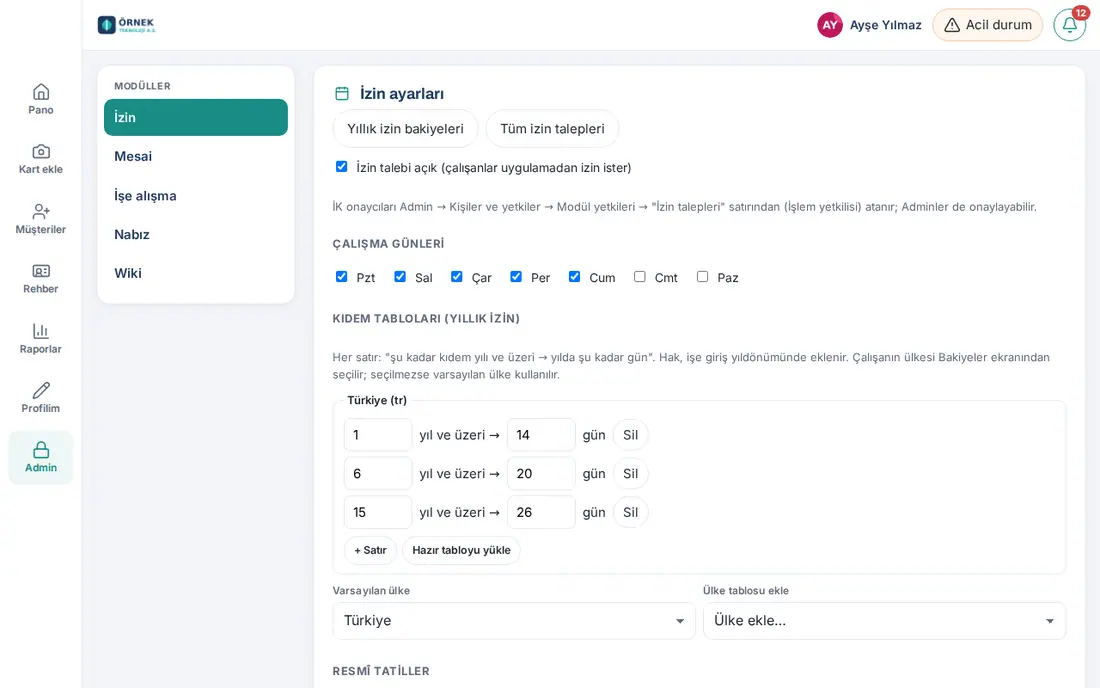
Important: If a menu item does not appear for a person, they do not have permission or the module is off. Check the person's roles in the By person view, or ask the person for a screenshot of the My permissions screen.
App role and duty permissions
Who: App administrator · Where: Admin → People → People and permissions
What it does: You give employees an administration role, announcement permission and duty permissions in the app without opening a WordPress account for them.
- Open the People and permissions section. Find the person with the Search by name, title or department box at the top. To see only people who have permissions, select Only people with permissions.
- In the person's row, select the app role in the first list:
- None: ordinary employee;
- Auditor: sees the general status and analytics, cannot change them;
- Admin: uses the Admin section, publishes announcements, approves profile changes and changes settings.
- In the second list, select the announcement permission: No announcements, To their department or To the whole company.
- If necessary, select the checkboxes:
- Services manager: manages the whole Services section;
- Emergency responder: starts and ends the I’m Safe check-in, and gets an instant notification for people who answer "I need help".
- Each change is saved as soon as you select it; the bottom of the screen shows "…: saved.".
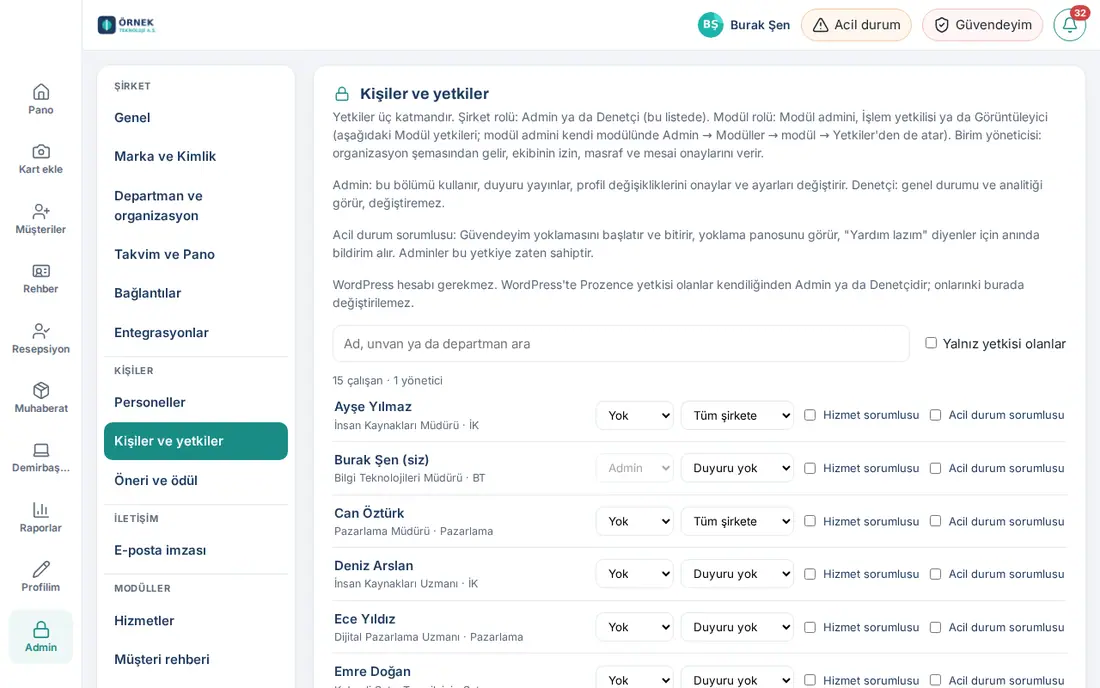
Tip: Module-based roles (e.g. HR's leave approval, accounting's expense approval) are in the Module permissions table at the bottom of the same screen (see Module roles (permission table)).
Important: Users with Prozence permission in WordPress are automatically Admin or Auditor; you cannot change their role here. You also cannot change your own role; your list appears dimmed.
Module roles (permission table)
Who: App administrator · Where: Admin → People → People and permissions → Module permissions
What it does: For each module, you set in one table who changes the settings, who processes the records and who only follows them.
Each module has three roles:
- Module admin: changes the module's settings;
- Operator: processes records and gets notifications;
- Viewer: sees lists and reports read-only.
Admins have full permission in every module.
Assigning by module:
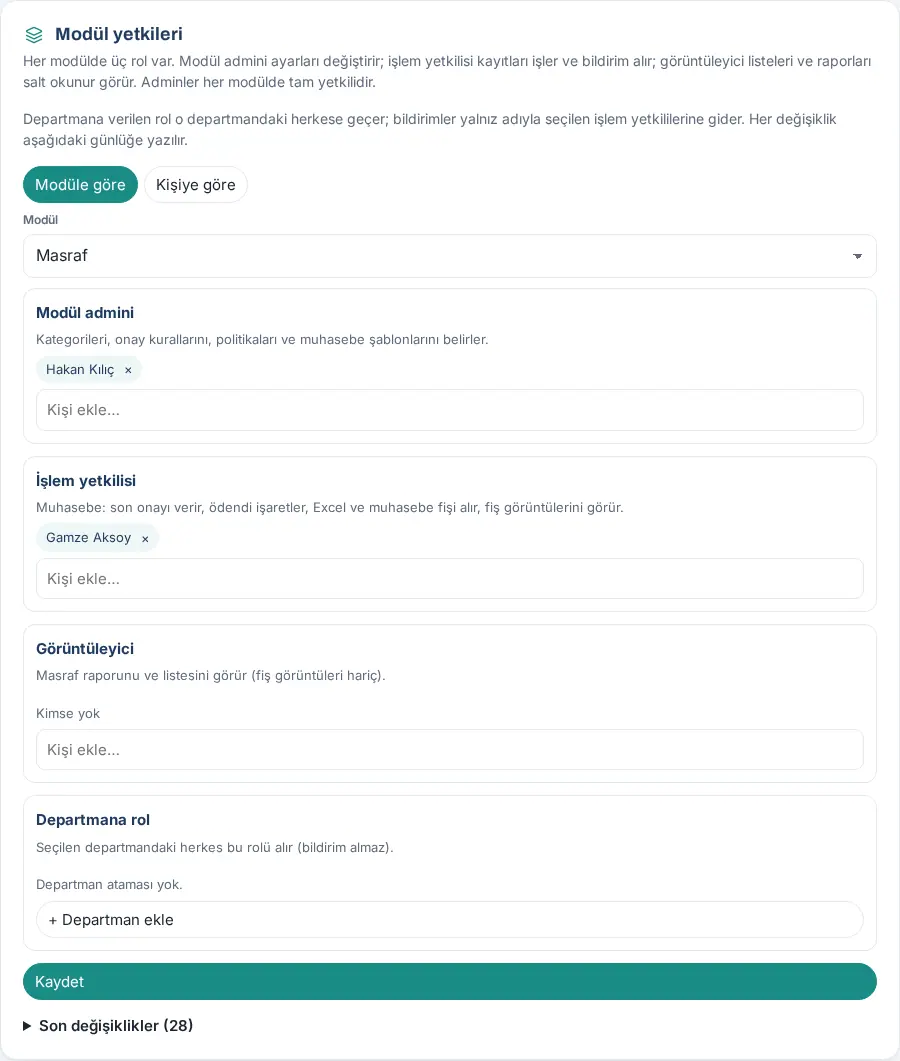
- In the Module permissions box, select By module.
- Select the module in the Module list.
- Type a name in the Add person… box under each role and select the person in the list. To remove a person, click the × next to the name.
- To give a role to everyone in a department, use + Add department under Role by department.
- Click Save.
Assigning by person:
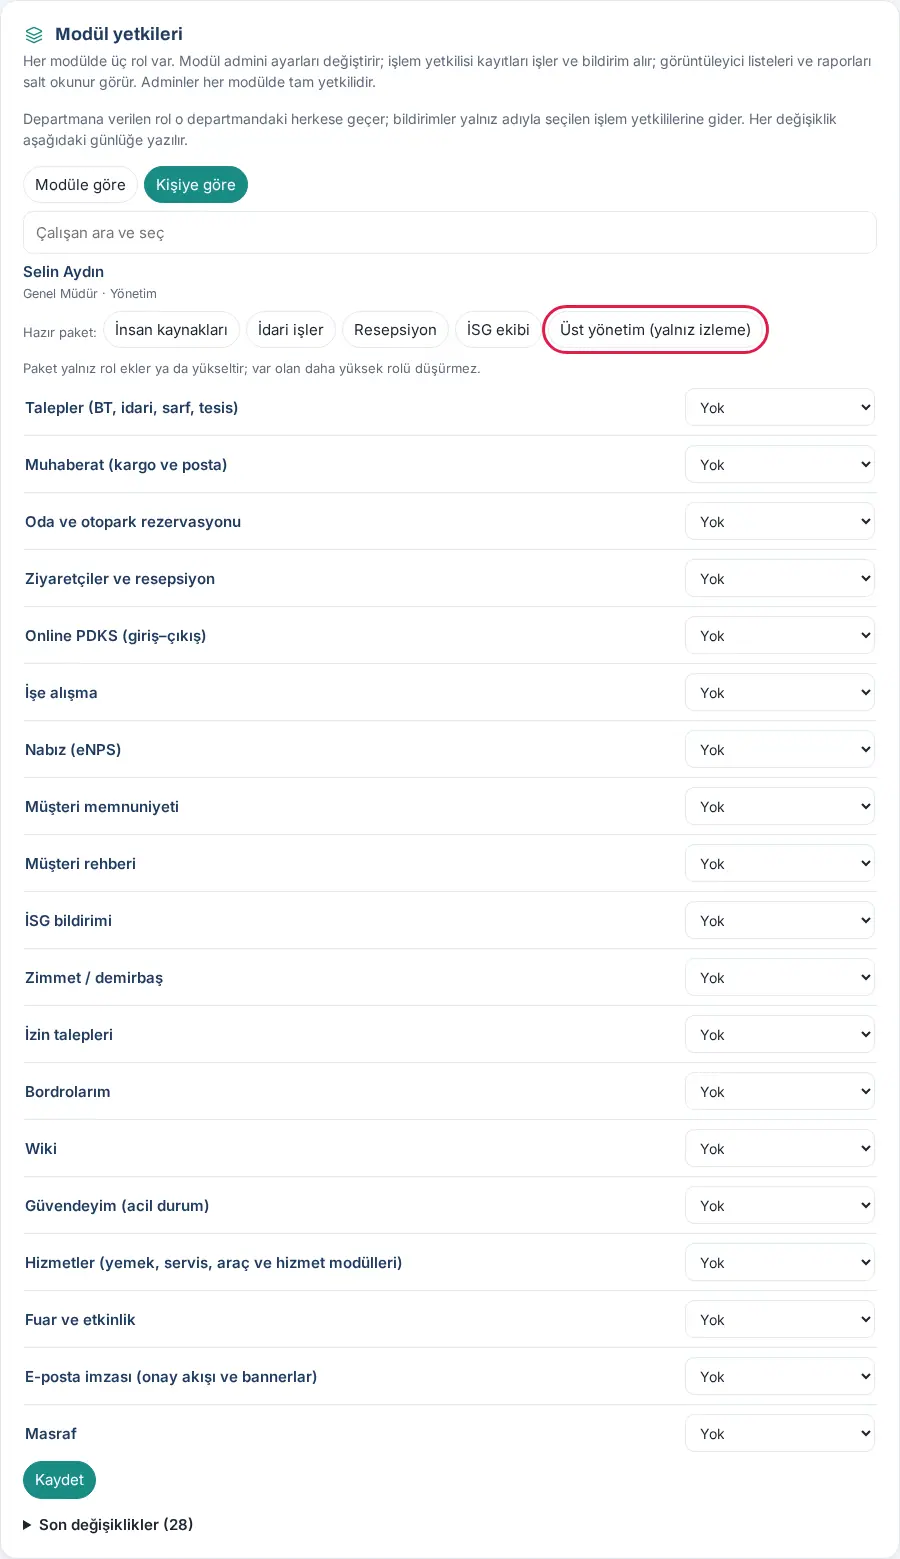
- Select By person.
- Type a name in the Search and pick an employee box and select the person. The person's role in all modules appears in one list.
- Select the role in the list next to each module and click Save.
- Or click one of the Preset buttons: Human resources, Facilities, Reception, Safety team, Senior management (view only). The preset is applied immediately.
What the roles mean in each module:
| Module | Module admin | Operator | Viewer |
|---|---|---|---|
| Requests (IT, admin, supplies, facilities) | Sets the categories, target times and category owners | Takes on and resolves requests in all categories | Sees incoming requests and the report |
| Mailroom (parcels and post) | Changes the mailroom settings | Records incoming parcels, hands them over, sends outgoing requests | Sees the mailroom log |
| Room and parking booking | Sets the rooms, parking spaces and rules | Reception: sees the guest list, cancels other people's bookings; gets guest notifications | Sees the day's guest list |
| Visitors and reception | Manages the visitor settings, the QR code and the privacy notice | Reception: records visitor check-in and check-out (Reception screen) | Sees the visitor log |
| Time tracking (check-in/out) | Sets the methods, offices, working hours and retention period | Approves correction requests, prepares the timesheet | Sees today's status and the monthly timesheet |
| Onboarding | Sets the templates, task owners and welcome text | Starts, follows and cancels processes | Sees the processes and progress |
| Pulse (eNPS) | Sets the questions, frequency and thresholds | Starts and ends a round by hand, sees the results | Sees the results and the trend |
| Customer satisfaction | Sets the scope, the question and the thresholds | Sees the report, gets notifications of negative ratings | Sees the report |
| Customer directory | Manages the card reading, source list, tags, sharing and enrichment settings | Imports on behalf of others, exports the whole catalog (only the record owner or the team manager merges records) | Sees the whole customer catalog read-only and exports it |
| Safety report | Turns on the module, sets the locations, anonymous reports and the retention period | Reviews reports, scores risks, opens actions | Sees incoming reports and the report |
| Assets / inventory | Sets the handover confirmation, the warranty reminder and the retention period; deletes records | Records assets, assigns them, takes them back; gets problem reports | Sees the asset list and history (Assets screen) |
| Leave requests | Sets the leave types, seniority tables, working days, holidays and the carry-over rule | HR: approves after the manager's approval, enters and corrects balances, records leave such as sick notes | Sees requests and balances (special types masked) |
| Wiki | Sets the categories, category editors and the review period | General editor: writes and publishes in all categories | — |
| I’m Safe (emergency) | — | Emergency responder: starts and ends the check-in | — |
| Meals and canteen (0.99.27) | Meals manager: manages the menu, meal participation and canteen settings (guest allowance); sees the report | Canteen attendant: opens the day's check-in, shows the QR code screen, adds a person without a phone by hand | Sees the canteen report |
| Shuttle (0.99.26) | Shuttle manager: manages the routes, stops, number of seats and driver links; sees today's trips, sends announcements to passengers | — | — |
| Purchasing (0.99.22) | Sets the categories, approvers and the permission to procure without approval; approves requests | Purchasing officer: processes the procurement list (order, delivery); gets notifications | Sees all requests and the report |
| Services (meals, shuttle, cars and service modules) | Services manager: manages the whole Services tab; also sees request, mailroom, booking and visitor work | — | — |
| Trade fairs and events | Trade fair manager: creates trade fairs, assigns staff, edits all trade fairs | — | Sees all trade fair boards and the comparison read-only |
| Email signature (approval flow and banners) | Approves or rejects signature changes | Prepares banners, suggests signature changes | — |
| Expense | Sets the categories, approval rules, policies and accounting templates | Accounting: gives the final approval, marks as paid, gets the accounting files | Sees the expense report and list |
| My payslips | Sets the verification method, the SMS provider and the Prozon API key | HR: uploads payslips, sets links to people, enters matching details, sees the acknowledgment status and the audit log | Sees the acknowledgment status and the audit log (cannot open the payslip content) |
Tip: Modules that are off show (off) next to their name; you can give roles in advance. Each change is written to the Recent changes log with who made it and when.
Important:
- A role given to a department passes to everyone in that department, but notifications go only to operators selected by name.
- A preset only adds or raises roles; it does not lower an existing higher role.
Assigning permissions from a module tab (module admin)
Who: Module admin, Admin · Where: Admin → Modules → module → Permissions
What it does: A module admin assigns the operators and viewers of their own module without going to the People and permissions screen.
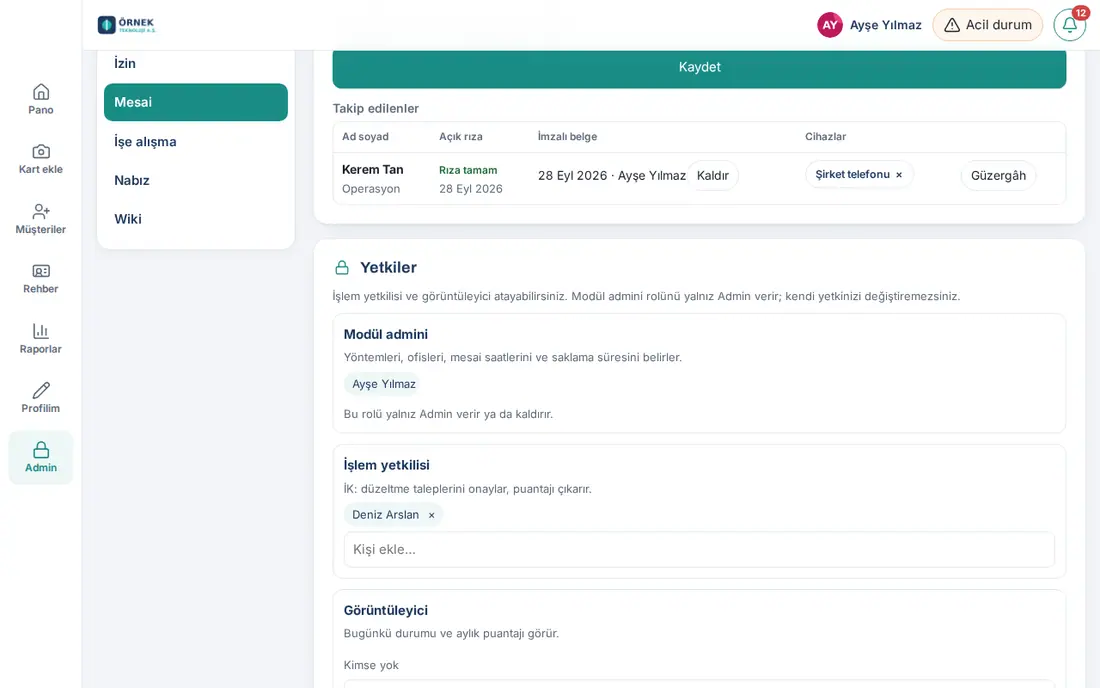
- Under Admin → Modules, open the module's tab (e.g. Work time). The module's settings are at the top and the Permissions section is at the bottom.
- Type a name in the Add person… box under Operator or Viewer and select the person in the list. To remove a person, click the × next to the name.
- To give a role to everyone in a department, use + Add department under Role by department.
- Click Save. The screen shows "…: permissions saved.".
Important:
- The module admin sees the Module admin row read-only. Only an Admin gives or removes the module admin role; no one can change their own permissions.
- The old "sorumlular" ("owners") pickers in the module settings are hidden on this tab; owners are assigned only in the Permissions section. This way there are no conflicting records from two places.
- The assignments here are the same as the People and permissions → Module permissions table; each change is written to the Recent changes log.
Start screen and shortcut button on phones
Who: App administrator · Where: Admin → Company → General → Start screen on phones and Shortcut button on phones
What it does: Sets, for the whole company, the first screen employees see when they open the app on their phone and the floating shortcut button at the bottom of each screen.
Start screen:
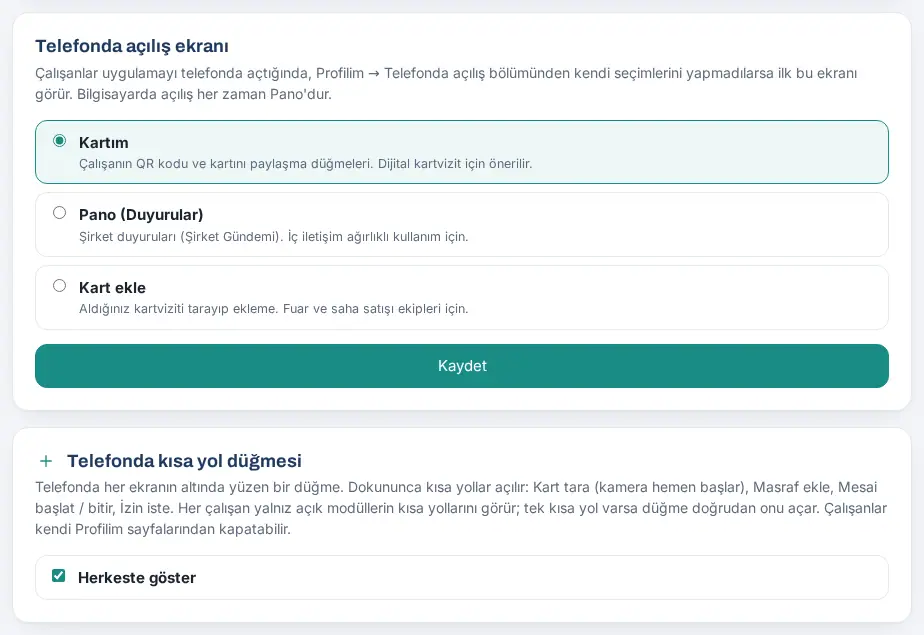
- In the Start screen on phones box, select one option:
- My card: the employee's QR code and card sharing buttons (recommended for the digital business card);
- Board (Announcements): company announcements (for use mainly as internal communication);
- Add card: business card scanning (for trade fair and field sales teams).
- Click Save.
Shortcut button:
- In the Shortcut button on phones box, select or clear Show for everyone. The change is saved immediately.
- When the employee taps the button, the shortcuts they can use open: Scan card, Add expense, Start work / End work, Request leave. Each employee sees only the shortcuts of the modules that are on. If there is only one shortcut, the button opens it directly.
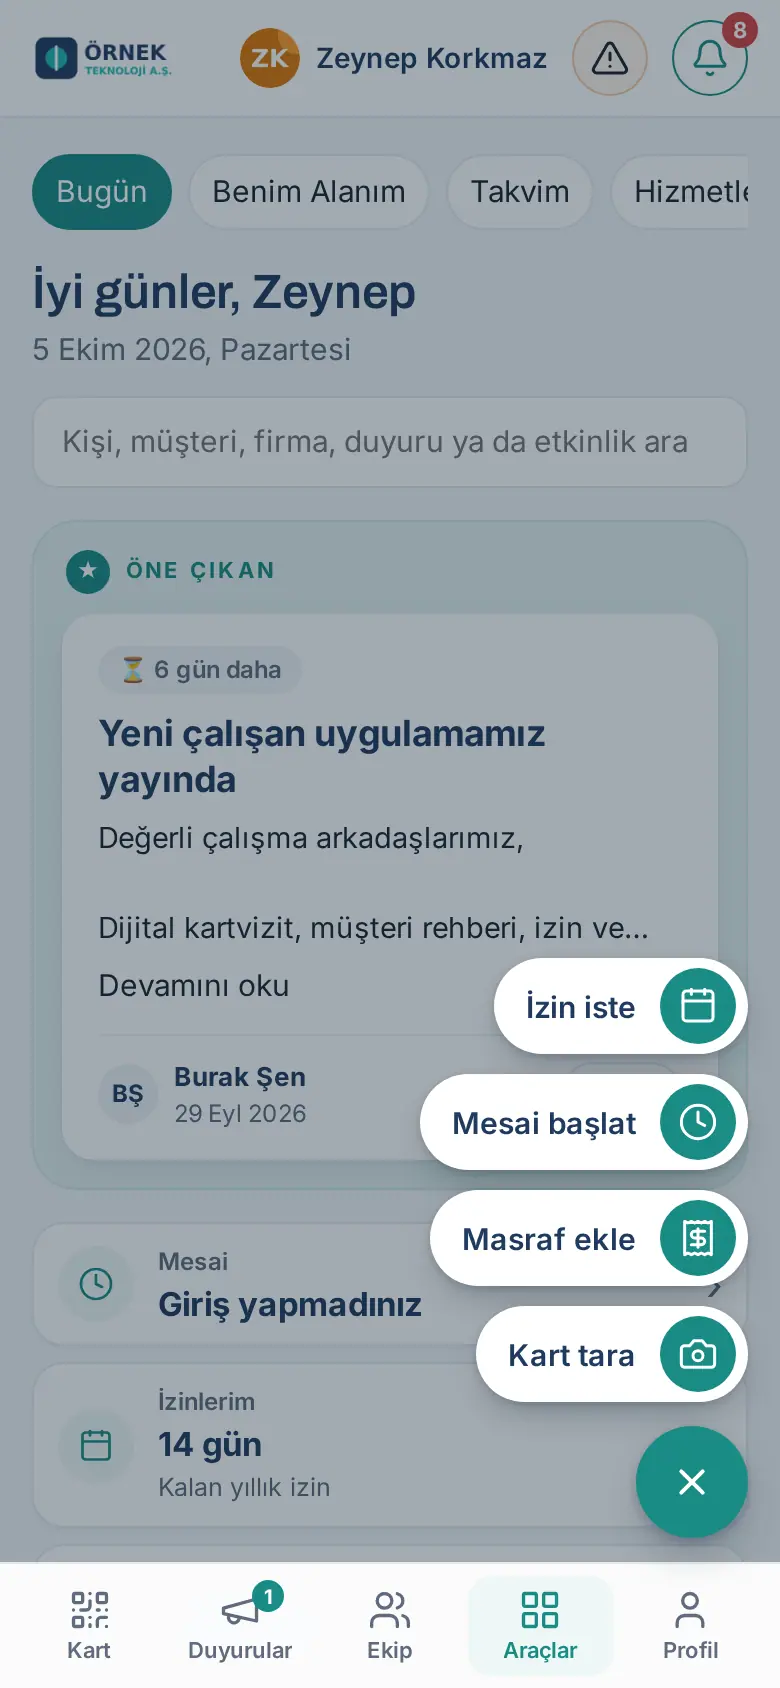
Tip: Employees can change their own start screen in My profile → Start screen on phone; the personal choice comes before the company setting. They can turn the shortcut button off and on for themselves only if Show for everyone is on in the company (see 00. Getting started).
Important: On a computer, the app always opens on the Board. The shortcut button appears only on a phone and on narrow screens.
Reminding people who have not signed in
Who: App administrator · Where: Admin → Company → General → Never signed in to the app
What it does: Sends employees who have never signed in an email that explains sign-in step by step.
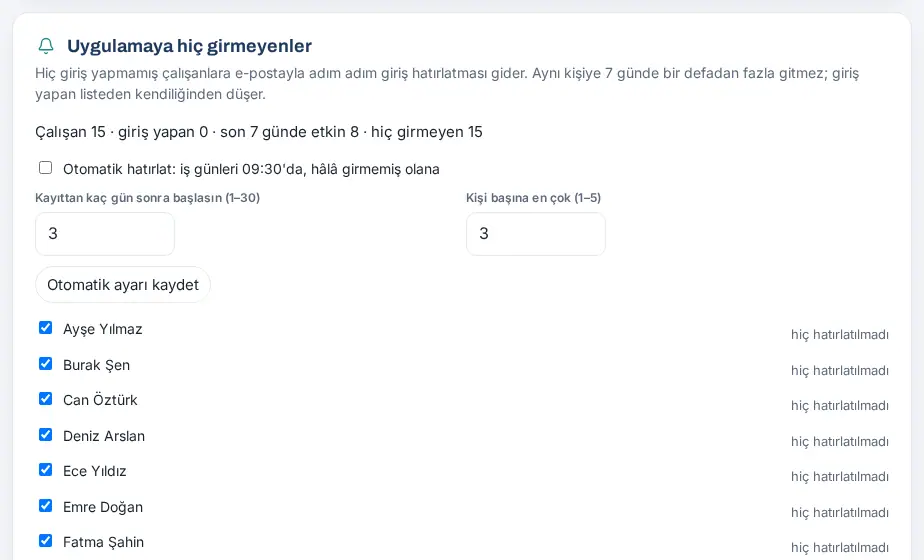
- The top of the box shows the number of employees, of people who signed in and of people who never signed in. Below, you see the list of people who never signed in and when the last reminder went to each of them.
- Select the people to remind.
- If you want, type a note in the Short note to add (optional) box.
- Click Send reminder to selected.
Automatic reminder:
- Select the Remind automatically: on workdays at 09:30, to anyone still not signed in checkbox.
- Enter the values for Days after the record is created (1–30) and Maximum per person (1–5).
- Click Save automatic setting.
Important: The same person gets no more than one reminder in 7 days. A person who signs in drops off the list automatically. For an employee without a company email, the reminder goes to the sign-in email in their record (see Employees without a company email).
Turning on content translation (AI)
Who: Admin · Where: Admin → Company → General → Content translation
What it does: In teams working in different languages, announcements, Wiki articles and Team Square posts are translated by AI into the employee's app language. The same content is translated into the same language once and stored; later readers see the stored translation. When the content changes, it is translated again.
- First make sure the AI key is set: WordPress → Prozence → Kart tarama ("Card scanning") → Anthropic API key (see 12. Customer directory administration). If there is no key, the box shows a warning and translation cannot be turned on.
- In the Translation section, choose a mode:
- Off: no translation.
- "Translate" button in content: employees translate when they want.
- Automatic: employees whose app language isn't Turkish see the translation automatically; employees using Turkish still see the Translate button on content in another language.
- In What gets translated, tick Announcements, Wiki articles and Team Square posts and comments. User guide articles are not translated; the English version of the guide is ready.
- In Max new translations per day (site-wide), enter a number between 10 and 5,000. Showing a stored translation again does not count. A person can make at most 30 new translations per hour.
- Click Save. Below the box you see the number of translations made today and in total.
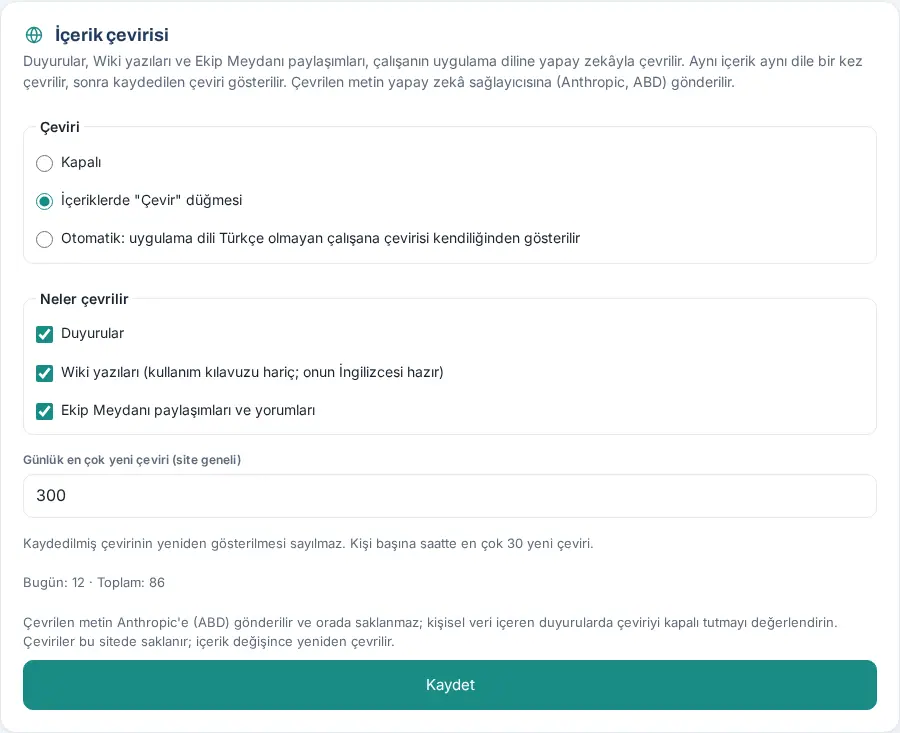
Important: The translated text is sent to an AI service abroad (Anthropic, USA); the employee privacy notice explains this. If you publish announcements containing personal data, consider keeping translation off or removing announcements from the scope, and mention it in your KVKK privacy notice (see 15. Multiple companies, language, KVKK and license). When the daily limit is reached, new translations wait until the next day; stored translations continue to be shown.
Turning on Ask the Wiki (AI)
Who: Admin · Where: Admin → Company → General → Ask the Wiki
What it does: Employees ask questions in plain language in the Wiki. The answer comes only from the Wiki articles the person asking can see (including the user guide) and, if you wish, company policies; sources are shown as links. Restricted articles, drafts and policies not targeted to the person are not used.
- Make sure the AI key is set: WordPress → Prozence → Kart tarama ("Card scan") → Anthropic API key. The Wiki must also be on (Admin → Modules → Wiki). If something is missing, the box shows a warning.
- Tick Ask the Wiki on.
- If you don't want policies used as sources, untick Also use company policies as sources.
- Optionally tick Keep questions that couldn't be answered. Unanswered questions are kept for 90 days without recording who asked and are listed in Reports → Communications, so you can see missing topics in the Wiki. Unticking it deletes the stored questions.
- In Max answers per day (site-wide), enter a number between 10 and 5,000. A person can ask at most 20 questions per hour. Questions with no relevant article are not sent to the AI and don't count toward the limit.
- Click Save. Below the box you see the number of questions answered today and in total.
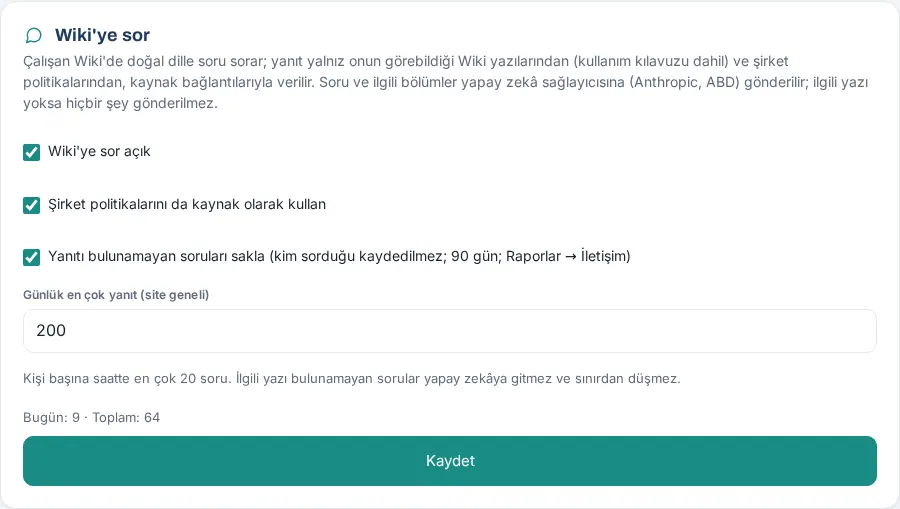
Important: The question and the related article sections are sent to an AI service abroad (Anthropic, USA); the employee privacy notice explains this. If the Wiki has articles with personal data, restrict their access (see 06. Board and intranet); a restricted article is only used for questions from people who can see it.
Employees without a company email: sign-in methods and invitations
Who: App administrator, HR · Where: Admin → People and permissions → Sign-in methods and invitations; settings in WordPress → Prozence Workplace → Kişisel alan
What it does: People who work in the field, in production, in a store or in a warehouse and have no company email can also sign in to the app: with a code sent to their personal email or phone, or with a single-use invitation link (QR) that you create. On shared devices, the session is kept short.
Turning on the methods (WordPress):
- Open the WordPress → Prozence Workplace → Kişisel alan screen.
- In the Şirket e-postası olmayan çalışanlar ("employees without a company email") section, select the methods you want: Kişisel e-posta ile kod ("code by personal email"), SMS ile kod ("code by SMS"), Davet bağlantısı / QR ("invitation link / QR").
- Type the longest session time in the Ortak cihaz oturumu ("shared device session") box (1–24 hours, default 8).
- Click Ayarları kaydet.
Entering sign-in details for an employee (app):
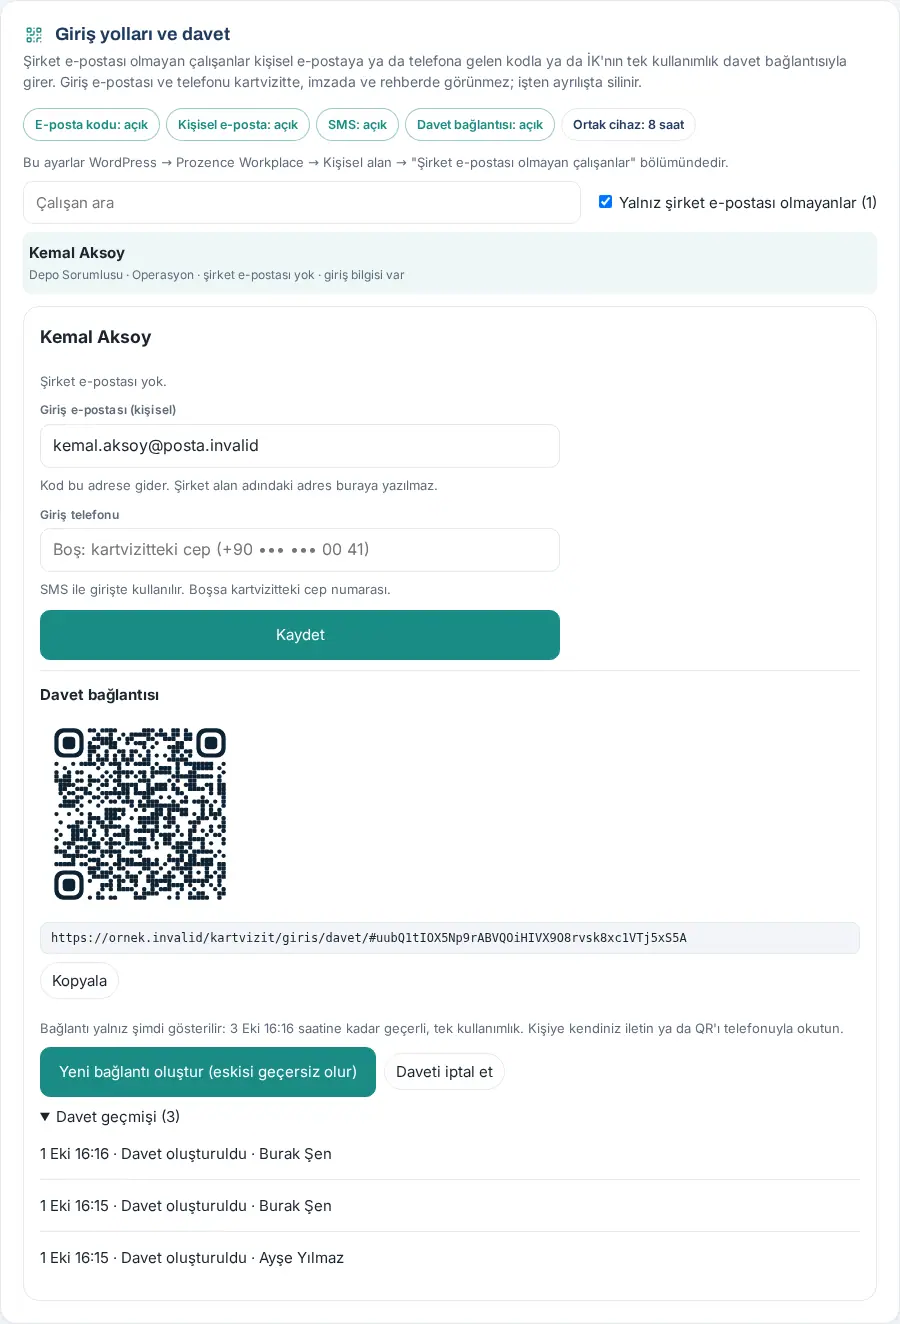
- In Admin → People and permissions tab, scroll down to the Sign-in methods and invitations section. The top shows which methods are on.
- While Only those without a company email is selected, the list shows only these people. Search for the employee and select them.
- Fill in the Sign-in email (personal) and/or Sign-in phone box and click Save. If the sign-in phone is empty, the mobile number on the business card is used.
Creating an invitation link:
- On the same screen, click Create invitation link.
- A QR code and a link appear. Send the link to the employee with Copy or Share, or scan the QR code with the employee's phone.
- If necessary, click Cancel invitation. Invitation history shows who created a link, when, and whether it was used.
Tip:
- The Giriş (şirket e-postası olmayanlar) ("sign-in (employees without a company email)") box in the employee record in WordPress does the same job.
- The SMS code uses the SMS provider in the My payslips settings (Netgsm or generic HTTP) (see Payroll settings: verification, SMS provider and Prozon API). If there is no provider, the SMS button does not appear on the sign-in screen and this section shows a warning.
- Sign-in with Google did not change: only a Workspace account in the company domain is accepted; a person who comes with a personal Gmail account is offered the other methods.
Important:
- The invitation link is shown only at the moment it is created; it is valid for 48 hours and can be used once. If you need it again, create a new link; the old one becomes invalid.
- You cannot enter an address in the company domain as the sign-in email; that address goes in the email field of the business card. An address or a sign-in phone cannot belong to two employees.
- If the same mobile number is on the cards of more than one employee (e.g. a shared line), SMS sign-in does not work with that number; the section warns you. Enter a separate sign-in phone for the person.
- When the employee is marked as left, the sign-in email, the sign-in phone and the invitation are deleted. These details do not appear on the business card, in the signature or in the directory ("Giriş bilgileri" ("sign-in details") row in the KVKK processing inventory).
WordPress admin screens
Who: App administrator (with Prozence permission in WordPress) · Where: WordPress → Prozence Workplace
What it does: Setup, license, external connections, employee records and some reports are in the WordPress admin panel. The screens in the menu are in alphabetical order (of their Turkish names).

| Screen | What it does |
|---|---|
| Bağlantı sihirbazı ("connection wizard") | Giving and testing Google Workspace and Microsoft 365 permissions; the same in the app is in Admin → Integrations → Google / Microsoft (0.99.25; see 13) |
| Bildirimler | Who turned on phone notifications, messages to selected people, view notifications |
| CRM bağlantıları ("CRM connections") | Sending contacts to CRMs; the same setting in the app is in Admin → Integrations → CRM (0.99.13; see 12, 13) |
| Çalışan panosu ("employee board") | Settings for employees' own posts (Team Square) |
| Departmanlar ("departments") | Department list |
| E-posta ile ekleme ("adding by email") | Adding customers from a shared mailbox (see 12) |
| E-posta imzaları ("email signatures") | Google service account key and summary of the signature status (see 13) |
| Ekip | Employee records: adding, editing, offboarding |
| Etiketler ("tags"), Firmalar ("companies"), Toplanan kartvizitler ("collected business cards") | Customer directory lists (see 12) |
| Google eşitlemesi ("Google sync") | Google or Microsoft directory sync; the comparison and approval in the app are in Admin → Integrations → Directory and sign-in (see 13) |
| Hizmetler ("services") | Settings of the service modules (see 14) |
| Kart tarama ("card scan") | Card scanning and leave-your-details settings |
| Kişisel alan | Sign-in with Google, allowed domains, sign-in methods and shared device time for employees without a company email, My profile rules, company directory |
| Kullanım ("usage") | Weekly active users and employee activity report |
| Kurulum, Kurulum sihirbazı | Setup status and first setup |
| KVKK / GDPR, Lisans ("license") | Personal data operations and license (see 15) |
| Microsoft 365 | Sign-in with Microsoft and the Entra ID connection (see 13) |
| Organizasyon ("organization"), Önerilen kişiler ("suggested people") | Organization chart and people suggested on the card |
| Pano ve takvim ("board and calendar"), Politikalar ("policies"), Politika raporu ("policy report"), Politikaları içe aktar ("import policies") | Board and company policies (see 06) |
| Şirket ve bannerlar, Şirketler ("companies"), Tasarım ("design") | Company details, office addresses, group companies; logo and colors are read-only here and are changed in the app (see 11) |
| Wallet | Apple and Google Wallet certificates (see 13) |
| Yeni ekip üyesi | New employee record |
| Yetkiler | Prozence administrators, trade fair managers, suggestion topics |
| Zenginleştirme ("enrichment") | Customer company enrichment (see 12) |
Tip: The Prozence WordPress admin screens (setup wizard, license and the other plugin pages) are only in Turkish; the Admin panel in the app appears in the selected language. WordPress's own screens (Plugins, Settings) appear in your site's WordPress language.
Important: Many settings appear both in WordPress and in the app. Settings such as the logo, colors, email signature and the permission table are changed only in the app; in WordPress you see a read-only summary. At the top of the CRM bağlantıları, Google eşitlemesi and Kart tarama (HubSpot) screens, there is the note "… artık uygulamada da: Admin → Entegrasyonlar. Burası çalışmaya devam eder; iki yer aynı ayarı kullanır." ("… is now also in the app: Admin → Integrations. This page keeps working; both places use the same setting.") and an Uygulamada aç ("open in the app") link. The Microsoft app registration and the Wallet certificates are set up only in WordPress; since 0.99.25 you can also paste the JSON key of the Google service account into the wizard in the app.