29. Time and attendance management
Screenshots show the Turkish interface of Prozence with fictional "Örnek Teknoloji A.Ş." data; the English interface has the same layout.
This chapter is for the people who set up and manage the time and attendance module (Mesai; PDKS: personnel attendance control system). The settings are on four tabs: General, Work locations, Work schedule, Lunch break and questions. You define the offices, turn on work outside the office (from home, remote, in the field), assign weekly work schedules to people and departments, set up the QR code screen at the entrance, get the timesheet (puantaj) and manage field location tracking.
For the employee's check-in and check-out screens and the manager's My team view, see 22. Time and attendance.
Who: Time and attendance module admin · Time and attendance operator (HR) · App administrator
In this chapter
- Opening the time and attendance settings
- The General tab
- Work locations: the company default for offices
- Saving your current location as an office
- Editing a saved office, the office-specific check-in rule and deleting
- Assigning employees to an office (Offices today)
- Work outside the office: from home, remote, in the field
- Work schedules and the assignment order
- Lunch break and questions
- Setting up and protecting the QR code screen at the entrance
- Time and attendance permissions
- Timesheet and export to payroll software
- Location tracking (field) settings and consent documents
Before you start: Before you turn on time and attendance, announce the privacy notice to employees. If you will turn on location, selfie or IP recording, update the privacy notice first. The screens in this chapter use data from the fictional company "Örnek Teknoloji A.Ş." (Merkez Ofis and Ankara Şube); the internet addresses are sample addresses reserved for documentation.
Opening the time and attendance settings
Who: Time and attendance module admin, app administrator · Where: Admin → Modules → Work time
What it does: Opens all the settings of the time and attendance module.
- On a computer, click Admin in the menu on the left.
- In the Modules group, click Work time. Work time settings opens.
- Select one of the tabs at the top: General, Work locations, Work schedule, Lunch break and questions.
- Make the changes and click Save, which stays fixed at the bottom. The message "Work time settings saved." appears; the same tab stays open.
- At the bottom of the page there are the Location tracking (field) and Permissions sections.
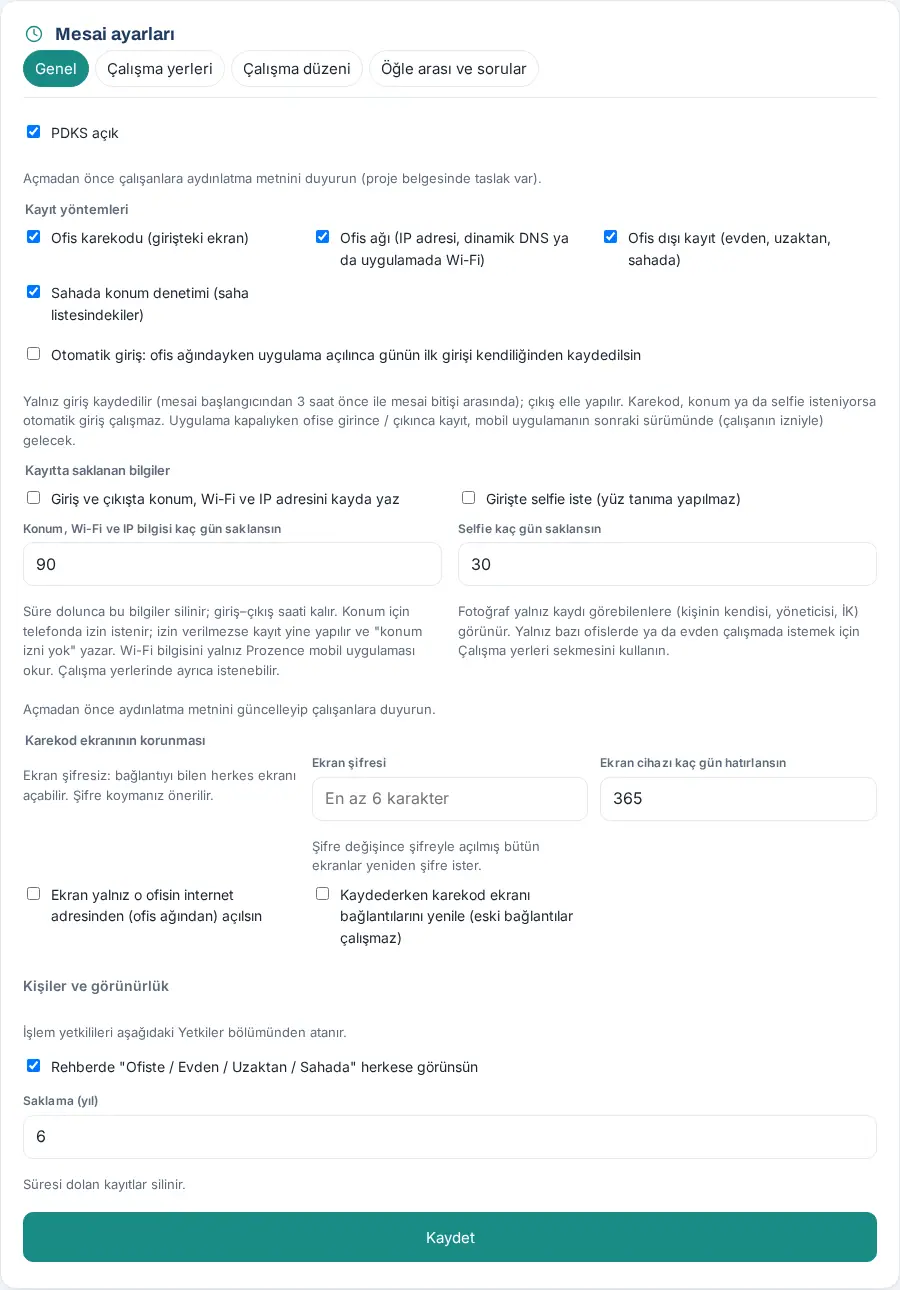
Important: The single Save button saves all four tabs. Saved offices, however, are saved on their own with each action; you do not need to click Save for them. Only the module admin and the app administrator can change the settings: "Time-tracking settings are changed by the module admin or an Admin."
The General tab
Who: Time and attendance module admin · Where: Admin → Modules → Work time → General
What it does: Turns on the module; sets which recording methods are used, what is written to the record, how the QR code screen is protected and the retention period.
- Select the Time tracking on checkbox.
- Under Recording methods, select the methods to use.
- If necessary, select the Automatic check-in checkbox.
- Under Information stored with records, select location / Wi-Fi / IP recording and the selfie at check-in; enter the retention periods.
- Under Protecting the QR code screen, enter the screen password and the options.
- Under People and visibility, select the directory option and enter the Retention (years) value.
- Click Save.
| Setting | What it does | Default |
|---|---|---|
| Time tracking on | Turns on the module; the Work time box shows to employees | Off |
| Office QR code (entrance screen) | Records with the QR code of the screen at the entrance | On |
| Office network (IP address, dynamic DNS or Wi-Fi in the app) | Records with I'm at the office while on the office network | On |
| Out-of-office check-in (home, remote, field) | The Started from home, Started remotely and I'm on site buttons | On |
| On-site location check (field staff) | Asks for the location in the I'm on site record of an employee on the field list and compares it with the defined places | On |
| Automatic check-in: when the app is opened on the office network, record the first check-in of the day automatically | Check-in only (between 3 hours before the start of the workday and the end of the workday); check-out is done manually. It does not work if a QR code, location or selfie is required | Off |
| Store location, Wi-Fi and IP address with check-ins and check-outs | Each record stores the location (if there is no permission, "no location permission"), the Wi-Fi in the mobile app and the IP address the record came from | Off |
| Keep location, Wi-Fi and IP for how many days | When the period ends, this information is deleted; the check-in and check-out times remain (7–730) | 90 |
| Ask for a selfie at check-in (no face recognition) | A photo with the front camera is asked at each manual check-in | Off |
| Keep selfies for how many days | When the period ends, the photo is deleted (1–90) | 30 |
| Screen password | The QR code screen asks for a password the first time it opens (6–64 characters) | Empty (no password) |
| How many days the screen device is remembered | A tablet opened with the password does not ask for it again during this period (1–730) | 365 |
| Open the screen only from that office’s internet address (office network) | The QR code screen does not open from another network | Off |
| Renew QR screen links on save (old links stop working) | All screen links change when you save (one time) | Off |
| Show "At office / From home / Remote / In the field" to everyone in the directory | The badge for today's status shows in the directory and on the profile | On |
| Retention (years) | Check-in and check-out records whose period has ended are deleted (1–15) | 6 |
Tip: To ask for location or a selfie only in some offices or only for work from home, leave the general settings off and use the Work locations tab.
Common errors and warnings: "En az bir kayıt yöntemi açık olmalı." ("At least one recording method must be on.") · "Ekran şifresi 6–64 karakter olmalı." ("The screen password must be 6–64 characters.") · "Ekranın hatırlanma süresi 1–730 gün olmalı." ("The screen remember period must be 1–730 days.") · ""Ekran yalnız ofis ağından açılsın" için ofis internet adreslerini girin." ("Enter the office internet addresses for "Open the screen only from the office network".")
Important: No biometric data is kept; no face recognition is done on the selfie. Before you turn on location, IP and selfie recording, update the privacy notice and announce it to employees. Attendance officers (HR) are not assigned on this tab but in the Permissions section at the bottom of the page.
Work locations: the company default for offices
Who: Time and attendance module admin · Where: Admin → Modules → Work time → Work locations
What it does: Sets which checks are required together for an office record. If no "Specific to this office" rule is selected on the office card, this default applies.
- Open the Work locations tab. The note at the top reminds you that if you define offices from a phone with the Prozence app while connected to the office Wi-Fi, the Wi-Fi MAC address of the router (access point) is also saved.
- Under Company default for offices: checks required together to check in, select the ones you want.
- Click Save.
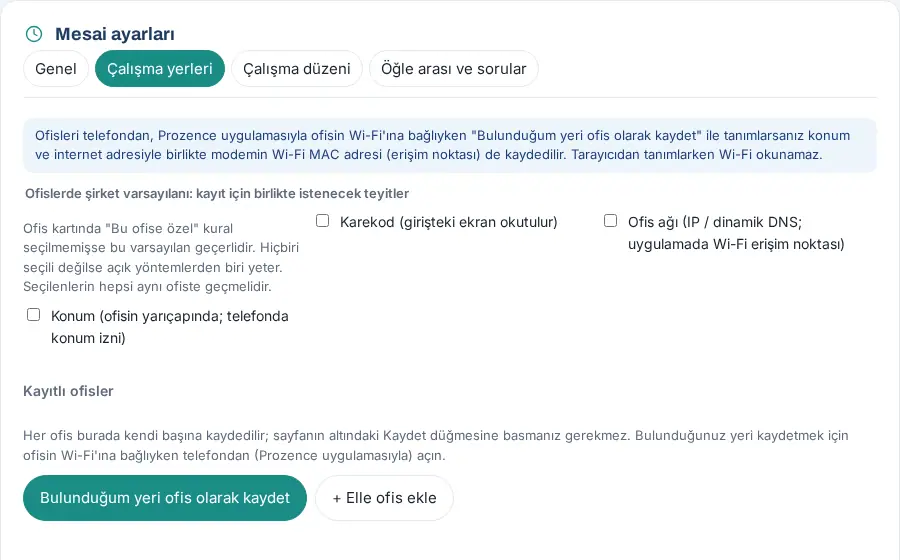
| Setting | What it does | Default |
|---|---|---|
| QR code (the entrance screen is scanned) | The QR code at the entrance must be scanned for an office record; the I'm at the office button is hidden | Off |
| Office network (IP / dynamic DNS; Wi-Fi access point in the app) | The phone must be on the office network during the record | Off |
| Location (within the office radius; location permission on the phone) | The location must be within the office radius; the latitude and longitude of the office must be entered | Off |
If none is selected, one of the methods that are on is enough. All the selected checks must pass at the same office: for example, if all three are selected, the employee scans the QR code, the phone is on the office network and the location is within the office radius.
Common errors and warnings: "Karekod teyidi için "Ofis karekodu" yöntemi açık olmalı." ("For the QR code check, the "Office QR code" method must be on.") · "Ofis ağı teyidi için "Ofis ağı" yöntemi açık olmalı." ("For the office network check, the "Office network" method must be on.") · "Konum teyidi için en az bir ofisin enlem ve boylamını girin." ("For the location check, enter the latitude and longitude of at least one office.")
Saving your current location as an office
Who: Time and attendance module admin · Where: Admin → Modules → Work time → Work locations → Saved offices → Save my location as an office
What it does: While you are at the office, reads the location, the internet address and (in the mobile app) the Wi-Fi details, and writes them to a saved office in one step.
Before you start: At the office, open this from your phone with the Prozence app while connected to the office Wi-Fi network. If you open it from a browser, the Wi-Fi cannot be read; the location and the internet address are read.
- Under Saved offices, click Save my location as an office (on a phone, tap it). If location permission is asked, allow it.
- The box "The following was read. Choose what to save:" shows the information that was read: Location (coordinates and accuracy), Internet address, Wi-Fi (network name and access point). A row that could not be read cannot be selected.
- Select the ones you want to save. If you are connected with mobile data, do not select the internet address.
- In the Where should it be saved? list, select the office, or select New office and type the Office name and Address (optional). If the internet address is already saved for an office, that office is preselected ("This internet address is already saved for this office; missing details will be filled in.").
- Click Save. The result line says "✓ "Merkez Ofis" updated: location, internet address." or "added as a saved office".
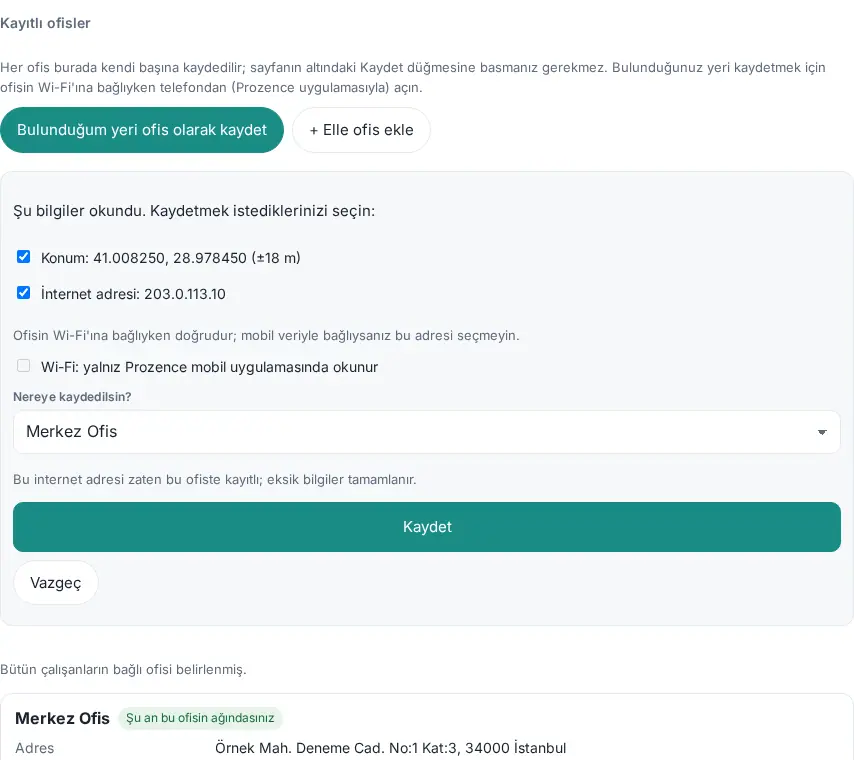
Common errors and warnings:
- "The location could not be read. Allow location access and try again."
- "The location accuracy is too low (±… m). Try again outdoors or by a window." (a location worse than ±1000 m is not accepted; if twice the accuracy margin is larger than the office radius, the radius is widened to this value, rounded to 50 m and at most 5000 m — for a 200 m radius, at an accuracy worse than ±100 m)
- "This internet address (…) is already saved for the "…" office." · "This Wi-Fi access point is already saved for the "…" office."
- "An office named "…" already exists; select it in the list and update it." · "Up to 20 offices can be defined."
Important: The internet address is always the address that the server sees at that moment. Reading the location and the Wi-Fi needs a real device; in the screenshot in this guide, the location was given in the test environment and the Wi-Fi row is in the "can only be read in the Prozence mobile app" state.
Editing a saved office, the office-specific check-in rule and deleting
Who: Time and attendance module admin · Where: Work locations → Saved offices → office card
What it does: You see and change the address, location, internet addresses and Wi-Fi details of each office, and the rule for "how to check in at this address".
Office card: The card shows Address, Location (coordinates, radius, Open in map), Internet address (IP), Wi-Fi (network name · access point MAC), Check-in rule, Employees and Last updated. If you are on this office's network, the badge "You are on this office’s network now" shows. If the QR code method is on, there are the Open QR screen and Copy link buttons.
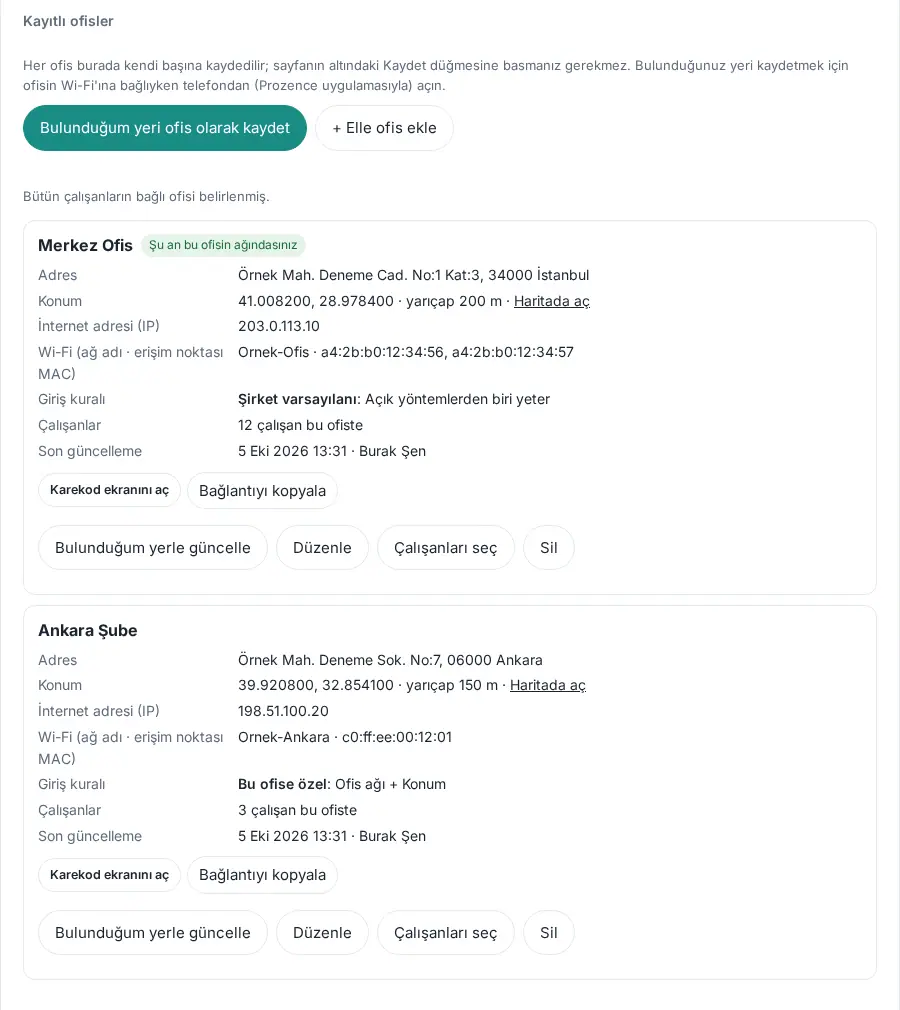
Editing:
- On the office card, click Edit. The Edit office form opens. For a new office, click + Add office manually (the same form, empty).
- Fill in the fields (see the table).
- Under How should check-in work at this address?, select Company default or Specific to this office: require all of the options selected below together. For the specific rule, select the options you want from QR code, Office network, Location and Selfie on check-in (no face recognition).
- Click Save changes (for a new office, Add office). The message "Office saved." appears.
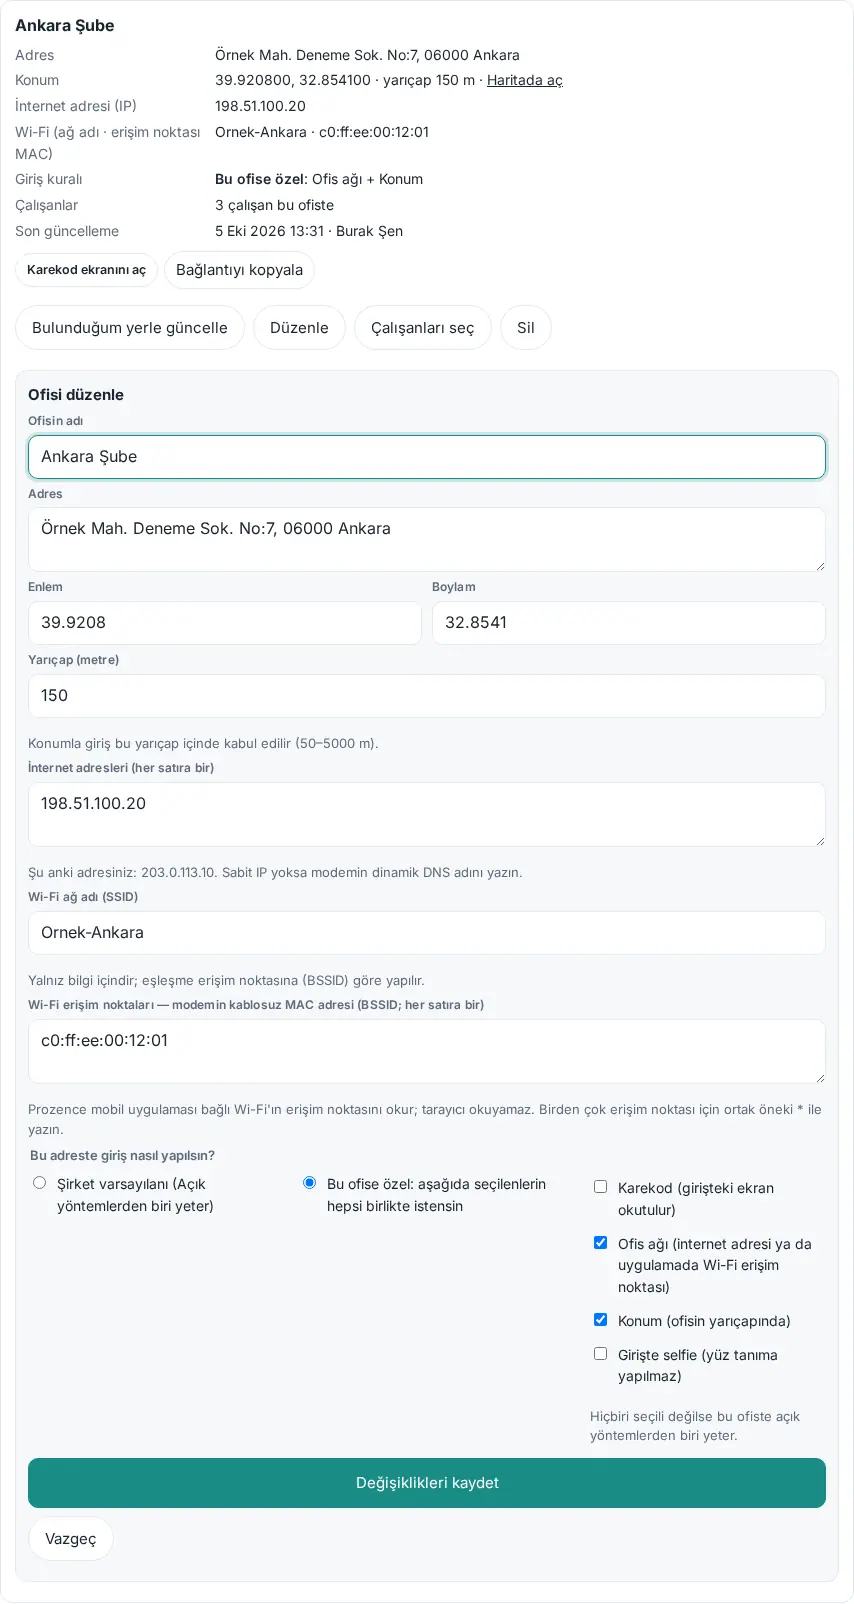
| Field | What it does | Default |
|---|---|---|
| Office name | The name that shows in records, reports and on the QR code screen | — (required) |
| Address | For information; shows on the office card | Empty |
| Latitude / Longitude | The location of the office; for the location check, the map and the distance calculation | Empty |
| Radius (meters) | Check-in by location is accepted within this radius (50–5000) | 200 |
| Internet addresses (one per line) | The internet exit address of the office (e.g. 203.0.113.10 or 203.0.113.0/24) or, if there is no static IP, the dynamic DNS name of the router (resolved every 5 minutes) |
Empty |
| Wi-Fi network name (SSID) | For information only; matching is done by access point | Empty |
| Wi-Fi access points — the router’s wireless MAC address (BSSID; one per line) | The Prozence mobile app reads the access point of the connected Wi-Fi; for several access points, write the common prefix with * |
Empty |
| How should check-in work at this address? | Company default or Specific to this office (QR code, office network, location, selfie at check-in together) | Company default |
Deleting:
- On the office card, click Delete. The question "Delete this office?" appears.
- Click Yes, delete the office. To stop, click Cancel.
Common errors and warnings:
- "A location check is selected for "…"; save the office location first." · "An office network check is selected for "…"; save the internet address or Wi-Fi access point first."
- ""…" için geçersiz IP adresi: …" ("Invalid IP address for "…": …") · ""…" için geçersiz Wi-Fi erişim noktası (BSSID): …. Biçim: aa:bb:cc:dd:ee:ff" ("Invalid Wi-Fi access point (BSSID) for "…": …. Format: aa:bb:cc:dd:ee:ff")
- "Konum yarıçapı 50–5000 metre olmalı." ("The location radius must be 50–5000 meters.")
- "At least one office must remain. Add the new office first, then delete this one."
Important: The QR code screen of a deleted office stops working, and check-in from that office's network or location is no longer possible; past check-in and check-out records are not deleted. Employees assigned to the office become "No office assigned". If a selfie is required for the office, automatic check-in does not work at that office.
Assigning employees to an office (Offices today)
Who: Time and attendance module admin · Where: Saved offices → office card → Choose employees
What it does: Sets the office to which each employee is assigned. The Offices today box on the Board and the office report count an employee who did not come as "absent" at the assigned office (see 06. Board and intranet).
- On the office card, the Employees row shows how many people are assigned ("3 employees at this office" or "Not chosen yet").
- Click Choose employees. The Employees at this office list opens; people assigned to another office have "currently: …" next to them.
- Filter with the Search name or department box and select the people.
- Click Save. The message ""Ankara Şube": 3 employees." appears.
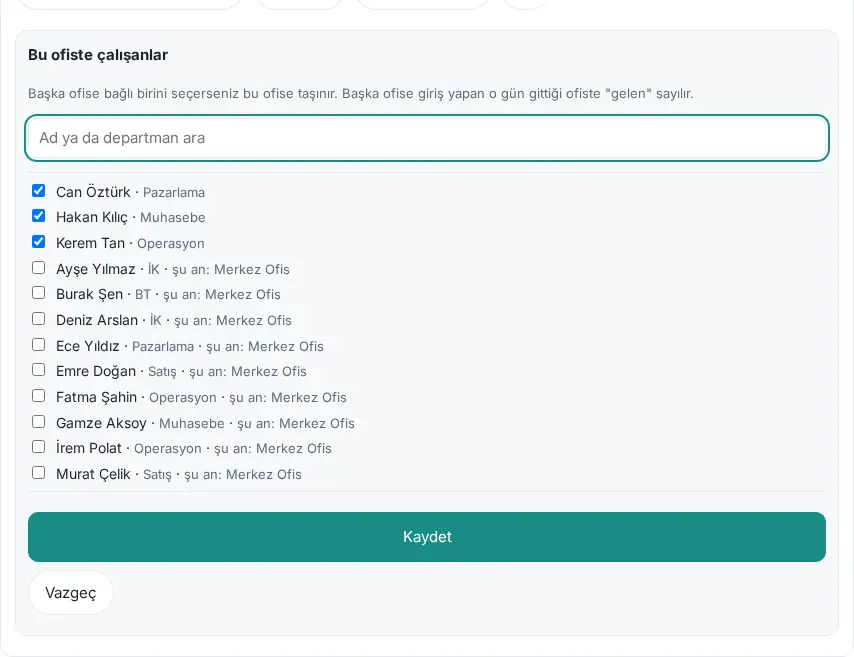
Suggestion from check-ins: If the note "Employees without an assigned office: N." shows above the saved offices, click Suggest from check-ins. The office where they checked in most in the last 30 days is suggested; check the selections and click Apply selected. If everyone is assigned, the box says "Every employee has an assigned office."
How is it counted?
- An employee with a check-in record at an office is counted as "present" at the office they went to that day; they are not counted as "absent" at their assigned office.
- An employee with only a home, remote or field record is counted as "remote" or "in the field" at their assigned office (an employee working from home is in the "remote" column).
- An employee with no record and with approved leave is counted as "on leave"; an employee with no leave either is counted as "absent" on a working day. Weekends, public holidays and holidays in the work schedule are not counted.
Important: If you select a person who is assigned to another office, the person moves to this office; a person you remove from the list is no longer assigned.
Work outside the office: from home, remote, in the field
Who: Time and attendance module admin · Where: Work locations → Working outside the office
What it does: Defines work from home, remote work and field work like offices: you select who uses them and what is required on the record.
Before you start: Out-of-office check-in (home, remote, field) must be on in the General tab.
- Under Working outside the office, find the Working from home, Remote work and In the field (at a client) cards.
- On each card, turn the work location on or off with the Open checkbox.
- Under Required on check-in, select the Location (no check-in without permission), Selfie (on check-in) and Record internet details (IP address; Wi-Fi network and MAC in the app) options.
- Under Who uses it?, select Everyone or Only selected departments and people (and those scheduled for this location that day); for the second option, select the Departments and People.
- On the On site card, also select Employees with field location check and Departments with field location check.
- Click Save.
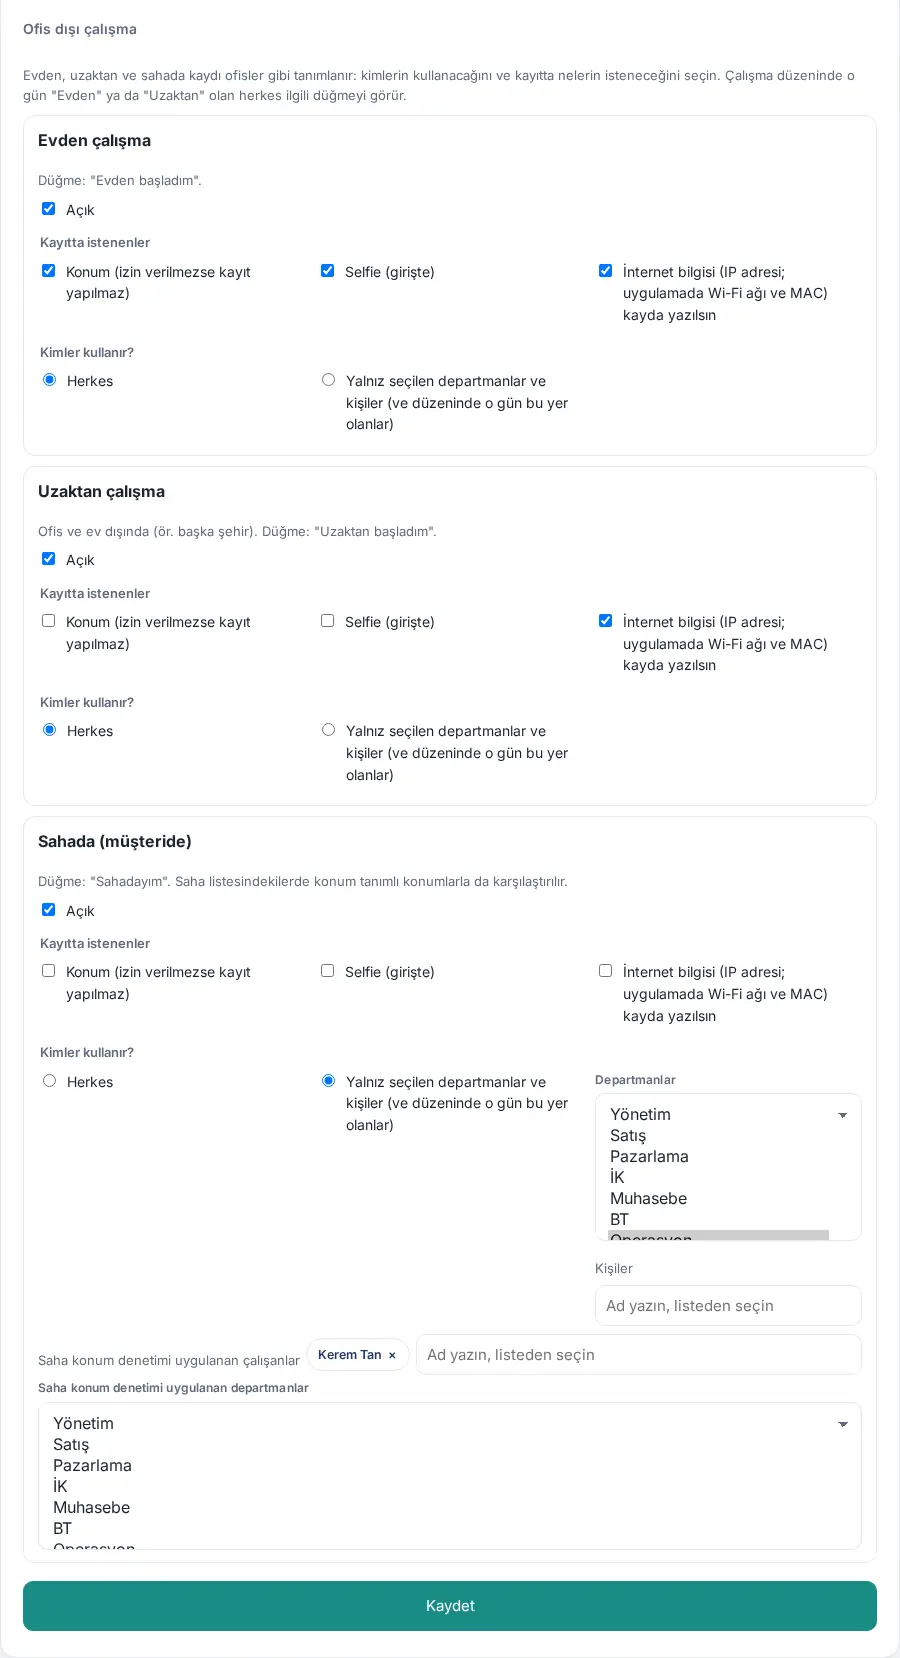
| Setting | What it does | Default |
|---|---|---|
| Open | Shows the button (Started from home, Started remotely, I'm on site) | On (all three) |
| Location (no check-in without permission) | Location is required on the record; it is stored even if general location recording is off | Off |
| Selfie (on check-in) | A selfie is asked at check-in from this location | Off |
| Record internet details (IP address; Wi-Fi network and MAC in the app) | The IP address the record came from and (in the mobile app) the Wi-Fi details are stored with the record | Off |
| Who uses it? | Everyone or the selected departments and people | Everyone |
| Employees with field location check / Departments with field location check | Location is required in the I'm on site record of these people and is compared with the defined places | Empty |
Important:
- Everyone whose work schedule says "From home" or "Remote" for that day always sees the related button; the "Only selected" setting does not leave them out.
- If you select "Only selected" for On site and select nobody, the setting is not saved: "Choose who uses "In the field" or select "Everyone"."
- An employee who tries to record from a location that is off sees the message ""From home" check-in is not available to you."
Work schedules and the assignment order
Who: Time and attendance module admin · Where: Admin → Modules → Work time → Work schedule
What it does: Defines the work type (Office, From home, Remote, Holiday) and the hours for each day of the week; you assign the schedules to the company, to departments and to people. Late arrival, early check-out, overtime, "absent", the automatic check-in window and the timesheet are calculated from the person's plan for that day.
Creating a schedule:
- Open the Work schedule tab.
- For a new schedule, click + New schedule or one of the presets: Preset: Mon–Thu office 09–17, Friday from home or Preset: Mon–Fri office 09–18.
- Type a name in the Schedule name field (e.g. "Hibrit: Pzt–Çar ofis, Per–Cum ev" — "Hybrid: Mon–Wed office, Thu–Fri home").
- For each day, select the type in the list (Office, From home, Remote, Holiday) and type the start and end times. On holidays, the time fields are disabled.
- If the hours are the same every day, fill in the first day and click Apply the first day's hours to all working days.
- Remove a schedule you do not need with Delete schedule (at least one schedule must remain).
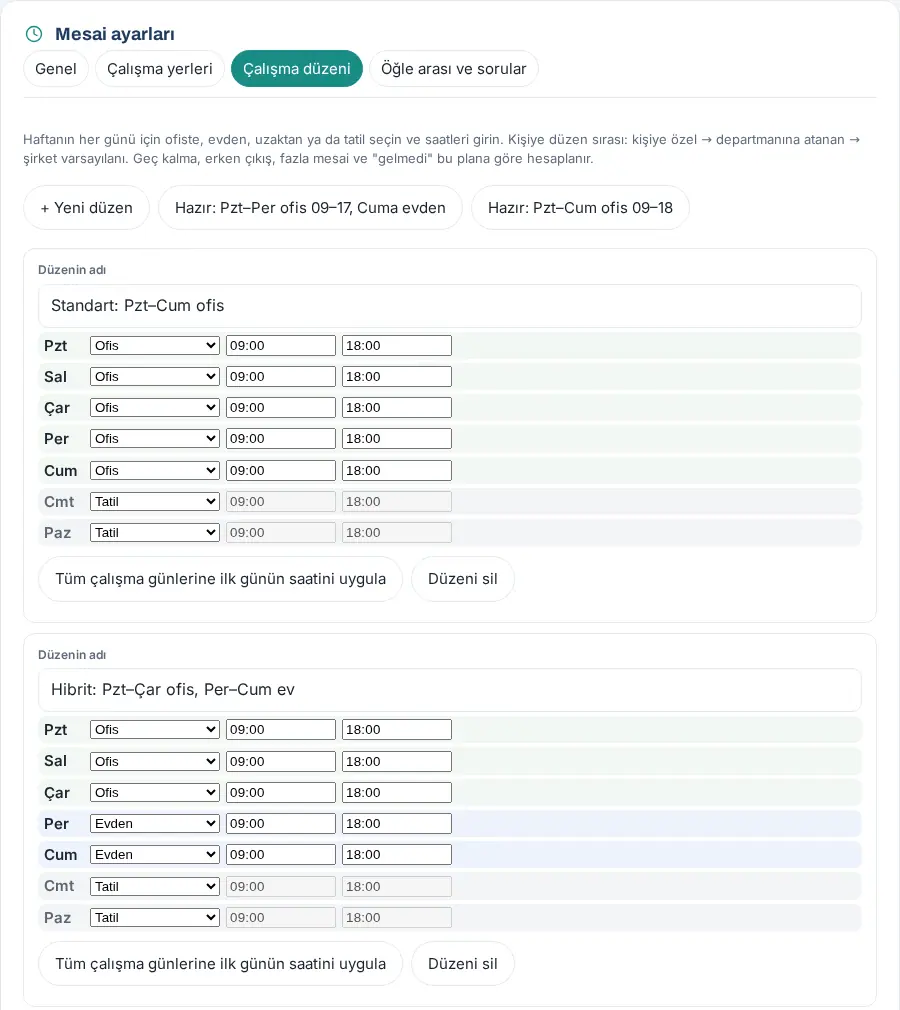
Assigning:
- At the bottom of the same tab, select the schedule in the Company default list. Everyone who has no schedule assigned to their department or to themselves uses it.
- Under By department, select a schedule for each department or leave Company default.
- Under Per person, type a name in the Add employee: type a name, pick from the list box and select it, then select the schedule in the list next to it. To remove it, click ×.
- Enter the Tolerance (min) value.
- Click Save.
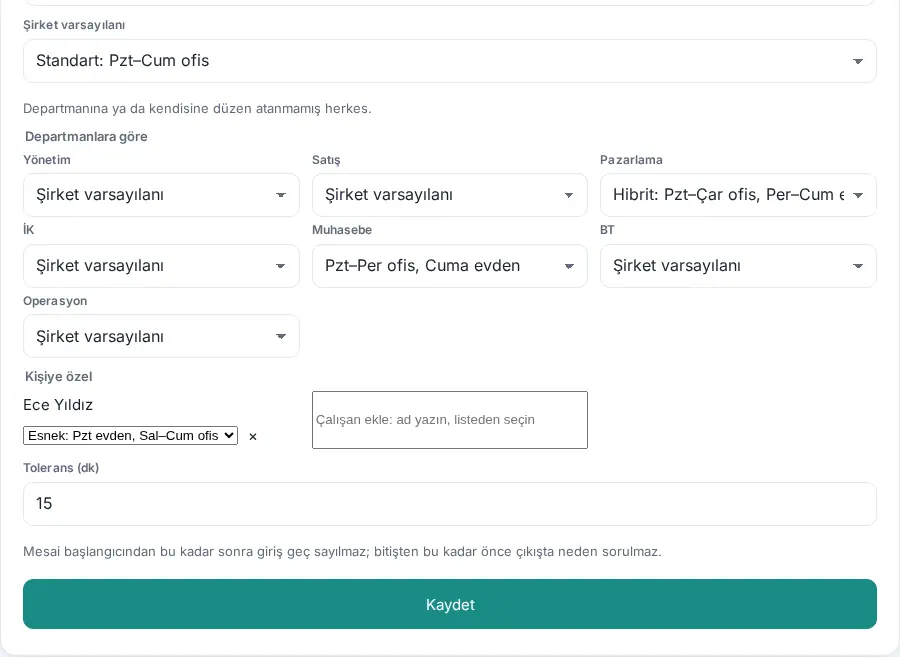
Assignment order: An employee's schedule is found in this order: per person → assigned to the department → company default. In the example, the Pazarlama (marketing) department uses the "Hibrit" schedule, but Ece Yıldız in the same department has the personal schedule "Esnek: Pzt evden, Sal–Cum ofis" ("Flexible: Mon from home, Tue–Fri office"); Ece's plan on Monday becomes "Today: working from home · 09:00–18:00".
| Setting | What it does | Default |
|---|---|---|
| Schedule name | The name that shows in lists (at most 60 characters) | — (required) |
| Day type (Office / From home / Remote / Holiday) | The plan for that day; on From home / Remote days, the related button comes first | In a new schedule, Mon–Fri Office, Sat–Sun Holiday |
| Start–end | The working hours of that day (HH:MM) | 09:00–18:00 |
| Company default | The schedule of everyone without an assignment | The first schedule ("General schedule") |
| By department | The schedule of the department | Company default |
| Per person | The schedule of the person (overrides everything) | None |
| Tolerance (min) | A check-in this long after the start is not counted as late; no reason is asked at a check-out this long before the end (0–120) | 15 |
Common errors and warnings:
- "Give every schedule a name."
- "In the "…" schedule, enter start and end times for Tuesday in HH:MM format, with the end after the start."
- "The "…" schedule must have at least one working day."
- "Unknown department: …" · "The personal schedules include an invalid employee."
Important:
- If no schedule has been saved, the "General schedule" derived from the old general setting (09:00–18:00, Mon–Fri) applies; calculations do not change in existing installations.
- Department and person assignments linked to a deleted schedule fall back to the company default.
- At most 12 work schedules are saved; schedules after the 12th are not saved, and no warning is shown.
- The tolerance and the lunch break are company-wide; they do not change by schedule. The "Working hours" option of field location tracking uses the hours of the company default schedule.
- On days shorter than 6 hours, the lunch break is not deducted; on the eve of a religious holiday, the workday ends at 13:00 at the latest.
Lunch break and questions
Who: Time and attendance module admin · Where: Admin → Modules → Work time → Lunch break and questions
What it does: Defines the lunch break and turns on the three questions asked to employees: the reason for an early check-out, the reason on a day without a check-in, and the "Have you started work?" reminder on home / remote days.
- Enter the Lunch break length (min).
- Enter the Lunch break starts and Lunch break ends times (e.g. 12:00–13:30). No reason is asked for a check-out in this window.
- Select the Ask "Why did you leave the office?" on check-out before the end of the workday checkbox and edit the Check-out reasons list.
- Select the If there is no check-in after start + tolerance, ask "Why haven't you checked in today?" (notification) checkbox and edit the Absence reasons list.
- Select the On home / remote work days, send "Have you started work?" at the start of the workday checkbox.
- Click Save.
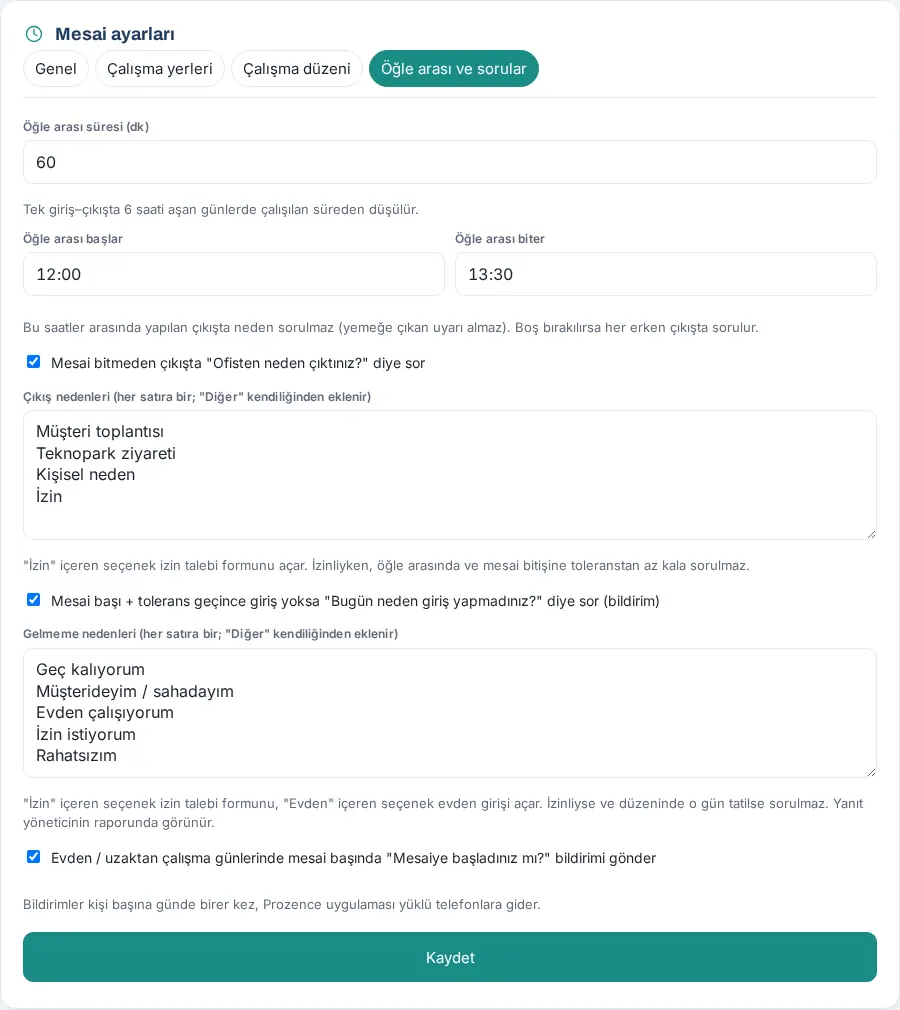
| Setting | What it does | Default |
|---|---|---|
| Lunch break length (min) | Deducted from the worked time on days with a single check-in and check-out of 6 hours or more (0–180) | 60 |
| Lunch break starts / Lunch break ends | No reason is asked for a check-out between these times; if empty, it is asked at every early check-out (at most 4 hours) | Empty |
| Ask "Why did you leave the office?" on check-out before the end of the workday | On a working day, when the end is more than the tolerance away, outside the lunch break and when not on leave, a reason is required at check-out | Off |
| Check-out reasons (one per line; "Other" is added automatically) | The options shown to the employee (at most 10); an option that contains "İzin" opens the leave request form | Müşteri toplantısı, Teknopark ziyareti, Kişisel neden, İzin |
| If there is no check-in after start + tolerance, ask "Why haven't you checked in today?" (notification) | One notification to the employee and the "No check-in today" card in the Work time box | Off |
| Absence reasons (one per line; "Other" is added automatically) | The options (at most 10); one that contains "İzin" opens the leave form, one that contains "Evden" opens the check-in from home | Geç kalıyorum, Müşterideyim / sahadayım, Evden çalışıyorum, İzin istiyorum, Rahatsızım |
| On home / remote work days, send "Have you started work?" at the start of the workday | One notification at the start of the workday to an employee whose schedule says From home / Remote for that day, who has not checked in and is not on leave. It turns on only the notification: the "Have you started work?" line in the Work time box also shows when this setting is off | Off |
Notification texts:
- Have you started work? — "Today is your work-from-home day (09:00–18:00). If you've started, check in from Work time." (on a remote day, "Today is your remote work day (…). If you've started, check in from Work time.").
- No check-in today — "Work started at 09:00. If you can't come or are running late, give a reason."
Important:
- The notifications are sent by a server task that runs every 10 minutes; once a day per person for each one. They go only to devices with the Prozence mobile app installed or with browser notifications turned on; the card in the app shows in all cases. Because a real phone notification cannot be shown in the test environment, the guide gives the texts.
- No question is asked on public holidays, on the employee's holidays or to an employee on leave. The answers show in the manager's My team view and in the Neden ("reason") column of the timesheet.
- Common errors: "Enter both the start and end of the lunch break, with the end after the start." · "The lunch break window can be at most 4 hours." · "Enter at least one check-out reason." · "There can be at most 10 absence reasons."
Setting up and protecting the QR code screen at the entrance
Who: Time and attendance module admin, IT · Where: Saved offices → office card → Open QR screen
What it does: The tablet or screen at the office entrance shows a QR code that changes every 30 seconds. When an employee scans the QR code, their time is recorded.
- On the office card, click Open QR screen. If you will open the screen on a tablet, get the link with Copy link ("Link copied.").
- Open the link on the tablet at the entrance and switch to full screen.
- The screen shows the company logo, the title Giriş–çıkış ("check-in/out"), the name of the office and the QR code: "Prozence uygulamasıyla ya da telefonunuzun kamerasıyla okutun. Kod 30 saniyede bir yenilenir." ("Scan with the Prozence app or your phone's camera. The code changes every 30 seconds.")
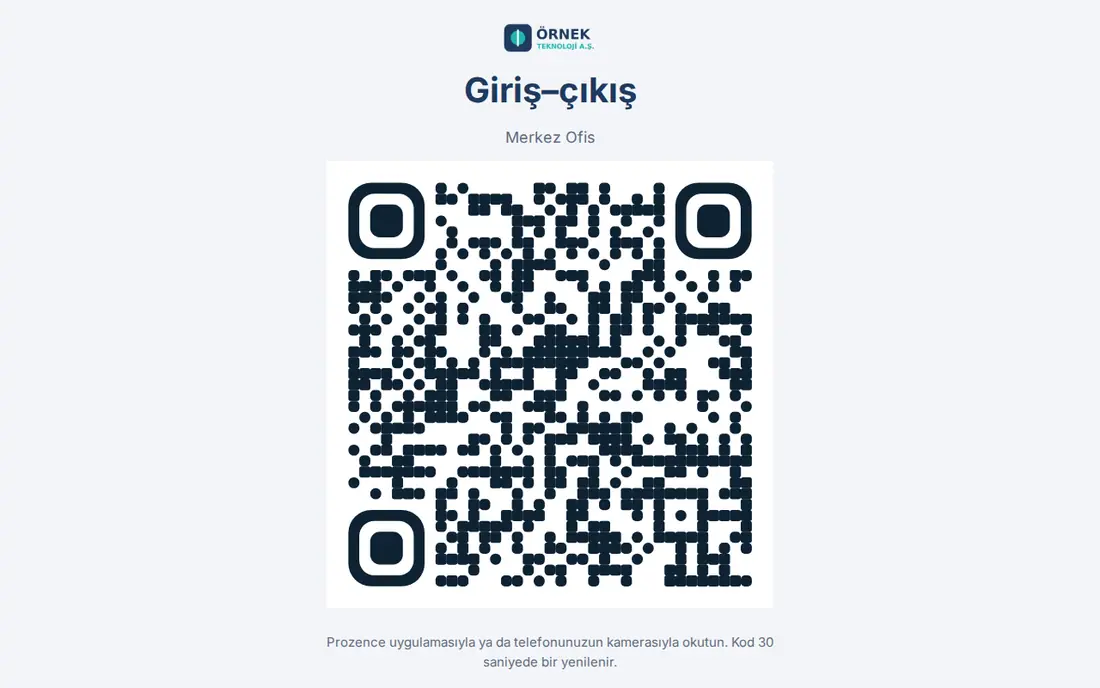
Protecting the screen: In the Protecting the QR code screen section of the General tab, set a Screen password. The tablet asks for the password the first time it opens the link, then remembers it for the How many days the screen device is remembered period. If you change the password, all screens opened with the password ask for it again; with Remove password, you go back to no password.
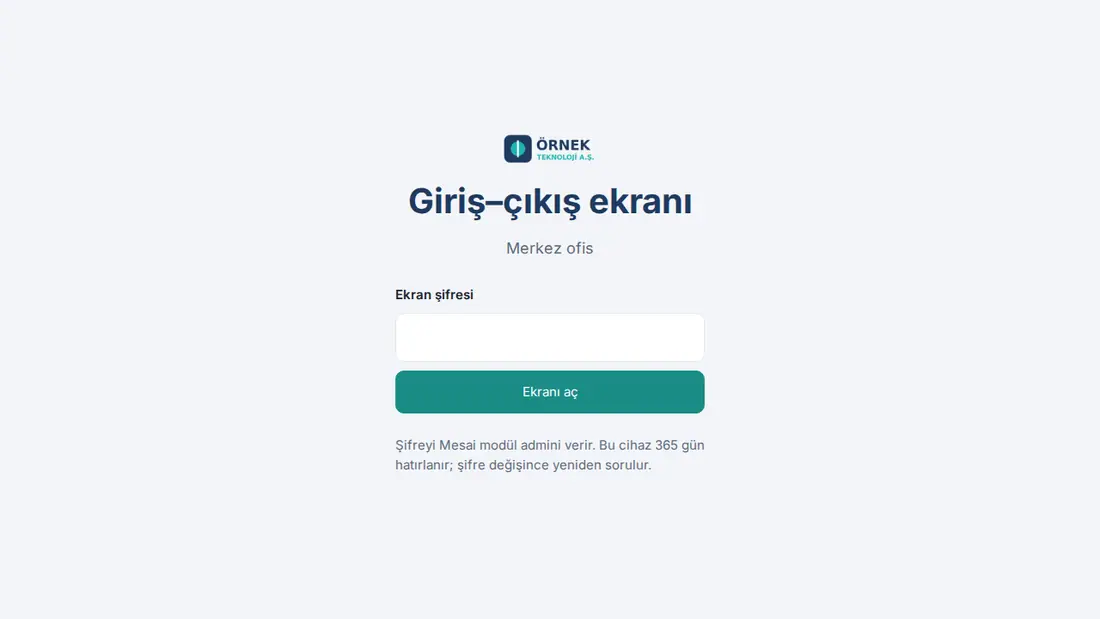
Important:
- If the connection drops, the screen shows "Bağlantı bekleniyor…" ("waiting for connection…"); check the tablet's internet connection.
- If Open the screen only from that office’s internet address (office network) is selected, the screen shows "Ekran yalnız ofis ağından açılır." ("The screen opens only from the office network.") on another network.
- If you think that the link was passed to someone else, select the Renew QR screen links on save (old links stop working) checkbox, save, and open the new link on the tablet.
Time and attendance permissions
Who: App administrator, time and attendance module admin · Where: Admin → Modules → Work time → Permissions
What it does: Assigns the attendance officers (HR), the viewers and the module admin.
- Go down to the Permissions section at the very bottom of the Work time page.
- In the role's box, type a name in the Add person… field and select it in the list; to remove a person, click ×. To give a role to a department, click + Add department.
- Click Save.
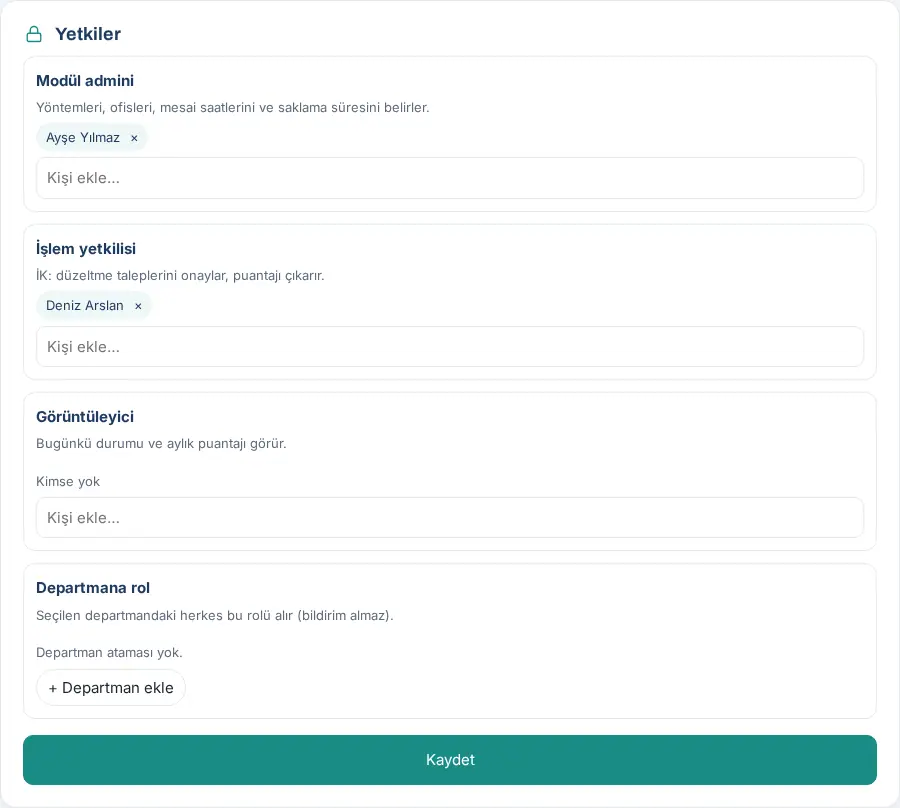
| Role | What it does |
|---|---|
| Module admin | Sets the methods, offices, working hours and retention period |
| Operator | HR: approves correction requests, produces the timesheet; manages the whole company's My team view and the consent documents for location tracking |
| Viewer | Sees today's status and the monthly timesheet (cannot see locations) |
| Role by department | Everyone in the selected department gets this role (does not get notifications) |
Timesheet and export to payroll software
Who: Time and attendance operator (HR), viewer, app administrator · Where: My Space → Work time → Timesheet
What it does: Shows the totals of the month per employee; you download a CSV file for payroll or an Excel file that fits your payroll software.
- In the Work time box, click Timesheet.
- Select the month with the ‹ and › buttons.
- The table shows the Day, Worked, Overtime, Late, Missing check-out and Workdays without record values of each employee. Click an employee's name to open their records for that month.
- For day-by-day details, click Download CSV (
puantaj-YYYY-AA.csv). - For payroll software, under Export to payroll software, select the software (General (all columns), Logo (Bordro Plus / j-HR), Mikro (Bordro / İK), Luca Bordro, Netsis (Logo Netsis HR)) and click Download Excel or Download CSV (timesheet).
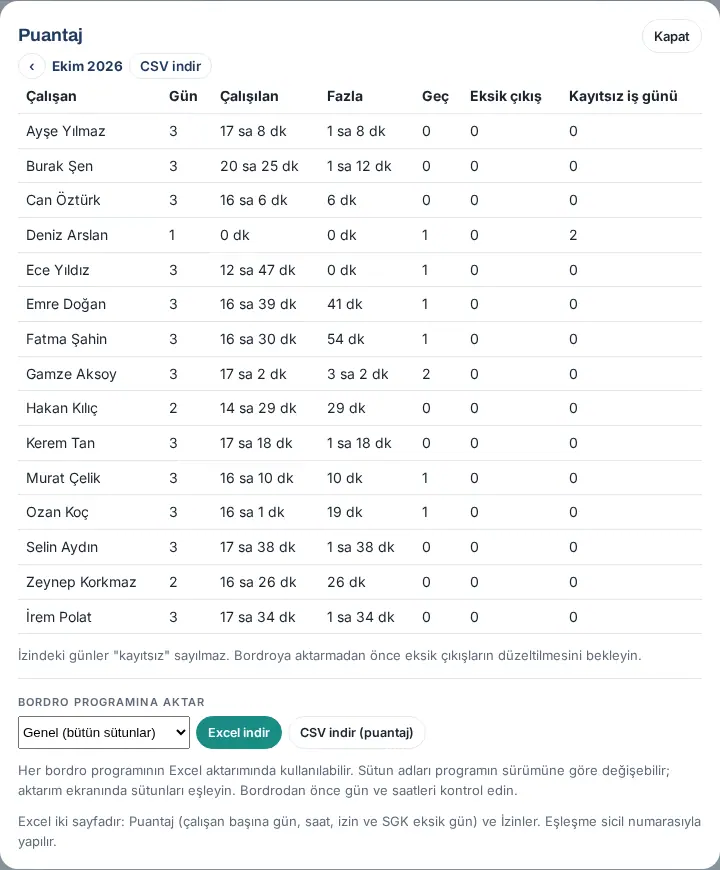
The 16 columns of the CSV file: Çalışan · Departman · Tarih · Giriş · Çıkış · Çalışılan (dk) · Fazla (dk) · Geç (dk) · Eksik çıkış · İzinde · Kayıtsız iş günü · Yer · Resmî tatil · Tatil çalışması (dk) · Plan · Neden (employee · department · date · check-in · check-out · worked (min) · overtime (min) · late (min) · missing check-out · on leave · workday without record · place · public holiday · holiday work (min) · plan · reason; the column names in the file are in Turkish). The file is UTF-8 and separated by semicolons. The Plan column shows the work schedule type of that day, and the Neden column shows the absence or check-out reason the employee gave.
The payroll Excel file has two sheets: Puantaj ("timesheet": per employee, days worked, normal / overtime / public holiday hours, absence, leave days by type, the number of SGK (Social Security Institution) missing days and the reason, SGK premium days) and İzinler ("leave"). Matching is done by the personnel number; the file has no Turkish ID (TC) number. You can also get the same file from Admin → Integrations → HR & accounting (see 13. Integrations).
Tip: For the Work time and office reports in the Reports section, see 19. Reports.
Important: Days on leave are not counted as "without record". Before you export to payroll, wait until missing check-outs are corrected. Column names can change with the version of the payroll software; match the columns on the import screen. For people who joined or left during the month, check the SGK premium days in the software.
Location tracking (field) settings and consent documents
Who: Time and attendance module admin, app administrator; for the consent document, the time and attendance operator (HR) · Where: Admin → Modules → Work time → Location tracking (field)
What it does: Turns on location collection, during working hours, for field employees with the Prozence mobile app on their company phone; sets who is tracked, during which hours, at which interval and how long the data is kept. You follow the explicit consent and the signed consent document here.
Before you start: Location tracking is part of the time and attendance module; it does not work if the module is off. To show stops with an office name, enter the latitude, longitude and radius of the offices.
- On the Work time page, go down to the Location tracking (field) section. The yellow box at the top summarizes the rules of KVKK (Turkey's personal data protection law): "Data protection (KVKK): tracking does not start without the employee’s written explicit consent."
- Select the Location tracking on checkbox.
- Type names in the Employees to track box and select them; if you want, select from Departments to track (several with Ctrl / Cmd).
- Select the Tracking hours and enter the other values (see the table).
- Edit the Consent text and Privacy notice drafts for your company (company title, address, contact address for requests).
- Click Save.
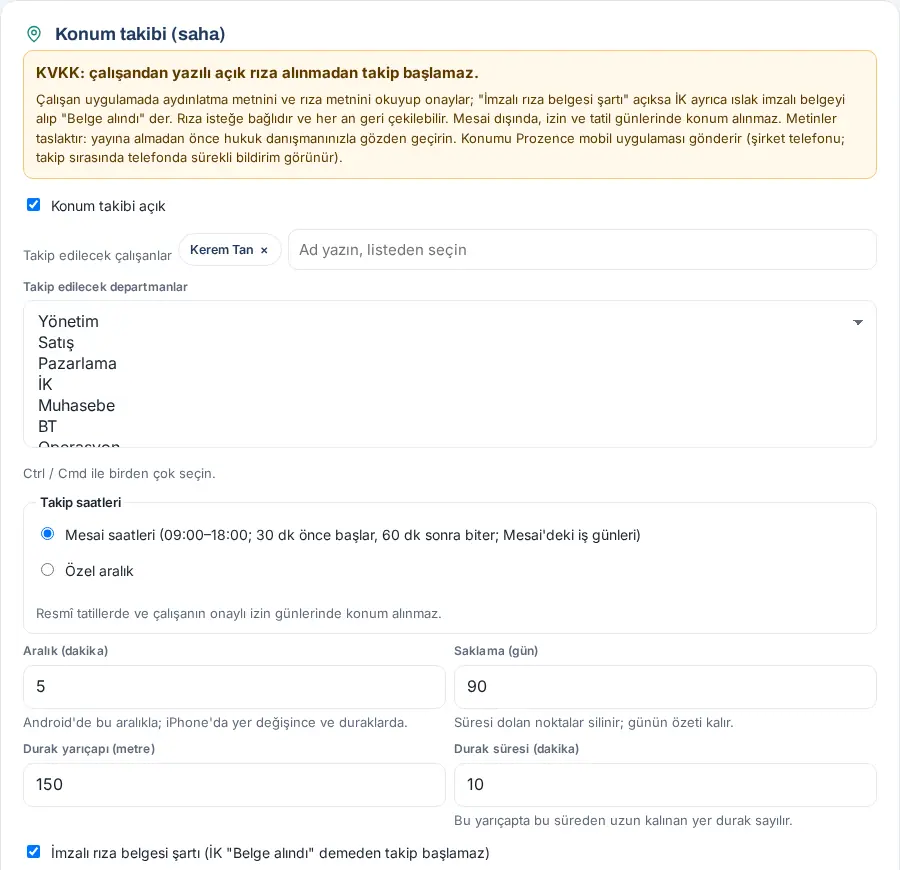
| Setting | What it does | Default |
|---|---|---|
| Location tracking on | Turns on tracking | Off |
| Employees to track / Departments to track | Who is tracked | Empty |
| Tracking hours → Working hours | The hours of the company default schedule (starts 30 min earlier, ends 60 min later) and the working days | Selected |
| Tracking hours → Custom range | Start, end and days | 08:00–19:00, Mon–Fri |
| Interval (minutes) | How often the location is collected (on Android, at this interval; on iPhone, when the location changes and at stops) | 5 |
| Retention (days) | Points older than this are deleted; the summary of the day remains | 90 |
| Stop radius (metres) / Stop time (minutes) | A place where the person stays within this radius for longer than this time counts as a stop | 150 / 10 |
| Signed consent form required (tracking does not start until HR clicks "Form received") | Tracking does not start until a document with a wet signature is received | On |
| Consent text / Privacy notice | The texts the employee confirms; Reset consent text to default / Reset information notice to default returns to the draft. When the consent text changes, all employees confirm it again | Draft text |
Marking the signed consent document (HR):
- In the Tracked employees table at the bottom of the section, the Explicit consent, Signed form and Devices status of each employee shows.
- After the employee gives consent in the app, get the document with a wet signature and click Form received in the row. The status becomes Consent complete. If it is wrong, click Remove.
- To remove a device (e.g. a lost phone), click × next to the device. Route opens the employee's day.

Important:
- Consent is optional; tracking does not start for an employee who does not give it, and this must have no negative consequence. The employee can withdraw consent at any time.
- The consent and privacy notice texts are drafts; before you turn on tracking, review them with your legal adviser.
- The location is visible to the person, the line manager and the time and attendance operator; viewers cannot see it. Each view is recorded.
- The Prozence mobile app sends the location; sending the location in the background needs a real device. The route in this guide is made of fictional points.