18. Expense management and accounting
Screenshots show the Turkish interface of Prozence with fictional "Örnek Teknoloji A.Ş." data; the English interface has the same layout.
This chapter is for the administrators who set up the expense module and for the accounting team that processes expenses: turning on the module, categories and approval rules, business advance and per diem (harcırah) policy, accounting approval, payment, advance closing, export to accounting software, and the report. For the employee side, see 17. Expenses, business advances and per diem.
In this chapter
- Giving roles
- Turning on the expense module and categories
- Additional approvers and amount thresholds
- Rules (items without a receipt, limit, duplicate document)
- Advance policy (business advance)
- Per diem policy
- Accounting accounts and software template
- Receipt reading and storage
- Private folders
- Accounting approval and payment
- Closing an advance (business advance)
- Exporting to accounting software
- Expense report
Giving roles
Who: App administrator · Where: Admin → People and permissions → Module permissions → Expense
What it does: Sets who does what in the expense module.
| Role | What it does |
|---|---|
| Module admin | Sets the categories, approval rules, policies and accounting templates. |
| Operator (accounting) | Gives the final approval, marks as paid, closes advances, gets the journal entry file and Excel, sees receipt images. |
| Viewer | Sees the expense report and list; cannot see receipt images. |
The first step of the approval chain is the employee's manager in the organization chart (if the manager is on leave, the person covering also approves). If no manager is defined, this step is skipped and the expense goes to the additional approvers or straight to accounting. For the role table, see 10. Administration and setup.
Important: If nobody has the accounting role, accounting approval goes to Admins. For separation of duties: a person who approved an earlier stage cannot give accounting approval for the same expense if there is another accountant.
Turning on the expense module and categories
Who: Module admin · Where: Admin → Modules → Expense
- Open the Expense settings screen.
- Tick the Expense module on (employees can enter expenses) box.
- In the Categories table, edit these for each row:
- Name
- Expense account (e.g. 770.01)
- VAT rate
- Per-transaction limit (TRY)
- Receipt required
- Non-deductible (KKEG: an expense that is not deductible under Turkish tax law)
- For a new category, click + Category; to delete one, click Remove.
- At the bottom, click Save settings.
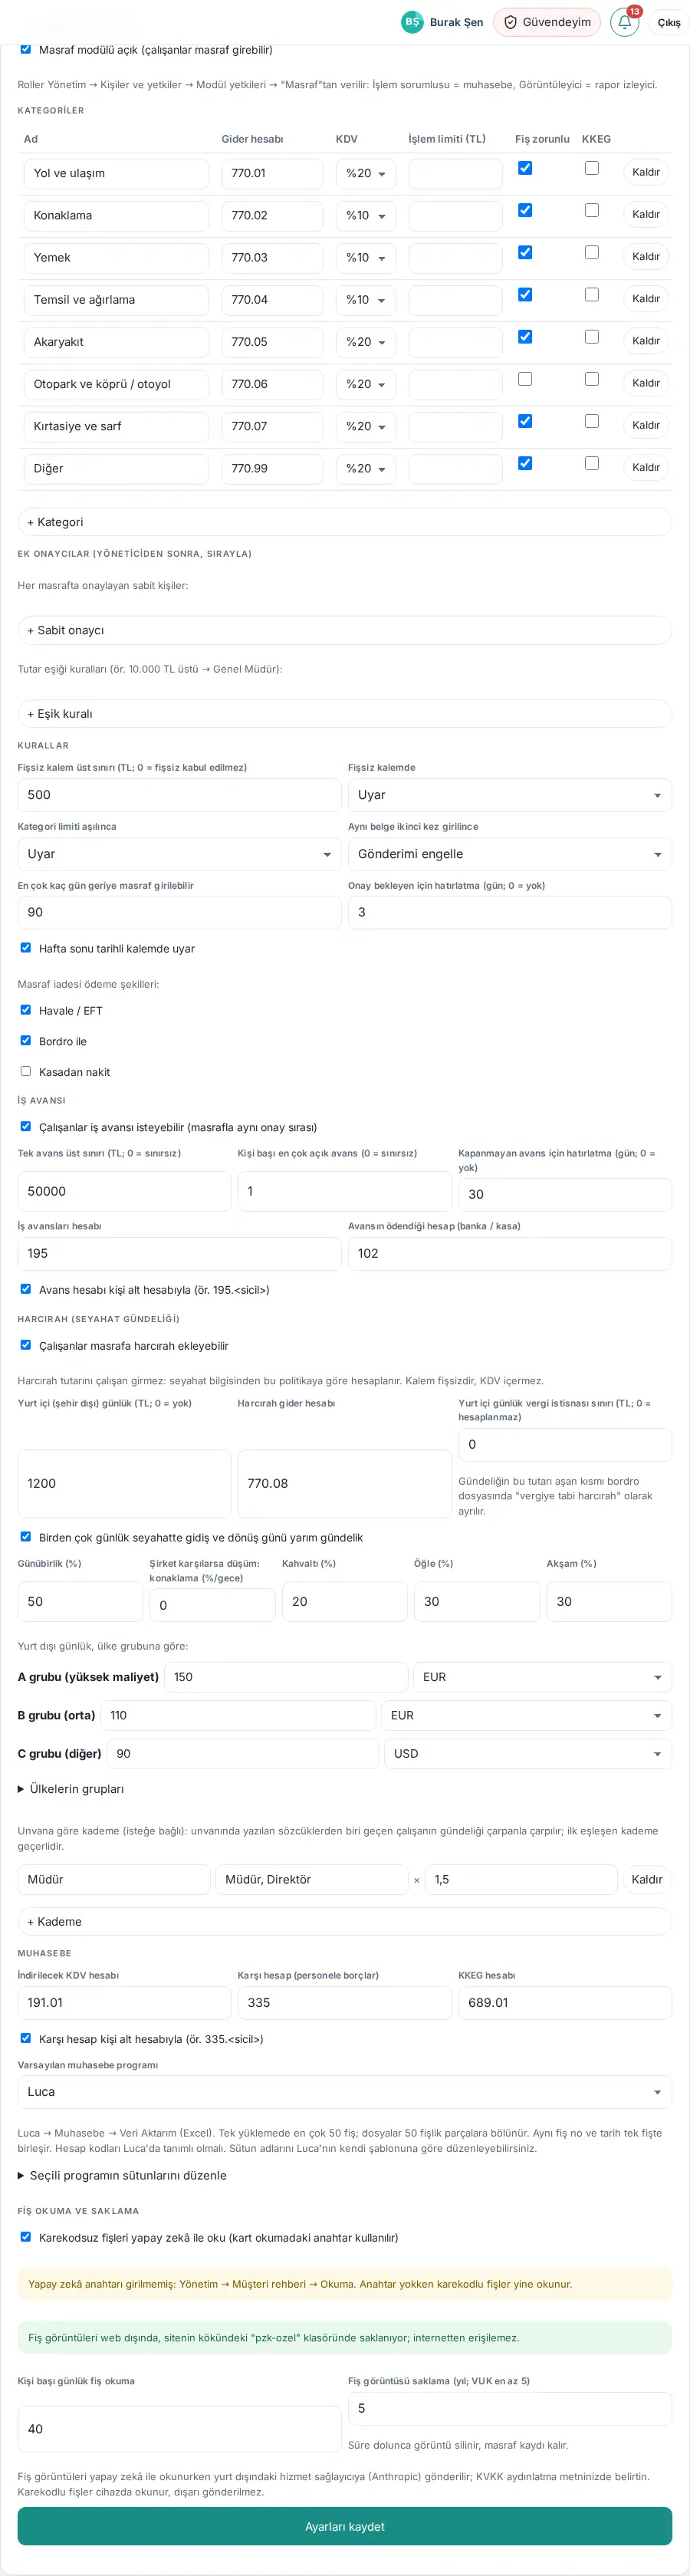
Tip: The default categories are: Travel and transport, Accommodation, Meals, Entertainment and hospitality, Fuel, Parking and tolls, Stationery and supplies, Other. Harcırah (gündelik) ("per diem" system category) is a system category; it does not show in the table, and its account comes from the Per diem section.
Additional approvers and amount thresholds
Who: Module admin · Where: Expense settings → Additional approvers (after the manager, in order)
- With + Fixed approver, add the people who approve every expense after the manager (e.g. the budget owner).
- With + Threshold rule, add an approver that depends on the amount (e.g. above 10.000 TL → General Manager).
- Click Save settings.
The approvers get a notification and an email in order; when the reminder period in the Rules section ends, they get one reminder.
Rules (items without a receipt, limit, duplicate document)
Who: Module admin · Where: Expense settings → Rules
| Setting | Meaning |
|---|---|
| Max. amount without receipt | An item without a receipt above this amount triggers the rule (0 = items without a receipt are not accepted). Applies only to categories marked Receipt required. |
| For items without receipt | Warn or Block submission. |
| When a category limit is exceeded | Warn or Block submission. |
| When the same document is entered twice | Duplicate document: if the ETTN (unique ID of the e-invoice) or the VKN (tax ID number) + document number + amount are the same. |
| How many days back expenses can be entered | An expense with an item older than this cannot be submitted (this rule cannot be overridden with an explanation). |
| Reminder for pending approvals | Number of days; 0 = no reminder. |
| Warn on weekend-dated items | If ticked, gives a warning. |
| Reimbursement payment methods | The methods the employee can select: Bank transfer, Via payroll, Cash from petty cash. |
For rules set to "Warn", the employee can submit by writing an explanation; the approvers see the explanation.
Advance policy (business advance)
Who: Module admin · Where: Expense settings → Business advance
- Tick the Employees can request business advances (same approval order as expenses) box.
- Enter the Maximum per advance (TRY; 0 = no limit).
- Enter the Maximum open advances per person (0 = no limit). The default is 1: an employee who has an advance that is not closed cannot request a new one.
- Enter the Reminder for unclosed advances (days; 0 = none). The default is 30.
- Check the accounting accounts:
- Business advances account (default 195);
- Account the advance is paid from (bank / cash) (default 102);
- Advance account with a sub-account per person (e.g. 195.<ID>).
- Click Save settings.
Per diem policy
Who: Module admin · Where: Expense settings → Per diem (travel allowance)
What it does: You define the daily allowance amounts once, as company policy. The employee does not write an amount; the server calculates it from the trip information.
- Tick the Employees can add per diem to expenses box.
- For domestic trips, enter:
- Domestic daily rate (TRY; 0 = none);
- Per diem expense account (default 770.08);
- if required, the Domestic daily tax-exempt limit. The part of the daily allowance above this limit is shown separately as "taxable per diem" in the payroll file.
- Set the day calculation:
- On multi-day trips, departure and return days are half days;
- Same-day trip (%).
- Enter the Deduction if covered by the company percentages: accommodation (%/night), Breakfast, Lunch, Dinner.
- For trips abroad, enter the daily amount and currency (EUR, USD, GBP, CHF, TL) for Group A (high cost), Group B (medium) and Group C (other).
- In the Country groups section you can change the group of a country. The initial groups are only suggestions.
- Optional: add a Level by job title (+ Level). Enter the name of the level, the words to look for in the job title (comma-separated, e.g. "Müdür, Direktör") and the multiplier (e.g. 1,5). The first matching level applies.
- Click Save settings.
Important: The amounts are your company's own policy; legal amounts are not retrieved automatically. Check the tax exemption limit every year.
Accounting accounts and software template
Who: Module admin · Where: Expense settings → Accounting
- Check the codes of the Input VAT account (default 191.01), Offset account (payable to employees) (335) and Non-deductible expense account (689.01).
- If necessary, tick the Offset account with a per-person sub-account (e.g. 335.<employee no.>) box.
- Select the Default accounting software: Luca, Luca (invoice import, CSV), Logo, Mikro, Zirve, ETA, Paraşüt, QuickBooks Online, Xero, DATEV or Generic (CSV / Excel).
- To match the column names to your software's template, click Edit the selected software's columns. With Reset to preset, you go back to the defaults.
Tip: In Luca, Muhasebe → Veri Aktarım (Excel) (Accounting → Data Import (Excel)) is used; because one upload takes a maximum of 50 entries, the file is split into parts of 50 entries.
Receipt reading and storage
Who: Module admin · Where: Expense settings → Receipt reading and storage
- Read receipts without QR code with AI: the AI key from card reading is used. Receipts with a QR code are read on the device, also without a key.
- Receipt readings per person per day limit.
- Receipt image retention (years; at least 5 under Turkish tax law): when the period ends, the image is deleted and the expense record stays.
- The screen shows the status of the receipt folder. If the images are outside the web root, or the server blocks outside access to the folder, a green check mark shows. If not, two solutions are shown: define
PZK_OZEL_DIZINor ask the hosting company for an Nginx rule. Below it, the Diagnosis list shows why the folders outside the web root (the "private" and "pzk-ozel" folders in the site root, andPZK_OZEL_DIZINif defined) cannot be used (for example "not found", "no write permission", "outside the PHP access restriction (open_basedir)"); you can send this list to your hosting support. If all folders outside the web root are "outside the PHP access restriction (open_basedir)", thePZK_OZEL_DIZINoption is not shown, because it does not work on that server; only the hosting rule is suggested (0.95.2). Try again repeats the access check and also searches the folders outside the web root again at once; if a usable folder is found, the receipts are moved there (0.95.1).
Important: Receipts read with AI are sent to a service provider outside Türkiye (Anthropic); state this in your KVKK (Turkey's personal data protection law) privacy notice.
Private folders
Who: Module admin · Where: Expense settings → Receipt reading and storage → Private folders
What it does: Prozence keeps some files in its own folders inside the site's uploads folder and shows them only through the app: receipt images, scanned business cards, announcement and policy attachments, company board photos, Zoom upload files, request, parcel and OHS report photos, and payslips (0.97.0). Direct internet access to these folders must be blocked. On servers that run Apache, Prozence does this itself. On servers that run Nginx (for example Kinsta), the hosting company must add a rule.
- In the expense settings, look at the Private folders list. Each folder shows its status: "outside access blocked (tested)", "can be opened from outside (tested)", "could not be tested" or "no files yet". Prozence puts a temporary file in each folder, requests it from its own address and deletes it at once; the result is kept for one day.
- If all folders are blocked, the list is green; there is nothing to do.
- If a folder is open or could not be tested, a ready-made Nginx rule shows below. Click Copy rule and send it to your hosting company (Kinsta: support chat). The rule also covers folders that have no files yet.
- After the rule is added, click Try again. The statuses should be "outside access blocked (tested)".
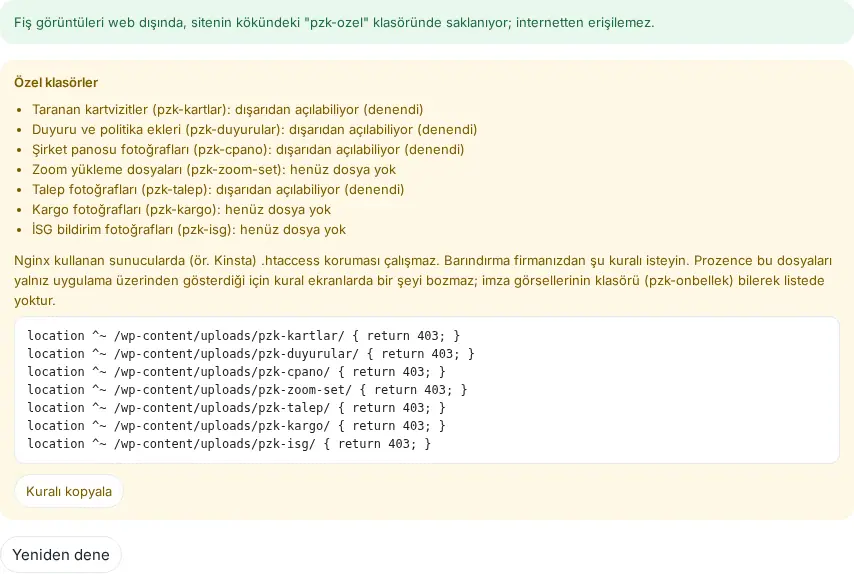
Tip: The rule does not break any screen: Prozence shows these files only through the app. Since 0.95.2, request, parcel and OHS photos also open through a signed app address; someone who is not signed in cannot see them, even with the address.
Important:
- The signature images folder (pzk-onbellek) is intentionally not listed; the photos and banners in signatures must be public in emails. Make sure the hosting company does not block the whole uploads folder.
- On Kinsta, if a backup taken before the rule is restored, the rule is removed. In that case, ask for the rule again.
Accounting approval and payment
Who: Accounting (operator) · Where: My expenses → Accounting
- In the My expenses box, tap Accounting.
- Select the filters and click Apply:
- Start month and End month;
- Status (e.g. With accounting (awaiting you), Ready for payment, All (incl. rejected and cancelled));
- Type (Expenses and advances, Expenses only, Advances only);
- Department and Category;
- Only those not yet exported to accounting.
- Open an expense that waits for your approval. If necessary, correct the Account code and the Non-deductible mark of the items, then click Approve (ready for payment) (for an expense linked to an advance, the button is Approve (offset against advance)). The expense becomes Ready for payment.
- After you make the payment, open the expense, select the payment date and method, and click Mark as paid. The employee gets a "Your expense has been paid" notification. For a business advance, the button is Mark advance as paid; the advance becomes Paid out (open).
- If you marked it by mistake, use Undo paid mark.
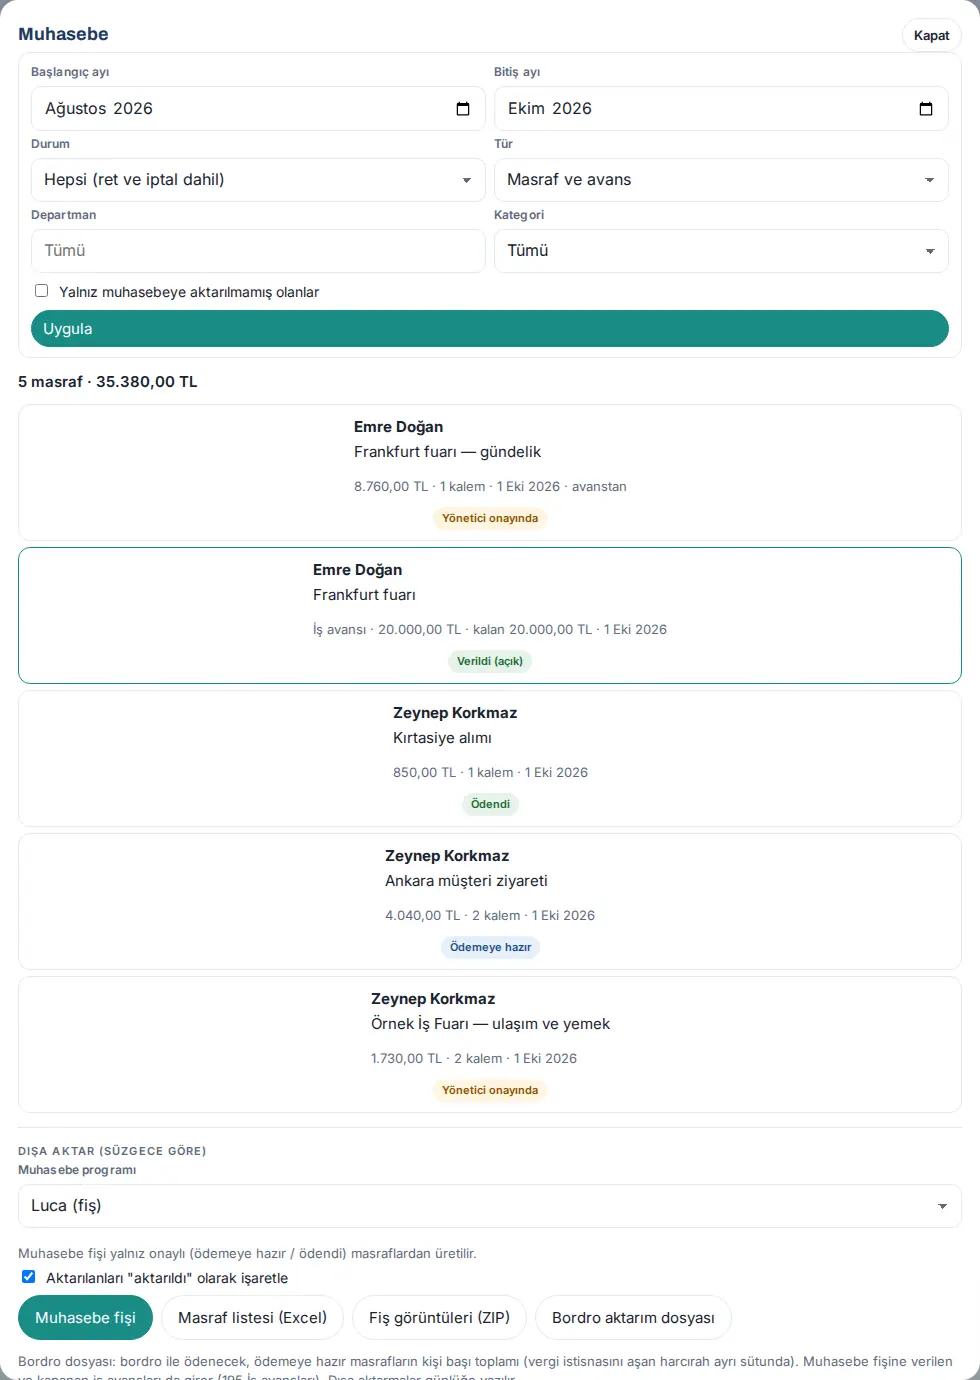
Important: An expense offset against an advance is not marked "paid" manually; when the advance closes, it becomes "paid (offset against advance)" automatically.
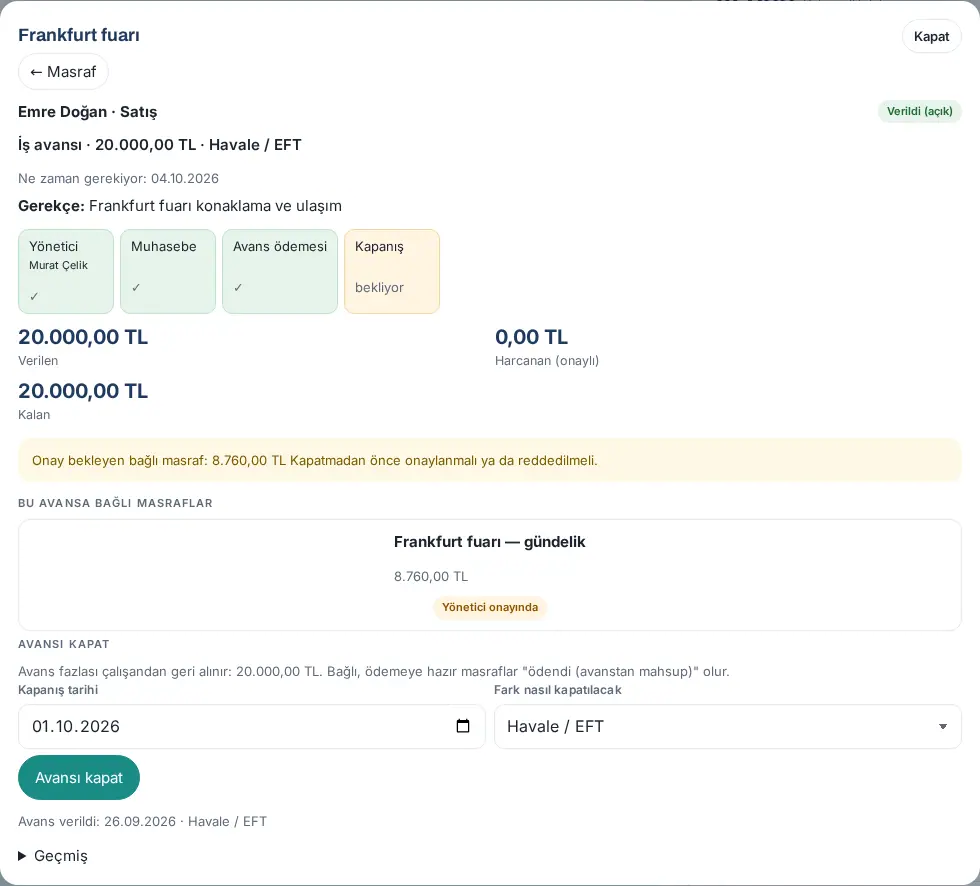
Closing an advance (business advance)
Who: Accounting · Where: Accounting → open the advance → Close advance
What it does: Deducts the employee's expenses linked to the advance from the advance and settles the difference.
- On the Accounting screen, select Type = Advances only and Status = Paid / advance paid out (open), then click Apply.
- Open the advance. The Paid out, Spent (approved) and Remaining amounts show at the top, and Expenses linked to this advance show below.
- If a linked expense waits for approval, finish it first; closing is not possible while it waits.
- In the Close advance section, select the Closing date and How to settle the difference (Bank transfer, Cash, Payroll).
- Advance higher than expenses: the difference is taken back from the employee.
- Expenses higher than advance: the difference is paid to the employee.
- Click Close advance. Linked expenses that are ready for payment become "paid (offset against advance)"; the advance changes to Closed status.
In the journal entry:
- Payment of the advance:
195.<kişi>debit /102credit. - Offset account of an expense linked to the advance:
195.<kişi>. - Closing difference:
- advance higher than expenses:
102(for payroll deduction335.<kişi>) debit /195credit; - expenses higher than advance:
195debit /335.<kişi>credit.
- advance higher than expenses:
Exporting to accounting software
Who: Accounting · Where: Accounting → Export (by filter)
- On the Accounting screen, select the filters and click Apply.
- Select the Accounting software.
- To prevent exported items from coming again, keep the Mark exported items as "exported" box ticked.
- Click the file you need:
- Journal entry file: only from approved expenses (ready for payment / paid); debit = credit.
- Expense list (Excel): includes the type, advance number and taxable per diem columns.
- Receipt images (ZIP).
- Payroll export file: the total per person of the expenses to be paid via payroll; taxable per diem in a separate column.
- Upload the file to your accounting software. Exports are written to the log.
Expense report
Who: Accounting, viewer, module admin, managers (their own teams only) · Where: My expenses → Report (Reports → Expense → Management) → Detailed report
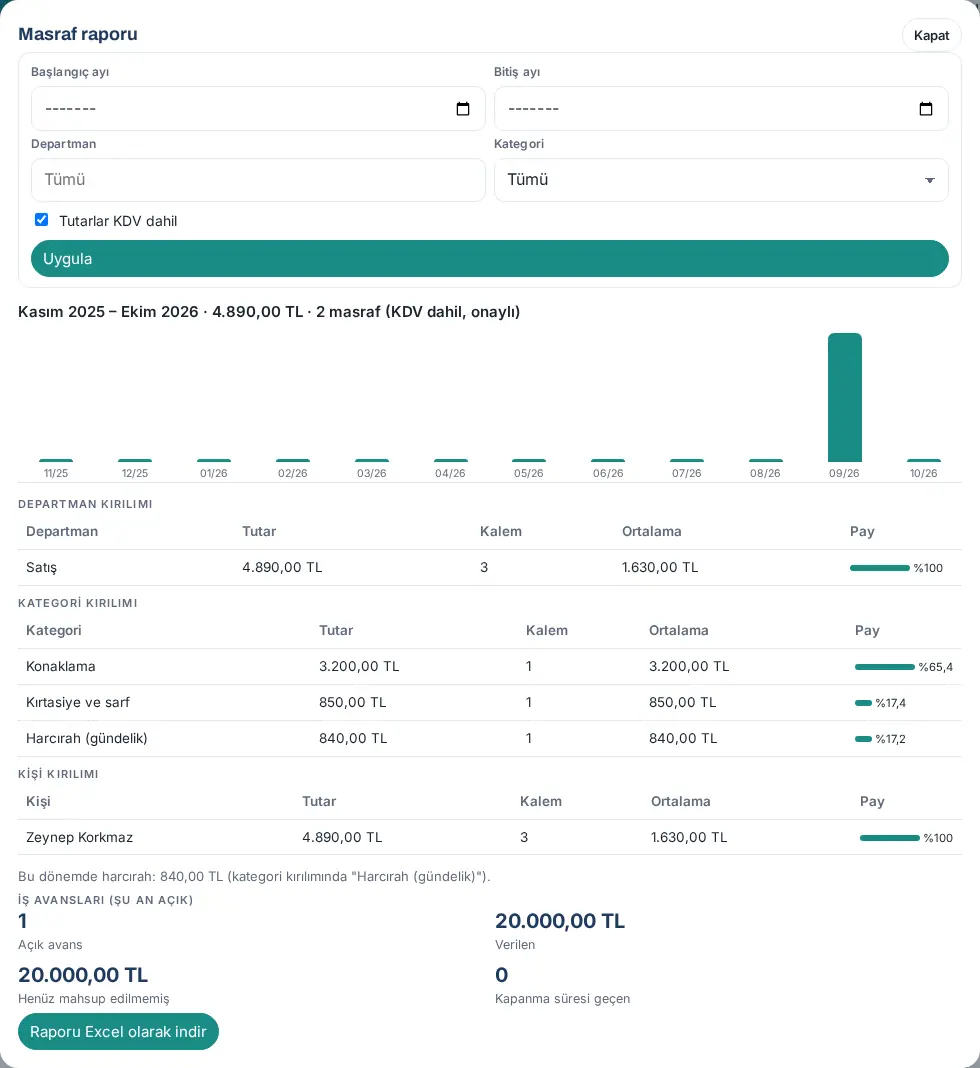
- Tap Report. Reports → Expense → Admin opens: period, department and person filters, summary, monthly chart and CSV tables (see 19. Reports). For the detailed report with Excel, tap Detailed report and select a period.
- A monthly chart; breakdowns by department, category and person; and amounts including / excluding VAT show. A business advance summary (open, paid out, overdue) and the per diem total are shown separately; advances do not count as expenses.
- With Download report as Excel, you get each breakdown on a separate sheet.