32. Shuttle, meal, visitor and emergency management
Screenshots show the Turkish interface of Prozence with fictional "Örnek Teknoloji A.Ş." data; the English interface has the same layout.
This chapter is for the people who manage the shuttle, canteen, meeting room, visitor, emergency, occupational health and safety (OHS, İSG) and occupational physician services. It describes turning on the modules, their settings, giving roles and the daily management tasks of the managers. What each setting does and its default value are given in a table.
Who: Admin · Services manager · Shuttle manager · Meals manager · Booking and visitors module admins · Emergency responder · OHS officer
For the screens that employees see, see 25. Shuttle and canteen, 26. Meeting rooms and visitors and 27. Emergencies, occupational safety and the occupational physician. For reports, see 19. Reports.
In this chapter
- Opening Services management
- Turning on service modules (General)
- Assigning roles: shuttle manager, meals manager, canteen attendant, reception
- Defining shuttle routes
- Monitoring today's trips
- Driver link and notices to passengers
- Entering the meal menu
- Monitoring lunch attendance and menu ratings
- Canteen entry settings
- Booking resources and rules
- Google Calendar sync
- Visitor settings, welcome and sign-out
- Editing the emergency plan
- Emergency response teams and drills
- Starting an I’m Safe check-in
- Monitoring and ending the check-in board
- Assembly points and I’m Safe settings
- Safety report settings
- Handling near-miss and hazard reports
- Adding a physician and appointment settings
Opening Services management
Who: Admin, services manager, service module admins · Where: Admin → Modules → Services
What it does: The shuttle, meal, vehicle, request, mailroom, booking and visitor settings are on one screen, in separate sub-tabs.
- In the menu on the left, click Admin.
- In the Admin menu, click Services in the Modules group.
- Select one of the sub-tabs at the top: General, Requests, Mailroom, Booking, Visitors, Meals, Shuttle, Vehicle, Permissions.
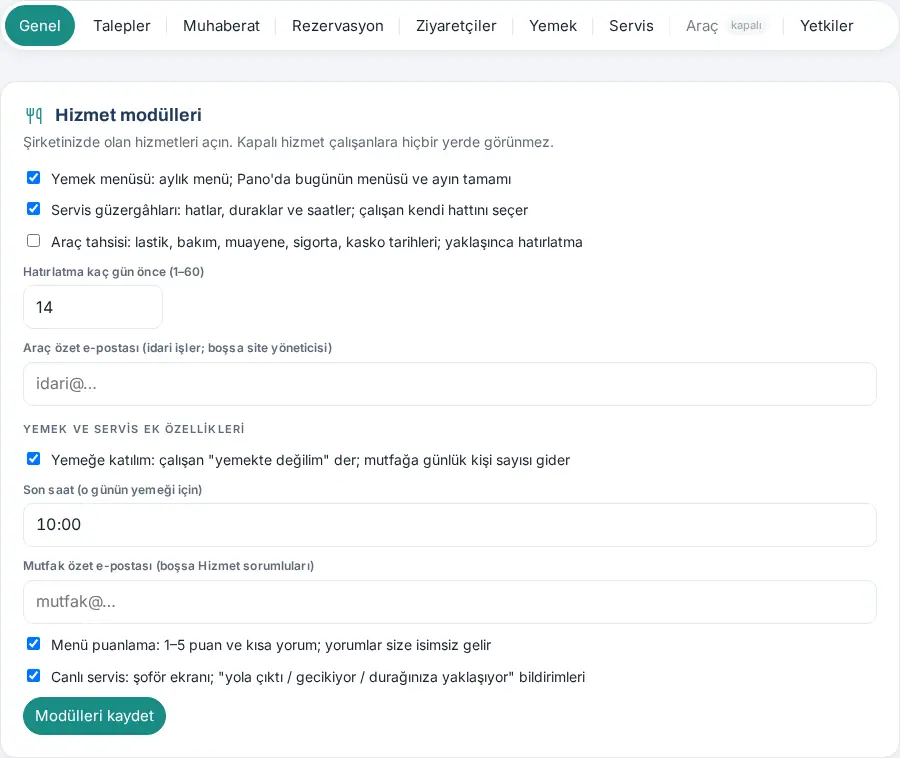
Who sees what:
- The Admin and the services manager see all sub-tabs.
- The admin of a module (e.g. the shuttle manager, the meals manager) sees only their own sub-tab and Permissions.
- The tab of a service that is off is dimmed and has the "off" label; you can open its settings, and to turn it on, use the General tab.
- The sub-tab you select is remembered during the session. You can also move between the tabs with the arrow keys.
On a phone: Tap Profile → the Admin strip, then select Services.
Tip: The emergency plan and I’m Safe are not on this screen; they are managed from the Emergency and I’m Safe buttons in the top bar. OHS and the occupational physician are in Admin → Modules → OHS.
Turning on service modules (General)
Who: Admin, services manager · Where: Admin → Services → General
What it does: You turn on the services your company has. A service that is off is not visible to employees anywhere.
- On the General tab, in the Service modules section, select the modules you want to turn on.
- Under Extra meal and shuttle features, select the optional features.
- Click Save modules.
| Setting | What it does | Default |
|---|---|---|
| Meal menu: monthly menu; today’s menu and the whole month on the Board | Turns on the Meal menu box. Canteen entry also depends on it. | Off |
| Shuttle routes: routes, stops and times; employees pick their own route | Turns on the Shuttle box. | Off |
| Company vehicles: tyre, service, inspection and insurance dates; reminders as they approach | Turns on the My vehicle box for the employee who is given a company vehicle. | Off |
| Remind how many days before (1–60) | How many days before the vehicle dates the reminder goes out. | 14 |
| Vehicle summary email (administration; site admin if empty) | The address the vehicle summary goes to. | Empty |
| Lunch attendance: employees say "not at lunch"; the kitchen gets a daily headcount | Turns on the Lunch attendance section for employees. | Off |
| Cut-off time (for that day’s lunch) | The latest time at which attendance for that day can be changed. | 10:00 |
| Kitchen summary email (if empty: service managers) | The address the day's expected headcount goes to at the cut-off time. | Empty |
| Menu rating: 1–5 stars and a short comment; comments reach you anonymously | Turns on the Rate the menu section for employees. | Off |
| Live shuttle: driver screen; "departed / delayed / approaching your stop" notifications | Turns on the driver link, the shuttle notifications and the "not riding" and "ride another shuttle" features. | Off |
Tip: Requests, mailroom, booking and visitors are turned on with the first box on their own tabs.
Assigning roles: shuttle manager, meals manager, canteen attendant, reception
Who: Admin, services manager · Where: Admin → Services → Permissions
What it does: For each service module, you decide who manages it, who does the daily work and who only views it.
- Open the Permissions sub-tab. Each module has its own section.
- Type the person's name in the box of the role and select them in the list. To remove a person, click × next to their name.
- To give a role to everyone in a department, click + Add department (a role given to a department does not get notifications).
- Click the Save button of the section.

| Module | Role | What it does |
|---|---|---|
| Services (meals, shuttle, cars and service modules) | Module admin | Services manager: manages the whole Services tab. |
| Shuttle | Module admin | Shuttle manager: manages the routes, stops, number of seats and driver links; sees today's trips and sends notices to passengers. |
| Meals and canteen | Module admin | Meals manager: manages the menu, lunch attendance and the canteen settings; sees the report. |
| Operator | Canteen attendant: opens the day's entry, shows the QR code screen, adds a person without a phone manually. | |
| Viewer | Sees the canteen report. | |
| Room and parking booking | Operator | Reception: sees the guest list, cancels other people's bookings; gets guest notifications. |
| Visitors and reception | Operator | Reception: records visitor check-in and sign-out; sees the Reception screen. |
| Viewer | Sees the visitor log. |
Important: Only the Admin gives or removes the Module admin role. You cannot change your own permission. You assign emergency responders in Admin → People and permissions with the Emergency responder box (see 10. Administration and setup).
Defining shuttle routes
Who: Shuttle manager, services manager · Where: Admin → Services → Shuttle
What it does: You enter the shuttle routes, vehicles, drivers, number of seats and stop times. Employees select their own route and stop.
- Open the Shuttle sub-tab.
- For a new route, click + Add route.
- Type the name of the route in the Route name (e.g. Kadıköy – Office) box.
- Fill in the Vehicle (e.g. 34 ABC 123, white minibus), Driver, Phone and, if you want, Note (e.g. Leaves at 17:30 on Fridays) boxes.
- In the Seats (empty = unlimited) box, type the number of passenger seats in the vehicle.
- In the Stops box, type one stop per line:
Stop name | morning time | evening time(e.g.Kadıköy İskele | 07:15 | 18:45). - Click Save routes.
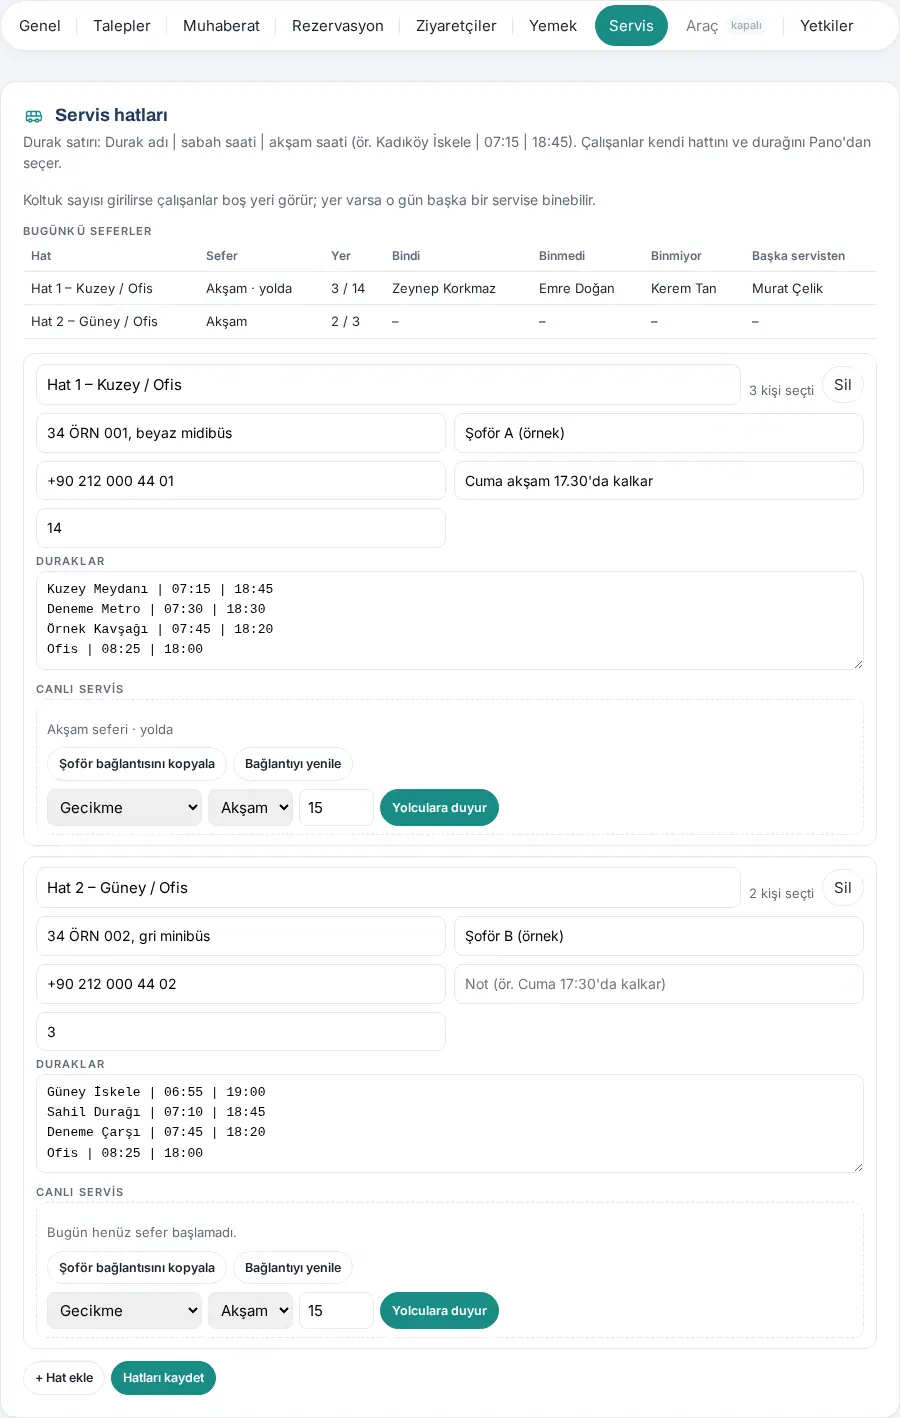
| Setting | What it does | Default |
|---|---|---|
| Route name | The name employees see in the list. | Empty |
| Vehicle | Plate and vehicle type; shown in the employee's Shuttle box. | Empty |
| Driver / Phone | The driver's name and phone number; the Call the driver button for the employee. | Empty |
| Note | Short information about the route (e.g. a special departure time). | Empty |
| Seats (empty = unlimited) | Turns on the occupancy calculation; employees see the free seats and, if there is a free seat, ride another shuttle. 99 at most. | Empty (unlimited) |
| Stops | Stop names and morning / evening times. | Empty |
Tip: Next to saved routes, you can see how many people selected that route (e.g. "3 people chose it").
Important: If you delete a route with Delete, the selection of the employees who selected that route is cleared. The system asks before it deletes.
Monitoring today's trips
Who: Shuttle manager, services manager · Where: Admin → Services → Shuttle → Today’s trips
What it does: You see today's trip of each route, its occupancy and who got on or not in one table.
- Open the Shuttle sub-tab. The Today’s trips table is at the top.
- The columns are: Route, Trip (morning / evening and status, e.g. "Evening · on the way"), Seats (taken / total), Boarded, Didn’t board, Not riding, From another shuttle.
Tip: The Boarded / Didn’t board columns come from the driver's marks (see 25. Shuttle and canteen). The marks are kept only for that day; there is no report for past days.
Driver link and notices to passengers
Who: Shuttle manager, services manager · Where: Admin → Services → Shuttle → Live shuttle
What it does: You give the driver of each route a secret link that does not need sign-in. In case of a delay or cancellation, you send a notice to the passengers.
Before you start: The Live shuttle feature must be on (see Turning on service modules).
- In the Live shuttle box below the route, click Copy driver link. Send the link to the driver in a message.
- The top of the box shows the trip status for the day (e.g. "No trip has started today." or "Evening trip · on the way").
- For a notice to passengers, select the type in the list: Delay, No trip today or Custom message.
- Select the Morning or Evening trip. For a delay, enter the minutes; for a custom message, type the message.
- Click Notify passengers. The message "Notification sent to … passengers." appears.
Common errors:
- "Gecikme 5–120 dakika olmalı." ("The delay must be 5–120 minutes.")
- "The message can’t be empty."
- "Duyuru türü geçersiz." ("Invalid notice type.")
Important: If someone else got the link, click Renew link and confirm. The old link stops working immediately ("Şoför ekranı kapalı" ("Driver screen closed")); send the new one to the driver.
Entering the meal menu
Who: Meals manager, services manager · Where: Admin → Services → Meals
What it does: You enter the month's menu day by day. Employees see today's menu and the whole month in Services.
- Open the Meals sub-tab. Select the month with the ‹ and › buttons next to the month name.
- Type the dishes in the box of each day, one dish per line.
- If you want, type the note for the day in the Note (e.g. Vegetarian: …) box below it.
- For past days and weekends, click Past days (…) or Show weekends.
- Click Save menu.

Uploading from a file (CSV):
- Prepare the menu with one day per row: the first column is the date, the next columns are the dishes (e.g.
01.10.2026;Mercimek çorbası;Tavuk sote;…). The date can beDD.MM.YYYYorYYYY-MM-DD; the separator can be a semicolon, comma or tab. - Save the file as CSV (512 KB at most).
- Select the file in the Upload from file (CSV) field. Rows whose first column is not a date are skipped.
Important: The days in the file replace the old entries for those days. Days older than 120 days are deleted automatically.
Monitoring lunch attendance and menu ratings
Who: Meals manager, services manager, kitchen · Where: Admin → Services → Meals (top of the tab)
What it does: The kitchen knows in advance how many people will eat each day. You see employees' ratings and comments anonymously.
Before you start: Lunch attendance and Menu rating must be on.
- Look at the Expected headcount list at the top of the Meals sub-tab. For each day, it shows the number of people and, next to it, the not at lunch … and on leave … counts.
- Under Ratings from the last 30 days, the overall average and the number of votes are shown. If there are no ratings yet, it says "No ratings yet."
- Click a day to open that day's menu and the comments.
Tip: After the cut-off time, the expected headcount for the day goes to the Kitchen summary email address in one email. Employees on leave are subtracted automatically.
Important: Comments are anonymous; do not try to find who wrote a comment.
Canteen entry settings
Who: Meals manager (Meals and canteen → Module admin), services manager · Where: Admin → Services → Meals → Canteen entry
What it does: You turn on QR code entry to the canteen and decide who can bring guests.
Before you start: The Meal menu module must be on. If it is off, the warning "The meal menu is off, so canteen entry doesn’t work either. First turn on the meal menu under General." appears.
- On the Meals sub-tab, scroll down to the Canteen entry section.
- Select the QR code entry to the canteen: the attendant opens the day’s entry, employees scan the code box.
- In the Who may bring guests list, select Nobody, All employees or Selected employees. For Selected employees, select the people in the searchable list that opens.
- Enter the Max. guests per person per day and Keep records (months) values.
- Click Save canteen settings. The message "Canteen settings saved." appears.
- On the Permissions tab, assign the attendant as Meals and canteen → Operator.
| Setting | What it does | Default |
|---|---|---|
| QR code entry to the canteen | Turns on the attendant's QR code screen and the employees' entry. | Off |
| Who may bring guests | Who can enter guests with I have guests today: Nobody / All employees / Selected employees. | Nobody |
| Max. guests per person per day | The number of guests an employee can enter in one day (1–10). | 3 |
| Keep records (months) | How long the entry and guest records are kept. | 24 |
Tip: For the attendant's daily screen, see 25. Shuttle and canteen. Who ate today, the guests and the daily average are in Reports → Canteen.
Booking resources and rules
Who: Booking module admin, services manager · Where: Admin → Services → Booking
What it does: You set the meeting rooms and parking spaces that can be booked, the booking hours and the limits.
- Open the Booking sub-tab.
- Select the Booking on: employees book rooms and parking box.
- Enter the hours and limits (see the table).
- With the Add reception: type a name box, add the reception staff who will get guest notifications.
- Click + Add room or + Add parking space. For each resource, enter Name, Type (Meeting room / Parking), Floor / location; for rooms, also enter Capacity (people), Equipment and, if you want, Google resource calendar (optional).
- To close a resource temporarily, clear its Open for booking mark. To delete it completely, click Remove.
- Click Save booking settings.
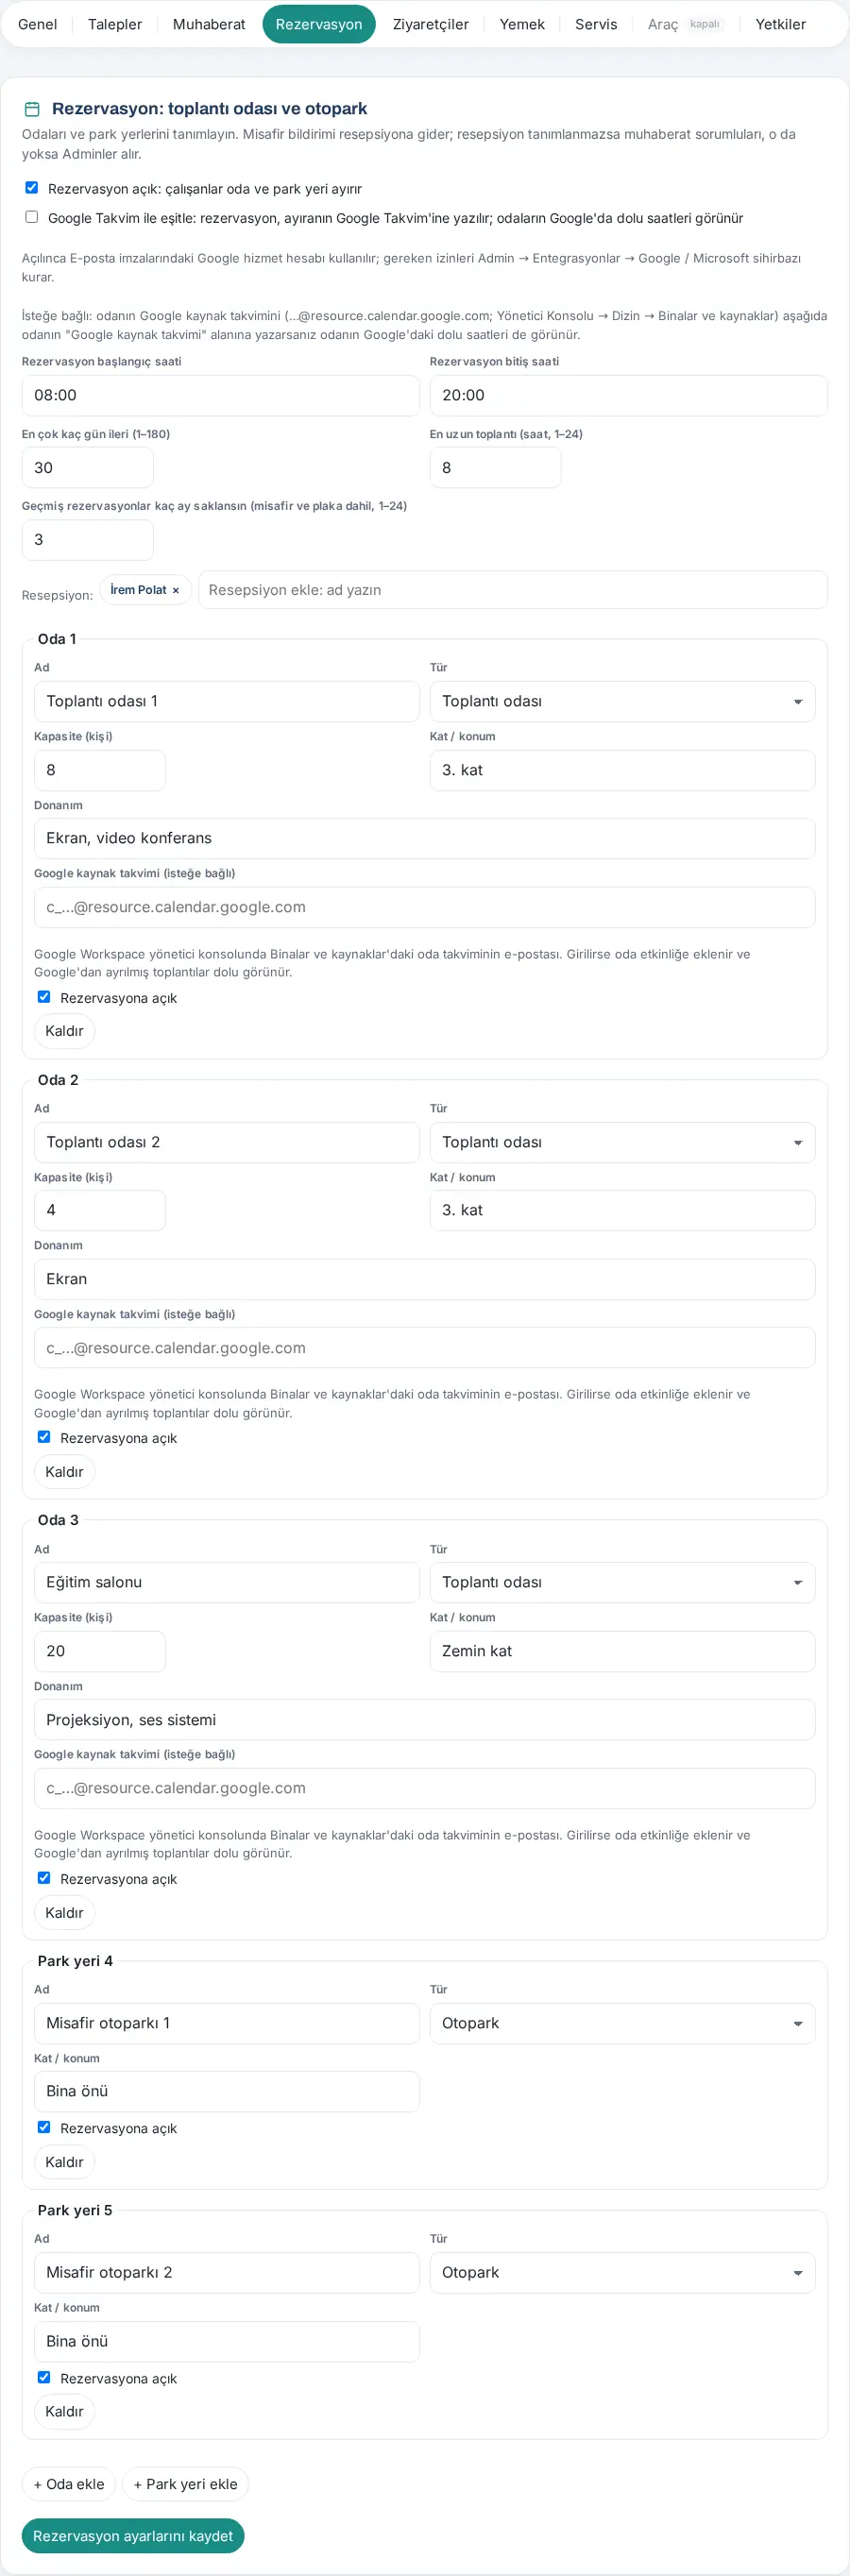
| Setting | What it does | Default |
|---|---|---|
| Booking on | Turns on the Booking box for employees. | Off |
| Sync with Google Calendar | Writes the booking to the booker's Google Calendar; shows the room times booked in Google (see Google Calendar sync). | Off |
| Bookings start at / Bookings end at | The range of the day's schedule and of the times that can be selected. | 08:00 / 20:00 |
| How many days ahead at most (1–180) | How many days ahead a booking can be made. | 30 |
| Longest meeting (hours, 1–24) | The maximum length of a room booking. | 8 |
| Keep past bookings for how many months (incl. guests and plates, 1–24) | When old bookings and guest details are deleted. | 3 |
| Reception | The people who get guest notifications. If empty, the mailroom handlers get them, and if there are none, the Admins. | Empty |
| Google resource calendar (optional) | The email of the room's resource calendar in Google Workspace (c_…@resource.calendar.google.com). |
Empty |
| Open for booking | Closes the resource temporarily without deleting it. | On |
Tip: How many cars the guest parking can take at the same time is set on the Visitors tab (see Visitor settings). Parking space bookings do not reduce this capacity.
Google Calendar sync
Who: Admin, booking module admin · Where: Admin → Services → Booking → Sync with Google Calendar
What it does: Bookings made in Prozence are written to the booker's Google Calendar; meetings set up in Google Calendar by selecting a room come to Prozence every 10 minutes as "From Google Calendar" bookings. Outside participants are added to the reception's list of expected visitors.
Before you start: The company's Google Workspace connection (the Google service account in Email signatures and domain-wide delegation) must be set up. The Admin → Integrations → Google / Microsoft wizard sets up the required permissions (see 13. Integrations).
- On the Booking sub-tab, select the Sync with Google Calendar: bookings are written to the booker's Google Calendar; rooms' busy times in Google are shown box.
- Read the status line below the box:
- "Ready. The Google service account from Email signatures is used; employees are not asked for separate consent."
- "No Google service account is installed (Email signatures screen); sync won't work."
- "Nothing is written to Google in a test / staging environment."
- If the connection is incomplete, click Open the wizard next to the "… steps missing for Google Calendar." line.
- In the Google resource calendar (optional) field of each room, type the email of the room calendar from Google Admin console → Directory → Buildings and resources.
- Click Save booking settings.
- After you save, the Room bookings from Google Calendar section appears. It shows the time of the last sync and the counts ("Last sync — new: …, updated: …, cancelled: …"). To sync immediately, click Sync now.
- To match the rooms in Google with the Prozence rooms, click Find Google rooms; match each room or add it as a new room.
Common errors:
- "Eşitleme için odaların "Google kaynak takvimi" alanını doldurun ve kaydedin." ("For sync, fill in the "Google resource calendar" field of the rooms and save.")
- "Couldn't read Google Calendar: …": the employee who reads has no access to the room calendar, or Google cannot be reached. The records of that room are not touched.
- For Find Google rooms, the scope for reading the room list must be added to the domain-wide delegation in the Admin console; if not, an error with instructions appears.
Important: A booking that came from Google cannot be cancelled in Prozence; changes and cancellations are made in Google Calendar. Microsoft 365 room calendars are not supported.
Note: The image above shows the state with sync off. While it is off, only the note "When turned on, the Google service account from Email signatures is used; the Admin → Integrations → Google / Microsoft wizard sets up the required permissions." is shown below the box; the status line and the Room bookings from Google Calendar section appear when sync is turned on and saved.
Visitor settings, welcome and sign-out
Who: Visitors module admin, services manager · Where: Admin → Services → Visitors
What it does: You turn on visitor registration; you set the privacy notice, the guest parking capacity, the content of the welcome email sent to the visitor, the exit points and QR self check-in.
- Open the Visitors sub-tab.
- Select the Visitor registration on: reception checks visitors in, employees announce guests box.
- Set the options and periods according to the table.
- In the Welcome message section, type the texts that go to the visitor: address and floor / room directions, company rules, emergency, occupational health and safety, parking rules, guest Wi-Fi name and password. For the rules, emergency and OHS, you can also add a link if you want (it must start with
https://). - In the Exit points box, type one door per line (e.g. "Ana giriş" ("Main entrance"), "Otopark kapısı" ("Car park gate")).
- With the Add reception: type a name box, add the reception staff.
- Click Save visitor settings.
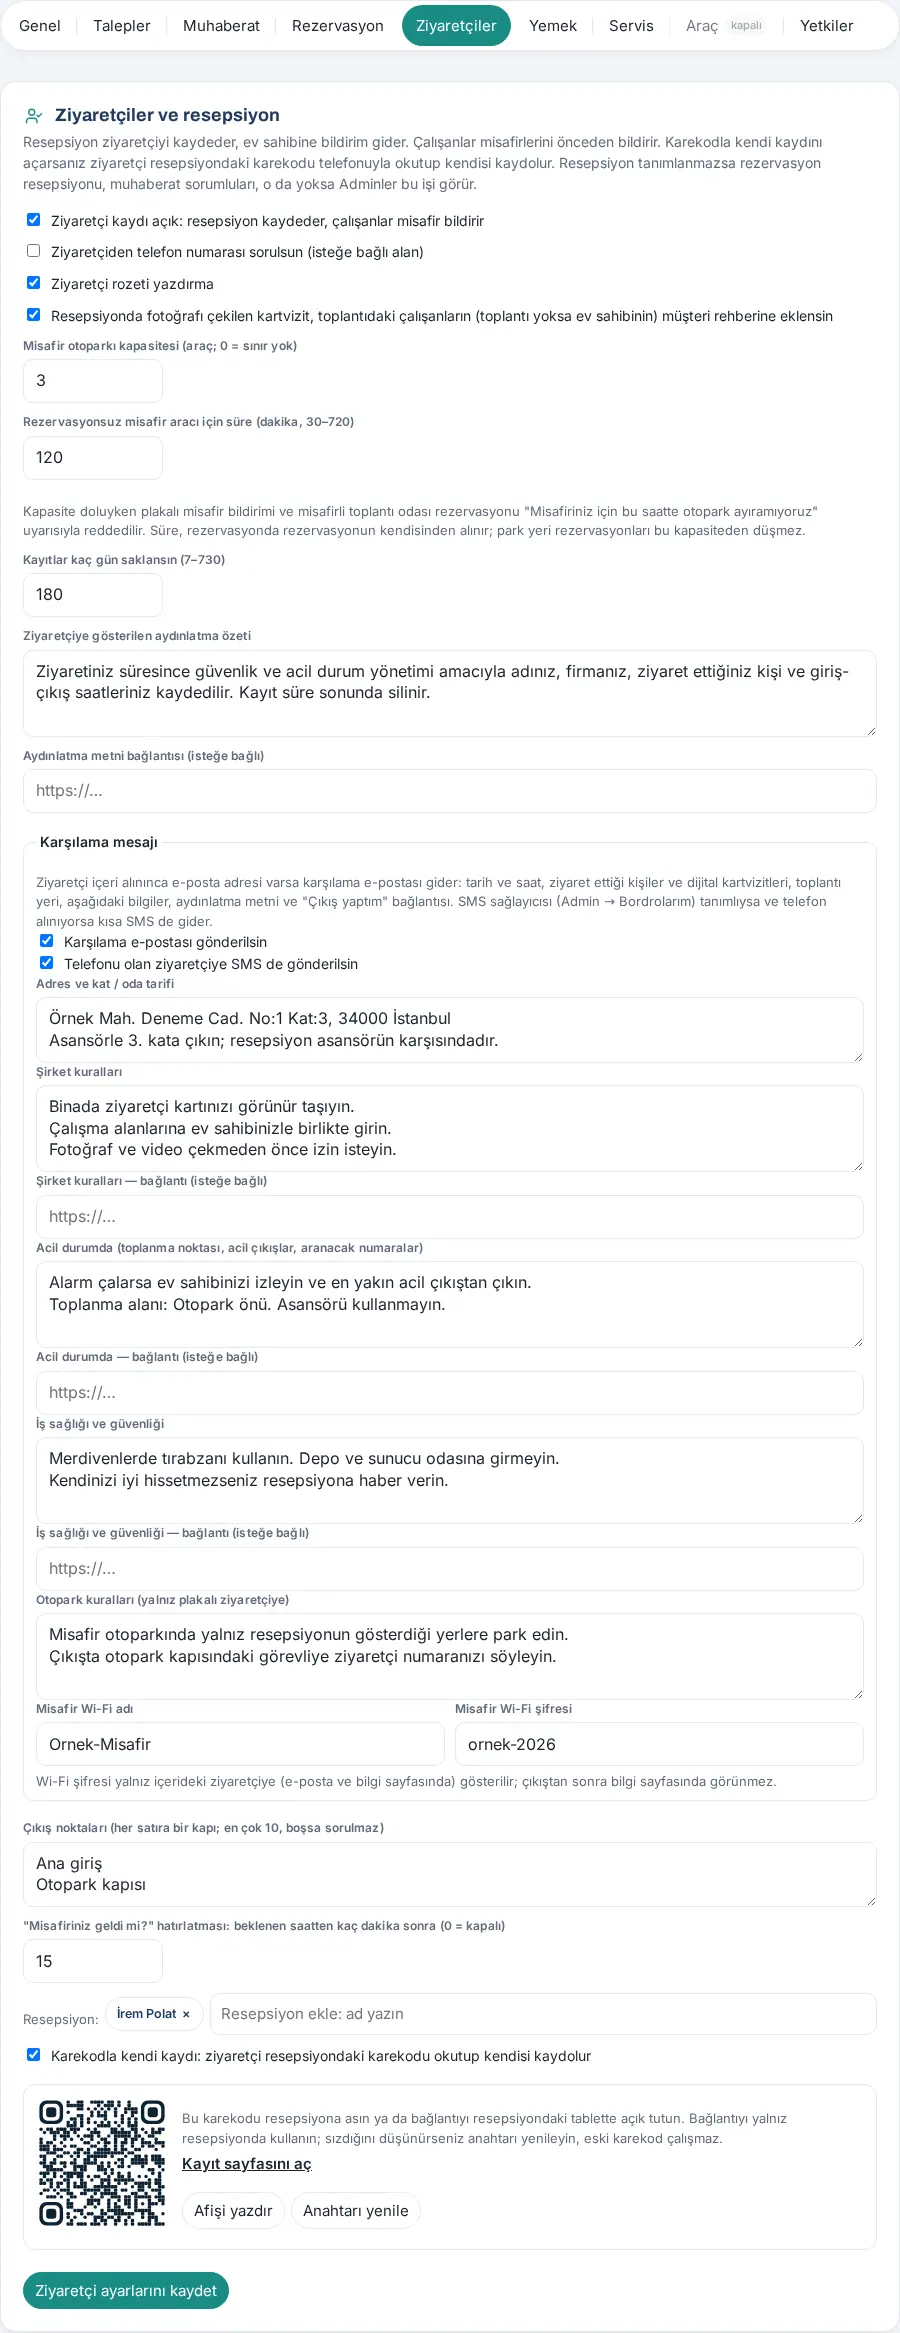
| Setting | What it does | Default |
|---|---|---|
| Visitor registration on | Turns on the Visitors box and the Reception screen. | Off |
| Ask visitors for a phone number (optional field) | Adds a phone field to the forms; the phone number is visible only to reception. | Off |
| Visitor badge printing | Shows the Print badge option after check-in. | On |
| Add business cards photographed at reception to the contacts of … | Adds the business card read at the desk to the customer directory of the employees in the meeting (if none, of the host). | On |
| Guest parking capacity (cars; 0 = no limit) | The maximum number of guest cars at the same time. If it is full, a pre-registration with a plate and a booking with guests are refused. | 0 |
| Duration for a guest car without a booking (minutes, 30–720) | The default time that a guest with a plate in a pre-registration stays in the car park. | 120 |
| Keep records for how many days (7–730) | When visitor records are deleted. | 180 |
| Privacy summary shown to visitors | The short privacy text shown in the forms and in the welcome email. | Preset text |
| Privacy notice link (optional) | The address of the full privacy notice. | Empty |
| Send a welcome email | Sends a welcome email to a visitor who is checked in and has an email. | On |
| Also send an SMS to visitors with a phone number | Sends a short SMS if an SMS provider is defined. | On |
| Guest Wi-Fi name / Guest Wi-Fi password | Shown only to a visitor who is on site; hidden after sign-out. | Empty |
| Exit points (one door per line; up to 10; if empty, not asked) | Turns on the "Which exit?" question at sign-out. | Empty |
| "Has your guest arrived?" reminder: minutes after the expected time (0 = off) | Sends one reminder to the host for a guest who has not been checked in (0–240). | 15 |
| QR self check-in | Lets the visitor register themselves with the QR code at reception. | Off |
QR self check-in:
- Select the QR self check-in: visitors scan the code at reception and register themselves box and save.
- A QR code appears in the section. Print the poster with the QR code with Print poster and put it up at reception, or keep the page open on the tablet at reception with Open the check-in page.
- If you think someone else got the link, click Renew key; the old QR code stops working, so print the poster again.
Common errors:
- "Guest parking capacity must be 0–200 cars (0 = no limit)."
- "The default guest car duration must be 30–720 minutes."
- "The "Has your guest arrived?" reminder must be 0–240 minutes (0 = off)."
- "Links must start with https://."
- "Enter the privacy notice shown to visitors."
Important: The welcome email and the visitor pages are in Turkish only. No ID document, photo or signature is collected. For the pages the visitor sees, see 26. Meeting rooms and visitors.
Editing the emergency plan
Who: Emergency responder, Admin · Where: Emergency in the top bar → Edit plan
What it does: You enter the locations, phone numbers, instructions and evacuation map of the emergency plan that everyone sees.
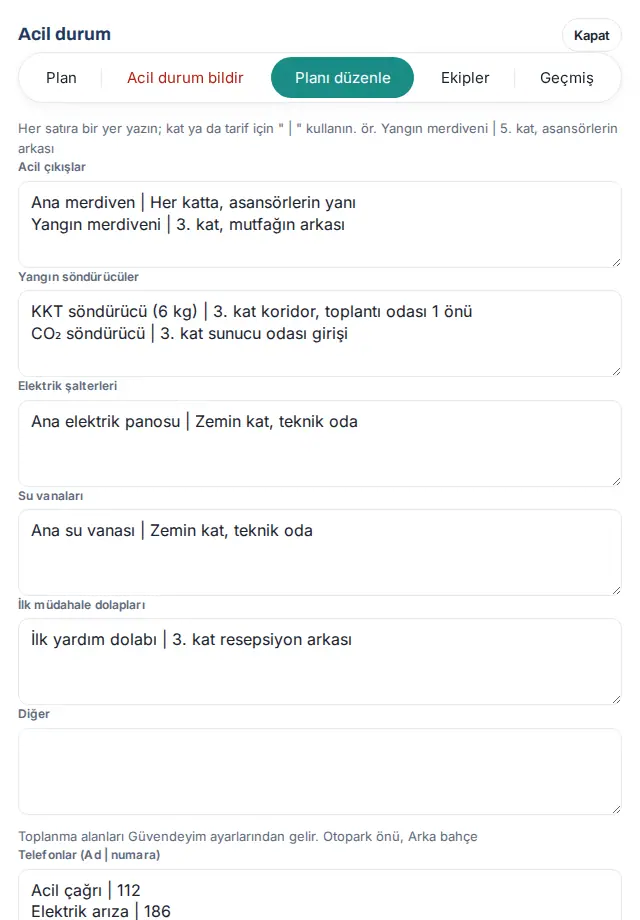
- In the top bar, click Emergency and open the Edit plan tab.
- In the location boxes, type one location per line; use " | " for the floor or directions (e.g.
Yangın merdiveni | 5. kat, asansörlerin arkası). The boxes are: Emergency exits, Fire extinguishers, Electrical breakers, Water valves, First-aid cabinets, Other. - In the Phone numbers (Name | number) box, type one phone number per line (e.g.
Bina yönetimi | +90 212 000 00 50). - If necessary, edit the Instruction: Earthquake, Instruction: Fire, Instruction: Workplace accident, Instruction: Electrical leak and Instruction: Flooding texts.
- If there is one, type the
https://address of the PDF or image in the Evacuation map link (optional) field. - Check the In an emergency, send visitors inside the exit and assembly point details (email; SMS if a provider is set) box.
- Click Save. The message "Emergency plan saved." appears.
| Setting | What it does | Default |
|---|---|---|
| Locations (emergency exits, extinguishers, breakers, valves, first-aid cabinets, other) | The locations shown in the plan and in the emergency banner (80 at most). | Empty |
| Phone numbers (Name | number) | The numbers shown in the plan and in the banner (12 at most). 112 is always shown at the top of the list. | 112, 186 (power failure), 187 (natural gas emergency) |
| Instruction: … | The instructions for each emergency type. If left empty, the default text is used. | Preset short instructions |
| Evacuation map link (optional) | The Open evacuation map link in the plan. | Empty |
| In an emergency, send visitors inside … | When an emergency is reported, sends the emergency exit, assembly point and 112 information to the visitors inside. | On |
Tip: Assembly points are not entered on this screen but in the I’m Safe settings ("Assembly points come from the I’m Safe check-in settings."). If no locations have been entered yet, the plan says "Acil çıkış, söndürücü, şalter, vana ve ilk müdahale dolabı yerleri henüz girilmedi." ("The locations of the emergency exits, extinguishers, breakers, valves and first-aid cabinets have not been entered yet.").
Important: The instruction texts are not translated; they are shown in Turkish. Locations are not shown on a floor plan; they are kept as text.
Emergency response teams and drills
Who: Emergency responder, Admin · Where: Emergency in the top bar → Teams
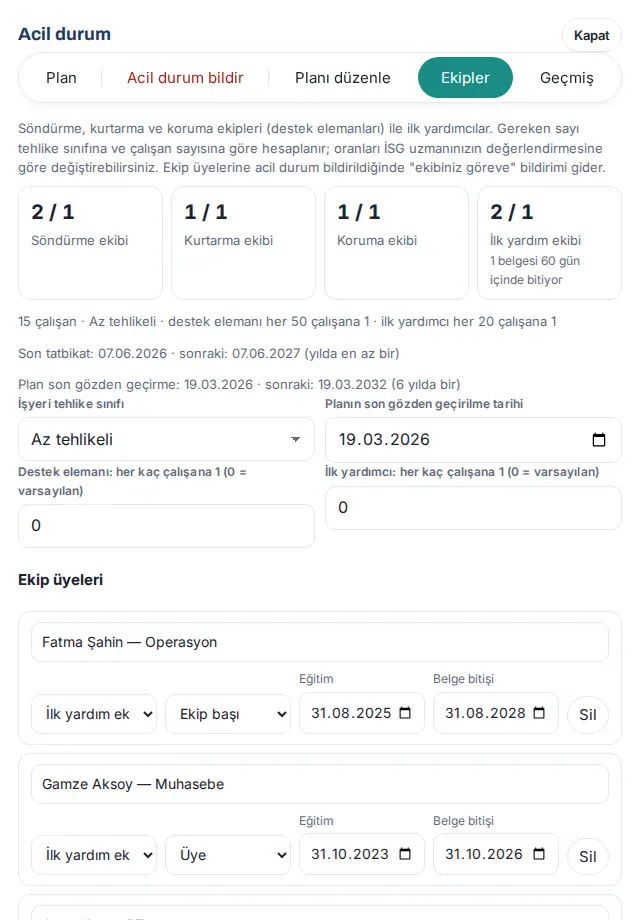
What it does: You record the firefighting, rescue and protection teams (support staff) and the first-aid team. The required number of people is calculated from the hazard class of the workplace and the number of employees; missing teams, expiring certificates, the plan review date and the drills are shown on one screen.
- In the top bar, click Emergency and open the Teams tab.
- In the boxes at the top, see the current / required number for each team (e.g. "1 / 1 Kurtarma ekibi" ("1 / 1 Rescue team")), the gaps and the certificates that expire within 60 days. Below them, the number of employees, the hazard class and the ratios, and the Last drill and Plan last reviewed dates are shown.
- In the Workplace hazard class list, select Low hazard, Hazardous or Very hazardous.
- Enter the Date the plan was last reviewed.
- If you want to change the ratios according to the assessment of your OHS specialist, enter the Support staff: 1 per how many employees (0 = default) and First aider: 1 per how many employees (0 = default) values.
- Under Team members, click + Add member. On the line, type the employee's name and select them in the list, select the team and the duty (Member / Team leader), and enter the Training date and the Certificate expiry. To remove a line, click Delete.
- Click Save teams. The message "Emergency response teams saved." appears.
| Setting | What it does | Default |
|---|---|---|
| Workplace hazard class | Sets the required number and how often the plan is reviewed: low hazard 1 per 50 / 20 employees, hazardous 40 / 15, very hazardous 30 / 10 (support staff / first aider); the plan once every 6 / 4 / 2 years. | Low hazard |
| Date the plan was last reviewed | Calculates the next review date; when it is overdue, a reminder goes to the responders. | Empty |
| Support staff: 1 per how many employees (0 = default) | The ratio for the firefighting, rescue and protection teams. | 0 (by class) |
| First aider: 1 per how many employees (0 = default) | The ratio for the first-aid team. | 0 (by class) |
| Certificate expiry | The validity date of the certificate. For first aid, if it is empty, the date 3 years after the training date is entered. | Empty |
Drill records:
- In the Drills section, select the Drill date.
- In the Drill type list, select Fire, Earthquake, Evacuation, First aid or Other.
- Type the Number of participants and, if you want, a note (e.g. "tahliye 4 dk" ("evacuation 4 min")).
- Click Add drill. The message "Drill saved." appears. Remove a wrong record with Delete.
Tip: Emergency reports made in the app with Drill selected are counted as drills automatically. At least one drill must be held every year; if there are no recorded drills, the warning "No recorded drills (at least one drill a year is required)." appears. 30 days before a certificate expires, and when the plan or a drill is overdue, the emergency responders get a reminder once.
Common errors:
- "Pick an employee from the list in every row, or delete the row."
- "Choose the drill date."
- The certificate expiry cannot be before the training date; an employee who has left the company and a physician record cannot be added to a team.
Important: Team members are listed by name and with a Call button in the plan that everyone sees. When an emergency is reported, the members get the "your team is on duty" notification.
Starting an I’m Safe check-in
Who: Emergency responder, Admin · Where: The I’m Safe button in the top bar
What it does: After an earthquake, fire, evacuation or drill, you ask employees "Are you safe?". The replies are collected live on the check-in board. With "Report an emergency", the check-in starts automatically; this task is only for starting a check-in separately.
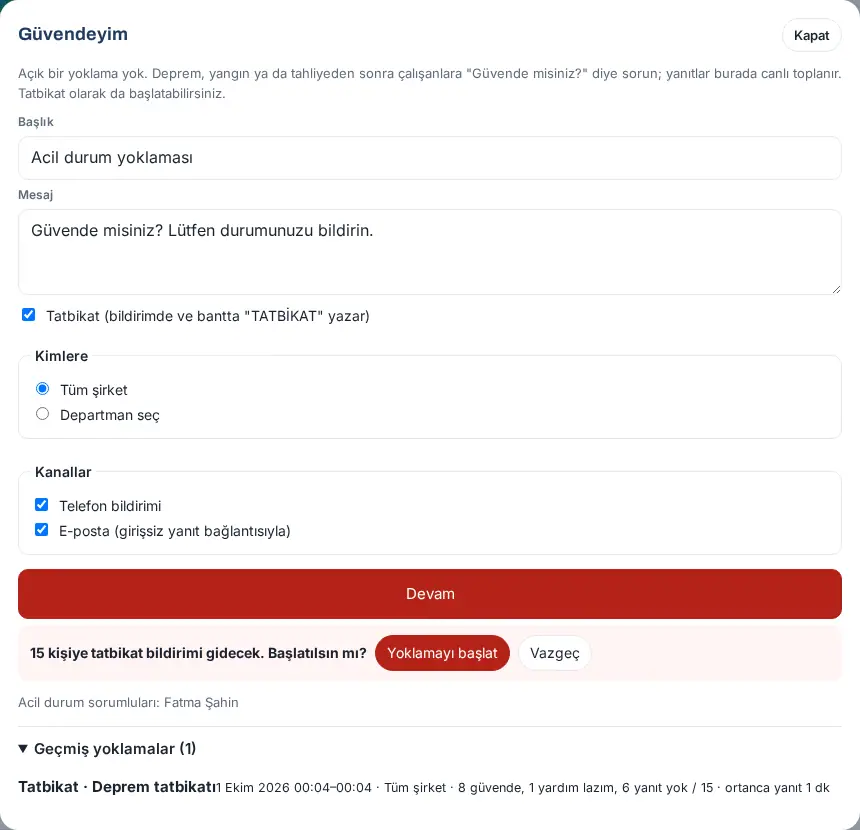
- In the top bar, click the I’m Safe button.
- Check the Title and Message (the defaults come from the settings).
- If it is a drill, select the Drill (notifications and the banner say “DRILL”) box.
- Under Who, select Whole company or Choose departments.
- Under Channels, check the phone notification and email boxes.
- Click Continue. The number of people who will be notified is shown.
- Click Start the check-in.
Common errors:
- "A check-in is already open; end it before starting a new one."
- "Choose at least one notification channel."
- "I’m Safe has been turned off by an admin."
Important: When the check-in starts, the check-in banner appears at the top of all employees' screens (see 27. Emergencies, occupational safety and the occupational physician). Do not start one to try it out; for drills, select the drill box. I’m Safe and emergency reporting work even if the license has expired.
Monitoring and ending the check-in board
Who: Emergency responder, Admin · Where: I’m Safe in the top bar; Emergency → People inside → I’m Safe check-in board
What it does: You see immediately who is safe, who asks for help and who has not replied.
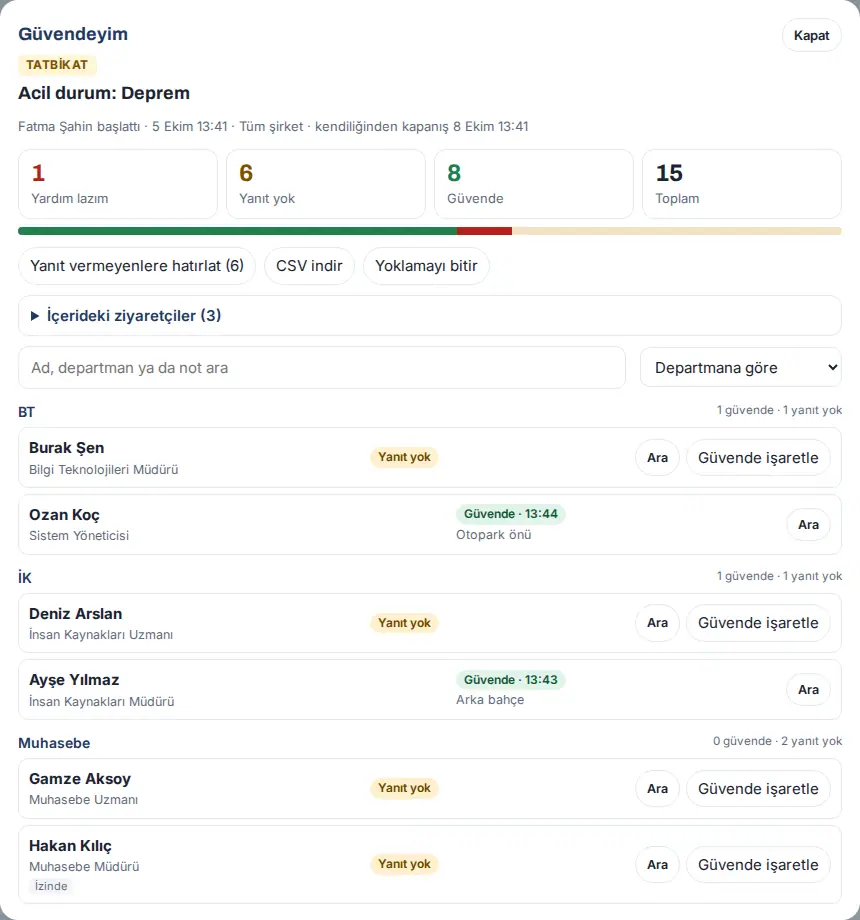
- During an open check-in, click I’m Safe in the top bar. The top shows who started it, the time, the scope and the automatic closing time.
- Look at the I need help, No response, Safe and Total counts. Click a count to filter the list by that status. The board refreshes itself every few seconds.
- Group the list with By department, By assembly point or No grouping; find a person by typing in the search box (Search name, department or note).
- Read the note of the person who said I need help and call them with Call.
- To notify the people who have not replied again, click Remind those who haven’t responded (n).
- Mark a person you learn is safe with Mark as safe; the person who marks it is recorded.
- Open the Visitors on site (n) list for the count during an evacuation.
- If you need a record, first click Download CSV. Then click End the check-in and Yes, end it.
Tip: Employees on leave have On leave next to them. The drill results stay under Past check-ins (n): title, time, scope, counts and median response time.
Important: When you end the check-in, the individual replies, notes and locations are deleted; only the counts stay in the history. If the check-in is not ended manually, it closes automatically when the time in the settings runs out.
Note: The image shows the board of an earthquake drill with sample replies.
Assembly points and I’m Safe settings
Who: Admin · Where: I’m Safe → Settings (admin)
- In the top bar, click I’m Safe and open Settings (admin) at the bottom of the window.
- Enter the settings according to the table.
- Click Save.
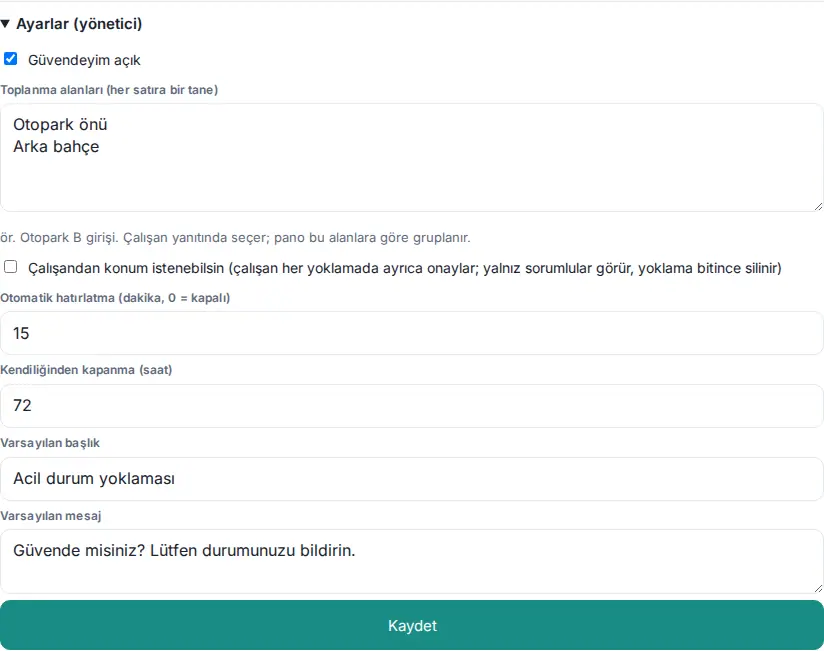
| Setting | What it does | Default |
|---|---|---|
| I’m Safe on | Turns on the I’m Safe button and the check-in. While it is off, no check-in starts with an emergency report. | On |
| Assembly points (one per line) | The points the employee selects in the reply; the board and the emergency plan use these points. | Empty |
| Allow asking for location (…) | Shows the Add my current location box in the reply; only the responders see the location, and it is deleted when the check-in ends. | Off |
| Automatic reminder (minutes, 0 = off) | Sends a reminder automatically to the people who have not replied after the set number of minutes (5–240). | 15 |
| Auto-close after (hours) | The time after which the check-in closes if it is not ended manually. | 72 |
| Default title | The title that is filled in the check-in window. | Acil durum yoklaması ("Emergency check-in") |
| Default message | The message that is filled in the check-in window. | Güvende misiniz? Lütfen durumunuzu bildirin. ("Are you safe? Please report your status.") |
Tip: You assign emergency responders in Admin → People and permissions with the Emergency responder box.
Safety report settings
Who: OHS module admin, Admin · Where: Admin → Modules → OHS → OHS settings
- Click Admin → Modules → OHS.
- Select the Turn on safety reporting box.
- Enter the other settings according to the table and click Save.
- Add the OHS team (OHS specialist, occupational physician, employee representative…) as Operator in the Permissions section at the bottom of the tab. If there is no operator, reports go to the Admins.
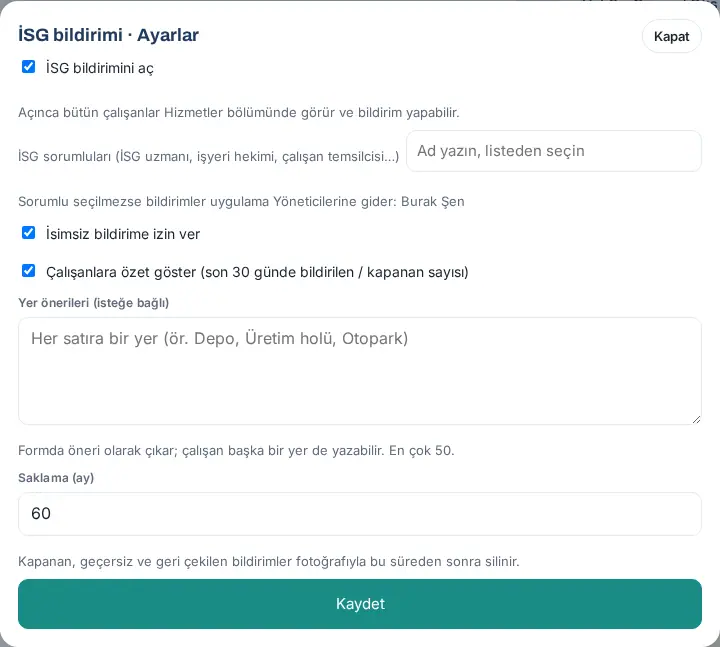
| Setting | What it does | Default |
|---|---|---|
| Turn on safety reporting | Turns on the Safety report box for all employees. | Off |
| Allow anonymous reports | Shows the Send anonymously option in the form. | On |
| Show employees a summary (reported / closed in the last 30 days) | Shows the summary of the last 30 days in the box. | On |
| Location suggestions (optional) | The locations shown as suggestions in the form (one location per line, 50 at most). | Empty |
| Retention (months) | When closed, invalid and withdrawn reports are deleted together with their photos. | 60 |
Tip: The report summary is in Reports → OHS (see 19. Reports).
Handling near-miss and hazard reports
Who: OHS operator (OHS specialist, occupational physician, employee representative) · Where: Board → Services → Safety report → Incoming reports
What it does: You review the near misses, unsafe conditions and unsafe acts that employees report. You score the risk, open a corrective / preventive action (DÖF) and get back to the reporter.
- In the Safety report box, click the Incoming reports (…) tab.
- Select a filter: Open, New, Overdue, Closed or All. To filter by type, select a type in the list. Reports marked Urgent come first in the list.
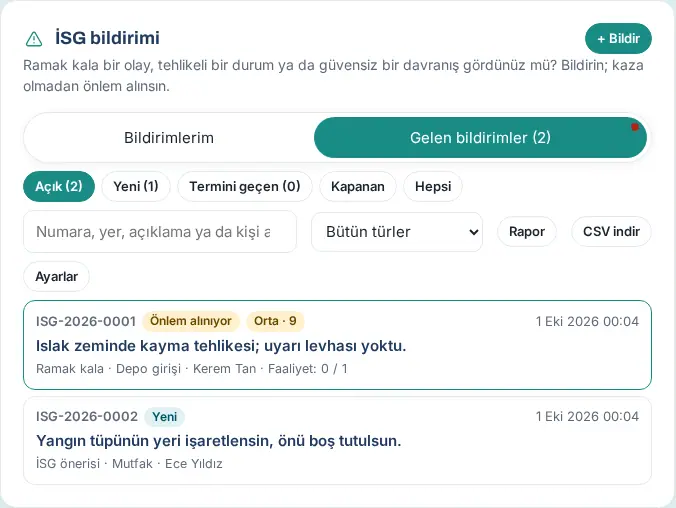
- Click a report and click Take and review. The status changes to Under review.
- Under Risk assessment (likelihood × severity), select the Likelihood and Severity values (1–5). The score and level are calculated: Low (1–6), Medium (7–12), High (13–16), Unacceptable (17–25). Click Save risk.
- Under Corrective / preventive actions, type the Action, select the Owner, select the Due date and click + Add action. The status changes to Action in progress.
- To write to the reporter, type in the message box and click Send. For a note that only the team sees, select the Internal note (reporter can’t see) box.
- When the actions are finished, type what was done and click Close.
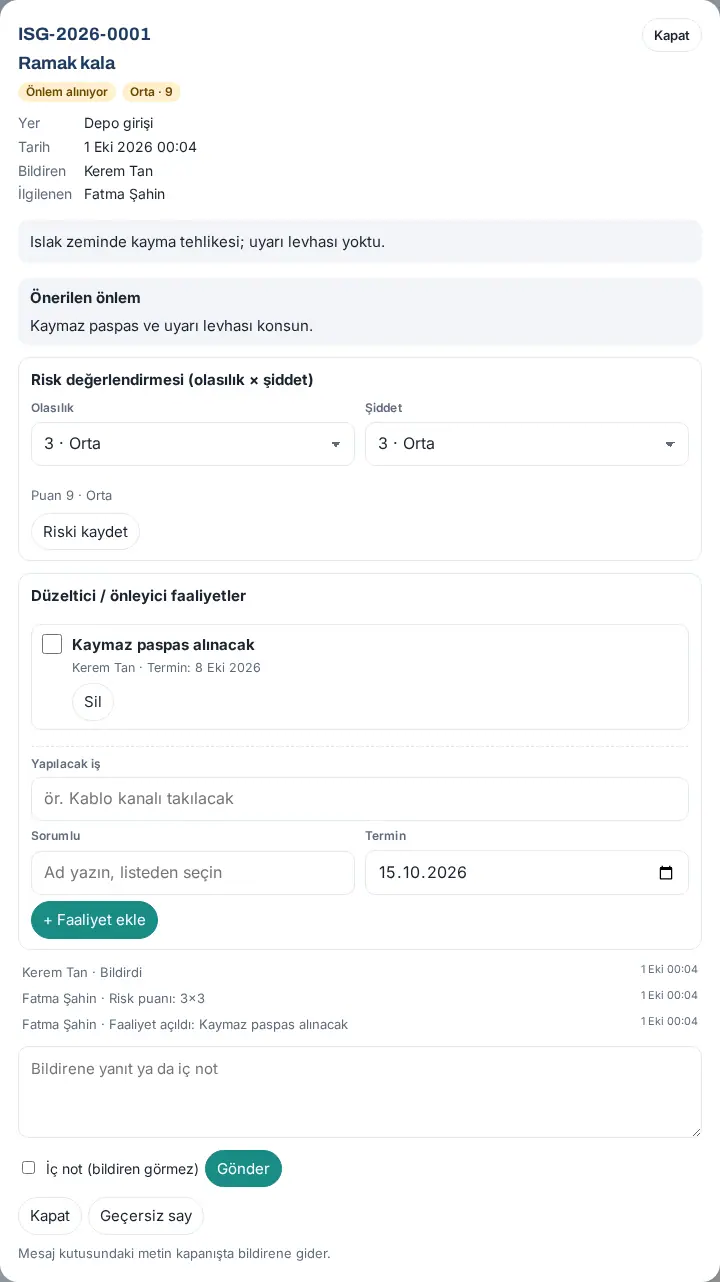
Important:
- A report does not close while it has an open action.
- Close a duplicate report, or a report that is not an OHS topic, with Mark invalid after you type the reason.
- In anonymous reports, the reporter's name is not shown anywhere. Do not try to find out who wrote it.
- A workplace accident is not the subject of this module; the legal notification is made separately.
Adding a physician and appointment settings
Who: OHS officer, Admin · Where: Admin → Modules → OHS → Occupational physician
What it does: You turn on occupational physician appointments and add the physician. The physician is not counted as a company employee: they are not shown in the directory, in employee lists or in counts; they sign in with the code that comes to their email and see only their own screen.
Before you start: Email code sign-in must be on. If it is off, the screen shows the warning "Email code sign-in is off: the physician can't sign in. Turn it on in Admin → Sign-in methods." (see 10. Administration and setup).
- Click Admin → Modules → OHS and scroll down to the Occupational physician section.
- Select the Enable occupational physician appointments box, enter the limits and click Save.
- Under Add physician, fill in the Full name, Email (the sign-in code is sent here) and, if you want, Organization (optional) and Phone (optional) fields.
- Click Add the physician. The message "Physician added." appears. Below it, the address from which the physician signs in is shown.
- In the physicians list, click Availability next to the physician and enter their weekly hours (the physician can also enter them from their own screen; see 27. Emergencies, occupational safety and the occupational physician).
- Send the sign-in address and the email to the physician.
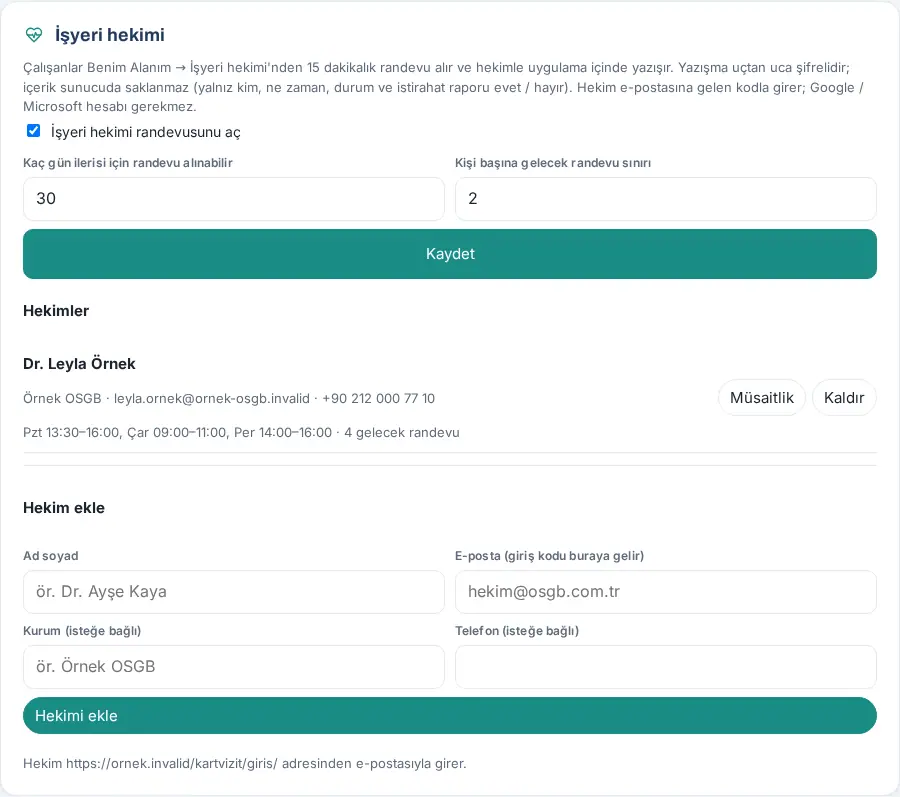
| Setting | What it does | Default |
|---|---|---|
| Enable occupational physician appointments | Turns on the My Space → Occupational physician box for employees. | Off |
| How many days ahead appointments can be booked | The appointment horizon (1–90 days). | 30 |
| Upcoming appointment limit per person | The number of upcoming appointments an employee can have at the same time (1–5). | 2 |
| Physicians | The defined physicians (10 at most); with an availability summary and the number of upcoming appointments. | Empty |
Removing a physician: Click Remove next to the physician and confirm with Yes, remove. If they have upcoming appointments, the question is "… upcoming appointments will be cancelled. Remove?". The upcoming appointments are cancelled and the employees get a notification; past records stay in the reports with the physician's name, and the physician's sign-in is closed.
Common errors:
- "Hekimin adını yazın." ("Enter the physician's name.")
- "Geçerli bir e-posta yazın; hekim bu adrese gelen kodla girer." ("Enter a valid email; the physician signs in with the code sent to this address.")
- "Bu e-posta bir çalışana ait; hekim için ayrı bir adres kullanın." ("This email belongs to an employee; use a separate address for the physician.")
- "Bu e-postayla bir hekim zaten var." ("A physician with this email already exists.")
- "En çok 10 hekim eklenebilir." ("At most 10 physicians can be added.")
Tip: Reports → Occupational physician (OHS officer and Admin) shows the number of consultations and appointments, the number of people who had a consultation with the physician, the sick note rate and the number of no-shows / cancellations. The content of the conversations is not stored anywhere; the report has only who, when, status and sick note yes / no.
Important: The conversation is end-to-end encrypted, but it relies on the code that runs in the browser. The Security code on both sides is for checking visually that the same key is used.