26. Meeting rooms and visitors
Screenshots show the Turkish interface of Prozence with fictional "Örnek Teknoloji A.Ş." data; the English interface has the same layout.
This chapter describes how to book a meeting room and a parking space, add employees and guests to a meeting, and tell reception about a visitor you expect. The screens on which reception greets the visitor, checks them in and signs them out, and the pages the visitor sees on their own phone, are also here.
Who: Employee · Reception staff · Visitor (own registration)
For room and parking space definitions, Google Calendar sync, visitor settings and the welcome message, see 32. Shuttle, meal, visitor and emergency management.
In this chapter
- Booking a meeting room
- Booking a parking space
- My bookings: adding to the calendar and cancelling
- Meetings you are invited to
- Booking with Google Calendar
- Visitor pre-registration (expecting a guest)
- When your guest arrives: Arrived, check in or No-show
- Checking a visitor in at the reception desk
- Signing a visitor out
- Who is on site now
- Reception: Today list and Log
- From the visitor's side: welcome email and sign-out
- QR self check-in (visitor)
Before you start: The company turns on booking and visitor registration separately. If you do not see the Booking or Visitors box, that service is off in your company. The Reception screen is visible only to people who have the visitor operator permission.
Booking a meeting room
Who: Employee · Where: Tools → Services → Booking
What it does: You book a meeting room. In the day's schedule, you see the busy and free times and, for a busy time, who booked it. You can add employees and outside guests to the meeting; guests are announced to reception in advance.
- In Tools → Services, scroll down to the Booking box.
- Check that Meeting rooms is selected at the top.
- Select the day with the ‹ and › buttons or with the date box. Each room shows its capacity, floor and equipment; busy times are shown in color in the schedule, and the time, the person who booked and the meeting title are listed below it.
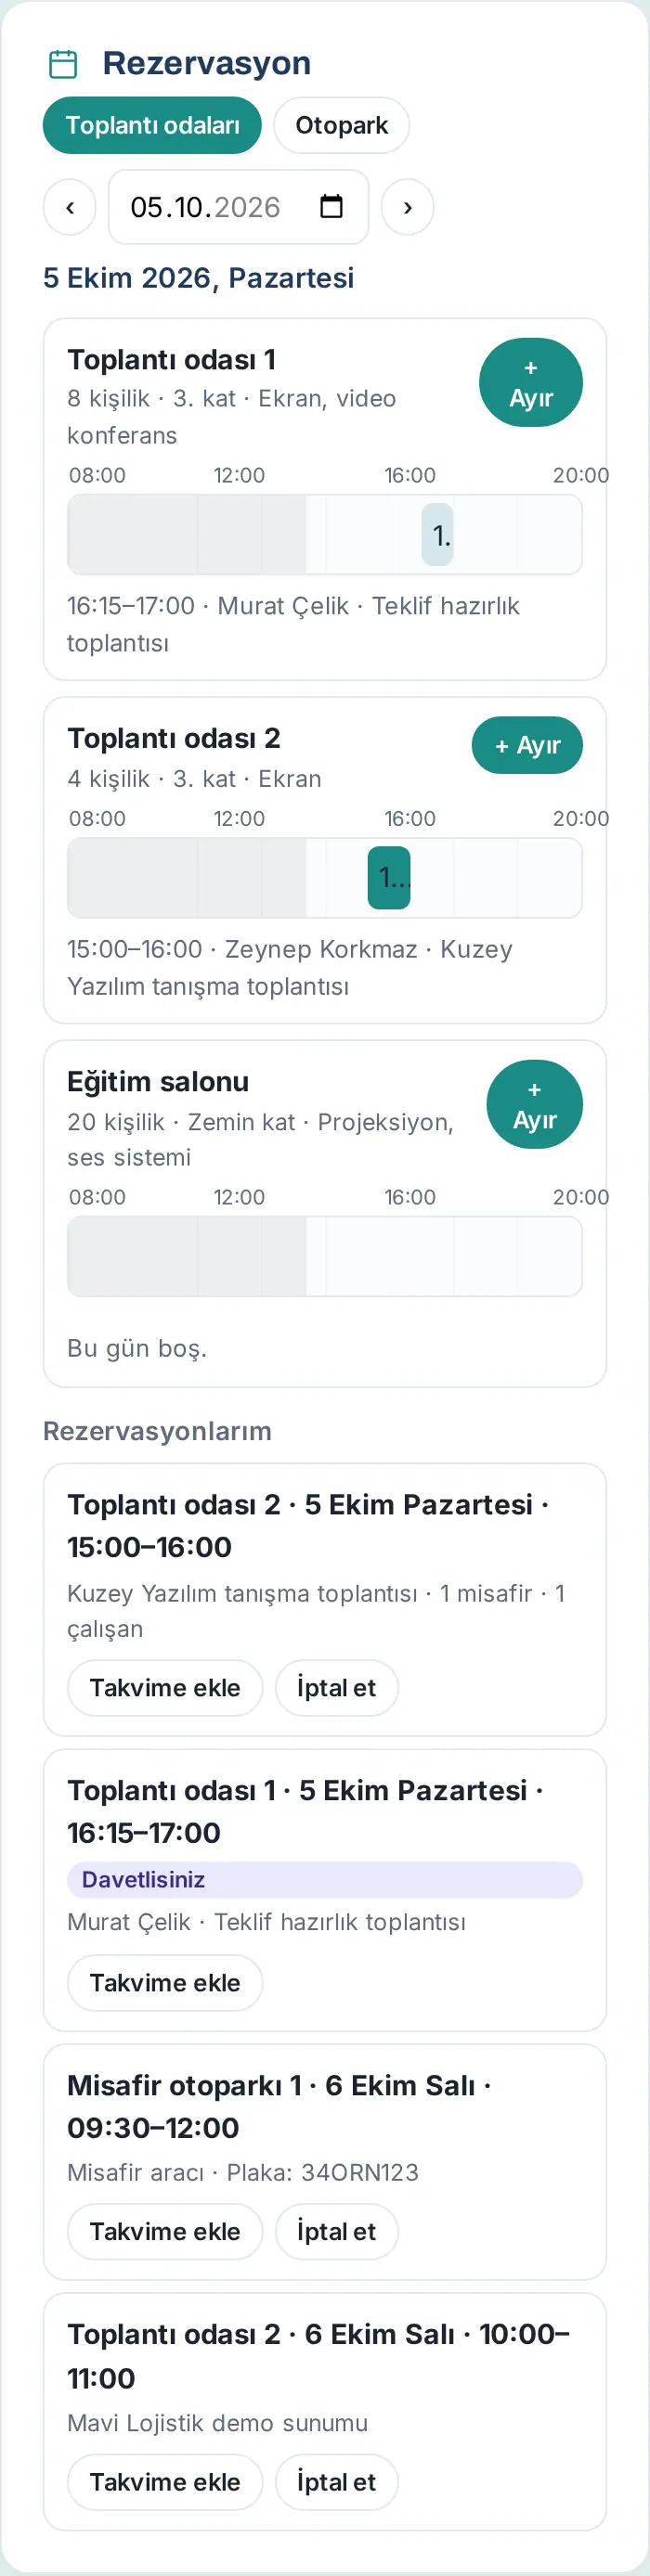
- Tap + Book next to the room. The Book room · <room name> window opens.
- In the Day field, check the day; change it if necessary. When the day changes, the busy times of that day ("Booked: …") are loaded again.
- Select the Start and End times (in 15-minute steps).
- Type a Meeting title (e.g. "Yeni ürün eğitimi" ("New product training")). If you want, enter Number of people (optional); the box shows the capacity of the room (e.g. "max 20").
- If someone comes from outside, tap + Add guest in the Guests (reception is notified in advance) section and type the guest's name, company, email and, if necessary, the plate of their car. To delete a line, tap ×.
- If employees from the company will join the meeting, type their name in the Employees in the meeting (optional) box and select them in the list. The person you add is shown above the box; to remove them, tap × next to their name.
- If you want, type a Note (optional) and tap Book.
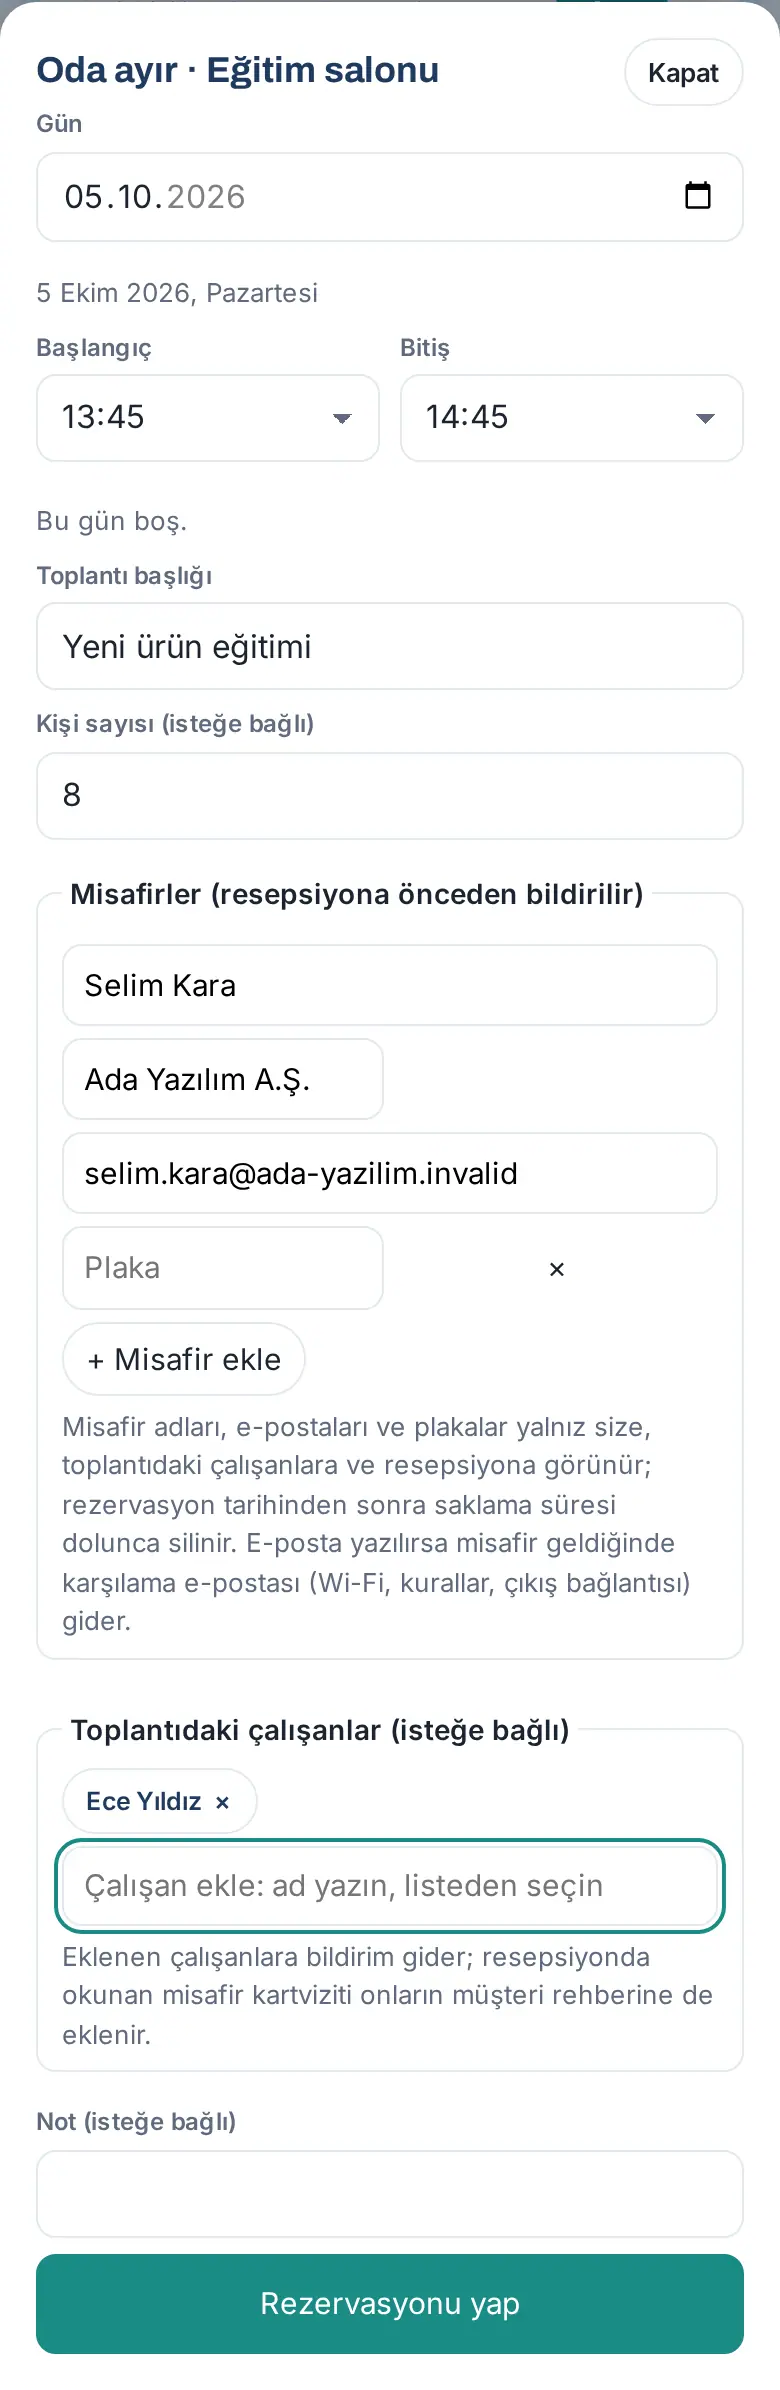
Result: The message "Booked: …" appears and the view changes to the day you selected. The booking is added to the My bookings list. The employees you added to the meeting get the "Toplantıya eklendiniz" ("You were added to a meeting") notification. The guests are added to the reception's list of expected visitors.
Tip:
- If you type the guest's email, the guest gets a welcome email (Wi-Fi, rules, sign-out link) when they are checked in.
- If the guest's business card is read at reception, the card is also added to your customer directory and to the customer directories of the employees in the meeting (see Reception desk).
- You get a reminder notification 15 minutes before the booking starts.
Common errors:
- "End must be after start." or "This time has passed.": correct the times.
- "You can’t book a past day.": select today or a later day.
- "We can’t reserve parking for your guest at this time: guest parking (2 cars) is full between 15:00–17:00.": there is no space in the guest parking at that time for a guest with a plate. Delete the plate or select another time.
- "Mavi oda is busy in Google Calendar at this time (10:00–11:00).": the room was booked in Google Calendar (see Booking with Google Calendar).
Important: Guest names, emails and plates are visible only to you, to the employees in the meeting and to reception; they are deleted when the retention period ends. Your company sets how far ahead you can book and the maximum length of a booking in hours.
Booking a parking space
Who: Employee · Where: Tools → Services → Booking → Parking
What it does: You book a parking space in the company car park for yourself or your guest.
- In the Booking box, tap Parking.
- Select the day and tap + Book next to the parking space. The Book parking · <space name> window opens.
- Select the Day, Start and End.
- Type the Licence plate. If you have a company vehicle, its plate is filled in. If it is a guest's car, you can also enter the plate next to the guest.
- Tap Book.
Common errors: "Enter the licence plate for parking.": the plate cannot be empty.
Tip: A parking space booking uses its own space; it does not reduce the guest parking capacity of reception.
My bookings: adding to the calendar and cancelling
Who: Employee · Where: Tools → Services → Booking → My bookings
What it does: You see your upcoming bookings, add them to your calendar or cancel them.
- Scroll down to the My bookings list at the bottom of the Booking box. Each line shows the room, day, time, title and the number of guests / employees (e.g. "Kuzey Yazılım tanışma toplantısı · 1 guests · 1 employees").
- To add the booking to your own calendar, tap Add to calendar. A calendar file (.ics) that you can add to a Google, Outlook or Apple calendar is downloaded.
- To cancel, tap Cancel. At the "Cancel this booking?" question, tap Yes, cancel.
Result: The cancelled booking is removed from the list. The employees in the meeting get the "Toplantı iptal edildi" ("Meeting cancelled") notification.
Tip: If you have no upcoming bookings, it says "You have no upcoming bookings."
Meetings you are invited to
Who: Employee · Where: Tools → Services → Booking → My bookings
What it does: If an employee added you to their meeting, the meeting is also shown in your list.
- Tap the "Toplantıya eklendiniz" notification or open the My bookings list.
- The meeting you were added to shows the You’re invited label and the name of the person who booked the meeting.
- To add the meeting to your calendar, tap Add to calendar.
Important: You cannot cancel a meeting you are invited to; the Cancel button is not shown. You see the guest names and the other participants; employees who are not in the meeting do not see them.
Booking with Google Calendar
Who: Employee · Where: Tools → Services → Booking
What it does: If your company turned on Google Calendar sync, the booking you make is added to your Google Calendar automatically; the meetings you set up in Google Calendar by selecting the room are also shown as bookings in Prozence.
Before you start: This feature depends on the company's Google Workspace connection and is turned on by an administrator (see Google Calendar sync in chapter 32). While sync is off, the texts and buttons in this task are not shown; bookings are kept only in Prozence.
When sync is on:
- At the bottom of the Book room window, it says "The booking will be added to your Google Calendar." The times when you are busy in your own calendar are shown as a warning (e.g. "Busy in your calendar: 14:00–15:30"). This warning does not block the booking.
- After the booking, the message ends with "… · Google Takviminize eklendi." ("… · added to your Google Calendar."). In My bookings, the In Google Calendar link is shown instead of Add to calendar.
- A meeting you set up in Google Calendar by selecting the room comes to Prozence within 10–15 minutes at most, with the From Google Calendar label. Outside participants are added to the reception's list of expected visitors.
- Times booked in Google are shown in the schedule as a hatched "Google" block; you cannot book these times from Prozence.
Important:
- You cannot cancel a meeting that came From Google Calendar in Prozence: "This meeting was booked in Google Calendar; cancel or change it in Google Calendar."
- If Google cannot be reached, the booking is still made and the warning "Couldn't be added to Google Calendar: …" appears.
Note: There is no screenshot for this task. The booking images in this chapter show the state with sync off.
Visitor pre-registration (expecting a guest)
Who: Employee · Where: Tools → Services → Visitors → + Expecting a visitor
What it does: You tell reception in advance about the guest you expect. Reception sees your guest in the list of expected visitors; when your guest arrives, you get the "Your guest has arrived" notification.
- In the Visitors box, tap + Expecting a visitor.
- Select the Day. You can register a visit up to 60 days ahead.
- If you want, type the Time (optional) (e.g. 16:30).
- Type the Guest’s full name.
- If you want, type Company (optional) and Licence plate (optional).
- If you want the guest to get a welcome email, type the Guest’s email (optional).
- If you want, type a Note for reception (optional) (e.g. "3. kat toplantı odasına yönlendirin" ("send them to the 3rd floor meeting room")).
- Tap Notify reception.
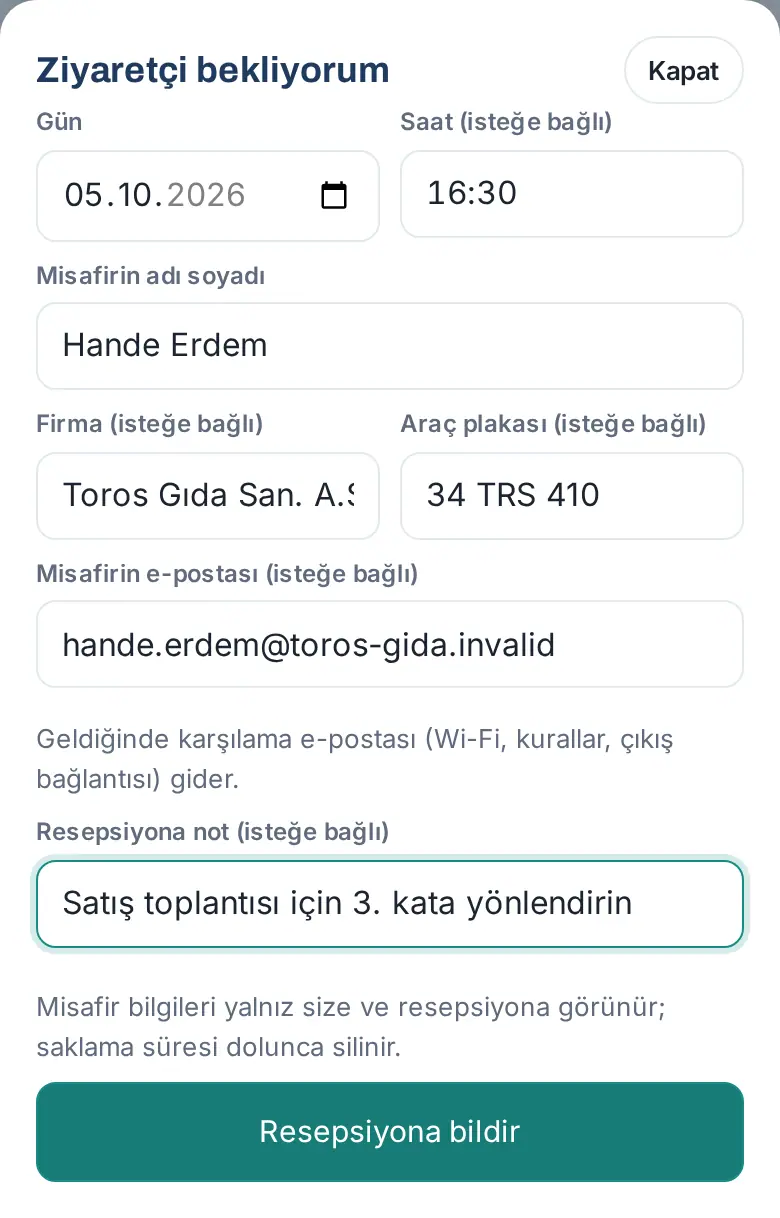
Result: The message "Reception notified: …" appears. The record is listed in the Visitors box as Expected. If the guest will not come, tap Cancel.
Common errors:
- "Enter the guest’s name."
- "Choose an arrival time for a guest with a car; guest parking is reserved by time.": if the company entered a guest parking capacity, the time is required for a record with a plate.
- "We can’t reserve parking for your guest at this time: guest parking (2 cars) is full between 15:00–17:00.": select another time or delete the plate.
- "Check the guest’s email address."
Tip: The guests you add when you book a meeting room are announced to reception automatically and are also shown in this box; you do not need a separate pre-registration.
Important: Guest details are visible only to you and to reception; they are deleted when the retention period ends.
When your guest arrives: Arrived, check in or No-show
Who: Employee (host), employees in the meeting · Where: Tools → Services → Visitors
What it does: If you greeted your guest yourself instead of reception, you check them in yourself. If they did not come, you mark them as "no-show".
Before you start: If your guest is still not checked in after the expected time (company setting, default 15 minutes), you get the "Misafiriniz geldi mi?" ("Has your guest arrived?") notification once.
- Tap the notification or open the Visitors box. The visitors you expect today are listed as Expected; for meeting guests, the room and time of the meeting are shown.
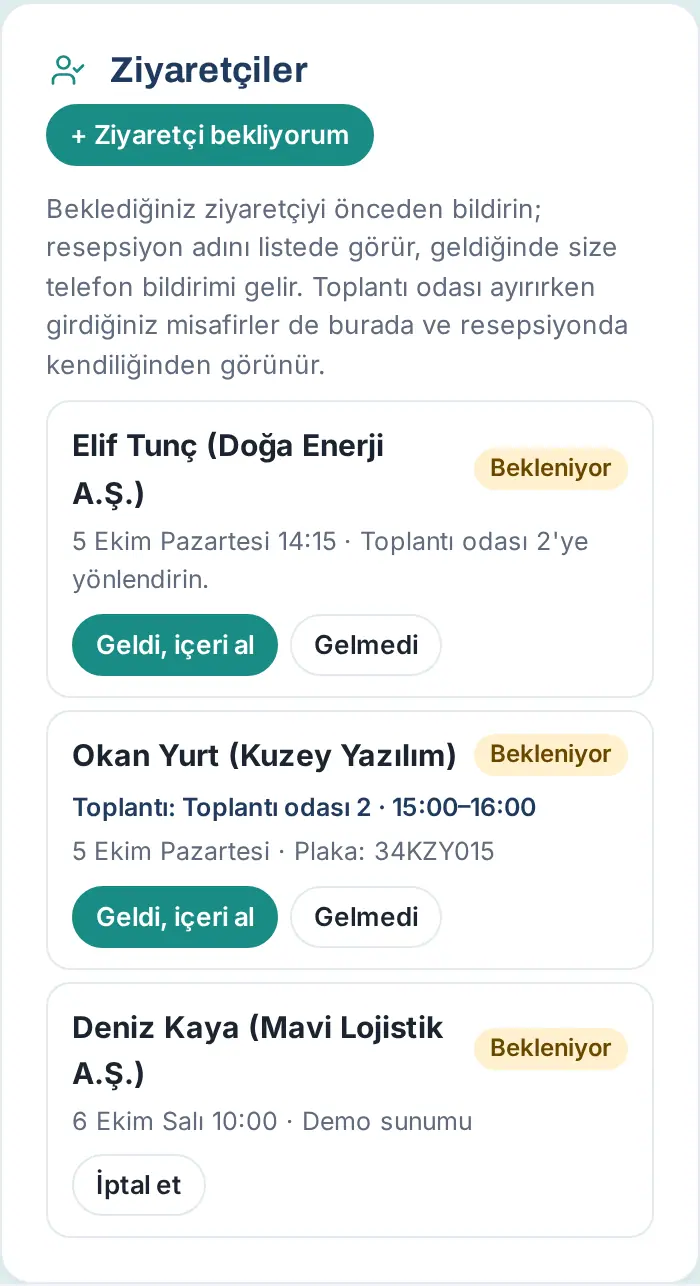
- If your guest has arrived, tap Arrived, check in.
- In the window that opens, select the "My guest has arrived. The visitor privacy notice was shown to them or will be sent with the welcome email." box.
- Tap Check in.
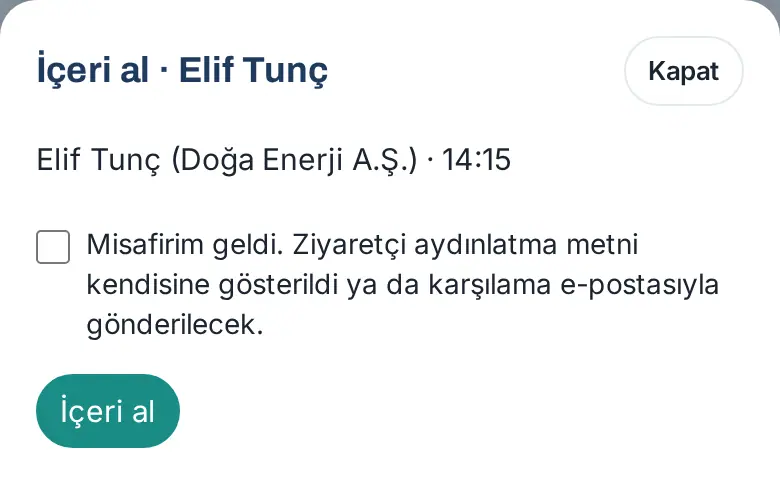
Result: The visitor is shown as on site; reception gets the "Ziyaretçi içeri alındı" ("Visitor checked in") notification. If the guest has an email, the welcome email is sent.
If they did not come: Tap No-show. The message "Marked as no-show: …" appears; the record stays in the log as "No-show".
Common errors:
- "Tick the confirmation box.": the privacy confirmation is required.
- "This guest is already checked in or the booking was cancelled.": reception checked the guest in before you.
Checking a visitor in at the reception desk
Who: Reception staff (Visitors → Operator) · Where: On a computer, Reception in the menu on the left; on a phone, Reception in the Tools strip
What it does: On this screen for reception, you register the arriving visitor, match them with the expected visitors and check them in in one step. The host and the employees in the meeting get a notification.
Before you start: Only people with the visitor operator permission see the screen. If you also have the mailroom permission, the Mailroom screen is also shown in the menu (see 24. Parcels, mailroom and purchasing).
- Open Reception in the menu. The status strip for today is shown at the top: Beklenen ("Expected"), On site and Misafir otoparkı ("Guest parking") (taken / capacity). The list refreshes automatically every 30 seconds.
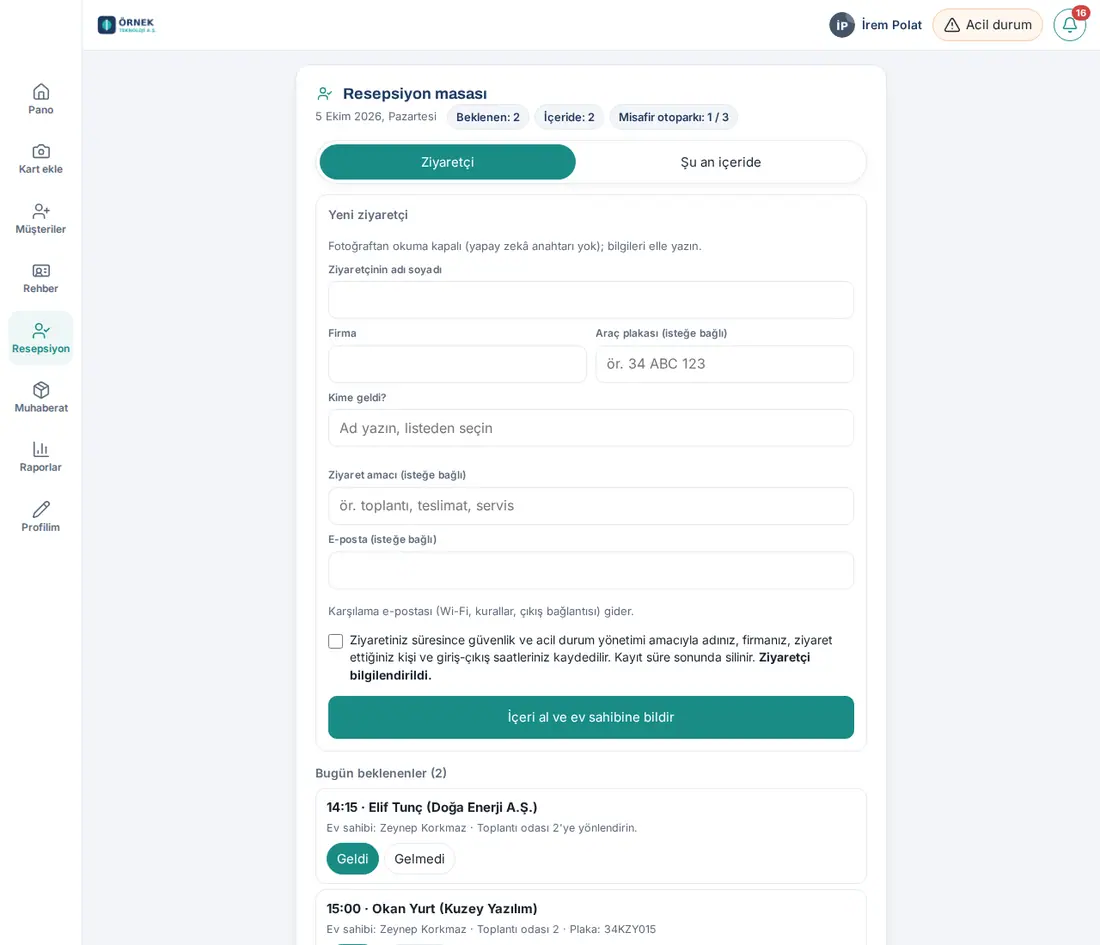
- If the visitor is expected today, click Arrived next to their name in the Expected today list. The form is filled in with the details and the line "Ön kaydı var: Elif Tunç → Zeynep Korkmaz · 14:15" ("Pre-registered: Elif Tunç → Zeynep Korkmaz · 14:15") is shown.
- If the visitor is not expected, fill in the New visitor form: Visitor’s full name, Company, Licence plate (optional), Visiting whom? (type a name and select it in the list).
- If you want, type the Purpose of visit (optional) and Email (optional). If an email is entered, the welcome email is sent.
- Show the privacy notice to the visitor and select the Visitor informed. box.
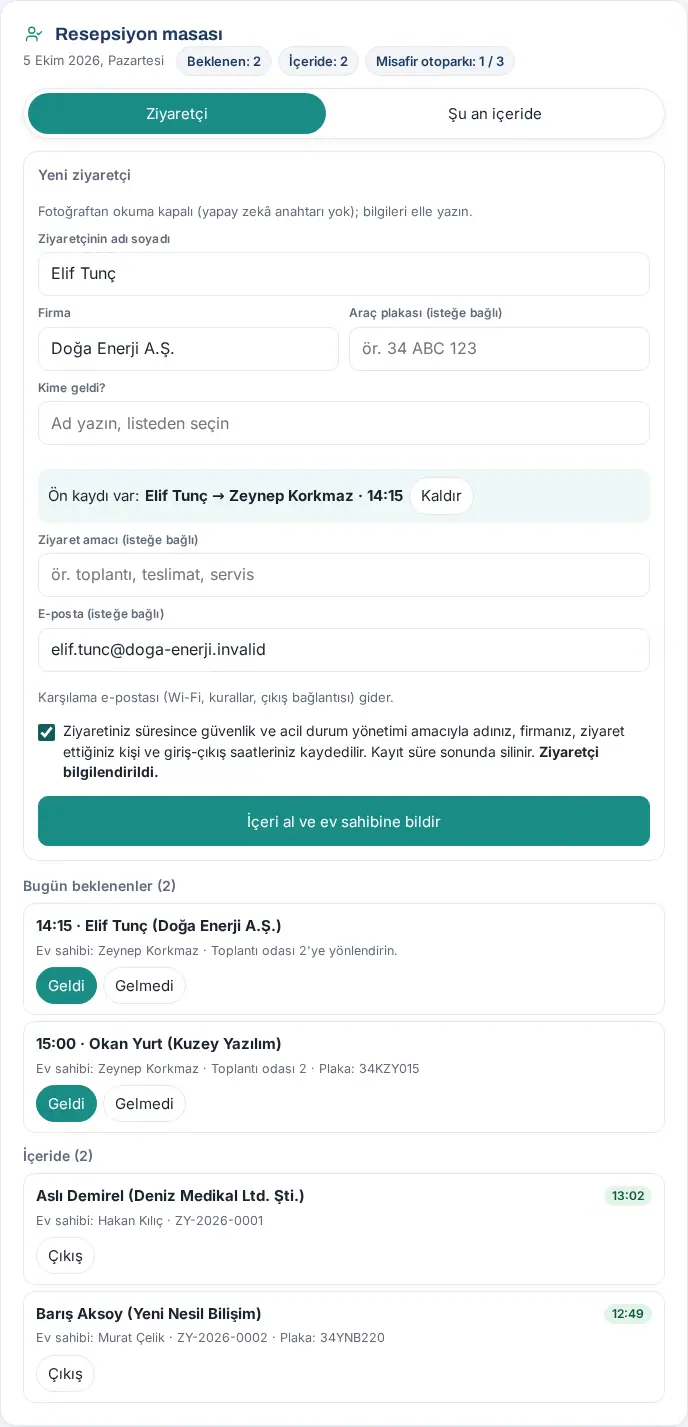
- Click Check in and notify host.
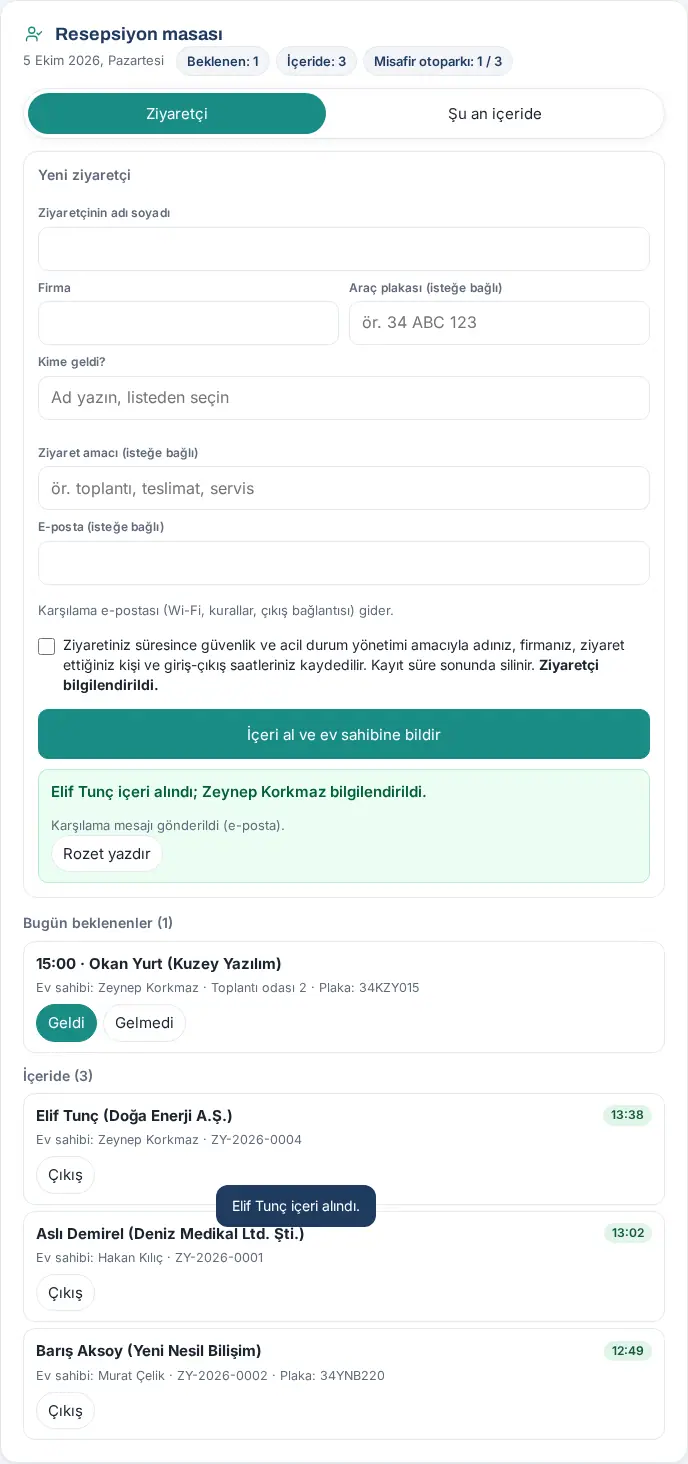
Result: The result is shown below the form: "Elif Tunç checked in; Zeynep Korkmaz notified." and "Welcome message sent (e-posta)." ("e-posta": email). To print a badge, click Print badge. The visitor moves to the On site list and gets a number (e.g. ZY-2026-0004).
Registering with a business card: If reading from photos is on in your company, the Photograph the business card button is shown above the form. You take a photo of the visitor's business card; the name and company are read and matched with today's expected visitors, and the card is added to the customer directory of the host and of the employees in the meeting ("Ziyaretçinizin kartviziti rehberinize eklendi" ("Your visitor's business card was added to your directory")). The photo is not stored.
Note: If reading from photos is not set up in your company, the screen says "Reading from photos is off (no AI key); type the details." and the photo button is not shown. The reception images in this chapter show this state.
Common errors:
- "Confirm that the visitor has been informed.": select the privacy box.
- "Pick the employee being visited from the list.": in the Visiting whom? field, type the name and then select it in the list.
- "Guest parking is full (3 / 2); direct the car elsewhere.": you can still check the visitor in; direct the car to another place.
- "The business card could not be read; type the details." or "Today’s photo reading limit has been reached; type the details."
On a phone: The Reception screen is the same on a phone; tap Reception in the Tools strip at the bottom.
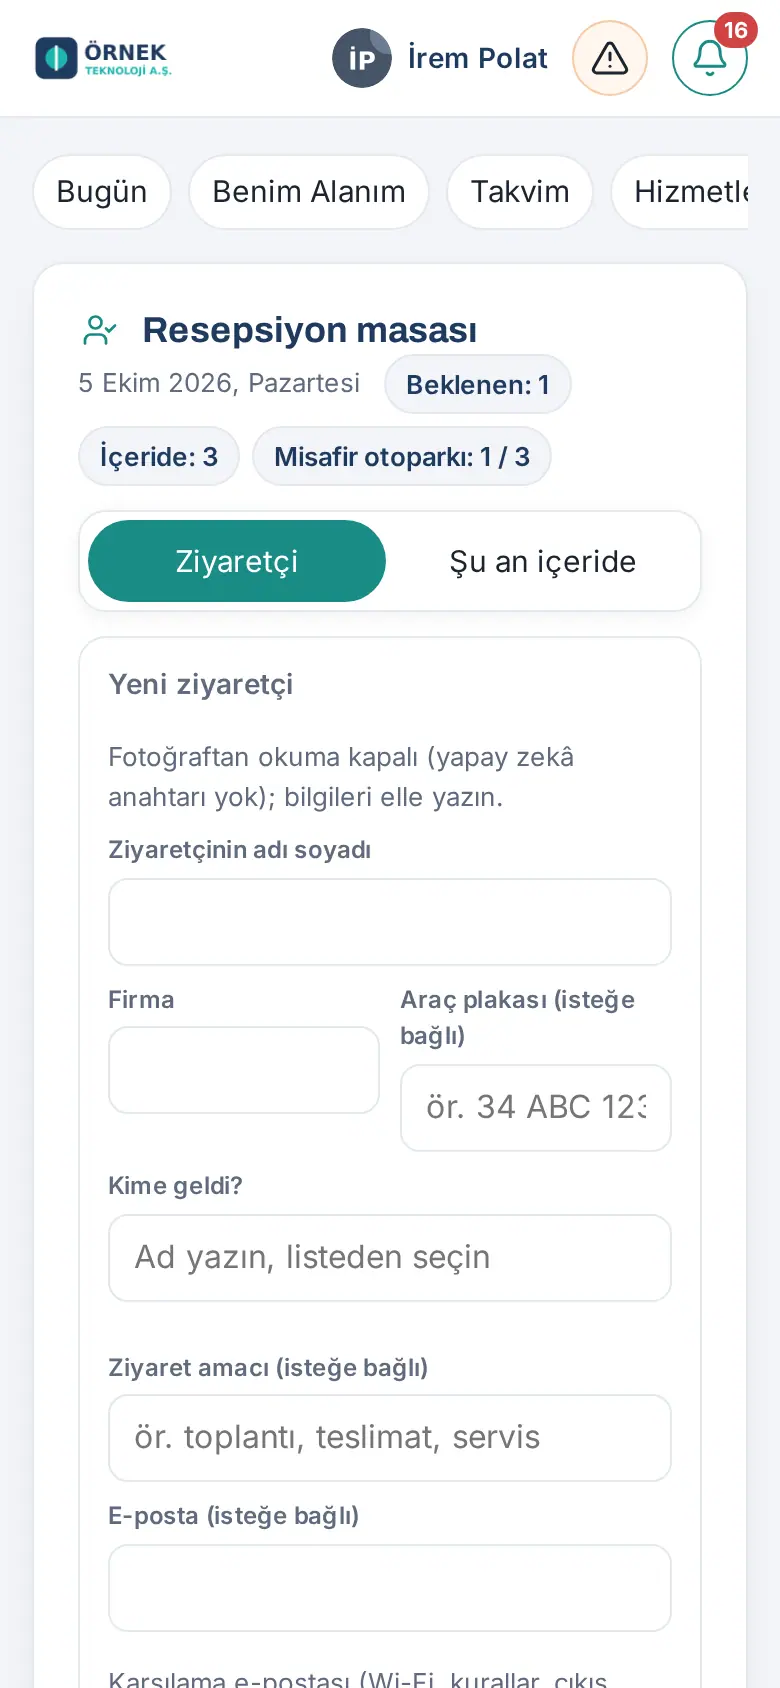
Tip: If a visitor will not come, click No-show in Expected today. You can also register a visitor who arrives without notice from the + New visitor window in Board → Services → Visitors (Save and notify host).
Signing a visitor out
Who: Reception staff · Where: Reception → On site
What it does: You record the sign-out time of a visitor who leaves. If the company defined exit points, you also mark which door they left by.
- In the On site list, click Sign out next to the visitor.
- If exit points are defined, the "Which exit?" question appears. Select the door (e.g. Ana giriş ("Main entrance"), Otopark kapısı ("Car park gate")) or click Not specified.
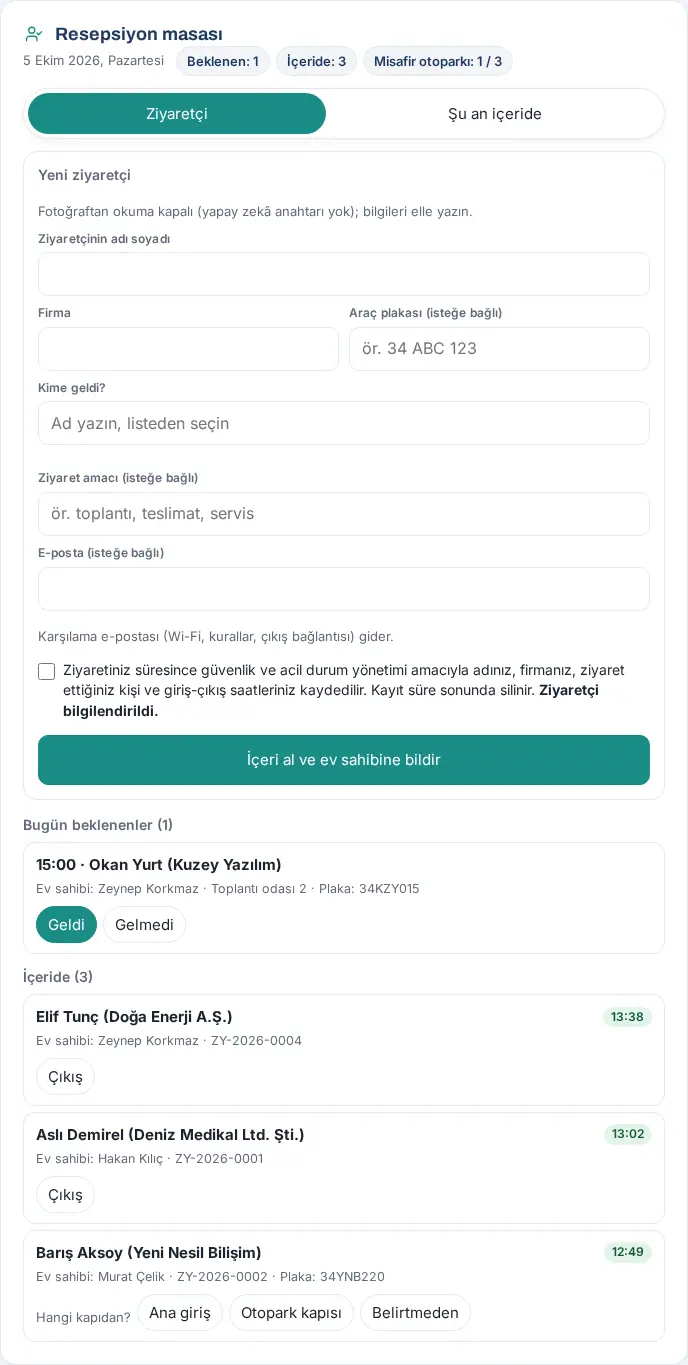
Result: The visitor leaves the On site list and is shown under Left today. If no exit points are set, sign-out is a single click.
Tip: The visitor can also sign out from their own phone (see From the visitor's side); the host gets the "Misafiriniz çıkış yaptı" ("Your guest has left") notification. At the end of the day, the sign-out of visitors who were not signed out is recorded automatically as "(gün sonu)" ("(end of day)").
Who is on site now
Who: Reception, visitors viewer, services manager, Admin, emergency responders · Where: Reception → On site now; Board → Services → Visitors → On site now
What it does: You see the visitors in the building at that moment and the employees in the office in one list. It is used for the count in an emergency.
- On the Reception screen, click the On site now tab.
- Under Visitors (n), the visitors on site (entry time, host, number, plate) are listed.
- Under Employees in the office (n), the employees who are in the office according to the work time record (entry time, department, office) are listed.
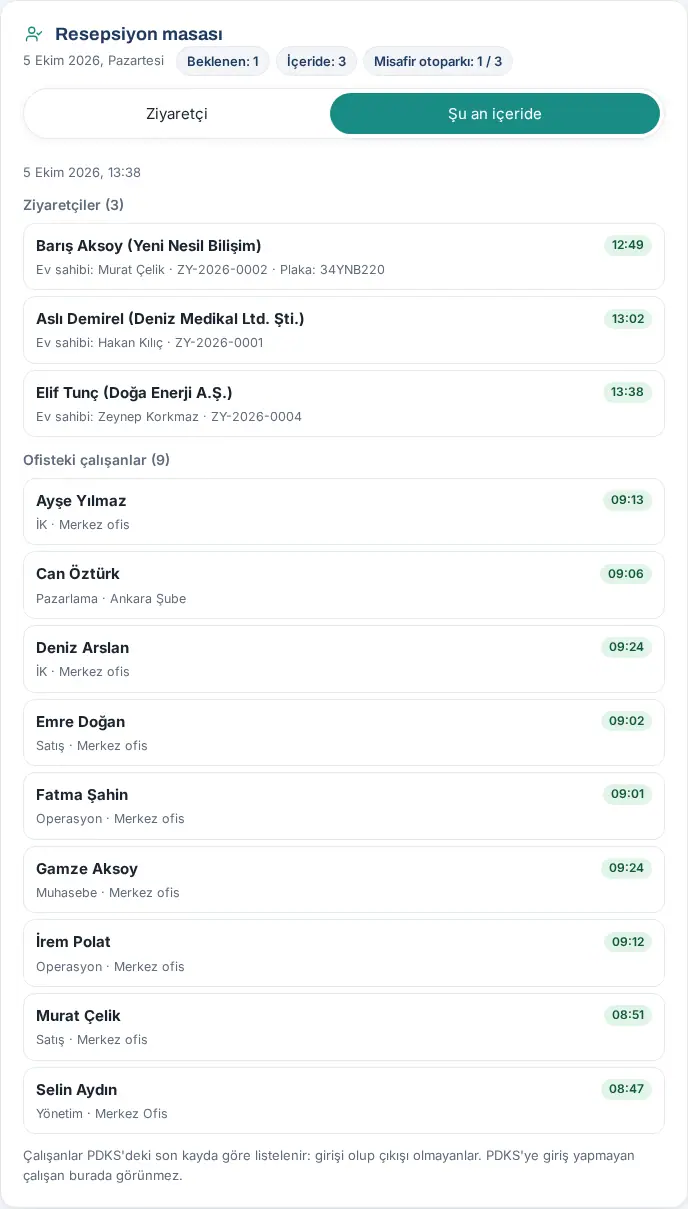
Important: Employees are listed based on the last entry in the work time (time and attendance, PDKS) record: those with a clock-in and no clock-out. A person who did not clock in, or who works remotely or in the field, is not shown here. If PDKS is off, it says "Time tracking is off, so employees in the office can’t be listed." In an emergency, also follow the I’m Safe check-in.
Reception: Today list and Log
Who: Reception staff, visitors viewer · Where: Board → Services → Visitors
What it does: You see all visitor movements of the day and past records; you resend the welcome message and export the records.
Today tab:
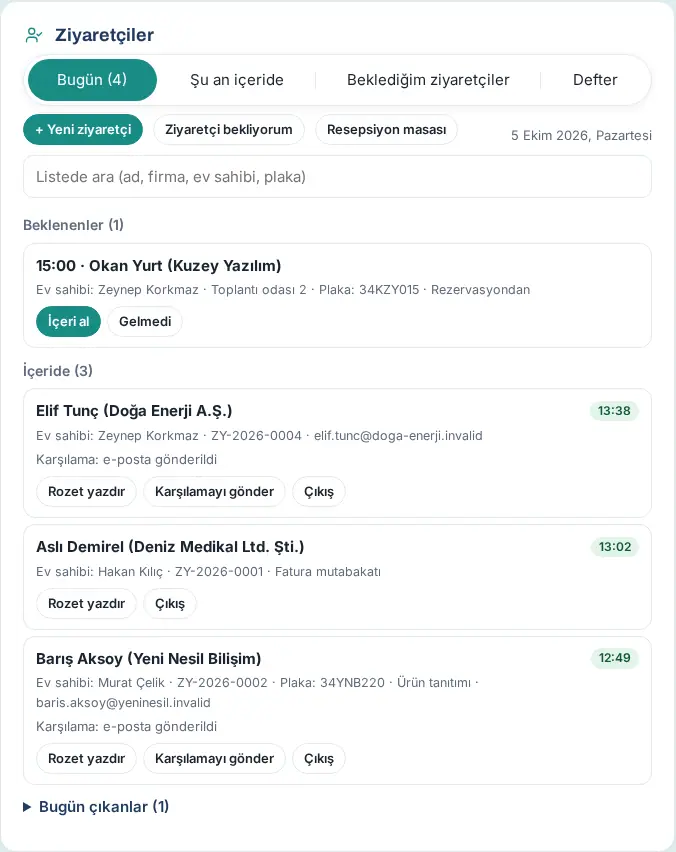
- In the Visitors box, open the Today (n) tab. The Expected and On site lists are shown; meeting guests have From booking next to them.
- Find the person by typing in the search box (Search the list (name, company, host, plate)).
- The line of a visitor on site shows the Welcome: e-posta gönderildi ("Welcome: email sent") status. If the visitor did not get the email, click Send welcome ("Welcome message sent.").
- Print the visitor card with Print badge; sign the visitor out with Sign out.
Log tab:
- Click Log.
- Select the start and end days.
- In the status list, select Checked in (default), No-show or All. All also shows pending and cancelled records.
- Filter by typing in the search box (Name, company, plate, number).
- To export the list, click Download CSV.
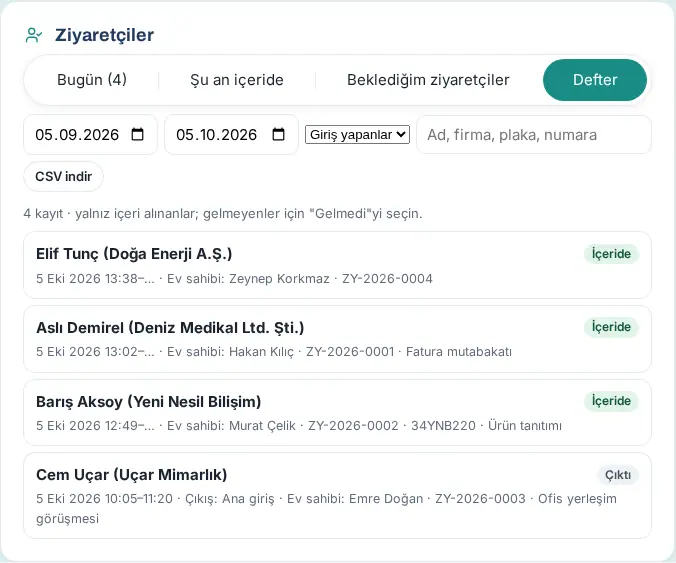
Tip: At the end of the day, meeting guests who were not checked in are automatically recorded in the log as "No-show". Monthly and per-person visitor reports are in Reports → Visitor (see 19. Reports).
Important: The welcome message can be resent to a visitor at most 3 times an hour ("Too many messages were sent to this visitor in a short time.").
From the visitor's side: welcome email and sign-out
Who: Visitor · Where: The visitor's email; the link in the email
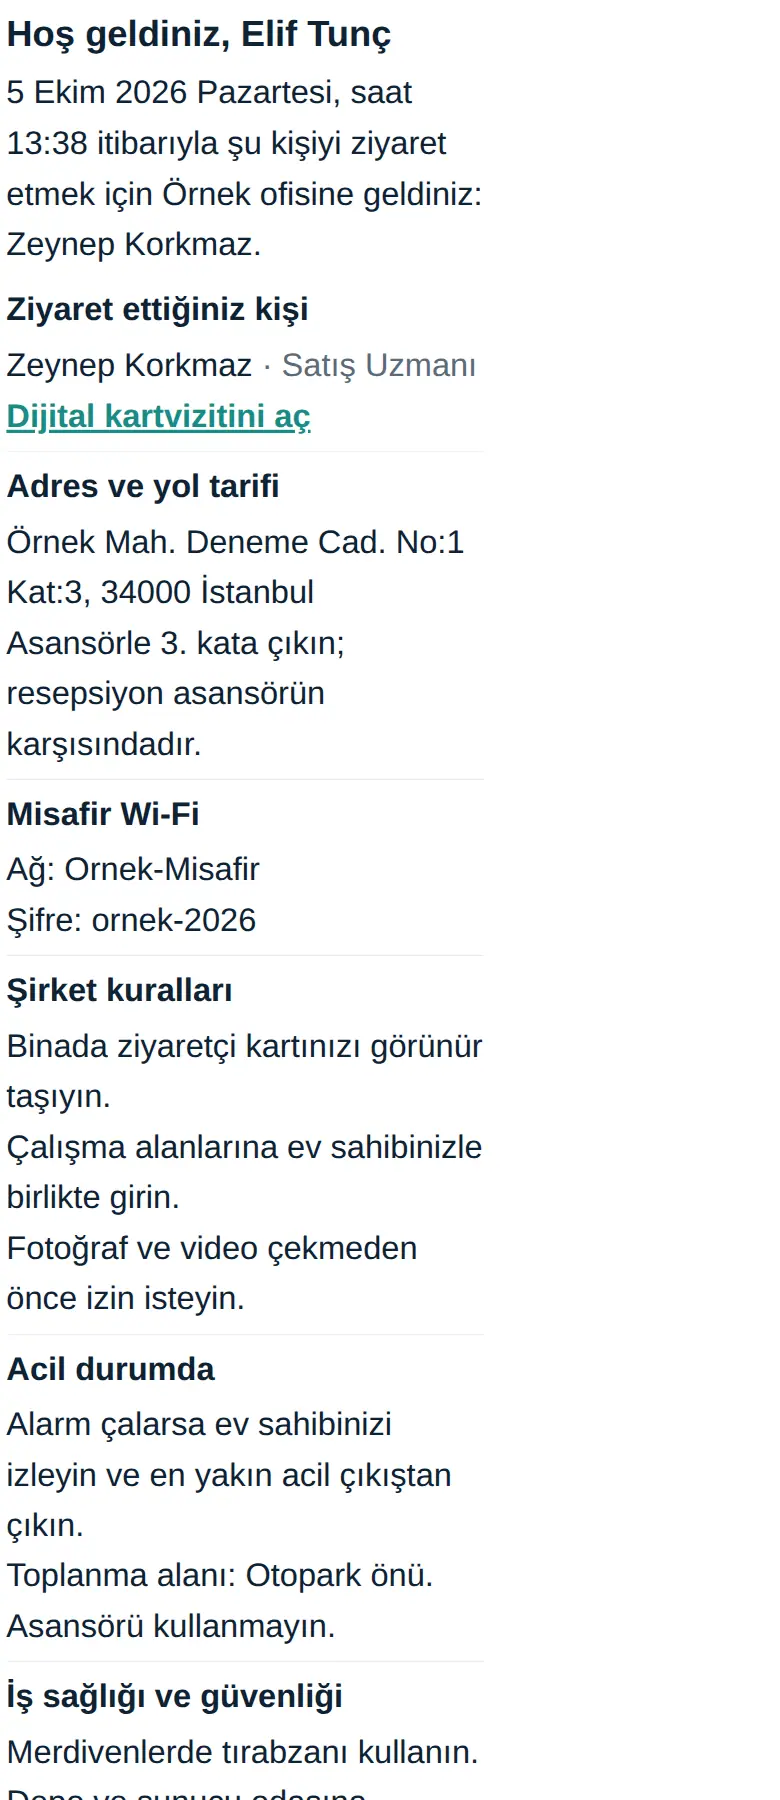
What it does: If an email address was entered, the visitor who is checked in gets a welcome email. The email contains the visit details, the address, the guest Wi-Fi details, the company rules and the emergency information. When the visitor leaves, they sign out themselves with the link in the email.
- The visitor opens the email with the subject "Örnek — hoş geldiniz" ("Örnek — welcome"). The email shows the visit time, the person visited and their digital business card, and the Adres ve yol tarifi ("Address and directions"), Misafir Wi-Fi ("Guest Wi-Fi"), Şirket kuralları ("Company rules"), Acil durumda ("In an emergency"), İş sağlığı ve güvenliği ("Occupational health and safety") and Acil çıkış ve toplanma alanı ("Emergency exit and assembly point") sections. A visitor with a plate also gets Otopark kuralları ("Parking rules").
- When leaving, the visitor opens the sign-out link in the email. The information page opens.
- If exit points are defined, the visitor selects the door under Hangi kapıdan çıkıyorsunuz? ("Which door are you leaving by?").
- The visitor taps Çıkış yaptım ("I've left").
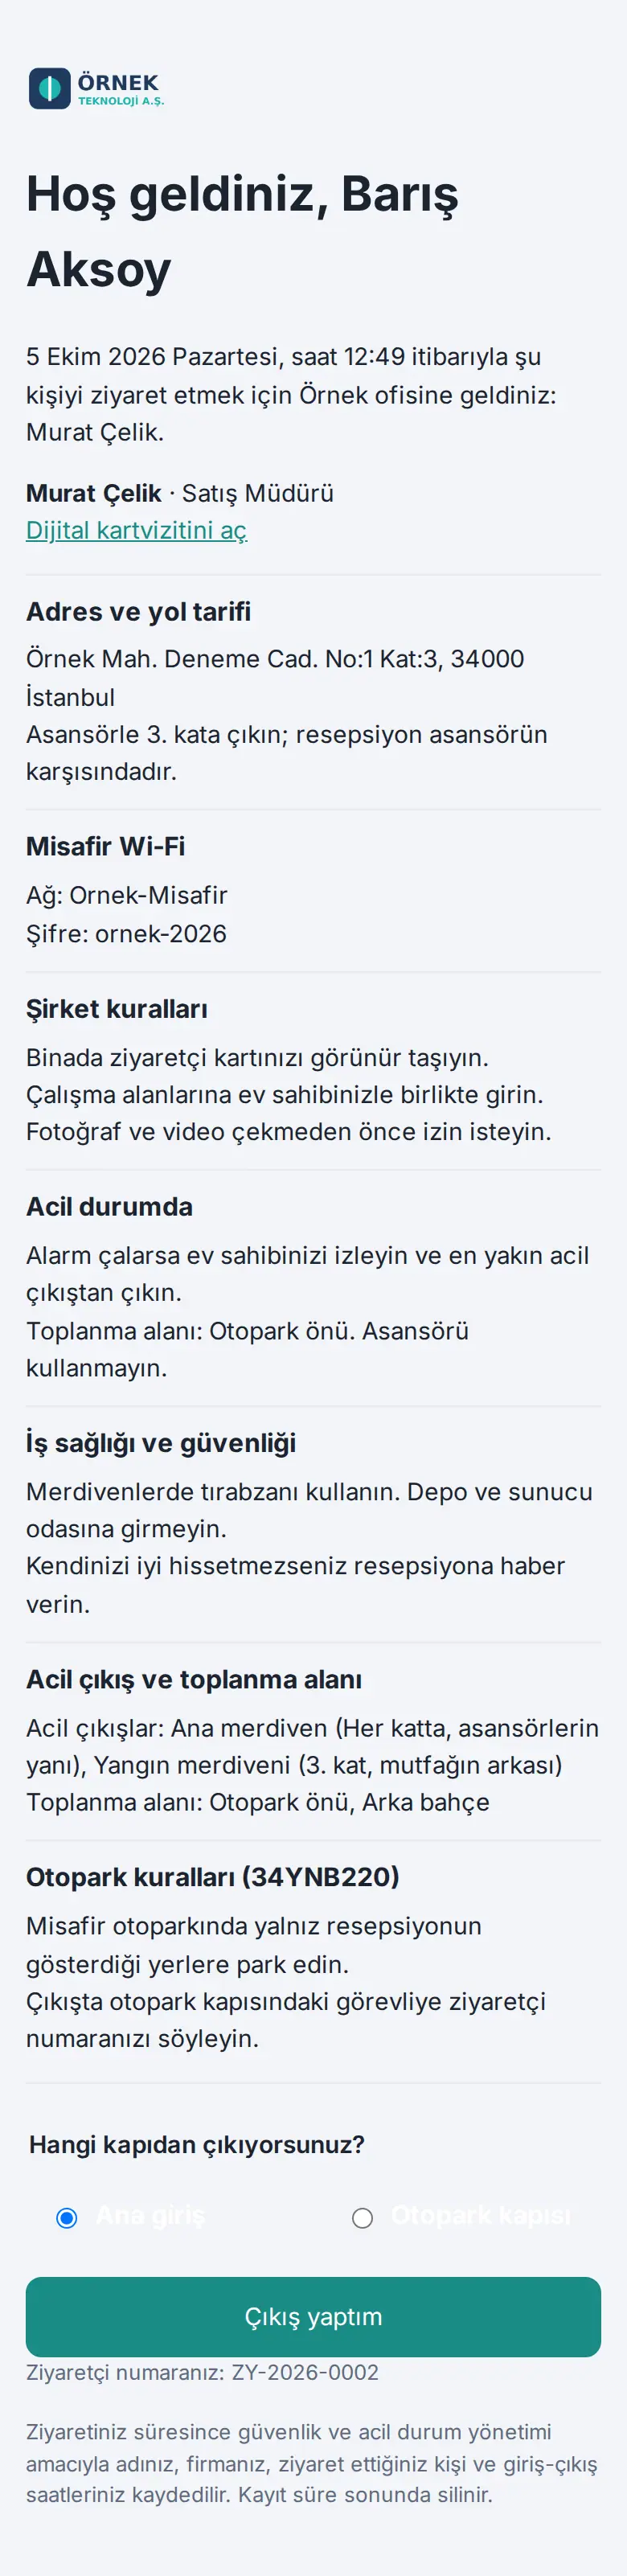
Result: The visitor's sign-out is recorded; the host gets the "Misafiriniz çıkış yaptı" notification. After sign-out, the page does not show the Wi-Fi and internal information.
Important: The welcome email and the visitor pages are in Turkish only. The link of the page is personal to the visitor; it must not be shared with anyone else. If an SMS provider is defined in your company and a phone number was collected, a short SMS is also sent.
QR self check-in (visitor)
Who: Visitor · Where: The QR code poster or tablet at reception
What it does: If there is no one at reception, the visitor scans the QR code at reception with their own phone and registers themselves. The host and reception get a notification.
Before you start: The company must have turned on the QR self check-in feature and put up the QR code at reception (see visitor settings in chapter 32).
Checking in:
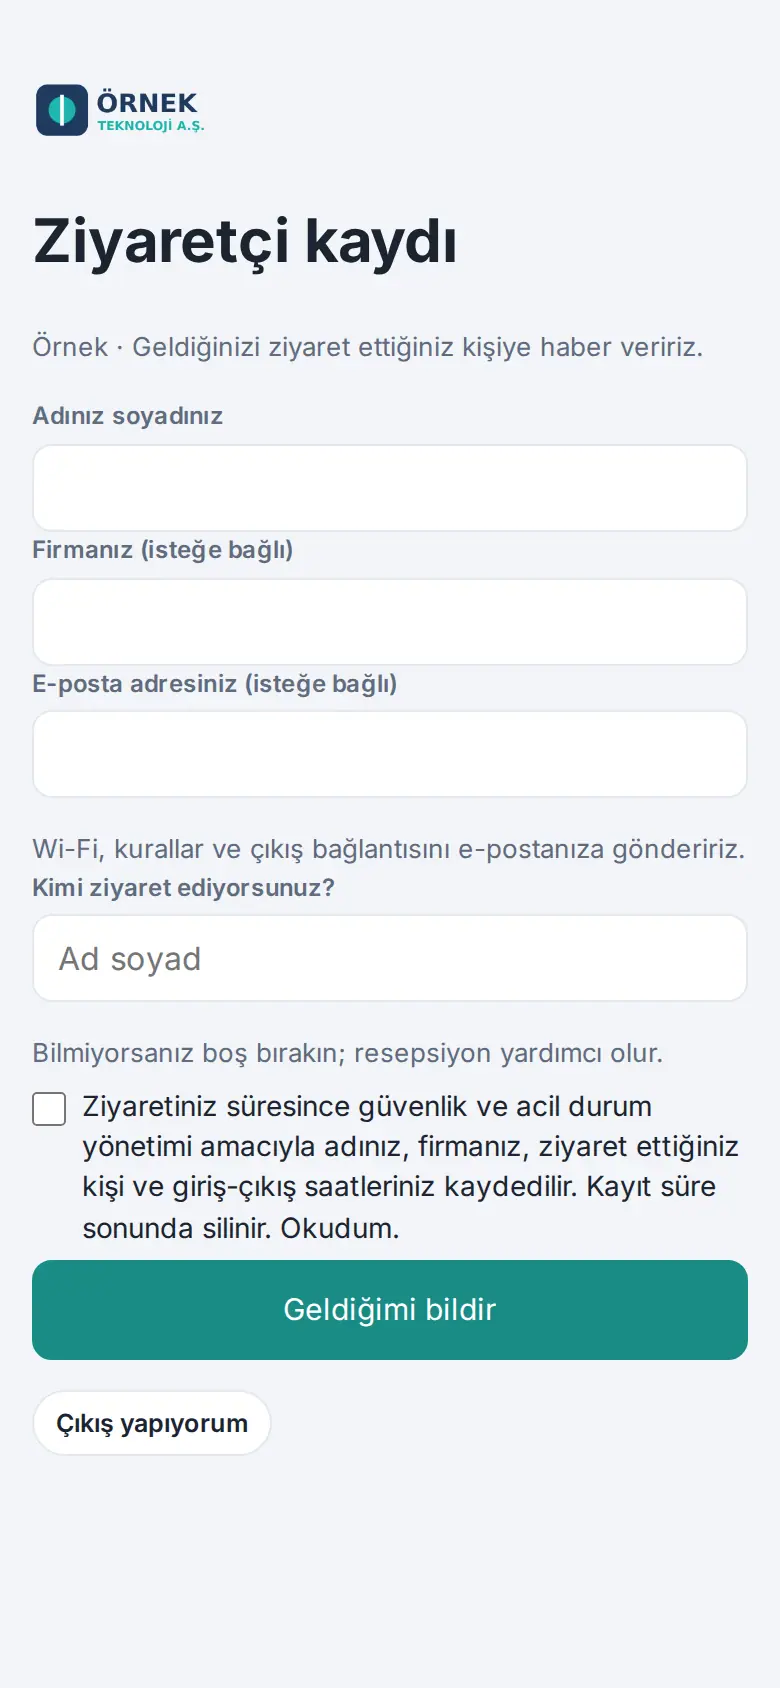
- The visitor scans the QR code at reception with their phone. The Ziyaretçi kaydı ("Visitor registration") page opens.
- The visitor types Adınız soyadınız ("Your full name"). If they want, they type Firmanız (isteğe bağlı) ("Your company (optional)") and E-posta adresiniz (isteğe bağlı) ("Your email address (optional)"); if they type an email, the Wi-Fi, the rules and the sign-out link come to their email.
- In the Kimi ziyaret ediyorsunuz? ("Who are you visiting?") field, the visitor types the name of the person they visit. If they do not know it, they leave it empty; reception helps.
- The visitor reads the privacy notice and selects the Okudum. ("I have read it.") box.
- The visitor taps Geldiğimi bildir ("Report my arrival").
Signing out:
- When leaving, the visitor scans the QR code again. If they registered with the same phone, the sign-out screen opens with one tap.
- If they sign out from another phone or tablet, they tap Çıkış yapıyorum ("I'm leaving") and type Adınız soyadınız and Ziyaretçi numaranız ("Your visitor number") (shown on the visitor card or in the welcome email).
- Under Hangi kapıdan çıkıyorsunuz?, the visitor selects the door and taps Çıkış yaptım.
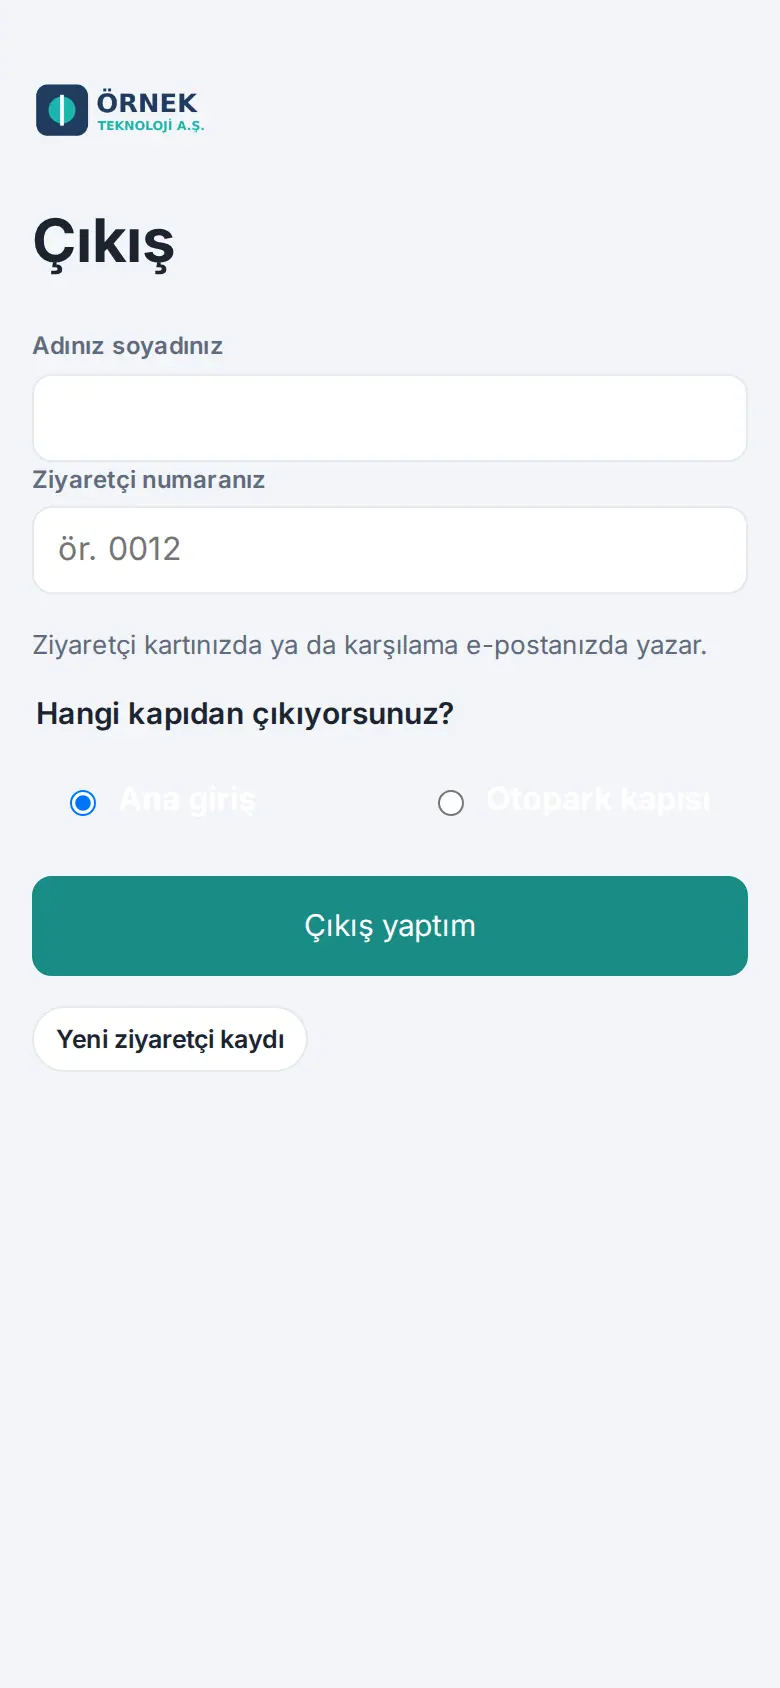
Important: If the registration was made on a shared tablet, only the initials are shown on the sign-out screen. If it is someone else, use the Yeni ziyaretçi kaydı ("New visitor registration") link. No ID document, photo or signature is collected.