24. Parcels, mailroom and purchasing
Screenshots show the Turkish interface of Prozence with fictional "Örnek Teknoloji A.Ş." data; the English interface has the same layout.
When a parcel, envelope, food, flowers or an official notice arrives for you, reception records it at the mailroom (muhaberat); you get a notification and a 4-digit pickup code. When you must send something for the company, you open a parcel or courier request and follow the four steps of your shipment (Requested → At the mailroom → In transit → Sent) in the app. When something must be bought for work, you open a Purchasing request: the request goes through management approval, and then the purchasing officer places the order.
This chapter is for employees, mailroom (reception) staff, purchasing approvers and purchasing officers. For settings, see 31. Request, mailroom, purchasing and fixed asset management.
Who: Employee · Mailroom staff · Purchasing approver · Purchasing officer
In this chapter
Parcels (employee)
- Parcels and mail box
- Picking up a delivery for you
- Requesting a parcel or courier shipment
- Following your shipment and marking it delivered
Mailroom (staff)
- Opening the mailroom desk
- Logging an incoming delivery
- Logging from a label photo (AI)
- Handing over a delivery
- Processing outgoing shipping requests
- Mailroom log: incoming and outgoing
Purchasing
- Purchasing box
- Opening a purchase request
- Adding alternatives and why this was chosen
- Purchasing without approval (if you are authorized)
- Following and cancelling your request
- Approving or rejecting as an approver
- Procurement list: order and receipt
- All purchase requests and CSV
Before you start: The Mailroom and Purchasing modules are turned on separately in the company; both are off by default. If you do not see the Parcels and mail or Purchasing box, that module is not on in your company. The screens in this chapter use data from the fictional "Örnek Teknoloji A.Ş.".
Parcels and mail box
Who: Employee · Where: Tools → Services → Parcels and mail (on a computer, Board → Services)
What it does: Shows the deliveries that arrived for you and wait for pickup, your pickup code and your own shipping requests.
- Tap Tools in the bottom menu and select Services in the strip at the top.
- Go to the Parcels and mail box.
- If a delivery waits for you, its card shows a title for its type (e.g. Your flowers have arrived), and below it the carrier, type, arrival time and Pickup point. The Pickup code shows in large characters on the card.
- Under the Past and outgoing parcels heading, the deliveries you picked up and the shipping requests you opened are listed.
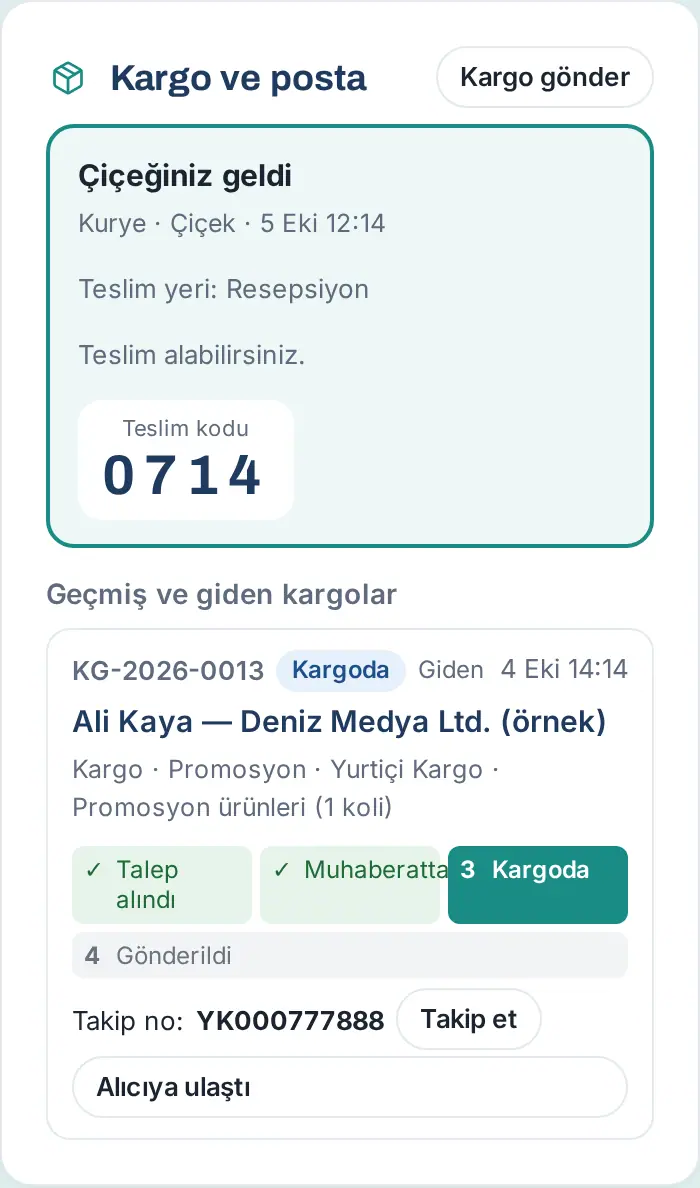
Delivery types and notification titles:
| Type | Notification title | Note |
|---|---|---|
| Parcel (box / package) | Your parcel has arrived | You get a reminder if you do not pick it up. |
| Envelope | Your envelope has arrived | |
| Documents | Your documents have arrived | |
| Official notice | An official notice arrived for you | "Collect the official notice in person." |
| Courier | Your courier delivery has arrived | |
| Meals | Your food has arrived | "Pick it up before it gets cold." No reminder is sent. |
| Flowers | Your flowers have arrived | No reminder is sent. |
| Bank / credit card | Your bank / credit card has arrived | "Collect it in person with your ID." |
| Other | Your delivery has arrived |
Result: If nothing waits for you, the box shows "No parcels for you. When one arrives you’ll get a notification and a pickup code."
Tip: Deliveries that wait for your pickup also show in the Waiting for you list (e.g. "Your food has arrived and is waiting for you"; see 09. Notifications).
Picking up a delivery for you
Who: Employee · Where: Parcels and mail → Pickup code
What it does: Your delivery is given only to you, with the pickup code.
- Tap the "Your parcel has arrived" notification (or "Your food has arrived" etc., by type), or open the Parcels and mail box.
- Go to the Pickup point shown on the card.
- Tell the staff member the 4-digit Pickup code shown on the card.
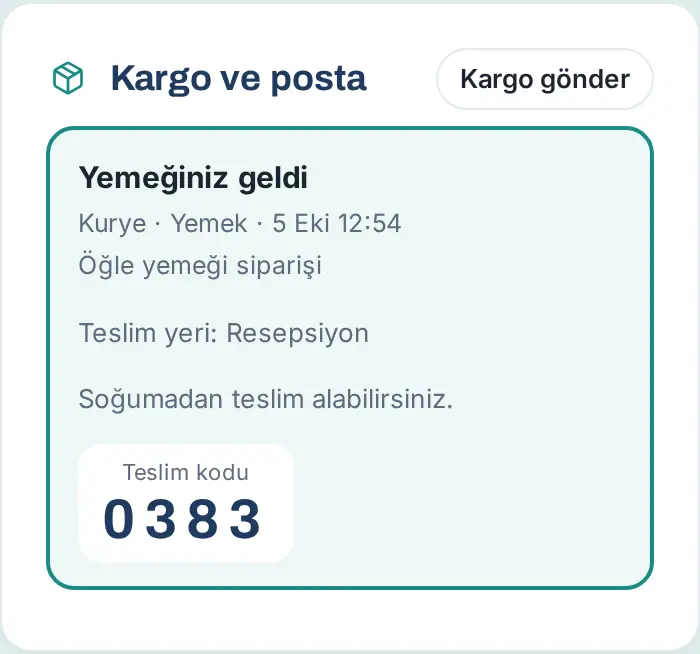
Result: When the staff member enters the code, the delivery is handed over and you get a "handed over" notification. The delivery moves to the Past and outgoing parcels list.
Tip:
- If someone else collects your delivery for you (the staff member hands it over without a code, with the name of the person collecting), you get a notification with that person's name.
- If you are on leave, the person covering for you is also notified.
- For a parcel that is not picked up, you get a reminder at the interval the company sets (by default every 2 days), at most 3 times. No reminder is sent for food and flowers.
Important: The pickup code shows only on your screen; tell the code only to the mailroom staff member.
Requesting a parcel or courier shipment
Who: Employee · Where: Parcels and mail → Send a parcel
What it does: When you must send something for the company, you open a request to the mailroom. The mailroom prepares the shipment, gives it to the carrier or courier and tells you the carrier and the tracking number.
Before you start: The Send a parcel button shows only if your company turned on outgoing shipping requests.
- In the Parcels and mail box, tap Send a parcel. The top of the window tells you where to leave the package (e.g. "The mailroom prepares the shipment; once shipped you’ll get the carrier and tracking number. Leave the package at the pickup point (Resepsiyon).").
- In the Recipient (person and company) field, type the recipient (e.g. "Berk Yalın — Mavi Ajans Ltd.").
- Type the Full address and Recipient phone.
- In the Contents field, type what you send (e.g. "Catalog and samples (1 box)").
- In the Shipping method list, select Parcel or Courier.
- In the Content category list, select Contract, Documents, Promotional, Marketing or General.
- In the Payment list, select Sender pays (company) or Recipient pays.
- If the shipment must go out the same day, select the Urgent (ship the same day) check box.
- If you want, type a Note (optional).
- Tap Request shipment.
- Leave the package at the pickup point.
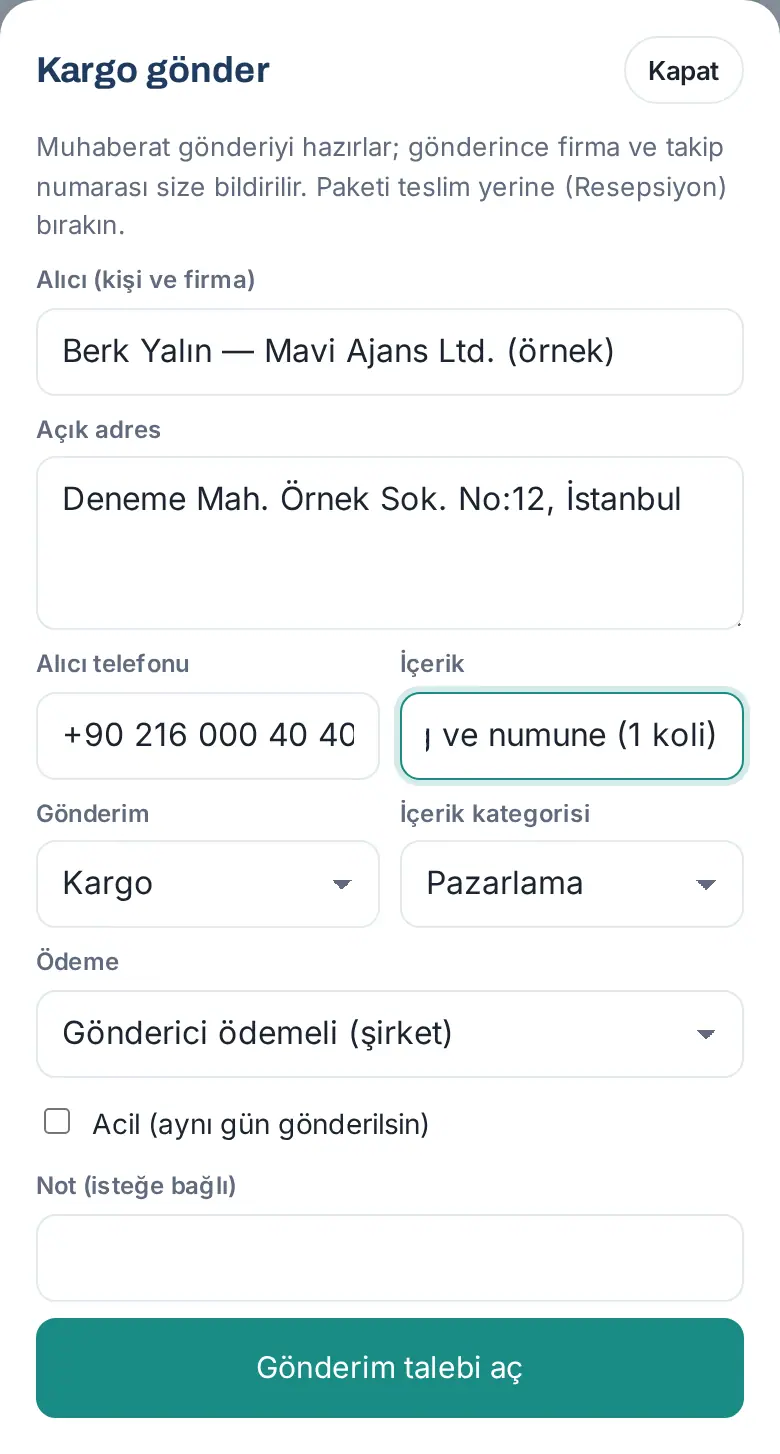
Result: The message "Shipping request received: KG-…" shows; the request is added to the Past and outgoing parcels list with the Requested status. Mailroom staff get a "Shipping request" (for a courier: "Kurye gönderim talebi", "courier shipping request") notification.
Common errors:
- "Write the recipient’s name and full address." — the recipient or the address is empty.
- "You’ve opened many shipping requests today." — the daily limit is reached; try again tomorrow.
- "Outgoing shipping requests are off at this company." — your company turned off this feature.
Following your shipment and marking it delivered
Who: Employee (sender) · Where: Parcels and mail → Past and outgoing parcels
What it does: You see the step your shipment is at, its carrier and tracking number; when it reaches the recipient, you close the record.
- In the Parcels and mail box, find your shipment in the Past and outgoing parcels list.
- Look at the four-step bar: Requested → At the mailroom → In transit → Sent. Completed steps show with ✓, and the current step shows in a dark color.
- If the shipment was given to the carrier, the Tracking no. shows. If there is a Track link, it opens the carrier's tracking page; if not, copy the tracking number with Copy.
- When the shipment reaches the recipient, tap Delivered to recipient.
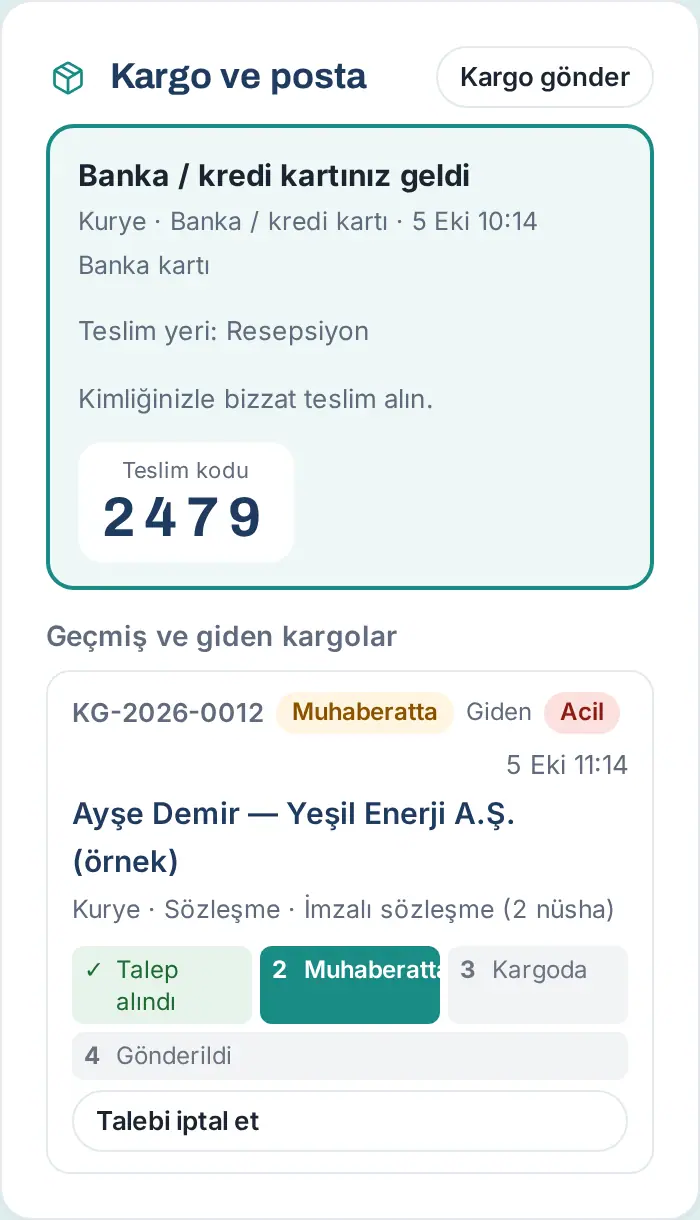
Result: The message "Marked as sent: delivered to the recipient." shows; the four steps are complete.
Cancelling the request: Before the shipment is given to the carrier (while it is Requested or At the mailroom), tap Cancel request. The message "Shipping request cancelled." shows.
Important:
- You cannot cancel a shipment that was given to the carrier ("A shipped parcel can’t be cancelled.").
- Delivered to recipient shows only on a shipment in In transit status ("Only a shipment handed to the carrier can be marked "delivered"."). The status is not fetched automatically from the carriers; you or the mailroom mark this step.
Opening the mailroom desk
Who: Mailroom operator (mailroom staff, reception) · Where: Left menu → Mailroom (on a phone, Tools strip → Mailroom)
What it does: A separate desk screen where you log and hand over incoming deliveries. Employees do not see this screen.
Before you start: If you do not see the Mailroom button in the menu, you are not an Operator in the Mailroom module (see chapter 31). If you also handle visitors, Reception also shows in the menu (see 26. Meeting rooms and visitors).
- On a computer, click Mailroom in the left menu. On a phone, tap Tools and select Mailroom in the strip at the top.
- The Mail room desk opens. Today's date and the count Deliveries awaiting pickup: N show at the top.
- Below are the Incoming items form and the Deliveries awaiting pickup (N) list.
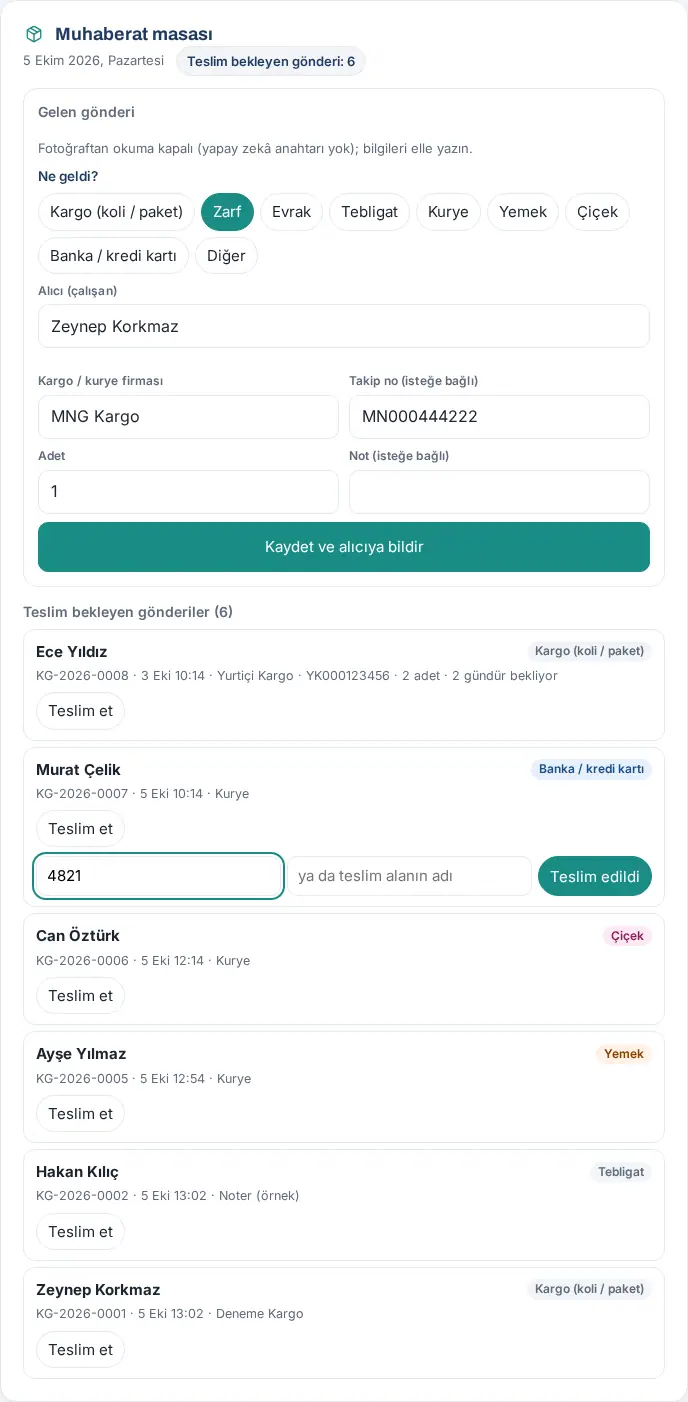
Tip: The list refreshes by itself every 30 seconds; what you typed in the form is not deleted. You can do the same work in the Board → Services → Parcels and mail → Mailroom (N) tab (+ Log incoming parcel, Awaiting pickup, Shipping requests, Log).
Logging an incoming delivery
Who: Mailroom operator · Where: Mail room desk → Incoming items
What it does: You log the incoming delivery in the name of the recipient employee. The employee gets a notification for its type and a pickup code.
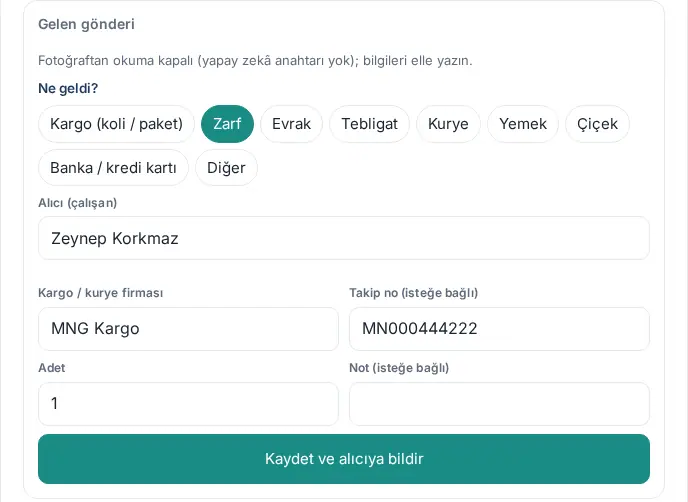
- Under What arrived?, select the type: Parcel (box / package), Envelope, Documents, Official notice, Courier, Meals, Flowers, Bank / credit card or Other.
- Start to type the name in the Recipient (employee) box and select the employee in the list.
- Type the Carrier / courier or select it in the list.
- If there is one, type the Tracking no. (optional).
- Enter the Pieces (default 1).
- If you want, type a Note (optional) (e.g. the sender).
- Click Save and notify recipient.
Result: The message "Saved; <employee> was notified." shows; the form clears for the next delivery and the delivery is added to the Deliveries awaiting pickup list.
Common errors:
- "Choose the recipient from the list." — you typed the name but did not select it in the list.
- "The mailroom is off at this company." — the module is turned off.
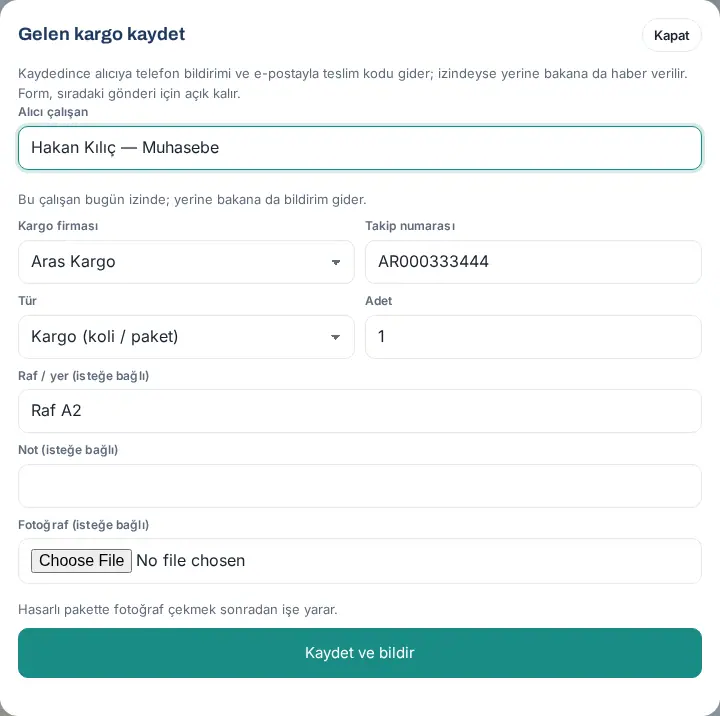
Tip: You can do the same in the Parcels and mail box from Mailroom (N) → the + Log incoming parcel window. This window also has the Shelf / spot (optional) and Photo (optional) fields ("A photo of a damaged parcel helps later."); the button is Save and notify. If the recipient is on leave today, it shows "This employee is on leave today; their cover will also be notified."
Logging from a label photo (AI)
Who: Mailroom operator · Where: Mail room desk → Photograph the label
What it does: You take a photo of the shipping label; AI reads the recipient, the sender, the carrier, the tracking number and the type, and fills in the form for you.
Before you start: This button shows only if the company's AI key is set (Admin → Customer directory; see 12. Customer directory administration). If there is no key, the top of the form shows "Reading from photos is off (no AI key); type the details." and you enter the details manually.
- Tap Photograph the label. On a phone, the rear camera opens.
- Take a sharp photo of the label. "Reading the label…" shows.
- The details that were read fill the form: type, Carrier / courier (with its name in the carrier list in Admin, e.g. "YURTİÇİ KARGO" → "Yurtiçi Kargo"), Tracking no. and "Sender: …" in the Note field.
- Recipient:
- if there is one strong match, the employee is selected automatically;
- if there are several possible employees, buttons show under Suggested recipient:; tap the correct person;
- if there is no match, type the name in the Recipient (employee) box and select it.
- If you do not want to attach the label photo to the record, clear the Attach the label photo to the record check box.
- Check the details and tap Save and notify recipient.
Important: Always check the details that were read. If the recipient name on the label cannot be read, it shows "No recipient name could be read on the label." Reading is limited to 200 times per person per day.
The trial site of this guide has no AI key, so there are no screenshots of these steps; the steps were written from the texts in the app.
Handing over a delivery
Who: Mailroom operator · Where: Mail room desk → Deliveries awaiting pickup
What it does: You give the delivery to the correct person, with the pickup code the employee tells you.
- Find the delivery in the Deliveries awaiting pickup list. Each row shows the recipient's name, a type badge, the number, the arrival time, the carrier, the tracking no. and (if it has waited for more than one day) a note such as "waiting for 2 days".
- Click Hand over.
- Type the 4-digit code the employee tells you in the Pickup code box.
- If someone else collects the delivery, leave the code empty and type the name of the person collecting in the or the name of the person collecting box.
- Click Handed over.
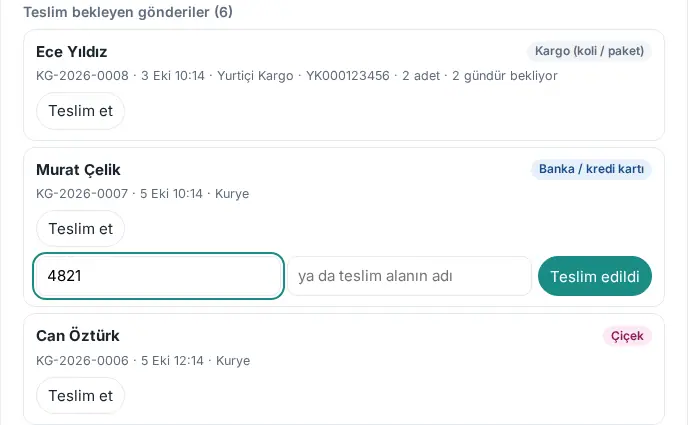
Result: The message "Handed over: <employee>" shows; the delivery leaves the list and the employee gets a notification. If someone else collected it, the notification shows that person's name.
Common errors:
- "Enter the pickup code or the name of the person collecting." — both boxes are empty.
- "Wrong pickup code." — ask the employee for the code again.
- "Too many wrong codes; for handover without a code, write the name of the person picking up."
- "This parcel was already handed over."
Important: Get the code from the employee in person. The code shows only on the recipient's screen.
Processing outgoing shipping requests
Who: Mailroom operator · Where: Board → Services → Parcels and mail → Mailroom (N) → Shipping requests (N)
What it does: You prepare the employees' shipping requests in order, give them to the carrier or courier and send the tracking number to the sender.
- In the Board → Services tab, open the Parcels and mail box.
- Click the Mailroom (N) tab, then Shipping requests (N). Each request shows the number, status, recipient, address, sender, parcel or courier, content category, phone, contents and payment method. Urgent requests have a red badge.
- When the package reaches you, click Received at mailroom. The request becomes At the mailroom.
- To write the address on the label, click Copy address ("Copied.").
- When you give the package, click Handed to carrier (for a courier, Handed to courier).
- In the carrier list, the company's default carrier is already selected (for a courier, "Kurye"); change it if necessary.
- Type the Tracking number.
- If you want, paste the address of the carrier's tracking page in the Tracking link (optional, https://…) field.
- Click Save.
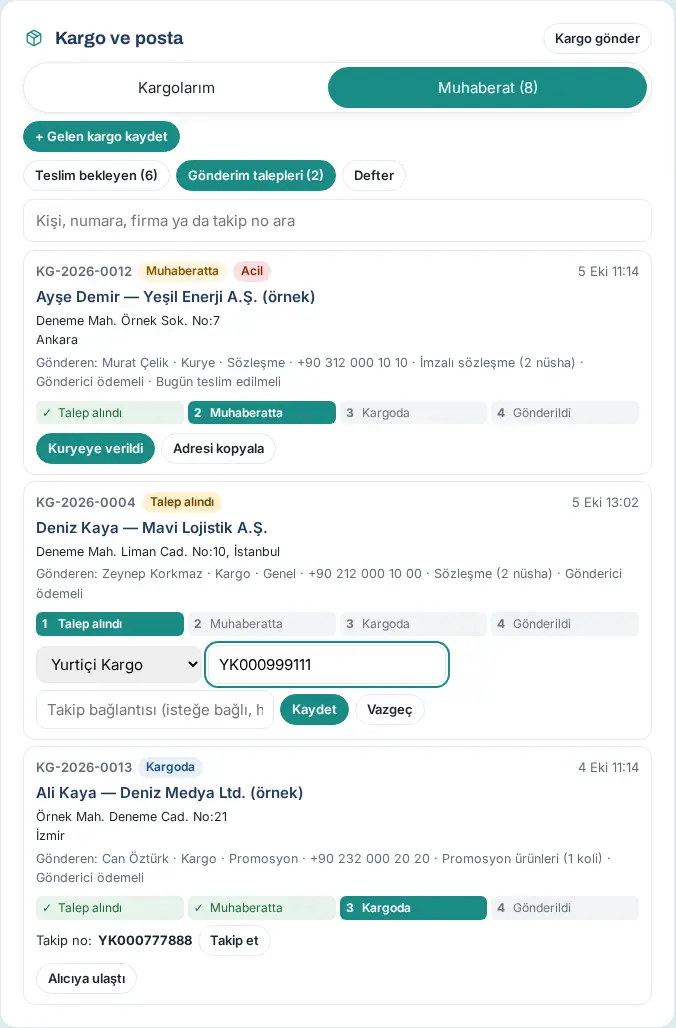
Result: The request becomes In transit; the sender gets a "Gönderiniz kargoya/kuryeye verildi" ("your shipment was handed to the carrier / courier") notification with the carrier and the tracking number.
Tip:
- Shipments of the last 30 days in In transit status also stay at the end of this list. If you learn that the recipient received it, click Delivered to recipient; the sender gets a notification.
- The Track link is made in this order: the link in the record, the carrier template in Admin, the built-in addresses of UPS / DHL / FedEx. If there is none, the tracking number is copied with Copy.
Common errors:
- "Choose the carrier."
- "The tracking link must start with https://."
- "This entry was already shipped or cancelled."
Mailroom log: incoming and outgoing
Who: Mailroom operator, mailroom viewer · Where: Parcels and mail → Mailroom → Log
What it does: Shows all incoming and outgoing deliveries month by month in one list; you can export them.
- In the Mailroom (N) tab, click Log.
- Change the month with the ‹ and › buttons.
- Select the All, Incoming or Outgoing filter.
- If you want, type in the search box (Search person, number, carrier or tracking no.).
- For a file, click Download CSV.
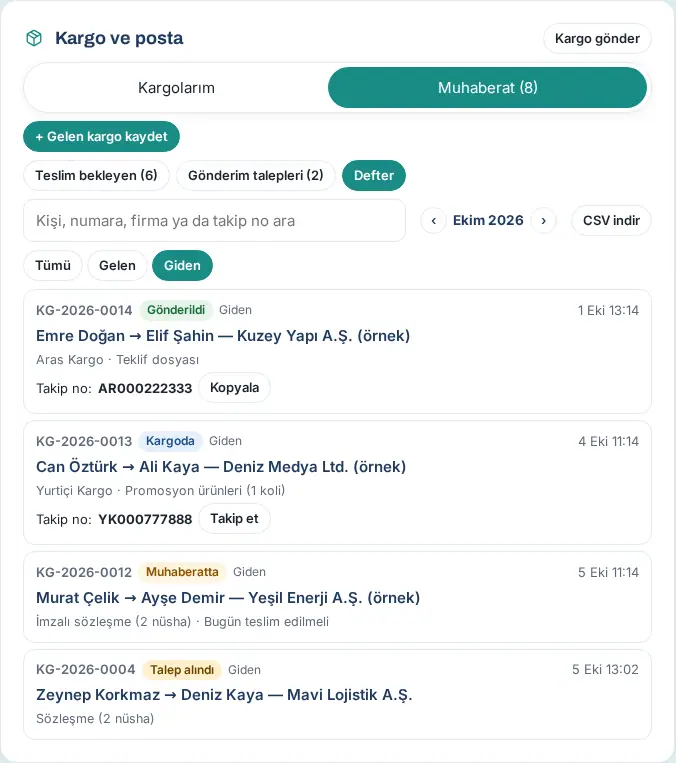
Tip: Food, flowers, card and courier rows show with a colored type badge. For summaries such as who sent how many shipments and how many shipments went out in each category, see 19. Reports.
Important: With the Viewer role you see the log, but you cannot log or hand over deliveries ("Viewer: you see the log but can't record or hand over items.").
Purchasing box
Who: Employee · Where: Tools → My Space → Purchasing (on a computer, Board → My Space)
What it does: Shows the purchase requests you opened with their statuses; you open a new request here.
- Tap Tools in the bottom menu and select My Space in the strip at the top.
- Go to the Purchasing box. Each request shows the code (e.g. SA-2026-0001), status, date, title, type, category and total amount.
- For the details, tap Details.
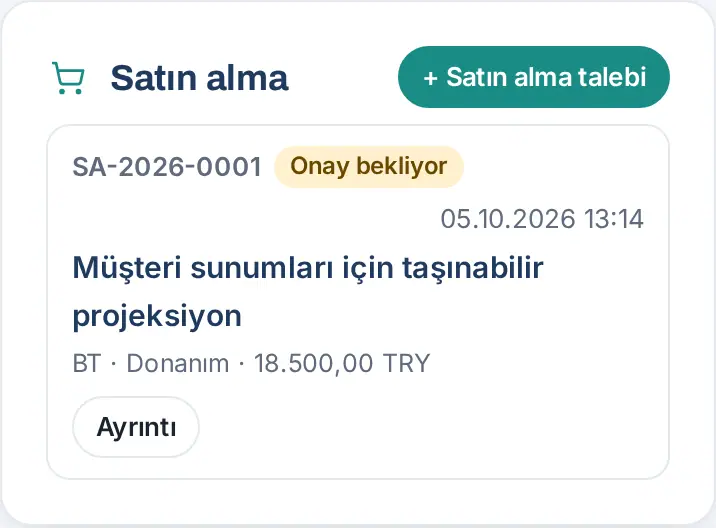
Statuses: Awaiting approval · Approved — awaiting purchase · Rejected · Ordered · Received · Cancelled.
Tip: If you are an approver, the Awaiting approval (N) tab shows in the box. If you are an approver, purchasing officer or purchasing viewer, the Procurement list (N) and All requests tabs also show (only the purchasing officer marks the order and the receipt). If the box looks short, it opens at full width when you click a tab; Collapse returns it to its earlier size.
Opening a purchase request
Who: Employee · Where: Purchasing → + Purchase request
What it does: You write what you want to buy, at what price and where from. The request goes to management approval; when it is approved, the purchasing officer procures it.
- In the Purchasing box, tap + Purchase request.
- In the Type list, select IT or Administrative. The Category list is filtered by type.
- Select a Category (e.g. for IT, Equipment, Software and licences, Network and accessories; for Administrative, Furniture and office equipment, Stationery and supplies, Services, Other).
- Type a Title (e.g. "Wireless presentation remote for presentations").
- In the What for? field, write who will use it and which need it meets.
- In the Items section, fill in the Brand, Model, Quantity, Unit price and Currency (TRY, USD or EUR) fields. The price can be approximate.
- Type Where from (e.g. manufacturer's dealer, marketplace) and, if there is one, the Product link (https://…).
- For another product, tap + Add item (at most 10 items). Delete an extra item with Remove item.
- Check the Total row at the bottom.
- Tap Send request.
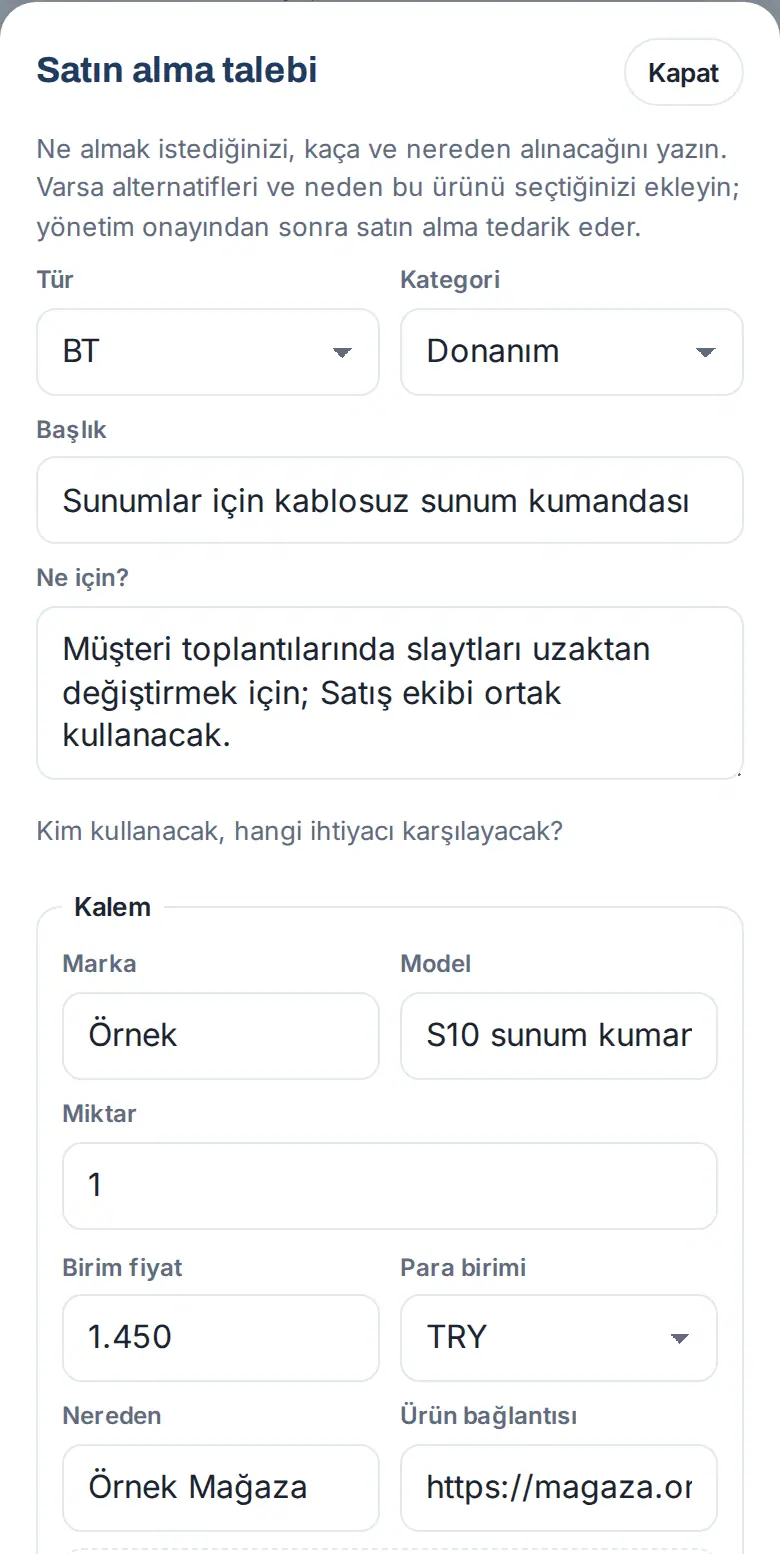
Result: The message "Request SA-… was sent for management approval." shows. Approvers get a phone notification and an email (subject "Satın alma onayı bekliyor — SA-…", "purchase approval pending").
Common errors:
- "Give the request a short title."
- "Fill in "What for?": what is this purchase for?"
- "Choose a category of the selected type."
- "Item 1: enter a brand or model." / "Item 1: enter the unit price (an estimate is fine)." / "Item 1: quantity must be 1–100,000."
- "Item 1: the link must start with https://."
- "You have opened many purchase requests today."
Adding alternatives and why this was chosen
Who: Employee · Where: Purchase request → Item → + Add alternative
What it does: The approver decides by comparing the product you selected with other options.
- Under the item, tap + Add alternative.
- Type the alternative's brand, model, price, where to buy it and, if you want, its link.
- For another alternative, tap + Add alternative again (at most 3 for one item). Delete an alternative you do not need with Remove.
- In the Why was this chosen? (compared with the alternatives) box, write why you chose this product instead of the alternatives (e.g. "It has a laser pointer and is rechargeable; the other one runs on batteries.").
- Tap Send request.
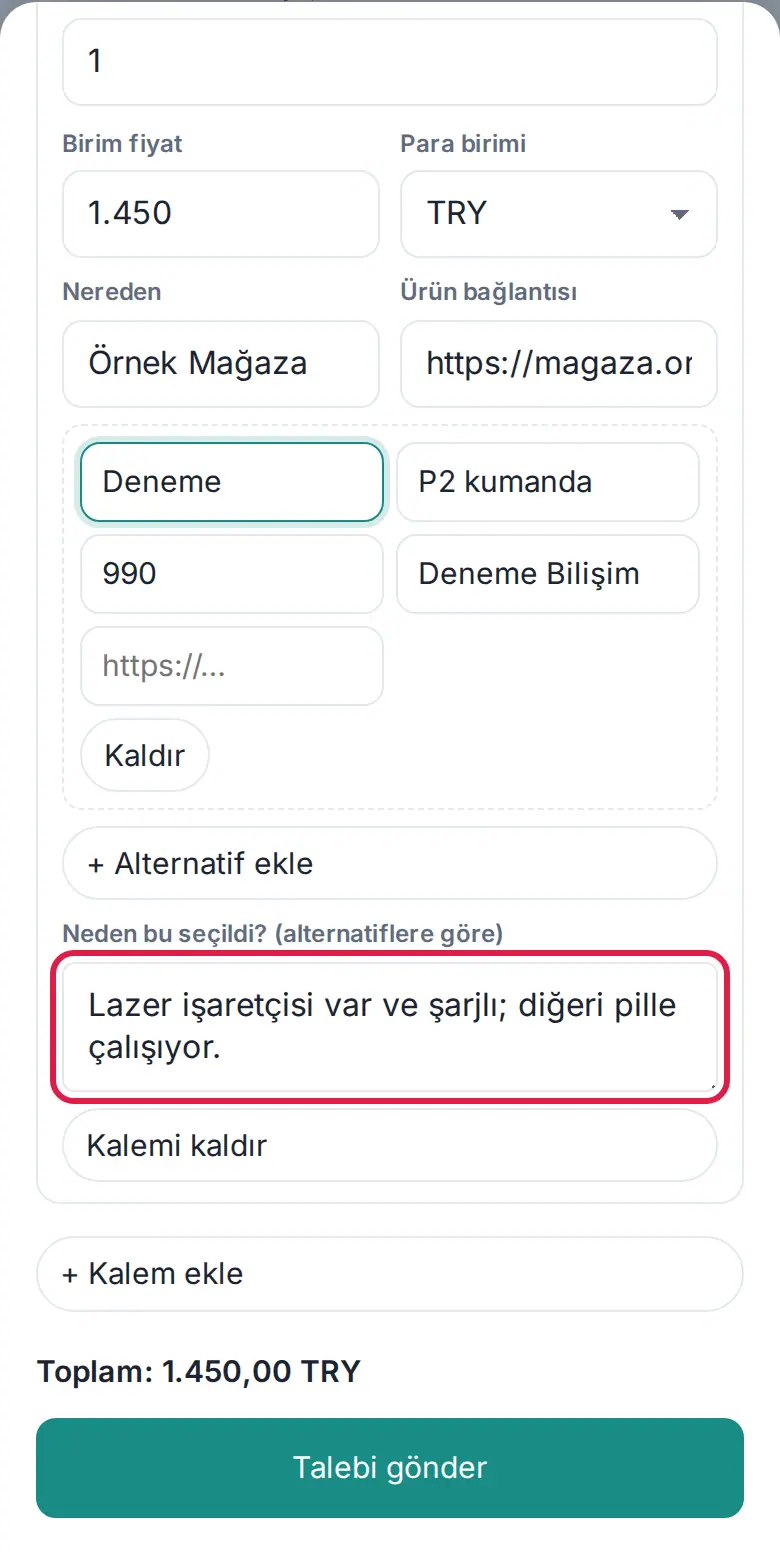
Important: If you added an alternative, Why was this chosen? (compared with the alternatives) is required ("Item 1: you added alternatives; explain why you chose this product."). The alternative's price is not added to the total.
Purchasing without approval (if you are authorized)
Who: Employee authorized to purchase without approval · Where: Purchase request → Add to the procurement list without approval (you are authorised)
What it does: People the company authorizes can put a request directly on the procurement list without waiting for management approval (e.g. an urgent spare part).
- Fill in the purchase request as usual.
- Select the Add to the procurement list without approval (you are authorised …) check box at the bottom of the form. If there is a limit, the check box shows it (e.g. "up to 10.000,00 TRY").
- Tap Send request.
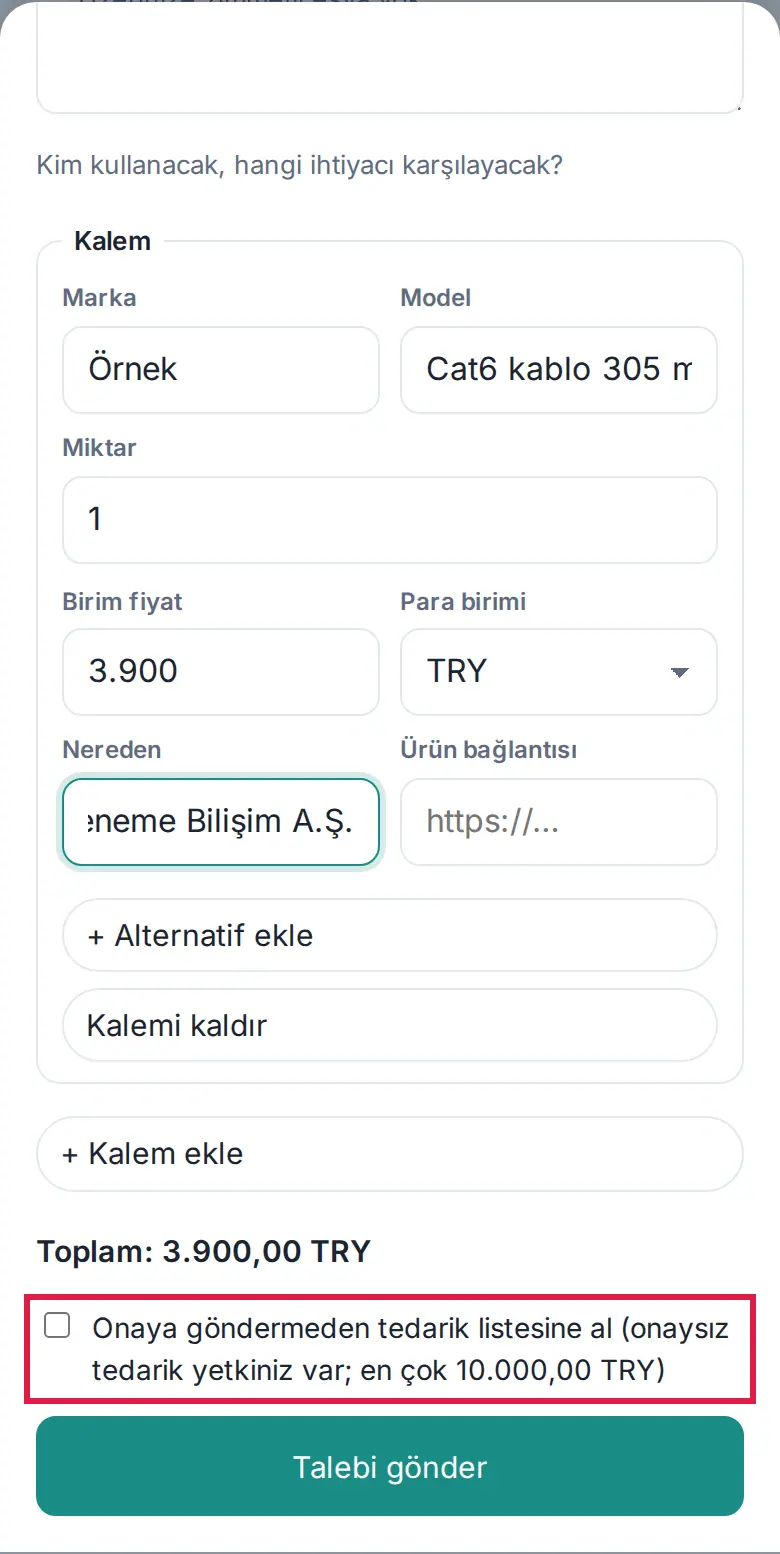
Result: The message "Request SA-… was added to the procurement list without approval." shows. In the lists, the request shows with the Without approval (authorised) badge; purchasing officers get a "Purchased without approval (authorised)" notification.
Important: If a limit is set, a request that is above the limit or that contains foreign currency (USD, EUR) cannot be taken without approval: "The amount exceeds the limit (… TRY) or includes foreign currency; send the request for approval." If you are not authorized, the check box does not show.
Following and cancelling your request
Who: Employee · Where: Purchasing → request → Details
- In the Purchasing box, tap the Details button of your request.
- The details show the requester, Purpose, Total, the items, the alternatives and Why this was chosen. If it was approved or rejected, the person who decided and (if rejected) the Reason for rejection show; if it was ordered, the Order note shows.
- At the bottom, the History section lists the steps of the request in order (request opened → approved / rejected → order → receipt).
- If you no longer need the request, tap Cancel request.
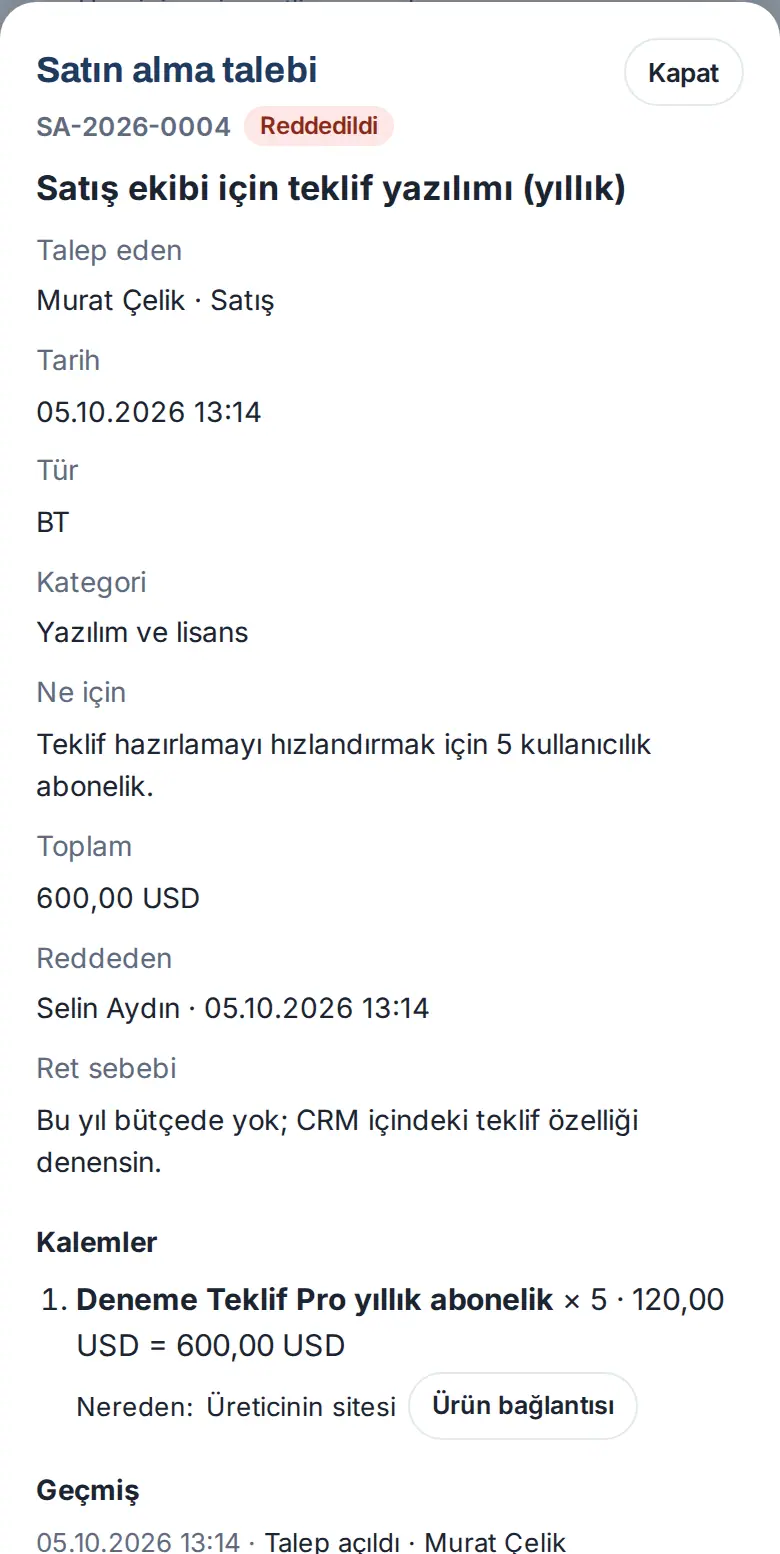
Result: The message "Purchase request cancelled." shows.
Tip: You get a phone notification at each step: approval, rejection, order and receipt (e.g. "Satın alma talebiniz onaylandı: SA-…", "your purchase request was approved").
Important: Only you can cancel your request, and only while it waits for approval or before it is ordered.
Approving or rejecting as an approver
Who: Purchasing approver, purchasing module admin, Admin · Where: My Space → Purchasing → Awaiting approval (N)
What it does: You decide on purchase requests for management.
- Click the "Satın alma onayı bekliyor" ("purchase approval pending") notification or email, or open the Awaiting approval (N) tab in the Purchasing box.
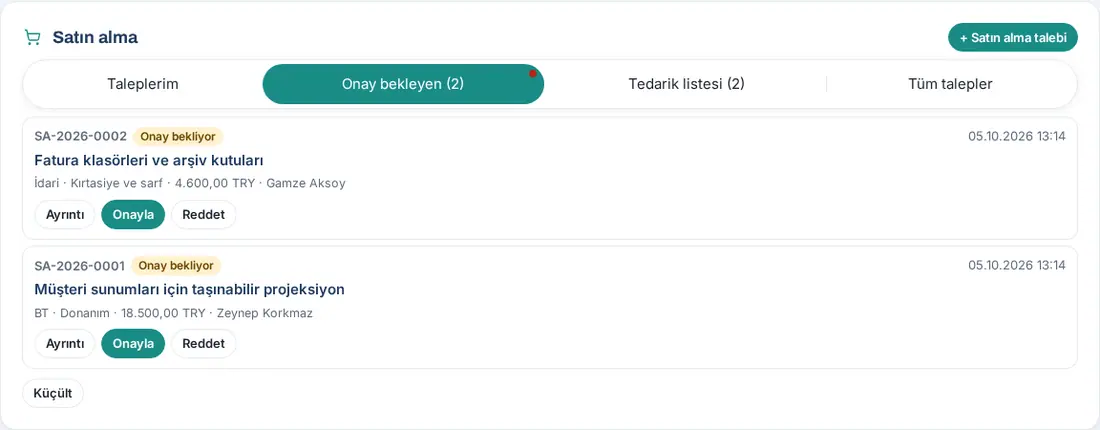
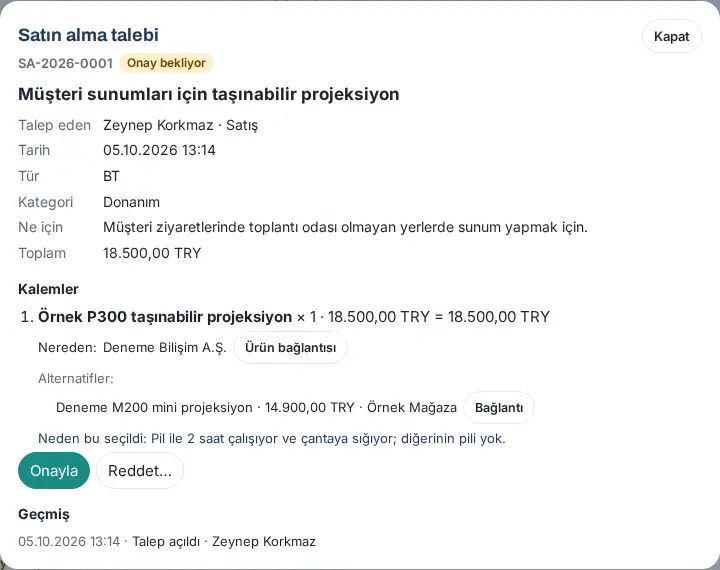
- To examine the request, click Details: it shows the items, Product link, Alternatives and Why this was chosen. Links open in a new tab.
- If it is suitable, click Approve. The message "Request approved; added to the procurement list." shows.
- If it is not suitable, click Reject…, write the reason in the Reason for rejection (sent to the requester) box and click Reject. The message "Request rejected; the reason was sent to the requester." shows.
Common errors:
- "Enter the reason for rejection." — the reason for rejection is required.
- "You cannot approve or reject your own request; another approver decides."
- "Purchase requests are approved by management approvers." — you are not an approver.
Tip: Requests that wait for approval also show in the Waiting for you list ("N purchase requests are awaiting your approval"). Approval has one stage: the decision of one approver is sufficient.
Procurement list: order and receipt
Who: Purchasing officer (Purchasing → Operator) · Where: My Space → Purchasing → Procurement list (N)
What it does: You turn approved requests and requests taken without approval into orders, and close them when you receive the goods.
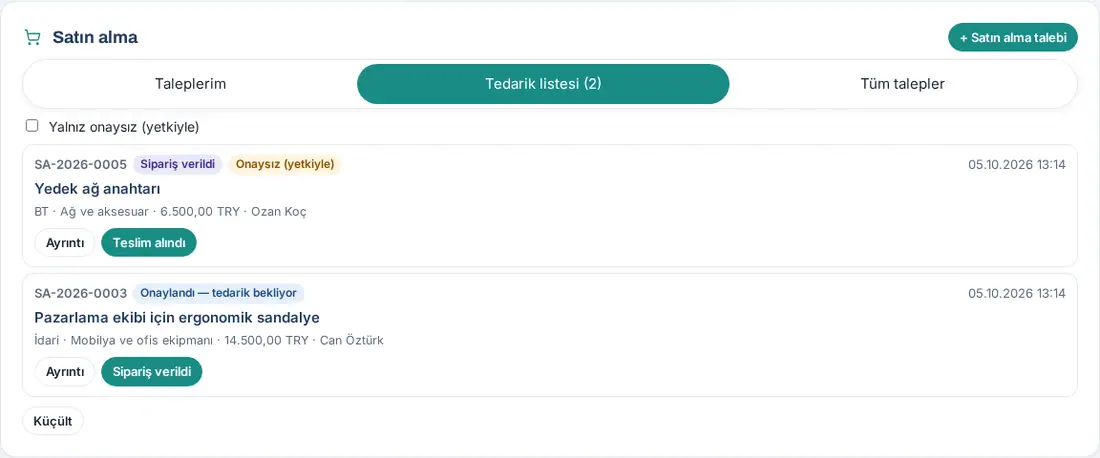
- In the Purchasing box, open the Procurement list (N) tab. The list contains requests in Approved — awaiting purchase and Ordered status.
- To see only the requests taken without approval by authorization, select the Only without approval (authorised) check box.
- When you place the order, click Ordered on the request. The details window of the request opens.
- If you want, type the order no., supplier or estimated delivery date in the Order note (optional) box.
- Click Ordered in the window. The message "Marked as ordered; the requester was notified." shows.
- When the product arrives, click Received on the request. The message "Marked as received." shows.
Result: At each step the requester gets a notification. Received requests go to the Assets → From purchasing tab of the asset officers (see 28. Fixed assets and asset assignment).
Common error: "The procurement list is handled by purchasing officers." — you are not a purchasing officer.
Tip: Requests that wait for an order show in the Waiting for you list ("N purchase requests are waiting to be ordered").
All purchase requests and CSV
Who: Approver, purchasing officer, purchasing viewer · Where: Purchasing → All requests
What it does: You see all purchase requests in the company grouped by category, and you can export them.
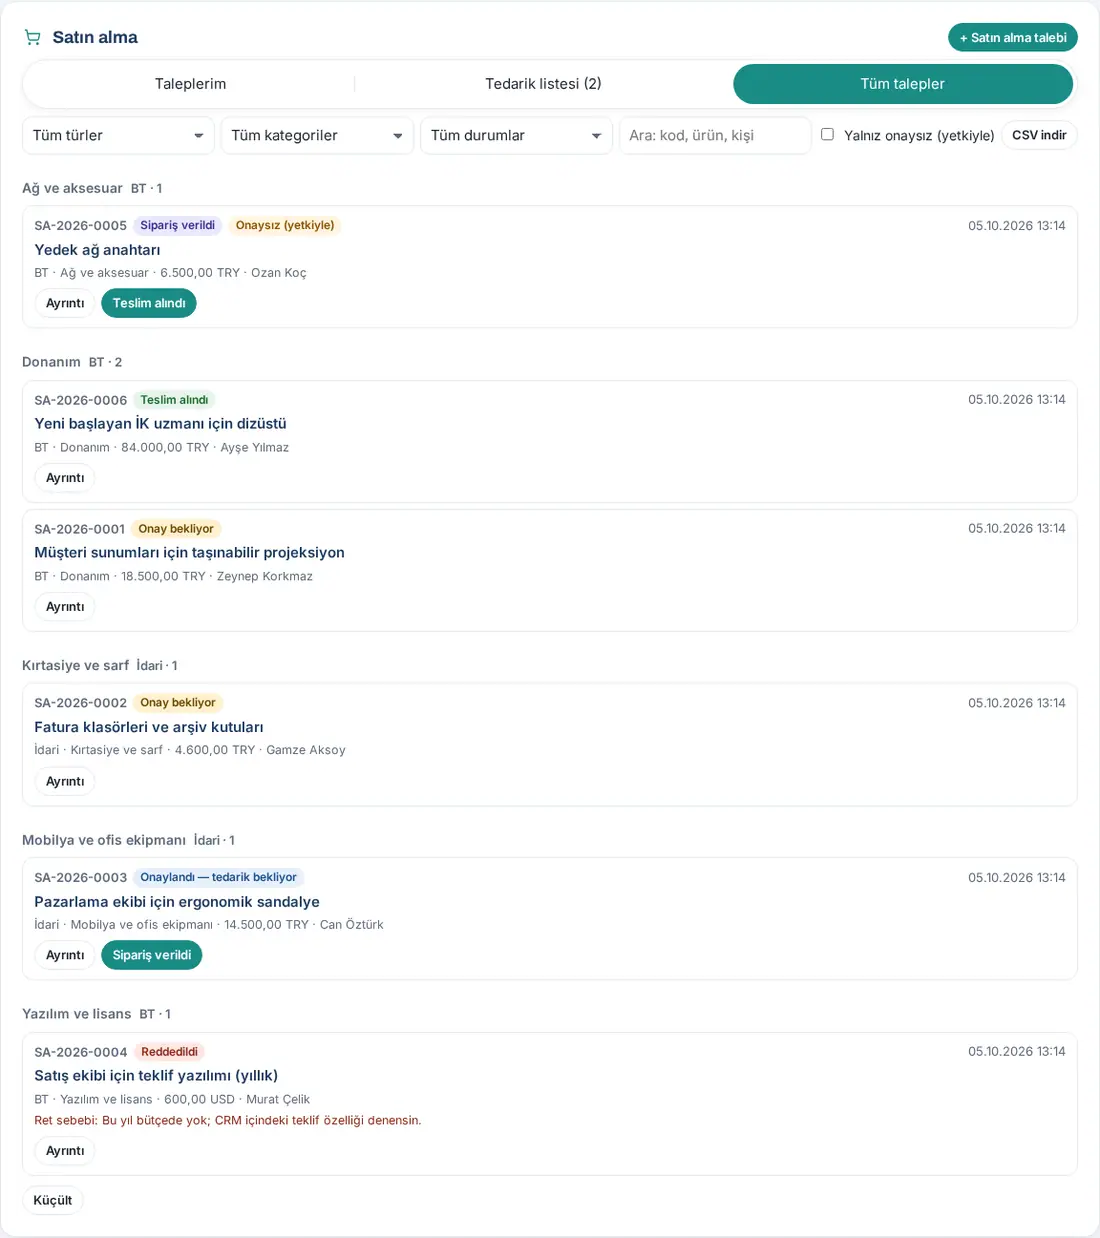
- In the Purchasing box, open the All requests tab.
- Use the filters: All types, All categories, All statuses, Only without approval (authorised) and search (code, product, person).
- Requests are grouped under category headings (e.g. "Equipment · IT · 2"). A rejected request shows a Reason for rejection row.
- For a file, click Download CSV.
Tip: For amounts by category, type, department and person, see 19. Reports. Foreign-currency amounts are not converted to TRY; they show separately.
Important: This list is open only to approvers, purchasing officers and viewers ("This list is open to approvers, purchasing officers and viewers.").